
EA-BDC10 - Grill Zojirushi - Free user manual and instructions
Find the device manual for free EA-BDC10 Zojirushi in PDF.


| Product Type | Grill |
| Brand | Zojirushi |
| Model | EA-BDC10 |
| Dimensions (approx.) | 19-3/8" W × 15-3/8" D × 5-5/8" H (49 × 39 × 14 cm) |
| Weight | approx. 9 lb (3.7 kg) |
| Power Supply | 120 V AC, 60 Hz |
| Power Consumption | 1300 W |
| Power Cord Length | 6' 6" (2.0 m) |
| Temperature Control Range | Keep Warm ~ 400°F (205°C) |
| Plate Surface | Diamond pattern nonstick coating |
| Safety Features | Safety Barrier Mechanism; plug cannot be inserted without plate; cannot remove plate while plug is inserted |
| Cleaning Instructions | Do not immerse Heater Set or Temperature Control Plug; hand wash Plate with mild detergent; wipe Main Body Guard and Lid with damp cloth |
| Replacement Parts | Plate (BX160005G-01), Temperature Control Plug (BX160820A-00) |
| Intended Use | Household grilling and steaming only |
| Not For | Deep frying |
| Accessories Included | Lid with knob, Plate, Heater Set, Main Body Guard, Temperature Control Plug |
| Voltage Compatibility | 120 V only; not suitable for other voltages |
Frequently Asked Questions - EA-BDC10 Zojirushi
User questions about EA-BDC10 Zojirushi
0 question about this device. Answer the ones you know or ask your own.
Ask a new question about this device
Download the instructions for your Grill in PDF format for free! Find your manual EA-BDC10 - Zojirushi and take your electronic device back in hand. On this page are published all the documents necessary for the use of your device. EA-BDC10 by Zojirushi.
USER MANUAL EA-BDC10 Zojirushi
CLEANING AND MAINTENANCE 10
REPLACEMENT PARTS 11
TROUBLESHOOTING GUIDE 11
SPECIFICATIONS 11
IMPORTANT SAFEGUARDS
BASIC SAFETY PRECAUTIONS SHOULD ALWAYS BE FOLLOWED WHEN USING ELECTRICAL APPLIANCES, INCLUDING THE FOLLOWING:
- Read all instructions thoroughly and keep these instructions for future use.
- Avoid touching hot surfaces. The handles and knobs are provided for your safety and protection.
- To prevent hazardous operation or electric shock, do not immerse the temperature control plug, power cord, power plug or heater set in water or other liquids.
- Close supervision is necessary when the appliance is used by or near children.
- Unplug from outlet when not in use and before cleaning. Allow the appliance to cool before adding or removing parts and before cleaning.
- Do not leave the appliance unattended when in use.
- Do not use or operate the appliance with a damaged cord or plug. If the appliance malfunctions or has been damaged in any manner, unplug the appliance and return it to the nearest authorized service facility or dealer for examination, repair or adjustment.
- Do not use outdoors.
- The use of accessories or attachments not recommended by the appliance manufacturer may be hazardous or may cause injuries.
- Keep the power cord away from hot surfaces and do not let the cord hang over the edge of tables or counters.
- Do not place the appliance on or near a heated surface such as a gas or electric stove, or in a heated oven.
- Always use the appliance on a dry, level surface.
- Always use extreme caution when moving appliances containing hot oil or liquids.
- The plug to the appliance should be attached first before plugging the cord into a wall outlet. To disconnect, turn the power control to OFF. Then remove the plug from wall outlet.
- To use, plug power cord into an electrical outlet. To disconnect, grasp the power plug and remove from outlet.
- Do not use the appliance for other than intended or specified purposes.
- Do not operate in the presence of explosives and/or flammable fumes.
- This appliance is intended for household/domestic use only and not for commercial or industrial use.
- To reduce the risk of fire, cook only with plate and guard properly in place.
- Make sure the detachable plate, heater unit and guard are assembled and fastened properly according to the "HOW TO USE" section of this instruction before cooking. Only use temperature control plug for Model No. EA-BDC10.
- This appliance is not intended for deep frying foods.
SAVE THESE INSTRUCTIONS
THIS APPLIANCE IS FOR HOUSEHOLD USE ONLY.
This appliance is supplied with a short power cord to reduce the risk of becoming entangled in or tripping over. Extension cords may be used if care is exercised in their use. If an extension cord is used, the marked electrical rating of the cord should be at least as great as the electrical rating of the appliance, and a longer cord should be arranged so that it will not drape over the countertop or tabletop where it can be pulled on by children or tripped over unintentionally.
This appliance has a polarized plug (one bade is wider than the other). To reduce the risk of electric shock, this plug was designed to fit into a polarized outlet in only one direction. If the plug does not fit fully into the outlet, do not attempt to force it or modify it in any way. Simply reverse the plug and insert. If it still does not fit, contact a qualified electrician.
To avoid circuit overload, do not operate another high wattage appliance on the same circuit.
These WARNINGS and CAUTIONS are intended to prevent property damage or personal injury to you and others.
■The degree of danger or damage by the misuse of this product is indicated as follows:
! WARNINGS
Indicates risk of serious injury or death.
CAUTIONS
Indicates risk of injury, household or property damage if mishandled.
■Prohibited or required actions are indicated as follows:

Indicates a prohibited operation.

Indicates a requirement or instruction that must be followed.

WARNINGS

Do not modify the product. Only a repair technician may disassemble or repair this unit. Attempting to do so may cause fire, electric shock or injury. Make any repair inquiries to the store where you purchased the product or Zojirushi Customer Service.

Do not damage the Power Cord. Do not bend, pull, twist, fold, or attempt to modify the Power Cord. Do not place it on or near high temperature surfaces or appliances, under heavy items or between objects.

Do not plug or unplug the Power Plug if your hands are wet.
A damaged Power Cord can cause fire or electric shock.
Doing so may cause electric shock or injury.

Do not immerse the product in water or splash it with water.

Insert the Power Plug completely and securely into the electrical outlet.
Doing so may cause short circuit or electric shock.
A loosely inserted Power Plug may cause electric shock, short circuit, smoke or fire.

Do not use the product if the Power Plug or Power Cord is damaged or if the Power Plug is loosely inserted into the electrical outlet.

Doing so may cause electric shock, short circuit or fire.
Use only an electrical outlet rated at 15 amperes minimum, and do not plug other devices into the same outlet.
Do not use for deep-fry cooking. Doing so may cause fire.
Plugging other devices into the same outlet may cause the electrical outlet to overheat, resulting in fire.
Do not attach pins on the Temperature Control Plug or soil it.
Stop using immediately if you notice any of the following symptoms indicating a malfunction or breakdown.
Doing so may cause electric shock, short circuit or fire.
Continued use of the product may cause smoke, fire, electric shock or injury.
Keep children from licking the Temperature Control Plug. Pay particular attention with infants.
• The Power Plug or Power Cord has become very hot.
Doing so may cause electric shock or injury.
• The Power Cord is deeply damaged or deformed
Do not use a power source other than 120 V AC.
- The electricity turns on and off when the Power Cord is touched or moved.
Use of any other power supply voltage may cause fire or electric shock.
• There is a burning smell.
Do not allow children to use the product unsupervised. Keep it out of the reach of infants.
- You feel a tingle or slight electrical shock.
May cause burns, electric shock or injury. Pay particular attention to prevent burns and injury by the plate's edges.
• The Operation Light does not turn on when the Temperature Control Dial is turned to a setting other than OFF even though the product is completely cooled down.
• The Operation Light does not turn off even though the Temperature Control Dial is turned to OFF.
If any of the above occurs, unplug the product immediately and return to the store where you purchased it for check-ups and/or repairs.
This appliance is not intended for use by persons (including children) with reduced physical, sensory or mental capabilities, or lack of experience and knowledge, unless they have been given supervision or instruction concerning use of the product by a person responsible for their safety. Children should be supervised to ensure that they do not play with the product.

CAUTIONS

Do not heat cans or jars of food directly. Doing so may cause burns or injury as the can or jar may break.

Do not use the product near walls or furniture. Steam or heat may damage, discolor or deform walls or furniture.
Do not use in dangerous locations such as unstable places, on table coverings that are vulnerable to heat, near an open flame or flammable substances, or in slippery places. Doing so may cause fire.
Do not use other Temperature Control Plugs than the one provided. Do not use the Temperature Control Plug for other appliances.
Doing so may cause malfunction or fire.
● The illustrations used in these Operating Instructions may vary from the actual product you have purchased.
IMPORTANT SAFEGUARDS (cont.)

CAUTIONS

Do not touch hot surfaces (all parts except the Lid Knob, Main Body Guard, and Temperature Control Dial) during use or shortly after use. Touching hot surfaces may cause burns.

Always unplug the product by holding the Power Plug, not by pulling the Power Cord. Pulling the Power Cord to unplug the product may cause electric shock, short circuit or fire.

Unplug the Power Plug from the outlet when the product is not in use. Leaving the Power Plug in an outlet may cause the insulation to become damaged, resulting in electric shock, short circuit or fire.
Please allow the product to cool down before cleaning.
Touching hot areas may cause burns. (See pg.7 and 10 for cleaning and maintenance of the Plate.)

During preheating or cooking, move birds and small animals that may be sensitive to smoke or smells to other rooms, and open windows or turn on exhaust fans.
If the Temperature Control Plug is damaged, it must be replaced by an appropriate cord or assembly made available by the manufacturer or its service agent.
IMPORTANT
■Plate and its Nonstick Coating
Please follow these instructions to ensure extended use of the Plate and for the protection of the nonstick coating:
● Do not use sharp-edged metal spatulas.
- Do not scrape hard with the edge or corners of a spatula. Do not scrape the corners of the Plate. - Do not scratch the Plate with sharp objects such as knives or forks.
● Do not cover the Lid while preheating, or preheat for an extended period of time. Do not place the Plate directly on the stovetop.
- Do not use abrasive cleansers, scouring powders, nylon brushes, metal brushes or eraser pads. - Do not use detergents other than mild kitchen detergents such as chlorine based alkaline detergents or those containing acidic ingredients. Doing so may cause corrosion.
●Do not leave the surface or bottom of the Plate soiled.
Acid (vinegar) and salt contents (sauce, soy sauce and salt) may cause corrosion. Foods left on the surface may also cause uneven cooking. Be sure to keep the product clean.
REMARKS: The nonstick coating may wear out with use.
The nonstick coating may eventually discolor or peel off. This will not affect the cooking performance or sanitary properties, and is harmless to your health. If concerned with the peeling of the nonstick coating or deforming of the Plate, please replace the Plate by purchasing a new one.
■ Temperature Control Plug
●Only use the Temperature Control Plug provided.
● Never disassemble the Temperature Control Plug.
●Always clean the Probe and Power Plug of dust, soil or foods.
● Do not bang, drop or handle the Temperature Control Plug roughly. Do not move the Temperature Control Plug up and down when plugging in or unplugging.
■ Use and Care
●Do not use the product for other than grilling or steaming foods.
●Handle the product gently; otherwise it may cause malfunction or breakdown.
● Do not place the product over direct flame (such as a gas stove top), or on top of electric or induction heating (IH) cookers. Doing so may cause fire, breakdown or damage of the product.
●Do not use with a soiled Heat Shield Plate. Doing so may cause malfunction or deformation
- Do not splash the Heat Shield Plate with water or soak in water. Do not use a metal brush to clean. If the surface becomes rusted or discolored, it may not shield heat properly, and cause fire, the Main Body Guard to deform, or the surface of the tabletop to become hot.
- Do not use on top of items such as newspapers that may obstruct the Air Holes beneath the Main Body Guard. Do not use on surfaces that are vulnerable to heat such as carpets, cushions, tatami mats or tablecloths. Doing so may cause fire, deform the Main Body Guard, or burn the surface.
●Do not use on top of glass surfaces such as a glass table. Doing so may cause the glass to break from the heat.
■This product is intended for household use and similar applications listed below:
- Staff (employee) kitchen areas in shops, offices and other working environments.
* This product is not intended for use by many unspecified people for a long period of time.
This product must not be used in the following areas:
• Farm houses. • By clients in hotels, motels and other residential type environments.
• Bed and breakfast type environments.

Air Holes

■This appliance is not intended to be operated by means of an external timer or separate remote-control system.
PARTS NAMES


1 Preparation
① Place the Heater Set in the Main Body Guard.
●Set the Heater Set Receptacle into the Opening for Receptacle in the Main Body Guard.
② Set up the Plate onto ①.
●Do not use the product without the Main Body Guard. Doing so may cause burns, injury or malfunction.
- Do not use only the Heater Set.
- Do not use only the Heater Set and Plate.
●Set up in the right order; otherwise it may cause burns, injury or malfunction.

natural_image
Stacked electronic components with a black 'X' symbol overlay (no text or symbols present)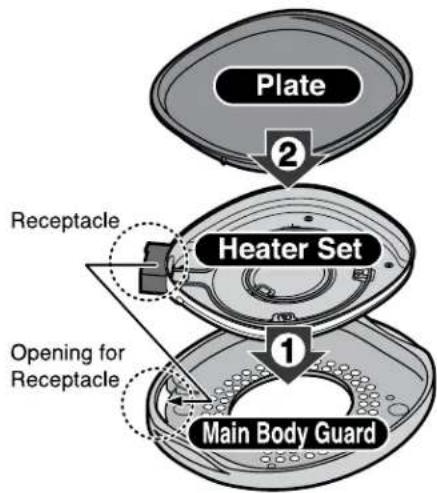
2 Insert the Temperature Control Plug
① Firmly insert the Temperature Control Plug to the Receptacle.
② Plug in the Power Plug to an electrical outlet.
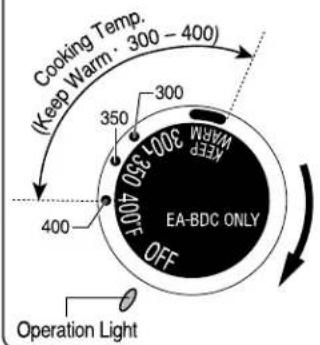
●Make sure OFF aligns with the Operation Light.
●Do not use other Temperature Control Plugs than the one provided. Do not use the Temperature Control Plug for other products.
●Insert the Temperature Control Plug completely until the white crescent marks on both Release Buttons are completely visible. The Plate may not heat up properly if the Temperature Control Plug is not inserted completely. Incorrectly inserting the Temperature Control Plug may also cause accidents or malfunctions due to abnormal heat generation.


●To remove the Temperature Control Plug, pinch both Release Buttons and pull the Plug away.
SAFETY MECHANISM
This product is equipped with the following safety features:
●The Temperature Control Plug cannot be inserted if the Plate is not properly set up.
●The Plate cannot be removed from the Heater Set while the Temperature Control Plug is inserted.
Never force the Temperature Control Plug in or remove the Plate forcefully as doing so may cause malfunction.
●This product is for grilling and steaming foods. Do not use for other than intended purposes.
●Wipe the Lid and Plate clean with a soft dry cloth before use.

Preheat and Cook
① Begin preheating by aligning the appropriate cooking temperature with the Operation Light. The Operation Light turns on and the Plate will begin to heat up.
●Do not cover the Lid while preheating.
Approximate time for preheating . . . 5 min.
② When preheating completes, begin cooking.
SUGGESTED COOKING TEMPERATURE
| Dial | Menu |
| Cooking Temp. | |
| 400 | Yakiniku, Pot Stickers (Gyoza) etc. |
| 350 | Bacon, Hamburgers etc. |
| 300 | Fried Eggs, Yakisoba, Pancakes etc. |
| KEEP WARM | Keep Warm |
●The temperature is the estimated surface temperature of the Plate without the Lid.
●Cooking results may vary depending on size, room temperature and voltage. Use the chart as a guideline to achieve your preferred results.
Temperature Control Dial
●Use hot water to steam gyoza.
●To keep food warm, set the dial to KEEP WARM.
●The product may make a creaking sound, but this is normal and does not indicate a malfunction.
●The Operation Light will turn on and off during cooking. This indicates that the temperature is being controlled and is not a malfunction.
● There may be some smoke or odor the first time the product is used, which is normal.
TIPS FOR USING THE LID
The surface temperature of the Plate increases by 86–104°F (30–40°C) when the Lid is used. Using the Lid will help speed up the cooking process.
WHEN REMOVING THE LID
●The Lid Knob will become hot while cooking. Take precautions to prevent burns.
●Beware of steam or oil splattering from the gap between the Plate and the Lid to prevent burns.
NOTE
●Do not cover the Lid while preheating.
●Place the Lid on the Lid Holder of the Plate properly. If the Lid sits on the Main Body Guard, it may cause malfunction, deformation or burns.
4 After Use
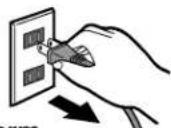
① Turn the Temperature Control Dial to OFF (align with the Operation Light), then unplug the Power Plug from the electrical outlet.
② Wipe off burnt on foods with a soft paper or cloth while the Plate is warm. (Use chopsticks or a similar implement to avoid burns.)
③ Allow the Plate to cool (at least 40 minutes after use), then remove the Temperature Control Plug from the Heater Set and clean.
●The Lid, Lid Knob, Plate, Heater Set (Heater, Heater Shield Plate, Receptacle) and the Temperature Control Plug's Probe will be hot for a while after use. Please take caution to prevent burns.
- Do not attempt to remove the Plate while the Temperature Control Plug is still inserted. Doing so may cause malfunction or damage.
●Do not hold the Heater Set by the Receptacle. Doing so may cause malfunction or damage.
●Take extra care while cooking as oil may splatter.
※Images are serving suggestions.
Okonomiyaki (Japanese Savory Pancakes)
Cooking Temp.
400
Ingredients (4 servings)
1 cup all purpose flour
1/2 tsp. salt
1 cup dashi stock (or chicken stock)
4 Tbsp. nagaimo (Chinese yam), grated
1/4 head medium-sized cabbage (10 oz./285g), cut into chunks
4 scallions, finely chopped
1 large egg, beaten
1 cup tempura bits (or deep-fried batter bits/fried onion)
6 oz. (174g) thinly-sliced pork (or bacon)
Vegetable oil, as needed
Okonomiyaki sauce, to taste
Mayonnaise, to taste
Dried green seaweed/bonito flakes, to taste

natural_image
Close-up of a textured, irregularly shaped object with visible cracks and fragments (no text or symbols)How to cook
① Lightly whisk together the flour and salt in a bowl.
② Whisk in the dashi stock and Chinese yam.
※To substitute Chinese yam, whisk in 1/2 tsp. baking powder then add 1/4 cup of milk.
3 Turn the Temperature Control Dial to 400. When preheating completes in about 5 minutes, lightly grease Plate with vegetable oil.
④ Add the cabbage, scallion, egg, and tempura bits to the batter from ②.
⑤ Mix the batter from ④ well. Scoop 1/4 of the batter onto the Plate to form a round pancake about 5/8-inch (1.5cm) thick (cook two pancakes at a time).
6 Lay the pork on top and cook on one side for several minutes. Flip over and cook on the other side for several minutes or until the pork is cooked through.
⑦ Flip again and cook for several minutes.
⑧ Once cooked through, spread Okonomiyaki sauce on top and drizzle with mayonnaise.
◆Sprinkle dried green seaweed and bonito flakes to taste.
Vongole Rosso
Ingredients (4 servings)
1.1 lbs. (500g) littleneck clams or small clams
2/3 package (2/3 lb./303g) spaghetti
3 Tbsp. olive oil
1 clove garlic, thinly sliced
3 oz. (90mL) white wine
1 can (14.5 oz./411g) diced tomatoes
1/2 tsp. salt
1 pinch pepper
Italian parsley, to taste
How to cook
1 Prepare a 3% brine solution and pour just enough over the clams to cover. Let clams soak for at least 3 hours to remove all the grit (cover and place in a dark location, making sure that the water does not become too cold).
2 Boil the spaghetti for slightly less time than indicated on package. Drain in a colander and coat with about 2 Tbsp. of olive oil (not listed in ingredients) to keep from sticking. Reserve cooking water.
3 Turn the Temperature Control Dial to 400. When preheating completes in about 5 minutes, add olive oil and garlic. Sauté until they produce an aroma.
Cooking Temp.
400

natural_image
Black-and-white photo of a plated dish with noodles, leafy greens, and a fork on a striped tablecloth (no text or symbols visible)4 Drain the clams and add to 3. Sauté briefly. Add wine and reserved pasta cooking water (2-3 Tbsp.). Cover with the Lid and steam for about 5-6 minutes (until the clams open).
◆Caution: The oil, water, and/or clams may spatter.
⑤ Add the canned tomato including the juice and stir. When liquid starts to bubble, add spaghetti from ②.
6 Once the spaghetti is warm, season with salt and pepper. Serve on a plate and garnish with parsley.
NOTE
The measurements used in these Recipes:
1 cup = 8 oz. (240mL)
1 Tbsp. = 0.5 oz. (15mL)
1 tsp. = 0.2 oz. (5mL)
Pork Chops
Cooking Temp.
400 - 300
Ingredients (4 servings)
4 boneless pork chops, 1/2 inch thick
1/2 tsp. salt
1/2 tsp. ground black pepper
4 Tbsp. olive oil
2 large (2.9 oz./81g) shallots, thinly sliced
4 oz. (113g) mushrooms, stemmed, thinly sliced
1/3 cup Italian parsley, chopped
1/2 cup white wine
1-1/2 cups heavy cream
1 pinch ground black pepper for sauce
1 Tbsp. capers, drained, chopped
How to cook
① Pat the pork chops dry with paper towels to remove any moisture. Season pork chops on both sides with salt and black pepper.
2 Turn the Temperature Control Dial to 400. When preheating completes in about 5 minutes, heat 1 Tbsp. olive oil and sear pork chops until brown on both sides – about 5 minutes for each side. Transfer seared pork chops onto a warmed plate and keep warm.
3 Add remaining oil, shallots and mushroom on the Plate and sauté until mushrooms are browned – about 2 minutes. Add parsley and white wine and cook until the liquid is mostly evaporated – about 1–2 minutes.

natural_image
Black-and-white photo of a plated dish featuring meat and vegetables on a patterned plate (no text or symbols visible)4 Turn the Temperature Control Dial to 300. Add heavy cream and mix well.
⑤ Add cooked pork chops from step ② back onto the Plate and submerge in the sauce from step ④ Cover with the Lid and cook until the pork chops are done – about 4–5 minutes.
6 Season with black pepper for sauce, and add capers and stir to combine.
⑦ Place pork chops onto warm plates and spoon over sauce.
Crepes
Ingredients (Makes 8 crepes)
3/4 cup all purpose flour
2 large eggs, beaten
1-1/2 Tbsp. butter, melted
1-1/2 cups milk
Vegetable oil, as needed
A「Water, to taste
Raspberry jam, to taste
Powdered sugar, to taste
How to cook
① Add egg and flour in a bowl and mix.
② Add melted butter to ①, then add milk a little at a time and mix until smooth. Let sit for about 30 minutes.
③ In a separate bowl, mix the ingredients for Ⓐ.
4 Turn the Temperature Control Dial to 300. When preheating completes in about 5 minutes, lightly grease Plate with vegetable oil.
⑤ Ladle the batter from ② onto the Plate and spread to a diameter of about 8 inches (20cm). Cook on both sides.
⑥ Cook the rest of the batter in the same way.
Cooking Temp.
300

natural_image
Black-and-white photo of a plated dessert with cream, strawberries, and a heart-shaped topping (no text or symbols visible)⑦ Once the crepes are done, place ③ on top and fold into quarters. Sprinkle with powdered sugar.
◆Top the crepes with chopped fruit, nuts, and whipped cream, or with seafood with white sauce or tuna salad for a tasty variation.
◆The diamond pattern surface of the Plate may leave an imprint on the crepes.
Clean the product after it has cooled down completely except for the Plate.
●Never wash the Heater Set and the Temperature Control Plug. Doing so may cause malfunction.
●Do not use the following:
- Detergents other than mild kitchen detergent, such as thinner, benzene and bleach. Doing so may cause discoloration, cracks, degradation or corrosion.
- Polishing powder, nylon brushes, scrub brushes, anything made with metal, eraser pads, hard nylon sponges and abrasive cleaners. Doing so may cause corrosion.
- When using chemically treated cloths, do not rub too hard or leave them on the product for a long time as the surface of the product may become damaged by chemical reactions.
●Do not use a dishwasher or a dish-dryer. Doing so may cause deformation.
●Be sure to remove the Heater Set when washing the Main Body Guard. Not doing so may cause malfunction.
- Do not leave or use the Plate soiled. Make sure to clean the surface and the bottom, as well as the sides of the Plate. Leaving the Plate soiled will not only make it difficult to clean, but will also cause uneven heating. It may also cause malfunction or fire.
●Always clean thoroughly after using acid (vinegar) or salt contents (sauce, soy sauce or salt). Leaving them on the Plate may cause corrosion of the nonstick coating.
●Do not leave or use the Lid soiled. Make sure to clean the outside and inside. Doing so may cause discoloration.
Heater Set
Heat Shield Plate · Safety Barrier Mechanism
①Use a mild kitchen detergent and a soft cloth and wipe down.
②Wipe down with a well-wrung cloth.
③Wipe dry with a soft dry cloth.
●Be sure to clean thoroughly after every use. Leaving burnt foods on the Heat Shield Plate may cause scorching, and will become difficult to remove.
- Do not splash it with water or soak in water. Do not use a metal brush to clean. If the surface becomes rusted or discolored, it may not shield heat properly, and cause the Main Body Guard to deform, or the surface of the tabletop to become hot.
Heater · Receptacle
Wipe down with a soft dry cloth.
Main Body Guard · Lid
①Use a diluted mild kitchen detergent and a sponge to wash.
②Rinse and then wipe dry with a soft dry cloth.
●Wash away burnt on foods with a sponge after soaking in warm water.
Temperature Control Plug
Wipe down with a soft dry cloth.
Plate
①Wipe off burnt on foods with a soft paper or cloth while the Plate is warm. (Use chopsticks or a similar implement to avoid burns.)
②Remove the Plate, pour warm water and mild kitchen detergent into the Plate and leave it for a while. Wash with a sponge.
③Rinse and then wipe dry with a soft dry cloth.
FOR STUBBORN SCORCHED FOOD, OR IF THE PLATE HAS COOLED
①Pour just enough hot water to cover the surface of the Plate and turn on the product. When the water reaches a boil, rub off the scorched food with a soft utensil such as a silicone spatula.
②When the Plate cools, discard the water and wash with a mild kitchen detergent using a sponge.
③Rinse and then wipe dry with a soft dry cloth.
REPLACEMENT PARTS
●Replacement parts may be available for an additional charge. Please replace damaged parts only with new parts.
- When replacing parts, please record the model number and part name beforehand. Then contact either the store where you purchased the product or Zojirushi Customer Service.
Zojirushi Customer Service
1-800-733-6270 www.zojirushi.com
| Parts Names | Parts Number |
| Plate | BX160005G-01 |
| Temperature Control Plug | BX160820A-00 |
TROUBLESHOOTING GUIDE
Please check the following points before calling for service.
| Problems | Cause | Remedy |
| Temperature Control Plug (Probe) will not plug in. | Are the Heater Set and the Plate properly set up? | Please set them correctly. |
| The Plate does not heat up. | Is the Temperature Control Plug inserted correctly? | Insert the Power Plug securely. |
| Insert the Temperature Control Plug completely until the white marks on the Release Buttons (located at 2 positions) are fully visible. (See pg.6) | ||
| The food does not cook well. | Insufficient preheating. | Start cooking after preheating completes. (See pg.7) |
| Food is scorched. | Is the Plate properly cleaned and maintained? | Perform Cleaning and Maintenance. (See pg.10) |
| The Plate cannot be removed. | Is the Temperature Control Plug still inserted? | Remove the Temperature Control Plug. |
| The Temperature Control Plug becomes hot. | The Temperature Control Plug may become hot during cooking. This is not a malfunction. | |
SPECIFICATIONS
| Model No. | EA-BDC10 | |
| Rating | AC 120 V 60 Hz | |
| Electric Consumption | 1300 W | |
| Length of the Power Cord | 6' 6" (2.0 m) | |
| External Dimensions | (approx. inches) | 19-3/8 (W) × 15-3/8 (D) × 5-5/8 (H) |
| (approx. cm) | 49 (W) × 39 (D) × 14 (H) | |
| Weight | approx. 9 lbs. (3.7 kg) | |
| Temperature Control | Keep Warm ~ 400°F (205°C) | |
●This product is not suitable for use in countries or regions with different power supply voltages or frequencies.

ZOJIRUSHI
www.zojirushi.com
- IMPORTANT SAFEGUARDS
- BASIC SAFETY PRECAUTIONS SHOULD ALWAYS BE FOLLOWED WHEN USING ELECTRICAL APPLIANCES, INCLUDING THE FOLLOWING:
- SAVE THESE INSTRUCTIONS
- THIS APPLIANCE IS FOR HOUSEHOLD USE ONLY.
- ! WARNINGS
- CAUTIONS
- WARNINGS
- IMPORTANT SAFEGUARDS (cont.)
- IMPORTANT
- ■Plate and its Nonstick Coating
- ■ Temperature Control Plug
- ■ Use and Care
- ■This product is intended for household use and similar applications listed below:
- PARTS NAMES
- Preparation
- Insert the Temperature Control Plug
- SAFETY MECHANISM
- Preheat and Cook
- TIPS FOR USING THE LID
- WHEN REMOVING THE LID
- After Use
- Okonomiyaki (Japanese Savory Pancakes)
- Ingredients (4 servings)
- How to cook
- Vongole Rosso
- NOTE
- Pork Chops
- Crepes
- Ingredients (Makes 8 crepes)
- Clean the product after it has cooled down completely except for the Plate.
- Heater Set
- Heat Shield Plate · Safety Barrier Mechanism
- Heater · Receptacle
- Main Body Guard · Lid
- Temperature Control Plug
- Plate
- FOR STUBBORN SCORCHED FOOD, OR IF THE PLATE HAS COOLED
- REPLACEMENT PARTS
- TROUBLESHOOTING GUIDE
- SPECIFICATIONS
- ZOJIRUSHI
Brand : Zojirushi
Model : EA-BDC10
Category : Grill