
HD Express - Audio Interface MOTU - Free user manual and instructions
Find the device manual for free HD Express MOTU in PDF.


| Product Type | HD/SD PCI Express Video Interface |
| Video Capture | Uncompressed HD & SD, 10-bit 4:2:2, up to 1080p30 |
| Video Output | HDMI, HD/SD Component, Composite, S-Video |
| Audio Capture | 2-channel analog (RCA), 8-channel HDMI embedded, 2-channel S/PDIF |
| Audio Output | 8-channel analog (RCA), 8-channel HDMI embedded, 2-channel S/PDIF, front headphone jack |
| Sample Rate | 44.1 kHz to 96 kHz |
| Supported Software | Adobe Premiere Pro CS5.0.3 or later |
| Computer Connection | PCI Express card (desktop) or ExpressCard adapter (laptop) |
| Power Supply | External 10-24V DC, 12W |
| Form Factor | Half-rack, mountable (removable rack ears) |
| Video Formats | NTSC, PAL, 720p, 1080i, 1080p, 1080PsF (multiple frame rates) |
| Color Depth | 10-bit 4:2:2 YUV |
| Analog Audio Channels | 2 inputs, 8 outputs (RCA) |
| Digital Audio I/O | S/PDIF stereo in/out, HDMI 8-channel in/out |
| Control Software | MOTU Video Console (Windows) |
| Dimensions | Approx. 1.75" x 8.5" x 8" (H x W x D) half-rack |
| Weight | Approx. 2.5 lbs |
Frequently Asked Questions - HD Express MOTU
User questions about HD Express MOTU
0 question about this device. Answer the ones you know or ask your own.
Ask a new question about this device
Download the instructions for your Audio Interface in PDF format for free! Find your manual HD Express - MOTU and take your electronic device back in hand. On this page are published all the documents necessary for the use of your device. HD Express by MOTU.
USER MANUAL HD Express MOTU
User's Guide for Windows
MOTU
1280 Massachusetts Avenue
Cambridge, MA 02138
Business voice: (617) 576-2760
Business fax: (617) 576-3609
Website: www.motu.com
Tech support: www.motu.com/support
About the Mark of the Unicorn License Agreement and Limited Warranty on Software
TO PERSONS WHO PURCHASE OR USE THIS PRODUCT: carefully read all the terms and conditions of the "click-wrap" license agreement presented to you when you install the software. Using the software or this documentation indicates your acceptance of the terms and conditions of that license agreement.
Mark of the Unicorn, Inc. ("MOTU") owns both this program and its documentation. Both the program and the documentation are protected under applicable copyright, trademark, and trade-secret laws. Your right to use the program and the documentation are limited to the terms and conditions described in the license agreement.
Reminder of the terms of your license
This summary is not your license agreement, just a reminder of its terms. The actual license can be read and printed by running the installation program for the software. That license agreement is a contract, and clicking "Accept" binds you and MOTU to all its terms and conditions. In the event anything contained in this summary is incomplete or in conflict with the actual click-wrap license agreement, the terms of the click-wrap agreement prevail.
YOU MAY: (a) use the enclosed program on a single computer; (b) physically transfer the program from one computer to another provided that the program is used on only one computer at a time and that you remove any copies of the program from the computer from which the program is being transferred; (c) make copies of the program solely for backup purposes. You must reproduce and include the copyright notice on a label on any backup copy.
YOU MAY NOT: (a) distribute copies of the program or the documentation to others; (b) rent, lease or grant sublicenses or other rights to the program; (c) provide use of the program in a computer service business, network, time-sharing, multiple CPU or multiple user arrangement without the prior written consent of MOTU; (d) translate, adapt, reverse engineer, decompile, disassemble, or otherwise alter the program or related documentation without the prior written consent of MOTU.
MOTU warrants to the original licensee that the disk(s) on which the program is recorded be free from defects in materials and workmanship under normal use for a period of ninety (90) days from the date of purchase as evidenced by a copy of your receipt. If failure of the disk has resulted from accident, abuse or misapplication of the product, then MOTU shall have no responsibility to replace the disk(s) under this Limited Warranty.
THIS LIMITED WARRANTY AND RIGHT OF REPLACEMENT IS IN LIEU OF, AND YOU HEREBY WAIVE, ANY AND ALL OTHER WARRANTIES, BOTH EXPRESS AND IMPLIED, INCLUDING BUT NOT LIMITED TO WARRANTIES OF MERCHANTABILITY AND FITNESS FOR A PARTICULAR PURPOSE. THE LIABILITY OF MOTU PURSUANT TO THIS LIMITED WARRANTY SHALL BE LIMITED TO THE REPLACEMENT OF THE DEFECTIVE DISK(S), AND IN NO EVENT SHALL MOTU OR ITS SUPPLIERS, LICENSORS, OR AFFILIATES BE LIABLE FOR INCIDENTAL OR CONSEQUENTIAL DAMAGES, INCLUDING BUT NOT LIMITED TO LOSS OF USE, LOSS OF PROFITS, LOSS OF DATA OR DATA BEING RENDERED INACCURATE, OR LOSSES SUSTAINED BY THIRD PARTIES EVEN IF MOTU HAS BEEN ADVISED OF THE POSSIBILITY OF SUCH DAMAGES. THIS WARRANTY GIVES YOU SPECIFIC LEGAL RIGHTS WHICH MAY VARY FROM STATE TO STATE. SOME STATES DO NOT ALLOW THE LIMITATION OR EXCLUSION OF LIABILITY FOR CONSEQUENTIAL DAMAGES, SO THE ABOVE LIMITATION MAY NOT APPLY TO YOU.
Update Policy
In order to be eligible to obtain updates of the program, you must complete and return the attached Mark of the Unicom Purchaser Registration Card to MOTU.
Copyright Notice
Copyright © 2011, 2010, 2009 by Mark of the Unicorn, Inc. All rights reserved. No part of this publication may be reproduced, transmitted, transcribed, stored in a retrieval system, or translated into any human or computer language, in any form or by any means whatsoever, without express written permission of Mark of the Unicorn, Inc., 1280 Massachusetts Avenue, Cambridge, MA, 02138, U.S.A.
Limited Warranty on Hardware
Mark of the Unicorn, Inc. and S&S Research ("MOTU/S&S") warrant this equipment against defects in materials and workmanship for a period of TWO (2) YEARS from the date of original retail purchase. This warranty applies only to hardware products; MOTU software is licensed and warranted pursuant to separate written statements.
If you discover a defect, first write or call Mark of the Unicorn at (617) 576-2760 to obtain a Return Merchandise Authorization Number. No service will be performed on any product returned without prior authorization. MOTU will, at its option, repair or replace the product at no charge to you, provided you return it during the warranty period, with transportation charges prepaid, to Mark of the Unicorn, Inc., 1280 Massachusetts Avenue, MA 02138. You must use the product's original packing material for in shipment, and insure the shipment for the value of the product. Please include your name, address, telephone number, a description of the problem, and the original, dated bill of sale with the returned unit and print the Return Merchandise Authorization Number on the outside of the box below the shipping address.
This warranty does not apply if the equipment has been damaged by accident, abuse, misuse, or misapplication; has been modified without the written permission of MOTU, or if the product serial number has been removed or defaced.
ALL IMPLIED WARRANTIES, INCLUDING IMPLIED WARRANTIES OF MERCHANTABILITY AND FITNESS FOR A PARTICULAR PURPOSE, ARE LIMITED IN DURATION TO TWO (2) YEARS FROM THE DATE OF THE ORIGINAL RETAIL PURCHASE OF THIS PRODUCT.
THE WARRANTY AND REMEDIES SET FORTH ABOVE ARE EXCLUSIVE AND IN LIEU OF ALL OTHERS, ORAL OR WRITTEN, EXPRESS OR IMPLIED. No MOTU/S&S dealer, agent, or employee is authorized to make any modification, extension, or addition to this warranty.
MOTU/S&S ARE NOT RESPONSIBLE FOR SPECIAL, INCIDENTAL, OR CONSEQUENTIAL DAMAGES RESULTING FROM ANY BREACH OF WARRANTY, OR UNDER ANY LEGAL THEORY, INCLUDING LOST PROFITS, DOWNTIME, GOODWILL, DAMAGE OR REPLACEMENT OF EQUIPMENT AND PROPERTY AND COST OF RECOVERING REPROGRAMMING, OR REPRODUCING ANY PROGRAM OR DATA STORED IN OR USED WITH MOTU/S&S PRODUCTS.
Some states do not allow the exclusion or limitation of implied warranties or liability for incidental or consequential damages, so the above limitation or exclusion may not apply to you. This warranty gives you specific legal rights, and you may have other rights which vary from state to state.
MOTU, Mark of the Unicorn and the unicorn silhouette logo are trademarks of Mark of the Unicorn, Inc. All other trademarks are the property of their respective owners.
This equipment has been type tested and found to comply with the limits for a Class A digital device, pursuant to Part 15 of the FCC Rules. These limits are designed to provide reasonable protection against harmful interference in a residential installation. This equipment generates, uses, and can radiate radio frequency energy and, if not installed and used in accordance with the instruction manual, may cause harmful interference to radio communications or television reception. However, there is no guarantee that interference will not occur in a particular installation. If this equipment does cause interference to radio or television equipment reception, which can be determined by turning the equipment off and on, the user is encouraged to try to correct the interference by any combination of the following measures:
• Relocate or re-orient the receiving antenna
• Increase the separation between the equipment and the receiver
- Plug the equipment into an outlet on a circuit different from that to which the receiver is connected
If necessary, consult a dealer or experienced radio/television technician for additional assistance.
PLEASE NOTE: only equipment certified to comply with Class A (computer input/output devices, terminals, printers, etc.) should be attached to this equipment, and it must have shielded interface cables in order to comply with the Class A FCC limits on RF emissions.
WARNING: changes or modifications to this unit not expressly approved by the party responsible for compliance could void the user's authority to operate the equipment.

Contents
Part 1: Getting Started
5 Quick Reference: HD Express Front Panel
6 Quick Reference: HD Express Rear Panel
7 Quick Reference: MOTU Video Console
9 About the HD Express
13 Packing List and System Requirements
15 Installing the HD Express Windows Software
17 Installing the HD Express Hardware
Part 2: Using the HD Express
27 HD Express Basics
29 MOTU Video Console
37 Adobe Premiere Pro
Part 3: Appendices
47 Troubleshooting
SAFETY PRECAUTIONS AND ELECTRICAL REQUIREMENTS

CAUTION! READ THIS SAFETY GUIDE BEFORE YOU BEGIN INSTALLATION OR OPERATION. FAILURE TO COMPLY WITH SAFETY INSTRUCTIONS COULD RESULT IN BODILY INJURY OR EQUIPMENT DAMAGE.

HAZARDOUS VOLTAGES: CONTACT MAY CAUSE ELECTRIC SHOCK OR BURN. TURN OFF UNIT BEFORE SERVICING.
WARNING: TO REDUCE THE RISK OF FIRE OR ELECTRICAL SHOCK, DO NOT EXPOSE THIS APPLIANCE TO RAIN OR OTHER MOISTURE.
CAUTION: TO REDUCE THE RISK OF ELECTRICAL SHOCK, DO NOT REMOVE COVER. NO USER-SERVICEABLE PARTS INSIDE. REFER SERVICING TO QUALIFIED SERVICE PERSONNEL.
WARNING: DO NOT PERMIT FINGERS TO TOUCH THE TERMINALS OF PLUGS WHEN INSTALLING OR REMOVING THE PLUG TO OR FROM THE OUTLET.
WARNING: IF NOT PROPERLY GROUNDED THE MOTU HD Express COULD CAUSE AN ELECTRICAL SHOCK.
The MOTU HD Express is equipped with a three-conductor cord and grounding type plug which has a grounding prong, approved by Underwriters' Laboratories and the Canadian Standards Association. This plug requires a mating three-conductor grounded type outlet as shown in Figure A below. If the outlet you are planning to use for the MOTU HD Express is of the two prong type, DO NOT REMOVE OR ALTER THE GROUNDING PRONG IN ANY MANNER. Use an adapter as shown below and always connect the grounding lug to a known ground. It is recommended that you have a qualified electrician replace the TWO prong outlet with a properly grounded THREE prong outlet. An adapter as illustrated below in Figure B is available for connecting plugs to two-prong receptacles.
Figure A Figure B


WARNING: THE GREEN GROUNDING LUG EXTENDING FROM THE ADAPTER MUST BE CONNECTED TO A PERMANENT GROUND SUCH AS TO A PROPERLY GROUNDED OUTLET BOX. NOT ALL OUTLET BOXES ARE PROPERLY GROUNDED.
If you are not sure that your outlet box is properly grounded, have it checked by a qualified electrician. NOTE: The adapter illustrated is for use only if you already have a properly grounded two-prong receptacle. Adapter is not allowed in Canada by the Canadian Electrical Code. Use only three wire extension cords which have three-prong grounding type plugs and three-prong receptacles which will accept the MOTU HD Express plug.
IMPORTANT SAFEGUARDS
- Read these instructions. All the safety and operating instructions should be read before operating the HD Express.
-
Keep these instructions. These safety instructions and the HD Express owner's manual should be retained for future reference.
-
Heed all warnings. All warnings on the HD Express and in the owner's manual should be adhered to.
-
Follow all Instructions. All operating and use instructions should be followed.
-
Do not use the HD Express near water.
-
Cleaning - Unplug the HD Express from the computer and clean only with a dry cloth. Do not use liquid or aerosol cleaners.
-
Ventilation - Do not block any ventilation openings. Install in accordance with the manufacturer's instructions.
-
Heat - Do not install the HD Express near any heat sources such as radiators, heat registers, stoves, or another apparatus (including an amplifier) that produces heat.
-
Overloading - Do not overload wall outlets and extension cords as this can result in a risk of fire or electrical shock.
-
Grounding - Do not defeat the safety purpose of the polarized or grounding-type plug. A polarized plug has two blades with one wider than the other. A grounding-type plug has two blades and a third grounding prong. The wide blade or the third prong are provided for your safety. If the provided plug does not fit into your outlet, consult and electrician for replacement of the obsolete outlet.
-
Power cord - Protect the HD Express power cord from being walked on or pinched by items placed upon or against them. Pay particular attention to cords and plugs, convenience receptacles, and the point where they exit from the HD Express.
-
Power switch - Install the HD Express so that the power switch can be accessed and operated at all times.
-
Disconnect - The main plug is considered to be the disconnect device for the HD Express and shall remain readily operable.
-
Accessories - Only use attachments/accessories specified by the manufacturer.
-
Placement - Use only with the cart, stand, tripod, bracket or table specified by the manufacturer, or sold with the HD Express. When a cart is used, use caution when moving the cart'apparatus combination to avoid injury from tip-over.
-
Surge protection - Unplug the HD Express during lightning storms or when unused for long periods of time.
-
Servicing - Refer all servicing to qualified service personnel. Servicing is required when the HD Express has been damaged in any way, such as when a power-supply cord or plug is damaged, liquid has been spilled or objects have fallen into the HD Express, the HD Express has been exposed to rain or moisture, does not operate normally, or has been dropped.
-
Power Sources - Refer to the manufacturer's operating instructions for power requirements. Be advised that different operating voltages may require the use of a different line cord and/or attachment plug.
-
Installation - Do not install the HD Express in an unventilated rack, or directly above heat-producing equipment such as power amplifiers. Observe the maximum ambient operating temperature listed below.
-
Power amplifiers- Never attach audio power amplifier outputs directly to any of the unit's connectors.
-
Replacement Parts - When replacement parts are required, be sure the service technician has used replacement parts specified by the manufacturer or have the same characteristics as the original part. Unauthorized substitutions may result in fire, electric shock or other hazards.
-
Safety Check - Upon completion of any service or repairs to this MOTU HD Express, ask the service technician to perform safety checks to determine that the product is in safe operating conditions.
ENVIRONMENT
Operating Temperature: 10°C to 40°C (50°F to 104°)
TO REDUCE THE RISK OF ELECTRICAL SHOCK OR FIRE


Do not handle the power cord with wet hands. Do not pull on the power cord when disconnecting it from an AC wall outlet. Grasp it by the plug. Do not expose this apparatus to rain or moisture. Do not place objects containing liquids on it.
AC INPUT
100 - 240VAC \~ • 50 / 60Hz • 20 Watts.
Part 1
Getting Started
Quick Reference: HD Express Front Panel

- Keep this switch in the down position to enable AUTO ON mode. With this main power switch flipped to the AUTO ON position, the HD Express will power on and off with your computer.
When using the HD Express rack-mount interface with the laptop ExpressCard adapter, operation is plug-and-play: you can disconnect and reconnect the interface, and freely switch it on or off as desired. When using the PCIe card adapter on a desktop machine, the HD Express rack-mount interface must be connected and switched on before starting up the computer. Similarly, you must shut down the computer before switching it off and/or disconnecting it. If the interface gets disconnected or switched off before computer shut-down, you'll need to restart the computer to bring the interface back on line. - The GENLOCK light glows when the HD Express has successfully locked to the currently selected clock source. The CAPTURE light glows when the HD Express is capturing or previewing video; the MONITOR light glows when the HD Express is playing back (whether still-framed or not).
- The HOST light illuminates when the HD Express interface successfully establishes communication with the computer via the PCIe card or ExpressCard adapter.
- When the power switch is in the AUTO ON position, the HD Express powers up when you switch on your computer and powers down when you switch off your computer.
- Connect an SD source here, such as a camcorder, DVD player, VHS deck or any other composite or S-Video source.
- Connect an HDMI source here, such as a camcorder, DVD player, set-top box, video game console, AV receiver or other HDMI device. Note that many consumer HDMI sources (such as DVD players) implement HDCP (High Bandwidth Digital Content Protection), which does not allow video capture of copy-protected signals via I/O devices like the HD Express.
- This is a standard quarter-inch stereo headphone jack. Its output always matches analog outputs 1-2 on the rear panel. Use the volume knob to control its level.
Quick Reference: HD Express Rear Panel
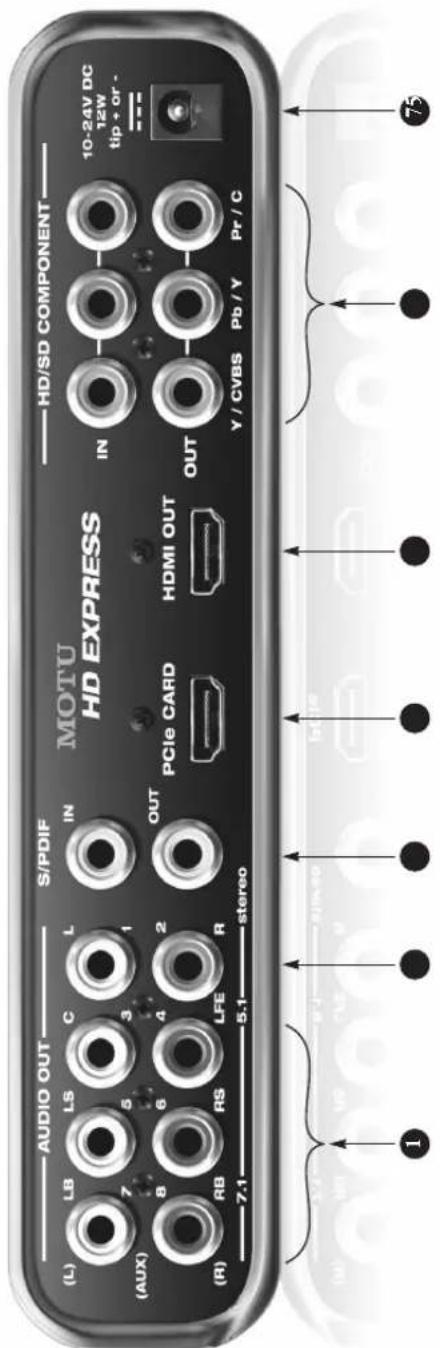
- Connect component HD or SD input and output here.
a standard HDMI-to-mini-HDMI cable. In either case, it
- These six RCA analog outputs provide 5.1 and 7.1
The HD/SD Component section of the HD Express is equipped with 12-bit converters that deliver 10-bit capture and playback, with support for either RGB or YPbPr component color space. Alternately, you can connect a composite video (CVBS) input or output signal to the Y connectors or an S-Video input or output signal to the Y/C connectors.
is recommended that you use the supplied cable. If you
surround sound monitoring. Connect them to a
use another cable, the length should not exceed six
feet, and use a high-quality cable.
YPbPr component color space. Alternately, you can connect a composite video (CVBS) input or output signal to the Y connectors or an S-Video input or output signal to the Y/C connectors.
The HD Express uses an external, 10-24 volt power supply that provides 12 watts of power. The connector can be either tip-positive or tip-negative.
HD Express supports 8-channel PCM (uncompressed) embedded audio over HDMI, so you could also connect this output to an HDMI-equipped home theater receiver to deliver both picture and multi-channel audio.
- Connect the HD Express to the computer here using any standard HDMI cable. If you are connecting the interface to an ExpressCard adapter for laptop operation, use
Quick Reference: MOTU Video Console

CHAPTER 1 About the HD Express
OVERVIEW
The HD Express is a PCI Express video interface for Windows that provides broadcast-quality video capture and monitoring for Adobe Premiere Pro.
The HD Express connects to a PC desktop computer via a standard PCI Express card or a PC laptop via an ExpressCard adapter and turns the computer into a powerful HD/SD video production workstation equipped with broadcast quality HD and SD video and audio capture and monitoring.
In Premiere Pro, the HD Express supports full-raster 1920 x 1080 HD capture and playback using any video format supported natively by Premiere Pro, including uncompressed, P2 (DVCProHD), XD CAM, HDV, and AVCHD.
The HD Express is ideal for any natively supported workflow because you can immediately play back clips (either imported or ingested) with no transcoding necessary. Conversely, you can connect any SD or HD video source such as an HDV camera, legacy video deck or DVD player and then capture it directly in the format of your choice in Premiere. Many cameras now feed their uncompressed component output directly from the camera's optics and image sensor, before compression, for the best-possible picture quality during capture with the HD Express.
A wide range of video equipment can be connected to the HD Express, from legacy SD camcorders to the latest HD cameras, video decks, LCD reference monitors and plasmas.
The HD Express is housed in a rugged aluminum alloy chassis with a standard half-rack, mountable form factor. Included rack mounting brackets can easily be removed for convenient desktop operation.
The HD Express is designed to streamline your video production workflow, with unified control over all your video gear from the convenience of your computer desktop.
FEATURE HIGHLIGHTS
- HD/SD PCI Express video interface for Mac and Windows — provides HD and SD capture and playback for any current-generation PCIe- or ExpressCard-equipped computer.
■ Tower or laptop operation — connects to a Mac or PC tower via PCI Express for ultra-fast operation, or to a laptop via ExpressCard connectivity for mobile operation.
■ Comprehensive video capture & monitoring — captures and plays uncompressed video in all standard SD and HD video formats up to and including 1080p30 (720p, 1080i, 1080p & 1080PsF).
■ Supports Adobe Premiere Pro.
■ Captures and plays uncompressed HD and SD — 10-bit 4:2:2 color depth and 1920 x 1080 resolution, all standard HD and SD formats up to and including 1080p30 (720p, 1080i, 1080p and 1080PsF).
■ Support for all codecs supported natively by Premiere Pro — capture and monitor any host-based codecs supported by Premiere.
■ Support for file-based workflows — lets you edit and monitor file-based workflow codecs supported natively in Premiere Pro, including HDV, XD CAM, P2/DVCPro, AVCHD, and others with no transcoding needed.
■ Broadcast quality — 10-bit 4:2:2 signal path throughout.
■ HDMI capture and monitoring — provides both HDMI in and out.
■ Color grading — provides flexible, industry-standard color adjustment with separate controls for capture and playback.
■ Comprehensive audio — capture stereo analog or 8-channel embedded HDMI digital audio. Monitor up to eight channels of surround audio via RCA analog or HDMI embedded at sample rates up to 96kHz.
■ Half-rack form factor with dedicated connectors — no cable swapping or gangly, inconvenient breakout cables.
VIDEO I/O
The HD Express provides comprehensive video input and output connectivity.
The front panel provides convenient inputs for legacy SD capture and full 10-bit uncompressed HDMI capture from today's latest HD camcorders.
The component section provides both RGB and YPbPr, but can alternately serve as CVBS (composite) in/out or even Y/C (S-Video) in/out.
■ 1 x HDMI in and out (4:2:2 10-bit, YUV)
■ Support for DVI output with HDMI-to-DVI adapter (sold separately)
■ 1 x HD/SD component in and out (10-bit, YPbPr or RGB) on RCAs
■ 1 x composite in (10-bit) on RCA
■ 1 x S-Video in (10-bit) on 4-pin mini-DIN
■ 1 x composite in and out (10-bit CVBS) on shared RCA
■ 1 x S-Video in/out (10-bit Y/C) on shared RCA
VIDEO FORMATS
■SD — 576i25 (PAL) and 486i29.97 (NTSC)
■HD — 720p23.976*, 720p24*, 720p25*, 720p29.97*, 720p30*, 720p50, 720p59.94, 720p60, 1080p23.976, 1080p24, 1080p25, 1080p29.97, 1080p30, 1080PsF23.976, 1080PsF24, 1080PsF25, 1080PsF29.97, 1080PsF30, 1080i25, 1080i29.97, 1080i30 (* playback only)
■ Supported Premiere Pro HD formats — Uncompressed HD (8-bit and 10-bit), DVCProHD 720p at all eight frame rates listed above, plus DVCProHD 1080 (1280 and 1440 rasters) at all 1080 frame rates listed above
■ Supported Premiere SD formats — Uncompressed 8-bit and 10-bit, DVCPro and DVCPro 50 at 486i29.97 and 576i25
AUDIO I/O
The HD Express provides stereo analog audio capture and surround sound monitoring with support for both 5.1 or 7.1 configurations. The HD Express also provides 8-channel capture and monitoring of embedded HDMI digital audio input and output.
■ Supports all standard audio sample rates from 44.1 to 96kHz
■ 8 x RCA out via direct connection (no breakout cable)
■2 x RCA analog input on the front panel for SD Composite/S-Video capture
■2 x S/PDIF digital in and out on RCA connectors
■ 8 x HDMI embedded audio in and out
■ Front panel headphone jack with dedicated volume control
INCLUDED SOFTWARE AND COMPATIBILITY
■MOTU Video console software — provides complete control of all programmable features and settings.
■ Supports Premiere Pro CS5 (version 5.0.3) or later
CHAPTER 2 Packing List and System Requirements
PACKING LIST
The HD Express ships with the items listed below. If any of these items are not present in your HD Express box when you first open it, please immediately contact your dealer or MOTU.
■One HD Express with removable rack ears
■One HDMI cable
■ One PCI Express card or ExpressCard adapter
■ One power adapter
■HD Express Mac/Windows manuals
■One software installer disc
■ Product registration card
WINDOWS SYSTEM REQUIREMENTS
The HD Express system requires the following Windows system:
■ Intel Core 2 Duo, AMD Phenom II, or equivalent 64-bit processor; multiple processors or multi-core processor required
■ Available PCI Express slot or ExpressCard slot
■ 2 GB RAM; 4 GB or more is recommended
■ Windows 7 or Vista, 64-bit versions only; Vista SP1 or later required
■ Large hard disk drive, preferably at least 500 GB
■ Adobe Premiere Pro CS5 or CS5.5; version 5.0.3 or later required
PLEASE REGISTER TODAY!
Please register your HD Express today. There are two ways to register.
■ Visit www.motu.com/registration to register online
OR
■ Fill out and mail the included product registration card
As a registered user, you will be eligible to receive technical support and announcements about product enhancements as soon as they become available. Only registered users receive these special update notices, so please register today.
Thank you for taking the time to register your new MOTU products!
CHAPTER 3 Installing the HD Express Windows Software
IMPORTANT! INSTALL THE HD EXPRESS SOFTWARE FIRST!
Before you connect the HD Express interface to your computer and turn it on, run the HD Express Software Installer. This ensures that all the HD Express components are properly installed in your system.
If Windows asks you to locate the drivers
If you've already connected the HD Express to your computer and switched it on, Windows probably issued an alert notifying you that the HD Express requires drivers, followed by another window asking you to locate the drivers on disk. If this happens:
1 Cancel the driver search.
2 Run the HD Express Software Installer as instructed in the next section.
INSTALLING THE HD EXPRESS SOFTWARE
Install the HD Express software as follows:
1 Insert the HD Express Installer disc; or, if you have downloaded the MOTU Video installer, locate the folder containing the download.
2 If there are Read Me files or other documents containing installation assistance or other important information, review each one.
3 Open the Setup Video.exe installer application.
4 Follow the installer's directions.
The HD Express ships with the following software for Windows:
| Software component Purpose | For more information | |
| MOTU Sequence presets | Provides sequence presets for Premiere Pro. These help you quickly configure Premiere for the HD Express. | “Sequence pre-sets” on page 38 |
| MOTU PCI Video Console | Provides access to all of the HD Express’s video settings. | chapter 6, “MOTU Video Console” (page 29) |
CHAPTER 4 Installing the HD Express Hardware
OVERVIEW
Here's an overview for installing the HD Express:
Did you run the software installer first? 17
Precautions before you begin 17
Installing the PCI Express card 17
Installing the ExpressCard adapter 18
Connect the HD Express to your computer ..... 18
Power-up/power-down sequence 19
Connect video inputs and outputs.... 20
Example HD Express video connections.... 22
Connect audio inputs and outputs 23
Example HD Express audio connections 24
DID YOU RUN THE SOFTWARE INSTALLER FIRST?
Before installing the HD Express hardware in your PC, be sure to run the software installer first. See chapter 3, “Installing the HD Express Windows Software” (page 15).
PRECAUTIONS BEFORE YOU BEGIN
Installing the HD Express hardware requires the handling of sensitive electronic components that can be easily damaged by static electricity, even in the very small amounts generated by our bodies every time we move. Please take these basic precautions before and during installation to avoid permanently damaging your HD Express hardware:
■ Completely review the installation procedure on the following pages before you begin the installation.
■ Avoid wool or synthetic clothing, which tends to generate much more static electricity than cotton.
■Static electricity occurs much more readily in dry climate conditions. If you can, perform the installation with a relative humidity of at least 50%.
■ Leave the HD Express PCIe host adapter in its antistatic bag until you are ready to install it.
■ When you are ready to begin installation, have the PCIe adapter, still in its anti-static bag, close by so it is in within easy reach during installation.
■ Before you begin, turn off the computer and unplug it from any power source. Do the same for any connected components (hard drives, etc.)
■ When handling the HD Express PCIe card adapter, hold it by the silver bulkhead, or by the edges of the circuit board. Be careful not to touch the components on the circuit board or the metal contacts on the insert tab.
INSTALLING THE PCI EXPRESS CARD
If you have a PCI Express card for the HD Express, install it as follows:
1 Power off and unplug your computer.
Failure to do so may result in serious shock or injury.
2 Open your computer.
3 Find an available PCI Express slot.
4 Remove the slot cover, if necessary.
5 Before removing the HD Express PCIe card from it's anti-static bag, touch the power supply inside your computer to discharge any static electricity that may have built up on you.
6 Remove the HD Express PCI card from its anti-static bag.
7 Gently but firmly insert the card into any available PCI slot.
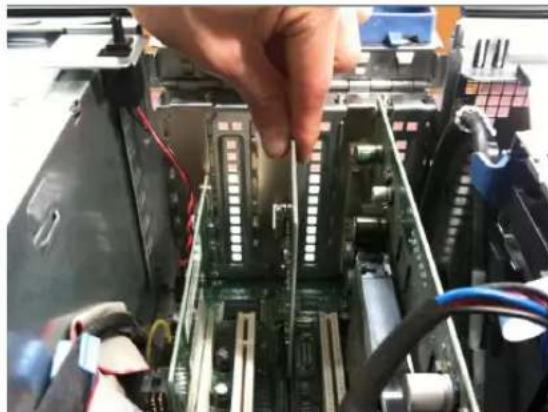
natural_image
Close-up of a hand inserting a CPU into a motherboard with visible RAM slots and wiring (no text or symbols)Figure 4-1: Inserting the HD Express PCIe card.
8 Secure the bulkhead of the card to the computer chassis with the bolt from the slot cover.
We strongly recommend securing the HD Express PCIe card in this manner. Doing so allows you to ensure secure connections to the card later on in the installation.
9 Place the cover back on your computer.
10 Reconnect the power cord to the computer before proceeding.
INSTALLING THE EXPRESSCARD ADAPTER If you have a laptop ExpressCard adapter for the HD Express, you can install it as follows, with your laptop computer turned on or off:
1 Before removing the ExpressCard adapter from it's anti-static bag, touch the metal chassis of your laptop computer to discharge any static electricity that may have built up on you.
2 Remove the ExpressCard adapter from its anti-static bag.
3 Insert the adapter into the ExpressCard slot on your laptop computer with the top of the ExpressCard adapter (the side with the label on it) facing up and the mini-HDMI connector (the smaller of the two connectors) facing out.
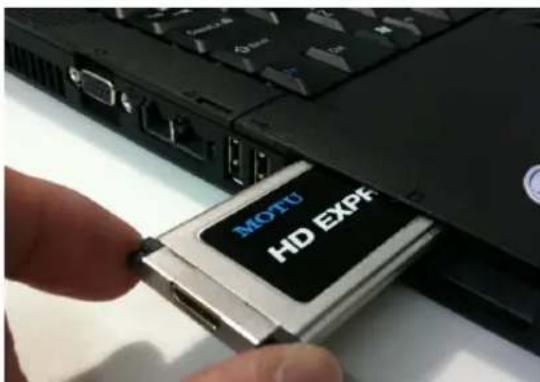
Figure 4-2: Inserting the HD Express ExpressCard adapter.
4 Push the adapter into the slot until it clicks into place.
Do not force the ExpressCard adapter into the slot. If it does not easily slide into place, remove it and try again.
When the card is properly seated in the slot, it should be flush with the side of your laptop.
Removing the ExpressCard adapter
To safely removing the ExpressCard adapter, first disconnect the HDMI cable, and then push the adapter inwards until you hear and feel it click. This releases it from its installed position and it should pop out of the slot far enough for you to grasp it and gently remove it. Immediately place it in its anti-static bag.
CONNECT THE HD EXPRESS TO YOUR COMPUTER
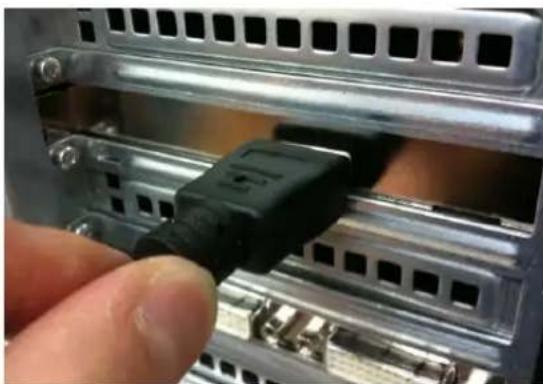
1 Plug one end of the supplied HDMI cable into the HDMI socket on the PCIe card or ExpressCard adapter as shown below in Figure 4-3.
natural_image
Close-up of a finger inserting a black USB port into a metal rack (no text or symbols visible)Figure 4-3: Connecting the HD Express to the computer.
If you purchased the HD Express with an ExpressCard adapter, the included HDMI cable has a regular HDMI plug at one end and a smaller, mini-HDMI plug at the other end. Plug the mini-HDMI plug into the ExpressCard adapter.

natural_image
Close-up of a hand inserting a black USB into a laptop keyboard (no visible text or symbols)2 Plug the other end of the HDMI cable into the HD Express I/O "PCIe CARD" jack as shown below in Figure 4-4.

Figure 4-4: Making the connection from the computer to the HD Express.

When making the connection from the computer (Figure 4-3) to the interface (Figure 4-4), be sure to plug the HDMI cable into the jack labeled
PCIe CARD, as shown in Figure 4-4. DO NOT plug it into the HDMI OUT jack. The computer must be connected to the PCIe CARD jack for proper operation.
POWER-UP/POWER-DOWN SEQUENCE
When using the HD Express rack-mount interface with the laptop ExpressCard adapter, operation is plug-and-play: you can disconnect and reconnect the interface, and freely power it on or off as desired.
However, when using the PCIe card adapter on a desktop machine, the HD Express rack-mount interface must be connected and powered on before the computer is powered on. Similarly, you must power down the computer before powering off or disconnecting the HD Express. If the interface gets disconnected or powered off before computer shut-down, you'll need to restart the computer to bring the interface back online.
CONNECT VIDEO INPUTS AND OUTPUTS
The HD Express provides a wealth of video input and output connectivity.
Support for both NTSC and PAL
The HD Express supports both NTSC and PAL formats on all inputs and outputs. It does not, however, convert between NTSC and PAL. Instead, it operates all inputs and outputs in one format or the other, as determined by the chosen video source. For details about choosing a video source, see “Input Source” on page 30.
S-video (Y/C) input
You have two choices for connecting S-video (Y/C) input: you can use the 4-pin mini-DIN jack on the HD Express front panel, or you can use the two RCA inputs on the rear panel labeled "Y" and "C". Either way, be sure to make the corresponding Input Source setting in the software. See "Input Source" on page 30.
Connect any S-video source, including consumer or prosumer camcorders, desktop video converters, VTRs, etc. For best results, use standard, high-quality shielded RCA or 4-pin mini-DIN S-video cables.
You can connect the same device to both the input and output, or you can connect two separate devices (one to the input and the other to the output).
S-video (Y/C) output
Connect a monitor or other S-video output device to the RCA Y/C connectors on the rear panel. Be sure to make the necessary settings in the software to change the output of these connectors from component (the factory default format) to S-video. See “Analog Output Format” on page 32 for details.
Composite (CVBS) input
You have two choices for connecting composite (CVBS) input: you can use the RCA jack on the HD Express front panel labeled VIDEO, or you can use the RCA input on the rear panel labeled CVBS. Either way, be sure to make the corresponding Input Source setting in the software. See “Input Source” on page 30.
Connect any composite source, including consumer or prosumer camcorders, desktop video converters, VTRs, etc. For best results, use a standard, high-quality shielded video RCA cable. You can connect the same device to both the input and output, or you can connect two separate devices (one to the input and the other to the output).
Composite (CVBS) output
Connect a monitor or other composite output destination to the RCA CVBS connector on the rear panel. Be sure to make the necessary settings in the software to change the output of these connectors from component (the factory default format) to composite. See “Analog Output Format” on page 32 for details.
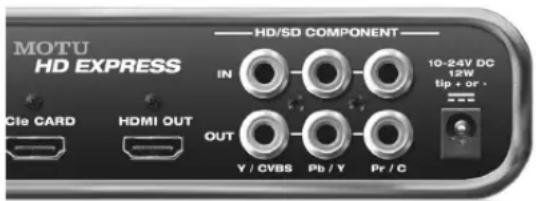
Figure 4-5: The HD Express video connectors.
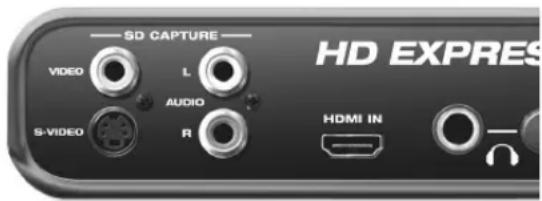
Component
The HD/SD Component Section (Figure 4-5) provides either HD or SD component input and output. The HD Express provides 10-bit analog performance with 12-bit A/D and D/A converters. In general, component video signals tend to be higher quality than composite or S-video, so to take full advantage of the component format, be sure to use high quality shielded RCA cables.
Configuring the HD/SD Component section The HD Express component input and output supports YPbPr or RGB operation, as shown by the labeling below the connectors in the HD/SD Component section. Accordingly, the input and output jacks in this section can be independently configured for one of three different analog video formats:
■ Component RGB
■ Component YPbPr
■ Composite + S-video
This setting is made in the MOTU Video console software. For the component inputs, see “Input Source” on page 30. For the component outputs, see “Analog Output Format” on page 32. Be sure that the mode you choose for each bank matches the component video source or destination to which it is connected. If the device you are connecting supports both RGB and YPbPr, use YPbPr, as it is the standard for broadcast video.
Analog YPbPr component video is sometimes referred to by other names, such as YUV, Y/R-Y/B-Y or YCbCr.
SD (480i) component formats
The HD Express supports four different SD component formats: SMPTE/EBU N10, Sony Beta, Sony Beta Japan and Panasonic MII. This setting is made in the MOTU Video console software. See “480i Component Levels” on page 33 and “480i Setup” on page 33. For PAL (576i) and HD component operation, the HD Express supports the industry standard SMPTE/EBU N10 specification.
HDMI
The HD Express provides HDMI input and output in professional, broadcast quality 10-bit 4:2:2 resolution. The input is ideal for capturing video from HDMI-equipped cameras, many of which send the video signal to their HDMI output before it is compressed in the camera.
The HDMI output can be connected to any device equipped with an HDMI input, such as a plasma screen, LCD screen or even a home theater receiver. The HD Express supports up to 8 channels of PCM (uncompressed) audio output via the HDMI connection for devices that can receive digital audio via HDMI.
DVI output
Using a HDMI-to-DVI cable, or a female HDMI-to-male DVI plug adaptor connected to one end of an HDMI-to-HDMI cable, you can connect the HD Express's HDMI output to the DVI input of another device, such as a computer monitor. In addition to the cable connection, you also need to make a software setting that changes the HD Express's HDMI output signal to the DVI format. See "HDMI format" on page 32.
EXAMPLE HD EXPRESS VIDEO CONNECTIONS
Here is an example of the types of video devices that you can connect to the HD Express. You can mix and match HD and SD sources and destinations, connect them all, and then choose the desired source from the MOTU Video console software.

flowchart
graph TD
    A["HD camera"] --> B["HD Component OUT"]
    C["Composite OUT"] --> D["HD EXPRESS"]
    E["HD/SD COMPONENT"] --> F["HDMI OUT"]
    G["SD CAPTURE"] --> H["HD EXPRESS"]
    I["SD Composite IN"] --> J["SD VTR (VHS, SVHS, etc.)"]
    K["S-video OUT"] --> L["HD Camera"]
    M["S-video IN"] --> N["Large format consumer plasma or LCD monitor"]
    O["SD TV (LCD or plasma)"] --> P["HD camera"]
Figure 4-6: HD Express video connections.
CONNECT AUDIO INPUTS AND OUTPUTS
The HD Express provides the following audio input and output:
| Audio format | Input channels | Output channels |
| 96 kHz RCA analog 2 8 | ||
| 96 kHz S/PDIF digital 2 2 | ||
| 96 kHz embedded HDMI* 8 8 |
*HDMI audio is stereo at sample rates above 48kHz when playing or capturing SD video.
All twelve audio inputs are always active. For audio output, the HD Express provides two 8-channel banks (1-8 and 9-16). Both 8-channel output banks can be enabled at the same time, for a total of sixteen channels of simultaneous audio output. You can freely assign the 8-channel analog output, 8-channel HDMI output, and stereo S/PDIF output to either bank, as desired, for a total of sixteen channels of simultaneous audio output.
Analog audio I/O
The analog inputs are equipped with digitally controlled analog trims that provide +18 dB of gain and -10 dB of cut. To adjust these trims, see “Analog input trims” on page 36.
The eight RCA analog outputs (Figure 4-7) can be connected directly to powered speakers, a mixer or any other analog audio destination.
Stereo S/PDIF digital I/O
The stereo RCA S/PDIF input and output jacks provide digital audio input and output. Be sure to use digital audio-grade RCA cables.
Sample rate conversion (SRC)
The stereo S/PDIF input on the HD Express is sample-rate converted, so you do not need to worry about digital audio clocking issues when using it. Simply set the HD Express clock source as desired (see “Capture Clock Source” on page 32), and any digital audio transfers will be clean and trouble-free.

Figure 4-7: The HD Express audio connectors.
EXAMPLE HD EXPRESS AUDIO CONNECTIONS
Figure 4-8 shows an example of the types of audio connections you can make between other devices and the HD Express.

Figure 4-8: HD Express audio connections.
Part 2
Using the HD Express
CHAPTER 5 HD Express Basics
TWO MODES
The HD Express provides two basic modes of operation:
■ Capture
■Playback (monitor)
The current mode is clearly indicated by the Status area in MOTU Video Console (Figure 6-1 on page 29), unless there is no genlock, in which case it will display a message explaining why not.
The HD Express is always either in Capture mode or Playback mode. If no application is actively capturing, previewing or playing back, the Default Mode setting (“Default Mode” on page 31) determines which mode the box is in.
CAPTURE
The HD Express is in Capture mode when it is successfully communicating with the computer (the HOST LED is illuminated) and video software has actively taken control of the HD Express hardware for the purposes of capturing video and audio from the HD Express. Here are some examples of when video software would put the HD Express into Capture mode:
■ You open the Capture window in Premiere Pro. Or you use any Premiere Pro feature that involves capturing or previewing the live video input from the HD Express.
- You run the MOTU Video console software and click the Preview tab (Figure 6-1 on page 29, Figure 6-9 on page 34). This causes MOTU Video console to “take over” the video signal being supplied by the HD Express and display it in the preview window.
In Capture mode, the HD Express uses the Capture Clock Source setting (“Capture Clock Source” on page 32), and if it is set to Input Source, the input signal is passed through to the video outputs (SD in to SD out or HD in to HD out).
Even though the primary purpose of Capture mode is to feed video to the computer, the HD Express continues to send the source video signal to any video outputs that match the source format (HD or SD). This allows you to simultaneously monitor what you are capturing via the HD Express's video outputs. You could even dub the source signal to a video deck or other video recorder during capture.
Live monitoring is only active when the Capture Clock Source setting (“Capture Clock Source” on page 32) is set to Input Source. When it is set to Master (Internal), the HD Express outputs a black image (i.e. black burst) on all video outputs.
PLAYBACK (MONITOR)
The HD Express goes into Playback mode when an application is sending video to it. When not playing or capturing, the HD Express reverts to the Default Mode setting (“Default Mode” on page 31).
In Playback mode, the HD Express uses the Playback Clock Source setting (“Playback Clock Source” on page 32), and if no application is playing back, will output black.
ONE SOURCE TO MANY OUTPUTS
The design of the HD Express allows you to choose a video input and the HD Express sends the signal to any outputs that match the input format (HD or SD). This allows you to simultaneously connect a number of input devices, such as cameras, video decks, DVD players, etc., along with a number of
output devices, such as monitors, video decks and other destinations. Then choose the desired input device and the HD Express will feed that signal to all matching output destinations simultaneously.
Choosing the current video source
The MOTU Video console software lets you choose the current video source (input). For details, see "Input Source" on page 30.
Audio I/O and monitoring
On the audio side, the HD Express feeds audio input to the computer and plays audio back from the computer, so that you can easily capture and playback audio in Premiere Pro.
If you are capturing multi-channel audio and wish to monitor all channels on stereo headphones or speakers, you can configure the HD Express's audio monitoring settings in Premiere Pro. For more information, see “Audio Monitoring” on page 50.
CHAPTER 6 MOTU Video Console
MOTU Video Console (Figure 6-1) is accessed via the Windows Start menu and provides convenient access to all HD Express settings from your computer desktop.
Video format....30
Input Source 30
Status area....31
Input status ....31
Genlock status ....31
Setup tab....31
Preview tab 34
Audio tab 35

Figure 6-1: MOTU Video console.
VIDEO FORMAT
The Video Format setting (Figure 6-1 on page 29) shows the format in which the HD Express is capturing or playing back video, and allows you to change the format manually. When capturing or playing video from Premiere Pro, this setting will be changed automatically by the host application.

Figure 6-2: The Video Format menu.
INPUT SOURCE
The Input Source menu (Figure 6-1) is important because this is where you choose the video input from which the HD Express will capture. This input may also be used as the clock source for playback (see “Playback Clock Source” on page 32).

Figure 6-3: The Input Source menu.
The menu choices with front or rear in their names (Figure 6-3) refer to the video inputs on the front panel of the HD Express or the RCA video input connectors on the rear panel.
STATUS AREA
The Status area (Figure 6-1) displays what mode the HD Express is in. It also provides helpful status information and troubleshooting suggestions. For example, if there is no video signal because of a wrong setting, the Status area will tell you which setting(s) to check.
INPUT STATUS
The Input Status (Figure 6-1) indicates the video format detected on the currently chosen video Input Source.
GENLOCK STATUS
The Genlock Status (Figure 6-1) indicates when the HD Express has successfully achieved lockup to the currently selected clock source, which could be the HD Express's internal clock or the current video input source.
SETUP TAB
The Setup tab (Figure 6-4) provides several general settings for HD Express operation.
Default Mode
As explained in chapter 5, “HD Express Basics” (page 27), HD Express has two modes of operation: Capture and Playback. Your host video software determines the mode, depending on what you are doing (i.e. capturing or playing back the timeline). The Default Mode setting (Figure 6-1) lets you choose which mode the HD Express enters when the host relinquishes control over the HD Express hardware, such as when you quit or switch out of your host software. If you spend most of your time just monitoring or just capturing, operation will be faster if you set this to the mode you expect to use most.

Figure 6-4: Setup tab.
Capture Clock Source
The Capture Clock Source setting (Figure 6-4) lets you specify the timing reference for the HD Express when it is in Capture mode. Two choices are provided in the menu, as shown below in Figure 6-5:

Figure 6-5: Capture Clock Source menu.
Input Source
Choose Input Source (Figure 6-5) when you wish to resolve the HD Express to the video signal being received on the currently chosen input in the Input Source menu (Figure 6-3).
Master (Internal)
Choose Master (Internal) (Figure 6-5) to make the HD Express resolve to its own internal clock when capturing from a device (such as a deck) that is resolved to the HD Express's output. Because the deck is resolved to the HD Express, the video signal being captured from the deck is genlocked.
Playback Clock Source
The Playback Clock Source setting (Figure 6-1) lets you specify the timing reference for the HD Express when it is in Playback mode. Two choices are provided in the menu, as shown in Figure 6-6:
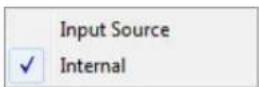
Figure 6-6: Playback Clock Source menu.
Input Source
Choose Input Source (Figure 6-6) when you wish to resolve the HD Express to the video signal being received on the currently chosen input in the Input Source menu (Figure 6-3) during playback.
Internal
Choose Internal (Figure 6-6) when you wish to resolve the HD Express to its own internal clock during playback.
Clock source when switching between Capture and Playback modes
When the HD Express switches its clock source, it may take a brief moment for it to resolve to the new source. If you need to frequently switch between Capture and Playback modes, set the capture and playback clock sources to one of these matching combinations:
Capture Playback
Input Source Input Source
Master (Internal) Internal
With either of these combinations, you can switch back and forth between capture and playback without losing genlock. This ensures a smooth, quick, seamless transition when switching modes.
HDMI format
The HDMI Format menu (Figure 6-4) lets you choose the output format for the HDMI output on the rear panel of the HD Express. If you choose DVI, you'll need an HDMI-to-DVI cable or adapter.
Analog Output Format
The Analog Output Format menu (Figure 6-4) lets you configure the analog outputs as Composite and S-Video (CVBS + S-Video Y/C), Component YPbPr, or Component RGB.

Figure 6-7: Analog Output Format menu.
Reset to Defaults
The Reset to Defaults button (Figure 6-4) restores all settings in the HD Express hardware to their original (factory) values.
Interlace Pause Mode
If you are working with an interlaced video format, the Interlace Pause Mode (Figure 6-4) lets you choose between viewing a Full Frame or individual Fields (1 or 2) when Premiere Pro parks on a frame. Clicking on these buttons will not bring the MOTU Video console application to the front, so you can switch between fields, or between Full Frame and Single Fields modes, while Premiere Pro is the front application.
480i Setup
The 480i Setup option (Figure 6-4) lets you choose between USA (7.5%) and Japan (0%) for NTSC composite and S-video input and output.
480i Component Levels
The 480i Component Levels option (Figure 6-4) lets you specify the voltage level standard for the HD Express's SD component inputs and outputs when running at 480i (NTSC). Choices are: EBU N10, Sony Beta, Sony Beta Japan and Panasonic MII. Choose the format that best matches the device(s) connected to the SD component input and output.
Color grading
In the Color Grading section (Figure 6-4), there are ten parameters which define a color transfer function, as defined by the American Society of Cinematographers Color Decision List (ASC CDL) specification.
The color grading controls in the Setup tab (Figure 6-4) define a transfer function which applies to the output on playback. The controls in the Preview pane (Figure 6-9) define a transfer function which applies to the input on capture. In this case, it affects pass through as well as capture. The power switch icon (Figure 6-8) is an enable/ bypass control. Click it to turn the color grading on or off.

Figure 6-8: Color lookup table controls.
The Reset button resets the transfer function to its default, which passes through each pixel unchanged, and also switches to bypass mode.
Changing any control automatically enables the transfer function, but you can also toggle between Enabled and Bypassed by clicking on the enable/ bypass control.
The Sat parameter is ASC CDL Saturation. A value of 1.0 passes each pixel through unchanged. Values below 1.0 will desaturate, with 0.0 resulting in a monochrome image. Values greater than 1.0 increases saturation. The maximum legal value is 10.0, which produces extreme results.
The Slope, Offset, and Power parameters for each component define a transfer function for that component, as per the ASC CDL specification. Offset ranges from -1 to +1, with a default of 0. Power and Slope range from 0.10 to 10.00, with a default of 1.0.
Each of the numeric controls may be modified in three ways:
■ If the console window is in front, click on a control to select it, and type a new value
■ Click and drag up or down
■ Use the mouse wheel
The capture color correction controls (in the Preview tab) only appear over the preview when the mouse is over the preview. The panel holding the capture color correction controls can be dragged around within the preview pane, allowing you to see any part of the preview while adjusting the controls. To drag it, click on any part of the panel other than one of the buttons or numeric controls.
PREVIEW TAB
The Preview tab (Figure 6-9) lets you preview the video signal being received from the currently selected input in the Input Source menu (Figure 6-3 on page 30).
If you don't see the source video signal
If you have trouble getting the source video signal to appear in the preview frame, make sure the Final Cut Pro Capture window isn't open in the background. If so, the Status area (Figure 6-1 on page 29) will alert you to the fact that the host application is currently capturing or previewing.
The Preview tab and Premiere Pro
When Premiere Pro is running, it takes over the HD Express hardware in regards to previewing. In this situation, the Preview window simply displays

Figure 6-9: Preview tab.
a message saying that previewing is unavailable. When you quit Premiere Pro, the Preview tab operates normally, as described above.
Color grading
See “Color grading” on page 33. You can drag this control panel anywhere you wish on the preview pane.
Brightness, Contrast and Hue
When previewing a Composite or S-Video signal, the Preview tab provides several settings for adjusting the Brightness, Contrast and Hue, as shown in Figure 6-9 below.
AUDIO TAB
The Audio tab (Figure 6-10) provides access to the HD Express's audio features. The HD Express provides 12 channels of audio input and 16 channels (two 8-channel banks) of simultaneous audio output. For a summary of audio bank formats, see “Connect audio inputs and outputs” on page 23.
Sample rate
Choose the audio sample rate (Figure 6-10) for capture or playback. Make sure this setting matches the rate of the audio being captured or played back. Sample rates up to 96 kHz are supported, with the following restriction:
The HDMI input and output are stereo at sample rates above 48000 Hz when playing SD video.

Figure 6-10: Audio tab.
When using the HD Express with Premiere Pro, the sample rate should be set from within Premiere Pro.
Analog input trims
Use the analog input trim controls (Figure 6-10) to apply up to +18 dB of gain or -10 dB of cut to each individual analog input.
Outputs
Use the buttons provided to assign each audio output format to the desired HD Express output channel bank (1-8 or 9-16). You can assign two or more formats to the same bank, in which case the audio output is mirrored (duplicated) on each output format. For S/PDIF digital output, the stereo channels are assigned to either channels 1-2 or 9-10.
Mirroring output banks
To make two or more output banks produce the same audio output, simply assign them to the same output bank (either 1-8 or 9-16).
Disabling output banks
To disable a bank completely, click its Off button.
CHAPTER 7 Adobe Premiere Pro
OVERVIEW
The HD Express serves as a powerful video capture and playback device for Adobe Premiere Pro. Operation is straightforward and follows the general workflow prescribed by Premiere Pro for capture procedures and time line playback.
Familiarity with Premiere Pro 37
Before you launch Premiere Pro 37
Getting started 38
Sequence presets 38
HD Express video settings 39
Video capture.... 40
Playback and monitoring 43
Audio hardware settings.... 44
FAMILIARITY WITH PREMIERE PRO
This chapter assumes that you have a working knowledge of basic Premiere Pro operation.
BEFORE YOU LAUNCH PREMIERE PRO
Before you launch Premiere Pro, be sure to:
- Insert the HD Express software, as explained in chapter 3, “Installing the HD Express Windows Software” (page 15).
■ Install the HD Express hardware and connect your video devices to it as explained in chapter 4, "Installing the HD Express Hardware" (page 17).
■ Power on the HD Express and run the MOTU Video Console to make sure that installation has been successful. If MOTU Video Console launches without any error messages, then Premiere Pro should successfully communicate with the HD Express.
GETTING STARTED
1 Launch Premiere Pro.
2 When the Welcome screen appears, click New Project and choose the desired Capture Compression Codec from the Capture Format menu (Figure 7-1).
3 Click Configure... to access capture parameters of the HD Express (Figure 7-2).

Figure 7-2: MOTU video capture settings.
4 Name the project and click OK.
PLAYBACK SETTINGS
If you are using a progressive 1080 line timeline, click Playback Settings to choose the desired 1080p Playback Format (Figure 7-3). This setting determines whether the video will be played back as progressive (1080p) or progressive segmented frame (1080PsF).

Figure 7-3: Playback settings.
SEQUENCE PRESETS
The HD Express software installer provides the MOTU HD Express factory-supplied sequence presets shown in Figure 7-4. These presets are organized in directories by video format. Each preset is clearly named with a video frame format, raster size and frame rate. Choose the preset that

Figure 7-1: Creating a new project in Premiere Pro.
most closely matches the settings you need. You can adjust settings further using the Settings tab (General tab in 5.0) and Tracks tab.
Custom settings
You can further adjust project settings or even create your own custom sequence presets to suit your workflow. Click the Settings tab (Figure 7-5) to further configure your settings. (This is the General tab in version 5.0.) Always be sure, however, to choose a MOTU PCI video preset from the Editing Mode menu. This ensures that you will be able to play video via the HD Express hardware. For information about other custom settings, consult your Premiere Pro documentation.
HD EXPRESS VIDEO SETTINGS
Once the HD Express hardware has been configured by the Premiere Pro settings you made in the previous section, open the MOTU Video Console application (Figure 6-1 on page 29) to view the HD Express's hardware settings and make any adjustments, if necessary, as explained in the following sections.
Basic hardware settings
Check the three basic hardware settings:
■ "Video format" on page 30
■ "Input Source" on page 30
■ "Capture Clock Source" on page 32
■ "Playback Clock Source" on page 32
Input/capture settings
To access the HD Express's capture settings, click the Setup tab (Figure 6-4 on page 31) and Preview tab (Figure 6-9 on page 34).

Figure 7-4: Sequence presets.
For details on other Capture settings, review chapter 6, "MOTU Video Console" (page 29).
VIDEO CAPTURE
Once you've made the appropriate settings in Premiere Pro and you've reviewed the capture settings in MOTU Video Console, you are ready to capture video from the HD Express:
1 In Premiere Pro, choose Capture from the File menu to open the Capture window (Figure 7-6).
2 Click the Settings tab and click the Edit button (Figure 7-6) to access the Capture settings (Figure 7-7).

Figure 7-7: Capture settings.
3 Choose the desired Capture Compression Codec from the Capture Format menu.
4 Click Configure... to access the capture parameters for the HD Express.
Refer to the following sections for information about the Capture settings (Figure 7-9 on page 42).
5 Click the Logging tab (Figure 7-6) and name the clip (Figure 7-8).
![New Sequence Sequence Presets Settings Trocks Editing Mode: HOTU PCV Video Playback Settings... Timeframe: 24.67 frames/second Video Frame Size: 1280 horizontal 1000Vertical 16x9 Pixel Aspect Ratio: RVCPRO HD (LS) Fields: No Fields [Progressive Scan] Display Format: 36fps Note-Drop-Frame Timercide Audio Sample Rate: 4000 Hz Display Format: Audio Samples Video Previews Preview File Format: P2 Cashmarks Codec: DVCPR6106 1000 MHz Width: 100 px Reset Height: 100 px Maximum Bit Depth Maximum Render Quality Save Preset... Sequence Name: Sequence 0: OK Cancel](/content/2026/05/958905/images/15b61f217b8fbab72706403473ba485a38c6dab108451049f18603566811aa04.jpg)
Figure 7-5: Settings tab.
Be sure to name the clip before you begin capture to avoid potential issues during capture.

Figure 7-8: Be sure to name the clip before you capture.
6 Click the Record button (Figure 7-6) to start capturing.
Capture settings
To access the capture settings, choose File menu> Capture to open the Capture window, click the Settings tab (Figure 7-6 on page 41), then click Configure (Figure 7-7 on page 40). Each setting is explained briefly below.

Figure 7-6: Capture window.

Figure 7-9: Capture settings.
Video format
Choose the desired video format Figure 7-2 on page 38.
Input source
Choose the desired video input on the HD Express from the Input Source menu (Figure 7-9). This is the physical input on the interface that you wish to capture from, and it is the same setting as the Input Source menu in MOTU Video Console (Figure 6-3 on page 30).
Frame rate
Choose the desired video frame rate from the Frame Rate menu (Figure 7-9). Make sure this setting matches your project frame rate.
Audio Sample Rate
From the Audio Sample Rate menu, choose the desired audio sample rate for the captured audio.
Audio Inputs
From the Audio Inputs menu, choose the audio channels that you wish to capture. These audio channels correspond to the audio bank configuration settings in the Audio tab in MOTU Video Console (Figure 6-10 on page 35).
For example, if Input Bank A is set to HDMI, choosing Audio A 1 and A 2 will capture the first two audio channels from HDMI inputs.
The HDMI audio input bank is available only when the Video Input Source is set to HDMI.
Audio Bit Depth
The HD Express supports both 16-bit and 24-bit audio capture and playback. Choose the desired format from the Audio bit depth menu (Figure 7-9).
Audio Monitoring
Audio monitoring menu settings are as follows:
Setting What it does
None No audio patch-through during capture.
Mix to Stereo All audio inputs will be mixed down to outputs 1 and 2. This lets you monitor any inputs being recorded in Premiere Pro on headphones or stereo monitors.
Direct All audio inputs will be routed directly to their corresponding outputs.
Show Settings in Preview
This option will overlay the current video and audio settings in the Capture window.
NOTE: The overlay is for monitoring only and will not be captured with the video signal.
PLAYBACK AND MONITORING
To play back your Premiere Pro project and view it on any monitor or other device connected to the HD Express's video outputs:
1 Choose Edit menu > Preferences > Player Settings.
2 Choose the MOTU HD Express as the Default Player (Figure 7-10).
This allows you to view the Source window on any monitor connected to the HD Express's video outputs.
3 Start playback.

Figure 7-10: Choosing the HD Express as the default player.
Native versus non-native clips
Clips that match the native video format of your Premiere Pro project and don't require any further rendering will play back. Clips that don't match the native video format of your Premiere Pro project will appear in the time line with the red render bar. For example, if you place an HDV clip in the time line, it will appear with a red render bar. In this case, it will likely not play smoothly, unless your computer is fast enough to transcode it in real time during playback (see "Mercury playback engine" below). For smooth playback, render the clip to convert it to the native video format for your project.
Mercury playback engine
The HD Express take full advantage of Premiere Pro's Mercury playback engine. If your system is equipped with a Mercury-enabled video card, you will enjoy industry-leading rendering speeds. Consult your Premiere Pro documentation for full details.
The HD Express does not require any additional configuration or settings to support the Mercury engine. If you enable Mercury as explained in the Premiere Pro documentation, the HD Express will take full advantage of the engine.
AUDIO HARDWARE SETTINGS
Choose MOTU PCI Video ASIO as a Default Audio Device (Edit > Preferences > Audio Hardware) to ensure that audio and video stay in sync during playback (Figure 7-11).

Figure 7-11: Default Audio Device.
Two 8-channel banks of audio
The HD Express provides two 8-channel banks of simultaneous audio input and output: Bank A (channels 1-8) and Bank B (channels 9-16). Use the settings in the Audio tab (Figure 6-10 on page 35) to assign the desired audio formats to each input and output bank.
Audio Output Mapping (Edit > Preferences > Audio Output Mapping) lets you configure the audio output destination. Choose MOTU PCI Video ASIO to view and make changes to fit your workflow (Figure 7-12).
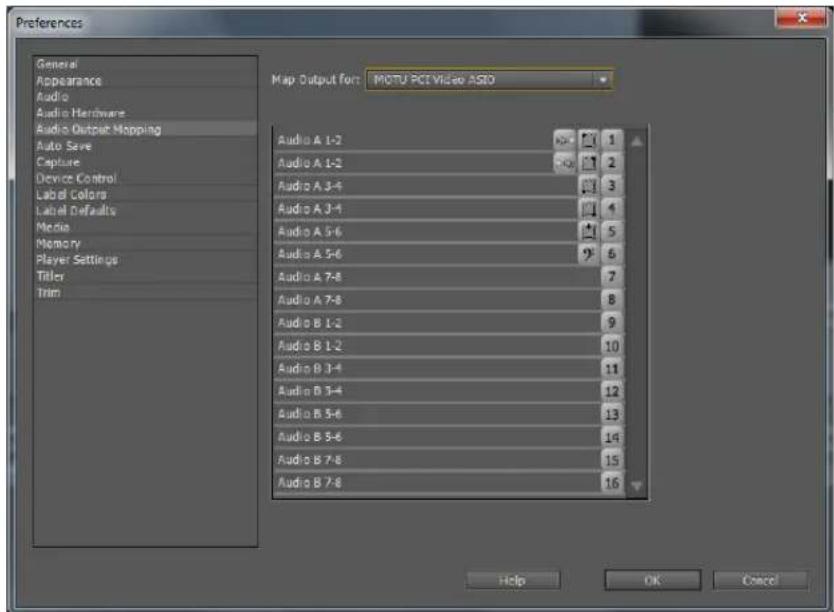
Figure 7-12: Audio Output Mapping.
Part 3
Appendices
APPENDIX A Troubleshooting
USE THE STATUS DISPLAY
Use the Status display in MOTU Video Console (Figure 6-1 on page 29) for help with various issues having to do with capture, playback, sync and other aspects of HD Express operation. MOTU Video Setup is engineered to detect problems and report them in the Status area. Most common issues can be resolved by following the instructions given by the Status display.
FREQUENTLY ASKED QUESTIONS
MOTU Video Console cannot detect the HD Express. Why not?
Is the HD Express connected to the PCIe card adapter installed in a desktop computer? If so, did the HD Express breakout interface get disconnected or powered off while the computer is still powered on? In this case, you need to power off the computer, plug in the interface, power on the interface, then power up the computer. The breakout interface must remain connected and powered on while the computer is running. The HD Express's Auto On mode lets you leave the power switch on, and the interface will power up and power down with your computer. See page 5 for details on Auto On mode.
Connecting or powering gear during operation It is not recommended that you connect, disconnect, or power on/off devices connected to the HD Express while recording or playing back audio. Doing so may cause a brief glitch in the audio.
The HD Express is having trouble genlocking to my video deck.
Is the deck connected to a video output from the HD Express? If so, it could be a clock loop problem, where the deck is trying to resolve to its video input, while the HD Express is trying to resolve to video input from the video deck. See “Master (Internal)” on page 32.
I experience glitching in my video signal when switching between Capture and Playback. See “Clock source when switching between Capture and Playback modes” on page 32.
My HDMI output does not output any video. Make sure the HDMI Format setting is set to HDMI, not DVI.
CUSTOMER SERVICE
We are happy to provide customer service to our registered users. If you haven't already done so, please take a moment to register online at www.motu.com/register, or fill out and mail the registration card included with your HD Express. Doing so entitles you to technical support and notices about new products and software updates.
TECHNICAL SUPPORT
If you are unable, with your dealer's help, to solve problems you encounter with the HD Express system, you may contact our technical support department in one of the following ways:
■ Phone: (617) 576-2760
(Monday through Friday, 9 a.m. to 6 p.m. EST)
■ Web: www.motu.com/support
Please provide the following information to help us solve your problem as quickly as possible:
■ The serial number of the HD Express system. This is printed on a sticker placed on the bottom of the HD Express rack unit. You must be able to supply this number to receive technical support.
■ A brief explanation of the problem, including the exact sequence of actions which cause it, and the contents of any error messages which appear on the screen.
■ The pages in the manual which refer to the parts of the HD Express with which you are having trouble.
■ Windows version information.
We're not able to solve every problem immediately, but a quick call to us may yield a suggestion for a problem which you might otherwise spend hours trying to track down.
If you have features or ideas you would like to see implemented, we'd like to hear from you. Please visit www.motu.com/suggestions or write to the HD Express Development Team, MOTU Inc., 1280 Massachusetts Avenue, Cambridge, MA 02138.
3D LUT 33
480i
component 21
Component Levels 33
Setup option 33
96kHz operation
S/PDIF 23
A
Adobe Premiere Pro (see Premiere Pro)
Analog
audio connectors 23
connectors 6
input trims 36
video connectors 6
Analog inputs/outputs 6
Analog Output Format 32
Apple ProRes 422 9
ASC CDL 33
Audio
analog connections 23
bit depth 42
connections 24
connectors 23
disabling banks 36
embedded 6
features 28
Input Source (Premiere Pro) 42
input trims 36
mirroring outputs 36
monitoring 24, 42
output 36
overview 28
S/PDIF connections 23
sample rate 35, 42
sample rate conversion 23
tab 35
Auto On 5
B
Bit depth (audio) 42
Brightness option 35
C
Cables
PCIe cable length 6
Camcorders
connecting 22, 24
Capture 40
LED (front panel) 5
Capture mode 27, 31
Capture settings (Premiere Pro) 41
CDL 33
Clock source 32
Color Decision List 33
Component 21
analog format options 21
connectors 6
Levels 33
output color format settings 32
RGB 21
YPbPr 21
Composite
connectors 6, 20
example 22
Computer
connecting the HD Express 18
Contrast option 35
Customer support 47
CVBS
connectors 20
D
Default Mode 31
Default Player 43
Direct 42
DLP display
connecting 6
DVD Player
connecting 22
DVI
cable requirements 21
connector 6, 21
output 21
output setting 32
E
EBU N10 33
Embedded audio
HDMI6,21
ExpressCard adapter
connecting to HD Express interface
6
installation 18
power-up/power-down 19
removal 18
F
Field 1/2 options 33
Final Cut Pro
playback settings in HD Express
hardware 31
Frame rate (Premiere Pro) 42
G
Genlock
indicator (video Console software)
29
LED (front panel) 5
LED (video Console software) 31
status (video Console software) 29
H
HD
Analog Output Format 32
component connectors 6
HD Express
basic operation 27
capture mode 27
clock source 32
installing 17
playback mode 27
software installation 15
summary of features 9
HDCP 5
HDMI
DVI output 21
embedded audio 21
format menu 32
HDCP 5
input 5, 21
output 6, 21
PCIe CARD connector 18
Headphone jack 5
Host LED 5
Hue option 35
1
Input
indicator (Video Setup software) 31
source menu 30
Input Source (Capture Clock option) 32
Input Source (Playback Clock option) 32
Inputs
analog 6
trims 36
Installation
hardware 17
precautions 17
sequence presets 15
software 15
Interlace Pause Mode 33
Interlaced Field When Paused options 33
Internal (Playback Clock option) 32
J
Japan (0.0%) option 33
L
LCD display
example 22
Load preset (Premiere Pro) 38
Logging (Premiere Pro) 40, 41
M
Master (Internal) sync setting 32
Mercury engine 43
Mirroring audio banks 36
Mix to Stereo 42
MODE LEDs 5
Monitor
LED (front panel) 5
Monitoring 43
Premiere Pro 43
Monitors
connecting 24
MOTU Sequence presets
installing 15
MOTU Video Console 27, 29-36, 47
Audio tab 35
Genlock indicator 29
Genlock LED 31
Genlock status 29
input indicator 31
input source menu 30
installing 15
Preview tab 34
Setup tab 31
status area 31,47
video format menu 30
N
NTSC 20
Component Levels 33
0
Offset (color grading) 33
Outputs
analog 6
P
Packing list 13
PAL 20
Panasonic MII option 21, 33
Patch-thru (audio) 42
PCIe
cable length 6
CARD connector 6
PCIe card
installation 17
power-up/power-down 19
Phones 5
Plasma display
connecting 6
example 22
Playback 27
only mode 27
Premiere Pro 43
Playback mode 31
Power (color grading) 33
Power supply 6
Power switch 5,19
Auto On 5
Premiere Pro 37-44
audio 28
audio connections for 28
Audio Input Source 42
capture 27, 40, 41
capture settings 39
clock source during playback 32
frame rate 42
monitoring 43
pausing video 33
playback 27, 43
preparation 37
previewing 34
sequence presets 15, 38
supported video formats 10
video input 42
Preview tab 34
ProRes 422 9
R
Registration 13
Reset (3D LUT) 33
Reset to Defaults 33
RGB 21,32
S
S/PDIF 6
connections 23
Sample rate 35, 42
Sample rate conversion 23
Sat (saturation color grading setting) 33
SD
Analog Output Format settings 32
camcorder 22, 24
capture connectors 5
component 21
component connectors 6
Component Output Color Mode settings 21
composite 22
monitor 22
video deck 22
Sequence presets
installing 15
Setup tab 31
Show Settings in Preview 42
Single Field option 33
Slope (color grading) 33
SMPTE/EBU N10 21
Software installation 15
Sony
Beta Japan option 21, 33
Beta option 21, 33
Speakers
connecting 24
SRC 23
Status 47
S-vid
connectors 20
connectors (front panel) 5
connectors (rear panel) 6
Synchronization
sample rate conversion 23
System requirements
minimum 13
recommended computer 13
T
Technical support 47
Trim (audio input) 36
Troubleshooting 47-48
basic concepts 27
playback (default player) 43
video glitching 32
U
USA (7.5%) option 33
V
VHS deck
connecting 22
Video
capture mode 27
connections 20, 22
connectors (front panel) 5
console application 29, 36
format menu 30
input (choosing) 28
modes 27
playback mode 27
source menu 21, 28
status LEDs 5
Video input (Premiere Pro) 42
W
Windows
system requirements 13
X
XLR
analog 6
Y
Y/C connectors 20
Y/R-Y/B 21
YCbCr 21
YPbPr 21,32
YUV 21

- User's Guide for Windows
- About the Mark of the Unicorn License Agreement and Limited Warranty on Software
- Reminder of the terms of your license
- Update Policy
- Copyright Notice
- Limited Warranty on Hardware
- Contents
- Part 1: Getting Started
- Part 2: Using the HD Express
- Part 3: Appendices
- SAFETY PRECAUTIONS AND ELECTRICAL REQUIREMENTS
- IMPORTANT SAFEGUARDS
- ENVIRONMENT
- TO REDUCE THE RISK OF ELECTRICAL SHOCK OR FIRE
- AC INPUT
- Part 1
- Getting Started
- Quick Reference: HD Express Front Panel
- Quick Reference: HD Express Rear Panel
- Quick Reference: MOTU Video Console
- CHAPTER 1 About the HD Express
- OVERVIEW
- FEATURE HIGHLIGHTS
- VIDEO I/O
- VIDEO FORMATS
- AUDIO I/O
- INCLUDED SOFTWARE AND COMPATIBILITY
- CHAPTER 2 Packing List and System Requirements
- PACKING LIST
- WINDOWS SYSTEM REQUIREMENTS
- PLEASE REGISTER TODAY!
- CHAPTER 3 Installing the HD Express Windows Software
- IMPORTANT! INSTALL THE HD EXPRESS SOFTWARE FIRST!
- If Windows asks you to locate the drivers
- INSTALLING THE HD EXPRESS SOFTWARE
- CHAPTER 4 Installing the HD Express Hardware
- DID YOU RUN THE SOFTWARE INSTALLER FIRST?
- PRECAUTIONS BEFORE YOU BEGIN
- INSTALLING THE PCI EXPRESS CARD
- Removing the ExpressCard adapter
- CONNECT THE HD EXPRESS TO YOUR COMPUTER
- POWER-UP/POWER-DOWN SEQUENCE
- CONNECT VIDEO INPUTS AND OUTPUTS
- Support for both NTSC and PAL
- S-video (Y/C) input
- S-video (Y/C) output
- Composite (CVBS) input
- Composite (CVBS) output
- Component
- SD (480i) component formats
- HDMI
- DVI output
- EXAMPLE HD EXPRESS VIDEO CONNECTIONS
- CONNECT AUDIO INPUTS AND OUTPUTS
- Analog audio I/O
- Stereo S/PDIF digital I/O
- Sample rate conversion (SRC)
- EXAMPLE HD EXPRESS AUDIO CONNECTIONS
- Part 2
- Using the HD Express
- CHAPTER 5 HD Express Basics
- TWO MODES
- CAPTURE
- PLAYBACK (MONITOR)
- ONE SOURCE TO MANY OUTPUTS
- Choosing the current video source
- Audio I/O and monitoring
- CHAPTER 6 MOTU Video Console
- VIDEO FORMAT
- INPUT SOURCE
- STATUS AREA
- INPUT STATUS
- GENLOCK STATUS
- SETUP TAB
- Default Mode
- Capture Clock Source
- Master (Internal)
- Playback Clock Source
- Internal
- Clock source when switching between Capture and Playback modes
- Capture Playback
- HDMI format
- Analog Output Format
- Reset to Defaults
- Interlace Pause Mode
- 480i Setup
- 480i Component Levels
- Color grading
- PREVIEW TAB
- If you don't see the source video signal
- The Preview tab and Premiere Pro
- Brightness, Contrast and Hue
- AUDIO TAB
- Sample rate
- Analog input trims
- Outputs
- Mirroring output banks
- Disabling output banks
- CHAPTER 7 Adobe Premiere Pro
- FAMILIARITY WITH PREMIERE PRO
- BEFORE YOU LAUNCH PREMIERE PRO
- PLAYBACK SETTINGS
- SEQUENCE PRESETS
- Custom settings
- HD EXPRESS VIDEO SETTINGS
- Basic hardware settings
- Input/capture settings
- VIDEO CAPTURE
- Capture settings
- Frame rate
- Audio Sample Rate
- Audio Inputs
- Audio Bit Depth
- Audio Monitoring
- Show Settings in Preview
- PLAYBACK AND MONITORING
- Native versus non-native clips
- Mercury playback engine
- AUDIO HARDWARE SETTINGS
- Two 8-channel banks of audio
- Part 3
- Appendices
- APPENDIX A Troubleshooting
- USE THE STATUS DISPLAY
- FREQUENTLY ASKED QUESTIONS
- MOTU Video Console cannot detect the HD Express. Why not?
- The HD Express is having trouble genlocking to my video deck.
- CUSTOMER SERVICE
- TECHNICAL SUPPORT
- A
- B
- C
- D
- E
- F
- G
- H
- 1
- J
- L
- M
- N
- 0
- P
- R
- S
- T
- U
- V
- W
- X
- Y
Brand : MOTU
Model : HD Express
Category : Audio Interface