
CS-6 IW - Speaker Phase Technology - Free user manual and instructions
Find the device manual for free CS-6 IW Phase Technology in PDF.


| Product Type | In-wall speaker |
| Model | CS-6 IW |
| Brand | Phase Technology |
| Driver Size | 6.5 inches |
| Impedance | 8 ohms |
| Power Handling (RMS) | 100 watts |
| Power Handling (Peak) | 150 watts |
| Frequency Response | 45 Hz - 20 kHz |
| Sensitivity | 90 dB |
| Mounting Depth | 3.5 inches |
| Cutout Dimensions | 7.5 x 11 inches |
| Overall Dimensions (H x W) | 8.5 x 12 inches |
| Weight | 4.5 lbs |
| Grille Material | Perforated metal |
| Tweeter Type | 1-inch soft dome |
| Woofer Material | Polypropylene cone |
| Crossover Frequency | 3 kHz |
| Enclosure Type | Infinite baffle (open back) |
| Installation | Flush mount with dogleg clamps |
| Recommended Amplifier Power | 20 - 150 watts |
| Cleaning | Wipe with dry cloth; do not use liquids |
| Safety | Turn off power before installation; avoid contact with electrical wires |
| Spare Parts Availability | Grilles and drivers available from authorized dealers |
| Repairability | Replaceable drivers and crossover |
Frequently Asked Questions - CS-6 IW Phase Technology
User questions about CS-6 IW Phase Technology
0 question about this device. Answer the ones you know or ask your own.
Ask a new question about this device
Download the instructions for your Speaker in PDF format for free! Find your manual CS-6 IW - Phase Technology and take your electronic device back in hand. On this page are published all the documents necessary for the use of your device. CS-6 IW by Phase Technology.
USER MANUAL CS-6 IW Phase Technology
Thank you for purchasing Phase Technology® CS Professional speakers. These speakers offer exceptional performance and power handling in flush-mounted designs. Each model features extra-high sensitivity to assure concert volume levels, even with low-powered distribution systems.
The CS Series is engineered to handle the dynamic range of multi-channel audio technologies like Dolby Digital and DTS as well as traditional two-channel sources. These in-ceiling speakers deliver high-end tonal balance and a clear distinction between musical notes.
The line comprises two-way models including 6.5" and 8" polypropylene cones with NBR ^™ surrounds for lasting performance, indoors or out, and dual voice coil, dual tweeter configurations permit one CS Professional series speaker to deliver stereo sound to any room.
Regardless of application, serious audiophile listening or home theater, we recommend that you take the time to read this manual thoroughly before connecting speakers to your amplifier or receiver. In the highly unlikely event that you should experience a problem with set-up or operation, please contact one of our authorized dealers for assistance, or contact us directly.
Phase Technology Corporation
8005 W. 110th St., Suite 208
Overland Park, KS 66210
855.663.5600 (Domestic)
+1.913.663.5600 (International)
913.663.3200 (Fax)
| SAFETY | INSTRUCTIONS | |
| INSTALLATION GUIDELINES | 3 | |
| SPEAKER | INSTALLATION | |
| CARING FOR YOUR SPEAKER | 4 | |
| MAINTENANCE AND SERVICE | 4 | |
| WARRANTY | 4 | |
| SPECIFICATIONS | ||
[SAFETY INSTRUCTIONS]
![Phase Technology CS-6 IW - [SAFETY INSTRUCTIONS] - 1](/content/2026/05/958896/images/666b833897b456d689c26581f145aebaa14b125c4f124914edd19f030b85e19c.jpg)
CAUTION
RISK OF ELECTRIC SHOCK DO NOT OPEN

CAUTION: To reduce the risk of electric shock, do not remove cover (or back). No user-serviceable parts inside. Refer servicing to qualified service personnel.
Explanation of Graphical Symbols

The lightning flash with arrowhead symbol, within an equilateral triangle, is intended to alert you to the presence of un-insulated “dangerous voltage: within the product’s enclosure that may be off sufficient magnitude to constitute a risk of electric shock to persons.

The exclamation point within an equilateral triangle is intended to alert you to the presence of important operating and maintenance (servicing) instructions in the literature accompanying the appliance.
- Read Instructions - All the safety and operating instructions should be read before the appliance is operated.
- Retain Instructions - The safety and operating instructions should be retained for future reference.
- Heed Warnings - All warnings on the appliance and in the operating instructions should be adhered to.
- Follow Instructions - All operating and other instructions should be followed.
- Water and Moisture - The appliance should not be used near water - for example, near a bathtub, washbowl, kitchen sink, laundry tub, in a wet basement, or near a swimming pool, etc.
- Carts and Stands - The appliance should be used only with a cart or stand that is recommended by the manufacturer. PORTABLE CART WARNING

- Wall or Ceiling Mounting - The appliance should be mounted to a wall or ceiling only as recommended by the manufacturer.
- Ventilation - The appliance should be situated so that its location or position does not interfere with its proper ventilation. For example, the appliance should not be situated on a bed, sofa, rug, or similar surface that may block the ventilation openings; or placed in a built-in installation, such as a bookcase or cabinet
that may impede the flow of air through the ventilation openings.
- Heat - The appliance should be situated away from heat sources such as radiators, stoves, or other appliances that produce heat.
- Power Source - The appliance should be connected to a power supply only of the type described in the operating instructions or as marked on the appliance.
- Power Cord Protection - Power supply cords should be routed so that they are not likely to be walked on or pinched by items placed up or against them, paying particular attention to cords at plugs, convenience receptacles, and the point where they exit from the appliance.
- Cleaning - The appliance should be cleaned only as recommended by the manufacturer.
- Nonuse Periods - The power cord of the appliance should be unplugged from the outlet when left unused for a long period of time.
- Object and Liquid Entry - Care should be taken so that neither objects fall nor liquids spill into the inside of the appliance.
- Damage Requiring Service - The application should be serviced by qualified service personnel when:
a. the power supply cord or the plug has been damaged,
b. objects have fallen onto or liquid has been spilled into the appliance,
c. the appliance has been exposed to rain,
d. the appliance does not appear to operate normally or exhibits a marked change in performance, or
e. the appliance has been dropped or the cabinet damaged.
- Servicing - The user should not attempt to service the appliance beyond those means described in the operating instructions. All other servicing should be referred to qualified service personnel.
- Grounding or Polarization - Precautions should be taken so that the grounding or polarization means of an appliance is not defeated.
APPLICABLE FOR USA, CANADA OR WHERE APPROVED FOR USAGE
CAUTION: TO PREVENT ELECTRIC SHOCK, MATCH WIDE BLADE PLUG TO WIDE SLOT, INSERT FULLY.
ATTENTION: POUR EVITER LES CHOCS ELECTRIQUES, INTRODUIRE LA LAME LA PLUS LARGE DE LA FICHE DANS LA BORNE CORRESPONDANTE DE LA PRESE ET POUSSER JUSQU AU FOND.
![[FIG. 1.1]](/content/2026/05/958896/images/0bcb4360ab4c1fa25f8ef22c68e20a31df7f4185e63bae26882449bf83eefc51.jpg)
![[FIG. 1.2]](/content/2026/05/958896/images/1045d291737bcc3810af5e1fa3efc29607742393f03135fdd40f5075e5745e8e.jpg)

natural_image
Circular mechanical component diagram with concentric rings and mounting holes, labeled [FIG. 2] (no text or symbols on the diagram itself)![[FIG. 3] RED/POSITIVE BLACK/NEGATIVE](/content/2026/05/958896/images/7188e65a546e94d114023970dec7e3b01c0ae508daca3d30362bf7dda1e66903.jpg)
![[FIG. 4] STEREO POINT-SOURCE CONFIGURATION](/content/2026/05/958896/images/df681a330cefc7a86ea6d6b4116e10f9b02ad80a286c6fd1a64c22235dd65919.jpg)
![[FIG. 5] SURROUND OR MONO CONFIGURATION](/content/2026/05/958896/images/7dbb3557f4e13f996ae54415196fa3d7399ea7347470ee94d7057830c45ad8bb.jpg)

natural_image
Technical diagram of a circular mechanical component with concentric rings and a central hub, labeled [FIG. 6] (no text or symbols on the diagram itself)[INSTALLATION GUIDELINES]
For proper connection and therefore full enjoyment of your new Phase Technology® speakers, we encourage you to read this owners' manual thoroughly, even if you are very familiar with installing speakers. Speaker placement is very subjective. Placement follows the guidelines for the developers of in-ceiling speakers, yet is also guided by personal preferences. The proper spacing, location and adjustment of in-ceiling speakers are critical for complete enjoyment of your new speakers. This manual covers these topics thoroughly. Choose the appropriate mounting location for each speaker.
NOTE: When deciding upon a location, consider the following:
- Be certain your speaker wires can be run to or are accessible from these locations.
- Make certain the wall or ceiling material is sturdy enough to support the weight and vibration of the speakers.
- It is recommended that our pre-construction rough-in brackets (part number RB21 for CS-6R, CS-6R DVT & CS-6R Point, AC-CS-8R-PCB for CS-8R and RB25 for CS-6R IW) be used whenever possible in new construction.
- Be certain the area behind the speaker is free of obstacles such as wall studs, electrical wiring, pipes, etc.
• Each speaker should be positioned properly, relative to the listening area for good coverage. - Audio performance and room-to-room isolation will be improved if there is some fiberglass insulation placed loosely behind the speaker.
[SPEAKER INSTALLATION]
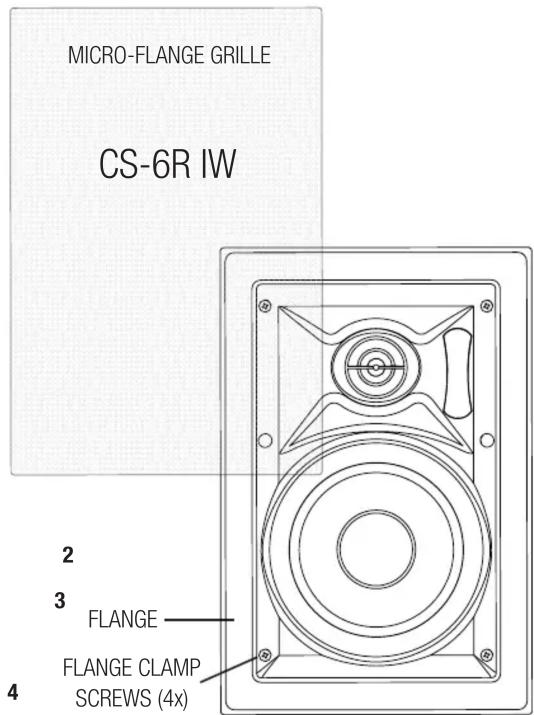
STEP 1: Using the supplied cutout template, carefully mark the area to be cut out. Using a drywall knife or saw, cut a hole in the drywall and prepare the speaker wires for connection to the speaker terminals. (Fig. 1.1 for CS-6R, CS-6R DVT, CS-6R Point & CS-8R - Fig.1.2 for CS-6R IW).
STEP 2: Remove the grille from the speaker assembly (Fig. 2). If it is necessary to paint the speaker grille to match the ceiling, we recommend that you do so with several light coats of matching spray paint.
STEP 3: Connect the speaker wires to the input terminals on the rear of the speaker, making sure no loose strands are exposed (Fig. 3).
STEP 4: NOTE: For the CS-6R DVT there are several hookup options. For stereo point-source operation, connect the speaker wires to the left AND right channel input terminals on the rear of the speaker (Fig. 4). Make sure no loose strands are exposed. Please make sure to check your hookup polarity for proper operation.
For Surround/Mono: The CS-6R DVT may also be used as a surround speaker for home theater applications. For the SURROUND or MONO mode of operation, connect your speaker wire to either the left OR right channel input as above (Fig. 5). Next, connect 2 jumper wires from this same input terminal to the corresponding input terminals on the opposite side of the speaker. Connect the red positive terminal to opposite red terminal and black negative terminal to opposite black terminal.
This speaker may be set to either the bipole OR dipole mode of operation using the selector switch on the rear panel.
Please note that the speaker is a 4 ohm speaker in this configuration.
STEP 5: Carefully position the speaker in the cutout hole. Using a Phillips screwdriver, rotate the four clamps to secure the speaker to the drywall (Fig. 6). CAUTION: DO NOT OVER-TIGHTEN.
Note: The CS6R Point has an angled baffle which allows the speaker to be pointed toward the listening position. Rotate the baffle in the cutout until it is pointing in the desired direction prior to tightening the clamping screws.
STEP 6: Carefully replace the grille by pressing it into the gap between the flange and the baffle. Enjoy!
[CARING FOR YOUR PHASE TECHNOLOGY SPEAKER]
All Phase Technology® speakers are finished with a high degree of craftsmanship in either hand polished paint or vinyl laminates. We recommend using a lint-free rag with a small amount of glass cleaner to maintain the long-lasting beauty of the finish. Avoid products containing silicones, oils, oil derivatives, or solvents. Use a damp cloth on enclosures finished in vinyl laminates.
[MAINTENANCE AND SERVICE]
Because of Phase Technology's uncompromising quality control programs, it's unlikely that your speakers will ever need service if connected and used as outlined in this Owners' Manual. In the unlikely event that a problem does occur, please contact your Phase Technology® dealer. Your dealer has the necessary factory-authorized parts and trained technicians to quickly restore your speaker to its original performance specifications.
[WARRANTY]
LIMITED WARRANTY: Phase Technology® warrants its loudspeakers to be free from defects in material and workmanship for a period of ten (10) years for speaker product, limited lifetime for CI speakers, and three (3) years for the electronic components to the original purchaser. Purchase must be made from an authorized Phase Technology® dealer.
This warranty does not cover service or parts to repair damage caused by misuse, abuse, damage while in transit, alterations, unauthorized repairs, failure to follow instructions, fire, flood or any other cause beyond the reasonable control of Phase Technology®. Defects in speaker cabinets or grilles must be brought to the attention of your dealer immediately after purchase. This warranty will be void if the products' serial number has been altered or removed.
Should your Phase Technology ^® product require service, please call the MSE Audio ^® customer service department for a return authorization. All merchandise returned to Phase Technology ^® without prior authorization will be refused. For your return authorization number, please call 855.663.5600 or email sales@mseaudio.com.
[SPECIFICATIONS]
CS-6R CS-6R DVT CS-8R CS-6R Point CS-6R IW
| Description: 6.5" Coax In-Ceiling w/ Micro-Flange Grille | 6.5" Coax Dual Voice Coil w/ Micro-Flange Grille | 8" Coax In-Ceiling w/ Micro-Flange Grille | 6.5" Coax In-Ceiling w/ Micro-Flange Grille | 6.5" Dual Voice Coil w/ Micro-Flange Grille |
| Nominal Impedance: 8Ω 8Ω 8Ω 8Ω 8Ω | ||||
| Sensitivity: 87 dB 87 dB 87 dB 87 dB | ||||
| Frequency Response: 50 Hz - 20 kHz 50 Hz - 20 kHz 42 Hz - 20 kHz 50 Hz - 20 kHz 50 Hz - 20 kHz | ||||
| Recommended Power: 5 - 100 Watts 5 - 100 Watts 5 - 120 Watts 5 - 100 Watts 5 - 100 Watts | ||||
| Tweeter(s): .75" Variable Axis Soft Dome | (2) .75" Soft Dome | .75" Variable Axis Soft Dome | .75" Soft Dome | .75" Soft Dome |
| Midrange: N/A | N/A | N/A | N/A | N/A |
| Woofer(s): 6.5" Polypropylene w/ NBR Surround | 6.5" Polypropylene w/ NBR Surround | 8" Polypropylene w/ NBR Surround | 6.5" Polypropylene w/ NBR Surround | 6.5" Polypropylene w/ NBR Surround |
| Inputs: Metal Push Terminals | Metal Push Terminals | Metal Push Terminals | Metal Push Terminals | Metal Push Terminals |
| Grille: White Powder-Coated Galvanized Magnetic Micro-Flange (paintable) | White Powder-Coated Galvanized Magnetic Micro-Flange (paintable) | White Powder-Coated Galvanized Magnetic Micro-Flange (paintable) | White Powder-Coated Galvanized Magnetic Micro-Flange (paintable) | White Powder-Coated Galvanized Magnetic Micro-Flange (paintable) |
| Dimensions: 9.1" Diameter | 9.1" Diameter | 10.625" Diameter | 9.3" Diameter | 12.4" H x 8.5" W |
| Cutout Dimensions: 8.062" | 8.062" | 9.625" | 8.2" | 10.6" H x 6.6" W |
| Mounting Depth: 3.375" | 3" | 3.375" | 4.8" | 3.4" |
| Weight: 2 lbs | 2.5 lbs | 4.75 lbs | 3 lbs | 3.5 lbs |
| Included Accessories: N/A | N/A | N/A | N/A | N/A |
| Optional Accessories: Pre-Construction Bracket (RB21) | Pre-Construction Bracket (RB21) | Pre-Construction Bracket (RB22) | Pre-Construction Bracket (RB21) | Pre-Construction Bracket (RB25) |
Copyright © 2018 MS Electronics, LLC. All rights reserved. MSE Audio, Phase Technology and PhaseTech are registered trademarks and
"Speakers for your Life" is a trademark of MSE Audio, Overland Park, Kansas USA. Phase Technology is part of MSE Audi®. www.phasetech.com.
MSE AUDIO® [◇ INDUCTION DYNAMICS* PHASE ROCKUSTICS SolidDrive SOUND TUBE SOUNDS PHERE]
www.mseaudio.com | 8005 W. 110th Street | Suite 208 | Overland Park, KS 66210 | p:913.663.5600 | f:913.663.3200


Brand : Phase Technology
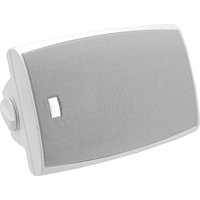
Model : CS-6 IW
Category : Speaker