
Regency - Electric guitar effect pedal Radial Engineering - Free user manual and instructions
Find the device manual for free Regency Radial Engineering in PDF.


| Product Type | Pre-Drive Overdrive Pedal with Boost and Effects Loop |
| Circuit Type | Class A Discrete |
| Power Supply | 9VDC (center negative), adapter not included |
| Current Draw | ~20 mA (estimated) |
| Input | 1/4" TS instrument input |
| Output | 1/4" TS high-Z output |
| Effects Loop | 1/4" TS send and return jacks |
| Controls | Drive, Tone, Level, Boost Gain (potentiometers); Low-Mid 3-position switch |
| Footswitches | Pre-Drive (latching, engages overdrive), Boost (latching, engages boost and effects loop) |
| Gain (Boost) | Variable from 0dB to +23dB |
| Gain (Overdrive) | Variable from 6dB to +43dB |
| Frequency Response | Adjustable via tone and low-mid controls |
| Indicator LED | Illuminates when power is on (via footswitch) |
| Power Cable Lock | Integrated cable clamp with hex key |
| Dimensions (approx.) | 4.8" x 2.8" x 2.0" (122 x 71 x 51 mm) |
| Weight (approx.) | 0.6 lb (270 g) |
| Warranty | 3-year transferable limited warranty |
| Compliance | RoHS, WEEE (estimated) |
Frequently Asked Questions - Regency Radial Engineering
User questions about Regency Radial Engineering
0 question about this device. Answer the ones you know or ask your own.
Ask a new question about this device
Download the instructions for your Electric guitar effect pedal in PDF format for free! Find your manual Regency - Radial Engineering and take your electronic device back in hand. On this page are published all the documents necessary for the use of your device. Regency by Radial Engineering.
USER MANUAL Regency Radial Engineering
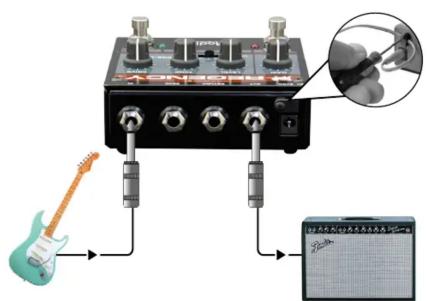
- 9VDC POWER: Connection for 9 volt (center negative) power adapter. Includes a cable clamp to prevent accidental power disconnection.
- OUTPUT: High-Z 14 " connection to your amplifier.
- EFX LOOP: Send & receive 14 " jacks used to connect pedals. The effects loop is engaged by depressing the Boost footswitch and used to add effects when soloing.
- IN: Standard 14 " instrument input used to connect your guitar.
- LEVEL: Used to set the output volume level for the Pre-Drive.
- TONE: Brightens or darkens the Pre-Drive circuit to suit your guitar and amp setup.
- DRIVE: Sets the amount of distortion in the Pre-Drive from very slight grit to full-on overdrive.
- LOW-MID: 3-position switch used to tailor the bottom end of the circuit to adapt the tone to your guitar and amp setup.
- PRE-DRIVE FOOTSWITCH: Used to activate the Pre-Drive circuit.
- BOOST FOOTSWITCH: Footswitch activates the power booster and the effects loop.
- BOOST GAIN: Variable Class-A power booster - 100% discrete with up to +18dB of clean gain.

True to the Music
Radial Regency Specifications
Circuit Type ....Class A discrete
Frequency Response ....Adjustable via tone and low-mid controls
Gain - Boost ...... Variable from 0dB to +23dB
Gain - Overdrive .......Variable from 8dB to +43dB
Footswitch - Drive ....Latching switch engages overdrive
Footswitch - Boost ....Latching switch engages boost and effects loop
Effects Loop .....Send & return jacks for additional pedals before boost stage
Power 9VDC, adapter not included
RADIAL ENGINEERING 3 YEAR TRANSFERABLE LIMITED WARRANTY
RADIAL ENGINEERING LTD. ("Radial") warrants this product to be free from defects in material and workmanship and will remedy any such defects free of charge according to the terms of this warranty. Radial will repair or replace (at its option) any defective component(s) of this product (excluding finish and wear and tear on components under normal use) for a period of three (3) years from the original date of purchase. In the event that a particular product is no longer available. Radial reserves the right to replace the product with a similar product of equal or greater value. In the unlikely event that a defect is uncovered, please call 800-939-1001 or email service@radialeng.com to obtain an RA number (Return Authorization number) before the 3 year warranty period expires. The product must be returned prepaid in the original shipping container (or equivalent) to Radial or to an authorized Radial repair center and you must assume the risk of loss or damage. A copy of the original invoice showing date of purchase and the dealer name must accompany any request for work to be performed under this limited and transferable warranty. This warranty shall not apply if the product has been damaged due to abuse, misuse, misapplication, accident or as a result of service or modification by any other than an authorized Radial repair center.
THERE ARE NO EXPRESSED WARRANTIES OTHER THAN THOSE ON THE FACE HEREOF AND DESCRIBED ABOVE. NO WARRANTIES WHETHER EXPRESSED OR IMPLIED, INCLUDING BUT NOT LIMITED TO, ANY IMPLIED WARRANTIES OF MERCHANTABILITY OR FITNESS FOR A PARTICULAR PURPOSE SHALL EXTEND BEYOND THE RESPECTIVE WARRANTY PERIOD DESCRIBED ABOVE OF THREE YEARS. RADIAL SHALL NOT BE RESPONSIBLE OR LIABLE FOR ANY SPECIAL, INCIDENTAL OR CONSEQUENTIAL DAMAGES OR LOSS ARISING FROM THE USE OF THIS PRODUCT. THIS WARRANTY GIVES YOU SPECIFIC LEGAL RIGHTS, AND YOU MAY ALSO HAVE OTHER RIGHTS, WHICH MAY VARY DEPENDING ON WHERE YOU LIVE AND WHERE THE PRODUCT WAS PURCHASED.
Radial® engineering
True to the Music
REGENCY™
PRE-OVERDRIVE PEDAL

USER GUIDE
Radial Engineering Ltd.
1588 Kebet Way, Port Coquitlam BC V3C 5M5
tel: 800-939-1001 • fax: 604-942-1010
info@radialeng.com • www.radialeng.com Made in Canada
Regency™ User Guide - Part# R870 1013 00 / 09-2016 All rights reserved.
Specifications and appearance are subject to change without notice.
OVERVIEW
Thank you for purchasing the Regency Pre-Drive pedal. This is without a doubt one of the most exciting pedals to hit the market in years. No, it is not exciting for what it does; it is actually exciting for what it doesn't do. And that is, jumble up your tone when you are already rocking with your amp.
This may sound a little weird at first, but once you get plugged in, all of this will make plenty of sense. Now, before you start pulling off Hendrix and Clapton solos, please take a minute to read the manual. It is short and concise and will give you quick pointers on how to use the features. If, after you have read it you find yourself asking for more, please visit the FAQ page on our web site as this is where we post questions from other users and updates. If you are still not satisfied, feel free to send us an email at info@radialeng.com and we will do our best to reply in short order.
Now get ready to rock and roll like a king!
MAKING CONNECTIONS
Before you make any connections, it is good practice to turn your guitar amp down or off. This will avoid plug-in or turn-on transients that could damage or shorten the life of your speaker. There is no power switch on the Regency, as soon as you connect a 9V supply, it will spring to life. The Regency does not come with a power supply as most players will power it from a multi-pedal power brick. Be careful to use a standard Boss® style adaptor and check to make sure the polarity is correct (center-pin negative).
To start, set all of the dials to 12 o'clock and the low-mid selector to the left position. Make sure you are properly powered by depressing one of the two footswitches. The LED will illuminate to let you know power is on. You can secure the power cable to the Regency to prevent accidental disconnection by unscrewing the cable lock using a hex key, passing the power cable through the cavity and then retightening.

flowchart
graph TD
    A["PRE-DRIVE"] --> B["F/X LOOP"]
    B --> C["Class "A" POWER BOOSTER"]
    C --> D["OUTPUT"]
    E["DRIVE TONE LEVEL"] --> A
    F["LOW-MD"] --> A
    G["GAIN"] --> C
    H["TRUE BYPASS SWITCHING"] --> I["TRUE BYPASS SWITCHING"]
    I --> J["OUTPUT"]
THE PRE-DRIVE
Turn the Regency LEVEL down to 9 o'clock. Next, turn on your amp and turn up the volume. Depress the Pre-Drive footswitch. Start by testing the level to get a sense of the volume range that is available. You are now set to play with the tone and drive settings. Turning the tone control clockwise will increase the high end content. Keep in mind that all of these interact, so adding drive will increase the output volume.
THE LOW-MID
Depending on your guitar, your amp and style of play, you will want to adjust the low-mid to suit. There are three settings that basically change the bottom end structure. This is then re-addressed using the tone control. Try each of the three settings while rotating the tone control. At this point it is all about finding the type of setting that best suits your playing.
THE BOOSTER
Set the Boost level to 7 o'clock. Turn off the Pre-Drive. Depress the BOOST footswitch and listen as you increase the gain. This section can be used to push your amp harder or to scream out solos. When you activate the boost, you can also insert the effects loop so that it automatically turns on or off following the boost.
THE EFFECTS LOOP
To add even more excitement to the performance, a built-in effects-loop allows a series of pedals such as a delay or chorus to be added to the signal chain when the BOOST footswitch is engaged. This speeds the transition from rhythm to lead when soloing. The effects loop is a straight through loop that employs standard 14 " guitar cable connections.
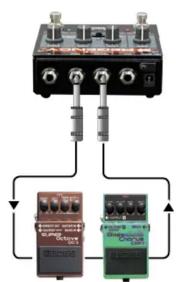
You can also use the effects loop in other creative ways:
1) Connecting a tuner
You can connect a tuner to the effects SEND jack and when the boost is engaged, it will shut off the signal going to the amp for quiet on-stage tuning

flowchart
graph LR
    A["Audio Player"] --> B["Frequency Analyzer"]
    B --> C["Output Stage"]
    C --> D["Guitar"]
2) Connecting an amp
You can also connect a second guitar amp using the effects send; however as this output is not isolated, you may experience a ground loop. To minimize the noise, make sure both amps are connected to the same electrical circuit using a power bar. Make sure both amps have a proper U-ground attached for safety.

flowchart
graph LR
    A["Input Audio"] --> B["Add to Record"]
    B --> C["Output"]
    C --> D["Green Electric Guitar"]
    D --> B
3) Connecting a second guitar
You can connect a second guitar to the Regency by using the effects RETURN jack. This will bypass the DRIVE circuit and feed directly into the power BOOST when activated.


Brand : Radial Engineering
Model : Regency
Category : Electric guitar effect pedal