
Nitro 7Q - Mobile Phone Maxwest - Free user manual and instructions
Find the device manual for free Nitro 7Q Maxwest in PDF.


| Product Type | Mobile Phone |
| Brand | Maxwest |
| Model | Nitro 7Q |
| Display Size | 5.7 inches |
| Resolution | HD+ (1440 x 720 pixels) |
| Processor | Quad-core 1.3 GHz |
| RAM | 2 GB |
| Internal Storage | 16 GB |
| Expandable Storage | MicroSD up to 128 GB |
| Operating System | Android 8.1 (Oreo) |
| Rear Camera | 8 MP with LED flash |
| Front Camera | 5 MP |
| Battery | 3000 mAh, removable |
| Dimensions | 152 x 72 x 8.5 mm |
| Weight | 150 g |
| SIM Type | Dual SIM (Micro-SIM) |
| Network | 4G LTE, 3G, 2G |
| Connectivity | Wi-Fi 802.11 b/g/n, Bluetooth 4.0, GPS |
| Ports | Micro-USB, 3.5mm headphone jack |
| Sensors | Accelerometer, Proximity, Light |
| Maintenance & Cleaning | Wipe with dry cloth; avoid water and solvents |
| Safety | Use original charger; do not expose to heat |
| Spare Parts & Repairability | Battery, screen, and back cover replaceable by authorized service |
Frequently Asked Questions - Nitro 7Q Maxwest
User questions about Nitro 7Q Maxwest
0 question about this device. Answer the ones you know or ask your own.
Ask a new question about this device
Download the instructions for your Mobile Phone in PDF format for free! Find your manual Nitro 7Q - Maxwest and take your electronic device back in hand. On this page are published all the documents necessary for the use of your device. Nitro 7Q by Maxwest.
USER MANUAL Nitro 7Q Maxwest
User Manual
Content
Content....2
1 Introduction....4
1.1 Announcements....4
1.2 Safety Instruction 4
1.3 Abbreviation/Terminology....5
2 Nitro 7Q Introduction....6
2.1 Nitro 7Q Operation and Preparation....6
2.2 Nitro 7Q Status and Reminder 6
3 Quick Start Guide....7
3.1 Keys Function 7
3.2 Startup and Shutdown....7
3.3 Open and Close of the Screen 7
3.4 Usage of Touch Screen....8
3.5 Home Page 9
3.6 Visit Application Procedures....13
3.7 USB Connection ....14
3.8 Typing words....15
3.9 Operation Technique....16
3.10 Quick Setting....17
4 Basic Setting 18
4.1 Network and Internet....18
4.2 Bluetooth....25
4.3 Apps & notification....27
4.4 Battery....29
4.5 Display....30
4.6 Sound 34
4.7 Storage 37
4.8 Security&location 40
4.9 Users & accounts 42
4.10 Accessibility....43
4.11 System....44
5 Multi-Media....53
5.1 Music....53
5.2 Photo Gallery 54
5.3 Camera....55
5.4 FM Radio 55
6 Communication Function....57
6.1 Phone....57
6.2 Text Message....57
6.3 Contact List....58
7 Internet....59
7.1 Browser....59
7.2 Email....60
8 other characteristics....62
8.1 New gesture navigation....62
8.2 PIP function....63
8.3 Accessibility Menu 64
8.4 Dark mode....66
8.5 New screenshot shortcuts....66
9 Other Application Procedures 67
9.1 Clock....67
9.2 Calculator....67
9.3 File Manager 68
10 Recorder....70
11 Installation of Procedures....70
11.1 Installation....70
11.2 Uninstall....71
12 Troubles Shooting....71
1 Introduction
1.1 Announcements
Preventive maintenance
- Please always keep the Tablet dry. To avoid the device short trouble, corrosion fault and electric short, please prevent the device, battery and charger from water and moisture, and don't operate the device or charger by wet hand.
- To avoid failure of device, battery and charger, please prevent the device, battery, charger from violent shock or shake.
● To avoid failure of device, battery and charger, please prevent the device, battery, charger of all over heating or too cold circumstance
● Never shock, throw, prod the tablet, or drop, extrude, bend the tablet. - Never disassemble the device and accessories arbitrarily, otherwise the device and accessories are not in our company warranty scope.
1.2 Safety Instruction
Before the operation of the tablet, please read this chapter and teach your kids about these information. For further details, please refer to the safety instructions and announcement.
● Never use the tablet when driving car, in order to ensure safe driving.
- In the medical area, please abide by related rules and regulations. Please shut down the tablet when it is near to the medical area.
- To avoid the wireless signal to interrupt the plane-controlled signal, please shut down the tablet or using airplane mode when you are boarding a flight.
- To avoid electronic equipment failure, please shut down the tablet in the vicinage of high-accuracy electronic equipments.
- Please don't disassemble the tablet and accessories. Only authorized agent has access to service the tablet.
- Please keep the tablet far away from magnetic equipments, the radiation of tablet may erase the data stored in the magnetic equipments.
- Never use the tablet in the vicinage of high temperature, inflammable gas (gas station).
- Protect the tablet and accessories from kids reach scope, and avoid the kids to use the tablet without parents' supervision.
- Please comply with related rules and regulations, and respect others' privacy and legal rights while using the tablet.
- Please strictly adhere to related instructions in the manual when using USB cable to ensure the safety of the tablet or PC.
- Never use the tablet in bathroom or other environment, and please protect the tablet from liquid wash or wet.
1.3 Abbreviation/Terminology
| Abbreviation/Terminology | Full Name Description | |
| MID | Mobile Internet Device | Mobile Internet Terminal |
| WIFI Wireless Fidelity | Base on IEEE 802.11b\g\nstandard wireless LAN | |
| T F TransFlash | Alternative name Micro SD,super miniature memory card | |
2 Nitro 7Q Introduction
2.1 Nitro 7Q Operation and Preparation
Battery Charging
If this navigator is first used, please use AC adaptor to fully charge it.
- Apply the power adaptor to charge for tablet.
2.2 Nitro 7Q Status and Reminder
Reminder icons
When some remind message appears in your reminder window, please click column and slip the screen to open the reminder list. Choose the menu you need, and confirm the information. Then you can close the reminder window through clicking the column to slide up. Please refer to below status icons:
 | New email |  | Airplane Mode on |
| USB connected | USB debugging connected | ||
| Return button |  | Downloading | |
| Swipe up to show recently used apps | Home button | ||
| Current electric volume. |  | WIFI connected, internet is available |
Reminder board
Reminder icons will work while receiving emails, WIFI is open, you can open the reminder board to view the detailed information.
Open the reminder board
When the reminder column shows new reminder icon, please hold the column and slip down your finger, then the reminder board is opened.
3 Quick Start Guide
3.1 Keys Function
Keys Function Description:
| Power button | Short press to sleep/wake up, long press to startup and shutdown. |
| Volume + (up) increase the volume | |
| Volume - (down) decrease the volume | |
| HOME button ( home ) | Click it in any interface will return to main interface. |
| Back button ( back ) | click it in any interface will return to previous menu |
| Menu button | This button will display in menu interface. |
| Setting button | Swipe up to show recently used apps; you can switch between the last two applications |
3.2 Startup and Shutdown
Startup
Long press POWER key for three seconds, you can enter into startup picture. The system enters into screen lock status, please unlock it.
Shutdown
- Long press POWER, it will popup shutdown window.
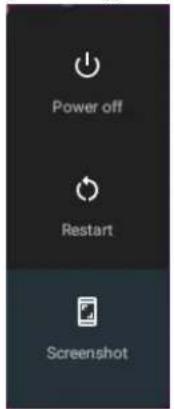
- Shutdown window contains power off mode, restart mode and screenshot mode three options.
- Click power off is the last step.
3.3 Open and Close of the Screen
Screen will be closed on its own when no operation happens.
-
Screen will be closed on its own if no operation happens for some time to save battery power
-
When screen is open, press POWER key, the screen will be closed immediately.
Open the screen when it is closed.
If the screen is closed, short press POWER to open the screen. The screen will be locked open it, it will show the picture as below picture, upward slide unlock the screen.

Picture 3.3-1
3.4 Usage of Touch Screen
Tablet operating methods
There are below methods to view the main screen, menu and application procedure in your Tablet.
Click
When you want to use the screen keyboard typing or choose application in the main interface, you only need to touch it by your finger.
Press on
If you want to open some item(textbox or the link in the webpage), or shortcut and main procedure move, you can press on this item.
Quickly slide or slide indicates
Quickly slide or slide indicates make quick vertical or horizon movement by finger.
Pull
Before you pull, you need to hold the it with strength until you pull it into the position you want.
Rotate
For most pictures, you only need to rotate the tablet sidewise to change the screen direction from horizon to vertical. For instance, when you are typing words, and watching movies.
3.5 Home Page
Main interface as below picture 3.5-1, long press the blank and it will popup windows to set wallpaper, folder, widgets, and shortcut.

The extended home page
The home page can be extended beyond the wideness of screen to provide more space, which you can put new-added shortcuts and widgets. Click the blank space in home page then slide right or left to extend to the right or left of the screen. In the home page, there are two extended pictures, as Picture 3.5-2.
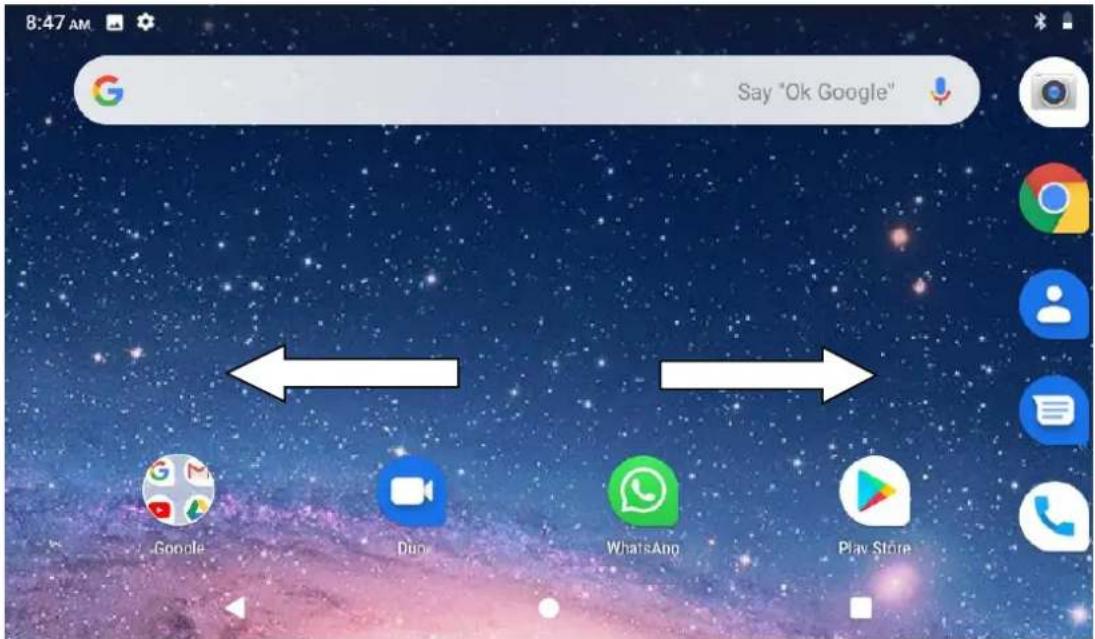
Picture 3.5-2
The shortcut icons management in desktop application.
Create folder icon in desktop
- Drag the icons need to be put together on one icon(can also overlay several icons)as Picture 3.5-3.

Picture 3.5-3
- Then click the overlaid icons, the applications can be folded, as Picture 3.5-4.
Click the unnamed folder in the black box, it will popup the hidden keyboard, the folder name can be renamed (this is similar with Apple IOS system), the icons position can be changed through long press.

Picture 3.5-4
- Long press to enter the home screen settings, as Picture 3.5-5. you can turn on the notification dots feature, A small circle will appear in the corner of the app icon to let users know which specific apps have new messages, and the long-pressed app will bring up a preview window for viewing messages. The circle's color also changes as the icon's color changes, such as On lock screen, Allow notification dots, Default notification sound, Do Not Disturb, Figure 3.5-6 shows the display of notification dots after it is started.
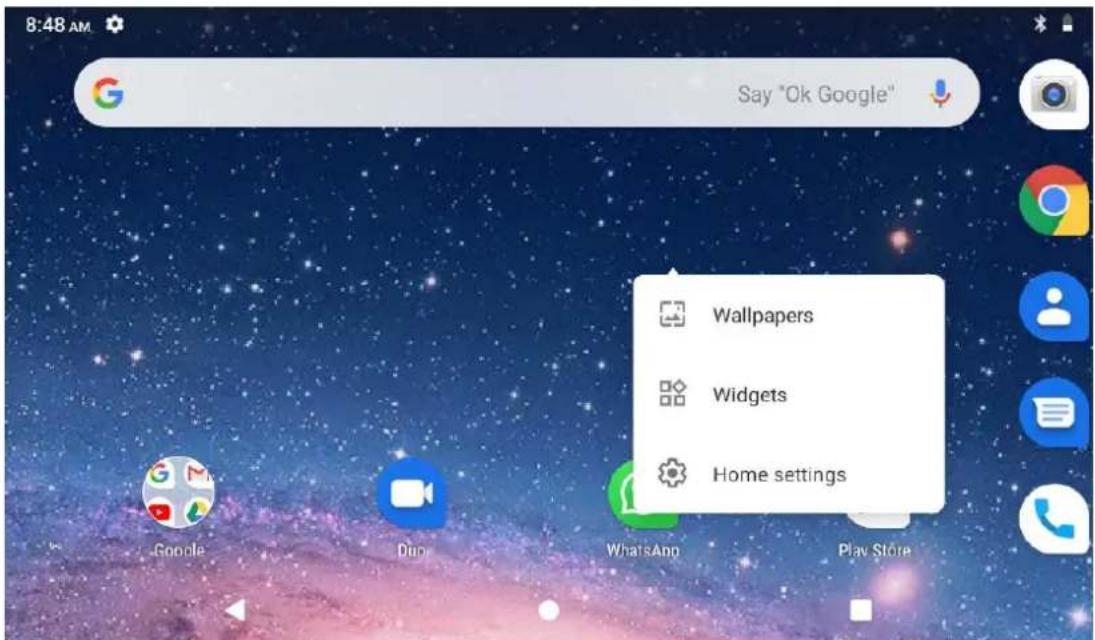
Picture 3.5-5

Picture 3.5-6
Remove the icons in desktop
- Long press the icons need to be remove, then on the right above of the screen, it
will appear ✗s.
- Drag the icon to the above of the remove icon, till the icon become red, then move your finger to delete the icon.
Change the wallpaper of desktop
- In home page, long press any blank space in main screen, it will popup a window to change the wallpaper.
- Click the gallery or wallpaper gallery to select the wallpaper.
3.6 Visit Application Procedures

Click in right top of Picture 3.5-1, enter into main interface as Picture 3.6-1, choose the application procedure you want to visit.

PinnedShortcuts
If you press an application software, you can pop-up the sub menu, and then you can use this way to use some functions of the application quickly as Picture 3.6-2

Picture 3.6-2
3.7 USB Connection
Tablet storage configuration
Before transmitting documents, you have to conduct storage configuration for your tablet:
- Connect the tablet and computer by USB cable, the reminder column will show the remind information.
- Open the reminder board; please view the tablet status and reminder to learn how to open the board.
- In the reminder board, click the "USB for file transfer", it will as below Picture 3.7-1, then click "File transfers".
- Now the USB is connected successfully.
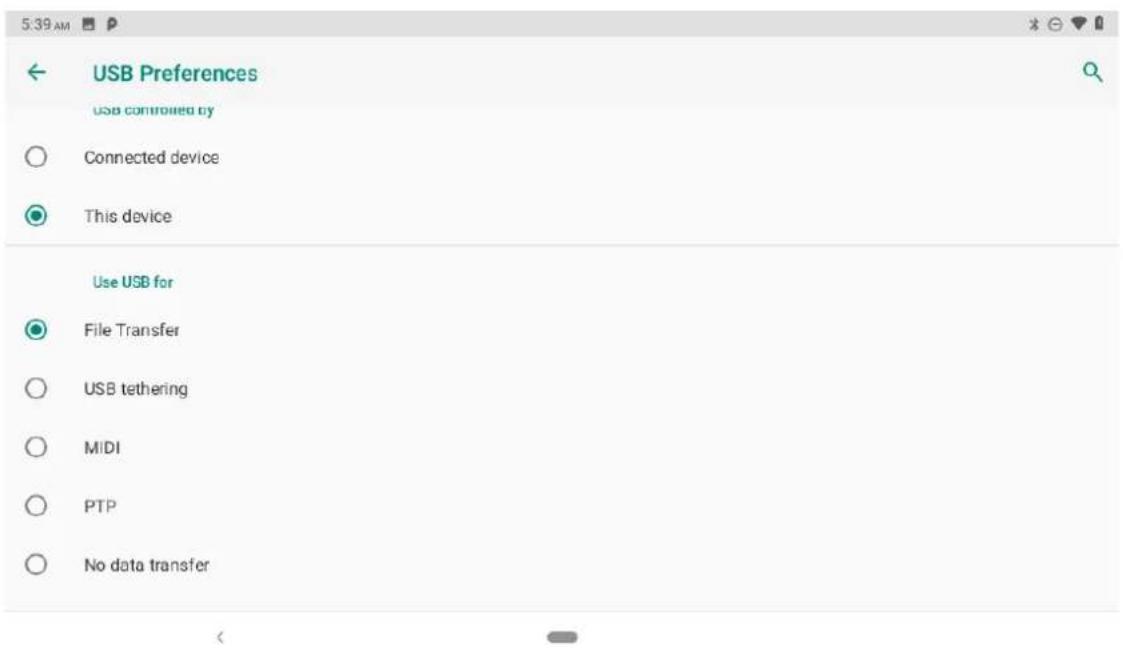
Picture 3.7-1
Copy the document into memory card
- Connect the Tablet to computer with USB cable.
- As Tablet storage configuration, it is connected with computer successfully.
- Open the "My computer" in your computer, check the items in "MTP devices".
- Copy the documents you need into "MTP devices".
- After copying finishes, unplug the USB can.
3.8 Typing words
Use the screen keyboard
When you start the procedure or choose the words or numbers edition, it will show the screen keyboard. The keyboard contains below typing options:
- Android keyboard
Choose the typing method you want
- Click Setting procedure application.
- Click Language and Keyboard.
- In the text setting area will reveal all the installed words-typing methods in your Tablet.
- Tick the typing method you want.
Use and switch of input method

Picture 3.8-1
| 1 | switch the capital and small letter |
| 2 | switch the mode of words input |
| 3 | click to insert the space |
| 4 | click input to execute |
| 5 | delete the character in the left of cursor, click and hold to delete all the characters in the left on the cursor. |
3.9 Operation Technique
Enter widgets interface
In the application interface, click widgets on the above of screen, or slide the screen, it will switch into widgets interface. Long press any widget to create its shortcut, then you can enter into the application through the shortcut icon.
Create application shortcut icons in the desktop
In the application interface or widgets interface, long press any icon to switch into desktop automatically, drag and hold the icon, you can move to any position in the desktop.
Remind: If the target position has no space, the widget won't be add in the main screen.
3.10 Quick Setting
Swipe-down gesture from the top of the screen, there are nine shortcuts icons, such as Wi-Fi, Bluetooth, Auto-rotate, and so on. In the full Quick Settings list you can also tap the edit button at the bottom right to rearrange the tiles or replace them with others, as Picture 3.10-1. The optional extras list is pretty minimal: Just Hotspot, Data saver and Invert colors. But developers are now able to create custom Quick Settings tiles for their apps, which will definitely make things a lot more interesting in the coming mouths.
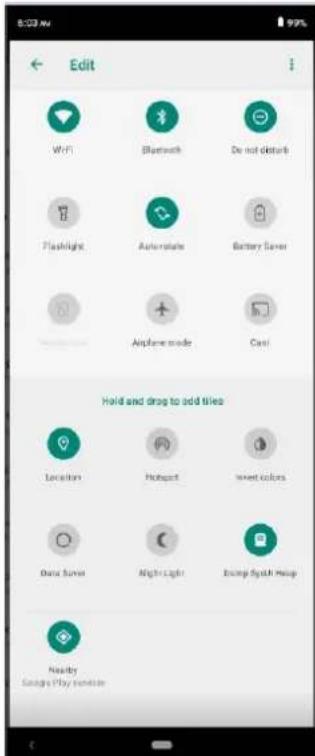
Picture 3.10-1
Swipe-down gesture from the top of the screen, Long press push message to see a switch, operate it to open and close the future of this app so all notifications as Picture 3.10-2
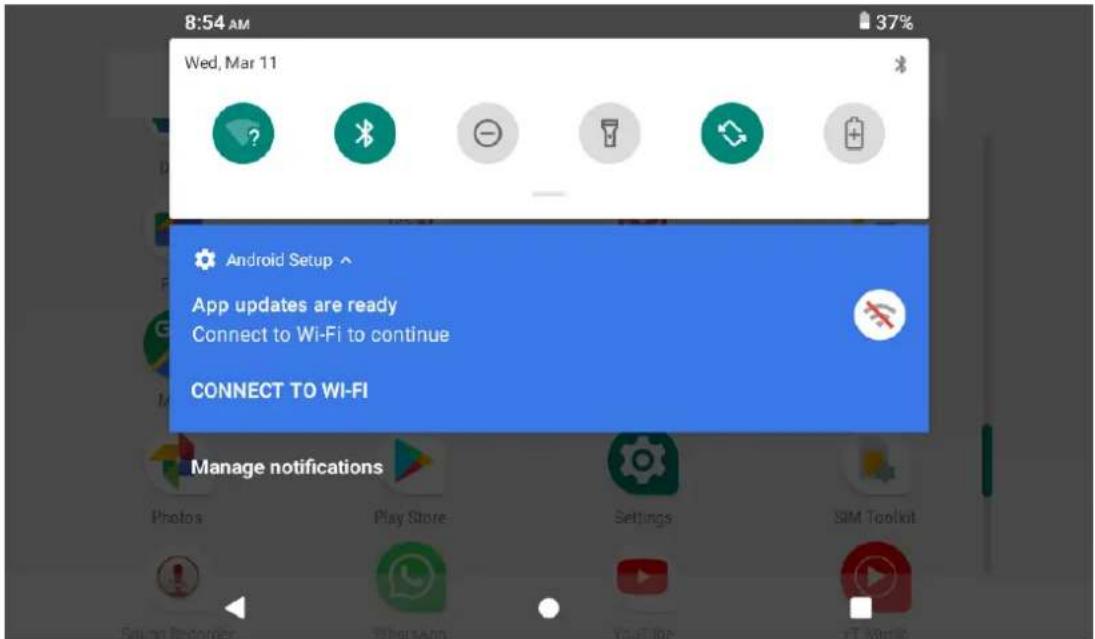
Picture 3.10-2
4 Basic Setting
4.1 Network and Internet
Search 搜索框
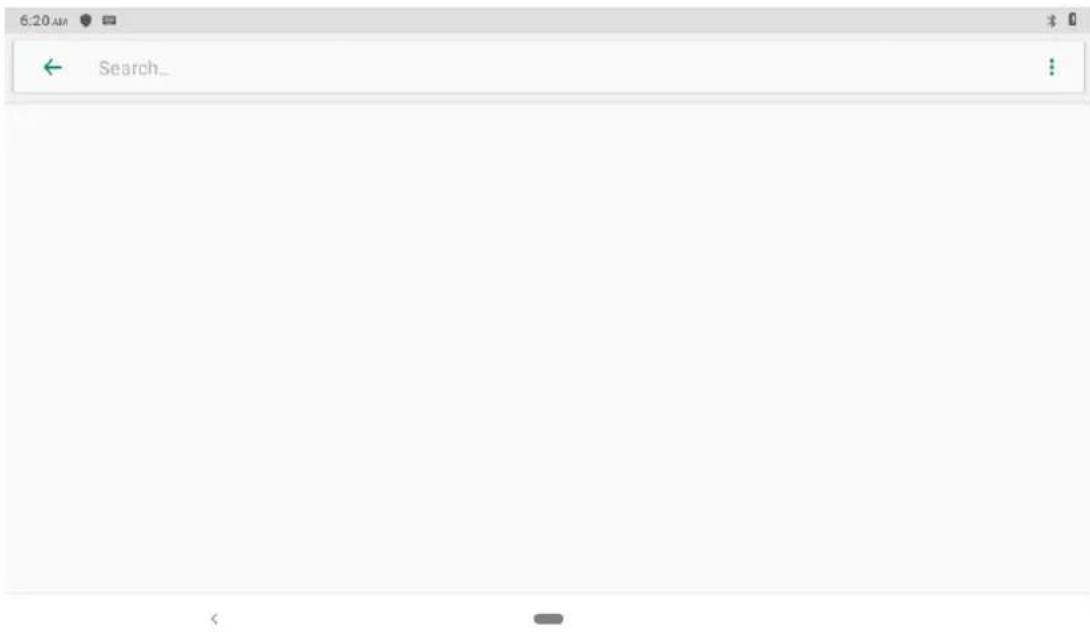
Click icon in right top of Picture, as Picture 4.1-1, You can search for what you want.
Picture 4.1-1
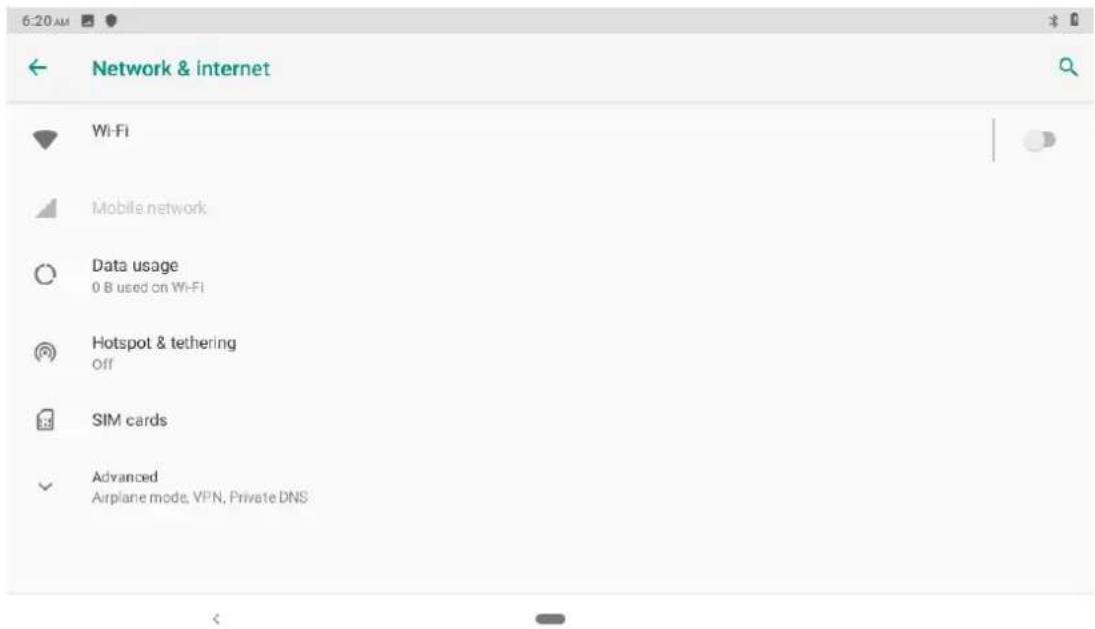
You can search for what you want as Picture 4.1-2

Picture 4.1-2
4.1.1. Connect Wi-Fi
(1) In the main menu or interface, choose setting application procedure.
(2)Click WLAN, open wifi, Tablet will automatically search the available Wifi wireless internet.
As Picture 4.1-3
(3) Choose the Wi-Fi internet you want to connect, if it has password, it will popup the password window, enter password, click connect.
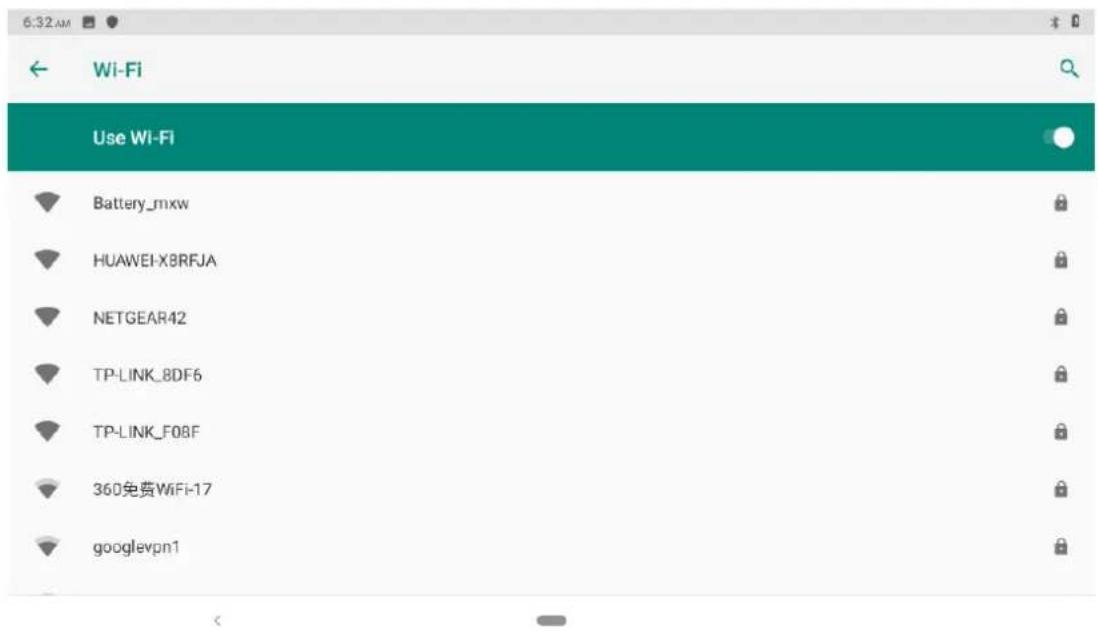
Picture 4.1-3
1.Add Network
1) Click Add network icon in right top, as Picture 4.1-4

Picture 4.1-4
2) Input network SSID, the wireless network name, click save.
3) Click user name already saved, click connect to use network, as Picture 4.1-5

Picture 4.1-5
2. Network Notice
If you open Network Notice, when WIFI signal appears, the right bottom will remind you available WLAN network, as Picture 4.1-3
4.1-2 Mobile Networks
- Access Point Name(APN)
Choose access points name (APN), choose SIM card you need to connect,
Choose connect type
Remark: (CMWAP transmitters data through GPRS, the webpage it visit belongs to wap webpage, and CMNET support www browse mobile phone network, it can also log in webpage in computer. And the charges are also different.)
2.Network
Click Automatically select networks, choose SIM card you need to connect, system will search available GSM and WCDMA network as Picture 4.1-6
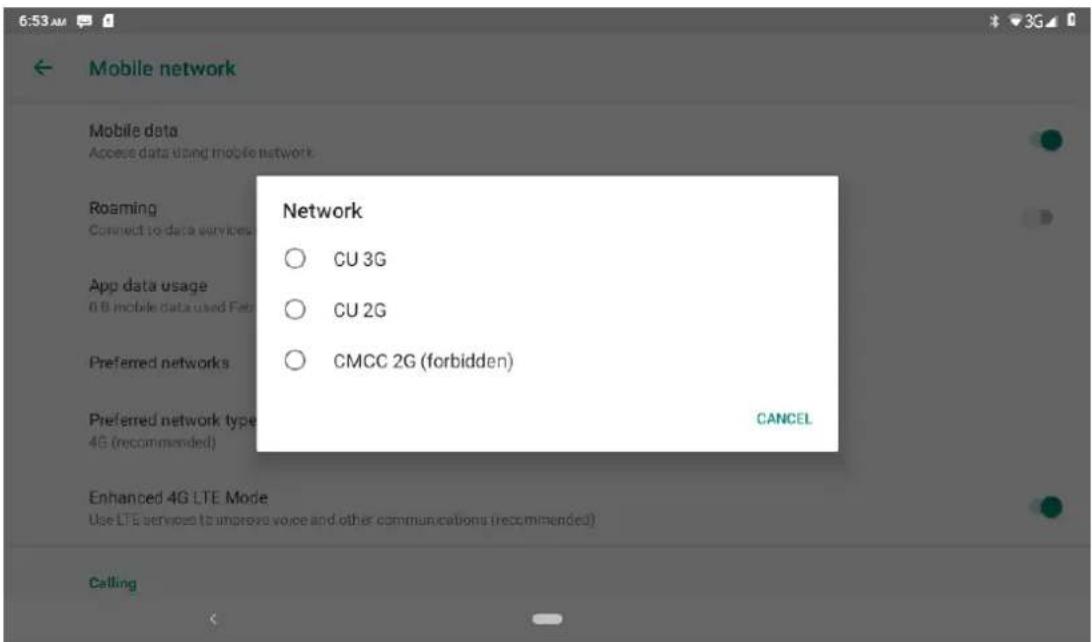
Picture 4.1-6
3. GPRS data prior mode
After Open GPRS data prior mode, systems will priority choose your network.
4.1.3 Data Usage
Check SIM card data usage, as Picture 4.1-7
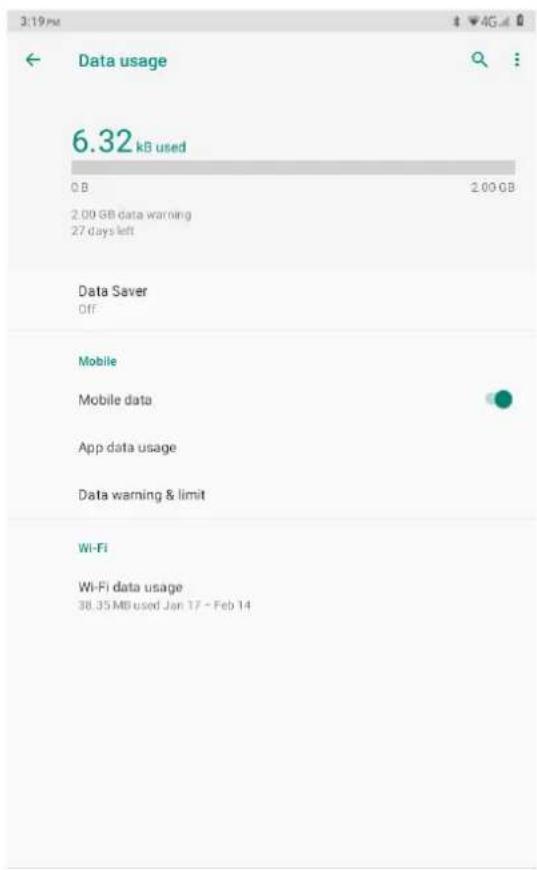
Picture 4.1-7
Check WIFI data usage
Slide on the data usage page to find "Wi-Fi data usage" and click it, as Picture 4.1-8
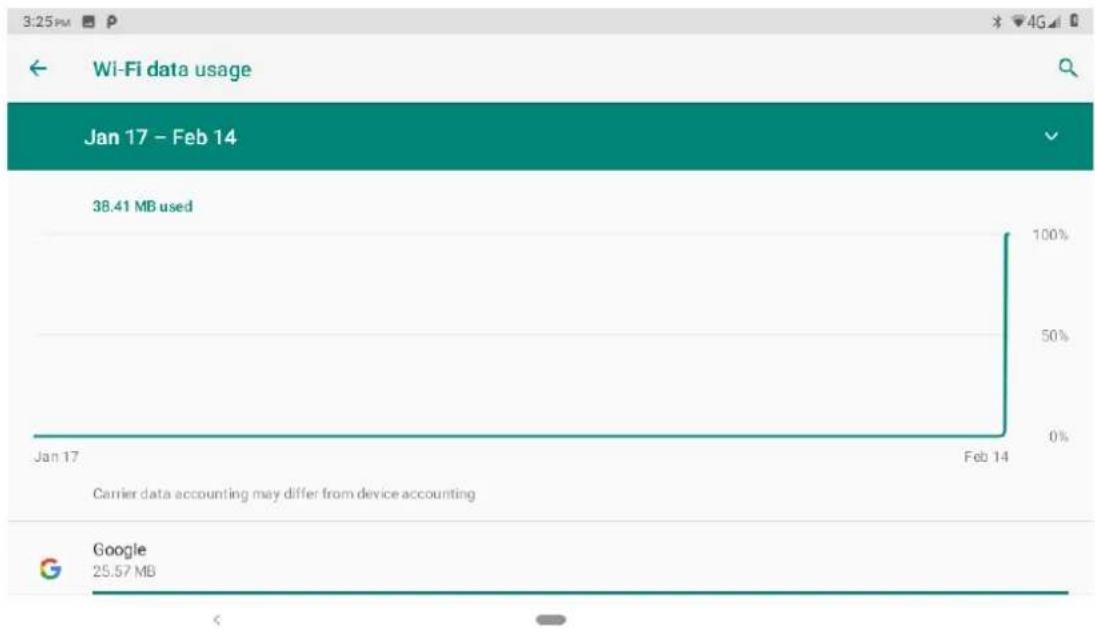
Picture 4.1-8
4.1-4 Network sharing and portable hotspots
Portable WI-FI hotspots
- Click setting application in main menu.
- Click more when wifi is well connected, open network share and portable hotspot
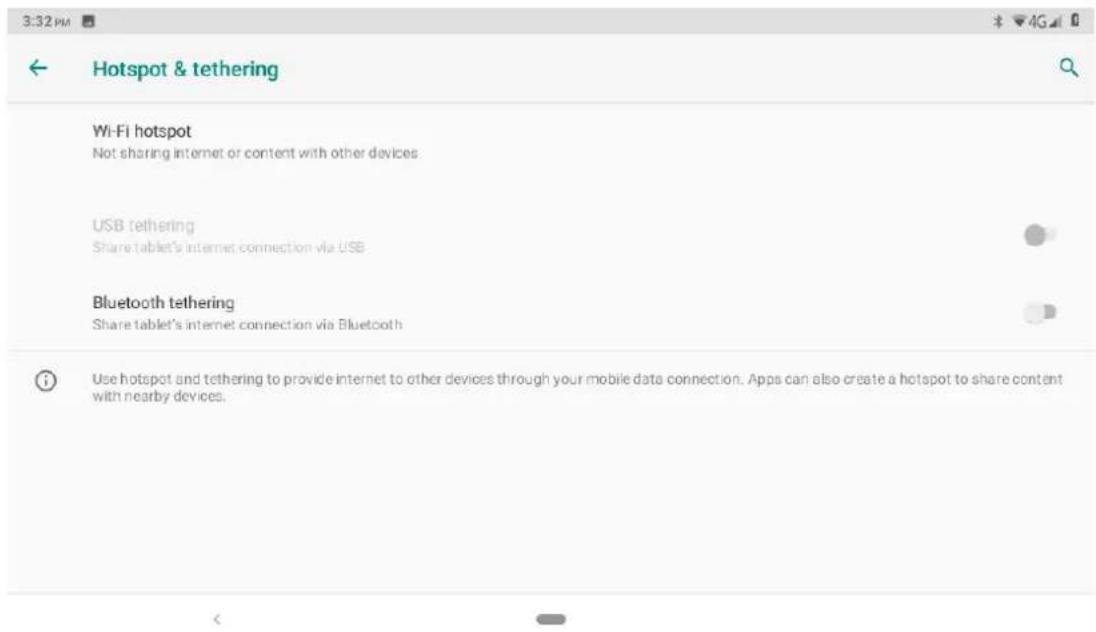
Picture 4.1-9
- Click keep WI-FI hotspots on, choose open time.
- Return to previous menu, open portable WLAN hotspots, click Set up WI-FI hotspots
as Picture 4.1-10
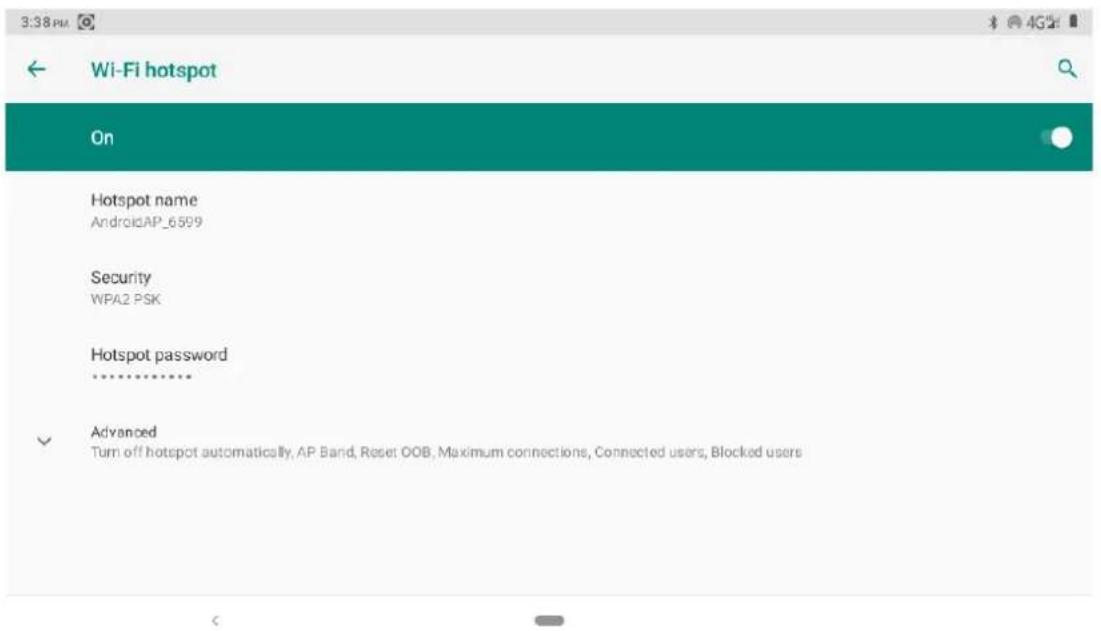
Picture 4.1-10
- Set passwords you want to, password should be more than 8 numbers.
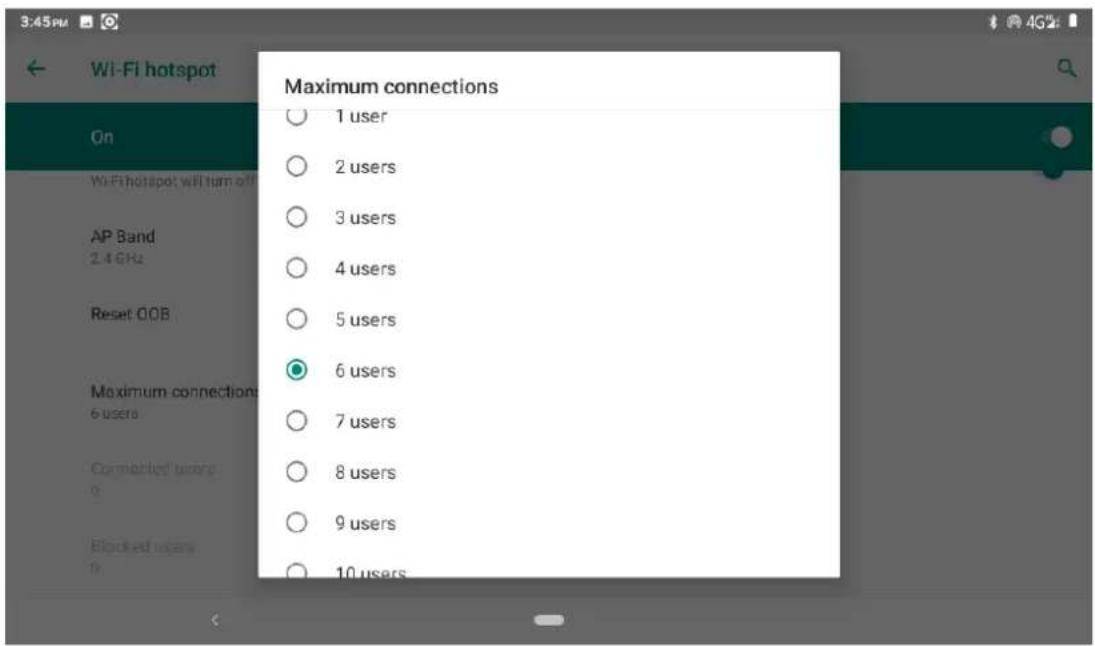
- Set Maximum connections, such as, 1 user, 2 users, 3 users, 4 users, 5 users, 6 users, 7 users, 8 users, 9 users, 10 users
4.1-5 VPN
Open VPN, click add VPN network, as Picture 4.1-11. Input name and server address, then save.
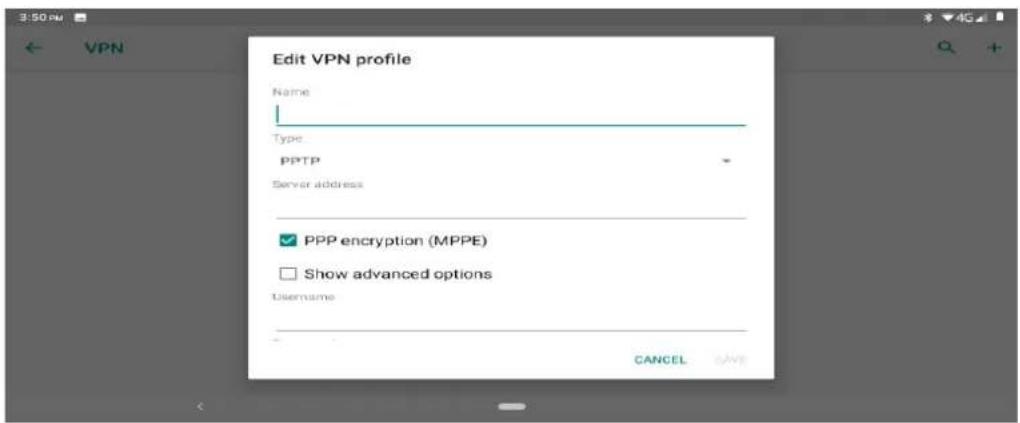
Picture 4.1-11
Click VPN, as Picture 4.1-12, input VPN user name and password, click connect.
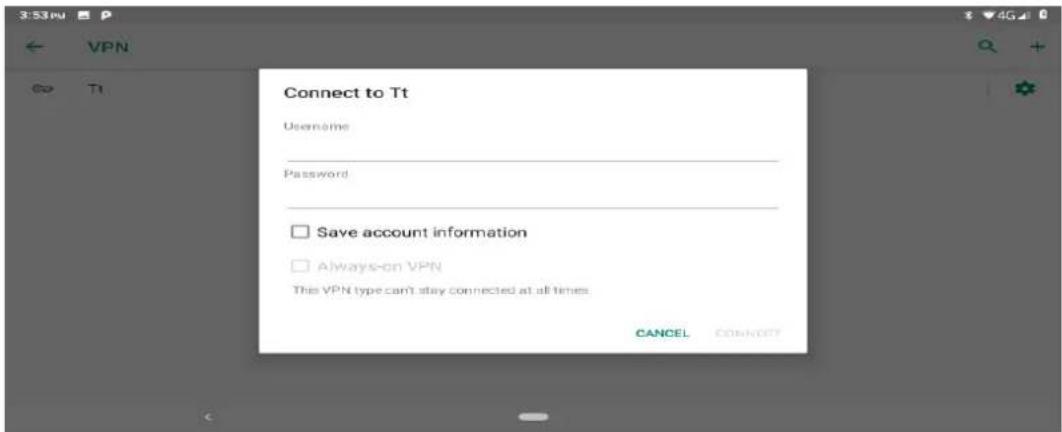
Picture 4.1-12
4.1-6 Airplane Mode
Airplane Mode can turn off WIFI and GSM card function quickly, when airplane mode is turned on, WIFI and GSM can't get any signal, then airplane mode is turned off, WIFI and GSM module will recover to previous state.
4.2 Bluetooth
Bluetooth function operation
- Click setting application in main menu interface
- Click Bluetooth and open it.
- If somebody open Bluetooth in your surroundings, click search device in right above, then Tablet will automatically search the Bluetooth device nearby. As picture 4.2-1
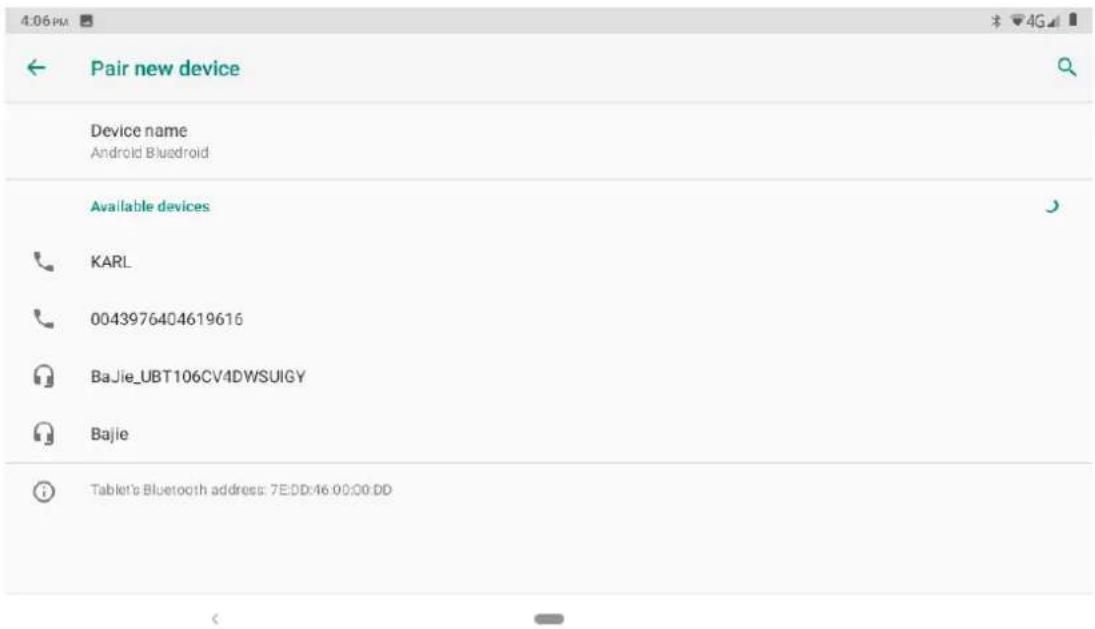
Picture 4.2-1
- Click the available Bluetooth device, it will popup request window, enter into related password, and match the device to connect.
- After match successfully, choose the operation you want to, click to enter into
Picture 4.2-2.
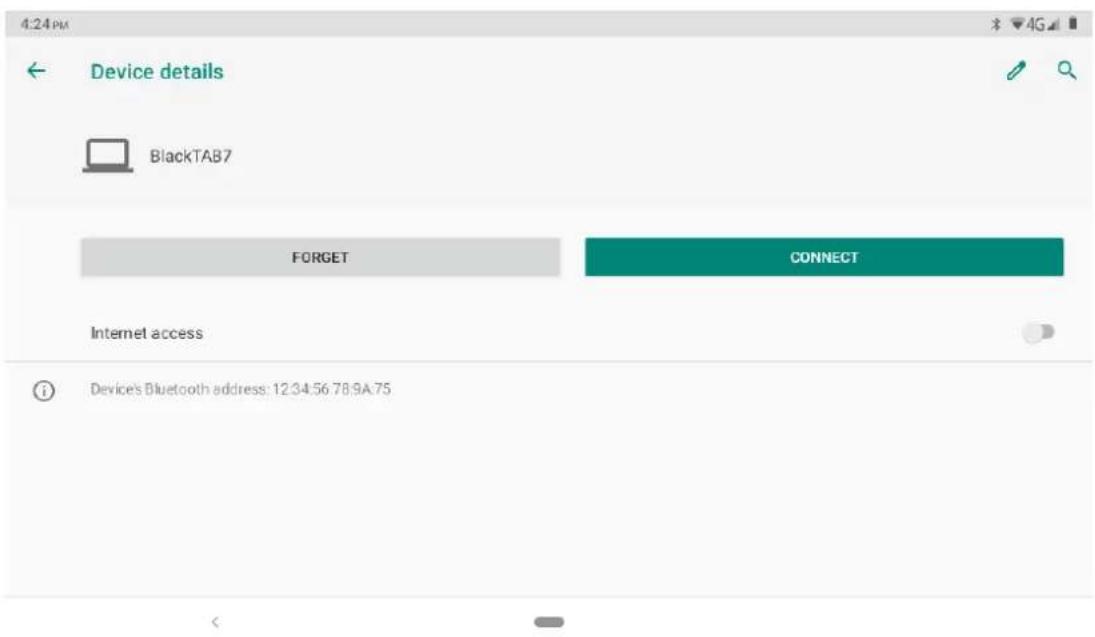
Picture 4.2-2
Bluetooth setting
- Rename tablet
Click Connected devices-Pair new device-Device name as Picture 4.2-3, select
rename tablet, you can rename it as you want

Picture 4.2-3
2. Display the file you received
Choose display the file you received in Picture 4.2-4, you can view download and upload files.

Picture 4.2-4
4.3 Apps & notification
4.3-1 APPS
- Click setting application in Apps.
- Select application, after enter, you can manage and delete installed application. (As Picture 4.3-1)

Picture 4.3-1
4.3-2 Notification
- Open settings, click Notification, as Picture 4.3-2
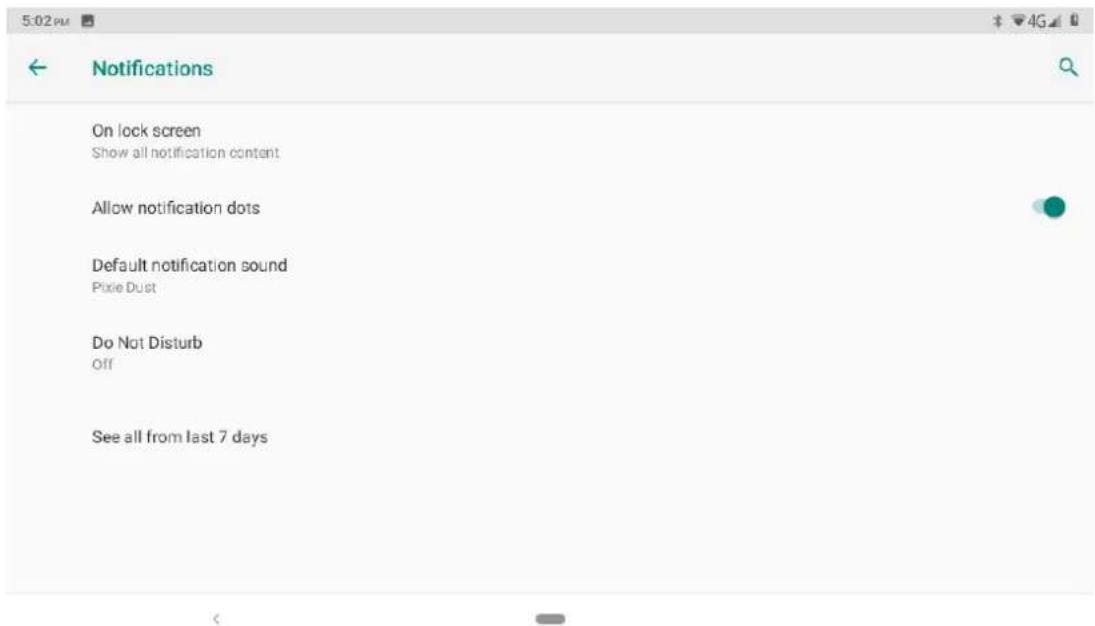
Picture 4.3-2
- Click on any app icon in the list, then you can choose to show notifications silently, block all notifications or don't silence or block, as Picture 4.3-3

Picture 4.3-3
4.4 Battery
Click setting function, select battery, you can view the battery situation, as Picture 4.4-1

Picture 4.4-1
4.5 Display
4.5-1 Night Light Mode
- Click Setting application procedure.
- Click display, choose Night Light Mode,
- Click the "Turn on Now" button and it will go into night mode and the blacklight turns red, as Picture 4.5-1

Picture 4.5-1
4.5-2 Wallpapers
- Click setting application.
- Click display, click wallpaper.
- You can choose different wallpapers as you like—gallery ---photos--- wallpapers (system defect), as Picture 4.5-2

Picture 4.5-2
4.5-3 Auto rotation
System is defaulted as open auto rotation, when it is turned off, system won't rotate Tablet screen by G-sensor.
4.5-4 Sleep
- Click setting application.
- Click display.
- Click sleep.
- Set the sleep time as you want, as Picture 4.5-3
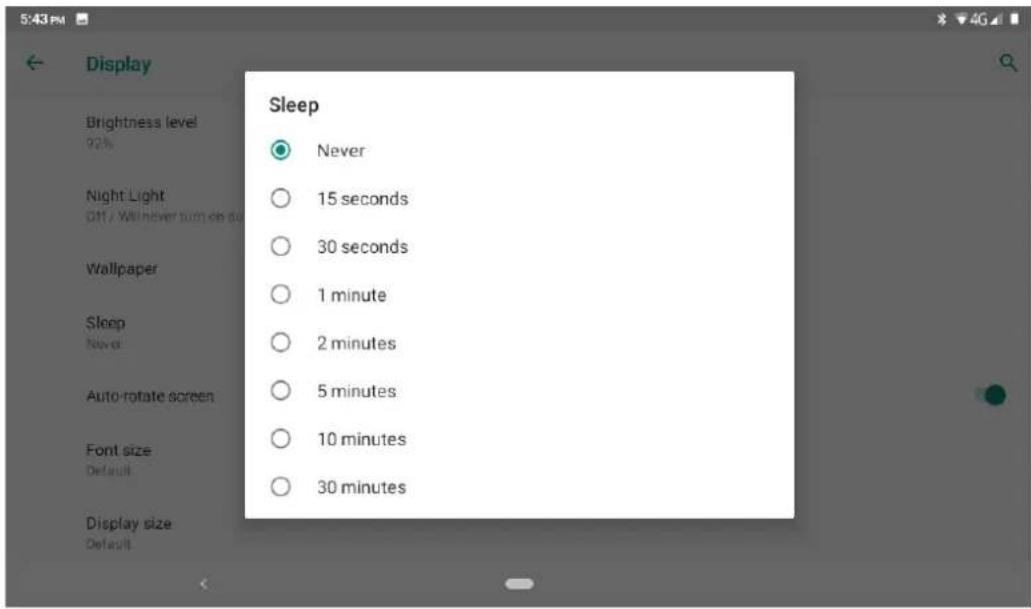
Picture 4.5-3
4.5-5 Font size
Click font size to adjust the size of the text, as Picture 4.5-4
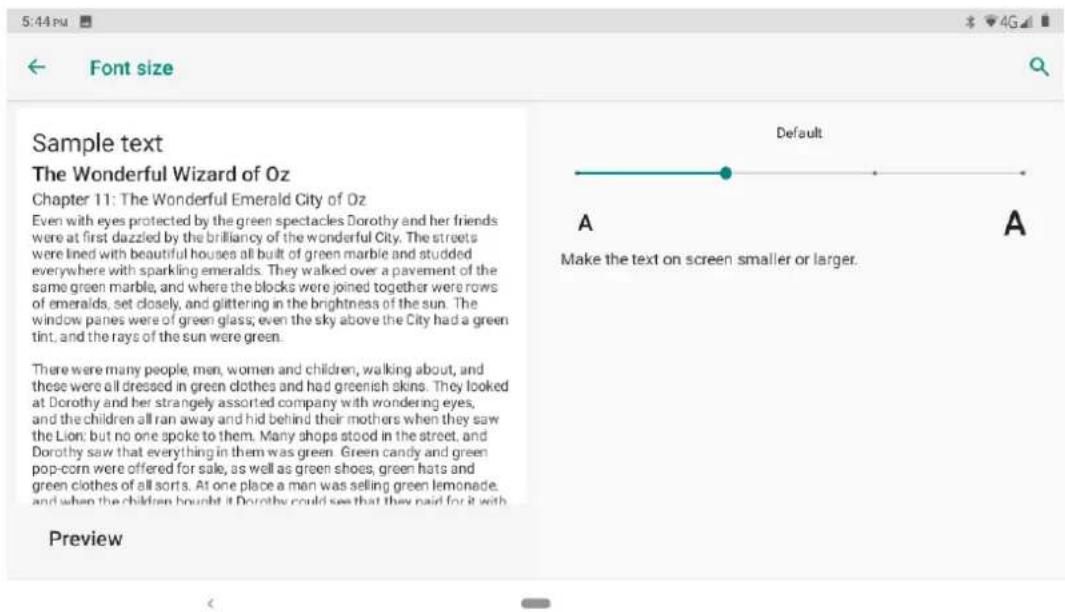
Picture 4.5-4
4.5-6 Display size
Click Display size to adjust the size of the icons, as Picture 4.5-5
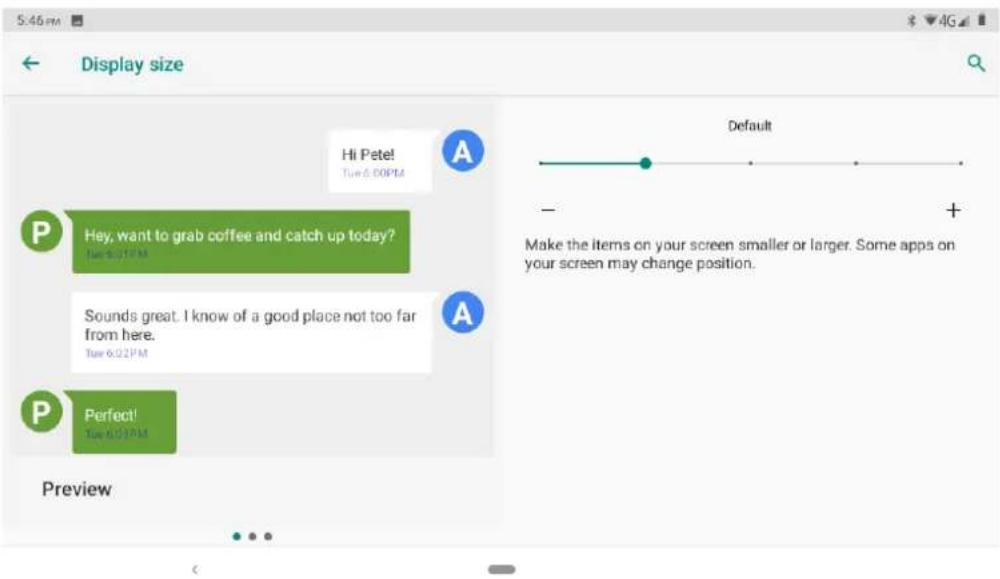
Picture 4.5-5
4.5-7 Screen saver
- Click setting application.
2.Click display. -
Click Screen saver.
-
Set the screensaver as you want, as Picture 4.5-6

Picture 4.5-6
4.5-8 Device theme
You can turn this feature on by selecting the "Dark" option in Settings> Display > Advanced > Device theme to dim or brighten Android devices, as Picture 4.5-7
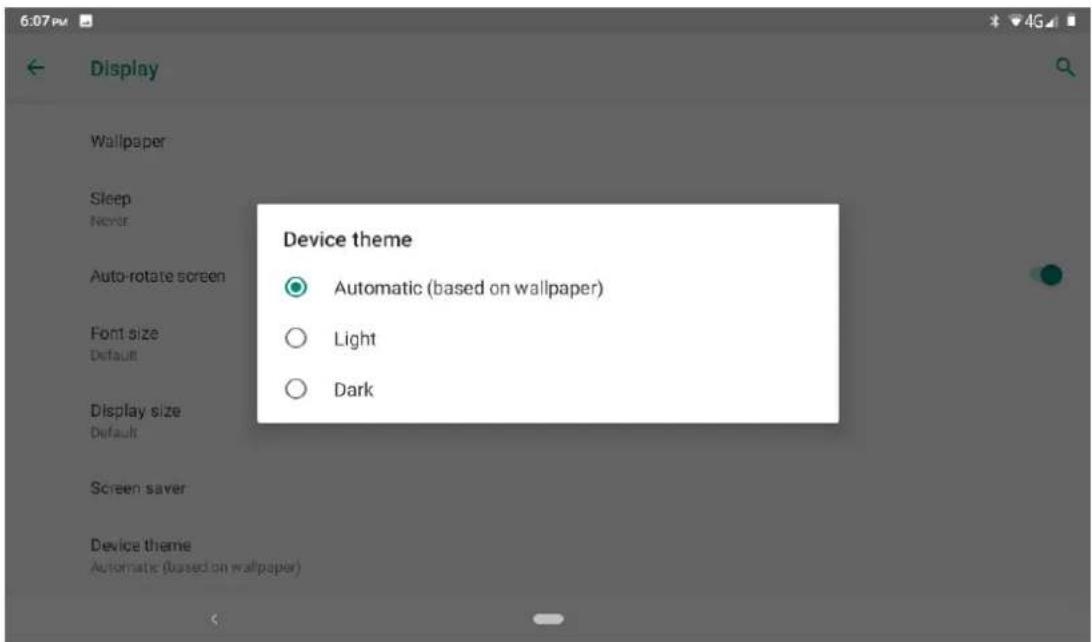
Picture 4.5-7
4.6 Sound
Open settings, click Sound, as Picture 4.6-1

Picture 4.6-1
1. Vibrate
In picture click Also vibrate for calls, Tablet will vibrate when someone calls you.
2.Volume
In picture click volume, you can set ringtone, media, and alarm volume, as Picture 4.6-2

Picture 4.6-2
3. Voice call Ringtone
In picture, click phone ringtone to choose voice call ringtone, as Picture 4.6-3

Picture 4.6-3
4. Shortcut to prevent ringing
Incoming calls can be controlled by pressing and holding the power and volume buttons together, as Picture 4.6-4
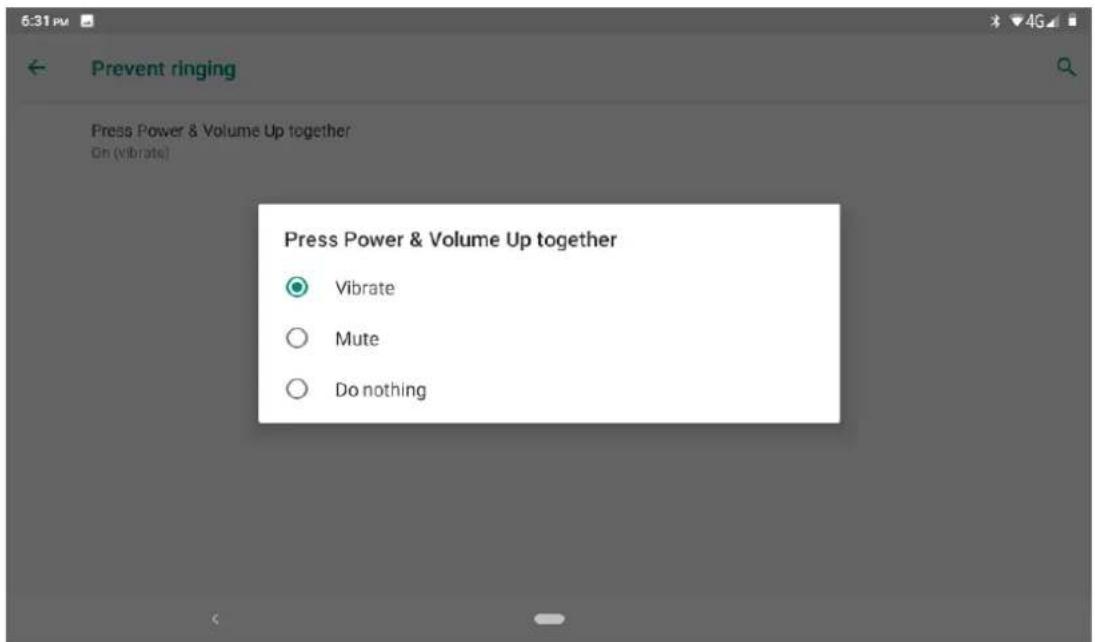
Picture 4.6-4
5. Charging sounds
Open setting function, click charging sounds buttoun. There will be a prompt sound output when the charging line is inserted
4.7 Storage
Open setting function, click Storage, as Picture 4.7-1
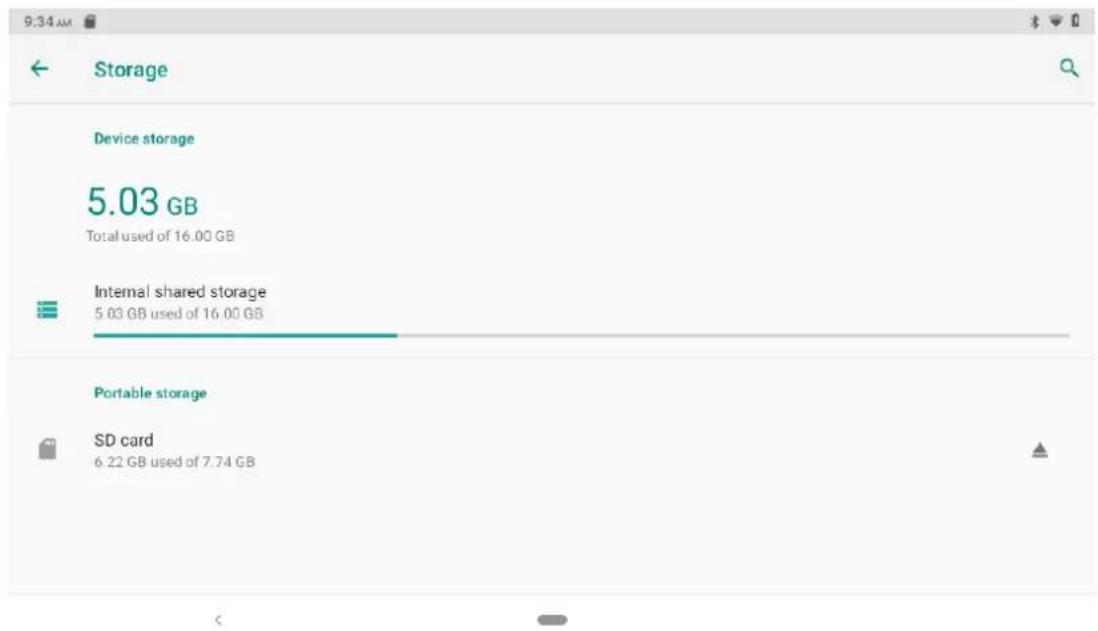
Picture 4.7-1
(1)Internal storage
Internal storage is Tablet local NAND storage, as Picture 4.7-2, if you need to check the storage content, you can check it in main menu.
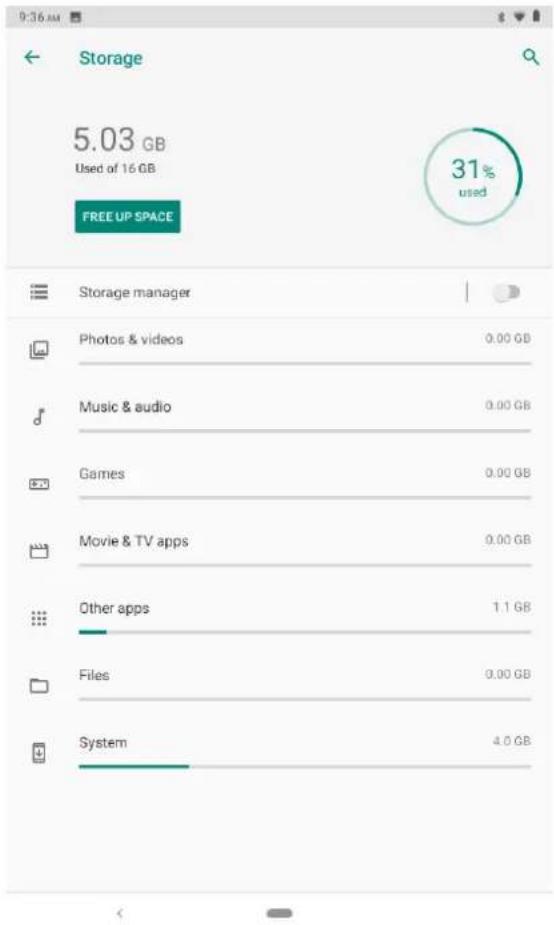
Picture 4.7-2
Storage manager
Storage manager is mainly used to help release storage space, used to delete the device above the backup photos and video files, you can choose the following way to manage, as Picture 4.7-3
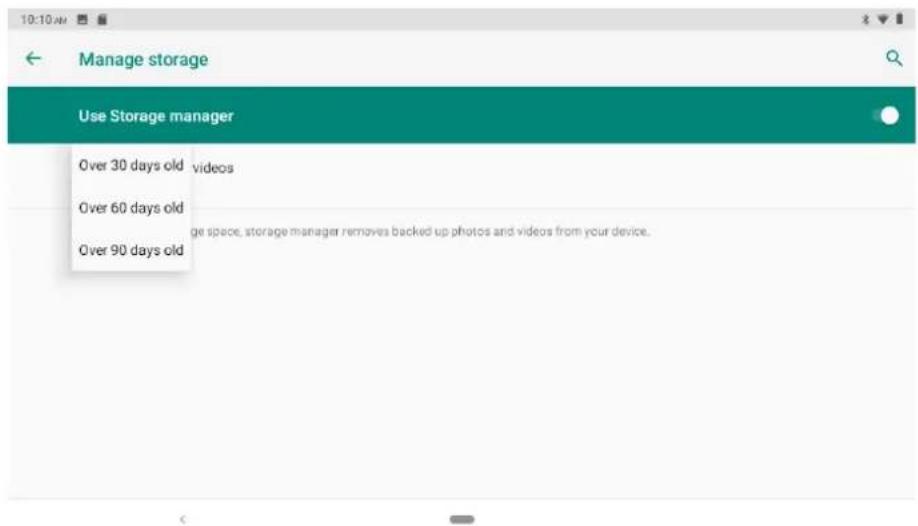
Picture 4.7-3
(2)SD card
Click SD card to check the storage content, as Picture 4.7-4
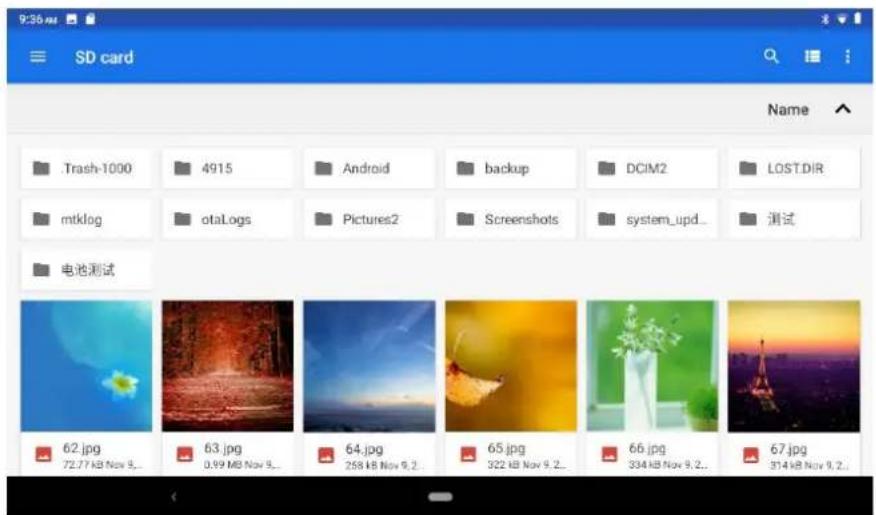
Picture 4.7-4
Safely remove or format SD card
-
Insert SD card
-
Click
Settings in picture 4.7-5
3.Click Settings
4...After the above two steps you can choose what you want to do, remove or format SD card, as Picture 4.7-6
Note: Removing SD card safely can protect SD card and increase its lifetime.

Picture 4.7-5
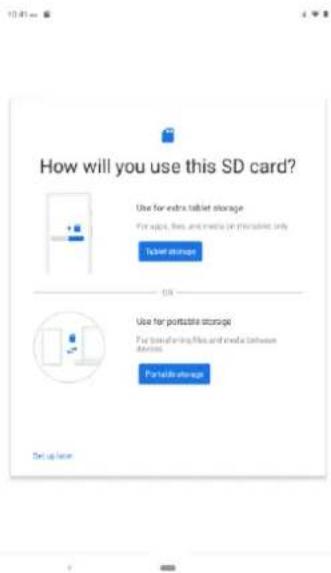
Picture 4.7-6
4.8 Security&location
4.8-1 Set locked screen
Lock the touch screen by unlock icon or password to protect your Tablet.
Note: After setting screen locked, you should enter the pass code each time when you startup or screen is locked
Set unlocked picture
- Click setting application in main interface.
-
Click security.
-
Click screen lock.
- Choose pattern in text setting area.
- Click next following the remind message.
- The unlocked pattern board pop up, there are nine touch spots, connect 4 points from vertical, horizontal or diagonal direction. As Picture 4.8-1, move your finger from the screen when finish. The system will record yours new unlock pattern.
- Click continue.
- When you see the reminder, enter the unlock pattern, then click confirm.
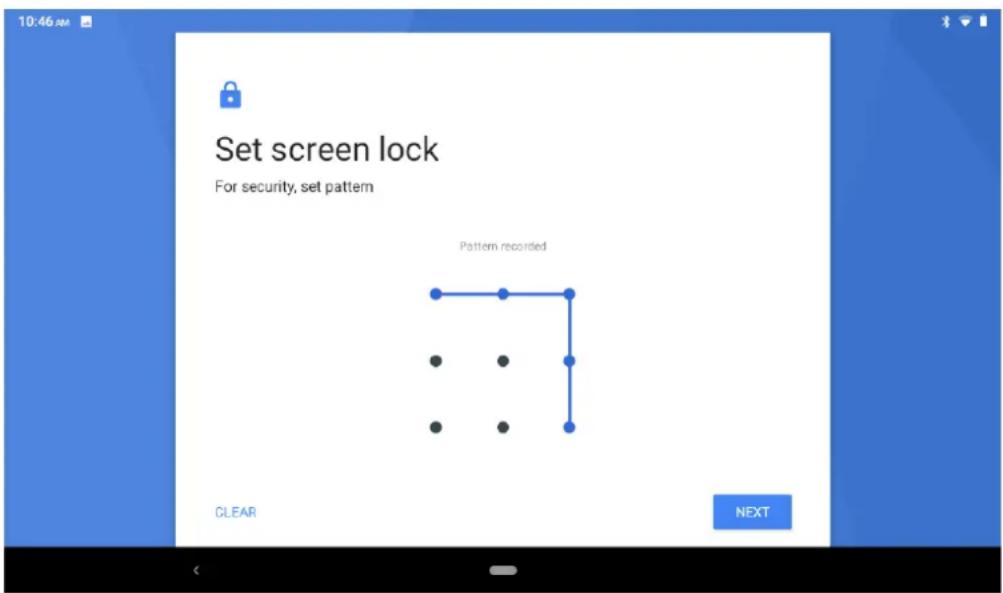
Picture 4.8-1
Set unlock PIN code
- Click setting application in main interface.
- Click security.
- Click screen lock.
- Choose PIN in text setting area.
- Enter new PIN code(numbers) and click continue.
- Enter new PIN code again and click confirm.
Set unlock password
- Click setting application in main interface.
2.Click safe. - Click screen locked.
- Set password in text setting area.
- Set new password(letters and numbers) and then click continue.
6.Enter the password again and the click confirm.
4.8-2 Location service
Click setting, select Location, as Picture 4.8-2
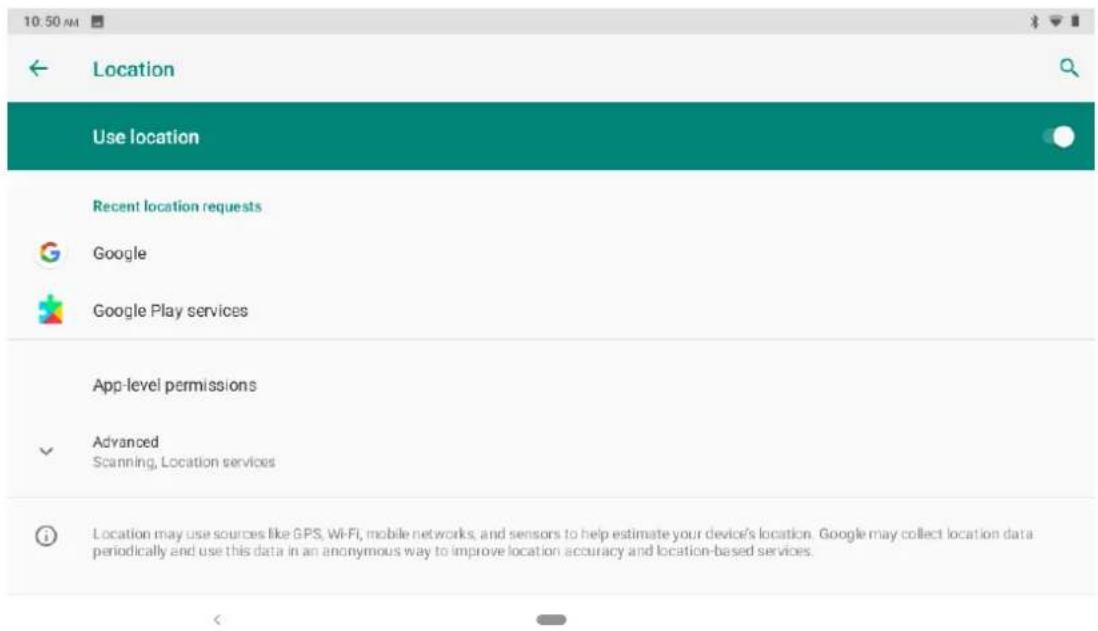
Picture 4.8-2
4.9 Users & accounts
- Select setting application
- Open account and sync, as Picture 4.9-1

Picture 4.9-1
3. Click add an account, as Picture 4.9-2
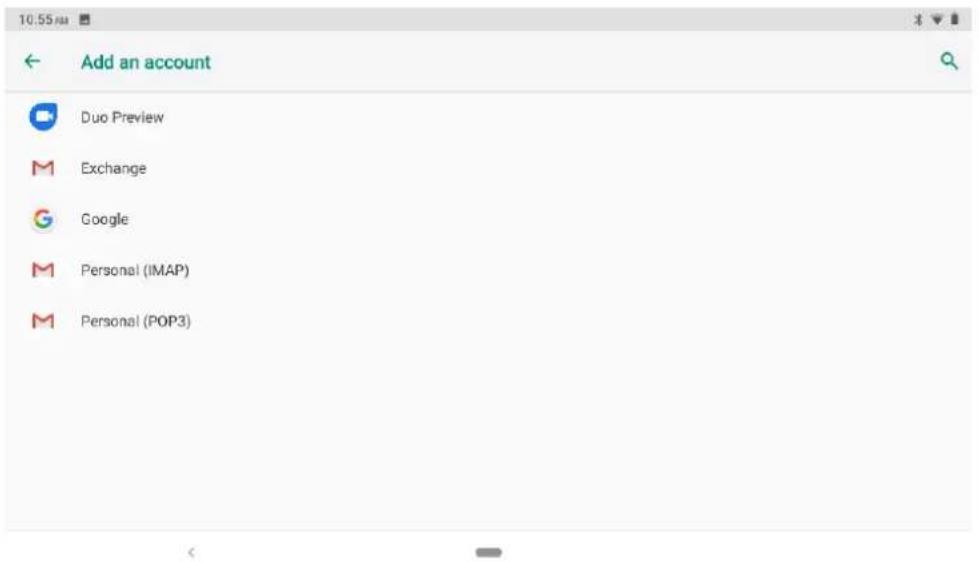
Picture 4.9-2
4. After successfully load, it will open the sync function, as Picture 4.9-3

Picture 4.9-3
4.10 Accessibility
4.10-1. Font size
Click it to make system font large size
4.10-2. Click power button to end calls
When Click call, press "power" button, call will end but not hold.
4.10-3. Touch and hold delay
Click touch and hold delay to increase time, as Picture 4.10-1
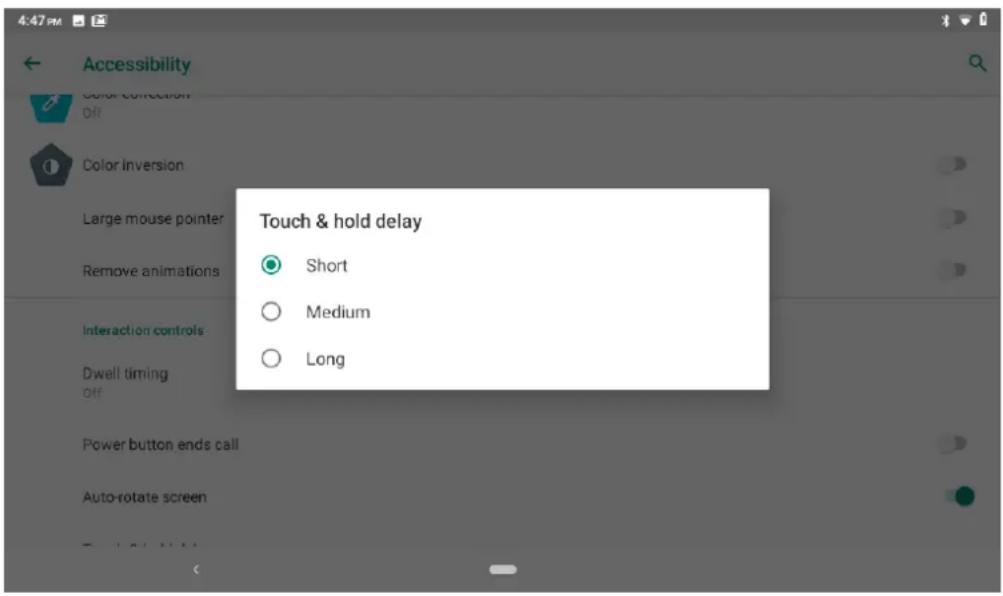
Picture 4.10-1
4.10-4 Install webpage script
It will allow you install webpage scrip when you open system,, but it will increase the risk when you are browsing webpage.
4.11 System
4.11-1 Language and Input Method
Click setting, select language and input method, choose language, then click Add a language, select the language you want to add from the language list, as Picture
4.11-2. Back to language preferences page, you can drag the language you want to set to the first to switch language.

Picture 4.11-1
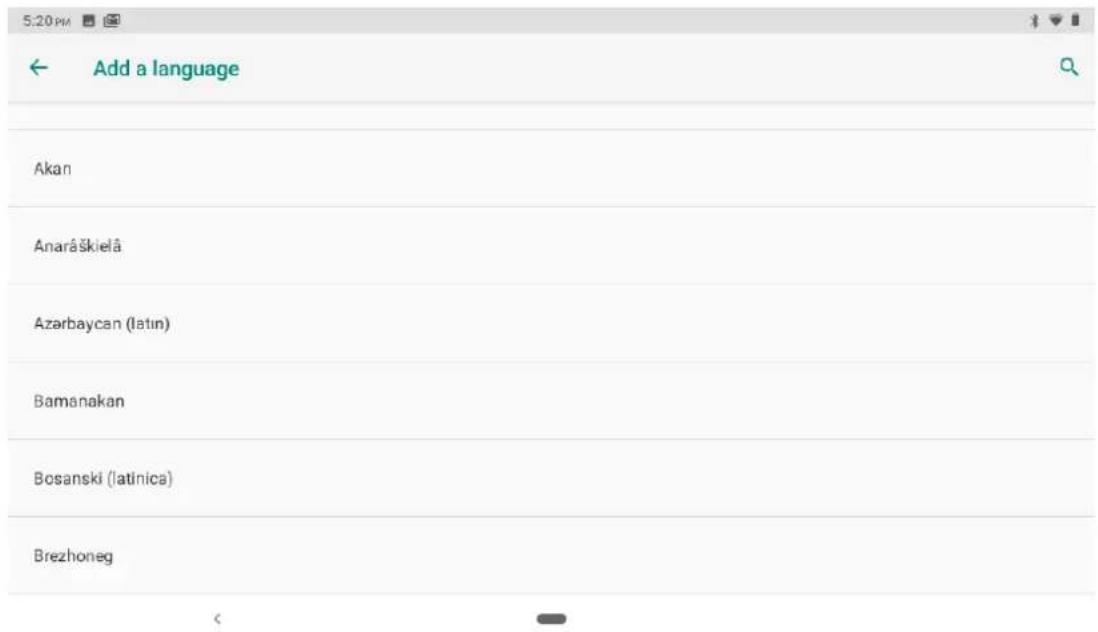
Picture 4.11-2
Click setting, choose language and input, choose Google keyboard setting, click input language, as Picture 4.11-3

Picture 4.11-3
Choose the language you want to change in the language list, as Picture 4.11-4

Picture 4.11-4
4.11-2 Gestures
Jump to camera
Operate it to open and close of this app as Picture 4.11-5
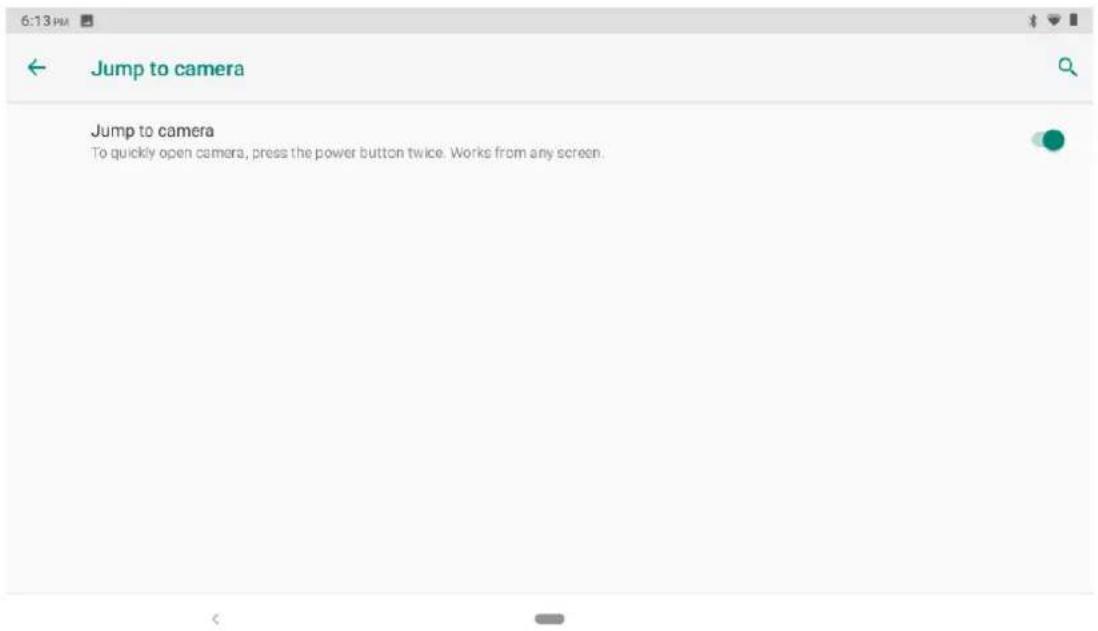
Picture 4.11-5
Swipe up to Home button
Swipe up on Home button is mainly used to switch apps. Swipe up once to show the recently opened application interface and up twice to enter the application interface as Picture 4.11-6

Picture 4.11-6
Prevent ringing function
Incoming calls can be controlled by pressing and holding the power and volume buttons together, as Picture 4.11-7

Picture 4.11-7
4.11-3 Date and Time
According to the preset, system will voluntarily apply the date, zone, and time provided by internet. as Picture 4.11-8
Manual set date, time and zone
- Click Setting application procedure.
- Slide down the screen, then click date and time.
- Turn off "auto setting of date and time".
- Turn off "auto setting zone".
- Click Zone Selecting, then choose the zone lists. Slide down the list to view more zones.
- Click Set date, then click upper or down button to adjust date, month, and year, click setting when you finish selection.
- Click Set Time, then click upper or down button to adjust hour and minute, click AM or PM to change morning or afternoon (there is no such selection when you see 24-hour format). Click Setting to finish.
- Click 24-hour format, switch between 12-hour or 24-hour format, the time format you choose will be used on the alarm clock.
- Click date format setting, then choose the time format you want to show on Tablet.
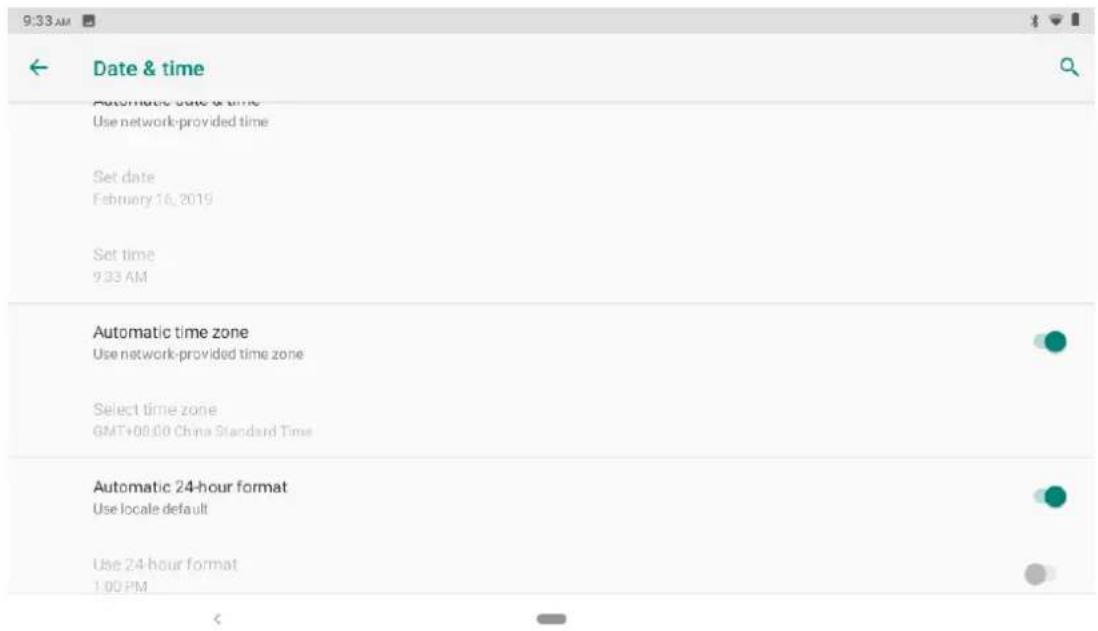
Picture 4.11-8
Note: If you use the time internet provided, you will not able to set the date, time and time zone.
4.11-4 backup
Connect WIFI and login your google account, choose backup my data, system will backup your data into google server. as Picture 4.11-9
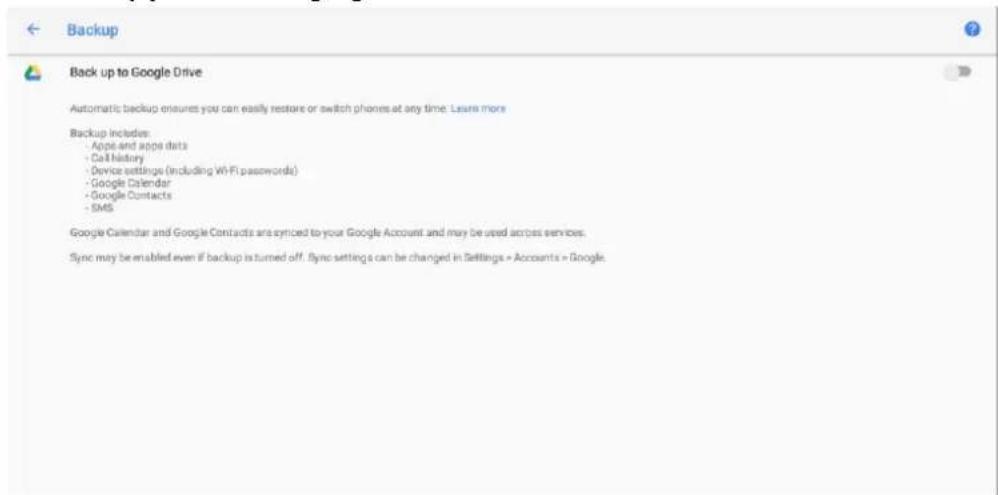
Picture 4.11-9
4.11-5 System update
Check to see if the system is up-to-date, as Picture 4.11-10
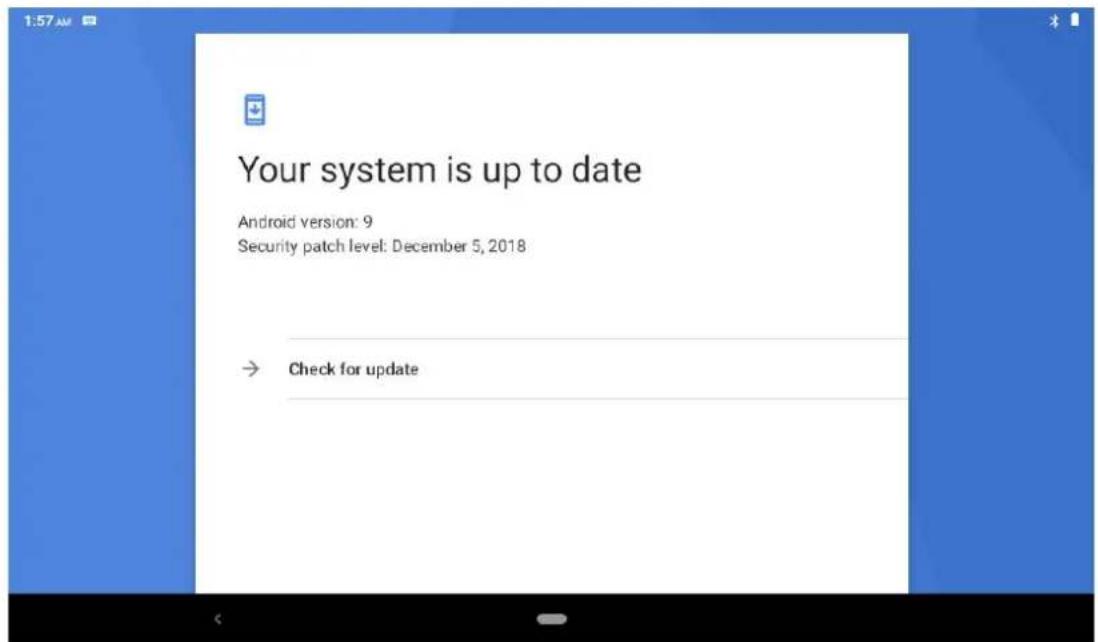
Picture 4.11-10
4.11-6 Reset options
If you need to recovery factory reset, please click reset, as Picture 4.11-11, if you need to formulate NAND, please click reset tablet.

Picture 4.11-11
4.11-7 Multiple users
Multi-user in Android is similar to multi-user in Windows, and can support multiple users to use the system. Typically, the first user registered with the system becomes the system administrator by default. You can add and remove users and switch between different users, as
Picture 4.11-12

Picture 4.11-12
4.11-8 Engineer Selection
- USB debugging
After opening USB debugging, you can use some software to read Tablet software, but when USB debugging is turned on, USB storage needs to manual adjust. - Stay awake
If you open stay awake, it will never auto sleep when your Tablet is charging. - Pointer Location
If you open pointer location, it will display touch vertical and horizontal direction. -
Show taps
If you open display touch screen operation, it will display touch operation on the screen. It is suggested to use with same direction as pointer location. -
Show surface updates
If you open screen refresh, it will display related area when the area is refreshing.
- Show CPU usage
After open CUP usage, in the right top of Tablet will show CPU usage situation. as Picture 4.11-13

Picture 4.11-13
4.11-8 About Tablet
Check Tablet state
- Check Setting application.
- Click about tablet, check Owner、Device name、Emergency information、Legal information、SIM status、Model&hardware、IMEI、Android version、IP address and so on.
(1). Click Emergency information state, you can add Medical information and Emergency contacts. Adding medical information and emergency contacts can help first responders in an emergency.
5 Multi-Media
5.1 Music
Enter into music player: in menu or desktop click music icon to enter into music player, click the music you want to play, as Picture 5.1-1:

Picture 5.1-1
Random play
Single/sequential cycle
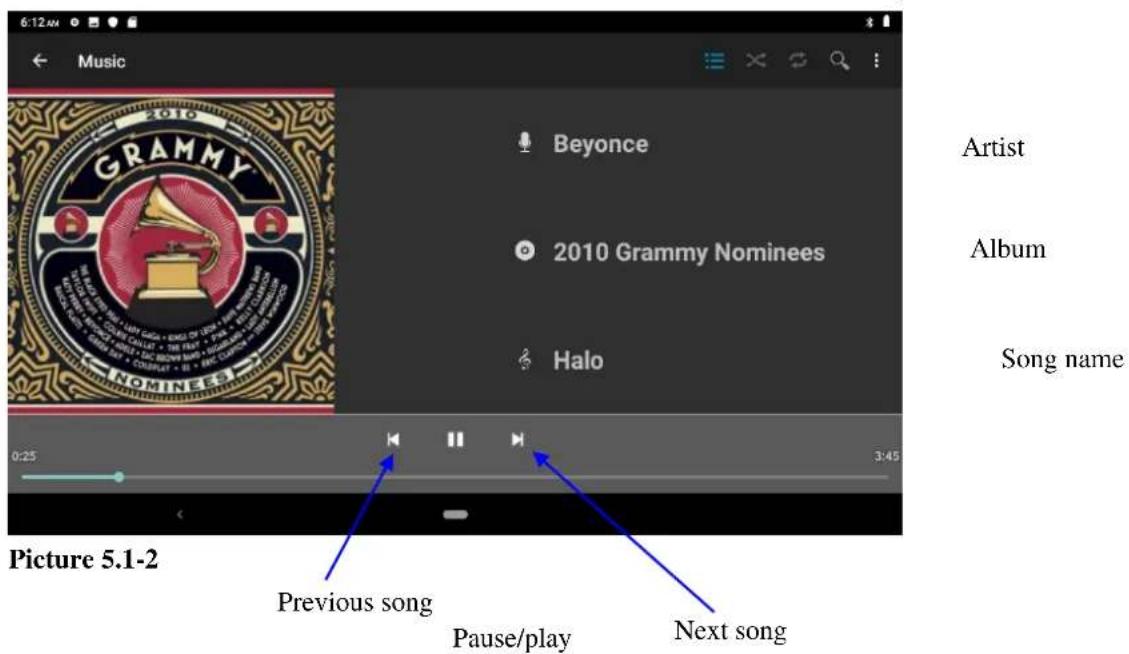
Drag the progress bar to adjust play progress. Operation of music player button as Picture 5.1-2
5.2 Photo Gallery
Photo gallery application can auto search photos and video files in SD card, and photo gallery will classify these photos and videos in folder. You can apply photo gallery to view and edit photos, set the photos as wallpaper and watch the video.
View pictures
- Click gallery application in main interface.
- Enter into gallery, click the folder you want to view.
- Click the picture you want to view, the system will play it in full screen mode automatically.
- The pictures can be zoom in and zoom out, put two fingers on the screen, the separate the fingers(gather up the fingers, the picture will be zoom in) or double click the screen.
Note: when you browse the pictures, slide left or right to view more pictures.
Edit and set pictures
When check the pictures in full screen mode, click menu key to display menu selection, you can choose the selection you need to edit and setting pictures.
- Slide Show
- Open a picture, use virtual key to click menu key, display menu selection.
- Click slide show, it will auto loop play
- Crop
- Click menu key to display menu selection.
- Then click crop, click and drag related area to adjust the cropper.
- Click cropper and drag it inside and outside to adjust the image.
- After adjust the size you want, click crop.
- If you wish to give up to crop, click cancel to return to picture browse.
- Edit
- Click menu key, display the menu selection.
- Click edit.
- Adjust the brightness, style, color, ant alias setting in selection.
- Click save.
- If you want to give up edit, click return key, click not to return to picture browse.
5.3 Camera
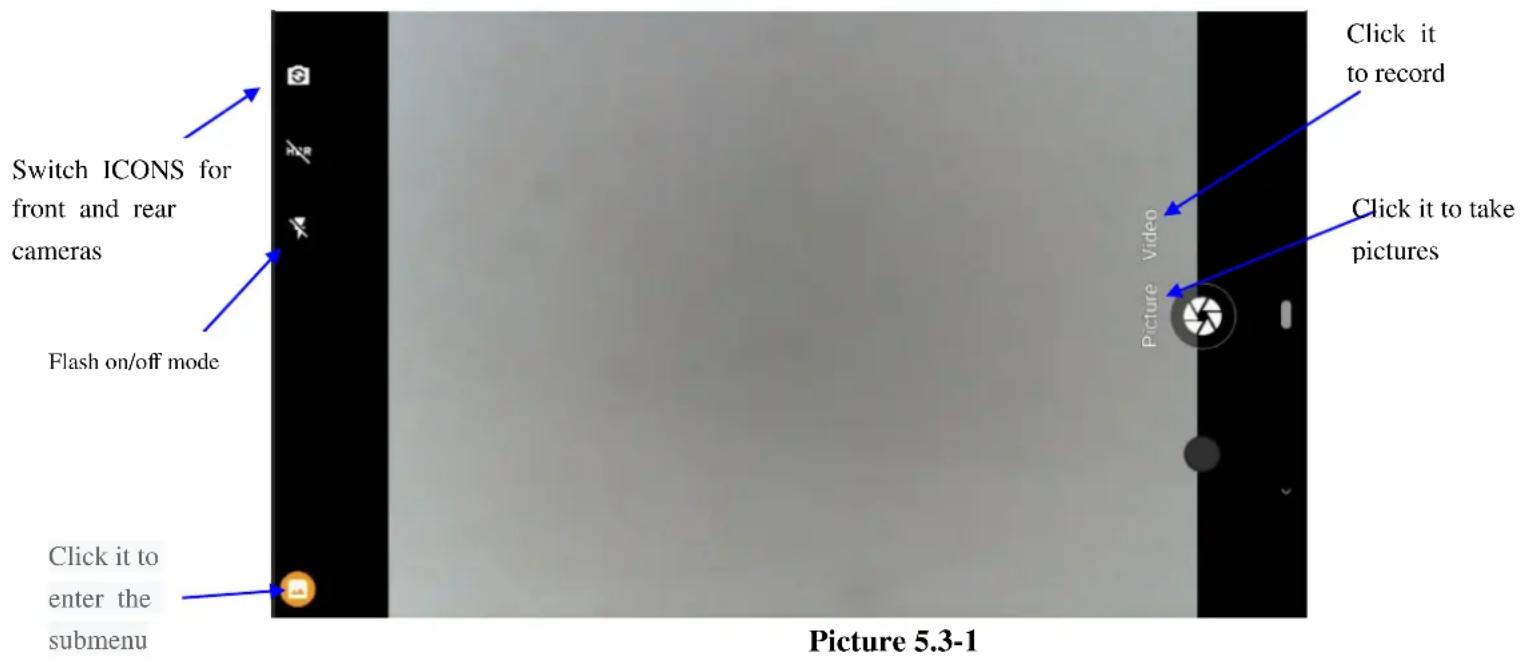
In the main interface or desktop, click camera application procedure, enter into camera
- Operation of camera ,Switch camera: choose Menu key, click switch front/back camera, as Picture 5.3-1.
5.4 FM Radio
Click in the main interface or desktop to enter into FM radio interface:
● Radio button operation instruction as Picture 5.4-1:
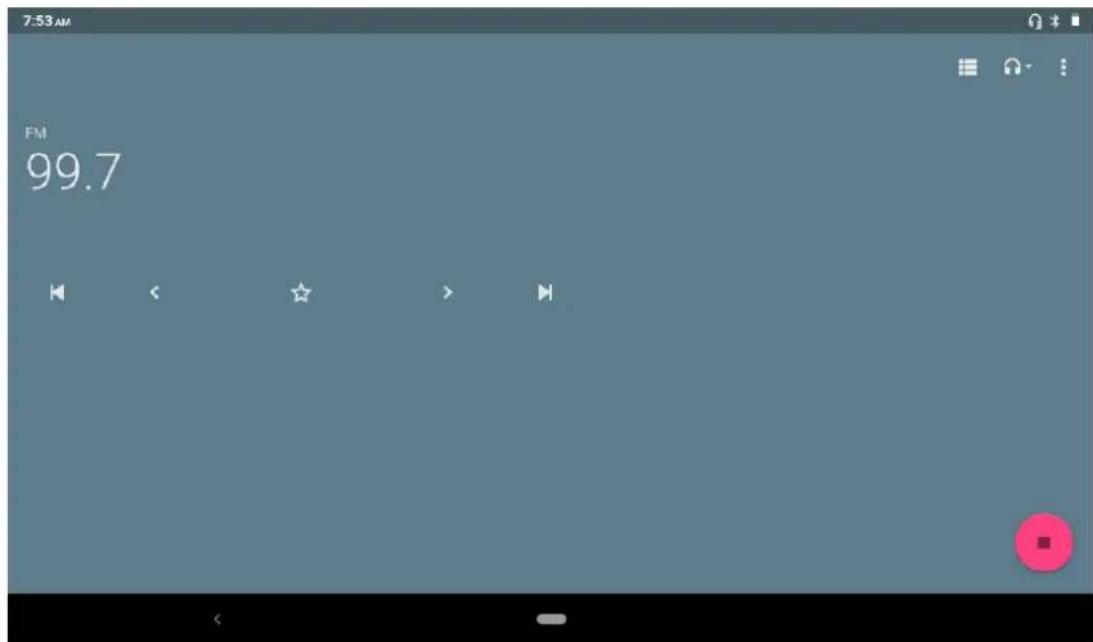
Pause/Play
Picture 5.4-1

- Save channels: Click button in the main interface to save the channel, and the channel will be saved in channels list.
Note: You need to insert earphone as antenna when using FM radio, If no antenna, your Tablet can't search any frequency band.
6 Communication Function
6.1 Phone
- Click Phone application procedure
- Operate as Picture 6.1-1

Picture 6.1-1
6.2 Text Message

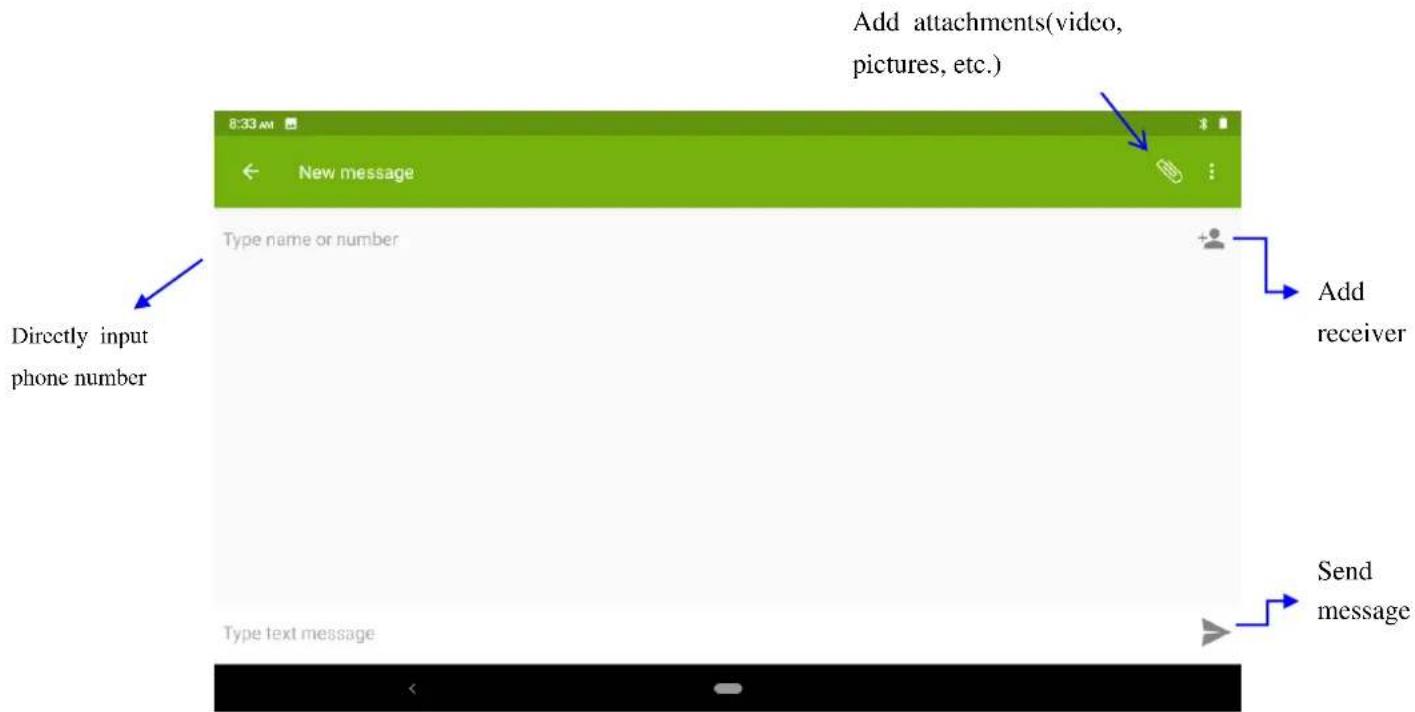
1 Enter into main menu, choose application procedure.
2 Click "Edit new message" as Picture 6.2-1
Picture 6.2-1
6.3 Contact List
Click Contact list in the main interface, enter into the contact list as Picture 6.3-1

Picture 6.3-1
- Search contact: click 🔒 button, enter into search function
- Add contact: click button, enter into add contact interface.
7 Internet
7.1 Browser
In case of Wi-Fi or mobile internet is connected well (Please refer to Chapter 4.1 for wireless and internet setting), click IE browser in the main menu or desktop to enter the IE interface, as Picture 7.1-1
Address
column
Save bookmark

Picture 7.1-1
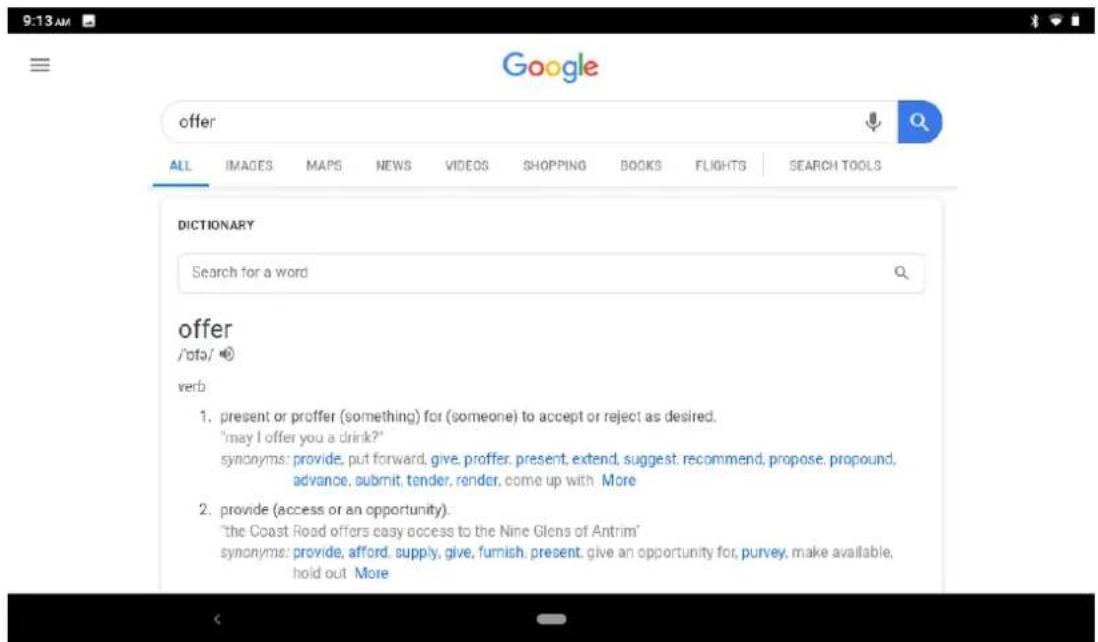
Click address bar to input the website, click start, enter into related webpage, then you can browse the website information, as Picture 7.1-2 and you can click the menu you can refresh ,save to bookmarks, share page, bookmarks, history and setting the webpage.
Picture7.1-2
7.2 Email
Email application procedure contains email setting guide, you can add the external POP3 OR IMAP email account of normal web email service provider (For instance, Google, Outlook, Hotmail, and Live, Yahoo, Gmail, Hotmail Exchange and office 365 and other), as Picture 7.2-1

Picture 7.2-1
a. Email Setting
- After you click the sending email icon , you can see the email setting guide, which can help you to set.
- Input your email address and password.
- Click "Next step" button, choose your email type is POP3 or IMAP.
- Click "Next Step" button to check whether the email box servicer can receive or send emails
- Input the email account and display the email subject, and click finish.
- If the email box is available, you will enter into your mail box automatically.
b. Delete the email account
You can delete stetted POP3 or IMAP email account from your Tablet.
Click

- Enter into your mail box.
- Press Menu key.
- Click Account
- Press the account you want to delete.
- Click confirm to remove.
c. Send E-mail

to display your mail box.
- Click the inbox, it will refresh the new emails automatically; click it to read new email.
-
Press Menu key. Menus will popup.
-
Click Edit to enter into new email editing interface.
-
Input the receiver's email address.
- Input the subject and email content.
- If you want to add attachment, click menu key, the menu popup.
- Click "Attach file" (photo, music, video, contacts).
- Click "send" to send the email out.

Picture 7.2-2
8 other characteristics
8.1 New gesture navigation
The Android P officially eliminates the three Android king kong buttons and replaces a virtual navigation bar similar to the one on the iPhone X. Long press: start Google smart assistant; Swipe up half: enter the switch window; Swipe up: go to the app drawer; Swipe left and right: scroll through the most recent application, back button: return (only within the application), as Picture 8.1-1

Picture 8.1-1
8.2 PIP function
- PIP function is a special type of multi-window mode
- The window that is playing the video can be hovered over other apps that are in use. The floating window can be dragged anywhere and then continue working on the home screen.
When playing video in full screen on Google Chrome browser, press the Home button or double-click on the multi-tasking button to return to the desktop, and the video being watched will be displayed in picture-in-picture mode. as Picture 8.2-1

Picture8.2-1
Specific operation:
-
Is to install the latest version of chrome, then open a video site to play video, and then full screen.
-
The last home button switches background tasks and switches on automatically when switched back to the desktop.
-
Tap the video window to pause, next set, and full screen.
Note: There are few applications currently supported.
8.3 Accessibility Menu
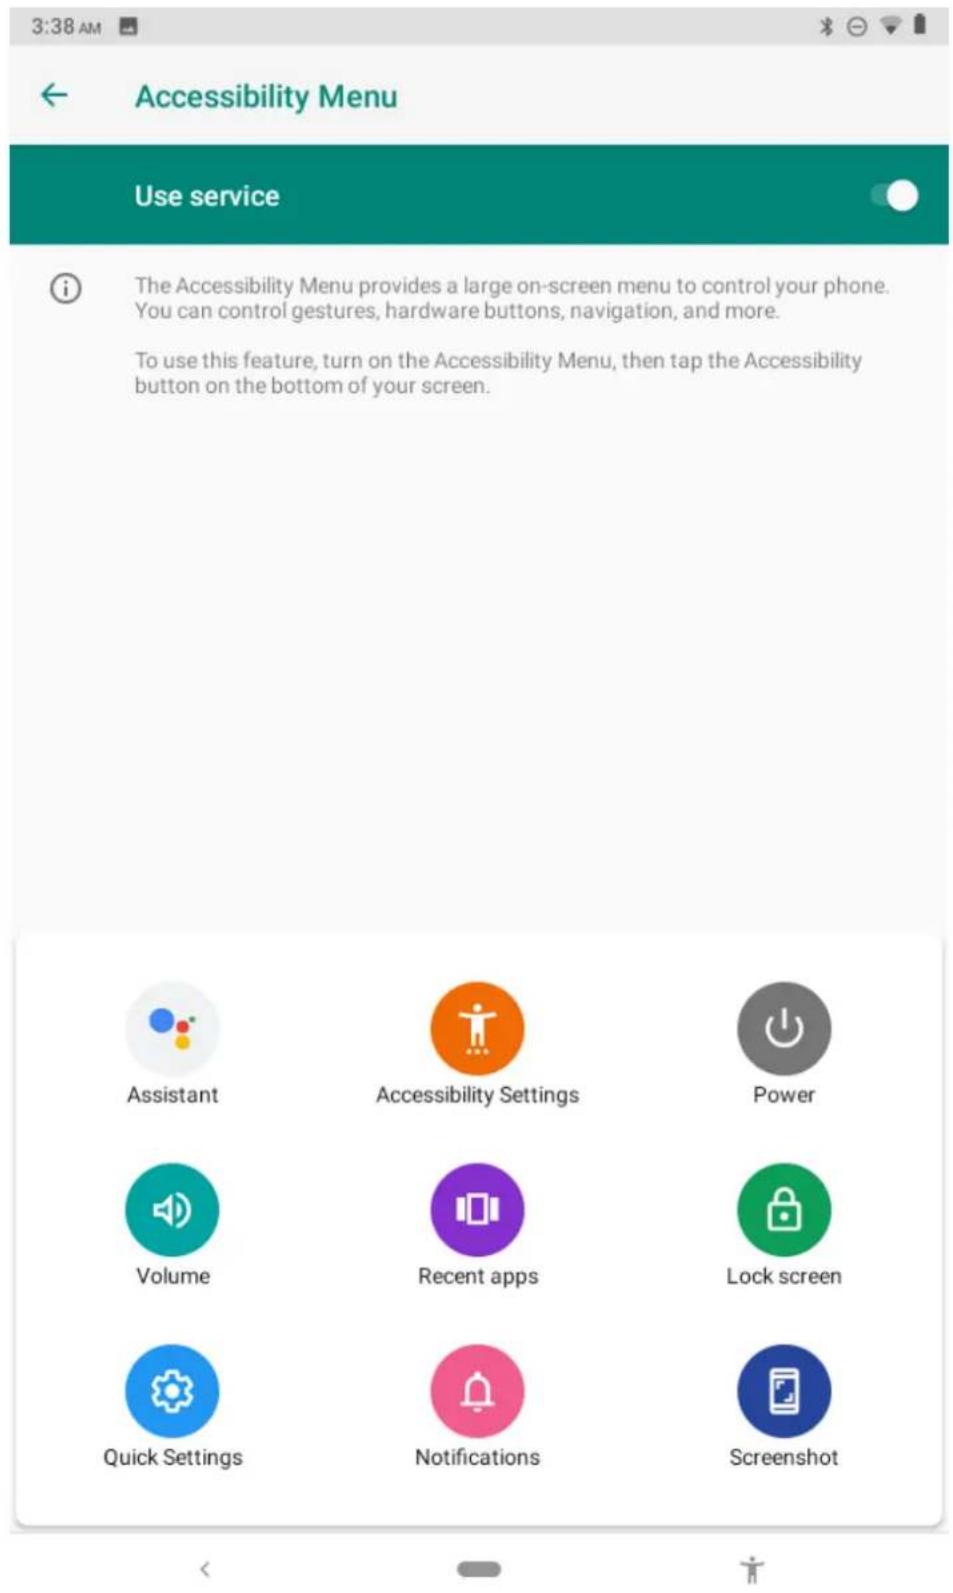
In the Settings>Accessibility >Accessibility Menu, you can activate the new Accessibility
Menu, which will enable an icon that you can click most recent application, volume, and more, as Picture

to perform quick Settings, set the
Picture 8.3-2
8.4 Dark mode
You can turn this feature on by selecting the 'Dark' option in Settings>System >Display >Advanced >Devicetheme to dim Android devices, as Picture 8.4-1

Picture 8.4-1
8.5 New screenshot shortcuts
Say goodbye to the default Power+ Volume Down button combo, and now you can grab a screenshot at any time by clicking on the icon in the Power menu, as Picture 8.5-1
Picture 8.5-1
9 Other Application Procedures
9.1 Clock
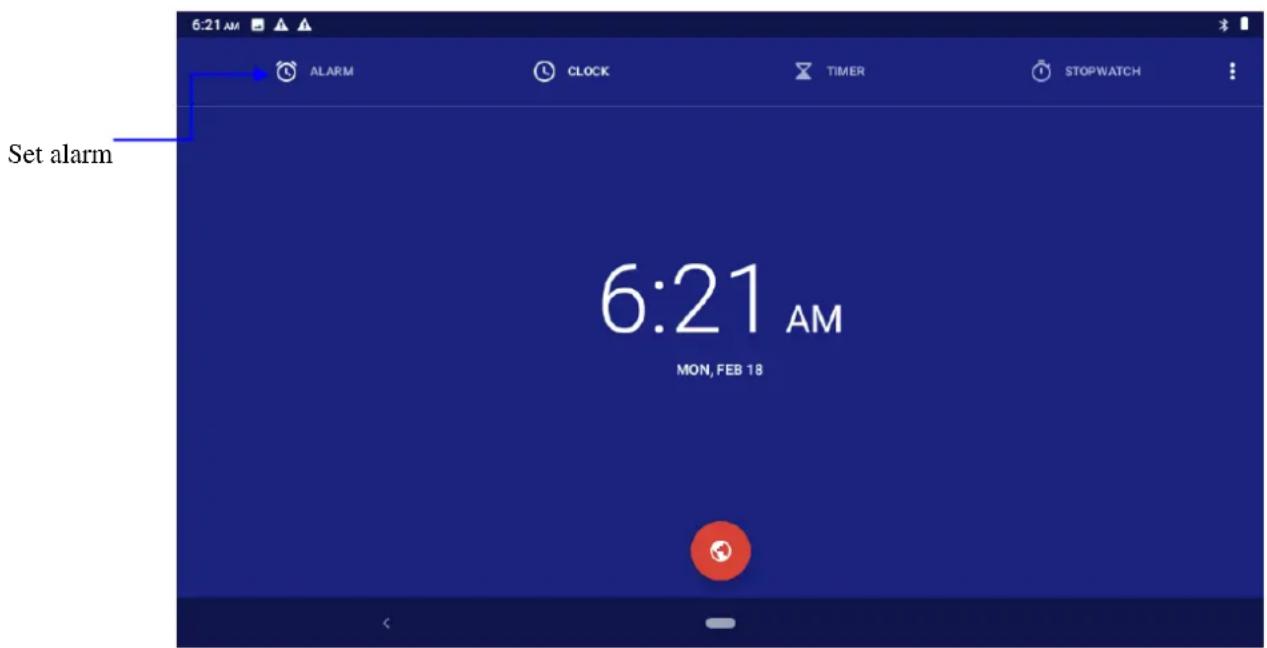
Click Clock procedure, enter into below interface as Picture 9.1-1.
There are clock, picture, music and homepage buttons.
Picture 9.1-1
9.2 Calculator
- Click.
- Enter into the basic board of calculator.
- Soft touch the numbers or operator in calculator to calculate.

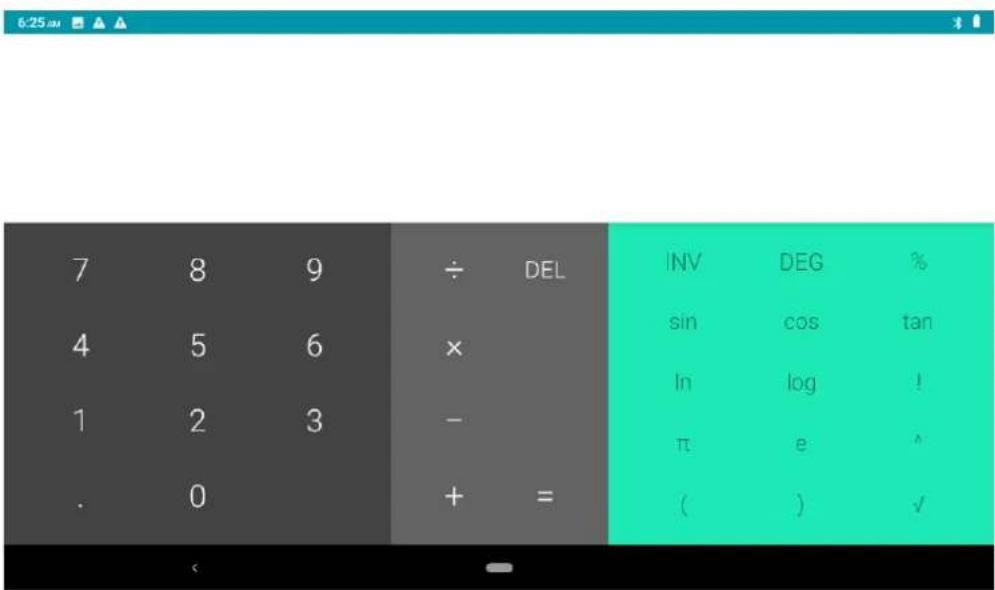
Pictuer9.2-1
9.3 File Manager
File manager will copy, cut, delete, rename the documents or the folder in the TF card, it also will share the files, install apk etc as Picture 9.3-1
In the main menu or desktop, click the document manager icon to enter into documents
manager.

ROM
External SD card

Picture9.3-1
a、Copy, cut, delete, rename the files and folder: choose the file or folder, long press the file or folder to enter into the interface as Picture 9.3-2, you can operate the file or folder.

Picture9.3-2
b、Share file:choose any file, long press it, it will popup "share", choose the share way you want in the list (Picture 9.3-4)

Picture 9.3-4
c、Install apk file: Choose the file suffixed .apk in the file manager, you can install the third part
software as reminder.
d、Build new folder: Choose the menu you want to build the file, click icon in right top, choose new folder, you can build new folder as reminder.
10 Recorder
In the main interface or desktop, click recorder icon ⚙️ to enter into record interface, click
record key to start record. Click Stop key to stop recording. Click Play key
to play the recorded sound. The system will auto remind you to use or abandon this record, please choose it manually.
Play the record: choose the video player to play the recorded sound, choose the recorded sound in the source manager, and click it to play.
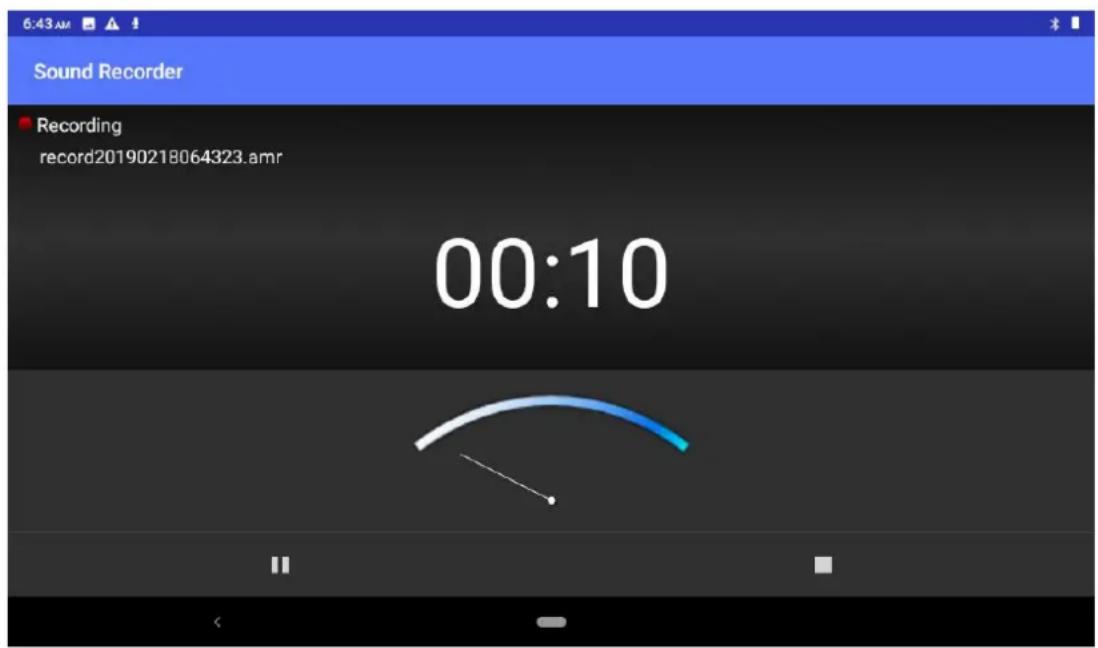
Picture10.4-1
11 Installation of Procedures
11.1 Installation
Install the third party application procedure
- Click "file manager" application procedure; choose the application procedure you need to install.
- Hold the application procedure you need to install.
- It popup install, click install apk.
- Finish the installation as guide, it will operate.
Note: The third party procedure searched from internet to use on the system are all suffixed with .apk.
11.2 U n i nstall
Uninstall application procedure
- Click setting icon in main interface.
- Click apps, list all the application procedures installed in the system.
- Click the APK you want to uninstall, click uninstall.
- Click confirm to finish uninstallation.
Skill: The procedure manager installed by system has many convenient methods to uninstall after opening procedure manager, click uninstall, it will list all the application procedures installed by system.
12 Troubles Shooting
1. The first startup of Tablet is slow
After the Tablet system upgraded, the first startup need to install the pre-installed application software, the lead time is around 2-3 minutes, the startup afterwards will be much quicker.
2. Tablet can't connect Wi-Fi
● Make sure the wireless router of internet service can work in normal.
- Ensure the Tablet and wireless router in certain distance, and no wall or other barrier between them.
- Ensure the user name and password both correct.
3. Tablet feels hot
When many application procedures are used in meanwhile, or the brightness of
screen open to the lightest or under charging, Tablet may feel fever. It is normal.
4. Email can't be set or Registration of application procedure.
- Ensure your internet is well connected.
● Make sure your email setting way is correct. - Keep your system time and local time consistent.
5. The system is abnormal and can't work.
When you install some third party application procedure, it may cause abnormal work, you can press Reset key(next to power port) to reset the system.
6. The webpage can't be opened
- Please keep the distance between from route to Tablet in effective range.
- Please restart WIFI and try again.
7. Tablet works terribly slow sometimes
It is normal phenomenon. Please turn off some application you don't need in advanced task management, or uninstall some third party application to release more system resource.
Warning
- Any changes or modifications not expressly approved by the party responsible for compliance could void the user's authority to operate the equipment. This device complies with part 15 of the FCC Rules. Operation is subject to the following two conditions:
(1) this device may not cause interference
(2) this device must accept any interference, including interference that may cause undesired operation of the device.
Note: This equipment has been tested and found to comply with the limits for a Class B digital device, pursuant to part 15 of the FCC rules. These limits are designed to provide reasonable protection against harmful interference in a residential installation. This equipment generates, uses and can radiate radio frequency energy and, if not installed and used in accordance with the instructions, may cause harmful interference to radio communications. However, there is no guarantee taht interference will not occur in a particular installation. If this equipment does cause harmful interference to radio or television reception, which can be determined by turning the equipment off and on, the user is encouraged to try to correct the interference by one or more of the following measures:
-Reorient or relocate the receiving antenna.
-Increase the separation between the equipment and receiver.
-Connect the equipment into an outlet an a circuit different from that to which the receiver is connected.
-Consult the dealer or an experienced radio/TV technician for help.
■SAR tests are conducted using standard operating positions accepted by the FCC with the device transmitting at its highest certified power level in all tested frequency bands, although the SAR is determined at the highest certified power level, the actual SAR level of the device while operating can be well below the maximum value, in general, the closer you are to a wireless base station antenna, the lower the power output.
Before a new device is a available for sale to the public, it must be tested and certified to the FCC that it does not exceed the exposure limit established by the FCC, Tests for each device are performed in positions and locations as required by the FCC.
■For body worn operation, this device has been tested and meets the FCC RF exposure guidelines
■ Non-compliance with the above restrictions may result in violation of RF exposure guidelines.

maxwest
@ 2020 Maxwest and the Maxwest Logo are registered trademarks Google, Android, Google Play, Gmail and other marks are trademarks of Google LLC.
The Android robot is reproduced or modified from work created and shared by Google and used according to terms described in the Creative Commons 3.0 Attribution Licence.


- CONTENT
- CONTENT....2
- 1 INTRODUCTION....4
- 2 NITRO 7Q INTRODUCTION....6
- 3 QUICK START GUIDE....7
- 4 BASIC SETTING 18
- 5 MULTI-MEDIA....53
- 6 COMMUNICATION FUNCTION....57
- 1 INTRODUCTION
- 1.1 ANNOUNCEMENTS
- PREVENTIVE MAINTENANCE
- 1.2 SAFETY INSTRUCTION
- 1.3 ABBREVIATION/TERMINOLOGY
- 2 NITRO 7Q INTRODUCTION
- 2.1 NITRO 7Q OPERATION AND PREPARATION
- 2.2 NITRO 7Q STATUS AND REMINDER
- REMINDER ICONS
- REMINDER BOARD
- OPEN THE REMINDER BOARD
- 3 QUICK START GUIDE
- 3.1 KEYS FUNCTION
- 3.2 STARTUP AND SHUTDOWN
- STARTUP
- SHUTDOWN
- 3.3 OPEN AND CLOSE OF THE SCREEN
- OPEN THE SCREEN WHEN IT IS CLOSED
- 3.4 USAGE OF TOUCH SCREEN
- TABLET OPERATING METHODS
- CLICK
- PRESS ON
- QUICKLY SLIDE OR SLIDE INDICATES
- PULL
- ROTATE
- 3.5 HOME PAGE
- THE EXTENDED HOME PAGE
- THE SHORTCUT ICONS MANAGEMENT IN DESKTOP APPLICATION
- CREATE FOLDER ICON IN DESKTOP
- REMOVE THE ICONS IN DESKTOP
- CHANGE THE WALLPAPER OF DESKTOP
- 3.6 VISIT APPLICATION PROCEDURES
- PINNEDSHORTCUTS
- 3.7 USB CONNECTION
- TABLET STORAGE CONFIGURATION
- COPY THE DOCUMENT INTO MEMORY CARD
- 3.8 TYPING WORDS
- USE THE SCREEN KEYBOARD
- CHOOSE THE TYPING METHOD YOU WANT
- USE AND SWITCH OF INPUT METHOD
- 3.9 OPERATION TECHNIQUE
- ENTER WIDGETS INTERFACE
- CREATE APPLICATION SHORTCUT ICONS IN THE DESKTOP
- 3.10 QUICK SETTING
- 4 BASIC SETTING
- 4.1 NETWORK AND INTERNET
- CONNECT WI-FI
- NETWORK NOTICE
- 4.1-2 MOBILE NETWORKS
- GPRS DATA PRIOR MODE
- 4.1.3 DATA USAGE
- 4.1-4 NETWORK SHARING AND PORTABLE HOTSPOTS
- 4.1-5 VPN
- 4.1-6 AIRPLANE MODE
- 4.2 BLUETOOTH
- BLUETOOTH FUNCTION OPERATION
- BLUETOOTH SETTING
- DISPLAY THE FILE YOU RECEIVED
- 4.3 APPS & NOTIFICATION
- 4.3-1 APPS
- 4.3-2 NOTIFICATION
- 4.4 BATTERY
- 4.5 DISPLAY
- 4.5-1 NIGHT LIGHT MODE
- 4.5-2 WALLPAPERS
- 4.5-3 AUTO ROTATION
- 4.5-4 SLEEP
- 4.5-5 FONT SIZE
- 4.5-6 DISPLAY SIZE
- 4.5-7 SCREEN SAVER
- 4.5-8 DEVICE THEME
- 4.6 SOUND
- VIBRATE
- 2.VOLUME
- VOICE CALL RINGTONE
- SHORTCUT TO PREVENT RINGING
- CHARGING SOUNDS
- 4.7 STORAGE
- STORAGE MANAGER
- (2)SD CARD
- 4.8 SECURITY&LOCATION
- 4.8-1 SET LOCKED SCREEN
- SET UNLOCKED PICTURE
- SET UNLOCK PIN CODE
- SET UNLOCK PASSWORD
- 4.8-2 LOCATION SERVICE
- 4.9 USERS & ACCOUNTS
- CLICK ADD AN ACCOUNT, AS PICTURE 4.9-2
- AFTER SUCCESSFULLY LOAD, IT WILL OPEN THE SYNC FUNCTION, AS PICTURE 4.9-3
- 4.10 ACCESSIBILITY
- 4.10-1. FONT SIZE
- 4.10-2. CLICK POWER BUTTON TO END CALLS
- 4.10-3. TOUCH AND HOLD DELAY
- 4.10-4 INSTALL WEBPAGE SCRIPT
- 4.11 SYSTEM
- 4.11-1 LANGUAGE AND INPUT METHOD
- 4.11-2 GESTURES
- SWIPE UP TO HOME BUTTON
- PREVENT RINGING FUNCTION
- 4.11-3 DATE AND TIME
- 4.11-4 BACKUP
- 4.11-5 SYSTEM UPDATE
- 4.11-6 RESET OPTIONS
- 4.11-7 MULTIPLE USERS
- 4.11-8 ENGINEER SELECTION
- 4.11-8 ABOUT TABLET
- 5 MULTI-MEDIA
- 5.1 MUSIC
- 5.2 PHOTO GALLERY
- VIEW PICTURES
- EDIT AND SET PICTURES
- SLIDE SHOW
- CROP
- EDIT
- 5.3 CAMERA
- 5.4 FM RADIO
- 6 COMMUNICATION FUNCTION
- 6.1 PHONE
- 6.2 TEXT MESSAGE
- 6.3 CONTACT LIST
- 7 INTERNET
- 7.1 BROWSER
- 7.2 EMAIL
- EMAIL SETTING
- DELETE THE EMAIL ACCOUNT
- SEND E-MAIL
- 8 OTHER CHARACTERISTICS
- 8.1 NEW GESTURE NAVIGATION
- 8.2 PIP FUNCTION
- SPECIFIC OPERATION
- 8.3 ACCESSIBILITY MENU
- 8.4 DARK MODE
- 8.5 NEW SCREENSHOT SHORTCUTS
- 9 OTHER APPLICATION PROCEDURES
- 9.1 CLOCK
- 9.2 CALCULATOR
- 9.3 FILE MANAGER
- 10 RECORDER
- 11 INSTALLATION OF PROCEDURES
- 11.1 INSTALLATION
- 11.2 U N I NSTALL
- 12 TROUBLES SHOOTING
- THE FIRST STARTUP OF TABLET IS SLOW
- TABLET CAN'T CONNECT WI-FI
- TABLET FEELS HOT
- EMAIL CAN'T BE SET OR REGISTRATION OF APPLICATION PROCEDURE
- THE SYSTEM IS ABNORMAL AND CAN'T WORK
- THE WEBPAGE CAN'T BE OPENED
- TABLET WORKS TERRIBLY SLOW SOMETIMES
- WARNING
- MAXWEST
Brand : Maxwest
Model : Nitro 7Q
Category : Mobile Phone