
Nitro 5P - Mobile Phone Maxwest - Free user manual and instructions
Find the device manual for free Nitro 5P Maxwest in PDF.


| Product Type | Mobile Phone |
| Brand | Maxwest |
| Model | Nitro 5P |
| Operating System | Android |
| Display Size | 5.0 inches |
| Display Resolution | 480 x 854 pixels |
| Processor | Quad-core 1.2 GHz |
| RAM | 1 GB |
| Internal Storage | 8 GB |
| Expandable Storage | microSD up to 32 GB |
| Rear Camera | 5 MP |
| Front Camera | 2 MP |
| Battery Capacity | 2000 mAh |
| Battery Type | Removable Li-Ion |
| Network | 4G LTE |
| SIM Type | Dual SIM (Mini-SIM) |
| Connectivity | Wi-Fi 802.11 b/g/n, Bluetooth 4.0, GPS |
| Dimensions | 143 x 72 x 9 mm |
| Weight | 150 g |
| Charging Port | micro USB |
| Audio Jack | 3.5 mm |
| Sensors | Accelerometer, Proximity |
| Additional Features | FM Radio, Torch, Sleep Mode |
Frequently Asked Questions - Nitro 5P Maxwest
User questions about Nitro 5P Maxwest
0 question about this device. Answer the ones you know or ask your own.
Ask a new question about this device
Download the instructions for your Mobile Phone in PDF format for free! Find your manual Nitro 5P - Maxwest and take your electronic device back in hand. On this page are published all the documents necessary for the use of your device. Nitro 5P by Maxwest.
USER MANUAL Nitro 5P Maxwest
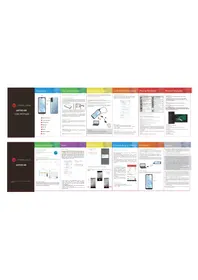
SIM Card Installation
A SIM card contains your phone number and other necessary data. Your device has dual SIM slot that supports 4G [LTE] SIM card.
To Install the SIM Card 1. Make sure the device is turned off and the front facing down. Hold the firmly and use the notch at the bottom corner to loosen the cover. Use material with a hard, thin edge such as your fingernail or a credit card to carefully run along the seam to loosen, then lift the cover until it detaches completely.

-
Remove the battery if it is in. Locate the SIM card slot and insert the proper SIM card into the proper slot. For more information on SIM card installation, check out the included SIM Card & Micro SD Card installation Guide.
-
To turn on/off a SIM card go to Settings > SIM management, then slide the SIM card slides. To turn on/off a SIM card's data connection, go to Settings > SIM management, click on the "Data connection" option, and select a SIM card that has 4G capability.
Keys/Touch Points
Power Key: To power on/off it, press and hold power key for a few seconds. When it is ON, press the power key once to activate or deactivate the screen.
Home key (O): Touch the key to return to the home screen. In idle screen, touch and hold the key to view recently opened apps.
Options key( □ ): In home screen , touch the key to set wallpaper, manage apps, and to access system settings. Touch it to view menu options.
Back key ( ◀ ): Touch to go back to the previous menu.
Charging battery
New batteries are shipped partially charged. Before using your device, install and charge the battery. Batteries perform best after several full charge / discharge cycles.
Charging Your battery
Please charge the battery using the following methods: 1. Charge the phone by connecting it to a computer via the USB cable. 2. Connect the USB cable to the phone and the AC adapter. Plug the AC adapter into an electrical outlet to switch charges.
AC adapter into an electrical buslet to start charging. As the battery charges, an icon will appear in the status bar of the home screen. When the battery is fully charged, a full battery icon appears on screen.

Warning:
- Do not remove the battery while the device is charging. - Use only the AC adapter & USB cable provided with your device. Note: For safely, the battery will stop charging if in danger of overheat
Audio Profile/Sleep Mode
Intelligent keyboard
From the home screen, swipe up to open APP Drawer & select "Settings". Go to "Sound" and change the audio settings by Changing Sound levels and change your ring tones.

Sleep Mode
Turn on sleep mode to save your battery power. 1. On the home screen, touch "App Menu" & select "Settings". 2. Select "Display". 3. Select "Sleep", and choose a time interval from the list.
Greenish
- On the home screen, touch the "APP Menu" & select "Settings".
- Select "Security and location" then select "Screen lock".
- Select the desired type of lock & follow the prompts to set up.
Phone Features
Description Icons
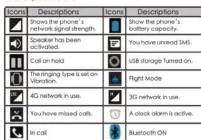
Main Menu & Its Functions
Select
Allow you to view a list of features available in your phone.
-
CLOCK Allow you to
-
Browser Browse the internet, Search engine- default set as Google
-
Calculo
-
Calendar
-
Comey
Allow you to click pictures anytime you want. Your Nitro SP has a 2.0 MP High Definition camera with LED Rash supporting many special features like Face Detection which ensures you to take good quality of pictures and stores them in the Gallery. In Camera, easily choose Camcorder to record Video.
- Comloc To see your
function. 7. Email
Allows you set up your POP/IMAP email accounts.
Phone Features
The Ground Truth image displays a single, solid horizontal line. According to Rule 2 (UNDERSCORE & LINE RULES), this is a stylistic or background line, not a placeholder underscore. Therefore, the OCR result must ignore it and output nothing or only meaningful text. The provided OCR content is "____", which consists of four underscores. This is an incorrect interpretation of the line as a placeholder, violating the rule that stylistic lines must be ignored. The OCR has hallucinated underscores where none should exist in the GT, violating the rule to ignore such lines. Hence, the OCR result is inconsistent with the Ground Truth.
Allow you to save & view photos & videos.
v. Google Play Log In to your Gmail account to view all the applications & download from thousands of applications available on Google Play. Note:
To use this app please connect to an Internet connection.
- Messaging
Allow you to view messages sent & received as a thread.
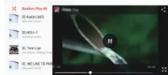
View the list of songs available in your phone. View the artists, albums
plotists & mo
Music Q 1
res Aburs 109 Poi
1.1
∴ m = 3/11
- Phone
Allow you to make phone calls.
-
File Manager You could browse view, modify and install your files
-
MAX SIM KIT
the service information
- Sound Recorder
Allows you to record sound.
View from list of videos.

maxwest
nitroSP
@ 2020/Mawest and the Mawest Logo are registered trademarks Google, Android, Google Play and other markets are trademarks of Google LLC. The Android robot is reproduced or modified from work created and shared by Google and used according to terms described in the Creative Commons 3.0 Attribution Licence.
Phone calls/Texting
To Make Phone Calls 1. Touch the phone icon. 2. Click on a contact from your contact list to make a call.

Composing text messages
Maxwest automatically corrects and suggests words as you
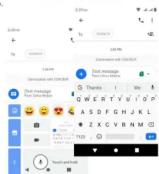
Cut. Copy and Paste Touch and hold text content to bring up the magnifying glass, and then slide your finger to move the insertion points. Then choose to cut. copy. or paste. It is very easy to copy text from web pages. email. or text messages.
WLAN
Turn on WLAN
Maxwest supports WLAN Direct which allows Android™ 9.0 PCIe (In edition) or later devices with the appropriate hardware to connect directly to each other via Wi-Fi without an intermediate access point. Using the APIs, you can discover and connect to other devices. If each device supports Wi-Fi Direct, then communicate over a speedy connection across distances much longer than a Bluetooth connection. This is useful for applications that share data among users, such as a multiplayer game or file sharing.

a. Enter "Settings" >> Click "NETWORKS & internet" >> Select "Wi-Fi" >> Select "Wi-Fi Preference" >> Select "Advanced" >> Then click "Wi-Fi direct" to access Wi-Fi direct feature. b. After click "Search" at the bottom and it will display the available devices.
c. Click "Android_7e33" (in this case specifically) and it will give you option to connect. d. Click "Connect" to connect and it will pop up an interface to confirm like below.
Camera
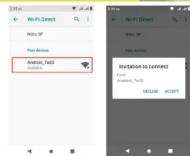
e. Click "OK" and the devices will be connected
Camera Capture images or record videos and share with family and friends!

Connecting to E-mails
Log into your e-mail accounts.
You may log-in to your e-mail accounts from the phone to access your e-mails. From the Home screen select Application "Gmail" and then Enter your email address, password and tap "Next". Select which type of email account you are setting up and enter the proper settings. (POP3 / IMAP / Microsoft Exchange Account)
You will need to enter your user name, password, and server information depending on the type of email account or you can change the settings by tapping "Manual setup" at the top right corner screen. Tap "Next" and select "OK" to accept.
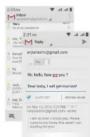
Compose new: 1. Press MENU & select "Compose", 2. Add recipients by typing a name or email address in the "To" field. Matching contacts will appear. Select a recipient or continue typing in the email address to send to multiple contacts. 3. Once finished typing the mail,
elect "senda", "Save as draft", or "Discard". 4. The reply tab contains "Reply", Reply call "and "Forward" options
Delete message:
- Go to Inbox to display messages.
- Touch & hold the message you want to delete.
- Select "Delete".
File Transfer
Connecting Smartphone to PC
Connect the USB cable to your smartphone and computer. Once connected successfully, on your phone, slide the top menudown and click on "Android System", then, press "Transfer Files" button. A new storage named Nitro SP will appear on your PC file "My Computer". Click on it to review files in the smartphone and /or 10 transfer documents between devices. When finished, press Disconnect device from PC.
Note: Photos taken with the camera will be saved under the "DCIM" folder. Screenshots captured will be saved under "Pictures" folder. Put Music files in the "Music" folder for the files to be played properly.

∴ m = 3/11
Screen Capture
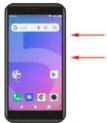
Press Volume(-) and power button at the same time to capture Screenshot". All captured screenshot will be saved under gallery.
Warning
■ Any Changes or modifications not expressly approved by the party responsible for compliance could void the user's authority to operate the equipment. This device complies with part 15 of the FCC Rules. Operation is subject to the following two conditions:
(1) This device may not cause harmful interference, and (2) this device must accept any interference received, including interference that may cause undesired operation.
Note: This equipment has been tested and found to comply with the limits for a Class 8 digital device, pursuant to part 15 of the FCC Rules. These limits are designed to provide reasonable protection against harmful interference in a residential installation. This equipment generates, uses and can radiate radio frequency energy and, if not installed and used in accordance with the instructions, may cause harmful interference to radio communications. However, there is no guarantee that interference will not occur in a particular installation. If this equipment does cause harmful interference to radio or television.
user is encouraged to try to correct the interference by one or more of the following measures: —Recent or relocate the receiving antenna. Receiving the resonance behavior the management recommendations.
—Connect the equipment into an outlet on a circuit different from that to which the receiver is connected. —Consult the dealer or an experienced radio/TV technician for help.
■ SAR tests are conducted using standard operating positions accepted by the FCC with the phone transmitting at its highest certified power level in all tested frequency bands, although the SAR is determined at the highest certified power level, the actual SAR level of the phone while operating can be well below the maximum value, in general, the closer you are to a wireless base station antenna, the lower the power output.
Before a new model phone is a available for sale to the public, it must be tested and certified to the FCC that it does not exceed the exposure limit established by the FCC. Tests for each phone are performed in positions and locations (e.g. at the ear and worn on the body) as required by the FCC.
For body worn operation, this model phone has been tested and meets the FCC RF exposure guidelines when used with an accessory designated for this product or when used with an accessory that Contains no metal and that positions the handset a minimum of 1.0 cm from the body.
■ Non-compliance with the above restrictions may result in violation of RF exposure guidelines.

Brand : Maxwest
Model : Nitro 5P
Category : Mobile Phone