TCTO09 - Food processor Total Chef - Free user manual and instructions
Find the device manual for free TCTO09 Total Chef in PDF.


| Product Type | Food Processor |
| Brand | Total Chef |
| Model | TCTO09 |
| Dimensions (approx.) | 10 x 8 x 14 inches (25 x 20 x 36 cm) |
| Weight (approx.) | 5.5 lbs (2.5 kg) |
| Power Supply | 120V / 60Hz (standard US plug) |
| Power Consumption | 500-700 Watts |
| Bowl Capacity | 7 cups (1.6 liters) |
| Main Functions | Chopping, Slicing, Shredding, Mixing, Pureeing, Kneading |
| Accessories Included | Chopping blade, Slicing disc, Shredding disc, Kneading hook, Pusher |
| Material | Plastic body, Stainless steel blades |
| Speed Settings | 2 speeds + pulse |
| Safety Features | Interlock safety switch, Non-slip feet, Overload protection |
| Cleaning | Removable parts dishwasher safe (top rack); Wipe motor base with damp cloth |
| Storage | Cord wrap under base, Accessory storage box |
| Warranty | 1 year limited warranty |
| Spare Parts Availability | Bowl, lid, blades, discs available separately |
| Repair Information | Contact Total Chef customer service or authorized service centers |
| Manual | Downloadable PDF from notice-facile.com |
Frequently Asked Questions - TCTO09 Total Chef
User questions about TCTO09 Total Chef
0 question about this device. Answer the ones you know or ask your own.
Ask a new question about this device
Download the instructions for your Food processor in PDF format for free! Find your manual TCTO09 - Total Chef and take your electronic device back in hand. On this page are published all the documents necessary for the use of your device. TCTO09 by Total Chef.
USER MANUAL TCTO09 Total Chef
This product is warranted to the retail customer for 90 days from date of retail purchase, against defects in material and workmanship.
WHAT IS COVERED
- Replacement parts and labour.
• Transportation charges to customer for the repaired product.
WHAT IS NOT COVERED
• Damage caused by abuse, accident, misuse, or neglect.
- Transportation of the unit or component from the customer to Koolatron.
IMPLIED WARRANTIES
Any implied warranties, including the implied warranty of merchantability are also limited to the duration of 90 days from the date of retail purchase.
WARRANTY AND SERVICE PROCEDURE
Keep the original, dated, sales receipt with this manual. If you have a problem with your unit, or require replacement parts, please call 1-800-265-8456 or email service@koolatron.com
Koolatron has Master Service Centres at these locations:
U.S.A. - 4330 Commerce Dr., Batavia, NY 14020-4102
Canada - 139 Copernicus Blvd., Brantford, ON N3P1N4
A Koolatron Master Service Centre must perform all warranty work.

TOASTER OVEN
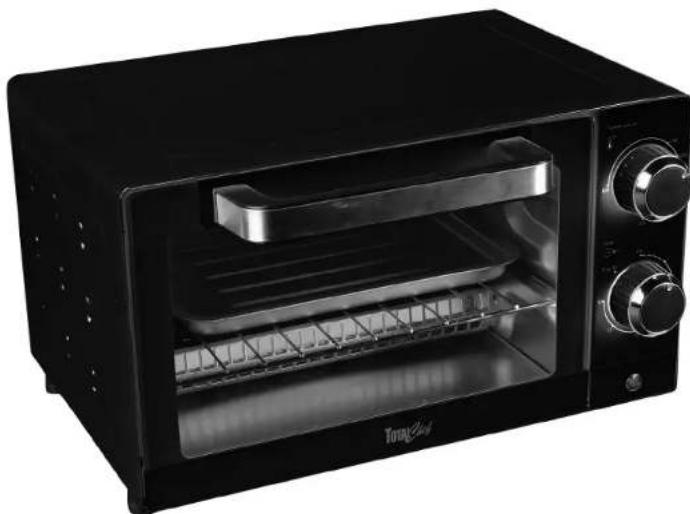
natural_image
Black square microwave oven with open lid and control knobs (no visible text or symbols)
www.koolatron.com
©2023 Koolatron, Inc. All rights reserved.
All specification are subject to change without notice.
H1S289
3/2023 - v5
TCTO09
User Manual
Please Read These Instructions Carefully Before Use!
IMPORTANT SAFEGUARDS
When using an electrical appliance, basic safety precautions should always be followed to reduce the risk of fire, electric shock, and/or injury, including the following:
- Read all instructions before using.
- Ensure the voltage is compliant with the voltage range stated on the rating label and ensure the grounding of the outlet is in good condition.
- If the supply cord is damaged, it must be replaced by the manufacturer or its service agent or a similarly qualified person in order to avoid a hazard.
- To protect against risk of electric shock, do not pour water on cord, plug and ventilation.
- Do not immerse unit into water as this would give rise to electric shock.
- Unplug the appliance after using or before cleaning.
- Do not use accessories not recommended by manufacturer.
- Children should be supervised to ensure that they do not play with the appliance.
- Do not operate appliance on or near stove top or sources of high heat.
- Never clean with scouring powders or hard implements.
• This appliance is intended for household use only.
- Do not operate appliance if there is any sign of damage to the power cord or any other part of the appliance.
- Do not disconnect power supply by pulling on cord, grasp by plug.
- Do not attempt to repair the unit yourself. Please contact Koolatron Customer Service in the event that you have difficulty with the product, and you will be advised of the appropriate course of action.
- Do not touch the hot surfaces. The temperature of the door or the outer surface may be high when the toaster oven is operating. Always use oven mitts when handling hot materials, and allow metal parts to cool down before cleaning. Allow the units to cool thoroughly before putting in or taking off parts. Always use the handle when moving the unit.
This symbol indicates, temperature of accessible surfaces may be high when the appliance is operating and for some time after use.
- Do not place the appliance near the hot gas or electronic burner or other toaster oven, for this will cause fire.
- A fire may occur if the toaster oven is covered or touching flammable material, including curtains, draperies, walls and the like when in operation. Do not store any items on top of the appliance during operation.
- Do not cover crumb tray or any part of the oven with metal foil, for it will cause overheating.
- Oversize food shall not be put into the appliance for it will cause fire or electronic shock.
- Extreme caution is necessary when disposing the hot grease when broiling.
HOUSEHOLD USE ONLY SAVE THESE INSTRUCTIONS
PARTS & FEATURES
CONTROL PANEL
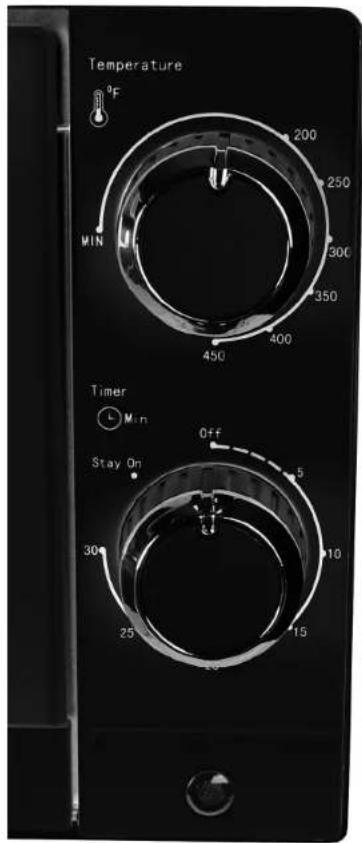
Temperature Control Knob
- turn to set temperature desired
- maximum setting : 450°F
Timer Knob
- turn to set desired toasting time
- maximum : 30 minutes
Timer Knobs
OPERATION
BEFORE FIRST USE
Remove packing materials and any stickers. Remove the detachable accessories from oven. Wash in sudsy water, rinse and dry with a cloth or paper towel. Replace all the detachable accessories in oven. Select a location for the unit. Do not place unit under cabinets or too close to the wall to allow heat to flow without damaging counter space. Plug unit into electrical outlet.
NOTE
- Initial start-up operation may result in minimal smell and smoke (about 15 min.). This is normal. It is due to the protective substance on heating elements which protect them from salt effects during shipping from factory.
- The minimum distance between the food and the upper heating element should be 1.2" / 30mm, for the perfect result.
- The baking pan can just be placed on the grill rack.
- Always monitor the food at this setting to ensure that you are not overcooking.
- The interior is equipped with slots at different heights for placing grill rack in order to get perfect results.
- Make sure the crumb tray is completely positioned in place before using.
- The toaster oven is with "stay on" function, it means that if you rotate the timer to "stay on" position, the toaster oven will not stop working until you manually shut it off.
- Rotate the temperature control knob clockwise to 450^ F position. Both heating elements will work. Open the oven door and place the bread slice on the wire rack. One slice of bread is placed in the center of wire rack, four slices side by side. Four slices will be lighter than one slice—adjust timer accordingly. NOTE – Remember to remove the baking pan firstly for even toasting result.
2. Time setting
Turn the time knob to the corresponding position depending on the bread color. Usually the time is in the range of about 3-10 minutes. The more toasting time, the bread is darker. When setting the timer dial for less than 5 minutes, always rotate timer to over 5 minutes and then rotate back to your desired time. This will ensure a safe and accurate timer setting. To interrupt the toasting process just need to turn back the timer to OFF position. When the timer has reached to OFF position a bell sound will be heard to prompt the completion of toasting, also the power supply will be cut off automatically.
WARNING: The bread may catch fire if the toasting time is setting too long. Close supervision is necessary during toasting and do not set the time too long.
BAKING (biscuit, cake, pizza and bread)
- Put the baking pan on the wire rack. Put the foods on baking pan after 10 minutes preheating, the suggested temperature is about 350-450°F. Temperature and time is based on food type and thickness. Usually the proper temperature for baking the food like bread or pizza is 350°F.
- When baking, the upper and lower heating elements will cycle on and off to maintain the constant temperature.
- When baking is finished, turn the timer to OFF position.
- Remove the food from the oven carefully, use oven mitts.
OPERATION (cont.)
GRILLING (FOR CHICKEN WINGS AND DRUMSTICKS)
- Put the baking pan above the wire rack and place the food on baking pan. Always use the baking pan when grilling the food like chicken wings or drumstick with fat, as it can catch the drippings when grilling the food.
NOTE - We suggest preheating oven for about 10 minutes before placing the food. - Rotate the temperature controller clockwise to your desired temperature, usually for grilling much thick food. It is advised that you should turn the temperature controller to the 450☒, as it can get better effect. When grilling, both the heating elements will work.
- Set the time based on the food type, thickness. The heat element will be cycled on and off to maintain the constant cavity temperature. For short time cooking, the time can't be set more than 30 minutes. For long time cooking (exceeding 30 minutes), you must set the timer to STAY ON position. In this case once the food is over you must stop the oven manually by turning the Timer to OFF position.
NOTE - Always monitor the food to prevent overcooking. Turn over the food during the process or add the flavor if necessary. Always use oven gloves to avoid the risk of scalding.
DEFROSTING
- Remember to put the food on the baking pan when defrosting.
- Put the baking pan on the wire rack, removing all paper or plastic wrapping. The temperature should be set at 200-250^ F. It is unnecessary to preheat the oven. The time needed for defrosting is largely dependent on food weight, type and shape. If the food is thick and heavy, the temperature should be set at 250^ F and long time is needed. It is necessary to turn over the food. The oven temperature should not be set too high as this may cause the food to be burned. If the food can be cut easily by knife the defrosting process can be ended. Always cook food promptly after defrosting.
USEFUL TIPS
- Condensation will appear on the oven door for some foods and then disappear. This is normal.
- Cook food immediately after defrosting.
- Frozen foods and thick meat will take longer to cook.
- Avoid opening the Oven Door too frequently to prevent heat loss.
- When baking, smoke will likely appear. Removing excess fat prior to baking can reduce this.
CLEANING AND MAINTENANCE
- Before cleaning the toaster oven unplug it and allow it to cool completely.
- Wash all the attachments with mild, soaped water including the grill rack and the baking pan.
- Immerse the attachments on the water to wash them completely, abrasive cleansers, scrubbing brushes and chemical cleansers will damage the grill rack and baking pan.
- Using a mild cloth to clean the inner of the oven, remember to clean it regularly.
- To clean the door by using a hot cloth with detergent or soap.
- Do not immerse the unit on water to clean the appliance.
- Do not wipe the heating elements.
- Do not install the grill rack or baking pan on the lower heating element directly.
- Do not use any metal pad to clean the surfaces of oven to avoid reducing finish.
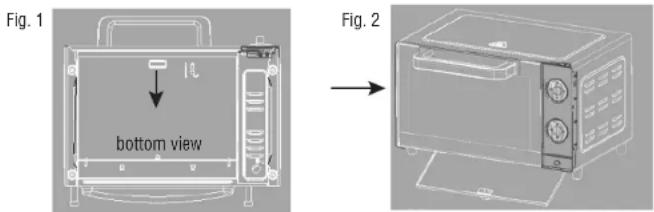
- Press down the tab of crumb tray downwards (see Fig. 1) and pull it outwards to open the crumb tray (see Fig. 2). Wipe interior of crumb tray with a damp cloth. After cleaning, close the crumb tray to the bottom of oven and then push it inwards.
WARNING Do not touch the tab of crumb tray before cooling it down completely.
- Dry all the attachments with a clean and dry cloth, then replace in position.
CAUTION
- To prevent counter top from being damaged, the toaster oven must be operated with the crumb tray in place, securely closed and cleaned of excess food.
- Never operate your toaster oven with the oven door open.
- Never put the baking pan (or any other accessory) directly on the top of the lower heating elements.
TROUBLE SHOOTING
Unit smokes during bake function
- Initial start up operation may result in minimal smell and smoke (about 15 min.). This is normal. It is due to the protective substance on heating. Elements which protects them from salt effects during shipping from factory.
- Smoke in baking functions often means the multi – use pan or Interior is dirty.
- Smoke almost always appears in baking and is normal. Cut off excess fat prior to baking to reduce smoke.
- Stop using appliance if smoke source is the power cord and plug.
The wire rack is stuck and oven door does not operate smoothly
- Remove wire rack and clean inside the rack grooves inside oven chamber. Also clean inside of crumb tray. Check that hooks on oven properly aligned into wire rack.
Toast black and smoking or too light
- Choose a lighter or darker crust setting.

WARNING! This product contains chemicals known to the State of California to cause cancer, and birth defects or other reproductive harm. www.P65Warnings.ca.gov
- WHAT IS COVERED
- WHAT IS NOT COVERED
- IMPLIED WARRANTIES
- WARRANTY AND SERVICE PROCEDURE
- TOASTER OVEN
- IMPORTANT SAFEGUARDS
- HOUSEHOLD USE ONLY SAVE THESE INSTRUCTIONS
- PARTS & FEATURES
- OPERATION
- BEFORE FIRST USE
- NOTE
- Time setting
- BAKING (biscuit, cake, pizza and bread)
- OPERATION (cont.)
- DEFROSTING
- USEFUL TIPS
- CLEANING AND MAINTENANCE
- CAUTION
- TROUBLE SHOOTING
Brand : Total Chef
Model : TCTO09
Category : Food processor