
Navigator - Stroller Baby Trend - Free user manual and instructions
Find the device manual for free Navigator Baby Trend in PDF.


| Product Type | Stroller/Wagon |
| Brand | Baby Trend |
| Model | Navigator |
| Weight Capacity per Child | 55 lb (24.94 kg) |
| Total Weight Capacity (with accessories) | 110 lb (49.89 kg) |
| Recommended Age | At least 6 months and able to sit upright unassisted |
| Harness Type | 5-point safety harness with crotch strap |
| Brake Type | Rear wheel brakes with lever |
| Fold Mechanism | Double lock with safety lock and trigger |
| Canopy | Removable, adjustable with snap closure and hook-and-loop fasteners |
| Child Tray | Removable, maximum weight 5 lb (2.26 kg) |
| Parent Organizer | Soft organizer, maximum weight 2 lb (0.90 kg) |
| Wheels | Front and rear, lockable; rear axle release for removal |
| Cleaning Instructions | Spot clean with mild soap and water; surface wash frame and fabric |
| Warranty | 1 year against workmanship defects |
| Assembly Required | Yes, adult assembly required |
| Safety Features | Safety harness, brakes, double lock fold, never leave child unattended |
| Accessories (sold separately) | Car seat adapter, Seat 2 Mat, basket, stroller board, fabric cover |
| Customer Service | 1-800-328-7363 (M-F, 8am-4:30pm PST) |
Frequently Asked Questions - Navigator Baby Trend
User questions about Navigator Baby Trend
0 question about this device. Answer the ones you know or ask your own.
Ask a new question about this device
Download the instructions for your Stroller in PDF format for free! Find your manual Navigator - Baby Trend and take your electronic device back in hand. On this page are published all the documents necessary for the use of your device. Navigator by Baby Trend.
USER MANUAL Navigator Baby Trend
natural_image
Line drawing of a baby stroller with four wheels and a back cover (no text or symbols)Instruction Manual Manual de Instrucciones
WG03XXXXA
Baby Trend, Inc. 13048 Valley Blvd. Fontana CA 92335
1-800-328-7363 (8:00 a.m. \~ 4:30 p.m. PST) www.babytrend.com

babytrend®
Quality·Comfort·Style

babytrend®
WARRANTY
DO NOT RETURN YOUR PRODUCT TO THE STORE. PLEASE CONTACT BABY TREND® FOR REPLACEMENT PARTS, SERVICE AND REPAIR.
The Baby Trend® warranty covers workmanship defects within 1 year of purchase. Any product which has been subjected to misuse, abuse, abnormal use, excessive wear and tear, improper assembly, negligence, environmental exposure, alteration or accident, or has had its serial number altered or removed invalidates all claims against the manufacturer. Any damage to property during installation is the sole responsibility of the end user.
Customer Service Department can be contacted at 1 (800) 328-7363 Monday through Friday between 8:00 a.m. and 4:30 p.m. (PST). Return Authorizations are required prior to returning product(s) to Baby Trend®. Please visit http://babytrend.com/pages/limited-warranty for complete warranty details.
GARANTIA
NO DEVUELVA SU PRODUCTO A LA TIENDA. POR FAVOR CONTACTE A BABY TREND® PARA PIEZAS DE REPUESTO, SERVICIO Y REPARACION.
IMPORTANT! To ensure safe operation of your product, please follow these instructions carefully. Please keep these instructions for future reference.
IMPORTANT! Before assembly and each use, inspect this product for damaged hardware, loose joints, missing parts or sharp edges. NEVER use if any parts are missing or broken.
IMPORTANT! Adult assembly is required. Keep child away during unpacking and assembly.
WARNING: Please follow all of these instructions to ensure the safety of your child. Keep these instructions for future reference.
WARNING: Failure to follow these instructions could result in serious injury or death. Avoid serious injury from falling or sliding out, always use the safety harness and ensure that the children are properly positioned according to these instructions.
WARNING: Never leave children unattended.
WARNING: Care must be taken when folding and unfolding the stroller to prevent finger entrapment.
- CAUTION: NEVER run or jog with this stroller. This stroller is designed for up to 2 children only. Use with more than 2 children may cause an unbalanced condition which can injure/harm your child. Children must be at least 6 month old and be able to sit upright unassisted.
- Purses, shopping bags, parcels, diaper bags or accessory items may change the balance of the stroller and cause a hazardous, unstable condition.
- Be certain the stroller is completely opened and locked in place before allowing a child near the stroller.
• The maximum weight that can be carried in the child tray is 5 lbs (2.26 kg). - The maximum weight that can be carried in the soft parent organizer is 2 lbs (0.90 kg).
- The maximum weight capacity of the stroller is 55 lb (24.94 kg) for each child. The maximum weight capacity of the stroller in combination with any accessories is 110 lbs (49.89 kg) total. Exceeding the weight limit will cause excessive wear and stress on the stroller and may cause a hazardous unstable condition to exist.
• NEVER use the stroller on stairways or escalators. - NEVER use the stroller with roller skates, in-line skates, skateboards or bicycles.
• NEVER allow your stroller to be used as a toy.
• To clean use only mild household soap or detergent and warm water on a sponge or clean cloth. - Check your stroller for loose screws, worn parts, torn material or stitching on a regular basis. Replace or repair parts as needed.
- Discontinue use of stroller should it malfunction or become damaged.
natural_image
Simple line drawing of a vehicle chassis with wheels and a handle (no text or symbols)Rear Axle and (2) Wheels Eje trasero y (2) Ruedas
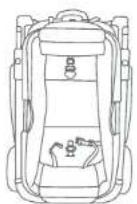
Wagon Frame
Marco de vagón
*Accessories sold separately*
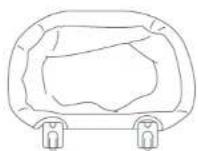
Basket Canasta
Sold separately at www.babytrend.com
natural_image
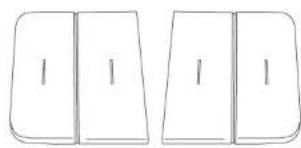
Two simple line drawings of rectangular panels with vertical lines, no text or symbols presentSeat 2 Mat Asiento a colchoneta
natural_image
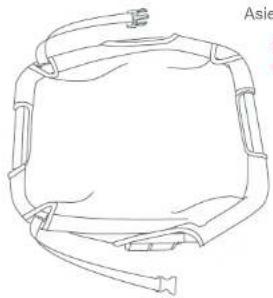
Line drawing of a rectangular object with curved edges and a small protrusion at the top (no text or symbols)Sold separately at www.babytrend.com
Car seat adapter- fabric cover
(visit babytrend.com for compatibility chart)
Adaptador de la silita para el automóvil - Cubierta de tela
(visite babytrend.com para ver la tabla de compatibilidad)
Sold separately at www.babytrend.com
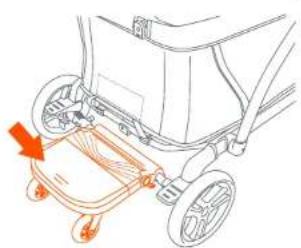
natural_image
Line drawing of a bicycle steering wheel with orange arrows indicating motion (no text or symbols)Stroller Board / Ride-On Board Accessory Tablero De Cochecito / Ride-On Tablero Accesorio Sold separately at www.babytrend.com
ASSEMBLY MONTAJE ASSEMBLY MONTAJE
WARNING: Care must be taken when unfolding the stroller to prevent finger entrapment.
CAUTION: Do not allow children near stroller while unfolding.
To attach the wheels, unfold stroller as described in the following section:
natural_image
Diagram of a folding chair with two red arrows indicating movement or force direction (no text or symbols)Fig. 1b
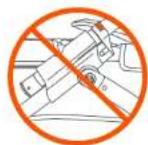
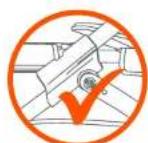
Fig. 1c
Copyright © 2023, Baby Trend Inc.. All Rights Reserved. Todos los derechos reservados.
ASSEMBLY MONTAJE
ASSEMBLY MONTAJE
FRONT WHEELS RUEDA DELANTERA
2) • Insert front wheel axle pin into the wheel hub until the wheel locks firmly into place. Repeat on other side. (Fig. 2a). NOTE: Pull on the wheel assembly to ensure that it is securely attached to the stroller.
natural_image
Mechanical diagram showing a lever mechanism with a highlighted force arrow (no text or symbols)Fig. 2a
NOTE: NEVER use stroller if wheels do not lock into place. If you need assistance, please contact our customer service department at 1-800-328-7363, M-F, between 8am and 4:30pm, PST.
Attach the rear axle assembly and wheels as follows:
3) · Position stroller with rear leg tubes facing upward. Place the rear axle with wheels over the rear legs and apply downward pressure on both sides. Ensure both sides lock into place (Fig. 3a).
WARNING: Do not place hot liquids or more than 2 lb. (0.90kg) pounds in the parent tray. Serious burns or unstable conditions can result.
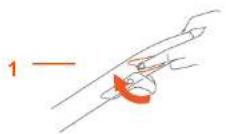
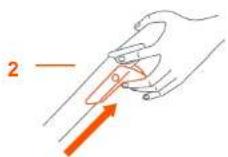
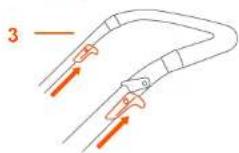
4) • Strap In The Soft Parent Organizer: Use the hook and loop to hang the soft parent organizer onto the stroller handle. Follow illustrations 1-3 (Fig. 4a). Be sure to fasten tightly.
Fig. 4a
CHILD TRAY BANDEJA PARA NIÑOS
WARNING: Do not place hot liquids or more than 5 pounds in the child tray. Serious burns or unstable conditions could result.
5) • Attach child tray by lining up the corresponding slots located on stroller frame. Slide down into position until locked into place (Fig. 5a). NOTE: Check to make sure the child tray is secure before using.
natural_image
Diagram of a human pelvic band with orange bandpass and circular cutouts (no text or labels)Fig. 5a
ASSEMBLY MONTAJE ASSEMBLY MONTAJE
CANOPY DOSEL
6) · To install the canopy: Add the canopy frame into the designated slots located on the child tray (Fig. 6a).
• To open the canopy: Behind the main fold mechanism use the strap and snap closure to anchor the canopy. Firmly spread out both sides of the canopy (Fig 6b).
• To secure canopy: Fasten the canopy to the front and back circle tabs. Then, stitch each hook and loop to the wagon (Fig. 6c).
• To loosen canopy: Unhook the canopy from both front and back circle tabs. Then, detach all hook and loops from the canopy. (Fig. 6d).
• To remove the canopy: Press the tab on each end of the canopy, and lift up the entire canopy from the bottom ends slots of the child tray (Fig. 6e).
• To remove the child tray: push the tabs outward and pull out the child tray (Fig. 6f). NOTE: The canopy may also be installed without the child tray. Insert the ends into holes.
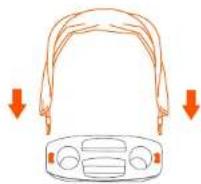
Fig. 6a
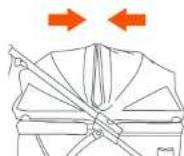
Fig. 6b
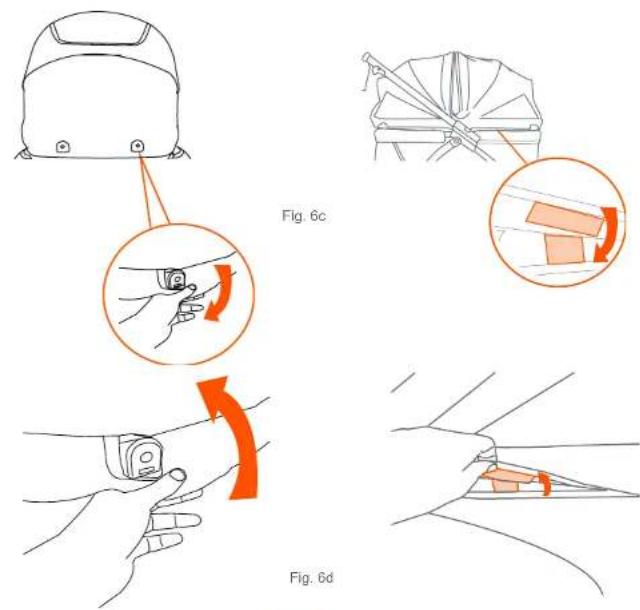
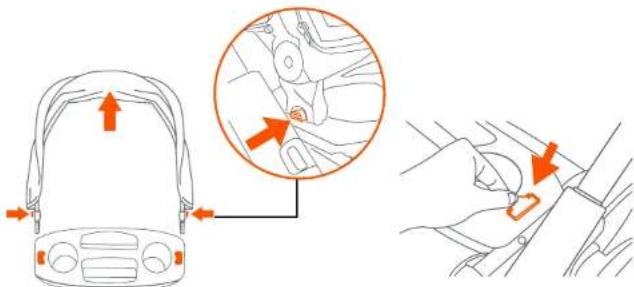
Fig. 6fFig. 6e
ASSEMBLY MONTAJE ASSEMBLY MONTAJE
Fig. 7a
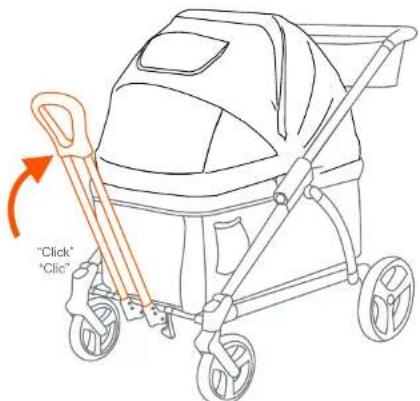
Fig. 7b
ASSEMBLY MONTAJE
FOLD PLEGAR
natural_image
Diagram of a mechanical clamp or bracket assembly with directional arrows indicating motion (no text or symbols)Fig. 7c
TO FOLD STROLLER PARA PLEGAR EL CARRITO
8) • Close the canopy by reversing (Fig. 6b).
• To use the double lock feature: (1) push the safety lock up. (2) Lift up the trigger to hold the safety lock into place. (3) Pull both triggers together (Fig. 8a).
- Push down on the stroller handle until the stroller is completely folded. Ensure the fold latch clicks and secures the stroller closed (Fig. 8b).
• Cierre el dosel invirtiendo (Fig. 6b).
- Para usar la función de doble bloqueo, (1) empuje el bloqueo de seguridad hacia arriba. (2) Luego levante el gatillo para mantener el bloqueo de seguridad en su lugar. (3) Jale ambos gatillos al mismo tiempo (Fig. 8a).
FOLD PLEGAR
UNFOLD DESPLEGAR
Fig. 9b
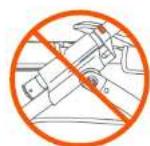
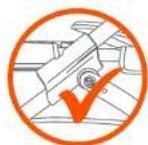
SAFETY SEGURIDAD SAFETY SEGURIDAD
TO USE THE SAFETY HARNESS PARA USAR EL CINTURON DE SEGURIDAD
10) • The child tray is not designed to hold the child in the stroller. Stay near and watch child during use. NEVER leave child unattended.
- Place the crotch strap between your child's legs. Insert the Harness Buckles into the Center Clasp with the Button.
- NOTE: Only use top slots with Baby Trend Seat 2 Mat accessory (sold separately). Adjust waist straps for your child's comfort and safety by sliding buckles in either direction. Safety straps are to fit snug around your child (Fig. 10a).
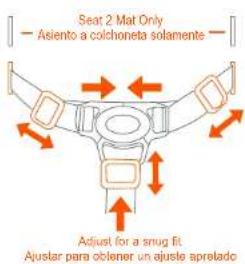
Fig.10a
WARNING: Always set brakes when the stroller is not being pushed so that the stroller will not roll away. NEVER leave stroller unattended on a hill or incline as the stroller may slide down the hill.
12) To engage brakes, apply light downward pressure to the brake lever located on each rear wheel. The stroller may require slight forward or rearward movement in order to line up the teeth on the brake with each wheel brake cluster (Fig. 12a). NOTE: Check that the stroller will not move and that both brakes are properly applied.
natural_image
Line drawing of a car wheel with orange tool points, no text or symbols presentFig. 12a
CAR SEAT ADAPTER Sold separately
(visit babytrend.com for compatibility chart)
Always remove the child tray and canopy from the wagon to install the adapter. See pages 11 to 13.
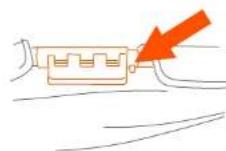
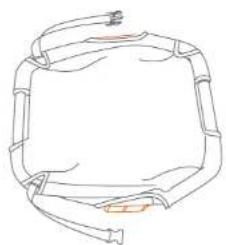
13) · Unfold the adapter and place it on a flat surface (Fig 13a). Connect both ends of the adapter bars together as shown on (Fig 13b). NOTE: Ensure both pins click into the holes. Flip the adapter (Fig 13c).
natural_image
Diagram of a vehicle seat with an orange arrow indicating direction (no text or symbols)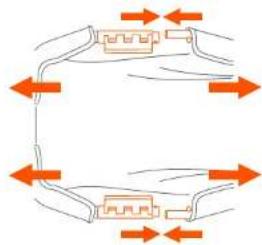
flowchart
graph TD
    A["Start"] --> B{Process Step}
    B --> C["Loop Back"]
    C --> D["End"]
    style A fill:#f9f,stroke:#333
    style D fill:#f9f,stroke:#333
Fig. 13bFig. 13a
natural_image
Simple line drawing of a rectangular frame with curved edges and a small orange accent (no text or symbols)Fig. 13c
ACCESSORIES ACCESORIOS
ACCESSORIES ACCESORIOS
14) • REMOVAL: To remove the adapter wrap your thumbs over the wagon frame and use all your other fingers to apply pressure on the clip to release it from the bar (Fig. 14).
NOTE: Refer to pages 29 and 30 for car seat installation.
Fig. 14
INFANT CAR SEAT Sold separately
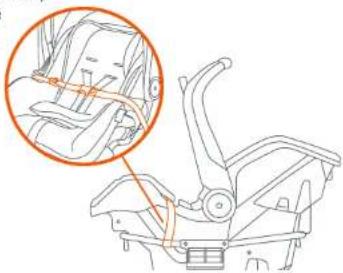
15) • Place the car seat onto the Car Seat Adapter. The front of the car seat should be facing the same direction as the stroller wagon handle. Ensure the car seat stoppers are resting on the Adapter Bars (Fig. 15a).
- Strap the Safety Belts through the Belt Path on the Car Seat and connect the buckles together (Fig.15b). Tighten the strap so it fits snugly and the car seat is secured to the frame (Fig. 15c).
natural_image
Mechanical assembly diagram showing a bracket with arrows indicating motion direction (no text or symbols)Fig. 15b
natural_image
Technical line drawing of a car seatbelt assembly with an inset close-up showing the seatbelt detail (no text or symbols present)Fig. 15c
ACCESSORIES ACCESORIOS
ACCESSORIES ACCESORIOS
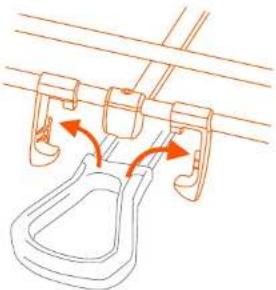
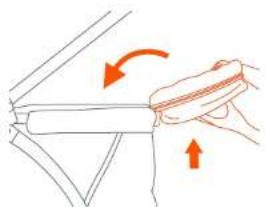
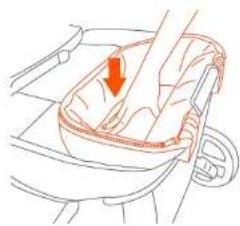
16) To Install: Attach the basket from the outside frame of the wagon. Ensure both latches are straight, facing the frame. Insert by pushing in and sliding down the latches until it locks (Fig. 19a). IMPORTANT: DO NOT put child in the basket.
natural_image
Illustration of a hand adjusting a bag with arrows indicating force or movement (no text or symbols)Fig. 16a
natural_image
Illustration of a hand holding a zipper over a car window, with arrows indicating movement (no text or symbols)Fig. 16b
natural_image
Line drawing of a hand pressing down on a bowl with a red arrow indicating force or direction (no text or symbols)Fig. 16c
ACCESSORIES ACCESORIOS
ACCESSORIES ACCESORIOS
TO REMOVE BASKET PARA RETIRAR LA CESTA
17) • To detach: Flip the basket over the wagon frame. Pull the latch levers forward and lift up, until the basket comes off completely (Fig. 17).
Fig. 17
SEAT 2 MAT Sold separately ASIENTO A COLCHONETA
18) • Option 1 Mat(s): Lay flat in stroller (Fig. 18a). IMPORTANT: Only use the harness in the lowest position, and place mat(s) with round edge towards the back seating position as shown in (Fig. 18b). (See step 19 for rethreading).
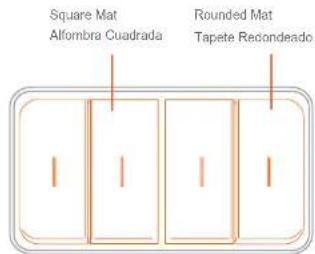
Fig. 18a
- Option 2 Seat(s): To use as seat(s) thread the crotch buckle through the folded or unfolded mat(s). IMPORTANT: Only use the lowest position for the unfolded mat and the highest position for folded mat (Fig. 18c) (Fig 18d). Always buckle the harness to use as a stroller. Refer to step 10 for harness instructions. (See step 19 for rethreading).
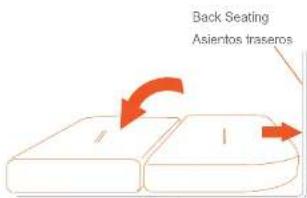
Fig. 18b
natural_image
Simple line drawing of a device with an arrow pointing to a component (no text or symbols)Fig. 18c
Fig. 18d
Copyright © 2023, Baby Trend Inc.. All Rights Reserved. Todos los derechos reservados.
ACCESSORIES ACCESORIOS
MAINTENANCE MANTENIMIENTO
desdoblada(s).
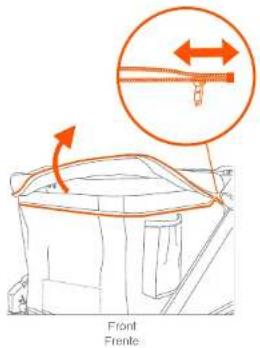
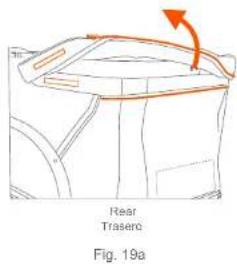
19) • To detach the fabric: for cleaning or replacement, unzip from the front and rear of the wagon frame (Fig. 19a).
- Through the pocket opening, remove the D-Rings straps from the fabric near the bottom front and rear frames to unthread the harness straps (Fig. 19b). Remove the screws on the underside of the frame (Fig. 19c).
• To reattach the fabric: ensure that the fabric is realigned to the corresponding front and rear end frames.
• Through the pocket opening, Insert the D-Ring straps through the slots. The straps must be secured completely with the D-Ring. Refer to (Fig. 19b).
• To ensure the fabric is securey attached, the zippers should be zipped and the hook and loop fasteners are attached (Fig. 19a).
NOTE: Check for worn parts, torn material, or stitching on a regular basis. Replace or repair parts as needed.
MAINTENANCE MANTENIMIENTO MAINTENANCE MANTENIMIENTO
natural_image
Simple line drawing of a cable or cable clamp securing a wire (no text or symbols)Attach the rear axle assembly and wheels as follows:
Fig. 20a
20) • To release the entire rear wheel assembly, push in the rear wheel release. The wheel easily detaches from the bushing (Fig. 20a).
natural_image
Line drawing of a stroller with wheels and directional arrows indicating motion (no text or symbols)Fig. 20b
MAINTENANCE MANTENIMIENTO MAINTENANCE MANTENIMIENTO
ADAPTER FABRIC Comes with adapter TELA DE ADAPTADOR
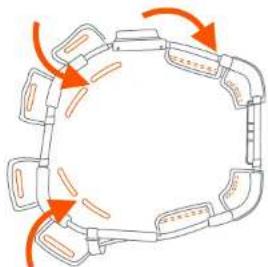
21) Use the pin to separate the frame, undo the hook and loop fasteners. Slide out the pre sewn panels from the adapter bar to remove the fabric (Fig. 21a).
natural_image
Illustration of hands assembling a mechanical component with an arrow indicating rotation (no text or symbols)Fig. 21a
flowchart
graph TD
    A["Start"] --> B["Segment 1"]
    B --> C["Segment 2"]
    C --> D["Segment 3"]
    D --> E["Segment 4"]
    E --> F["Segment 5"]
    F --> G["End"]
    style A fill:#f9f,stroke:#333
    style G fill:#f9f,stroke:#333
Fig. 21b
NOTE: NEVER use stroller if wheels do not lock into place. If you need assistance, please contact our customer service department at 1-800-328-7363, M-F, between 8am and 4:30pm, PST.
- Cleaning Seat Pad: Spot clean only - Surface wash small spots with mild solution of soap and water. Rinse with water to remove soap solution. Wipe or air dry.
- Cleaning Stroller: Surface wash stroller frame, plastic parts and fabric with mild solution of soap and water. Wipe surfaces with water to remove soap solution. Wipe or air dry.
- Check your stroller for loose screws, worn parts, torn material or stitching on a regular basis. Replace or repair parts as needed.
MAINTENANCE MANTENIMIENTO
The Customer Service Department can be contacted at 1 (800) 328-7363 Monday through Friday between 8:00 a.m. and 4:30 p.m. (PST). Return Authorizations are required prior to returning product(s) to Baby Trend®.
BABY TREND® SERVICIO AL CLIENTE
- babytrend®
- WARRANTY
- GARANTIA
- ASSEMBLY MONTAJE ASSEMBLY MONTAJE
- ASSEMBLY MONTAJE
- FRONT WHEELS RUEDA DELANTERA
- CHILD TRAY BANDEJA PARA NIÑOS
- CANOPY DOSEL
- FOLD PLEGAR
- TO FOLD STROLLER PARA PLEGAR EL CARRITO
- UNFOLD DESPLEGAR
- SAFETY SEGURIDAD SAFETY SEGURIDAD
- CAR SEAT ADAPTER Sold separately
- ACCESSORIES ACCESORIOS
- INFANT CAR SEAT Sold separately
- TO REMOVE BASKET PARA RETIRAR LA CESTA
- SEAT 2 MAT Sold separately ASIENTO A COLCHONETA
- MAINTENANCE MANTENIMIENTO
- MAINTENANCE MANTENIMIENTO MAINTENANCE MANTENIMIENTO
- ADAPTER FABRIC Comes with adapter TELA DE ADAPTADOR
- BABY TREND® SERVICIO AL CLIENTE
Brand : Baby Trend
Model : Navigator
Category : Stroller