
Ravo - Guitar effects pedalboard Hotone - Free user manual and instructions
Find the device manual for free Ravo Hotone in PDF.


| Product Type | Guitar/Bass Multi-Effects Processor & USB Audio Interface |
| Brand | Hotone |
| Model | Ravo (MP-10) |
| Effect Types | 130 types |
| Simultaneous Effect Modules | Up to 8 |
| User Banks/Patches | 10 banks x 10 patches (A-J) |
| Preset Banks/Patches | 10 banks x 10 patches (0-9) |
| Built-in Looper | Maximum 30 seconds recording time |
| Drum Machine | 100 rhythm patterns with adjustable tempo (40-250 BPM) and volume |
| Audio Interface | USB Audio 2.0, 16-bit/44.1kHz, USB MIDI |
| Expression Pedal | Built-in, assignable to volume or effect parameters |
| Display | LED (patch number) and LCD (patch name, parameters) |
| Input Jack | 1/4" mono (6.35mm) |
| Output Jack | 1/4" stereo (6.35mm) |
| Aux In Jack | 1/8" stereo (3.5mm) |
| Phones Jack | 1/8" stereo (3.5mm) |
| USB Jack | USB Type-B |
| Power Supply | DC 9V center negative, 500mA AC adapter (included) or 4 x AAA batteries (up to 6.5 hours) or USB bus power |
| Power Switch | On/Off (slide); USB bus power requires OFF position |
| Dimensions | 210mm (D) x 125mm (W) x 50mm (H) |
| Weight | 650g (without batteries) |
| Cleaning | Soft dry cloth; do not use solvents |
| Serviceable Parts | Battery holder; no user-serviceable internal parts |
| Warranty | Refer to HOTONE support; not specified in manual |
| Compatible OS | Windows XP SP2+, Vista, 7+, Mac OS X 10.4.6/10.5/10.6+ |
Frequently Asked Questions - Ravo Hotone
User questions about Ravo Hotone
0 question about this device. Answer the ones you know or ask your own.
Ask a new question about this device
Download the instructions for your Guitar effects pedalboard in PDF format for free! Find your manual Ravo - Hotone and take your electronic device back in hand. On this page are published all the documents necessary for the use of your device. Ravo by Hotone.
USER MANUAL Ravo Hotone
GUITAR/BASS MULTI-EFFECTS PROCESSOR
&
USB AUDIO INTERFACE
OWNER'S MANUAL
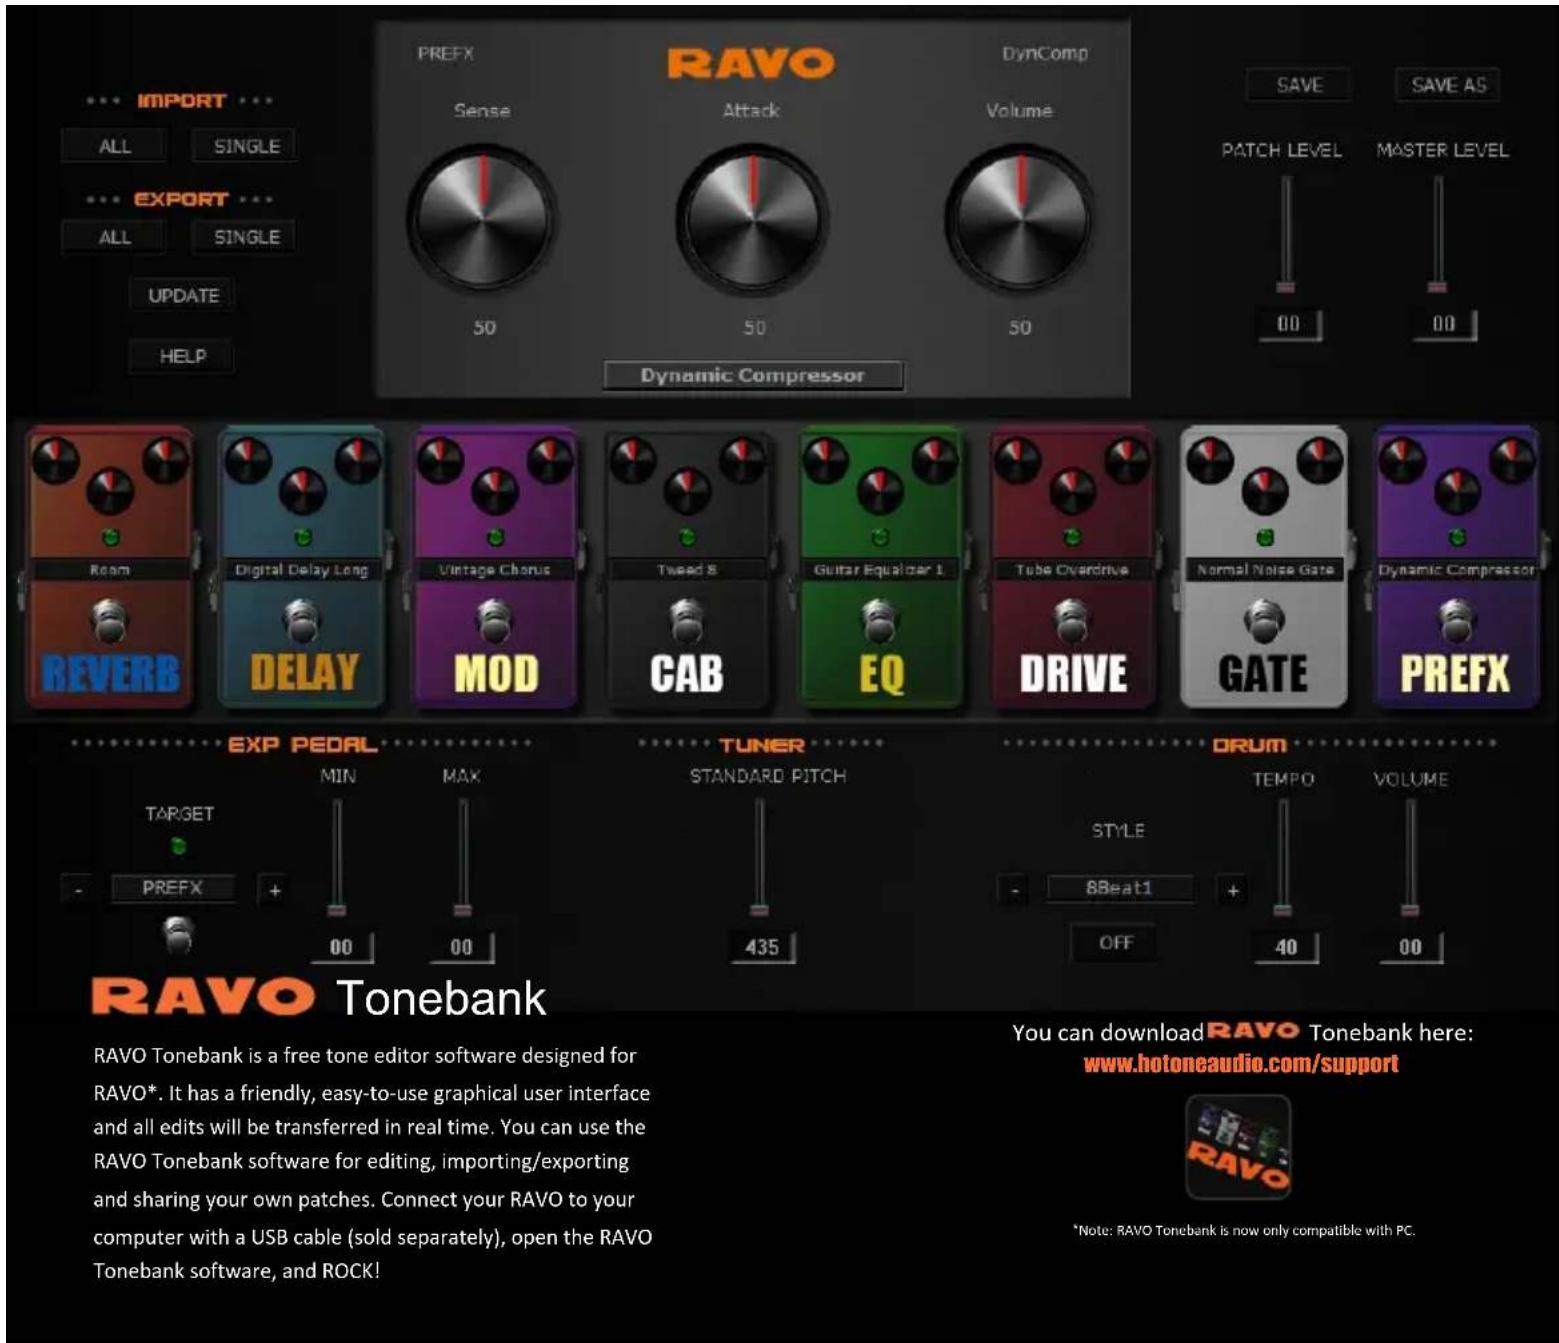
RAVO Tonebank
RAVO Tonebank is a free tone editor software designed for RAVO*. It has a friendly, easy-to-use graphical user interface and all edits will be transferred in real time. You can use the RAVO Tonebank software for editing, importing/exporting and sharing your own patches. Connect your RAVO to your computer with a USB cable (sold separately), open the RAVO Tonebank software, and ROCK!
You can download RAVO Tonebank here: www.hotoneaudio.com/support
*Note: RAVO Tonebank is now only compatible with PC.
OWNER'S MANUAL
Thank you for purchasing a HOTONE product. Please read this manual carefully to learn about all functions of the RAVO.
CONTENTS
Precautions 3
Usage Precautions 6
Definitions 7
Panel Introduction 9
Connections 12
Beginner's Guide 13
How To Play 13
Bypass/Mute/Tuner Function 15
Loop Function 18
Drum Module 22
CONTENTS
Advanced Operations 24
Edit Your Own Sound 24
Store 29
Factory Reset 31
Pre-Patch-Select Function 32
Using Expression Pedal 34
Expression Pedal Calibration 38
Using Audio Interface Function 43
Effect Types And Parameters 44
Effect Types List 45
Patch List 88
Drum Rhythm List 98
Troubleshooting 108
Specifications 110
Precautions
Please observe the following precaution tips to ensure safe use of this unit.
Power Considerations
Since power consumption of this unit is high, we recommend the use of an AC adapter. If you use batteries, please use alkaline batteries.
AC Adapter Operation
- Always use a DC9V center negative 500mA AC adapter. Use of an adapter other than that specified could damage the unit or cause malfunction and pose a safety hazard.
- Always connect the AC adapter to an AC outlet that supplies the rated voltage required by the adapter.
- When disconnecting the AC adapter from an AC outlet, always pull the adapter itself.
- During lightning storms or when not using the unit for an extended period, disconnect the AC adapter from the AC outlet.
Battery Operation
- Use 4 conventional 1.5V AAA batteries (or nickel metal hydride batteries).
- Carefully read the safety indications on the batteries before use.
- When not using the unit for an extended period, remove the batteries from the unit.
- If battery leakage should occur, thoroughly wipe the battery holder and the battery terminals to remove battery fluid.
- Close the battery holder cover when using the RAVO.
Environment Considerations
Avoid using the unit in any of the following conditions that could cause malfunction:
• Extremely hot or cold places
• Near heaters and other heat sources
- Sandy or dusty places
- Places that are extremely humid or exposed to splashing water
- Places with lots of vibrations
Handling
- Never put objects filled with liquids, such as vases, on the unit since this could cause electric shock.
- Never place candles and other burning objects on top of the RAVO. Doing so could cause a fire.
- The RAVO is a precision instrumental device. Do not apply excessive force to the switches and other controls, exposing the unit to strong impacts, including applying excessive force, dropping it or bumping it, which could cause it to break.
- Do not put foreign objects, including coins and wires, or liquids, including water, soft drinks and alcohol, into the RAVO.
Connecting cables and input and output jacks
Please always turn OFF the power to the unit and all other equipment before connecting or disconnecting any cables. Also make sure to disconnect all connection cables and the AC adapter before moving the unit.
Alterations
Never open the case or attempt to modify the product in any way since this can result in damage to the unit. HOTONE Corporation will not assume responsibility for any damage to the unit caused by alterations.
Volume
Do not use the RAVO at a loud volume for a long time since this could cause hearing impairment.
Usage Precautions
Electrical interference with other equipment
In consideration of safety, the RAVO has been designed to provide maximum protection against the emission of electromagnetic radiation from the device and to minimize external electromagnetic interference. However, equipment that is very susceptible to interference or that emits powerful electromagnetic waves should not be placed near the RAVO, as interference could occur. In such a case, place the RAVO and the other equipment sufficiently far apart.
With any type of digital control device, the RAVO included, electromagnetic interference could cause malfunction and could corrupt or destroy data. Please use caution.
Cleaning
Use a soft cloth to clean the panels if they become dirty. If necessary, slightly moisten the cloth. Never use cleansers, wax, or solvents such as paint thinner, benzene or alcohol.
Malfunction
If the unit should malfunction, disconnect the AC adapter and turn the power OFF immediately. Then, disconnect all other connected cables.
Prepare information including the model name, serial number, specific symptoms related to the malfunction, your name, address and telephone number and contact the store where you bought the unit, or contact HOTONE support.
Please keep this manual in a convenient place for future reference.
Definitions
- Module
As shown in Panel Introduction section ( P9), you can use up to 8 effect units simultaneously. Each of these units is called a “module”.
- Effect type
Among the modules, some allow different effect types to be activated. For example, when “” using the MOD module you can choose one of several modulation effect types, including chorus, flanger, tremolo, and so on.
- Parameter
Variables that determine the application of an effect are called “parameters”. If we imagine each module as a separate effect pedal, then each parameter would be a knob on that pedal.
- Patch
The ON/OFF status of each module and the parameter settings are stored in units called "patches". Use patches to recall and save effects.
- Bank
A set of 10 patches is called a “bank”. This unit has a total of 20 banks, including user banks A–J, which can be edited and saved and preset banks 0–9, which can only be recalled.
- Mode
Each operation status of the RAVO is called a “mode”. Depending on the currently selected mode, the functions of keys and knobs change. The modes include the play mode in which you choose a patch and play your instrument, the rhythm mode in which you can play back a rhythm pattern, the edit mode in which you can create and change patches, and the store mode in which you can save patches.
Panel Introduction
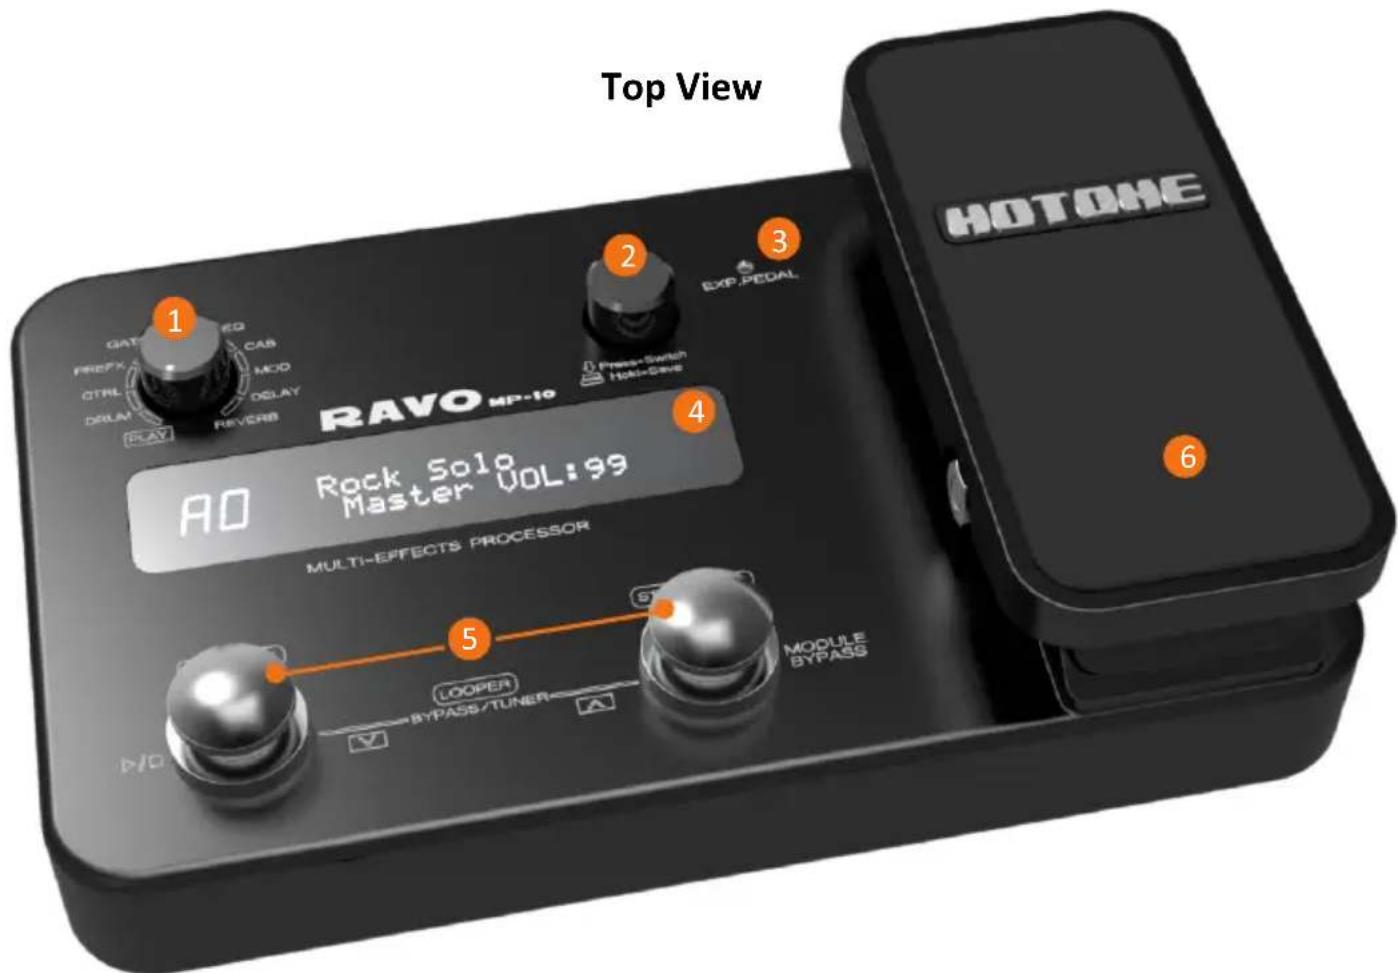

1 Module Selector: Switches between every function module. In patch edit mode, this knob selects the module/parameter for operation.
2 VALUE knob (with enter button): Dial the knob for setting master level, or changing parameter values. Press the button to switch effect type, ensure storing, etc.
3 EXP.PEDAL LED: Indicates the status of Expression Pedal.
4 LED Display: Shows bank and patch numbers, setting values, and other information for operating.
5 [▼]/[▲] Footswitches: Selects patches, controls the tuner, start/stop drum rhythm, start/stop/record phrases and other functions.
6 Expression Pedal: Adjusts volume or some effect parameters.
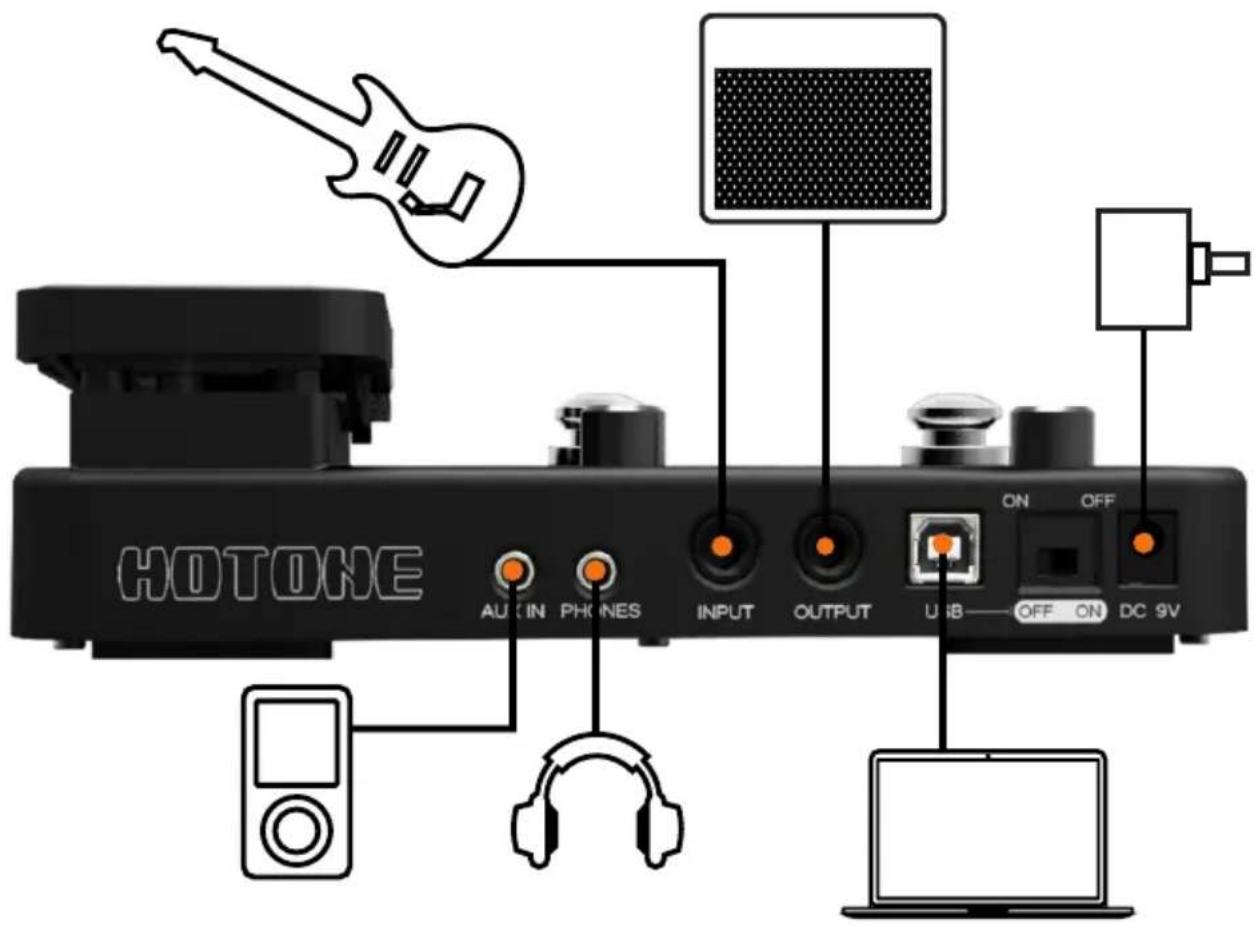
7 AUX IN Jack: 1/8" (3.5mm) stereo input audio jack, you can connect a CD player, MP3 Player or other devices for jamming, practicing, etc.
8 PHONES Jack: 1/8" (3.5mm) stereo output audio jack, for connecting headphones.
9 INPUT Jack: 1/4" mono audio jack, for connecting guitar.
10 OUTPUT Jack: 1/4" stereo audio jack, for connecting guitar amplifier. You can use a mono cable to output the signal to an amplifier, or use a Y cable to output the signal to two amplifiers.
11 USB Jack: For connecting to a computer, then RAVO becomes a USB audio interface.
12 Power switch: For switching ON/OFF status.
NOTE: For using USB bus power, you should slide the switch to OFF position to get this unit powered.
13 DC 9V Jack: For power supply, use a 9-volt DC regulated by AC adapter, 500mA (plug polarity is positive on the barrel and negative in the center).
14 Battery Holder: For installing batteries (AAA x 4).
Connections
Beginner's Guide
---- How To Play ----
1. Turn the power on
Minimize the volume of the amp.
- Using batteries
- Turn the unit over and open the battery holder on the bottom.
- Insert 4 AAA batteries into the battery holder.
- Close the cover.
When the remaining charge is low, "Low Battery" appears on the display and flash.

- Plug the guitar cable into the INPUT jack will turn the device on.
- Using an AC adapter
Connect the included AC adapter, and slide the power switch to ON position.
Note: Be sure to use the included HOTONE AC adapter ONLY.
- Using USB bus power
Connect the USB jack to computer by USB cable, and slide the power switch to OFF position.
2. Set the unit to play mode
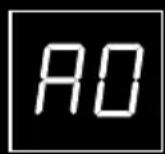
Turn the module selector to "PLAY", LED (on the left side) shows the patch number; LCD (on the right side) shows the patch name and master volume.

When in play mode:
Turn the VALUE knob to adjust Master Volume.
Push the VALUE button to start/stop Drum playback.
3. Select a patch
The LED display will show the information of current bank and patch number. Step on []/[] footswitches to change patches (Hold one footswitch to switch patches quickly).
Pressing [▲] footswitch time and again (or holding [▲] footswitch for fast switching) cycles through patches in the order A0\~A9...J0 J9, 00 09...90 99, A0. Pressing or holding [▼] footswitch will switch patches in the opposite order.
Note:
Using pre-patch-select mode(→P32), you can jump directly to a patch that is far from the current patch.
4. Adjust the patch volume
Turn the module selector to CTRL and use VALUE knob to adjust patch volume. The range of volume is 00\~99.

Bypass/Mute/Tuner Function
- Set the unit to play mode
- Set the unit to bypass/mute
Press both []/[] footswitches at the same time.

- To set the unit to bypass
After “BYPASS/TUNER” appears on the screen, release the switches within one second.
- To set the unit to mute
After “BYPASS/TUNER” disappears and “MUTE TUNER” appears on the screen, release the switches within one second.
MUTE/TUNER
Note:
- If you continue to press both []/[] footswitches for more than 2 seconds, the looper becomes active ( P18) .
- You cannot set the unit to bypass/mute from edit mode.
- When you press both [▼]/[▲] footswitches at the same time, the footswitch that is momentarily pressed first could change the tone in some cases. Please avoid making sound when pressing the switches.
3. Tune the guitar
The note name appears on screen, and the pitch accuracy is indicated by the symbols below.
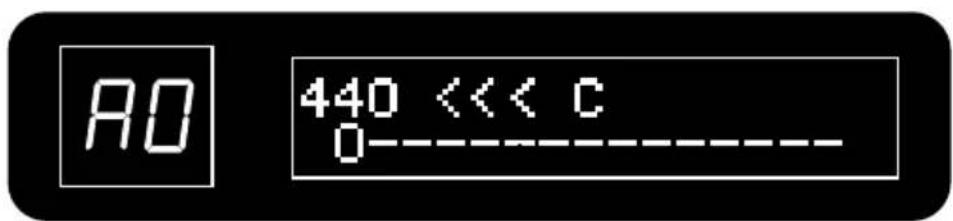
Low(flat)
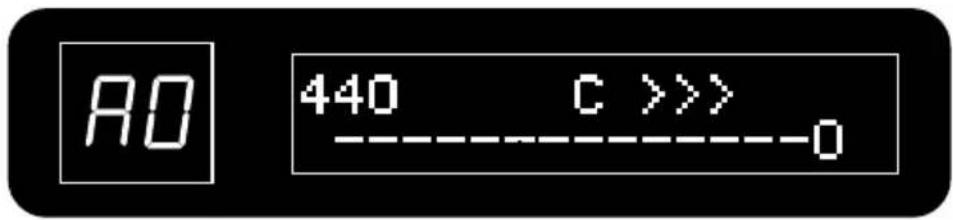
High(sharp)

In tune
4. Change the frequency of the tuner's standard pitch.
Turn the VALUE knob to set the standard pitch of middle A from 435\~445 Hz (Default: 440 Hz).
5. Return to play mode
Press either [▼]/[▲] footswitch.
------ Looper Function ----
You can use the looper function to record some phrases for practicing, jamming, etc. The maximum recording time of the looper is 30 seconds.
1. Activate the looper
In play mode, press and hold both []/[] footswitches until “LOOPER” appears on the screen.

After 2 seconds, LCD becomes to display:
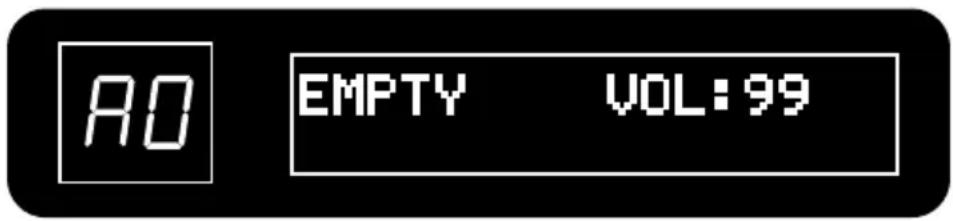
2. Record a phrase and play it back
Press the [▼] footswitch, and play the phrase that you want to record. "RECORD" appears on the display and recording starts.

Press [▼] footswitch again to set the loop end and start playback.

3. Overdub a phrase
During loop playback, press the [▼] footswitch and overdubbing starts.

To end overdubbing, press the [▼] footswitch again ("PLAY" appears on the display).

To stop loop playback, press the [▲] footswitch ("STOP" appears on the display).

To start loop playback again, press the [▼] footswitch.
4. Adjust the loop volume
Turn VALUE knob to adjust the loop volume in looper mode.
Note:
- When in looper mode, the effects can still be edited, but you cannot change the patch.
- When in looper mode, push VALUE button to start/stop drum playback.
5. Erase the phrase
Press and hold the [▲] footswitch to erase the recorded phrase. After erasing operation is done, LCD displays "EMPTY".

6. Return to play mode
PRESS both [▼]/[▲] footswitches.
Drum Module (Drum Machine)
1. Active drum machine
Turn the module selector to DRUM module.
2. Start/stop drum playback
In Play and Looper mode, press VALUE button to start/stop drum playback. In DRUM module, press either [▼]/[▲] footswitch to start/stop drum playback. In Edit mode, press [▼] footswitch to start/stop drum playback.
3. Select the style of drum rhythm
Turn VALUE knob to change styles.

4. Adjust the tempo (BPM, Beats Per Minute)
Press VALUE button to move the target parameter to BPM, then turn VALUE knob to set the BPM. Tempo can be set in a range from 040–250 BPM (beats per minute).

5. Adjust the drum volume
Press VALUE button to move the target parameter to VOL, then turn VALUE knob to set the volume. Drum volume can be set in a range from 00\~99.
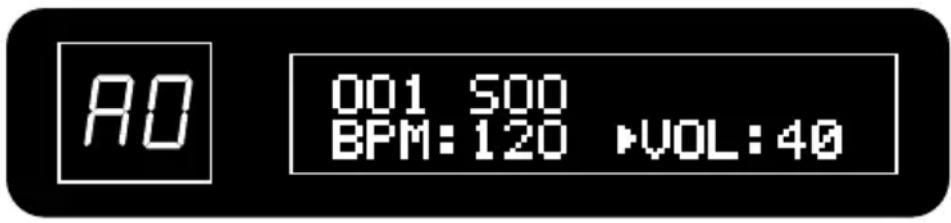
Note:
When in LOOPER mode, drum rhythm can be recorded in the loop data at the first recording, when recording is finished and turn to playback, the drum function will become unavailable unless the loop data is erased.
Advanced Operations
Edit Your Own Sound
1. Select a patch to edit
Step on []/[] footswitches to choose a patch (Hold one footswitch for quick switch).
2. Select a module to edit
Turn the module selector to the module you want to edit.

flowchart
graph TD
    A["DRIVE"] --> B["GATE"]
    B --> C["PREFIX"]
    C --> D["CSTR"]
    D --> E["DRUM"]
    E --> F["PLAY"]
    G["EQ"] --> H["CAB"]
    H --> I["MOD"]
    I --> J["DELAY"]
    J --> K["REVERB"]
This activates edit mode, the available setting options are listed below:
- PREFIX
- GATE
- DRIVE
- EQ
- CAB
- MOD
- DELAY
- REVERB
For more module details, please check Effect Types and Parameters section(→P44).
3. Change the effect type
Turn VALUE knob to change the effect type.
The screen display will change according to the effect type.
E.g.: DynComp -> ProComp

4. Adjust the parameters
Press VALUE button to move the target object between effect types and 3 parameters, turn VALUE knob to adjust the parameter.
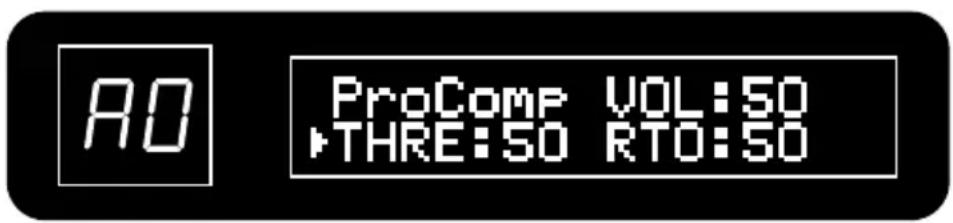

5. Turn a module ON/OFF
Press [▲] footswitch to turn an effect/module on/off.
When a module is set to off, the screen will display "MODULE OFF".
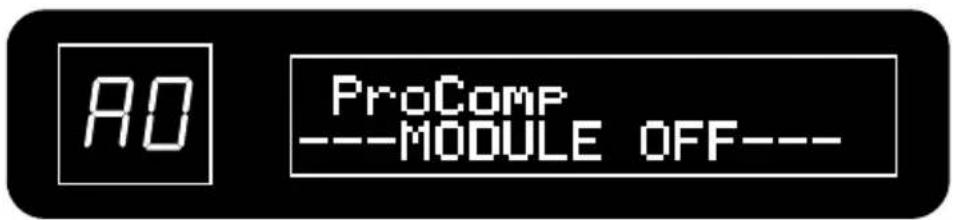
Note: DRUM and CTRL are not effect modules, cannot be turned OFF.
6. Adjust the patch volume and set up the EXP pedal
Turn the module selector to CTRL and use VALUE knob to adjust patch volume, range is 00-99.

Press VALUE button to move the target object between Patch VOL, EXP, and MIN/MAX, use VALUE knob to adjust the parameter.

AO
EXP: PREFIX MIN: 000 ▶ MAX: 100
7. Finish editing
Turn the module selector to "PLAY" to return to the play mode.
Note:
If you change to another patch after editing, all edits will be lost. Save the patch to keep your edits.
Store
1. Activate store mode
Select the patch that you want to save or copy, and hold the VALUE button up to 2 seconds.
2. Select the location to store
After holding VALUE button, the patch number begins to flash on the display.

Use [▼]/[▲] footswitches to choose location.

3. Rename the patch
The patch name will be flashing with one letter/symbol (current editing position), turn VALUE knob to change the letter/symbol, press VALUE button to confirm the current letter/symbol and switch to the next editing position.

4. Store the patch
Hold the VALUE button again to store the patch. The patch number flashes faster and then stops flashing.
Note:
To cancel this operation, turn the Module selector instead of pressing the VALUE key.
Factory Reset
You can restore all the patches in the A–J banks to their factory settings.
To use the Factory Reset function, turn the module selector to PLAY and turn the power on while pressing and holding the VALUE button. The following message appears on the display:

Press VALUE button to restore all patches to their factory settings and return to play mode.

To cancel this operation, press [▼] or [▲] footswitch.
Caution:
Executing factory reset will erase ALL the patches saved in the user banks.
Pre-Patch-Select Function
The pre-patch-select mode allows you to select a patch in advance, and only switch to that patch after you confirm the selection. This function is convenient during a live performance when you want to prepare switching to a patch that is saved in a distant position. In this mode, the LED will keep flashing.
1. Turn the power ON while pressing the [▲] footswitch.
"Pre-Patch-Select" appears on the screen about 3 seconds, then enters the normal status and the unit starts in pre-patch-select mode.

- Use the []/[] footswitches to select the next patch.
Patch number keeps flashing and does not change until confirmation is completed in step 3.
- To change the patch, press both []/[] footswitches at the same time.
Note:
- If you enter edit mode or store mode when the screen for step 2 is open, the current patch is the one affected.
- To return to the usual patch order, turn the power OFF and ON again.
Using The Expression Pedal
Use the built-in expression pedal to control volume and effects parameters in real time.
1. Set the control parameter
Turn the module selector to CTRL and press VALUE button to move the current editing object to EXP, use VALUE knob to change the control target of expression pedal, among PREFIX, DRIVE, MOD, DELAY, REVERB.

2. Switch between volume control and effects control
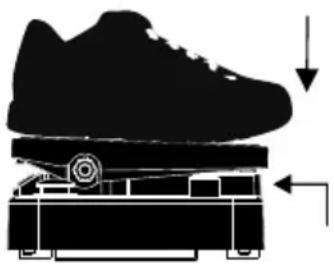
There is a LED next to the expression pedal. When lit up, the EXP pedal controls the effects; when not lit up, the EXP pedal controls the VOLUME.
Press down the expression pedal strongly to switch the control mode between volume control (LED lit up) and effect control (LED extinguished).
natural_image
Silhouette diagram of a shoe pressing down on a mechanical device (no text or symbols)3. Adjust the pedal range
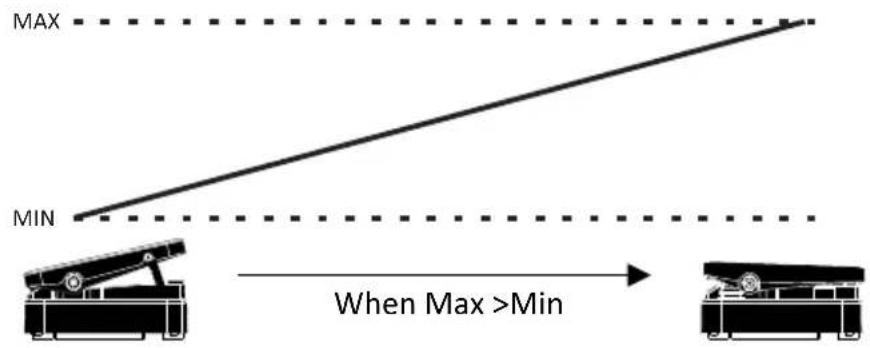
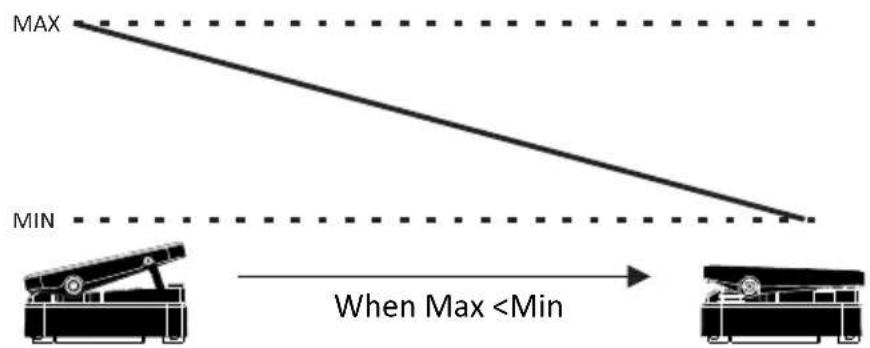
Press VALUE button to move the current editing object to MIN, use VALUE knob to set the minimum value.

Press VALUE button again to move the current editing object to MAX and turn VALUE knob to set the maximum value.
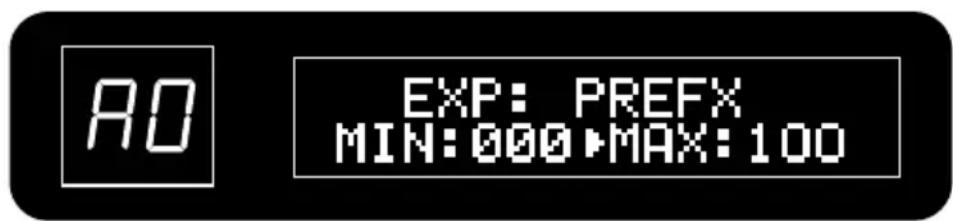
The minimum value can be set higher than the maximum value. Set this way, the effect is smallest when the pedal is fully pressed and largest when it is fully up.
Parameter value
Parameter value
natural_image
Silhouette of a shoe pressing down on a wooden table with directional arrows indicating motion (no text or symbols)natural_image
Silhouette of a shoe pressing down on a mechanical device with a downward arrow indicating motion (no text or symbols)natural_image
Silhouette of a shoe pressing down on a mechanical device with arrows indicating motion (no text or symbols)- - - - - Using Audio Interface Functions - - - - -
This unit can be used with computers running the following operating systems.Compatible OS
\- Windows XP SP2 or later Windows Vista or later Windows 7 or later • Mac OS X (10.4.6/10.5/10.6 or later)For recording and playback, this unit supports the following formats.
• Quantization (bit-rate): 16-bit - Sampling frequency: 44.1kHz The unit will be recognized as an audio device by the computer when connected by the USB cable. Note: If you turn the power switch OFF and connect the unit to a computer by USB, it will operate on USB bus power from that computer.Effect Types and Parameters
flowchart
graph LR
    A["Module knob"] --> B["DELAY"]
    B --> C["DELAY Module (14)"]
    C --> D["Module name"]
    C --> E["DigiDLL/DigiDLM/DigiDLS (Digital Delay Long/Mid/Short)"]
    E --> F["These effects produce a pure, accurate delay effect."]
| PARM1 | PARM2 | PARM3 | |||
| FB(Feedback) | 01~99 | Time | 50~4000ms(DigiDLL)50~1000ms(DigiDLM)50~500ms(DigiDLS) | LEV(Level) | 01~99 |
| Adjusts the feedback of delay. | Adjusts the delay time. | Adjusts the effect level. | |||
Parameters 1-3
When a pedal icon is shown next to a parameter, it can be controlled with the expression pedal. If you set the module to be controlled by the expression pedal, you can control the parameter in real time when you select a patch that uses it. \*The Manufacturers and product names mentioned below are trademarks or registered trademarks of their respective owners. The trademarks were used merely to identify the sound character of the products.Effect Types List
PREFIX (Pre Effects) Module (18)
PREFIX  DynComp (Dynamic Compressor) This compressor is based on the MXR M132 Super Comp\*. PARM1 PARM2 PARM3| SENS(Sense) | 01~99 | ATK(Attack) | 01~99 | VOL(Volume) | 01~99 |
| Adjusts the sensitivity.Higher values result inhigher sensitivity. | Sets compressor attacktime from short to long. | Adjusts the level of the signalafter it has passed throughthe compressor. | |||
ProComp (Pro Compressor)
This compressor allows more detailed adjustment. PARM1 PARM2 PARM3| THRE(Threshold) | 01~99 | RTO(Ratio) | 01~99 | VOL(Volume) | 01~99 |
| Sets the level that activates the compressor. | Adjusts the compression ratio. | Adjusts the level of the signal after it has passed through the compressor. | |||
SmoComp (Smooth Compressor)
This compressor Based on Diamond Compressor\* which provides a more natural sound. PARM1 PARM2 PARM3| COMP(Compression) | 01~99 | TONE | 01~99 | VOL(Volume) | 01~99 |
| Sets the compression level. Adjusts the compression tone. | Adjusts the level of the signal after it has passed through the compressor. | ||||
BasComp (Bass Compressor)
This compressor is specially designed for bass guitar, with more bottom end. PARM1 PARM2 PARM3| THRE(Threshold) | 01~99 | RTO(Ratio) | 01~99 | VOL(Volume) | 01~99 |
| Sets the level that activates the compressor. | Adjusts the compression ratio. | Adjusts the level of the signal after it has passed through the compressor. | |||
Limiter
This effect reduces high-level signals only. PARM1 PARM2 PARM3| THRE(Threshold) | 01~99 | RLS(Release) | 01~99 | VOL(Volume) | 01~99 |
| Sets the level that activates the limiter. | Sets compressor release time from short to long. | Adjusts the level of the signal afterit has passed through the limiter. | |||
| GAIN | 01~99 | TONE | 01~99 | VOL(Volume) | 01~99 |
| Sets how much bass/mid/treble gain is increased from boost. | Adjusts the tone shape of the booster. | Adjusts the level of the signal after it has passed through the booster. | |||
AutoWah
This effect varies wah effect automatically with speed control. PARM1 PARM2 PARM3| DEP (Depth) | 01~99 | RATE | 01~99 | VOL (Volume) | 01~99 |
| Adjusts the depth of the effect. Adjusts the speed of the effect. | Adjusts the level of the signal after it has passed through the effect. | ||||
Q Wah
This effect varies wah effect automatically and provides a Q control. PARM1 PARM2 PARM3| Q | 01~99 | RATE | 01~99 | VOL(Volume) | 01~99 |
| Adjusts the intensity of the resonance sound. | Adjusts the speed of the effect. | Adjusts the level of the signal after it has passed through the effect. | |||
SensWah (Sense Wah)
This effect varies wah effect depending on picking dynamics. PARM1 PARM2 PARM3| SENS(Sense) | 01~99 | RESO(Resonance) | 01~99 | VOL(Volume) | 01~99 |
| Adjusts the sensitivity of the effect. | Adjusts the intensity of the resonance sound. | Adjusts the level of the signal after it has passed through the effect. | |||
| FREQ | 01~99 | Q | 01~99 | VOL(Volume) | 01~99 |
| Adjusts the emphasized frequency. | Adjusts the intensity of the resonance sound. | Adjusts the level of the signal after it has passed through the effect. | |||
| FREQ | 01~99 | Q | 01~99 | VOL(Volume) | 01~99 |
| Adjusts the emphasized frequency. | Adjusts the intensity of the resonance sound. | Adjusts the level of the signal after it has passed through the effect. | |||
BassWah
This simulates a CRYBABY Bass\* wah pedal. PARM1 PARM2 PARM3| FREQ | 01~99 | Q | 01~99 | VOL(Volume) | 01~99 |
| Adjusts the emphasized frequency. | Adjusts the intensity of the resonance sound. | Adjusts the level of the signal after it has passed through the effect. | |||
SlowAtk (Slow Attack)
This effect simulates a BOSS SG-1 Slow Gear\* pedal. PARM1 PARM2 PARM3| THRE(Threshold) | 01~99 | ATK(Attack) | 01~99 | VOL(Volume) | 01~99 |
| Sets the level that activates the effect. | Sets the attack time from short to long. | Adjusts the level of the signal after it has passed through the effect. | |||
Cle Oct (Clean Octave)
This effect simulates a Electro-Harmonix Micro POG\*, which adds an effect sound one octave below/above the original sound. PARM1 PARM2 PARM3| LOW | 01~99 | HIGH | 01~99 | DRY | 01~99 |
| Sets the level of one Octave below. | Sets the level of one Octave above. | Adjusts the level of dry signal. | |||
RingMod
This effect produces a metallic ringing sound. PARM1 PARM2 PARM3| FREQ | 01~99 | TONE MIX | 01~99 | -50~50 | |
| Sets the frequency been modulated. | Adjusts the tone. | Adjusts the mix with the dry signal. | |||
| DEP (Depth) | 01~99 | TONE | 01~99 | MIX | -50~50 |
| Sets the depth of lo-fi effect. | Adjusts the tone. | Adjusts the mix with the dry signal. | |||
GATE Module (2)
GATE NorGate (Normal Noise Gate)
This is a noise gate that cuts the sound during playing pauses. PARM1 PARM2 PARM3| THRE(Threshold) | 01~99 | ATK(Attack) | 01~99 | RLS(Release) | 01~99 |
| Sets the level that activates the noise gate. | Sets noise attack time to from short to long. | Sets noise release time to from short to long. | |||
DtyGate (Dirty Noise Gate)
This is a noise gate with a hard reduction process. PARM1 PARM2 PARM3| THRE(Threshold) | 01~99 | ATK(Attack) | 01~99 | RLS(Release) | 01~99 |
| Sets the level that activates the noise gate. | Sets noise attack time to from short to long. | Sets noise release time to from short to long. | |||
DRIVE (Overdrive/Distortion/Amplifier Simulator) Module (36)
DRIVE  Tube OD(Tube Overdrive) This simulates an Ibanez TS808 Tube Screamer\* overdrive pedal. VintgOD (Vintage Overdrive) This simulates a vintage BOSS OD-1 Over Drive\* pedal. SuperOD (Super Overdrive) This simulates a BOSS SD-1Super OverDrive\* pedal. CompsOD (Compulsive Overdrive) This simulates a Fulltone OCD\* Overdrive pedal. SparkOD (Spark Drive) This simulates a Voodoo Lab Sparkle Drive\* overdrive pedal. MonkyOD (Monkey Overdrive) This simulates a Digitech Bad Monkey\* overdrive pedal. BassOD(Bass Overdrive) This simulates a BOSS ODB-3\* Bass Overdrive pedal. Muff FZ (Muff Fuzz) This simulates a vintage Electro-Harmonix Big Muff PI\* fuzz pedal. Face FZ (Face Fuzz) This simulates a vintage Dallas-Arbiter FUZZ fACE\* fuzz pedal. Bend FZ (Bend Fuzz) This simulates a vintage Vox Tone Bender\* fuzz pedal. Bass FZ (Bass Fuzz) This simulates an Electro-Harmonix Hog's Foot Fuzz\* pedal. Plus DS (Plus Distortion) This simulates a MXR M104 Distortion+\* pedal. PopDist (Pop Distortion) This simulates a BOSS DS-1 Distortion\* pedal. ClassDS (Classic Distortion) This simulates a vintage PROCO RAT\* Distortion pedal. Guv DS (Guvnor Distortion) This simulates a Marshall Gov'nor\* Distortion pedal. ShredDS (Shred Distortion) This simulates a Marshall Shred Master\* Distortion pedal. SmashDS (Smash Distortion) This simulates an Ibanez SM-7 SMASHBOX\* Distortion pedal. MetaIDS (Metal Distortion) This simulates a BOSS MT-2 Metal Zone\* Distortion pedal. GrungDS (Grunge Distortion) This simulates a DOD FX69 GRUNGE\* Distortion pedal. CrunchD (Crunch Distortion) This simulates a MI AUDIO CRUNCH BOX Distortion\* pedal.Tweed57
This simulates a vintage Fender Tweed Deluxe\* combo amplifier.Black65
This simulates a vintage Fender '65 Deluxe Reverb\* combo amplifier.Brit 30
This simulates a vintage VOX Ac30\* combo amplifier.Brit30+
This simulates a MATCHLESS CHIEFTAIN\* combo amplifier.Brit 45
This simulates a Marshall JTM45\* amplifier.Brit800
This simulates a Marshall JCM800\* amplifier.Plexi59
This simulates a vintage Marshall 1959 SuperLead\* amplifier.Mark 2c
This simulates a MESA BOOGIE Mark II C+\* amplifier.Rectif
This simulates a MESA BOOGIE Dual Rectifier\* amplifier.EVH5150
This simulates a PEAVEY EVH 5150\* amplifier.Bass 59
This simulates a Fender BASSMAN\* bass amplifier.BassSVT
This simulates a AMPEG SVT\* bass amplifier.Bass103
This simulates a HIWATT DR103\* bass amplifier.Bass360
This simulates an ACOUSTIC 360\* bass amplifier. BassF2B This simulates an ALEMBIC F2B bass preamp. The 35 effect types above have the same parameters.| PARM1 PARM2 PARM3 | |||||
| GAIN | 01~99 | TONE | 01~99 | LEV(Level) | 01~99 |
| Adjusts the gain. Adjusts the brightness. | Adjusts the level of the signal after it has passed through the drive. | ||||
| BODY TOP | 01~99 | 01~99 | LEV (Level) | 01~99 | |
| Adjusts the body resonance of acoustic guitars. | Adjusts the unique string tone of acoustic guitars. | Adjusts the level of the signal after it has passed through the simulator. | |||
EQ (Equalizer) Module (6)
GT EQ 1 (Guitar Equalizer 1)
This unit has a 3-band equalizer suited for guitar. PARM1 PARM2 PARM3| LOW 160Hz | -12~12 | MID 500Hz | -12~12 | HI 3.2kHz | -12~12 |
| Boosts or cuts the low (160 Hz) frequency band (±12dB). | Boosts or cuts the mid (800 Hz) frequency band (±12dB). | Boosts or cuts the high (3.2 kHz) frequency band (±12dB). | |||
GT EQ 2(Guitar Equalizer 2)
This unit has a 3-band equalizer suited for guitar. PARM1 PARM2 PARM3| LOW 125Hz | -12~12 | MID 800Hz | -12~12 | HI 2kHz | -12~12 |
| Boosts or cuts the low (125 Hz) frequency band (±12dB). | Boosts or cuts the mid (500 Hz) frequency band (±12dB). | Boosts or cuts the high (2 kHz) frequency band (±12dB). | |||
GT EQ 3(Guitar Equalizer 3)
This unit has a 3-band equalizer suited for guitar. PARM1 PARM2 PARM3| LOW 100Hz | -12~12 | MID 1kHz | -12~12 | HI 6.4kHz | -12~12 |
| Boosts or cuts the low (100 Hz) frequency band (±12dB). | Boosts or cuts the mid (1 kHz) frequency band (±12dB). | Boosts or cuts the high (6.4 kHz) frequency band (±12dB). | |||
BassEQ1 (Bass Equalizer 1)
This unit has a 3-band equalizer suited for bass. PARM1 PARM2 PARM3| LOW 62.5Hz MID 500Hz~12 | -12~12 | HI 1kHz | -12~12 | |
| Boosts or cuts the low (62.5 Hz) frequency band (±12dB). | Boosts or cuts the mid (500 Hz) frequency band (±12dB). | Boosts or cuts the high (1 kHz) frequency band (±12dB). | ||
BassEQ2 (Bass Equalizer 2)
This unit has a 3-band equalizer suited for bass. PARM1 PARM2 PARM3| LOW 100Hz MID 600Hz~12 | -12~12 | HI 4kHz | -12~12 | |
| Boosts or cuts the low (100 Hz) frequency band (±12dB). | Boosts or cuts the mid (600 Hz) frequency band (±12dB). | Boosts or cuts the high (4 kHz) frequency band (±12dB). | ||
BassEQ3 (Bass Equalizer 3)
This unit has a 3-band equalizer suited for bass. PARM1 PARM2 PARM3| LOW 50Hz MID 400Hz +12800Hz | -12~12 | -12~12 | ||
| Boosts or cuts the low (50 Hz) frequency band (±12dB). | Boosts or cuts the mid (400 Hz) frequency band (±12dB). | Boosts or cuts the high (800 Hz) frequency band (±12dB). | ||
CAB (Cabinet) Module (22)
 CAB Tweed 8 This simulates a Fender Tweed Champ\* 1x8 cabinet. Grh 110 This simulates a GRETSCH 6156\* 1x10 cabinet. Dlx 112 This simulates a Fender Deluxe Reverb\* 1x12 cabinet. AC 112 This simulates a VOX AC15\* 1x12 cabinet. AC 212 This simulates a VOX AC30\* 2x12 Cabinet. JC 212 This simulates a Roland JC120\*2x12 cabinet. Twin212 This simulates a Fender Twin Reverb\* 2x12 cabinet. Chf 212 This simulates a MATCHLESS CHIEFTAIN\* 2x12 Cabinet. Gbk 412 This simulates a Marshall\* 4x12 cabinet with Greenback\* speakers. V30 412 This simulates a Marshall\* 4x12 cabinet with Vintage 30\* speakers. MB 412 This simulates a MESA BOOGIE\* 4x12 cabinet. Pvy 412 This simulates a PEAVEY 5150\* 4x12 cabinet. Sol 412 This simulates a SOLDANO\* 4x12 cabinet. BassB15 This simulates an AMPEG B15\* 1x15 bass cabinet. Bass118 This simulates a SWR\* 1x18 bass cabinet. Bass360 This simulates an ACOUSTIC 360\* 1x18 bass cabinet. AC 215 This simulates a VOX AC100\* 2x15 bass cabinet. MB 215 This simulates a MESA BOOGIE\* 2x15 bass cabinet. Bass410 This simulates a Fender BASSMAN\* 4x10 bass cabinet. Hiwt412 This simulates a HIWATT DR103\* 4x12 bass cabinet. Bass412 This simulates a Marshall\* 4x12 bass cabinet. Bass810 This simulates an AMPEG SVT\* 8x10 bass cabinet. The 22 effect types above have the same parameters.| PARM1 PARM2 PARM3 | |||||
| MIC(Mic Distance) | 01~99 | PRES(Presence) | 01~99 | VOL(Volume) | 01~99 |
| Adjusts the distance between microphone and cabinet. | Adjusts the presence. | Adjusts the level of the signal after it has passed through the effect. | |||
MOD (Modulation) Module (24)
 MODVintgCH (Vintage Chorus)
This simulates a BOSS CE-1 Chorus\* pedal. PARM1 PARM2 PARM3| DEP (Depth) | 01~99 | RATE | 01~99 | MIX | -50~50 |
| Adjusts the chorus depth. Adjusts the chorus speed. | Adjusts the mix with the original signal. | ||||
ModrnCH (Modern Chorus)
This effect produces a modern feeling chorus sound, bright and deep. PARM1 PARM2 PARM3| DEP (Depth) | 01~99 | RATE | 01~99 | MIX | -50~50 |
| Adjusts the chorus depth. Adjusts the chorus speed. | Adjusts the mix with the original signal. | ||||
Hard CH (Hard Chorus)
This effect produces a thick and solid chorus. PARM1 PARM2 PARM3| DEP (Depth) | 01~99 | RATE | 01~99 | MIX | -50~50 |
| Adjusts the chorus depth. Adjusts the chorus speed. | Adjusts the mix with the original signal. | ||||
Shim CH (Shimmer Chorus)
This effect produces a light and clear chorus. PARM1 PARM2 PARM3| DEP (Depth) | 01~99 | RATE | 01~99 | MIX | -50~50 |
| Adjusts the chorus depth. Adjusts the chorus speed. | Adjusts the mix with the original signal. | ||||
Bass CH (Bass Chorus)
This effect produces a chorus tone that suit for bass. PARM1 PARM2 PARM3| DEP (Depth) | 01~99 | RATE | 01~99 | MIX | -50~50 |
| Adjusts the chorus depth. Adjusts the chorus speed. | Adjusts the mix with the original signal. | ||||
Detune (Detune Chorus)
This effect mixes dry signal with a slightly pitch shifting sound. PARM1 PARM2 PARM3| DEP (Depth) | -50~50 | DLY (Pre Delay) | 01~99 | MIX | -50~50 |
| Adjusts the detuning in cents, value of “0” will do a double effect. | Sets the pre-delay time of the effect sound | Adjusts the mix with the original signal. | |||
Flanger
This effect produces a standard flanger tone. PARM1 PARM2 PARM3| DEP (Depth) | 01~99 | RATE | 01~99 | MIX | -50~50 |
| Adjusts the flanger depth. Adjusts the flanger speed. | Adjusts the mix with the original signal. | ||||
NFB FLG (Negative Feedback Flanger)
This effect produces a special flanger tone with negative feedback. PARM1 PARM2 PARM3| DEP (Depth) | 01~99 | RATE | 01~99 | MIX | -50~50 |
| Adjusts the flanger depth. Adjusts the flanger speed. | Adjusts the mix with the original signal. | ||||
Jet FLG (Jet Flanger)
This effect produces a massive flanger tone with plenty of feedback. PARM1 PARM2 PARM3| DEP (Depth) | 01~99 | RATE | 01~99 | MIX | -50~50 |
| Adjusts the flanger depth. Adjusts the flanger speed. | Adjusts the mix with the original signal. | ||||
StepFLG (Step Flanger)
This effect produces an automatic flanger tone with step variation. PARM1 PARM2 PARM3| DEP (Depth) | 01~99 | RATE | 01~99 | MIX | -50~50 |
| Adjusts the flanger depth. Adjusts the flanger speed. | Adjusts the mix with the original signal. | ||||
BassFLG (Bass Flanger)
This effect produces a flanger tone that suit for bass. PARM1 PARM2 PARM3| DEP (Depth) | 01~99 | RATE | 01~99 | MIX | -50~50 |
| Adjusts the flanger depth. Adjusts the flanger speed. | Adjusts the mix with the original signal. | ||||
Phaser
This effect adds a phasing variation to the sound. PARM1 PARM2 PARM3| DEP (Depth) | 01~99 | RATE | 01~99 | MIX | -50~50 |
| Adjusts the effect depth. Adjusts the effect speed. | Adjusts the mix with the original signal. | ||||
FB PHS (Feedback Phaser)
This effect produces a phasing sound with feedback. PARM1 PARM2 PARM3| DEP (Depth) | 01~99 | RATE | 01~99 | MIX | -50~50 |
| Adjusts the effect depth. Adjusts the effect speed. | Adjusts the mix with the original signal. | ||||
O-Trem (Opto Tremolo)
This effect simulates the DEMETER TREMULATOR\* tremolo pedal. PARM1 PARM2 PARM3| DEP (Depth) | 01~99 | RATE | 01~99 | VOL (Volume) | 01~99 |
| Adjusts the tremolo depth. Adjusts the tremolo speed. | Adjusts the effect volume. | ||||
B-Trem (Bias Tremolo)
This effect produces a lush, warm, and roundly pulsing tremolo. PARM1 PARM2 PARM3| DEP (Depth) | 01~99 | RATE | 01~99 | VOL (Volume) | 01~99 |
| Adjusts the tremolo depth. Adjusts the tremolo speed. | Adjusts the effect volume. | ||||
T-Trem (Tube Tremolo)
This effect simulates the Electro-Harmonix WIGGLER\* tremolo pedal. PARM1 PARM2 PARM3| DEP (Depth) | 01~99 | RATE | 01~99 | VOL (Volume) | 01~99 |
| Adjusts the tremolo depth. Adjusts the tremolo speed. | Adjusts the effect volume. | ||||
VintgVB (Vintage Vibrato)
This effect simulates a vintage Boss VB-2 Vibrato\* pedal. PARM1 PARM2 PARM3| DEP (Depth) | 01~99 | RATE | 01~99 | VOL (Volume) | 01~99 |
| Adjusts the vibrato depth. Adjusts the vibrato speed. | Adjusts the effect volume. | ||||
ModrnVB (Modern Vibrato)
This effect produces a bright and deep vibrato tone. PARM1 PARM2 PARM3| DEP (Depth) | 01~99 | RATE | 01~99 | VOL (Volume) | 01~99 |
| Adjusts the vibrato depth. Adjusts the vibrato speed. | Adjusts the effect volume. | ||||
| DEP (Depth) | 01~99 | RATE | 01~99 | VOL (Volume) | 01~99 |
| Adjusts the rotary depth. Adjusts the rotary speed. | Adjusts the effect volume. | ||||
| RAN(Range) | -12~12 | TONE MIX | 01~99 | -50~50 | |
| Adjusts the pitch shift amount in semitones. | Adjusts the tone of shifted notes. | Adjusts the mix with the original signal. | |||
FBPitch (Feedback Pitch Shift)
This effect shifts pitch with a short delay and feedback. PARM1 PARM2 PARM3| RAN(Range) | -12~12 | FB(Feedback) | 01~99 | MIX | -50~50 |
| Adjusts the pitch shift amount in semitones. | Adjusts the amount of feedback. | Adjusts the mix with the original signal. | |||
AutoLPF (Auto Low Pass Filter)
This effect produces low filter variation at a regular rate. PARM1 PARM2 PARM3| FREQ | 01~99 | RATE | 01~99 | MIX | -50~50 |
| Adjusts the filter working frequency. | Adjusts the filter speed. | Adjusts the mix with the original signal. | |||
AutoBPF (Auto Band Pass Filter)
This effect produces an auto band pass filter effect. PARM1 PARM2 PARM3| FREQ | 01~99 | RATE | 01~99 | MIX | -50~50 |
| Adjusts the filter working frequency. | Adjusts the filter speed. | Adjusts the mix with the original signal. | |||
AutoHPF (Auto High Pass Filter)
This effect produces high filter variation at a regular rate. PARM1 PARM2 PARM3| FREQ | 01~99 | RATE | 01~99 | MIX | -50~50 |
| Adjusts the filter working frequency. | Adjusts the filter speed. | Adjusts the mix with the original signal. | |||
DELAY Module (14)
 DELAY DigiDLL/DigiDLM/DigiDLS (Digital Delay Long/Mid/Short) These effects produce a pure, accurate delay effect. PARM1 PARM2 PARM3| FB(Feedback) | 01~99 | Time | 50~4000ms(DigiDLL)50~1000ms(DigiDLM)50~500ms(DigiDLS) | LEV(Level) | 01~99 |
| Adjusts the feedback of delay. | Adjusts the delay time. | Adjusts the effect level. | |||
AnlgDLL (Analog Delay Long)
This effect simulates an Electro-Harmonix DELUXE MEMORY MAN\* analog delay pedal. PARM1 PARM2 PARM3| FB(Feedback) | 01~99 | Time | 50ms ~1100ms | LEV(Level) | 01~99 |
| Adjusts the feedback of delay. | Adjusts the delay time. | Adjusts the effect level. | |||
AnlgDLM (Analog Delay Mid)
This effect simulates a MXR M169 CARBON COPY\* analog delay pedal. PARM1 PARM2 PARM3| FB(Feedback) | 01~99 | Time | 50ms~600ms | LEV(Level) | 01~99 |
| Adjusts the feedback of delay. | Adjusts the delay time. | Adjusts the effect level. | |||
AnlgDLS (Analog Delay Short)
This effect simulates a vintage BOSS DM-2 DELAY\* pedal. PARM1 PARM2 PARM3| FB(Feedback) | 01~99 | Time | 50ms~300ms | LEV(Level) | 01~99 |
| Adjusts the feedback of delay. | Adjusts the delay time. | Adjusts the effect level. | |||
Slapback (Slapback Echo)
This effect simulates the classic slapback echo tone. PARM1 PARM2 PARM3| FB(Feedback) | 01~99 | Time | 75ms~250ms | LEV(Level) | 01~99 |
| Adjusts the feedback of delay. | Adjusts the delay time. | Adjusts the effect level. | |||
Mod DL (Mod Delay)
This effect produces a pure delay with chorus effect. PARM1 PARM2 PARM3| FB(Feedback) | 01~99 | Time | 50ms~4000ms | LEV(Level) | 01~99 |
| Adjusts the feedback of delay. | Adjusts the delay time. | Adjusts the effect level. | |||
TapeEKO (Tape Echo)
This effect simulates the echo tone from a tape machine. PARM1 PARM2 PARM3| FB(Feedback) | 01~99 | Time | 50ms ~1000ms | LEV(Level) | 01~99 |
| Adjusts the feedback of delay. | Adjusts the delay time. | Adjusts the effect level. | |||
TubeEKO (Tube Echo)
This effect simulates the sound from a tube-driven echo machine. PARM1 PARM2 PARM3| FB(Feedback) | 01~99 | Time | 50ms~1000ms | LEV(Level) | 01~99 |
| Adjusts the feedback of delay. | Adjusts the delay time. | Adjusts the effect level. | |||
Dyna DL (Dynamic Delay)
This effect produces a pure delay tone with dynamic delay volume variation. PARM1 PARM2 PARM3| FB(Feedback) | 01~99 | Time | 50ms~4000ms | LEV(Level) | 01~99 |
| Adjusts the feedback of delay. | Adjusts the delay time. | Adjusts the effect level. | |||
SweepDL (Sweep Delay)
This effect produces a delay tone with sweeping filter. PARM1 PARM2 PARM3| FB(Feedback) | 01~99 | Time | 50ms~4000ms | LEV(Level) | 01~99 |
| Adjusts the feedback of delay. | Adjusts the delay time. | Adjusts the effect level. | |||
Lofi DL (Lo-Fi Delay)
This effect produces a delay tone with sample reducing feedback. PARM1 PARM2 PARM3| FB(Feedback) | 01~99 | Time | 50ms~1000ms | LEV(Level) | 01~99 |
| Adjusts the feedback of delay. | Adjusts the delay time. | Adjusts the effect level. | |||
PPongDL (Ping-Pong Delay)
This ping-pong delay outputs the delay sound alternately to the left and right. PARM1 PARM2 PARM3| FB(Feedback) | 01~99 | Time | 50ms~2000ms | LEV(Level) | 01~99 |
| Adjusts the feedback of delay. | Adjusts the delay time. | Adjusts the effect level. | |||
REVERB Module (8)
 REVERBRoom
This reverb effect simulates the acoustics of a room.Stage
This reverb effect simulates the acoustics of a live stage.Hall
This reverb effect simulates the acoustics of a hall.Stadium
This reverb effect simulates the acoustics of a stadium.Church
This reverb effect simulates the acoustics of a church.Plate
This reverb effect simulates a plate reverberator.Spring
This reverb effect simulates a spring reverberator.Mod REV (Mod Reverb)
This reverb effect provides a reverb with modulation. The 8 effect types above have the same parameters.| PARM1 PARM2 PARM3 | |||||
| DEC(Decay) | 01~99 | TONE | 01~99 | MIX | -50~50 |
| Sets the duration of the reverberations. | Adjusts the tone. | Adjusts the mix with the original signal. | |||
| Bank | Patch No. | Name | EXP.PedalTarget |
| A | 0 | Rock Solo | Volume |
| 1 | Smooth Drive | Volume | |
| 2 | Chorus Clean | Volume | |
| 3 | Golden Age | Volume | |
| 4 | Fuzzy Jet | Jet FLG: RATE | |
| 5 | Countryside | Volume | |
| 6 | Dirty Funk | Volume | |
| 7 | Basic Jazz | Volume | |
| 8 | Fusion Gig | Cry Wah: FREQ (press to activate) | |
| 9 | Brown Metal | Volume | |
| B | 0 | Scooped Solo | Cry Wah: FREQ (press to activate) |
| 1 | British Crunch | Volume | |
| 2 | Cowboy Overdrive | B-Trem: RATE | |
| 3 | Dreamy Clean | AnlgDLL: Time | |
| 4 | Stoned Fuzz | Volume | |
| 5 | OS Punk | Volume | |
| 6 | Tweedy OD | Volume | |
| 7 | Post Punk Rhythm | Volume | |
| 8 | Funky Autowah | Volume | |
| 9 | AC Verb | Volume | |
| C | 0 | Smooth Cali | Volume |
| 1 | Vintage OCTA | Cle OCT: DRY | |
| 2 | '65 Organ | Volume | |
| 3 | AC Blues | Volume | |
| 4 | Alternativity | Volume | |
| 5 | Modern Clean | Volume | |
| 6 | Rotating OD | U-Vibe: RATE | |
| 7 | Djentlemen | Volume | |
| 8 | Sludge | Volume | |
| 9 | Solo Shifter | Pitch: RAN |
| D | 0 | Ghost Notes | Volume |
| 1 | Distorted Wall | Volume | |
| 2 | Midnight | Volume | |
| 3 | Dynamic Rules! | Volume | |
| 4 | Synth Fuzz | Volume | |
| 5 | No Attack | SlowATK: ATK | |
| 6 | Hold On | DigiDLM: FB | |
| 7 | Tape Machine | Volume | |
| 8 | Shim Verb | Volume | |
| 9 | Rock Organ | Volume |
| E | 0 | Crazy Randy | Volume |
| 1 | Jimi's Haze | Cry Wah: FREQ (press to activate) | |
| 2 | Van Phase | Volume | |
| 3 | Bohemian Red | Volume | |
| 4 | Passion & Love | Cry Wah: FREQ (press to activate) | |
| 5 | Europe | Volume | |
| 6 | Edgy Delay | AnlgDLL: Time | |
| 7 | Neo Malmsteen | Volume | |
| 8 | Back in Angus | Volume | |
| 9 | Eric's Cream | Volume | |
| F | 0 | Green Idiots | Volume |
| 1 | Roto Muff | U-Vibe: RATE | |
| 2 | My Iron Harmonic | Volume | |
| 3 | ZZ Garage | Volume | |
| 4 | Kurt's Spirit | Volume | |
| 5 | The Way of Pat | Volume | |
| 6 | Plexi Wing | Cry Wah: FREQ (press to activate) | |
| 7 | Surfin' | B-Trem: RATE | |
| 8 | Liquid Animation | Cry Wah: FREQ (press to activate) | |
| 9 | Manhattan | Volume | |
| G | 0 | Road Salt | B-Trem: RATE |
| 1 | Alien & Satch | Volume | |
| 2 | Icy Camel | Volume | |
| 3 | LUKE | Volume | |
| 4 | Fuzzy Krimson | Volume | |
| 5 | Toolkit | Volume | |
| 6 | Eyes Closed | Volume | |
| 7 | Gilmour's Island | Volume | |
| 8 | Texas Trouble | Volume | |
| 9 | Dire Brothers | Volume |
| H | 0 | Basic Bass | Volume |
| 1 | Finger Bass | Volume | |
| 2 | Pick Bass | Volume | |
| 3 | Chorus Bass | Volume | |
| 4 | Overdriven Bass | Volume | |
| 5 | Screamin' Bass | Volume | |
| 6 | Synth Bass | Volume | |
| 7 | Fuzzy Bass | Volume | |
| 8 | Driven Pick Bass | Volume | |
| 9 | Wah Bass | BassWah: FREQ | |
| I | 0 | Smooth Bass | Volume |
| 1 | Dist 412 Bass | Volume | |
| 2 | DI Bass | Volume | |
| 3 | Chapman Bass | Volume | |
| 4 | Funky Bass | Volume | |
| 5 | Touch Bass | Volume | |
| 6 | Flanger Bass | Volume | |
| 7 | Tremolo Bass | T-Trem: RATE | |
| 8 | Slapback Bass | Volume | |
| 9 | Phase Bass | Volume | |
| J | 0 | Auto Filter Bass | Volume |
| 1 | Bass Dialing | Volume | |
| 2 | Delayed Bass | Volume | |
| 3 | Sweeping Bass | Volume | |
| 4 | Slow Gear Bass | Volume | |
| 5 | Lo-Fi Bass | Volume | |
| 6 | Solo Bass | Volume | |
| 7 | Organ Bass | Volume | |
| 8 | Cello Bass | Volume | |
| 9 | Bass Shifter | Pitch: RAN |
| Genre | No. | Type | Time Signature | Default Tempo |
| 8Beat | 00 | 8Beat1 | 4/4 | 120 BPM |
| 01 | 8Beat2 | 4/4 | 120 BPM | |
| 02 | 8Beat3 | 4/4 | 120 BPM | |
| 03 | 8Beat4 | 4/4 | 120 BPM | |
| 04 | 8Beat5 | 4/4 | 120 BPM | |
| 05 | 8Beat6 | 4/4 | 120 BPM | |
| 06 | 8Beat7 | 4/4 | 120 BPM | |
| 07 | 8Beat8 | 4/4 | 120 BPM | |
| 08 | 8Beat9 | 4/4 | 120 BPM | |
| 09 | 8Beat10 | 4/4 | 120 BPM | |
| 16Beat | 10 | 16Beat1 | 4/4 | 120 BPM |
| 11 | 16Beat2 | 4/4 | 120 BPM | |
| 12 | 16Beat3 | 4/4 | 120 BPM | |
| 13 | 16Beat4 | 4/4 | 120 BPM | |
| 14 | 16Beat5 | 4/4 | 120 BPM | |
| 15 | 16Beat6 | 4/4 | 120 BPM | |
| 16 | 16Beat7 | 4/4 | 120 BPM | |
| 17 | 16Beat8 | 4/4 | 120 BPM | |
| 18 | 16Beat9 | 4/4 | 120 BPM | |
| 19 | 16Beat10 | 4/4 | 120 BPM | |
| 4Beat | 20 | 4Beat1 | 4/4 | 120 BPM |
| 21 | 4Beat2 | 4/4 | 120 BPM | |
| 22 | 4Beat3 | 4/4 | 120 BPM | |
| 23 | 4Beat4 | 4/4 | 120 BPM | |
| 24 | 4Beat5 | 4/4 | 120 BPM | |
| 25 | 4Beat6 | 4/4 | 120 BPM | |
| 26 | 4Beat7 | 4/4 | 120 BPM | |
| 27 | 4Beat8 | 4/4 | 120 BPM | |
| 28 | 4Beat9 | 4/4 | 120 BPM | |
| 29 | 4Beat10 | 4/4 | 120 BPM | |
| Rock | 30 | Rock n' Roll | 4/4 | 210 BPM |
| 31 | Classic Rock | 4/4 | 120 BPM | |
| 32 | Pop Rock | 4/4 | 120 BPM | |
| 33 | Slow Rock | 4/4 | 72 BPM | |
| 34 | Rock Shuffle | 4/4 | 120 BPM | |
| 35 | Rock Ballad | 4/4 | 66 BPM | |
| 36 | Punk | 4/4 | 240 BPM | |
| 37 | New Wave | 4/4 | 120 BPM | |
| 38 | Hard Rock | 4/4 | 135 BPM | |
| 39 | Metal | 4/4 | 120 BPM | |
| Funk | 40 | Classic Funk | 4/4 | 108 BPM |
| 41 | Funk Rock | 4/4 | 114 BPM | |
| 42 | Electric Funk | 4/4 | 108 BPM | |
| 43 | Soul | 4/4 | 105 BPM | |
| 44 | R&B | 4/4 | 100 BPM | |
| Jazz | 45 | Jazz | 4/4 | 120 BPM |
| 46 | Big Band | 4/4 | 180 BPM | |
| 47 | Fusion | 4/4 | 120 BPM | |
| 48 | Swing | 4/4 | 144 BPM | |
| 49 | Dixieland | 4/4 | 240 BPM | |
| Blues | 50 | Blues | 4/4 | 108 BPM |
| 51 | Country | 4/4 | 114 BPM | |
| 52 | Country Folk | 4/4 | 138 BPM | |
| 53 | Rockabilly | 4/4 | 180 BPM | |
| 54 | Bluegrass | 2/4 | 132 BPM | |
| Electronic | 65 | Hip Hop | 4/4 | 84 BPM |
| 66 | Trip Hop | 4/4 | 84 BPM | |
| 67 | Techno | 4/4 | 132 BPM | |
| 68 | Break Beat | 4/4 | 128 BPM | |
| 69 | Drum n' Bass | 4/4 | 174 BPM | |
| Latin | 55 | Bossa nova | 4/4 | 120 BPM |
| 56 | Rumba | 4/4 | 114 BPM | |
| 57 | Samba | 4/4 | 108 BPM | |
| 58 | Cha Cha | 4/4 | 126 BPM | |
| 59 | Tango | 4/4 | 120 BPM | |
| 60 | Reggae | 4/4 | 90 BPM | |
| 61 | Beguine | 4/4 | 120 BPM | |
| 62 | Latin Pop | 4/4 | 108 BPM | |
| 63 | Latin Rock | 4/4 | 135 BPM | |
| 64 | Latin Dance | 4/4 | 126 BPM | |
| World | 70 | Waltz | 3/4 | 174 BPM |
| 71 | Polka | 4/4 | 120 BPM | |
| 72 | March | 4/4 | 120 BPM | |
| 73 | 6/8 March | 6/8 | 180 BPM | |
| 74 | Army March | 4/4 | 120 BPM | |
| 75 | Mazurka | 3/4 | 150 BPM | |
| 76 | Musette | 3/4 | 192 BPM | |
| 77 | Ska | 4/4 | 144 BPM | |
| 78 | New Age | 4/4 | 90 BPM | |
| 79 | World | 4/4 | 108 BPM | |
| Various Beat | 80 | 3/4 Beat1 | 3/4 | 120 BPM |
| 81 | 3/4 Beat2 | 3/4 | 120 BPM | |
| 82 | 6/8 Beat1 | 6/8 | 120 BPM | |
| 83 | 6/8 Beat2 | 6/8 | 120 BPM | |
| 84 | 5/4 Beat | 5/4 | 156 BPM | |
| 85 | 6/4 Beat | 6/4 | 125 BPM | |
| 86 | 7/4 Beat | 7/4 | 114 BPM | |
| 87 | 9/8 Beat | 9/8 | 120 BPM | |
| 88 | 10/8 Beat | 10/8 | 120 BPM | |
| 89 | 11/8 Beat 11/8 | 120 BPM | ||
| Metro | 90 | Metro 1/4 | 1/4 | 120 BPM |
| 91 | Metro 2/4 | 2/4 | 120 BPM | |
| 92 | Metro 3/4 | 3/4 | 120 BPM | |
| 93 | Metro 4/4 | 4/4 | 120 BPM | |
| 94 | Metro 5/4 | 5/4 | 120 BPM | |
| 95 | Metro 6/4 | 6/4 | 120 BPM | |
| 96 | Metro 7/4 | 7/4 | 120 BPM | |
| 97 | Metro 6/8 | 6/8 | 120 BPM | |
| 98 | Metro 7/8 | 7/8 | 120 BPM | |
| 99 | Metro 9/8 | 9/8 | 120 BPM |
Troubleshooting
- The unit will not turn ON
- Make sure the AC adapter is plugged in correctly. - When using USB bus power, confirm the USB cable is connected correctly. - When using batteries, make sure that they are still charged and the INPUT jack is plugged in with cable.- No sound or very low volume
- Check the connections. - Adjust the patch level. - Adjust the master level. - When adjusting the volume with an expression pedal, make sure that a suitable volume setting has been set with the pedal. - Confirm that unit is not in mute mode. - The unit might have switched to standby to save power. In standby, audio input and output are disabled.- There is a lot of noise
- Check the shielded cables you are using for defects. - Use only the HOTONE AC adapter. - Try to adjust the GATE module settings again.- Cannot change patches
- The unit might be in "pre-patch-select mode". - If it is, turn the power OFF and ON again to restart in the normal mode.- Sound is distorted/tone is extreme
- Try adjusting the Gain and Level parameters of the DRIVE module. - Check your guitar, cable, and amplifier.- The expression pedal is not working well
- Check the expression pedal settings. - Calibrate the expression pedal.Specifications
Effect types: 130 types Effect modules: Max. 8 simultaneous modules Number of user banks/patches: 10 patches x 10 banks Preset banks/patches: 10 patches x 10 banks Sampling frequency: 44.1 kHz A/D conversion: 24-bit with 512 x oversampling D/A conversion: 24-bit with 512 x oversampling Signal processing: 32-bit Maximum recording time (looper mode): 30 seconds INPUT jack: Standard 1/4 (6.35mm) monaural jack " AUX jack: Standard 1/8 (3.5mm) stereo jack " Input impedance: 470kΩ Output impedance (OUTPUT jack): 100Ω OUTPUT jack: Standard 1/4 (6.35mm) stereo jack " PHONES jack: Standard 1/8 (3.5mm) stereo jack" S/N Ratio (equivalent input noise): 106 dB Power: AC adapter: DC9V (center negative), 500 mA Batteries: Max. 6.5 hours of continuous operation using 4 AAA size alkaline batteries USB: USB bus powered, USB Audio 2.0, USB MIDI Dimensions: 210mm (D) x 125mm (W) x 50mm (H) Weight: 650g (without batteries) RAVO MP-10- RAVO Tonebank
- OWNER'S MANUAL
- CONTENTS
- Advanced Operations 24
- Effect Types And Parameters 44
- Patch List 88
- Drum Rhythm List 98
- Troubleshooting 108
- Specifications 110
- Precautions
- Power Considerations
- AC Adapter Operation
- Battery Operation
- Environment Considerations
- Handling
- Connecting cables and input and output jacks
- Alterations
- Volume
- Usage Precautions
- Electrical interference with other equipment
- Cleaning
- Malfunction
- Definitions
- - Module
- - Effect type
- - Parameter
- - Patch
- - Bank
- - Mode
- Panel Introduction
- Connections
- Beginner's Guide
- ---- How To Play ----
- Turn the power on
- - Using batteries
- - Using an AC adapter
- - Using USB bus power
- Set the unit to play mode
- Select a patch
- Adjust the patch volume
- Bypass/Mute/Tuner Function
- Tune the guitar
- Change the frequency of the tuner's standard pitch.
- Return to play mode
- ------ Looper Function ----
- Activate the looper
- Record a phrase and play it back
- Overdub a phrase
- Adjust the loop volume
- Erase the phrase
- Return to play mode
- Drum Module (Drum Machine)
- Active drum machine
- Start/stop drum playback
- Select the style of drum rhythm
- Adjust the tempo (BPM, Beats Per Minute)
- Adjust the drum volume
- Advanced Operations
- Edit Your Own Sound
- Select a patch to edit
- Select a module to edit
- Change the effect type
- Adjust the parameters
- Turn a module ON/OFF
- Adjust the patch volume and set up the EXP pedal
- Finish editing
- Store
- Activate store mode
- Select the location to store
- Rename the patch
- Store the patch
- Factory Reset
- Pre-Patch-Select Function
- Turn the power ON while pressing the [▲] footswitch.
- Using The Expression Pedal
- Set the control parameter
- Switch between volume control and effects control
- Adjust the pedal range
- Note:
- When you are finished setting the expression pedal, turn the module selector to PLAY to return to play mode."
- Expression Pedal Calibration
- Turn the module selector to CTRL and turn the power on while pressing VALUE button.
- - - - - - Using Audio Interface Functions - - - - -
- Compatible OS
- For recording and playback, this unit supports the following formats.
- Effect Types and Parameters
- Parameters 1-3
- Effect Types List
- PREFIX (Pre Effects) Module (18)
- ProComp (Pro Compressor)
- SmoComp (Smooth Compressor)
- BasComp (Bass Compressor)
- Limiter
- AutoWah
- Q Wah
- SensWah (Sense Wah)
- BassWah
- SlowAtk (Slow Attack)
- Cle Oct (Clean Octave)
- RingMod
- GATE Module (2)
- NorGate (Normal Noise Gate)
- DtyGate (Dirty Noise Gate)
- DRIVE (Overdrive/Distortion/Amplifier Simulator) Module (36)
- Tweed57
- Black65
- Brit 30
- Brit30+
- Brit 45
- Brit800
- Plexi59
- Mark 2c
- Rectif
- EVH5150
- Bass 59
- BassSVT
- Bass103
- Bass360
- EQ (Equalizer) Module (6)
- GT EQ 1 (Guitar Equalizer 1)
- GT EQ 2(Guitar Equalizer 2)
- GT EQ 3(Guitar Equalizer 3)
- BassEQ1 (Bass Equalizer 1)
- BassEQ2 (Bass Equalizer 2)
- BassEQ3 (Bass Equalizer 3)
- CAB (Cabinet) Module (22)
- MOD (Modulation) Module (24)
- VintgCH (Vintage Chorus)
- ModrnCH (Modern Chorus)
- Hard CH (Hard Chorus)
- Shim CH (Shimmer Chorus)
- Bass CH (Bass Chorus)
- Detune (Detune Chorus)
- Flanger
- NFB FLG (Negative Feedback Flanger)
- Jet FLG (Jet Flanger)
- StepFLG (Step Flanger)
- BassFLG (Bass Flanger)
- Phaser
- FB PHS (Feedback Phaser)
- O-Trem (Opto Tremolo)
- B-Trem (Bias Tremolo)
- T-Trem (Tube Tremolo)
- VintgVB (Vintage Vibrato)
- ModrnVB (Modern Vibrato)
- FBPitch (Feedback Pitch Shift)
- AutoLPF (Auto Low Pass Filter)
- AutoBPF (Auto Band Pass Filter)
- AutoHPF (Auto High Pass Filter)
- DELAY Module (14)
- AnlgDLL (Analog Delay Long)
- AnlgDLM (Analog Delay Mid)
- AnlgDLS (Analog Delay Short)
- Slapback (Slapback Echo)
- Mod DL (Mod Delay)
- TapeEKO (Tape Echo)
- TubeEKO (Tube Echo)
- Dyna DL (Dynamic Delay)
- SweepDL (Sweep Delay)
- Lofi DL (Lo-Fi Delay)
- PPongDL (Ping-Pong Delay)
- REVERB Module (8)
- Room
- Stage
- Hall
- Stadium
- Church
- Plate
- Spring
- Mod REV (Mod Reverb)
- Troubleshooting
- - The unit will not turn ON
- - No sound or very low volume
- - There is a lot of noise
- - Cannot change patches
- - Sound is distorted/tone is extreme
- - The expression pedal is not working well
- Specifications
Brand : Hotone
Model : Ravo
Category : Guitar effects pedalboard