COMVBEMIC - Video Conferencing System AVer - Free user manual and instructions
Find the device manual for free COMVBEMIC AVer in PDF.


| Product Type | Video Conferencing System |
| Brand | AVer |
| Model | COMVBEMIC |
| Dimensions (W x D x H) | Approximately 120 mm x 80 mm x 25 mm |
| Weight | Approximately 0.3 kg |
| Power Supply | USB bus-powered (5V, 500mA) |
| Connectivity | USB 2.0 Type-A |
| Microphone Type | Omnidirectional MEMS microphone |
| Microphone Pickup Range | Up to 3 meters radius |
| Speaker Output | Built-in full-range speaker, 2W RMS |
| Frequency Response | 100 Hz – 20 kHz |
| Supported Operating Systems | Windows, macOS, Chrome OS, Linux |
| Compatible Software | Zoom, Microsoft Teams, Google Meet, etc. |
| LED Indicators | Status LED (microphone mute, power) |
| Cable Length | 1.5 meters |
| Housing Material | Plastic with rubber base |
| Operating Temperature | 0°C to 40°C |
| Storage Temperature | -20°C to 60°C |
| Certifications | CE, FCC, RoHS |
| Maintenance | Clean with a soft dry cloth. Do not use liquids. |
| Safety Precautions | Avoid exposure to extreme temperatures, humidity, and direct sunlight. |
| Spare Parts Availability | Contact AVer support for replacement USB cable or unit. |
| Repairability | Non-user-serviceable. Refer to authorized service center. |
Frequently Asked Questions - COMVBEMIC AVer
User questions about COMVBEMIC AVer
0 question about this device. Answer the ones you know or ask your own.
Ask a new question about this device
Download the instructions for your Video Conferencing System in PDF format for free! Find your manual COMVBEMIC - AVer and take your electronic device back in hand. On this page are published all the documents necessary for the use of your device. COMVBEMIC by AVer.
USER MANUAL COMVBEMIC AVer
natural_image
Technical line drawing of a mechanical component with a cylindrical housing and flange (no text or symbols)VB342+
Conference Camera
User Manual
FEDERAL COMMUNICATIONS COMMISSION

This device complies with Part 15 of the FCC Rules. Operation is subject to the following two conditions: (1) This device may not cause harmful interference, and (2) this device must accept any interference received, including interference that may
cause undesired operation.
This equipment has been tested and found to comply with the limits for a Class B digital device, pursuant to Part 15 of the FCC Rules. These limits are designed to provide reasonable protection against harmful interference in a residential installation. This equipment generates uses and can radiate radio frequency energy and, if not installed and used in accordance with the instructions, may cause harmful interference to radio communications. However, there is no guarantee that interference will not occur in a particular installation. If this equipment does cause harmful interference to radio or television reception, which can be determined by turning the equipment off and on, the user is encouraged to try to correct the interference by one of the following measures:
- Reorient or relocate the receiving antenna.
- Increase the separation between the equipment and receiver.
- Connect the equipment into an outlet on a circuit different from that to which the receiver is connected.
- Consult the dealer or an experienced radio/TV technician for help.
FCC Caution: Any changes or modifications not expressly approved by the party responsible for compliance could void the user's authority to operate this equipment.
Europe – EU Declaration of Conformity
This device complies with the essential requirements of the Radio Equipment Directive (2014/53/EU). The following test methods have been applied in order to prove presumption of conformity with the essential requirements of the Radio Equipment Directive (2014/53/EU)
DISCLAIMER
No warranty or representation, either expressed or implied, is made with respect to the contents of this documentation, its quality, performance, merchantability, or fitness for a particular purpose. Information presented in this documentation has been carefully checked for reliability; however, no responsibility is assumed for inaccuracies. The information contained in this documentation is subject to change without notice.
In no event will AVer Information Inc. be liable for direct, indirect, special, incidental, or consequential damages arising out of the use or inability to use this product or documentation, even if advised of the possibility of such damages.
TRADEMARKS
“AVer” is a trademark owned by AVer Information Inc. Other trademarks used herein for description purpose only belong to each of their companies.
COPYRIGHT
© 2019 AVer Information Inc. All rights reserved.
All rights of this object belong to AVer Information Inc. Reproduced or transmitted in any form or by any means without the prior written permission of AVer Information Inc. is prohibited. All information or specifications are subject to change without prior notice.
NOTICE
SPECIFICATIONS ARE SUBJECT TO CHANGE WITHOUT PRIOR NOTICE. THE INFORMATION CONTAINED HEREIN IS TO BE CONSIDERED FOR REFERENCE ONLY.
CAUTION
- Risk of explosion if battery is replaced by an incorrect type.
- Dispose of used batteries in a safe and proper manner.
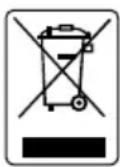
The mark of Crossed-out wheeled bin indicates that this product must not be disposed of with your other household waste. Instead, you need to dispose of the waste equipment by handing it over to a designated collection point for the recycling of waste electrical and electronic equipment. For more information about where to drop off your waste equipment for recycling, please contact your household waste disposal service or the shop where you purchased the product.
WARNING
■ To reduce risk of fire or electric shock, do not expose this appliance to rain or moisture. Warranty will be void if any unauthorized modifications are done to the product.
■ Do not drop the camera or subject it to physical shock.
■ Use correct power supply voltage to avoid damaging camera.
■ Do not place the camera where the cord can be stepped on as this may result in fraying or damage to the lead or the plug.
- Hold the bottom of the camera with both hands to move the camera. Do not grab the lens or lens holder to move the camera.
Remote Control Battery Safety Information
- Store batteries in a cool and dry place.
- Do not throw away used batteries in the trash. Properly dispose used batteries through specially approved disposal methods.
- Remove the batteries if they are not in use for long periods of time. Battery leakage and corrosion can damage the remote control. Dispose of batteries safely and through approved disposal methods.
- Do not use old batteries with new batteries.
- Do not mix and use different types of batteries: alkaline, standard (carbon-zinc) or rechargeable (nickel-cadmium).
- Do not dispose of batteries in a fire.
- Do not attempt to short circuit the battery terminals.
Contact Information
AVer Information Inc.
668 Mission Ct
Fremont, CA 94539
www.averusa.com
Toll-free: 1(877)528-7824
Local: 1(408)263-3828
Support.usa@aver.com
Contents
Package Contents....1
Product Introduction....2
Overview 2
Pan and Tilt 3
Remote Controller 4
Setup VB342+....7
Device Connection ....7
Extended Microphone Installation 8
Wall Mount Installation 9
Using VB342+....11
Make a Video Call ....11
LED Indicator....11
Install Displaylink Driver ....12
Phone in Connection....14
AVer PTZApp ....15
Install AVer PTZApp ....15
Use AVer PTZApp ....15
Set the Camera Number ....24
Hotkey Control....25
Home / Sleep Position....26
OpenGL....27
Full Screen Mode ....28
Install EZLive....29
Use AVer EZLive 29
Package Contents
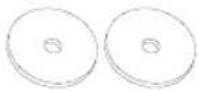
| VB342+ unit | Remote controller | Power Adaptor Power cord* | USB Cable | |
 | 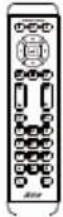 | 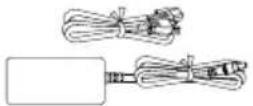 | 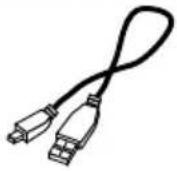 | |
| USB type-A to type-C adapter | Wall mount bracket | Screws(x4) for wall mount | Screws(x2) for TV mount | |
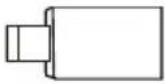 | 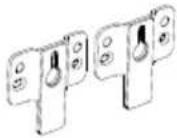 | 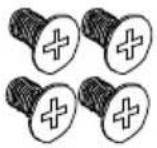 | 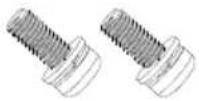 | |
| Mount rubbers(x 2) for TV Mount | AAA Batteries | Quick Guide | Warranty card | |
 |  |  |  | |
*The power plug will vary depending on the standard power outlet of the country where it is sold.
Overview
natural_image
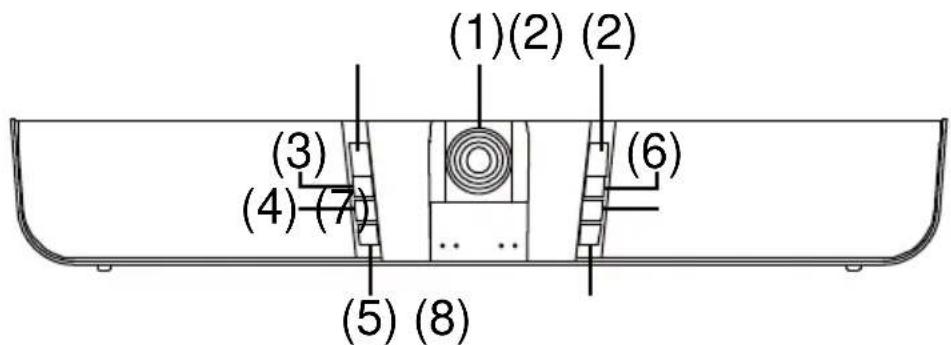
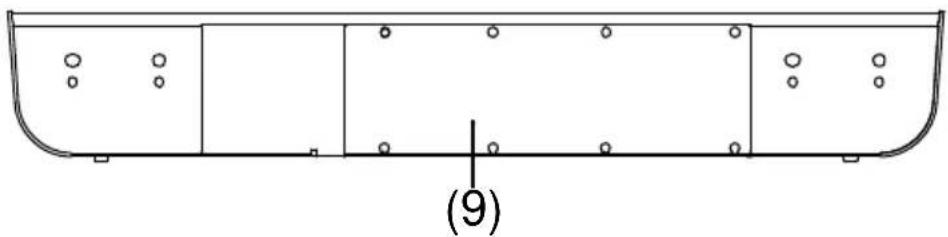
Technical line drawing of a curved structural component with circular holes and mounting points (no text or symbols)| (1) | Camera | (6) | Power |
| (2) | IR sensor | (7) | Preset |
| (3) | Mute | (8) | Phone in button |
| (4) | Volume + | (9) | Reset |
| (5) | Volume - | ||
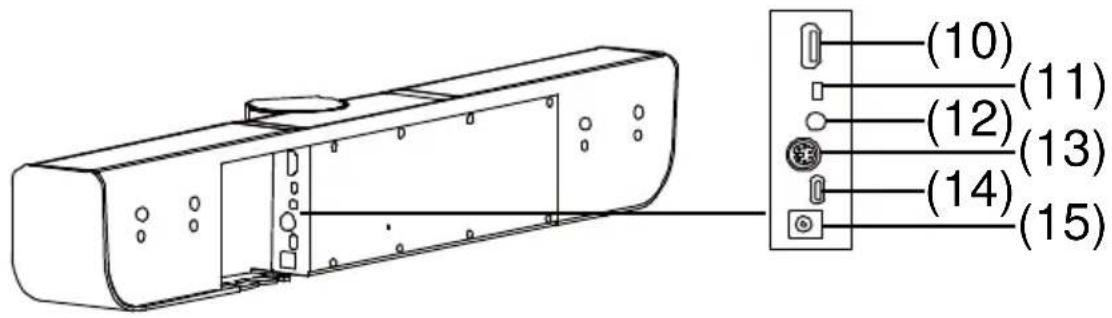
| (10) | HDMI Out | (13) | RS232 |
| (11) | MIC Input | (14) | USB port(to PC) |
| (12) | Phone In port | (15) | DC 12V Power Jack |
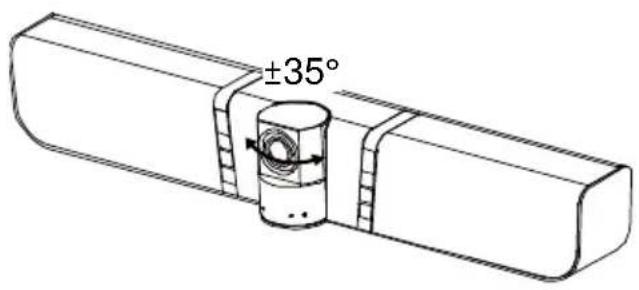
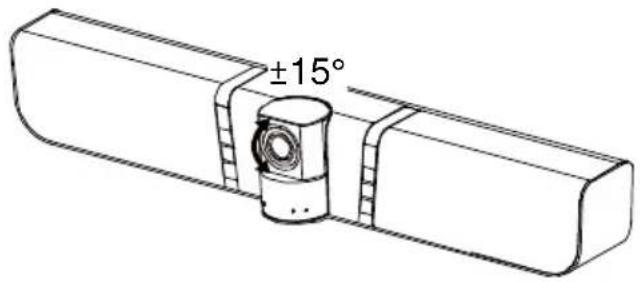
Pan and Tilt
Remote Controller
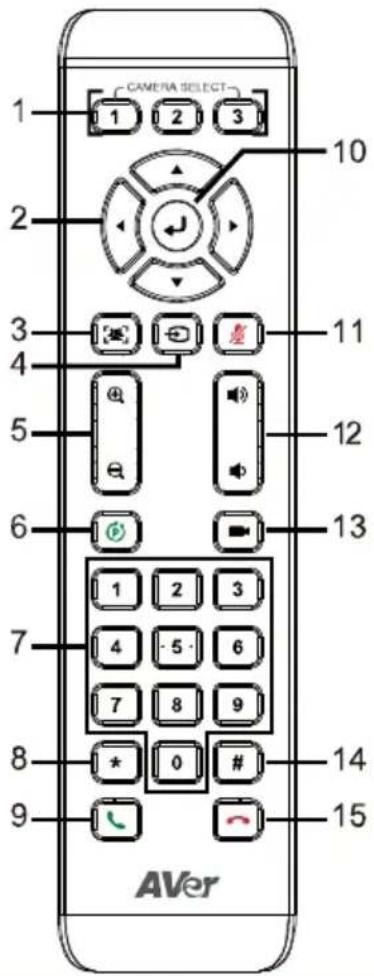
| Name | Function |
| 1. Camera select | One remote can control up to 3 AVer VC/CAM. Use AVer PTZApp sets number associated with each camera, select which camera you like to control on the remote.[Note]■ If you only have one camera and don't need to do any setting, the default is camera 1.■ If you press camera 2 or 3 on the remote control, you will find your remote can't control your camera. In this case, please press camera 1 on your remote again. |
| 2. Camera direction control | Use the direction button on the remote to control the direction of the camera. Press the direction button to move the camera or press and hold for continuous pan or tilt. |
| 3. Smart faming | One-click automatic FOV adjustment to fit all participants.Press the remote for 1 second can switch the Smart framing function between auto and manual mode; a message (as figure shown) will display on the screen to indicate in auto or manual mode.Auto Framing Manual Framing[Note] While in conferencing meeting, participants must face the camera for face detection (Smart Framing). |
| 4. Phone in | Press it to enable the phone in mode. |
| 5. Zoom in/Zoom out | Increase/Decrease the camera zoom. |
| 6. Preset | To save the camera at the desired position, press and hold the preset button until the "saved message" is displayed on the PTZApp video screen or other video apps. Select preset position button 0 to 9 to save.Press "preset" + "preset position button" (0 ~ 9) will move the camera to the saved position. |
| 7. Preset position | Preset position button is used in conjunction with the Preset button to save positions. There are a total of 0 to 9 saves.Press preset button and then press 0~9 to go to the saved position.Press button on remote controller for 1 second can turn on or off the WDR function.Press button on remote controller for 1 second to enable Audio Tracking function.Press button on remote controller for 1 second to enable Audio frame function.Press button on remote controller for 1 second to enable Audio Preset Tracking function. |
| 8. Brightness - | Decrease the brightness. |
| 9. Call/answer* | Answer a call or start a call. |
| 10. Enter** | Not supported. |
| 11. Mute/Unmute | Mute/Unmute the speakerphone. |
| 12. Volume up/down | Adjust volume up or down. |
| 13. Preset Hotkey | Press it can move to preset position as user has set. |
| 14. Brightness + | Increase the brightness. |
| 15. Hang up* | End the call. |
* Function requires AVer PTZApp
**Not supported
Device Connection
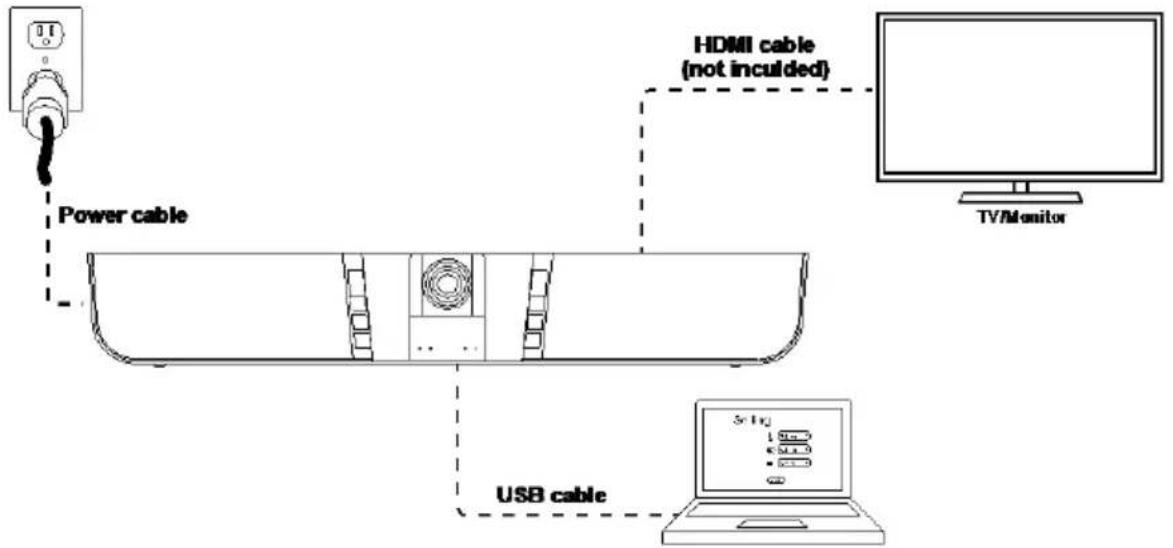
Two types of connection.
1.
flowchart
graph TD
    A["Power cable"] --> B["USB cable"]
    B --> C["HDMI cable (not incuiled)"]
    C --> D["TV/Monitor"]
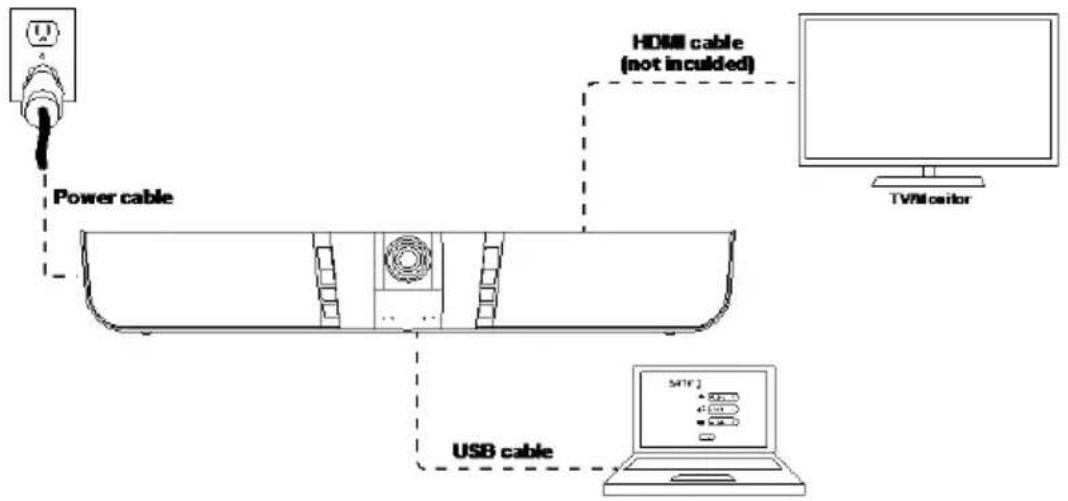
- Connect VB342+ to PC with provided USB cable. If you like to use type-C connector on newer PC, connect provided adapter to type-A end of cable, then connect type-C side of adapter to PC.
- Connect TV/HDMI monitor to VB342+ through the HDMI cable.
- Connect the power to the VB342+ and camera head will move, and the power indicator will light up.
- Install Aver PTZApp on laptop/PC that is connected with VB342+. The app can be used to adjust and setup the parameters of the camera (refer to section of AVer PTZApp).
- A Displaylink drive is required for the TV/Monitor connection with VB342+. To install Displaylink drive, refer to section of "Install Displaylink Driver".
- To make a call, run your video application (Skype ^TM , Skype for Business, Google Hangouts ^TM , Zoom ^TM , WebEx ^TM , Adobe Connect ^TM , WebRTC, and etc.) select VB342+ as your video and audio device.
II.
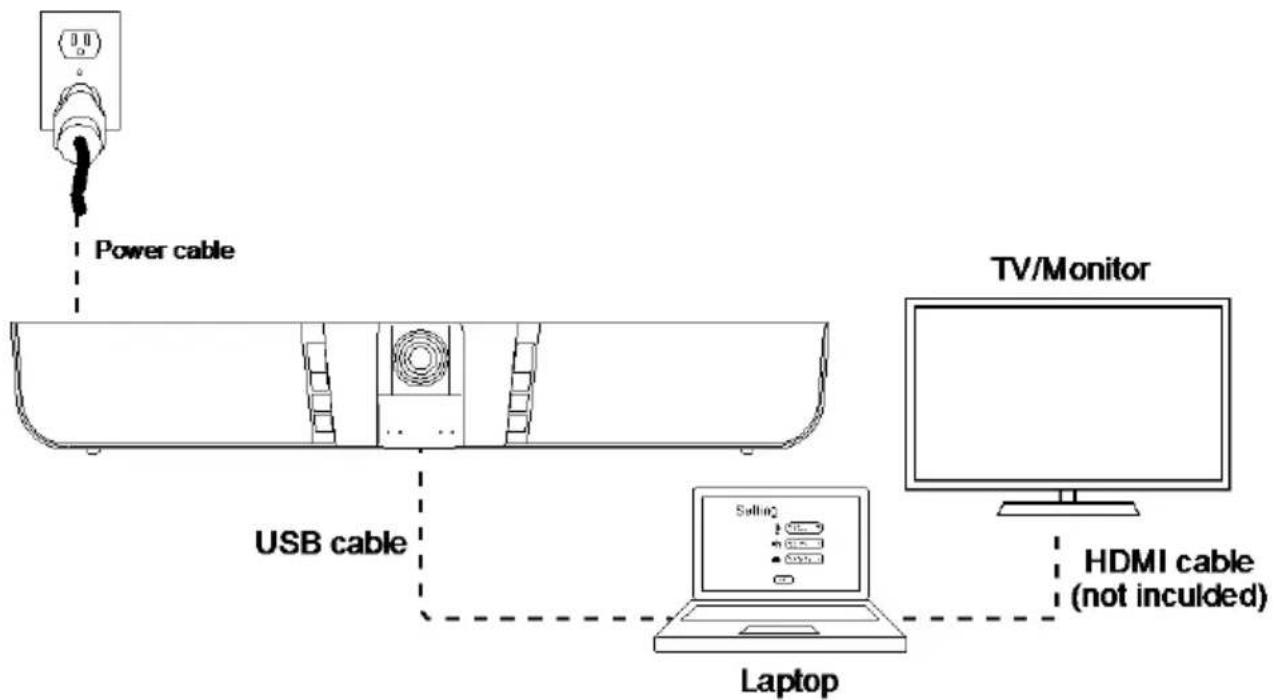
- Connect VB342+ to PC with provided USB cable. If you like to use type-C connector on newer PC, connect provided adapter to type-A end of cable, then connect type-C side of adapter to PC.
- Connect the TV/Monitor to PC/laptop through the HDMI cable.
- Connect the power to the VB342+ and camera head will move, and the power indicator will light up.
- Install Aver PTZApp on laptop/PC that is connected with VB342+. The app can be used to adjust and setup the parameters of the camera (refer to section of AVer PTZApp).
- To make a call, run your video application (Skype™, Skype for Business, Google Hangouts™, Zoom™, WebEx™, Adobe Connect™, WebRTC, and etc.) select VB342+ as your video and audio device.
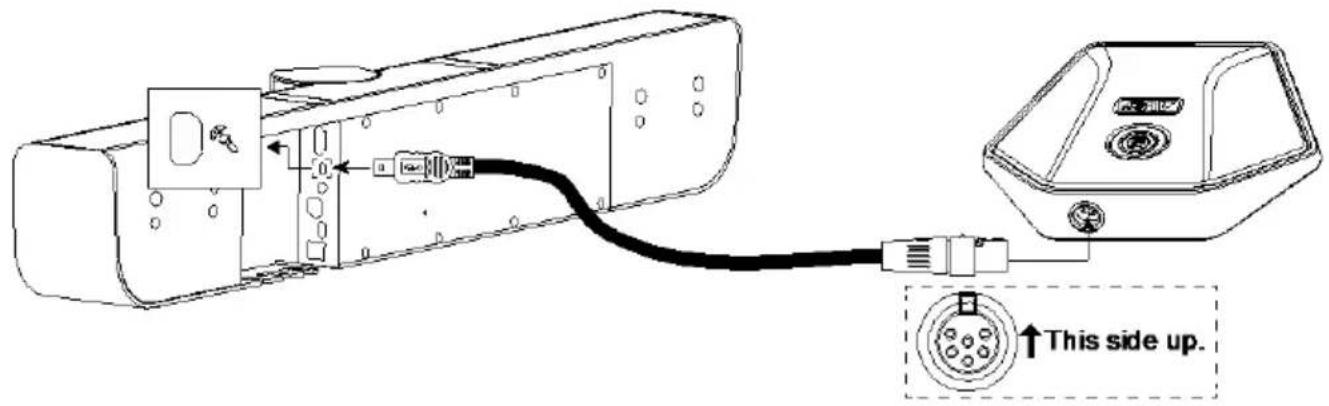
Extended Microphone Installation
[Note] There are two lengths of cables -- 10m and 20m.
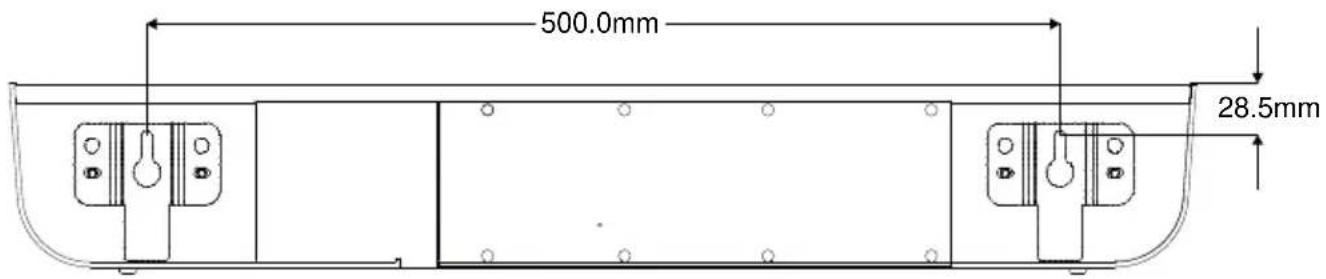
Wall Mount Installation
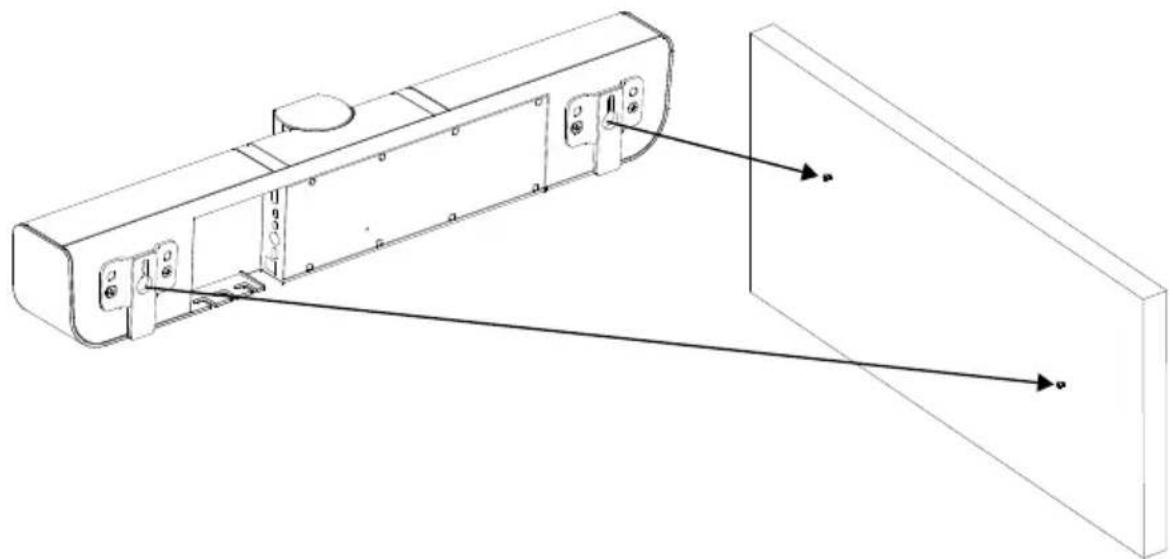
- Please refer to the following drilling dimension for drilling the wall mount holes.
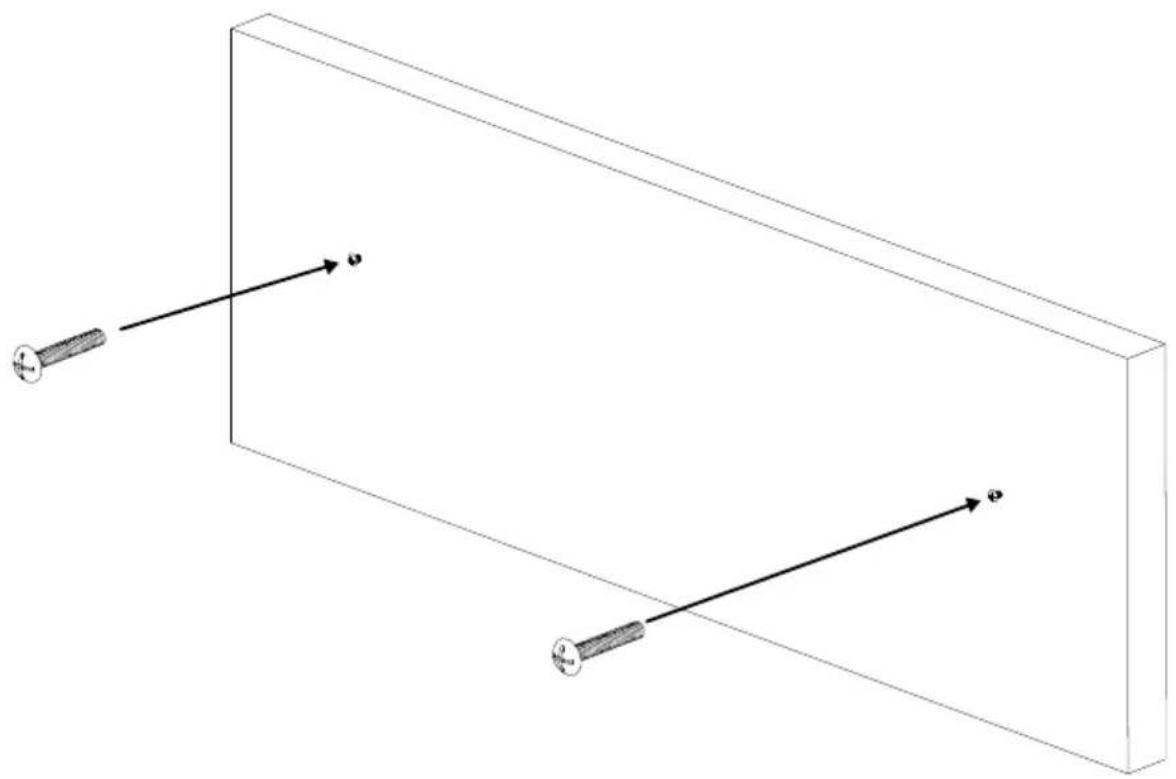
- Drill 2 holes on the wall and screw the screws into the holes. Leave some space between wall and screws for hanging the VB342+ on the wall.
natural_image
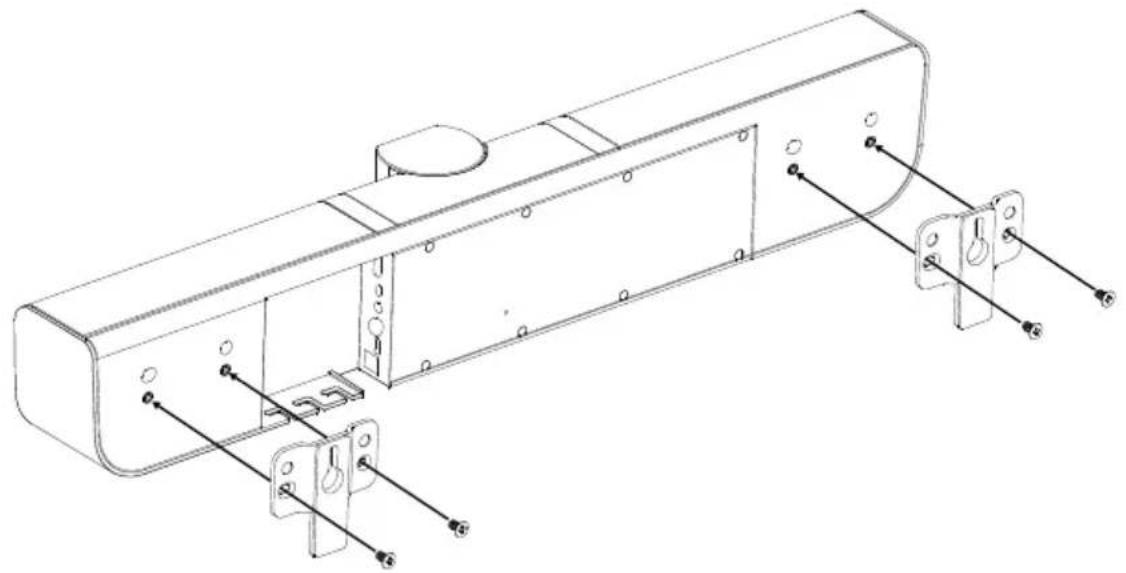
Diagram of two parallel wires passing through a rectangular prism with labeled points (no text or symbols present)- Install the wall mount bracket on the VB342+ unit.
natural_image
Technical line drawing of a mechanical assembly with mounting brackets and connectors (no text or symbols)- Hang the VB342+ on the wall.
natural_image
Technical line drawing of a mechanical assembly with directional arrows indicating motion or force (no text or symbols)Make a Video Call
- Make sure all devices (VB342+, laptop/PC, TV/monitor) are well connected and powered on.
- Run your video application (Skype ^TM , Skype for Business, Google Hangouts ^TM , Zoom ^TM , WebEx ^TM , Adobe Connect ^TM , WebRTC, and etc.) on your laptop/PC.
- Set the VB342+ camera as the primary camera and speakerphone for your video application (refer to your video application user guide). You can now make your call.
- We do recommend installing the AVer PTZApp for a better user experience. For information on how to install and use the AVer PTZApp, refer to the AVer PTZApp section in this user manual.
LED Indicator
| Button | LED Status |
| Power | ■ ON: Blue■ OFF: Red |
| Mute | ■ Mute: Red■ Un-Mute: Blue |
| Phone in | ■ Off: Red■ Connected: Blue |
Install Displaylink Driver
When the HDMI TV/monitor is connected with VB342+ directly, please install the Displaylink drivie on your laptop/PC which is connected with VB342+. If your laptop/PC has installed Displaylink drivie already, then, skip this step.
flowchart
graph TD
    A["Power cable"] --> B["USB cable"]
    B --> C["TV/Monitor"]
    D["HDMI cable (not incuded)"] --> B
    style A fill:#f9f,stroke:#333
    style B fill:#ccf,stroke:#333
    style C fill:#dfd,stroke:#333
    style D fill:#dfd,stroke:#333
Following is how to install Displaylink driver on Windows and Mac.
Windows(Win7 and Win8)
- Run the AVer PTZApp on your laptop/PC.
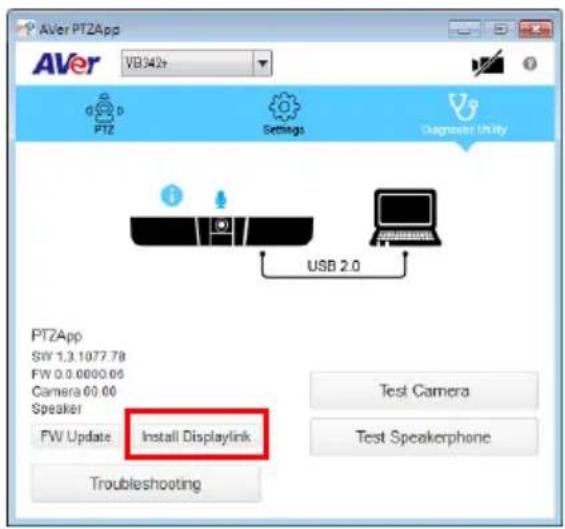
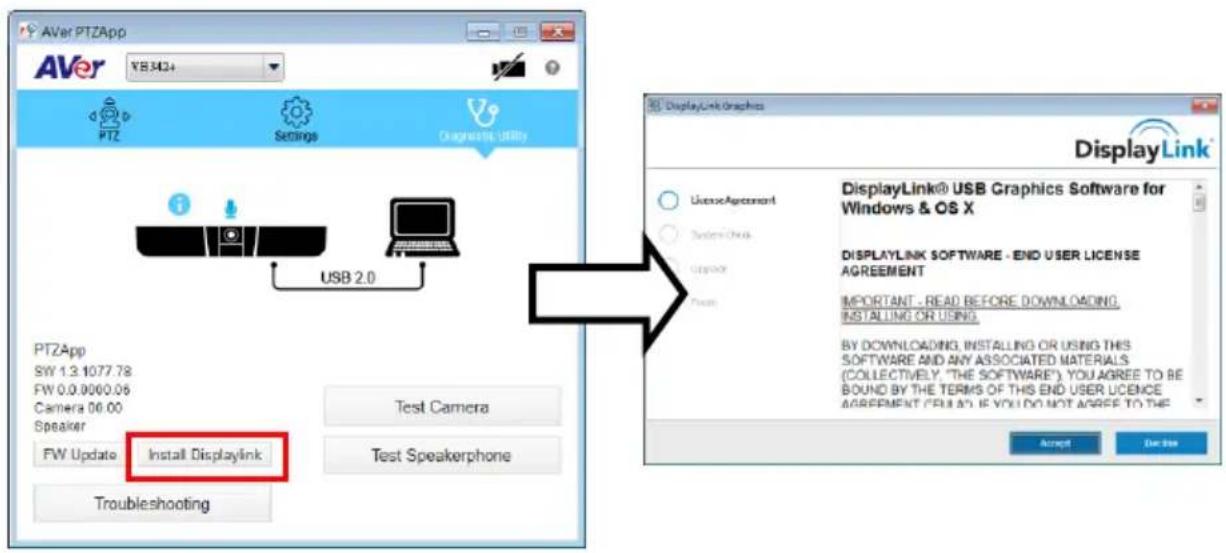
- In AVer PTZApp, select "Diagnostics Utility" > "Install Displaylink".
[Note]
If your laptop/PC is Win10, the "Install Displaylink" button will not show up. Because built-in support on Win10.
■ Maximum output is1080p resolution.
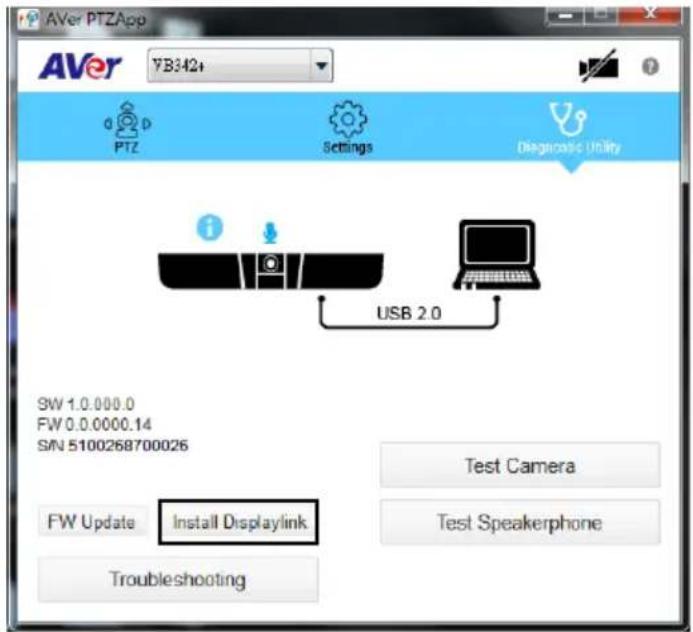
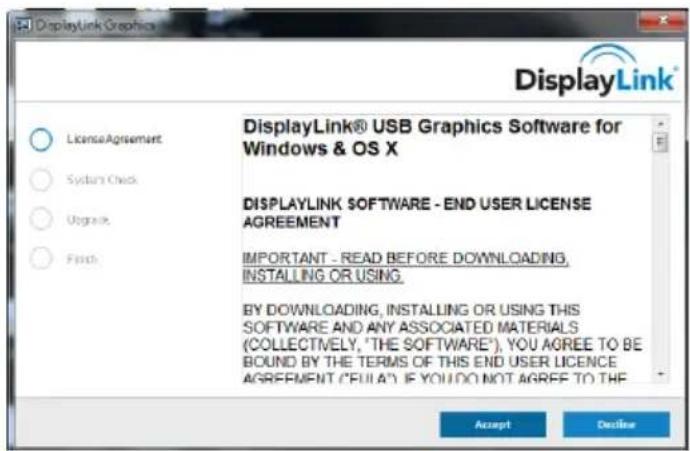
- Follow the on-screen instruction to complete the installation.
Mac OS
- Run the AVer PTZApp on your laptop/PC.
- In AVer PTZApp, select "Diagnostics Utility" > "Install Displaylink".
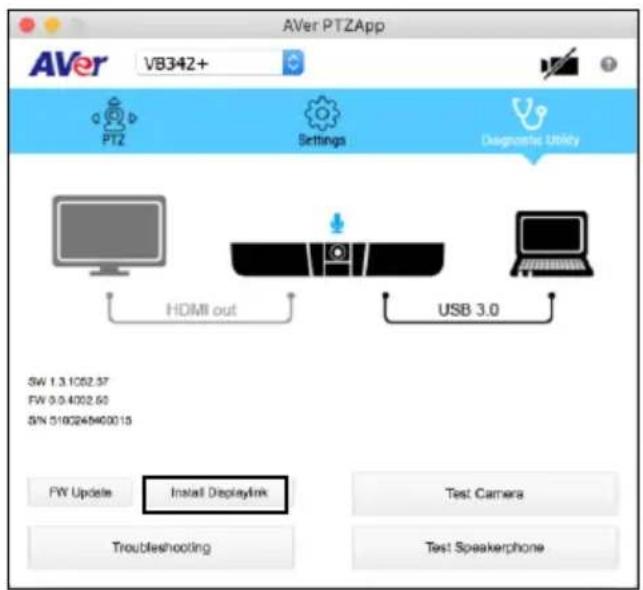
- Scroll to the bottom and select "Accept" for license.
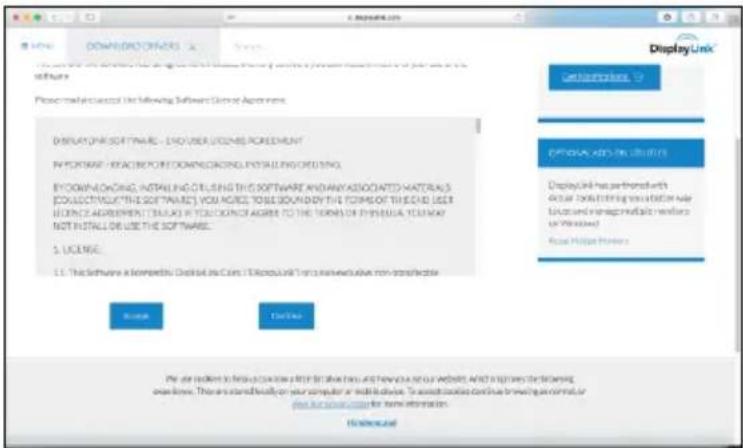
- Select "DisplayLink Software installer" and flow the on-screen instruction to complete the installation.
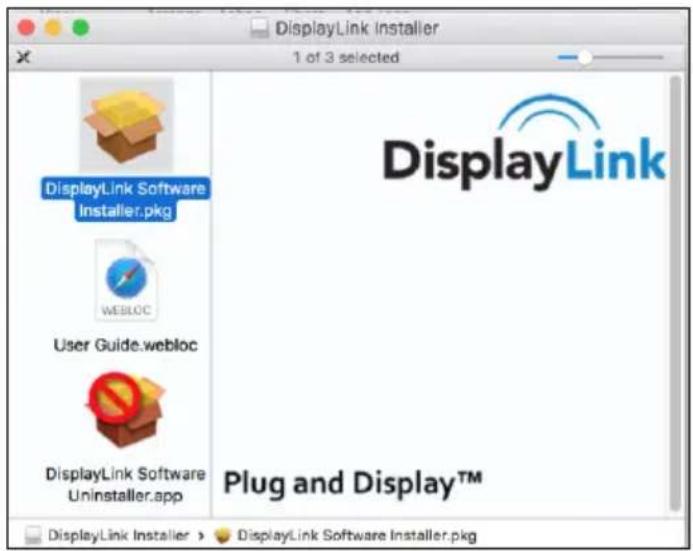
[Note] Maximum output is1080p resolution.
Phone in Connection
- Power on VB342+.
- Connect your device to VB342+ through the "phone in" port.
-
Press button 2 times to switch to Phone in mode.
-
In Phone in mode, press ➕ button 1 times to turn off Phone in mode.
Install AVer PTZApp
Please go to http://www.aver.com > Support > Download Center > Conferencing System to download the AVer PTZApp. After downloading, double-click on the file and follow the on screen instructions to complete the installation.
Remember to select the "Skype plug-in" option during installation.
After installing the AVer PTZApp, double-click on the AVer PTZApp icon to run the application.
Use AVer PTZApp
- Run your video application and make a video call.
- During your video call, you can use the AVer PTZApp to pan, tilt and zoom the camera in/out and enable/disable the true WDR, brightness, and sharpness feature.
- For the first time use, you can check the connection, camera, and speakerphone status, and setup the camera and speakphone's parameters. Each function will be described below:
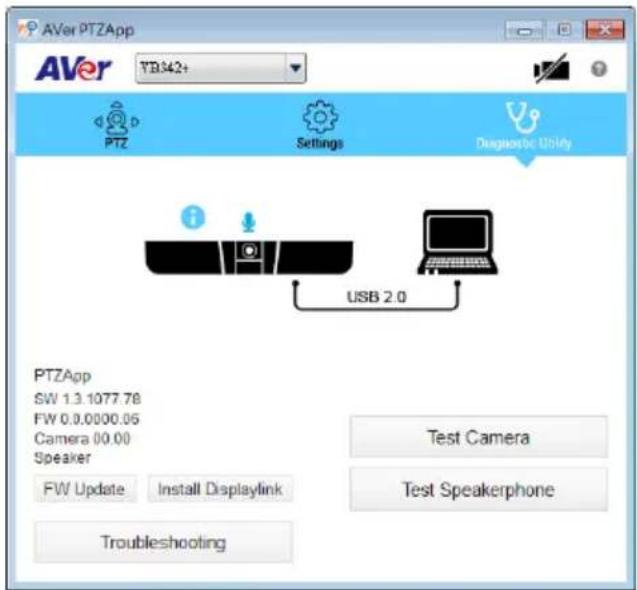
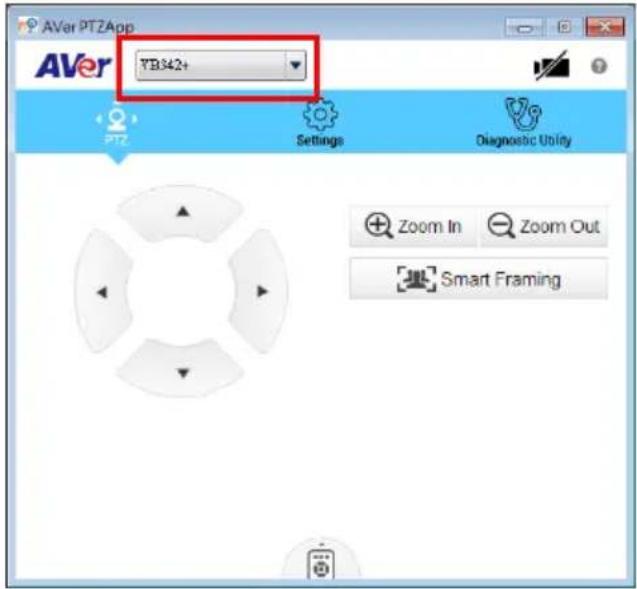
■ Currently selected device: This field displays currently selected VC, CAM, or VB device controlled by PTZApp. If you have more than one AVer VC, CAM, or VB devices connected to this PC/Mac PTZApp is running, you can click on the drop down list to select other AVer VC, CAM, or VB device.
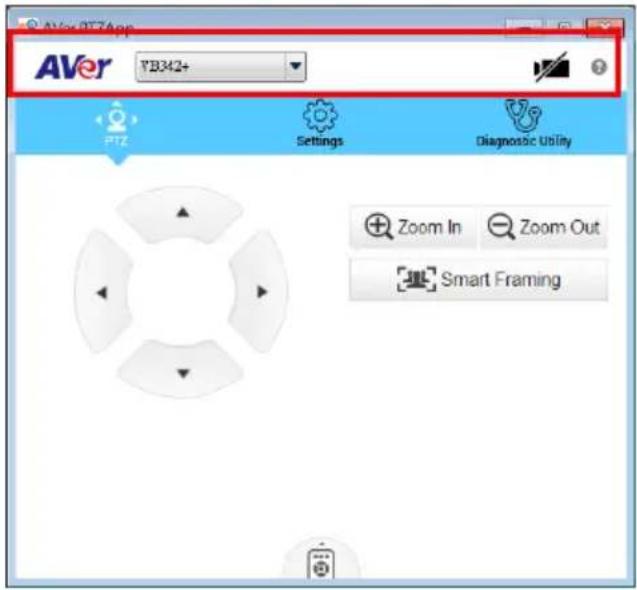
■ Function icon: Click it to switch to the function's page.
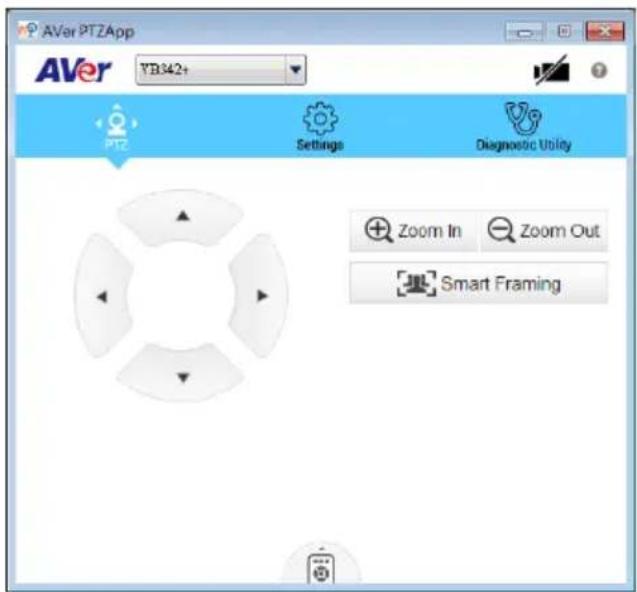
■ PTZ: To control the camera direction, zoom in and out, and to enable/disable the "Smart Framing" during your video call.
Smart Framing: One-click automatic FOV adjustment to fit all participants. Click "Smart Framing" button to enable Smart Framing manually. [Note] While in conferencing meeting, participants must face the camera for face detection (smart framing).
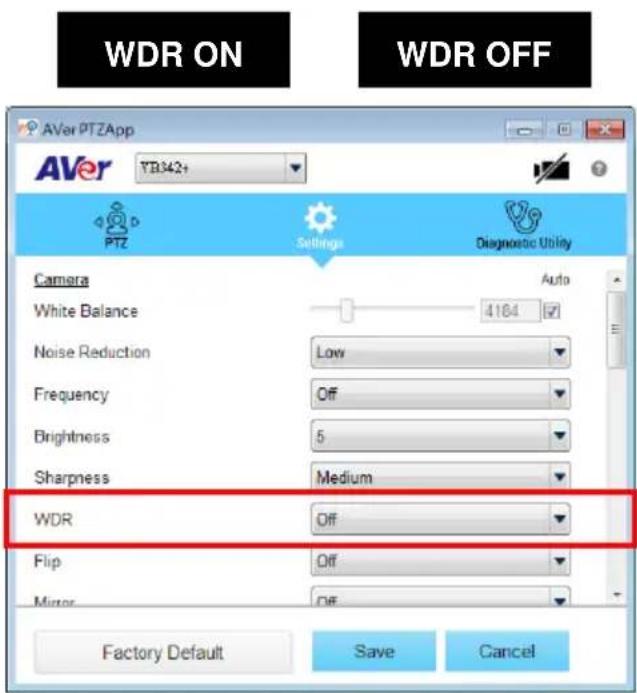
■ Settings: To setup parameters of the camera and speakerphone. Click the Save button to save all settings. To change all the settings, back to the default values, click the Factory Default button.
WDR: In back light environment, enable WDR can improve the brightness of image. To enable WDR function, set WDR to "On". When press and hold the button "1" on the remote controller can on/off the WDR function and the screen will display a message "WDR ON" or "WDR OFF" to indicate the WDR status.
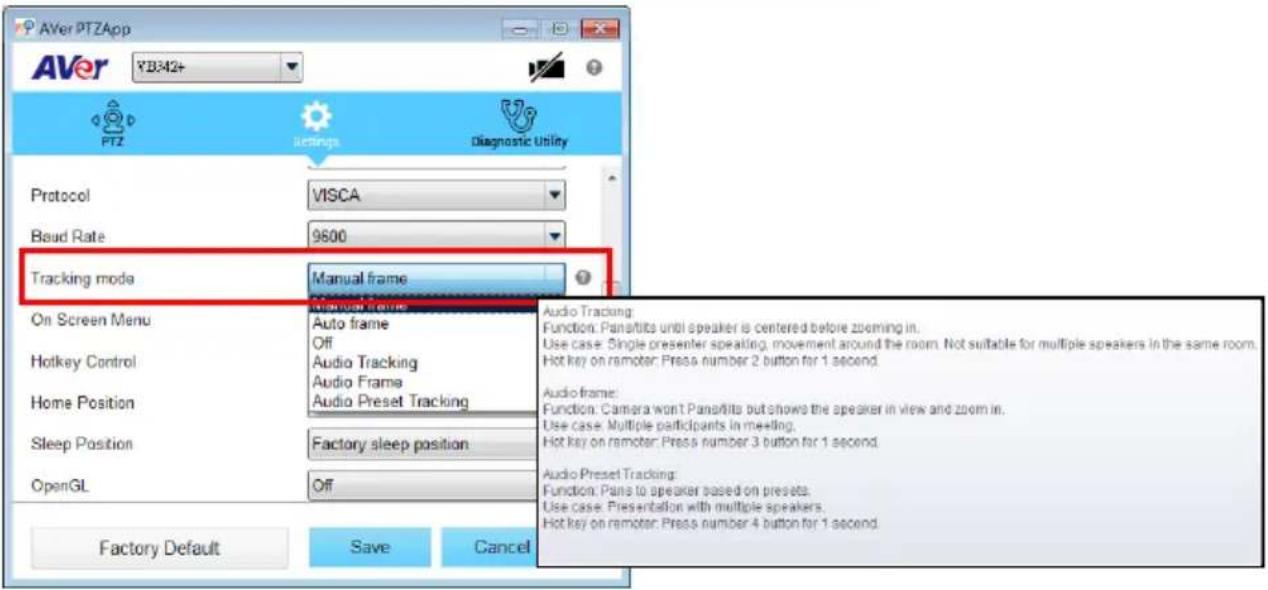
➢ Tracking Mode: Select the mode from drop-down list.
√ Manual frame/Auto frame: FOV (field of view) adjustment to fit all participants. Enable manual or auto smart frame function.
√ Off: Turn off all function included the hotkey on remote controller.
! To trigger the audio tracking, the presenter needs to speak over 3 seconds.
√ Audio Tracking: Pans/tilts until speaker is centered before zooming in. To use when single presenter speaking, movement around the room. Not suitable for multiple speakers in the same room.
[Hotkey] Press button on remote controller for 1 second to enable Audio Tracking function.
√ Audio Frame: Camera won't Pans/tilts but shows the speaker in view and zoom in. To use when Multiple participants in meeting.
[Hotkey] Press button on remote controller for 1 second to enable Audio frame function.
√ Audio Preset Tracking: Pans to speaker based on presets. To use when Presentation with multiple speakers.
[Hotkey] Press 4 button on remote controller for 1 second to enable Audio Preset Tracking function.
Tip: Move the mouse to “?” icon can see the functions’ description.
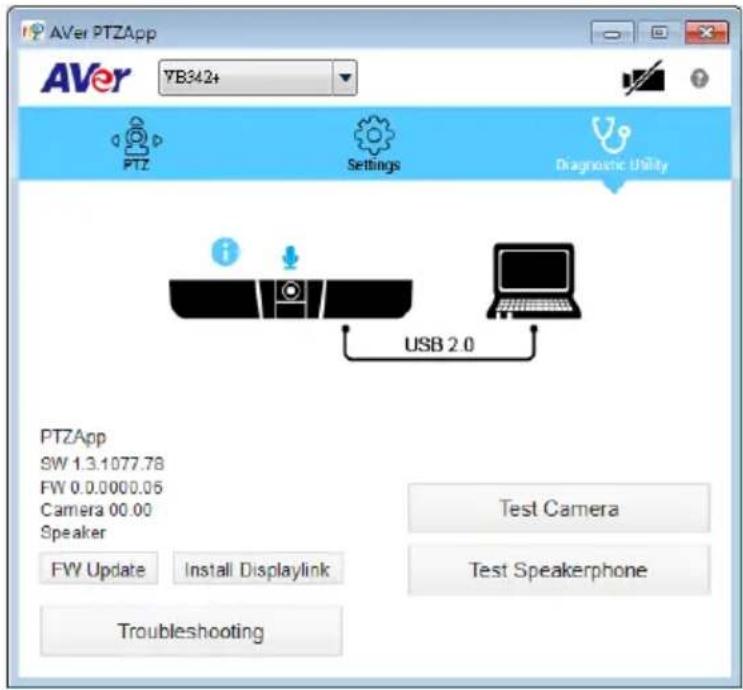
Diagnostic Utility: To display the S/W and F/W version and the devices connection status. You can also test the camera and speakerphone status, and update the firmware of the camera.
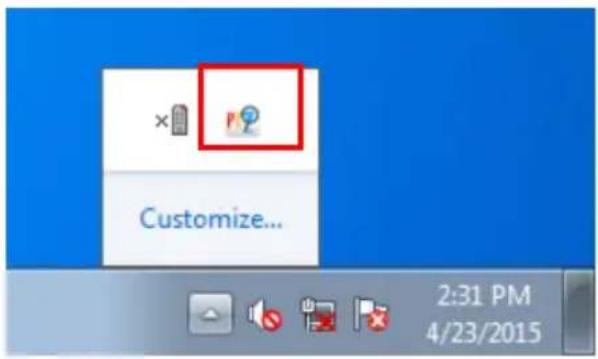
- Minimize: Minimize the app to system tray. To quit the application, right-click the icon on the system tray and select "Quit".
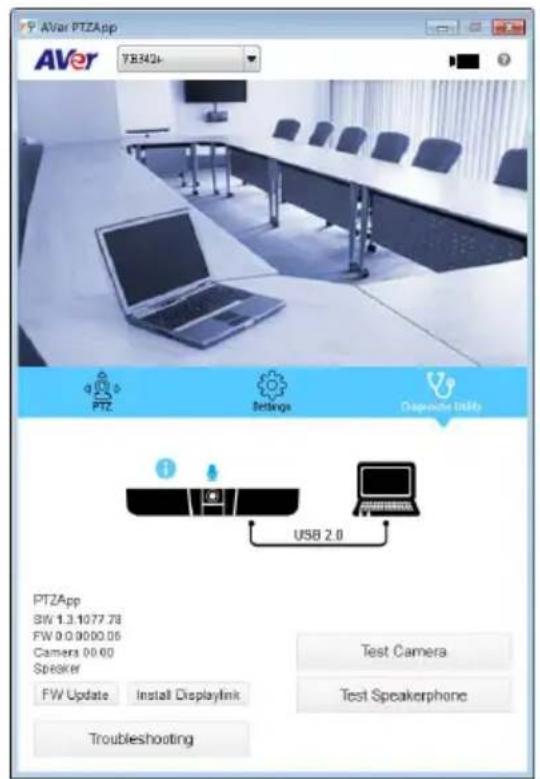
(Camera): Click it to view the camera live view. Click the camera icon again to close the camera live view. If the live video did not appear, please check the camera and the laptop/PC connection to make sure all are correct and well connected.
Normal
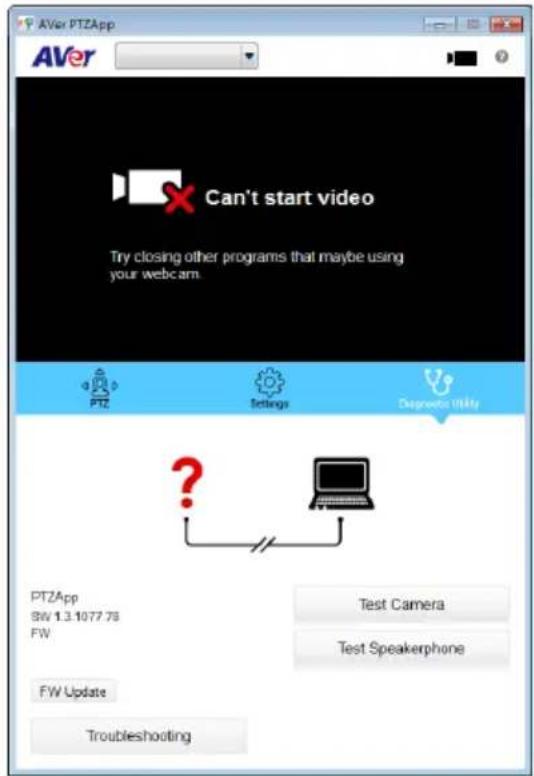
Un-normal
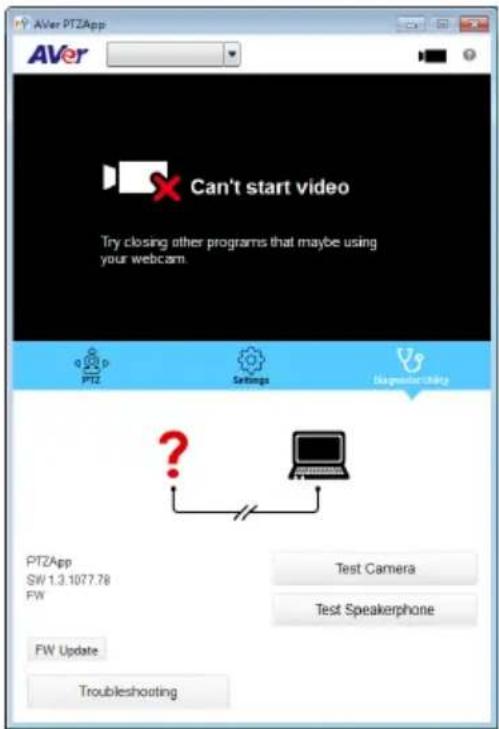
■ Connection diagnostic: Display devices connection status. If the AVer PTZApp has detected that some of the devices are not connected well, the diagram will display a “//” and “?” on the device to indicate the connection has a problem. If the camera is in use by another application, it will display “Can’t start video” warning.
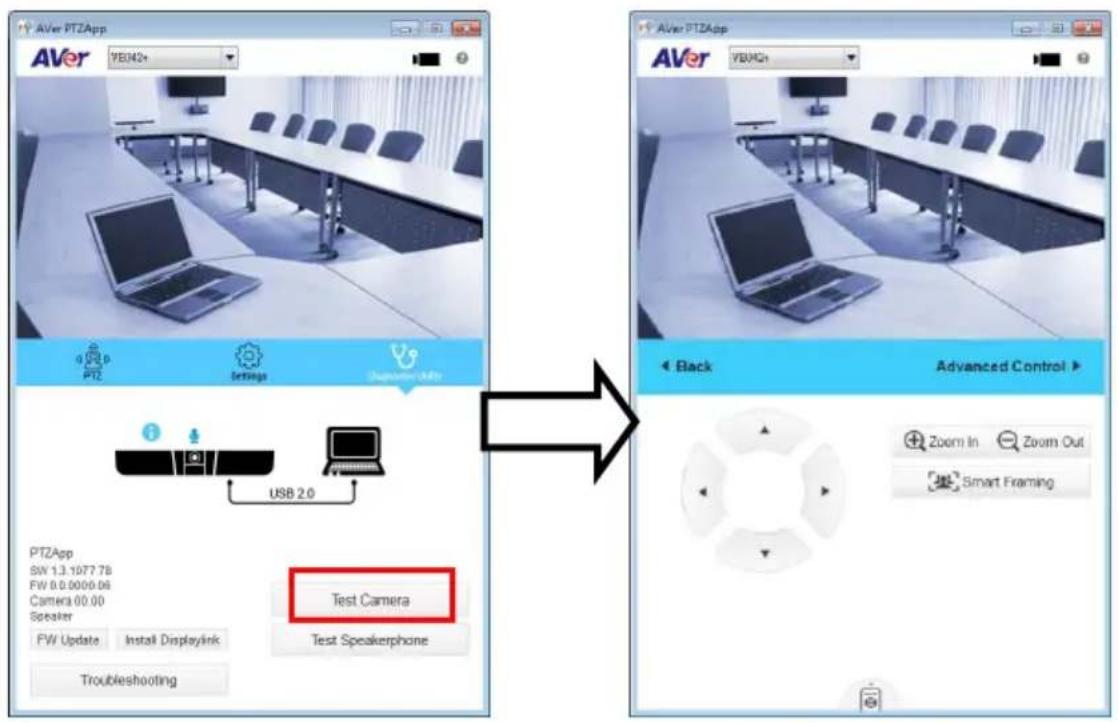
■ Test Camera: Click the Test Camera button to check the camera status. Click 📋 to view camera live video. Use direction and zoom in/out button to check camera view. Click “Advanced Control” can setup camera parameters. To leave the page, click the “Back” button.
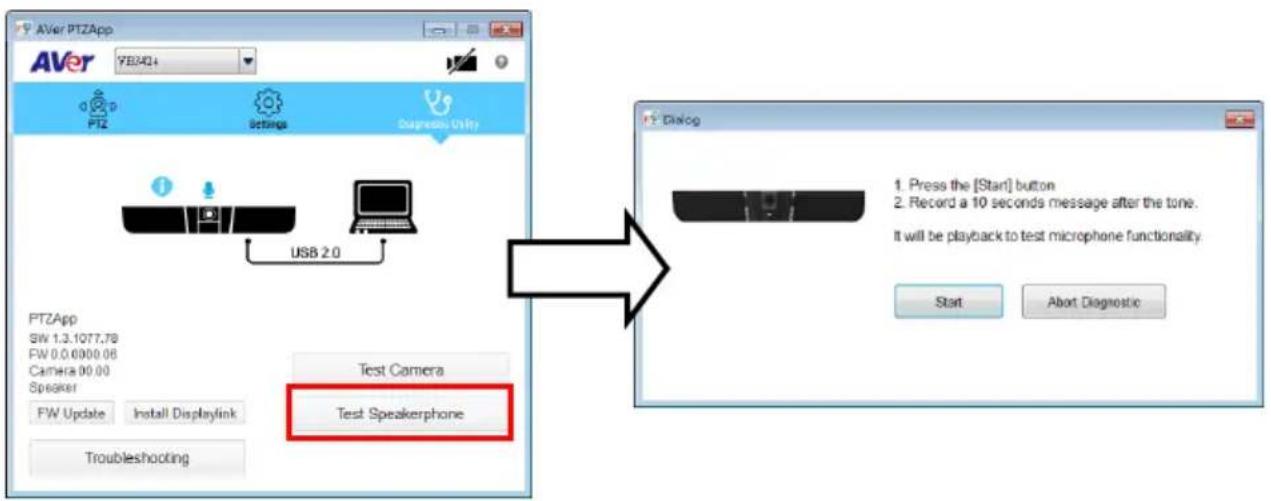
■ Test Speakerphone: Click to check the speakerphone status. It will require user to record a short message and play it back to ensure the speakerphone is working.
flowchart
graph LR
    A["PTZApp"] --> B["USB 2.0"]
    B --> C["Test Camera"]
    C --> D["Test Speakerphone"]
    D --> E["Dialog"]
    E --> F["Start"]
    E --> G["Abort Diagnostic"]
■ FW Update: Allows the user to update the VB342+ firmware.
- Click" FW Update".
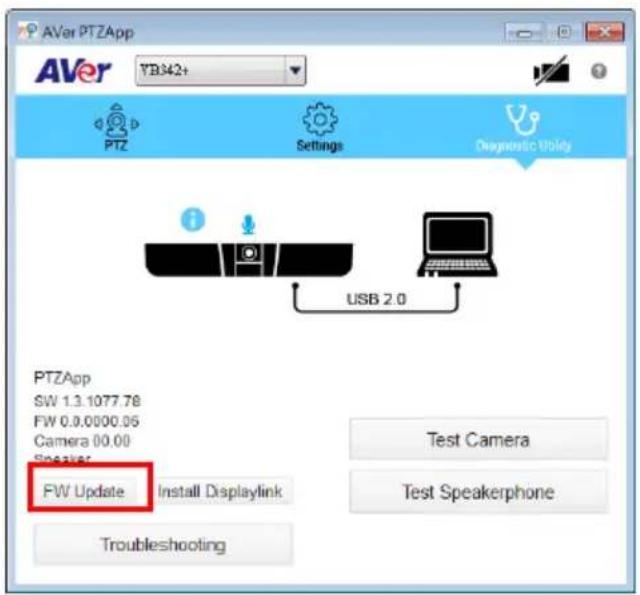
- A dialog will display the current firmware version and available new firmware version (internet connection is required).
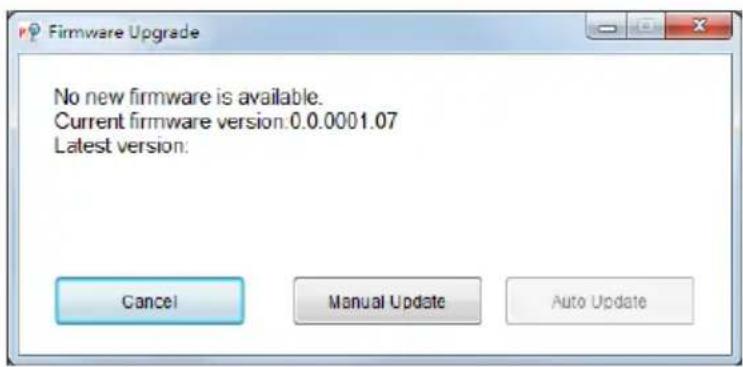
- To auto update, click "Auto Update" and update process will start. The new firmware will be downloaded first; then, the new firmware will be uploaded to camera.
[Note] Before updating the new firmware to the camera, please make sure camera and laptop/PC are all well connected and stay connected during the entire process.
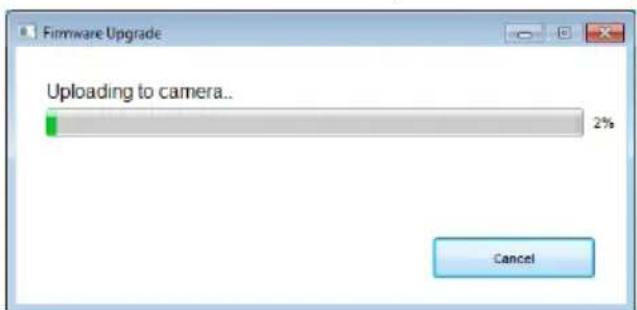
Download new firmware
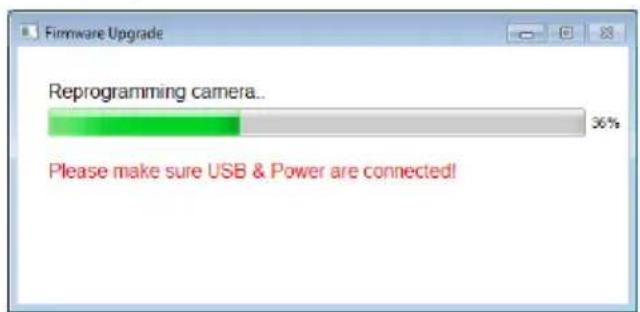
Update new firmware to camera
- To update the firmware manually, click "Manual Update" and locate the new firmware to start the process.
- Install Displaylink: The VB342+ requires Displaylink drive for HDMI connection. If your laptop/PC doesn't have installed Displaylink drive, click "Install Displaylink" and follow the on-screen instruction to complete installation.
[Note] Maximum output is 1080p resolution.
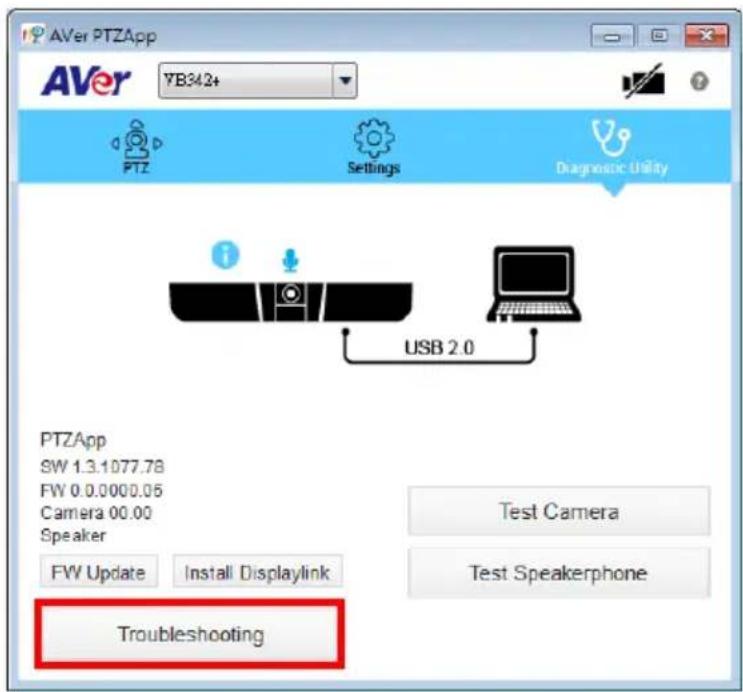
■ Troubleshooting: collect more system information for troubleshooting before you contact AVer technical support.
Set the Camera Number
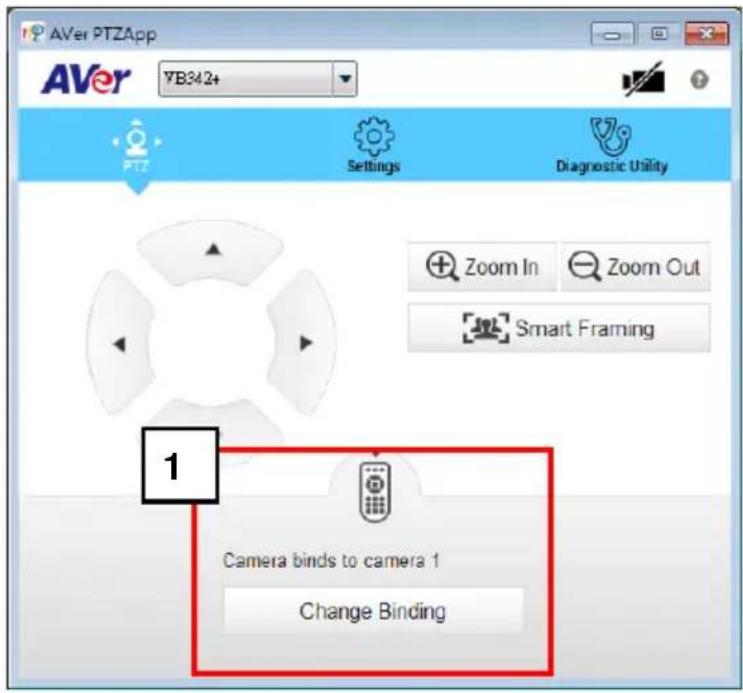
With multiple cameras connection, users can set each camera to buttons 1 to 3 on the remote control.
-
If PTZApp detects computer connects to multiple VC/CAM, you can select which camera you like to control through the dropdown list.
-
Next, Click Change Binding button.
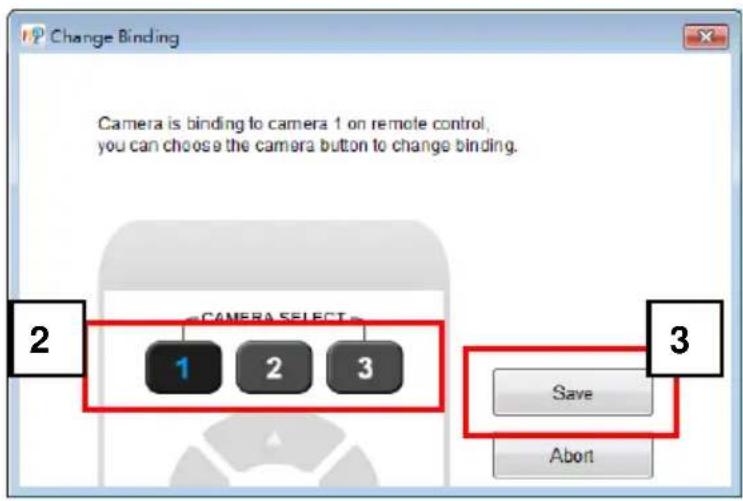
- Select which camera number of remote control it maps to.
- Click Save to save settings. To un-save the settings, click Abort.
[Note] If you only have one camera and don't need to do any setting, the default is camera 1. If you press camera 2 or 3 on the remote control, you will find your remote can't control your camera. In this case, please press camera 1 on your remote again.
Hotkey Control
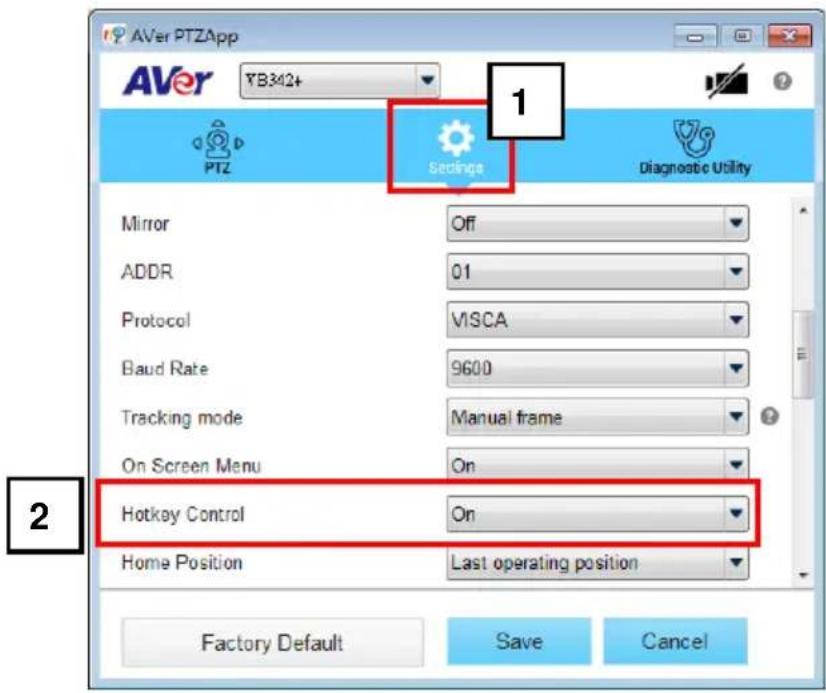
Enable hotkey control to use keyboard control camera's movement and backlight. The default is off.
- In AVer PTZApp, select "Settings"
- Set Hotkey Control to "On".
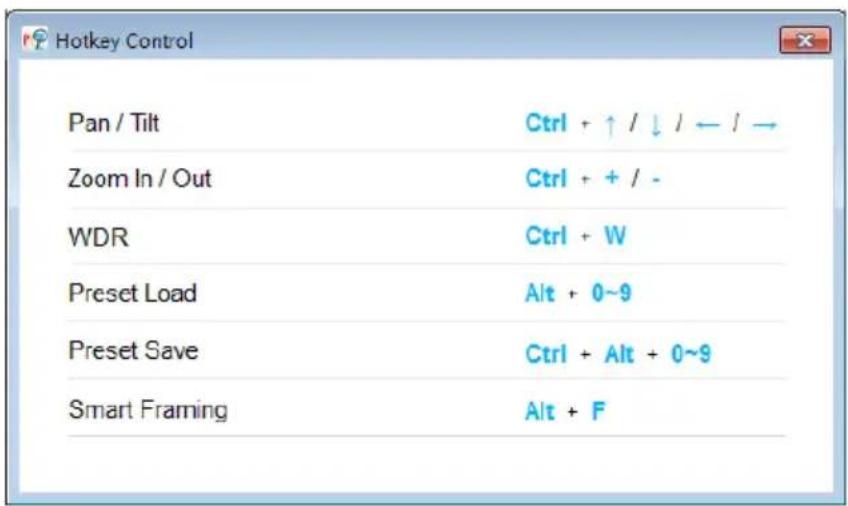
- A hotkey description as below figure shown:
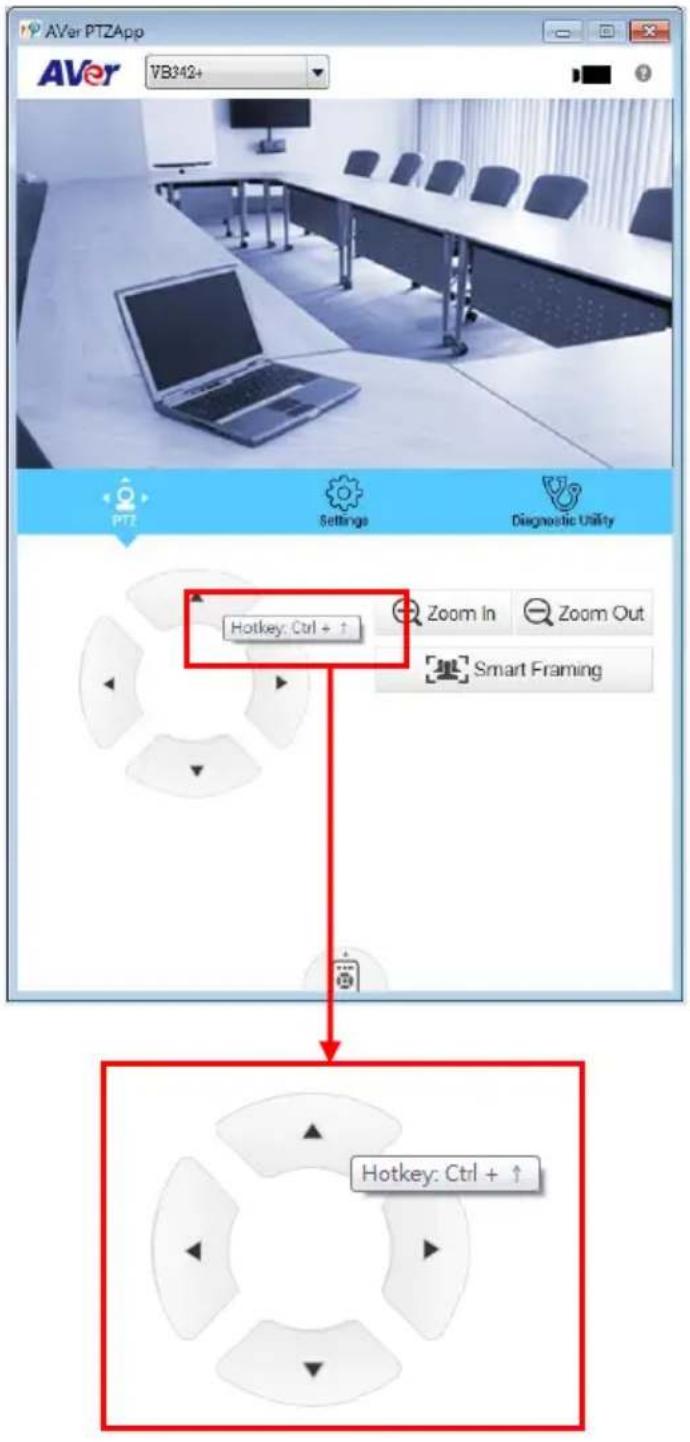
- When hotkey control is enabled, a hotkey tip will display when mouse is moved to the PTZ control button in PTZ mode.
Home / Sleep Position
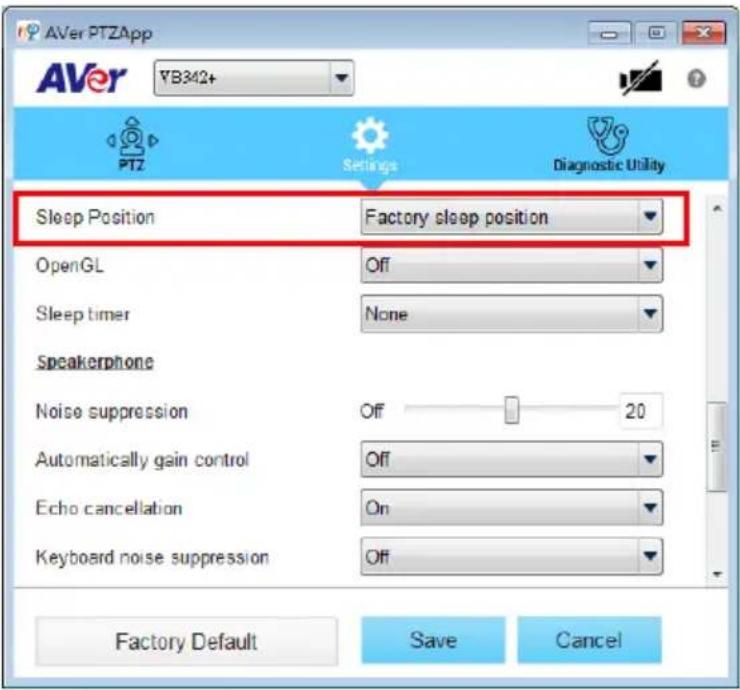
Home Position: There are three options: Last operating position/Factory central position/ Preset 0
Sleep Position: There are two options -- Factory sleep position/ Preset 9
If the camera idles for more than 3 minutes, it will enter sleep mode.
OpenGL
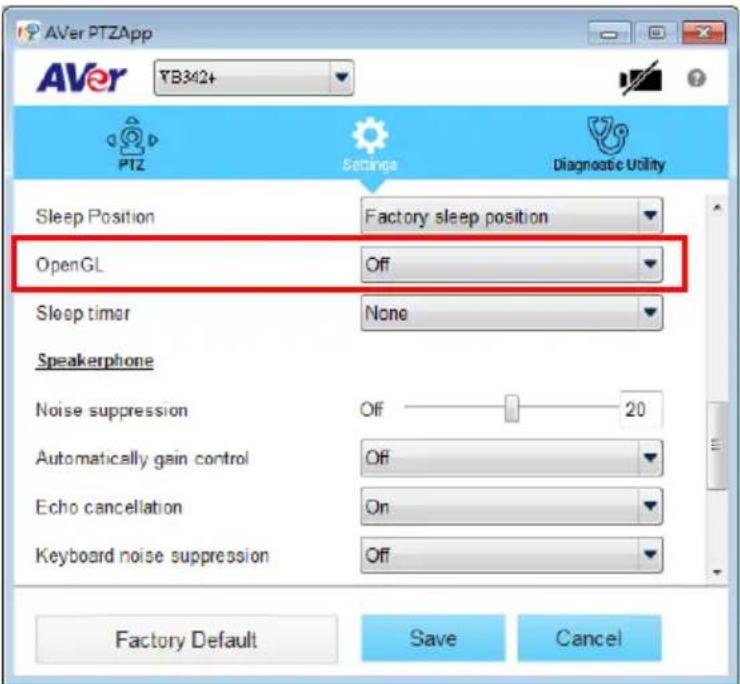
The default setting is off. If your PC has installed OpenGL, you can get better frame rate and smoother video quality by turn on it. If your PC is without OpenGL, it will cause video display problem after enable it.
Full Screen Mode
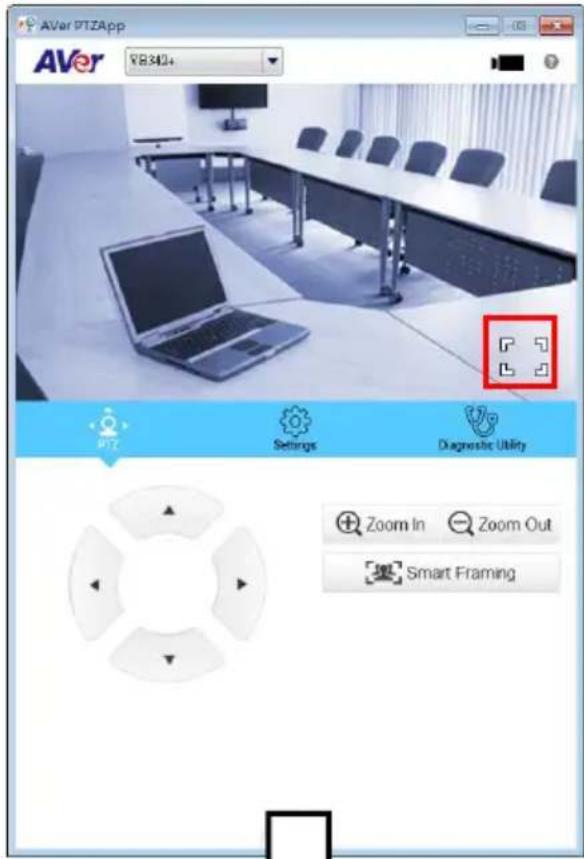
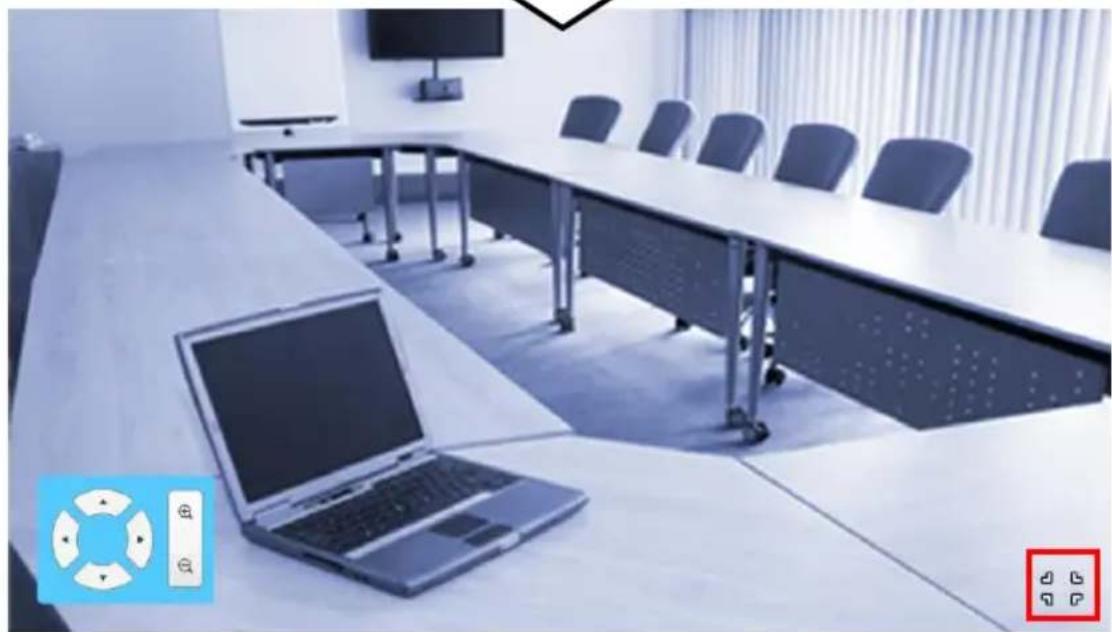
PTZApp can switch to full screen mode. Move the mouse to the right corner bottom of the video screen and a “” icon is displayed on video screen. Click “” icon and video screen will switch to full screen mode. In full screen mode, user can use direction panel to control camera direction. Click “” icon can go back to normal screen view.
natural_image
Interior view of a modern conference room with a laptop and large table, no visible text or symbolsPlease go to http://www.aver.com/download-center to download the AVer EZLive software. After downloading, double-click on the file and follow the on-screen instructions to complete the installation.
Use AVer EZLive
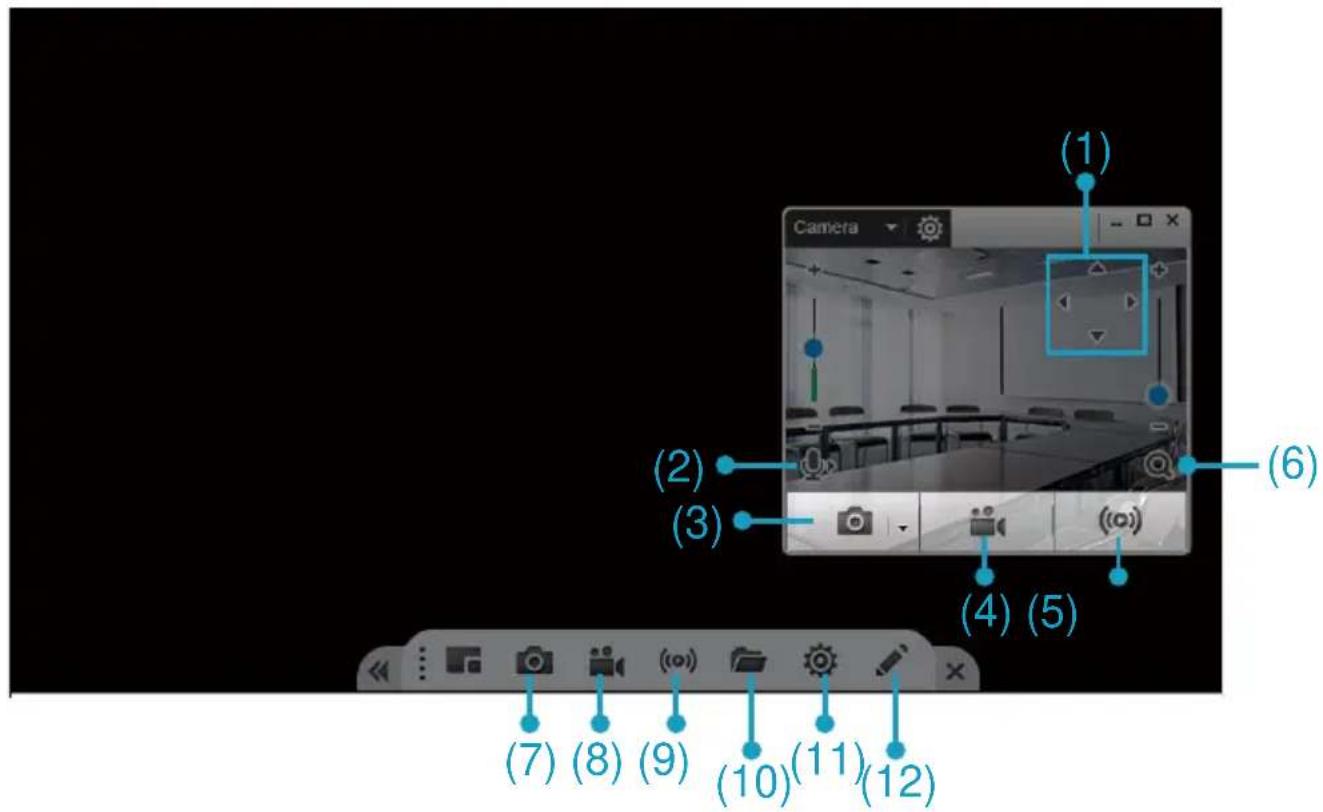
During a video call, EZLive can help user to do:
(1) Camera ePTZ
(2) Volume control for the speaker connected
(3) Capture camera's still images
(4) Record video
(5) Live stream to Youtube, Livehouse.in, USTREAM...etc.
(6) Camera Zoom in/out
(7) Capture PC screen shot
(8) Record PC screen video
(9) Set up livestream
(10) Open file management to retrieve photos and video files
(11) Livestream setting
(12) Drawing tool.
- VB342+
- Conference Camera
- User Manual
- FEDERAL COMMUNICATIONS COMMISSION
- Europe – EU Declaration of Conformity
- DISCLAIMER
- TRADEMARKS
- COPYRIGHT
- NOTICE
- CAUTION
- WARNING
- Remote Control Battery Safety Information
- Contact Information
- Contents
- Package Contents
- Overview
- Remote Controller
- Device Connection
- Extended Microphone Installation
- Wall Mount Installation
- Make a Video Call
- Install Displaylink Driver
- Windows(Win7 and Win8)
- [Note]
- Mac OS
- Phone in Connection
- Install AVer PTZApp
- Use AVer PTZApp
- ! To trigger the audio tracking, the presenter needs to speak over 3 seconds.
- Tip: Move the mouse to “?” icon can see the functions’ description.
- Set the Camera Number
- Hotkey Control
- Home / Sleep Position
- OpenGL
- Full Screen Mode
- Use AVer EZLive
Brand : AVer
Model : COMVBEMIC
Category : Video Conferencing System