
ASWM70-1024 - Wall mount Bauhn - Free user manual and instructions
Find the device manual for free ASWM70-1024 Bauhn in PDF.


| Product Type | Swing Arm TV Wall Mount |
| Brand | Bauhn |
| Model | ASWM70-1024 |
| VESA Compatibility | Up to 600 x 400 mm |
| Maximum Load Capacity | 60 kg |
| TV Size Range | 32" to 70" (81 - 177.8 cm) |
| Tilt Adjustment | ±20° up/down |
| Swivel Adjustment | ±90° left/right |
| Distance from Wall | 65 - 470 mm (approx.) |
| Product Weight (including accessories) | 4.7 kg |
| Material | Steel (black finish) |
| Color | Black |
| Installation Wall Types | Brick, concrete, or wood stud walls |
| Spirit Level Included | Yes |
| Warranty | 1 year |
| Indoor Use Only | Yes |
| Tools Required for Installation | Pencil, Phillips head screwdriver, power drill, hammer, stud detector |
| Package Contents | Wall mount, installation pack (screws, bolts, washers, etc.), installation guide, warranty certificate, safety warnings |
| Compliance & Disposal | Environmentally friendly packaging; recycle at end of life |
Frequently Asked Questions - ASWM70-1024 Bauhn
User questions about ASWM70-1024 Bauhn
0 question about this device. Answer the ones you know or ask your own.
Ask a new question about this device
Download the instructions for your Wall mount in PDF format for free! Find your manual ASWM70-1024 - Bauhn and take your electronic device back in hand. On this page are published all the documents necessary for the use of your device. ASWM70-1024 by Bauhn.
USER MANUAL ASWM70-1024 Bauhn
Swing Arm TV Wall Mount
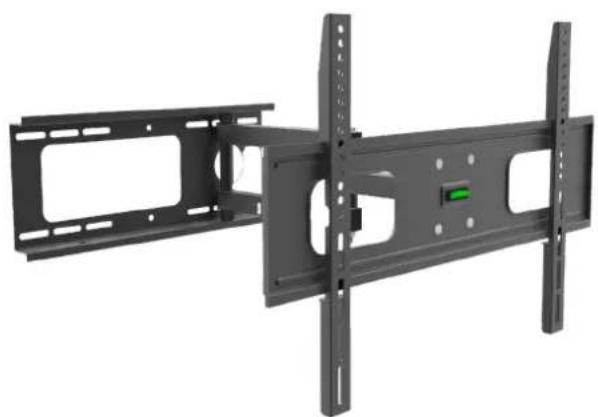
MODEL: ASWM70-1024
Installation Guide
Welcome
Congratulations on your purchase!
This installation guide tells you all you need to know about using your new BAUHN® product.
Please take special note of any important safety and usage information presented with the ⚠ symbol.
All products brought to you by BAUHN ® are manufactured to the highest standards of performance and safety and, as part of our philosophy of customer service and satisfaction, are backed by our comprehensive 1 Year Warranty.
Domestic use only: This product is intended for indoor domestic use only. It is not suitable for commercial, industrial or outdoor use. Do not use this product for anything other that its intended purpose, and only use it as described in this guide.
We hope you will enjoy using your purchase for many years to come.
WARNING
Fixing a TV to a wall mount requires specialist knowledge. We assume no liability for any injury or material damage incurred due to incorrect assembly or use. Make sure to follow all instructions and if you require professional advice, please consult a relevant tradesperson.
Contents
Welcome 2
Unpack and Prepare 4
What's in the Box 4
Parts List 5
Product Overview 5
Installation Pack (Assembly Hardware) 6
Installation 7
Preparation (for a Brick or Concrete Wall) 8
Preparation (for a Wood Stud Wall) 10
Attaching the Monitor Brackets to the TV 12
Securing the TV 13
Adjusting the Viewing Angle 14
Specifications 15
Compliance and
Responsible Disposal 16
Warranty Information 17
Repair and Refurbished
Goods or Parts Notice 18
Unpack and Prepare
What's in the Box
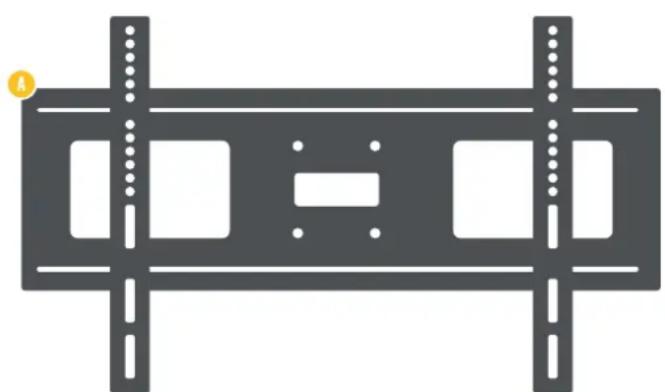
Before setting up your new product, check you have everything:
A. Swing Arm TV Wall Mount
B. Installation Pack (see page 6 for information)
C. Installation Guide
D. Warranty Certificate
E. General Safety Warnings


Parts List
Product Overview

PARTS LIST|5
Installation Pack (Assembly Hardware)
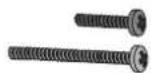
The illustration below shows the contents of the installation pack. These are the parts that you will need to assemble this wall mount. Some parts are not shown at the same scale.


(A)
Self-Tapping Screw M8 x 50mm (6pcs)

(B)
Masonry Plug ø10 x ø8 x L50 (6pcs)

(C)
Washer ø 8.5 x ø19 x T1.6 (6pcs)

(D)
Flat Washer M5-M8 (4pcs)

(E)
Plastic Spacer ø 8 x 14mm (4pcs)

(F)
Bolt M4 x 15mm (4pcs) M4 x 20mm (4pcs)
(G)
Bolt M5 x 15mm (4pcs) M5 x 25mm (4pcs)

(H)
Bolt M6 x 15mm (4pcs) M6 x 25mm (4pcs)

(I)
Bolt M8 x 15mm (4pcs) M8 x 30mm (4pcs)

(J)
Allen Key (1pcs)
Installation
Make sure you read and understand all instructions. Handle and use all materials strictly according to the instructions. If you do not understand these directions, or have any questions in relation to the safety of the installation, we recommend you contact a qualified professional.
Note: This wall mount is for indoor home use only.
Installation steps:
1 Preparation
2 Drilling the holes
3 Attaching to the wall
4 Attaching the Monitor Brackets to the TV
5 Securing the TV
6 Adjusting the Viewing Angle
TIP: Installation of the Wall Mount will be easier with two people.
WARNING: Be sure to choose a structurally sound wall area that is strong enough to hold the weight of the TV as well as the wall mount. Mount the wall plate far away from any water source and direct sunlight.
WARNING: DO NOT attach the wall mount to a hollow wall or decorative cardboard.
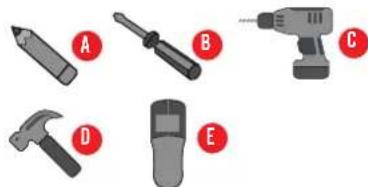
Tools Required: To complete the following steps you will need:
A. Pencil
B. Phillips Head Screwdriver
C. Power Drill
D. Hammer
E. Stud Detector
INSTALLATION | 7
1A
Preparation (for a Brick or Concrete Wall)

Using the wall base plate as a template, mark six holes in the locations as shown above.
NOTE: Ensure that you align the bracket so that the spirit level is flat and even.
Attaching to the Wall
3A
Hold the wall plate against the wall and align the holes in the plate to the holes drilled into the wall.
Screw the wall plate to the wall with the self-tapping screws (A): insert them through the washers (C) into each masonry plug (B) in the wall and then tighten the screws.

2A Drilling the Holes

On the marked holes, pre-drill holes of 10mm diameter and 60mm depth into the concrete or brick wall. Then wedge the masonry plugs (B) into the holes, gently tap each plug with a hammer until they are flush with the wall as illustrated on the left.
WARNING: Do not drill into mortar joints. Please pay attention to the electrical lines and also the location of gas and water lines when drilling holes.
1B
Preparation (for a Wood Stud Wall)

Use a stud detector to locate the centre of the framing studs.
Mark six holes in the locations as shown above. Use the wall base plate as a template.
NOTE: If you are installing the wall mount to a wood stud wall, consult a builder for advice. The wall must be strong enough for the weight of the wall mount and the TV.
WARNING: You must spread the wall plate across two studs.
Hold the wall plate to the wall and align the holes in the plate to the holes drilled into the wall.
Screw the wall plate to the wall with the self-tapping screws (A), inserting them through the washers (C).
Attaching to the Wall
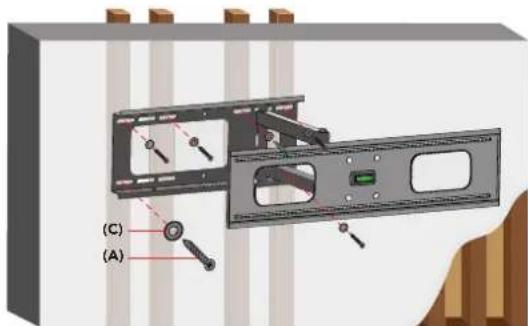
2B Drilling the Holes

On the marked holes, drill holes of 5mm diameter and 60mm depth into the wood stud wall.
WARNING: Please pay attention to the electrical lines and also the location of gas and water lines when drilling holes.
4 Attaching the Monitor Brackets to the TV
- Lay the TV face down. Check the back of the TV to find the appropriate mounting pattern.
- Select the appropriate bolts (F/G/H/I) that fit the thread holes at the back of the TV (refer to the TVs manual to determine the correct bolt sizes). Due to the many varieties of TVs, you may need to visit your local hardware supplier to find the correct bolt and washer sizes.
- To attach the left and right brackets to the back of the TV, place the mounting arms on the back of the TV and align to match the VESA mounting holes.
- Insert the correct bolts through the flat washers (D), as illustrated on the right. Use the plastic spacers (E) if necessary (check the TV's back panel).
- Tighten the bolts and ensure the brackets are firmly bolted into place.
- When affixing the monitor brackets, make sure that the sides of the brackets with the hooks are towards the top of the display. Use the holes in the centre, ensuring that the mounting holes are at the same level.
![TV [E] [D] [F-I]](/content/2026/05/958168/images/7cc87274260fe072f9215c212594c4cb96f0df5ddc46192c30886170b5adbfb9.jpg)
5
Securing the TV
- Carefully lift the TV and hook the mounting arms over the front plate. Do not let go of the TV until it is securely in place on the brackets.
- Tighten the bolt under each bracket with a Phillips head screwdriver to secure the TV in place. This will help ensure that the TV does not fall off the wall mount during use.
NOTE:
- While adjusting, please take care of your hands to avoid getting pinched and pay attention to the cables' position to avoid damage.
- At least two people are required to finish this mounting procedure. Do not attempt to assemble this wall mount independently, as it may result in incorrect assembly or injury.


Adjusting the Viewing Angle
Before adjusting the direction and viewing angle for the TV, loosen the Allen bolts at the rear of the TV mounting plate with the Allen key provided (make sure that they are only loose enough just to tilt the TV, and not so loose that the TV is not secured and can fall).
The viewing angle can be adjusted to ±20° . Tighten the bolts securely again once you have found your preferred viewing angle.

Specifications
| VESA Support Max. 600 x 400mm | |
| Maximum Load 60kg | |
| Size of flat panel TV 32"-70" (81-177.8cm) | |
| Adjustment Angle ±20° up/down, ±90° left/right | |
| Distance From Wall 65-470mm approx. | |
| Product Weight (including accessories) | 4.7kg |
Compliance and Responsible Disposal

Packaging
The packaging of your product has been selected from environmentally friendly
materials and can usually be recycled. Please ensure these are disposed of correctly. Plastic wrapping can be a suffocation hazard for babies and young children, please ensure all packaging materials are out of reach and are safely disposed of. Please recycle these materials rather than throwing them away.
Product
At the end of its working life, do not throw this product out with your household rubbish. An environmentally friendly method of disposal will ensure that valuable raw materials can be recycled. Electrical and electronic items contain materials and substances which, if handled or disposed of incorrectly, could potentially be hazardous to the environment and human health.


BAUHN®
Warranty Information
The product is guaranteed to be free from defects in workmanship and parts for a period of 12 months from the date of purchase. Defects that occur within this warranty period, under normal use and care, will be repaired, replaced or refunded at our discretion, solely at our option with no charge for parts and labour. The benefits conferred by this warranty are in addition to all rights and remedies in respect of the product that the consumer has under the Competition and Consumer Act 2010 and similar state and territory laws.
Our goods come with guarantees that cannot be excluded under the Australian Consumer Law. You are entitled to a replacement or refund for a major failure and to compensation for any other reasonably foreseeable loss or damage. You are also entitled to have the goods repaired or replaced if the goods fail to be of acceptable quality and the failure does not amount to a major failure.


BAUHN®
Repair and Refurbished Goods or Parts Notice
Unfortunately, sometimes faulty products are manufactured, which need to be returned to the supplier for repair.
Please be aware that if your product is capable of retaining user-generated data (such as files stored on a computer hard drive, telephone numbers stored on a mobile telephone, songs stored on a portable media player, games saved on a games console or files stored on a USB memory stick) during the process of repair, some or all of your stored data may be lost. We recommend you save this data elsewhere prior to sending the product for repair.
You should also be aware that rather than repairing goods, we may replace them with refurbished goods of the same type or use refurbished parts in the repair process.
Please be assured though, refurbished parts or replacements are only used where they meet ALDI's stringent quality specifications.
If at any time you feel your repair is being handled unsatisfactorily, you may escalate your complaint. Please telephone us on 1300 002 534 or write to us at:
Tempo (Aust) Pty Ltd ABN 70 106 100 252
PO BOX 6097, North Sydney, NSW, 2059
Telephone: 1300 002 534 (Aust) Fax: (02) 8977 3765
Tempo Help Desk: 1300 002 534 (Aust)
(Operating Hours: Mon-Fri 8:30am-6pm; Sat 9am-6pm AEST)
Email: tempo.org/support
Notes
Online support
Visit bauhn.com.au for the latest User Manual for information on the updated features.
Warranty returns
Should you for any reason need to return this product for a warranty claim, make sure to include all accessories with the product.
Product does not work?
If you encounter problems with this product, or if it fails to perform to your expectations, please contact our After Sales Support Centre on 1300 002 534.

Please read the guide
It will help you get the best out of your product.
Still have quest ons?
Call After Sales Support 1300 002 534
Or visit tempo.org/support
ALDI guarantees that our products are developed to our stringent quality specifications. If you are not entirely satisfied with this product, please return it to your nearest ALDI store within 60 days from the date of purchase for a full refund or replacement, or take advantage of our after sales support by calling the supplier's Customer Service Hotline.


- SWING ARM TV WALL MOUNT
- WELCOME
- WARNING
- CONTENTS
- UNPACK AND PREPARE
- PARTS LIST
- PRODUCT OVERVIEW
- INSTALLATION PACK (ASSEMBLY HARDWARE)
- INSTALLATION
- 1A
- PREPARATION (FOR A BRICK OR CONCRETE WALL)
- ATTACHING TO THE WALL
- 2A DRILLING THE HOLES
- PREPARATION (FOR A WOOD STUD WALL)
- 2B DRILLING THE HOLES
- 4 ATTACHING THE MONITOR BRACKETS TO THE TV
- 5
- SECURING THE TV
- NOTE
- ADJUSTING THE VIEWING ANGLE
- SPECIFICATIONS
- COMPLIANCE AND RESPONSIBLE DISPOSAL
- PACKAGING
- PRODUCT
- BAUHN®
- WARRANTY INFORMATION
- REPAIR AND REFURBISHED GOODS OR PARTS NOTICE
- ONLINE SUPPORT
- WARRANTY RETURNS
- PRODUCT DOES NOT WORK
Brand : Bauhn
Model : ASWM70-1024
Category : Wall mount