
SC-SS0011-0S - Sauna SteamSpa - Free user manual and instructions
Find the device manual for free SC-SS0011-0S SteamSpa in PDF.


| Product Type | Steam Sauna |
| Brand | SteamSpa |
| Model | SC-SS0011-0S |
| Capacity | 1 Person |
| Dimensions (L x W x H) | 90 x 90 x 190 cm |
| Weight | 45 kg |
| Power Supply | 220-240V, 50/60Hz |
| Power Consumption | 1800 W |
| Maximum Temperature | 55°C |
| Water Tank Capacity | 3 Liters |
| Heating Time | 15-20 Minutes |
| Material | Acrylic Shell, ABS Frame |
| Heating Type | Steam Generator |
| Safety Features | Auto Shut-off, Overheat Protection |
| Cleaning & Maintenance | Wipe with Soft Cloth, Descale Regularly |
| Included Accessories | Seat, Backrest, Water Scoop |
| Warranty | 1 Year |
| Certifications | CE, RoHS |
| Color | White |
Frequently Asked Questions - SC-SS0011-0S SteamSpa
User questions about SC-SS0011-0S SteamSpa
0 question about this device. Answer the ones you know or ask your own.
Ask a new question about this device
Download the instructions for your Sauna in PDF format for free! Find your manual SC-SS0011-0S - SteamSpa and take your electronic device back in hand. On this page are published all the documents necessary for the use of your device. SC-SS0011-0S by SteamSpa.
USER MANUAL SC-SS0011-0S SteamSpa
DON'T WAIT! REGISTER NOW!
Register your product within 90 days to ensure your sauna is recognized as an official purchase and is eligible for warranty coverage.
Mail in the completed registry card (Pg. 2) or register online at www.SteamSpa.com/register.
PRODUCT REGISTRATION*
IMPORTANT: Your warranty will not be recognized unless this card is fully completed and returned or online registration is completed.
To ensure that your warranty is registered and confirmed please do one of the following:
- Register online at www.SteamSpa.com/register. You will be asked to fill out the same information you would in the registration card. Registering online is fast, secure and ensures we receive your information.
- Complete, cut-out and mail the registration card below. By your returning card we confirm the date of purchase for your new product. This confirmation will allow us to process any warranty claims.
Mail the card to: 5701 NW 35 Avenue, Miami, FL 33142

CUT ALONG DOTTED LINE.
Product Registration Card
Name ...... Address ......
Date of Purchase.... Order or Purchase #.... SKU or Model #....
Installer's Name Phone
I have read the Owner's Guide carefully and understand and agree that any installation, operation or maintenance of the sauna and accessories must be done strictly in accordance with instructions and guidelines contained in the owner's manual and installation guide.
Signature Date
IMPORTANT WARRANTY INFORMATION!
WARRANTY AND REPAIR GUIDELINES
SteamSpa warrants that this sauna unit will be free from manufacturer defects and malfunctions. For terms and conditions please refer to latest SteamSpa Warranty at www.SteamSpa.com/warranty.
Please be advised failure to comply with any of the following will VOID the warranty.
- Sauna must registered within 90 days of delivery. See www.SteamSpa.com/register.
Warranty Period:
This product is covered under warranty for a period of one year, commencing from the date of purchase.
For further information or assistance, visit www.SteamSpa.com/warranty or call 1-800-856-0172.
TABLE OF CONTENTS
USER INSTRUCTIONS ....5
WARNING 5
ASSEMBLY TIPS....7
SPECIFICATIONS 8
PRODUCT SIZE CHART....8
COMPONENTS....9
INSTALLATION ....10
INSTRUCTIONS FOR USE....16
SUGGESTIONS ....18
TROUBLE SHOOTING 19
IMPORTANT!
● Malfunctions, damages, part replacements and labor resulting from improper installation, negligence, or lack of care and maintenance will NOT be covered under the SteamSpa Warranty.
● PRIOR TO INSTALLATION, ENSURE THAT THE PRODUCT IS POWERED OFF.
Thank You for choosing SteamSpa for health, beauty and relaxation. Now you can enjoy your own private sanctuary in the comfort of your own home.
USER INSTRUCTIONS
- Check for visible damages upon delivery of sauna. Any damages to packaging should be reported immediately to shipping company delivery representative and SteamSpa's Customer Service Dept.
- Check model and accessories are correct, including voltage input. Any discrepancies are to be reported to SteamSpa's Customer Service Dept. within 48 hours of delivery.
- Read installation instructions in detail for a secure and effective installation of SteamSpa sauna.
- SteamSpa shall not be responsible for product damage or malfunction caused by self-installation or installation procedures which do not comply with user manual.
- SteamSpa saunas are for indoor use only.
WARNING
Please read carefully before using sauna
● DO NOT use the sauna product with any of the following Health Conditions:
- Any type of respiratory condition
- Any type of a heart condition
- High or low blood pressure
- Pregnancy
- Any skin disease or disorders
- After or while drinking alcohol or alcoholic beverages
- Hemophilia or are prone to bleeding
Check with your doctor regarding the use of this product if you have any other health conditions.
● Hyperthermia occurs when the internal temperature of the body reaches a level several degrees above the normal body temperature of 98.6° F ( 37° C). The symptoms of hyperthermia include an increase in the internal temperature of the body, dizziness, lethargy, drowsiness, and fainting. The effects of hyperthermia include:
a. Failure to preceive heat
b. Failure to recognize the need to exit, or Physical inability to exit the room
c. Unawareness of impending hazard
d. Fetal damage in pregnant women
e. Unconsciousness
WARNING
Please read carefully before using sauna
● Children must use the sauna under the care of an adult. For safety, do not play with it.
- Do not insert objects such as fingers or sticks into the heating tube plate to prevent danger.
● Never pour water in the sauna especially the heating board.
● Do not place items inside or on top of the sauna.
- Do not touch any electrical components with wet hands to prevent electric shock.
- Do not use the sauna during thunderstorms to prevent electric shock.
- Do not tilt the sauna, do not use sharp objects to strike the sauna.
● Shut down the sauna for half an hour after 4 hours of continuous use.
- Do not operate the sauna in a long-term high temperature environment.
● Do not use after intense exercise, wait until the body temperature returns to normal before using.
● If you feel any discomfort, please stop using immediately.
● Mind your head when getting in and out of the sauna.
● Do not sleep inside when the sauna turned on.
● Do not use any bath products in the sauna.
● To avoid burns, do not touch the heating element.
● Please keep the seat timber and floor heater dry to avoid damage!
● Do not take pets into the sauna room.
- Do not spray water on the radiators, This may result in electric shock or damage to the radiators.
● Do not touch the light bulb in use.
- If the bulb needs to be changed, unplug the sauna and let the bulb cool down before changing it.
● Do not use the sauna room if you have a trauma, eye disease or burns.
● Do not install shower heads or water spray devices above or inside the sauna.

Covering the heater or infrared emitter causes fire risk!
ASSEMBLY TIPS
Before you begin, read all assembly instructions and safety warnings carefully.
● This sauna requires at least 2 adults to complete assembly.
- Remove all of the contents from the package and check that you have all parts shown in the component list.
● NOTICE: Some parts may be pre-installed / pre-assembled.
● This manual is used for the assembly of several sauna models, some figures or drawings may not look exactly like your sauna.
● Protect the wood surface of sauna during assembly to avoid damage.
- Keep this manual for future reference.
ELECTRICAL REQUIREMENTS
- It is recommended to consult a licensed electrician and check local ordinances before installing any sauna.
● This sauna requires that receptacle and circuit breaker specifications are 20 amp.
● Electrical modifications may be required to adapt 20 amp current.
● This sauna requires a dedicated circuit, other appliances may not share the same outlet as the sauna.
CHOOSING A LOCATION
● This sauna should be placed INDOORS on a dry, level surface only.
● There should be a minimum of 5 inches clearance between the sauna and any wall.
● Make sure the main power cord will reach the outlet and remains easy to access.
● The sauna should only be used in a dry location, moisture will damage the wood and electrical components.
- Keep the sauna away form any potential hazards including water sources, flammable objects and combustible materials.

RECOMMEND TOOLS

-
Pencil 2. Hammer 3. Tape
-
“+” screwdriver
Measure
- Electric Drill
SPECIFICATIONS
| SPECS | SC-SS0011-OS |
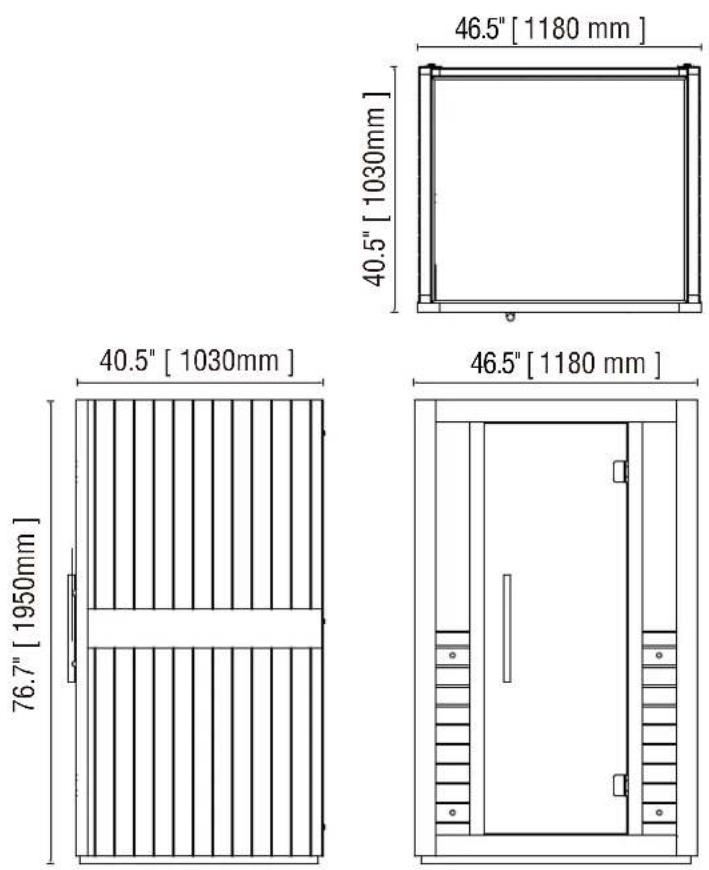
| Assembled Tent Dimensions(L x W x H) | 46.5" x 40.5" x 76.7" (1180 x 1030 x 1950mm) |
| Power | 2080 Watts |
| Maximum Temperature | 149°F (65°C) |
| Voltage | 120V AC / 60Hz |
| Function | Control panel with temp adjust and timer, Audio with USB drive/Bluetooth/FM, Color LED light, Oxygen ionizer |
PRODUCT SIZE CHART
COMPONENTS
1 Duster cover
2 Light
3 Control box
4 Left board
5 Control panel
6 Front board
7 Window glass
8 Door glass
9 Handles with screw (x2)
10 Heater frame
11 Hinge
12 Top board
13 Ventilation
14 Backrest
15 Back board
16 Right board
17 Bench
18 Bench front board
19 Foot rest board
20 Bottom board
21 Bench support frame x2

Accessories
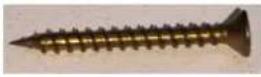 Self-tapping Screw(3*25)×6 Self-tapping Screw(3*25)×6 |  Self-tapping Screw(4*30)×12 Self-tapping Screw(4*30)×12 |  Self-tapping Screw(5*50)×2 Self-tapping Screw(5*50)×2 |
 Hexagen Wrench Hexagen Wrench | 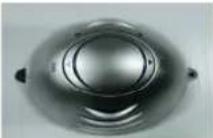 Oxygen ionizer Oxygen ionizer |  Handles [9] with Screws Handles [9] with Screws |
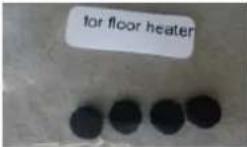 Floor Heater Screw Caps Floor Heater Screw Caps | ||
INSTALLATION
NOTICE:
Please read WARNING and ASSEMBLY TIPS section before installing the sauna.
The figures and drawings are used for the assembly guide only, parts and accessories may not be consistent with your sauna.
![graph TD A["Server Room"] --> B["Storage Unit"] B --> C["Storage Unit"] C --> D["Storage Unit"] D --> E["Storage Unit"] E --> F["Storage Unit"] F --> G["Storage Unit"] G --> H["Storage Unit"] H --> I["Storage Unit"] I --> J["Storage Unit"] J --> K["Storage Unit"] K --> L["Storage Unit"] L --> M["Sto…](/content/2026/05/958156/images/c3468c0ff92cfb294080274a2480fcccfe7419eb3d4e7105ef1e41f19a782447.jpg)
INSTALLATION
- Find a location to place the Bottom board [20], see ASSEMBLY TIPS for details.
Then Attach the Front board [6] to the Bottom board by lining up the Front board with the edge in front of the Bottom board. (Fig 1)

Fig 1
- There are two kinds of buckles during whole installation, install as shown. (Fig 2)
Outer buckle installation
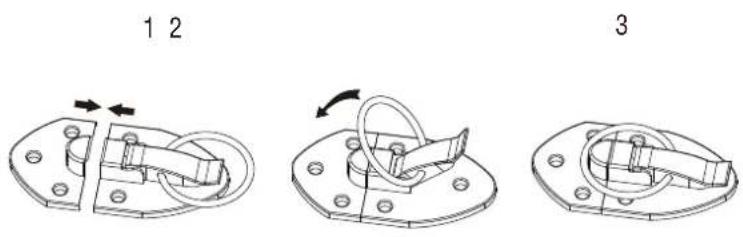
Hanging buckle installation
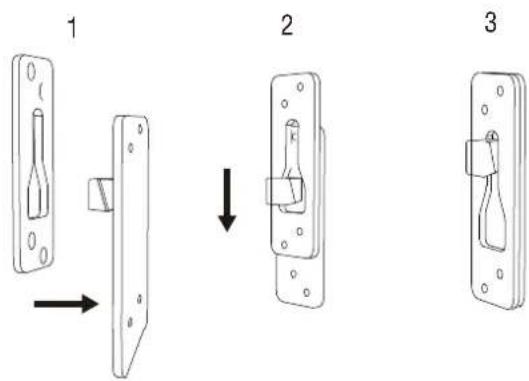
Fig 2
INSTALLATION
-
Attach the Right board [16] to the Front board by aligning the buckles and sliding the Right board down, locking it into place. (Fig 3)
-
Attach the Left board [4] to the Front board by aligning the buckles and sliding the Left board down, locking it into place. (Fig 4)
-
Attach the Back board [15] to the Bottom board by aligning the buckles of Left board and Right board, and sliding the Right board down, locking it into place. (Fig 5)

Fig 3

Fig 4

Fig 5
INSTALLATION
- Slide the Bench front board [18] into the grooves on Left and Right board as shown (Fig 6), connect the power cable as shown (Fig 7).
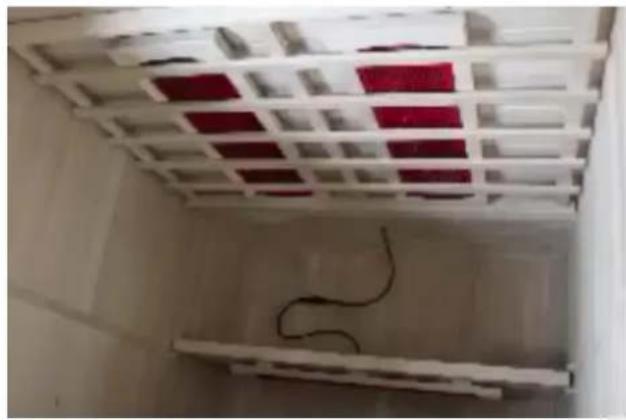
Fig 6

Fig 7
- Place the Bench support frame [21] at the bottom of Left board and Right board. (behind the Bench front board) Fix two pieces Bench support frame with self-tapping screws (4*30). (Fig 8) Put the Bench [17] on the Bench support frame and push it forward to Back board.
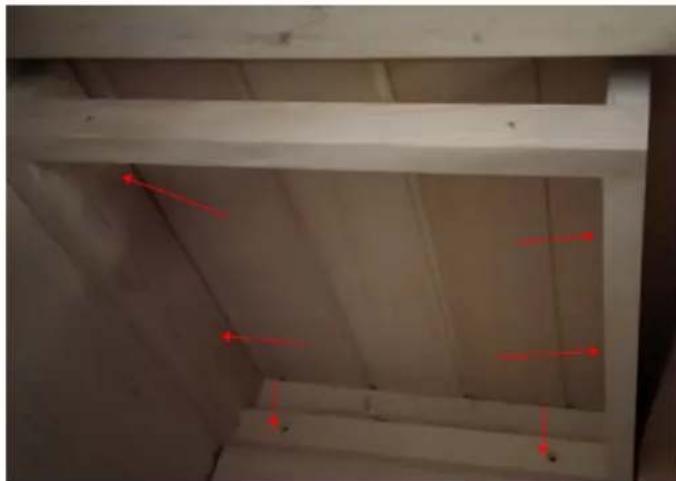

Fig 8
INSTALLATION
- Lead the wires in the sauna to the top, Install the Top board [12] at the top of the sauna (Fig 9), and let wires through the groove of Top board.
- Every connection cable or plug has a corresponding pair, find male and female with the same label (like "Control") and plug in correctly.
- Find the “12V output” wire from Control Box [3], through the hole on the Back board, and connect the Oxygen Ionizer (independent parts), then use Electric drill to fix the Oxygen ionizer on the Back board with self-tapping screws (3*25). (Fig 11)
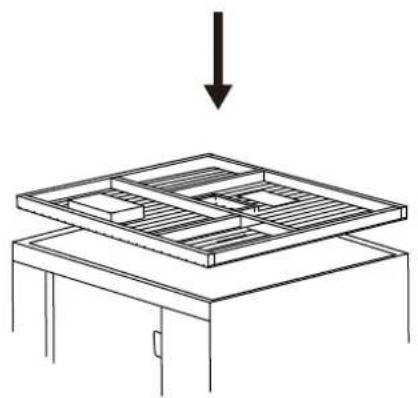
Fig 9
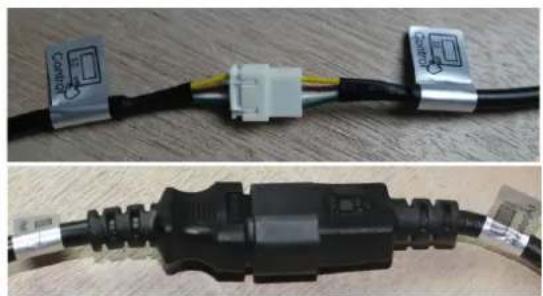
Fig 10

Fig 11
INSTALLATION
- There are some holes at the edges around the Top board, use Self-tapping screws (5*50) to fix the Top board. (Fig 12)
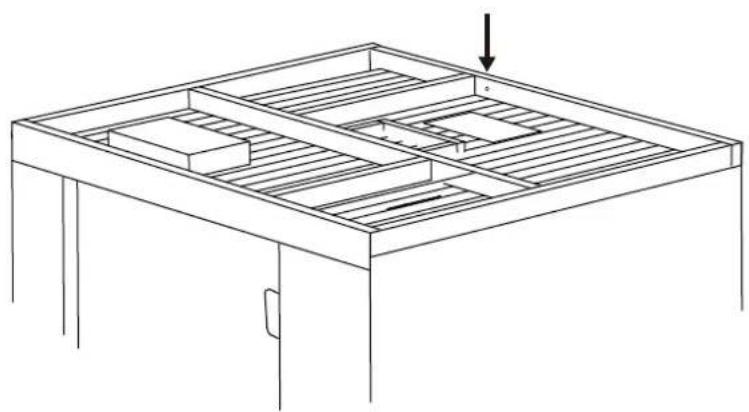
Fig 12
- Put the Duster cover [1] on the Top board, then fix the Duster cover with self-tapping screws (3*25) at the four corners. (Fig 13)
NOTICE: If the duster cover in the package comes in two pieces, you need to fix screws at the optional positions as shown.

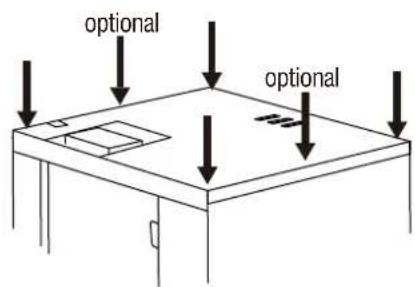
Fig 13
- Seperate Handles [9] by unscrewing screws on the wooden handle.
Wooden handle is for inside of Door glass [8], metal handle is for outside.
Put the both handle align with the holes in Door glass, and fix the handle with screws at the wooden handle. (Fig 14)
- Plug the main electrical cord into a dedicated outlet.
NOTICE: The power outlet should be dedicated to the sauna. Do not share it with other appliances.
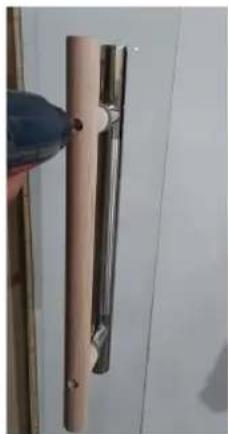
Fig 14
INSTRUCTIONS FOR USE
Congratulations, the assembly of the sauna is now complete, Please review instructions, warnings & suggestions before using.

1 Display screen
Display temp, timer, audio information.
2 Power button
Press this button to switch sauna ON/OFF.
3 Light button
Light in the sauna:
Press the button to turn on/off the light in the sauna.
Color light adjust:
Press the button 5s, display shows "2N".
(1) Short press "LIGHT" button to change the color of the LED light.(L0-shade, L1-all bright, L2-17 different colors).
(2) Press on TEMP+, control LED 1 ON/OFF (if available).
(3) Press on TEMP-, control LED 2 ON/OFF (if available).
(4) Press on TIME+/TIME-, control RGB Light and LED ON/OFF.
(5) No operation for 8s quits the light adjust mode.
4 Music button
Press to adjust audio status.
In audio status, press audio button for switch audio source.
No operation for 8s quits the audio adjust mode.
Bluetooth:
Display shows bluetooth icon. Use devices that support Bluetooth audio playback(e.g. smartphone), find the bluetooth device called "Steam Spa", click to connect.
NOTE: During bluetooth match, cannot switch audio source or turn ON/OFF another functions.
USB drive:
Display shows music icon.
FM Radio:
Display shows radio icon and frequency.
OFF: Audio function will turn off.
5 USB port Plug in USB drive, use Audio function to play the music in USB disk.
NOTICE: 1. The partition format of USB drive requires FAT32. 2. MP3 audio should be placed in the root directory.
6 Song selection function
In Bluetooth or USB state, Press previous or next button to switch previous or next music.
In FM Radio state, Press previous or next button to adjust the frequency. (85.7-108.0Mhz)
7 Temp control
Press “-” and “+” to adjust the heater temperature.
Temperature range is 77-149°F [25-65°C], press one adjusts 1°F [1°C], long press can adjust the temp quickly.
Celsius/Fahrenheit display switch: Press "-" and "+" for 5S.
8 Time control
Touch the "+" and "-" buttons to set the timer (5-90 Minutes).
9 Pause/Play
In Bluetooth or USB state, press to play music.
In FM radio state, press for 5 seconds, will search FM station automatically.
10 Volume control
Press '+'and '-' to adjust volume.
INSTRUCTIONS FOR USE
Oxygen ionizer
- Press ion button to turn ON/OFF ion function.
- Press ozone button to turn ON/OFF ozone function.

Tips
- The speaker is on the bottom of Top board, the audio quality is even better in the sauna.
- Control box may be hot during sauna session, do not cover.
- Ceiling vent can be adjusted in the sauna.
- When activated, the ozone/ionizer may a produce a distinct odor.

SUGGESTIONS
Before using
- Please be sure to follow the instruction manual before operations.
- A hot shower or bath prior to the start of your sauna session, will help promote perspiration.
During using
- STAY HYDRATED! Remember to drink plenty of water before, during and after your sauna.
- A normal sauna session should last 30 minutes or less.
- Perspiration will begin within 15-25 minutes.
- Open the ceiling vent or door to allow fresh air into the sauna.
After use
- Always remember to unplug your sauna after each use.
- Open the door to let the heat and humid water vapor dissipate and keep the sauna cabin dry.
- Make sure to wipe any sweat from the sauna walls and surfaces. We recommend using a towel.
Clean wood parts
- Use a wrung wet towel to wipe down the cabin's outer and inner surface. Additionally, we recommend running a small vacuum cleaner on the inner surfaces.
- Avoid the use of any organic based cleaners such as gasoline or alcohol on the sauna's wooden surfaces.
- Avoid using any sharp or abrasive materials to prevent scratching the wooden surfaces.
Cleaning glass parts
- Use soft materials to wipe the glass such as a micro-fiber washcloth.
- Stubborn stains can be wiped with a damp cloth, then dry with a dry cloth.
- Void using any sharp or abrasive materials to prevent scratching the glass surfaces.
Transportation and storage
- Avoid water, snow and intense impact during the transportation.
- Do not store it in a humid environment.
- The northern climate is relatively dry, keep the wood parts humid, for example, wipe the product with a wrung wet towel.
TROUBLE SHOOTING
| SYMPTOM | POSSIBLE CAUSES | RECOMMENED ACTIONS |
| Indicator light for the power supply not working. | The connector is not connected properly. | Check the connector. |
| No power supply input. | Contact SteamSpa service. | |
| The indicator light is broken. | ||
| Indicator light is not working. | The circuit board or components are broken. | Contact SteamSpa service. |
| The temperature sensor is broken. | ||
| Infrared Heater not heating up. | The heater is broken. | Contact SteamSpa service to replace heater . |
| The wire junction or the heater's wire is loosened. | Check and tighten the connection. | |
| The temperature sensor is broken. | Contact SteamSpa service. | |
| Odor from the sauna. | The circuit's problems, or foreign matter is heating. | 1) There is foreign matter around, remove it.2) Heater is over heated or some parts are damaged, cut off the power supply, contact SteamSpa service. |
TROUBLE SHOOTING
| SYMPTOM | POSSIBLE CAUSES | RECOMMENED ACTIONS |
| Display shows error code. | Er1: NTC is open circuit, or wire is not well connected. | Check the connect wire. |
| Er2: NTC is open circuit | Contact SteamSpa service. | |
| Er3: Ambient temp lower than 5°F. | Raise ambient temperature. | |
| Er4: Thermostat breakdown. | Contact SteamSpa service. | |
| Cannot play music or radio. | Cannot read USB drive. | Check partition format of USB drive is FAT32, or change another USB drive. |
| Bluetooth device connect failed. | Change another Bluetooth audio device. | |
| FM signal strength is not good. | Try to adjust the location of sauna. | |
| Light is not working. | Wire is not well connected. | Check the connecting wire. |
| The light is damaged. | Contact SteamSpa service. |
- DON'T WAIT! REGISTER NOW
- PRODUCT REGISTRATION
- PRODUCT REGISTRATION CARD
- IMPORTANT WARRANTY INFORMATION
- WARRANTY AND REPAIR GUIDELINES
- WARRANTY PERIOD
- TABLE OF CONTENTS
- IMPORTANT
- USER INSTRUCTIONS
- WARNING
- PLEASE READ CAREFULLY BEFORE USING SAUNA
- ASSEMBLY TIPS
- ELECTRICAL REQUIREMENTS
- CHOOSING A LOCATION
- RECOMMEND TOOLS
- PRODUCT SIZE CHART
- COMPONENTS
- INSTALLATION
- NOTICE
- INSTRUCTIONS FOR USE
- OXYGEN IONIZER
- TIPS
- SUGGESTIONS
- BEFORE USING
- DURING USING
- AFTER USE
- CLEAN WOOD PARTS
- CLEANING GLASS PARTS
- TRANSPORTATION AND STORAGE
Brand : SteamSpa
Model : SC-SS0011-0S
Category : Sauna