CWF440SZ - Wine cellar EDGESTAR - Free user manual and instructions
Find the device manual for free CWF440SZ EDGESTAR in PDF.


| Product Type | Freestanding Wine Refrigerator |
| Model | CWF440SZ |
| Capacity | 44 Standard Wine Bottles (750 mL) |
| Height | 32 7/8 inches (835 mm) |
| Width | 19 3/8 inches (492 mm) |
| Depth (with handle) | 24 7/8 inches (632 mm) |
| Depth (without handle) | 23 inches (584 mm) |
| Weight | 88 lbs (40 kg) |
| Power Supply | 115 V AC, 60 Hz |
| Amperage | 1.5 A |
| Power Consumption | 120 W |
| Refrigerant | R600a (1.06 oz) |
| Temperature Range | 40°F - 65°F (4°C - 18°C) |
| Control Type | Digital Touch Panel with LED Display |
| Interior Light | LED |
| Door Type | Stainless Steel Trimmed Glass Door with Lock |
| Number of Shelves | 8 Removable Wooden Shelves |
| Ventilation Clearance | 3 inches sides/top, 5 inches back |
| Reversible Door | Yes, right to left swing |
| Leveling Legs | Yes, adjustable |
| Defrost | Auto-defrost |
| Alarm Features | Door Ajar Alarm (>5 min), Temperature Alarm (HI/LO) |
| Carbon Filter | Yes, replace every 3-6 months (part #PCWRFILTER) |
| Warranty | 1 Year Parts, 90 Days Labor |
Frequently Asked Questions - CWF440SZ EDGESTAR
User questions about CWF440SZ EDGESTAR
0 question about this device. Answer the ones you know or ask your own.
Ask a new question about this device
Download the instructions for your Wine cellar in PDF format for free! Find your manual CWF440SZ - EDGESTAR and take your electronic device back in hand. On this page are published all the documents necessary for the use of your device. CWF440SZ by EDGESTAR.
USER MANUAL CWF440SZ EDGESTAR
natural_image
Line drawing of a rectangular refrigerator with lid and side panel (no text or symbols)CWF440SZ
Owner's Manual
For more information on other great EdgeStar products on the web, go to http://www.edgestar.com
Important Safety Information
Improper handling can cause serious damage to the EdgeStar wine refrigerator and / or injury to the user. This wine refrigerator is designed for domestic indoor use only. Do not use the unit for industrial or commercial use. Any other use may invalidate the warranty. Please review the ratings label located on the rear panel of the unit for electrical and other technical data related to this unit. The unit must be used in a properly grounded wall outlet.
Please read and follow the safety information listed below to reduce the risk of fire, electric shock, or injury.

Electrical Safety
- Do not exceed the power outlet ratings.
- It is recommended the wine refrigerator be connected on its own circuit.
- The unit must be installed in accordance with state and local electrical codes.
- A standard electrical supply (115 V, 60Hz), that is properly grounded in accordance with the National Electrical Code and local codes and ordinances is required.
- Use outlets that cannot be turned off by a switch or pull chain.
• Always turn the unit off and unplug it from the outlet when cleaning. - Unplug the unit if it is not going to be used for an extended period of time.
- Do not operate the unit with a power plug missing the ground plug, a damaged cord, or a loose socket.
- Be sure the wine refrigerator is properly grounded.
- Never plug or unplug the unit with wet hands.
- Do not bypass, cut, or remove the grounding plug.
- Do not use extension cords or power strips with this unit. You may need to contact your electrician if it is necessary to use a longer cord or if you do not have a grounded outlet. Do not modify the power cord's length or share the outlet with other appliances.
- Do not start or stop the unit by switching the circuit's power on and off.
- If the power cord is damaged, it must be replaced by the manufacturer or a qualified technician.
- Never repair the unit while it is plugged in.
- Immediately unplug the unit if it makes strange sounds, emits smells, or smoke comes out of it, and contact customer service.
- Do not remove any part of the casing unless you are instructed to do so by an authorized technician.
- You should never attempt to repair the unit yourself.
- Contact customer service for service options if the unit needs service.

General Safety
- To prevent back and other types of injuries, use at least two people to move and install the wine refrigerator.
- This appliance is not intended for use by persons, including children, with reduced physical, sensory or mental capabilities, unless they have been given supervision or instruction concerning the use of the appliance by the person(s) responsible for their safety.
- Install the wine refrigerator in a well-ventilated area where the ambient temperature is above 50^ F and below 95^ F.
- The temperature range for this refrigerator is optimized for wine storage. Perishable food items may require a different storage environment.
- Do not place hot or warm items into the refrigerator before they cool down to room temperature.
- This unit is designed to be installed indoors, and protected from rain, sleet, snow, and / or moisture.
• This unit is not intended to be used by children.
• Children should be supervised to ensure that they do not play with this product. - Never allow children to crawl inside the wine refrigerator. If you are disposing of the unit, remove the door.
- Do not use this appliance near flammable gas or combustibles, such as gasoline, benzene, thinner, etc.
- Do not place the unit near heat sources such as ovens, grills, or direct sunlight.
- Only use in an upright position on a flat, level surface and provide proper ventilation.
- Do not pinch or kink the power supply line between the unit and cabinet.
- Do not leave any cleaning solutions in the unit.
- Do not use solvent-based cleaning agents or abrasive solutions to clean the unit as they may damage the interior and exterior.
- Do not place any other appliances on top of the unit.
- Do not turn the unit upside down, on its side, or at an angle off level.
- If your model of wine refrigerator is equipped with a lock, take care to keep the keys away from children.
- Do not move the unit without emptying the contents and securing the door in a closed position.

Note: This owner's manual is provided for reference use only. Specifications may change without prior notice. Refer to the product label on the back of your wine refrigerator for the latest technical information.

Note: Flammable Refrigerant Used! When handling, moving, and using the refrigerator, make sure to avoid either damaging the refrigerant tubing, or increasing the risk of a leak.
Table of Contents
IMPORTANT SAFETY INFORMATION .... I
TABLE OF CONTENTS .... III
First Time Operating Instructions....1
INTRODUCTION....1
PARTS IDENTIFICATION 2
Front View 2
Back View....2
INSTALLING THE WINE REFRIGERATOR....3
Unpacking the Wine Refrigerator 3
Installation....3
Electrical Requirements 4
Leveling the Wine Refrigerator 5
Installing the Door Handle....5
Removing and Installing Decorative Plugs 6
Installing and Removing the Shelves....7
Reversing the Door Swing 8
OPERATION....10
Installation Check List Before Operation....10
Using the Temperature Control Panel 10
Bottle Positioning 11
Normal Sounds 12
Defrosting....12
Preparing the Wine Refrigerator for Storage 12
CLEANING AND MAINTENANCE....13
Exterior Cleaning....13
Interior Cleaning....13
TROUBLESHOOTING....14
SPECIFICATIONS....16
EDGESTAR LIMITED WARRANTY....17
First Time Operating Instructions
Before use, make sure all packaging labels and materials are removed from the unit. Be sure to keep track of all included parts and pieces before discarding packaging materials. It is advised that you keep the original box and packaging materials in case you ever need to move or ship the appliance in the future.
Let the unit stand for at least 24 hours before you use it; this allows the cooling components time to settle from transit. The instruction manual should be read before use.
Introduction
Thank you for purchasing this EdgeStar wine refrigerator. We hope that this purchase will be the beginning of a lasting and rewarding relationship between you and EdgeStar. We will provide the customer support and exemplary products necessary to nurture that relationship.
This manual contains important information regarding the proper installation, use, and maintenance of your wine refrigerator. Following this manual will ensure that your product will work at its peak performance and efficiency.
Please save the original product packaging in case you need to safely transport your wine refrigerator.
For Your Records:
Please write down the model number and serial number below for future reference. Both numbers are located on the ratings label on the back of your unit and are needed to obtain warranty service. You may also want to staple your receipt to this manual as it is the proof of your purchase, and is also needed for service under your warranty.
Model Number: ____
Serial Number: ____
Date of Purchase: ____
For a more efficient experience, please do the following before contacting customer service:
- If you received a damaged product, immediately contact the retailer or dealer that sold you the product.
- Read and follow this instruction manual carefully to help you install, use, and maintain your wine refrigerator.
- Read the troubleshooting section of this manual as it will help you diagnose and solve common issues.
- Visit us on the web at http://www.edgestar.com to register your product, download product guides, and access additional troubleshooting resources and up-to-date information.
- If you need warranty service, our friendly customer service representatives are available via email at service@edgestar.com.
Parts Identification

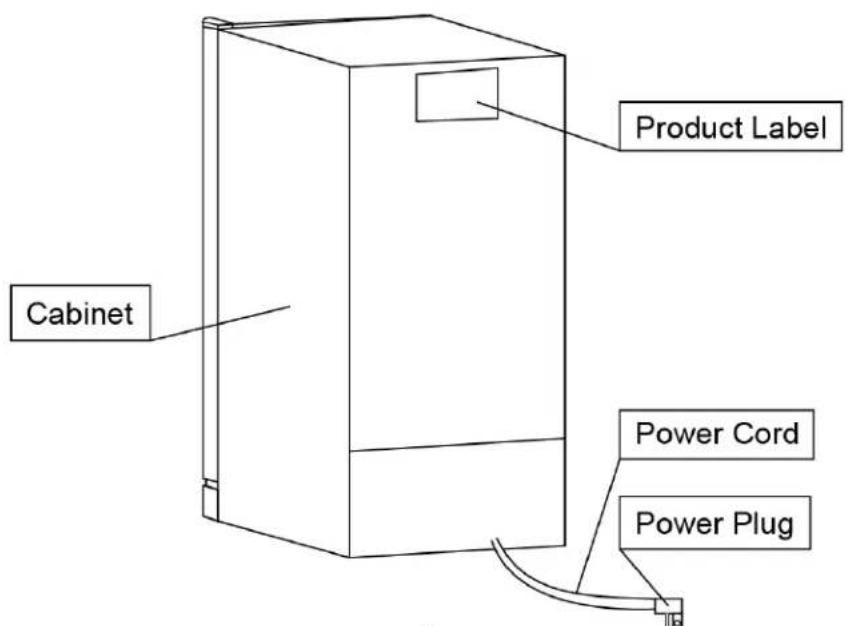
Tip: Gather the model and serial number from the product label and write them down before installing the wine refrigerator.
Front View
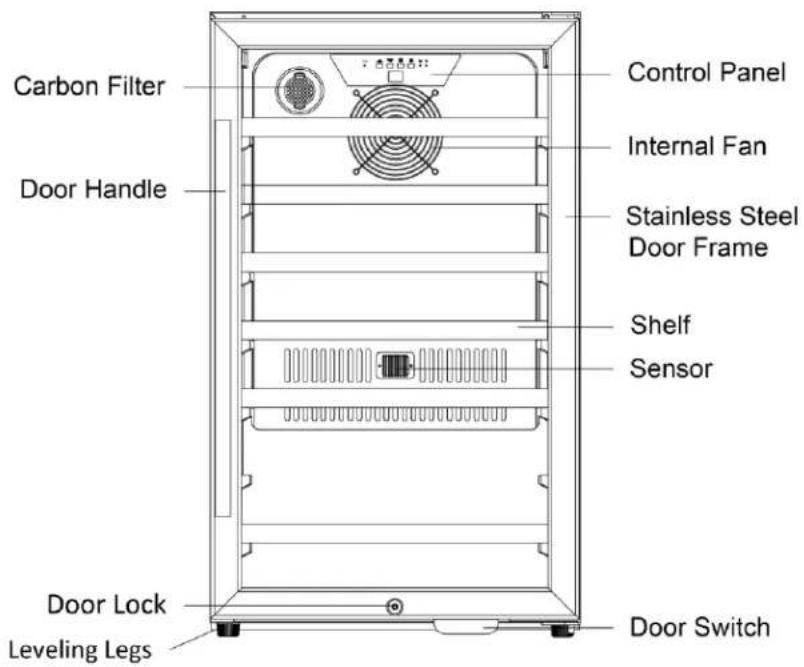

Note: The carbon filter (Part # PCWRFILTER) should be replaced every 3-6 months depending on the unit's exposure level to odor. If the unit is placed in a kitchen, regular replacement every three (3) months is ideal.
Back View
Installing the Wine Refrigerator
The wine refrigerator should be installed in accordance with local electrical code requirements. The wine refrigerator should also be placed in a location that is strong enough to support its total weight, keeping in mind that it will weigh substantially more when fully loaded than when empty. Before you plug the wine refrigerator into a power supply, be sure to let it stand upright for at least 24 hours to allow the compressor's oils to settle.
Unpacking the Wine Refrigerator

Warning: Use two or more people to move and install the wine refrigerator. Failure to do so can result in back or other injury. Carefully remove the packaging materials. Remove any shipping tape and glue from your wine refrigerator before use. Do not use sharp instruments, rubbing alcohol, flammable fluids, or abrasive cleaners to remove tape or glue. These products can damage the surface of your wine refrigerator.

Important: Do not remove any safety, warning, or product information labels from your wine refrigerator.
Installation
This wine refrigerator has been designed for free-standing installation. There must be adequate ventilation and access for service.
Free-standing Installation:
A free-standing installation will allow you to install the wine refrigerator in almost any place you desire as long as there is proper ventilation. This product is not designed to be built into a cabinet or recessed setting. You must follow the stated instructions for electrical requirements, and leveling the wine refrigerator.
- Choose a location that has ambient temperatures above 50^ F and below 95^ F. Operation outside these temperatures may lead to lowered efficiency or other adverse effects.
- This unit MUST be installed in an area protected from the elements, e.g., wind, rain, water spray or drips.
- The wine refrigerator should not be located next to ovens, grills, or other high heat sources.
- Do not kink or pinch the power supply cord between the wine refrigerator and the wall or cabinet.
- The wine refrigerator should be installed on a firm and level surface that will be able to support the entire weight of a fully loaded unit. It is important for the wine refrigerator to be level in order to work properly. If needed, you can adjust the height of the wine refrigerator by rotating the feet. See the “Leveling the Wine Refrigerator” section.
- A standard electrical supply (115 VAC only, 60 Hz), properly grounded in accordance with National Electrical Code and local codes and ordinances, is required.

Warning: DO NOT install the wine refrigerator behind a closed cabinet door.
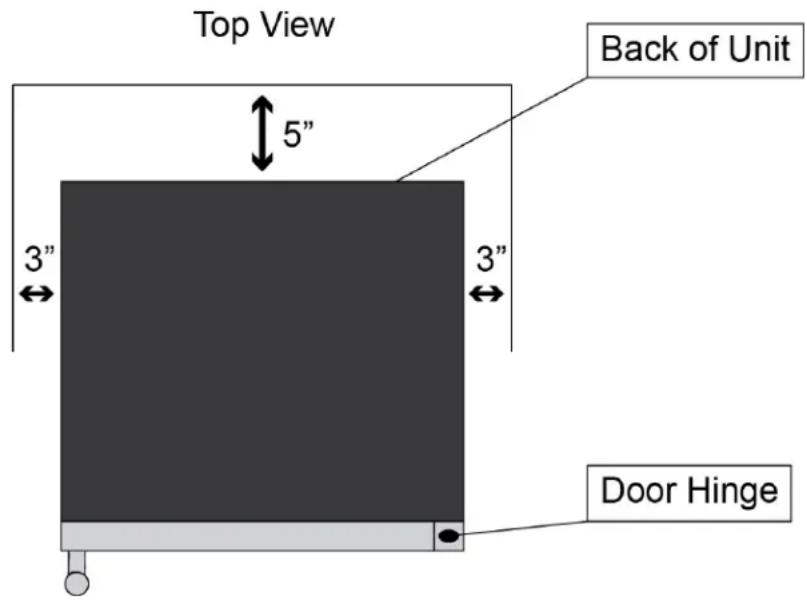
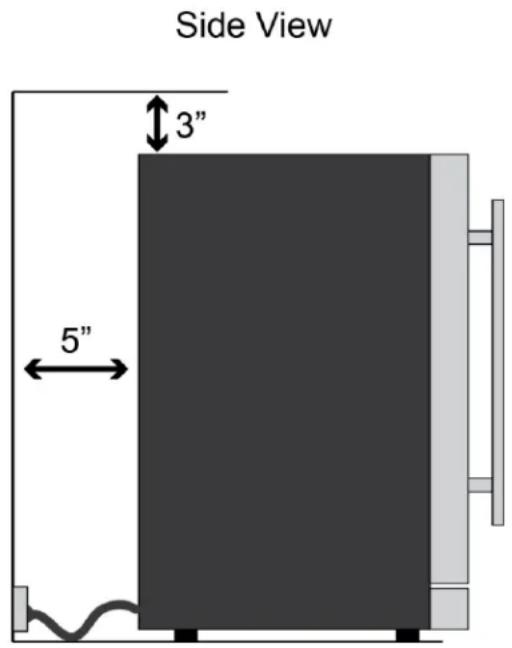
Installation Clearance Requirements
To ensure proper ventilation and service access, allow at least 3" of clearance at the sides and top of the wine refrigerator, and at least 5" of clearance at the back. Do not install this unit in a built-in undercounter setting.
Electrical Requirements

Electrical Shock Hazard!
- Plug into a grounded 3-prong outlet.
- Never remove the grounding prong from the plug.
- Never use an adapter to bypass the grounding prong.
• DO NOT use an extension cord.
- Failure to follow these instructions can result in fire, electrical shock, or death.
Before you move your wine refrigerator into its final location, it is important to make sure you have the proper electrical connection:
A standard electrical supply (115 V, 60Hz), properly grounded in accordance with the National Electrical Code and local codes and ordinances, is required.
It is recommended that a separate circuit, serving only your wine refrigerator, be provided. Use receptacles that cannot be turned off by a switch or pull chain.
The fuse (or circuit breaker) size should be 10-15 Amps.
Recommended Grounding Method
For your personal safety, this appliance must be grounded. It is equipped with a power supply cord that has a 3-pronged grounding plug. To minimize possible shock hazard, the cord must be plugged into a mating 3-pronged wall socket, and grounded in accordance with the National Electrical Code and local codes and ordinances. If a mating wall socket is not available, it is the personal responsibility of the customer to have a properly grounded, 3-prong wall receptacle installed by a qualified electrician.
Leveling the Wine Refrigerator
It is important for the wine refrigerator to be level in order to work properly. It can be raised or lowered by rotating the plastic sheaths around each of the feet on the bottom of the machine. If you find that the surface is not level, rotate the feet until the wine refrigerator becomes level. You may need to make several adjustments to level it. We recommend using a carpenter's level to check the machine.
- Place a carpenter's level on top of the product to see if the wine refrigerator is level from front to back and side to side.
- Adjust the height of the feet as follows:
Turn the leveling feet to the right to lower that side of the refrigerator.
Turn the leveling feet to the left to raise that side of the refrigerator.

Important: Once you are ready to install the unit in a cabinet or directly on the floor, you must adjust the feet to level the wine refrigerator.
Installing the Door Handle
- Open the door and carefully pull the door gasket around the area where the handle will be installed.
- Carefully remove the two pre-installed decorative plugs from the front of the door.

Note: Some wine refrigerators do not have decorative plugs installed.
- Insert each Philips head screw through the gasket side of the door until the screw passes through the door.
- Align the handle with the screws and tighten them using a Philips head screwdriver until the handle is flush against the door frame.

Caution: Do not over-tighten the screws as this may cause damage to the handle or to the stainless steel door.
- Carefully press the door gasket into its original position.
Removing and Installing Decorative Plugs
Follow the instructions below to remove the decorative plugs from the door.

Important: Before you begin, unplug the refrigerator.
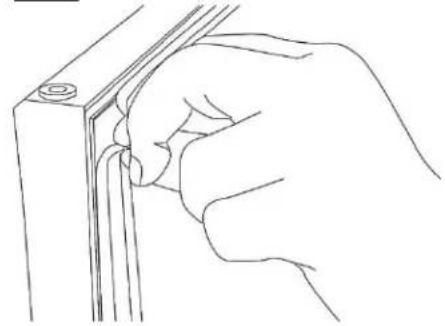
- Open the door and carefully pull the door gasket from the top left corner until you have exposed the two holes which correspond with the decorative plugs. Note: A small Flathead screwdriver is required.
natural_image
Line drawing of a hand holding a tool or component, no text or symbols present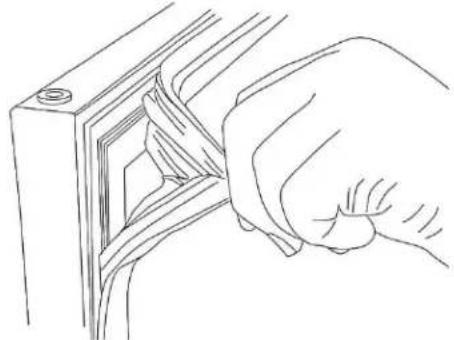
natural_image
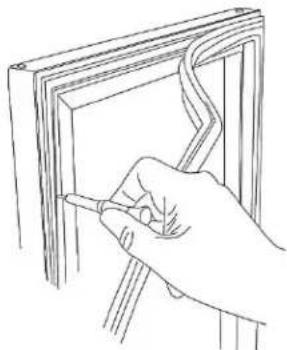
Line drawing of a hand inserting a spring into a bracket (no text or symbols)- Insert the Flathead screwdriver through the gasket side of the door into the decorative plug slot. You may need to use a flashlight to help guide you through this process.
natural_image
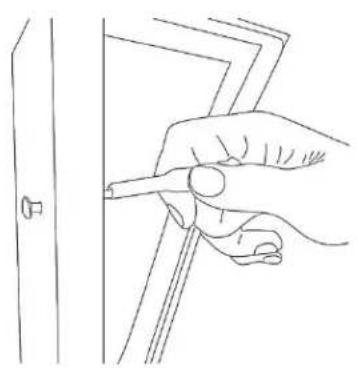
Line drawing of a hand holding a pen, writing on a curved surface (no text or symbols present)- Carefully turn the screwdriver clockwise to remove the two pre-installed decorative plugs from the front of the door. Reinsert the decorative plugs into the right side of the door using this same procedure.
natural_image
Line drawing of a hand holding a tool near a vertical panel (no text or symbols)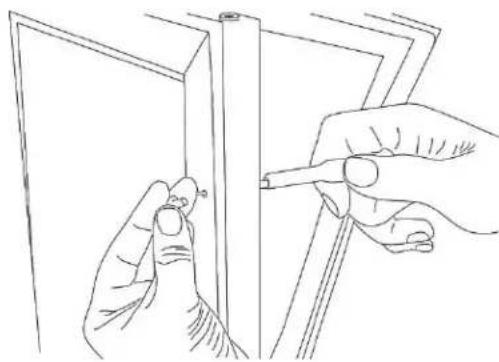
natural_image
Line drawing of hands using a tool to adjust or install a component, no text or symbols present- Remove the decorative plastic cap from the top left corner of the door and insert it into the top right corner. Do not attempt to pry up the metal ring on top of the door. The plastic cap is located inside it.
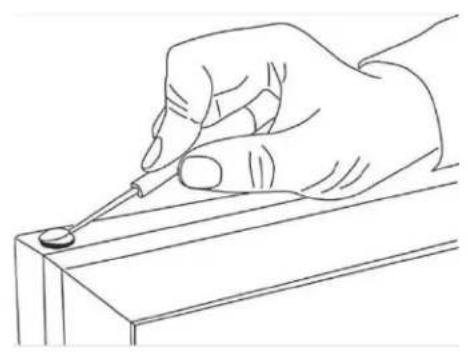
natural_image
Line drawing of a hand using a tool to apply material to a small circular component on a wooden surface (no text or symbols)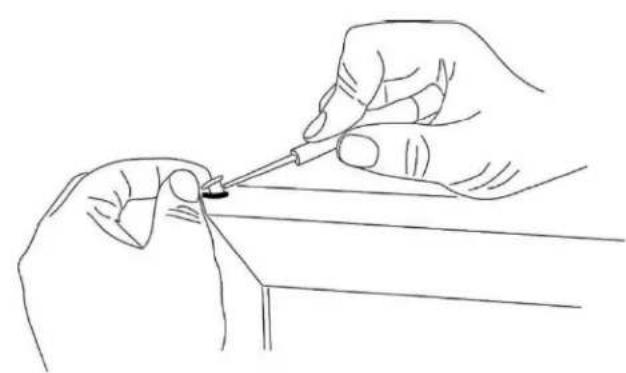
natural_image
Line drawing of two hands using a tool to apply material to a small object (no text or symbols present)- After the cap is inserted, carefully press the door gasket into its original position.
Installing and Removing the Shelves
To prevent damaging a door gasket, make sure to open the door all the way before pulling the shelves out of their track.
To Install the Shelves:
-
Open the door completely.
-
Take note of the protective stoppers located on the right and left side of the back of each shelf.
-
Lift either the left or right side of the shelf creating a 45^ angle. Insert the shelf at the desired track level and push back slowly until it stops in place.
-
Gently set the shelf down in place.
To Remove the Shelves
-
Open the door completely.
-
Make sure the shelf is pushed back completely (towards the real wall)
-
If necessary, make sure you remove all the contents sitting on the shelf.
-
Note the protective stoppers located on the right and left side of the back of each shelf.
-
Lift either the left or right side of the shelf creating a 45^ angle from its original position. Make sure not to lift either side of the shelf too hard as it may come in contact with the inner wall mount.
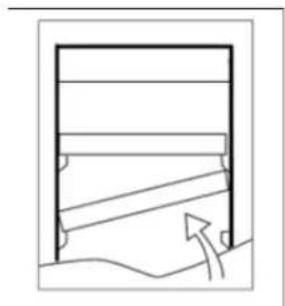
natural_image
Simple line drawing of a mechanical component or frame with an arrow indicating direction (no text or symbols)- Pull the shelf forward until it is completely removed from the inner compartment. Set aside safely.
Reversing the Door Swing
Follow the instructions below to reverse the door swing.

Important: Before you begin, unplug the refrigerator. All parts removed must be saved in order to reinstall the door.
To Reverse the Door from Right Swing to Left Swing
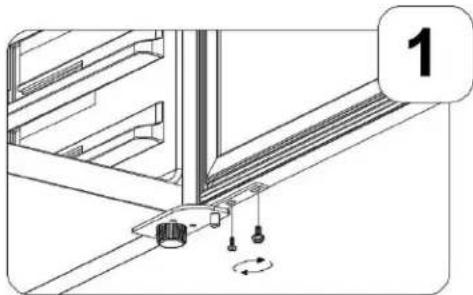
- Open the door and using a Phillips screwdriver, remove the bottom screws from the lower hinge.
natural_image
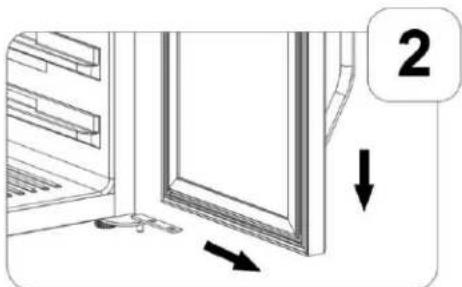
Technical diagram of a mechanical assembly with a rotating component and numbered label (1), no readable text or symbols present.- Carefully slide the bottom of the door forward and down, and place it on a padded surface to prevent damage.
natural_image
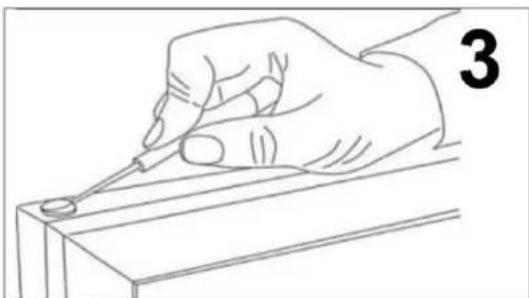
Diagram of a window with directional arrows indicating movement or force (no text or symbols present)- Remove the decorative plastic cap from the top left corner of the door and insert it onto the right top corner.
natural_image
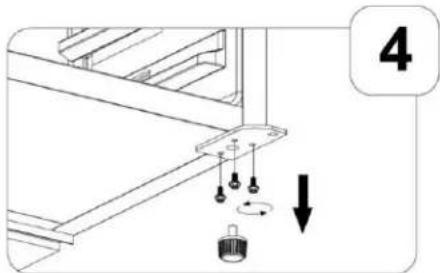
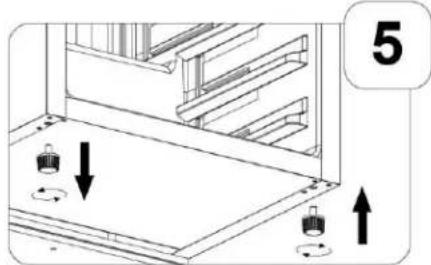
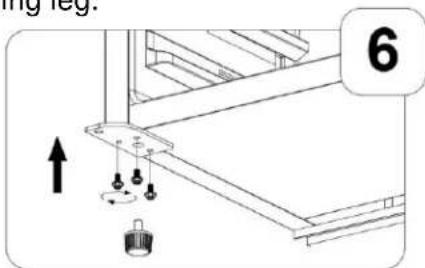
Line drawing of a hand using a pipette to apply liquid onto a surface (no text or symbols)- Remove the front leveling leg from the right bottom corner of the cabinet and then remove the three screws that are used to hold the lower hinge to the glass door.
- Remove the front leveling leg from the left bottom corner of the cabinet, then install the leveling leg into the right bottom corner of the cabinet and tighten it.
- Install the lower hinge by fastening the screws through the lower hinge to the cabinet. Install the front leveling leg.
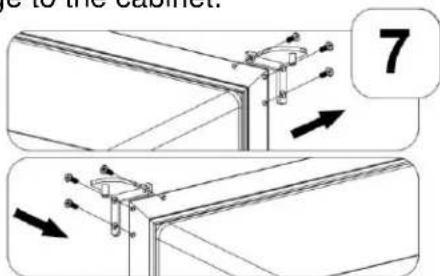
- Remove the screws from the upper right hinge. Place the upper right hinge in a safe place in case you need to reverse the door in the future. Remove the plastic caps from the upper left hinge corner. Install the upper left hinge by fastening the screws through the left hinge to the cabinet.
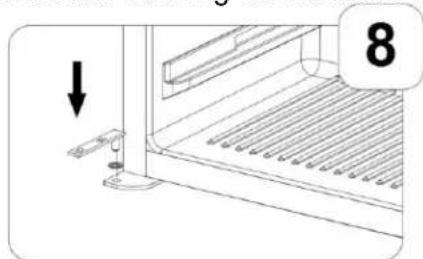
- Install the support bracket and bushing on the lower hinge.
natural_image
Diagram of a mechanical device with a downward arrow and numbered label (8), showing internal structure without any readable text or symbols.- Carefully insert the door into the upper right corner hinge, then slide the door on top of the lower hinge and secure the door by installing the lower screws.
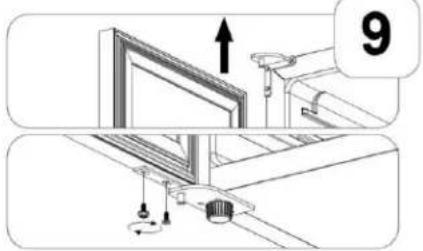
Operation
Installation Check List Before Operation
-
Have all packing materials and tape been removed from the interior and exterior of the wine refrigerator?
-
Have the installation instructions been followed, including connecting the machine to electricity? And has proper grounding been installed for the wine refrigerator?
-
Has the machine been leveled?
-
Is the wine refrigerator in a site where the ambient temperature is between 50°F and 95°F all year round?
-
Is there enough clearance for proper air circulation?
Using the Temperature Control Panel
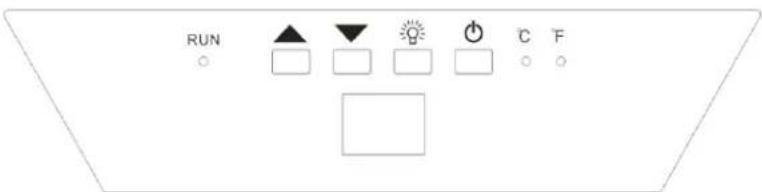
The single zone of this wine refrigerator has a temperature range from 40^ F to 65^ F and will display the set temperature.
- Up Button ▲: Press the button on the control panel to increase the temperature by 1 degree increments.
- Down Button ▼: Press the button on the control panel to lower the temperature by 1 degree increments.
• RUN: When lit, the unit is in cooling mode
• Light Button 🙏: Press the button to turn the inner light on or off.
- Power Button ⏻: Turns the unit on and off. (press and hold this button for approximately 3 seconds)
- The Celsius or Fahrenheit light will be lit depending on what scale temperature is being displayed. To switch between C and F. press and hold both buttons (▲/▼) simultaneously for approximately 3 seconds. A sound will then beep and the indicator light will illuminate next to desired temperature setting.

Note:
- The wine refrigerator is equipped with a temperature memory function. If power is suddenly lost, the previously set temperature will be saved and the refrigerator will return to this setting once power is restored.
- Allow at least 24 hours before storing your wines to allow the temperature to acclimate.

Caution: If you powered the unit off, please wait at least 5 minutes before powering it back on.
Temperature Alarm
If the interior temperature is higher than 73^ F ( 23^ C), “HI” is shown on the display panel and the temperature alarm will sound continuously after one hour. This indicates that the inner temperature is too high. If the inner temperature is lower than 32^ F ( 0^ C), “LO” is shown on the display panel and the temperature alarm will sound continuously after one hour. If one of these situations occurs please reference the troubleshooting section found in this manual or contact EdgeStar for support.
Bottle Positioning
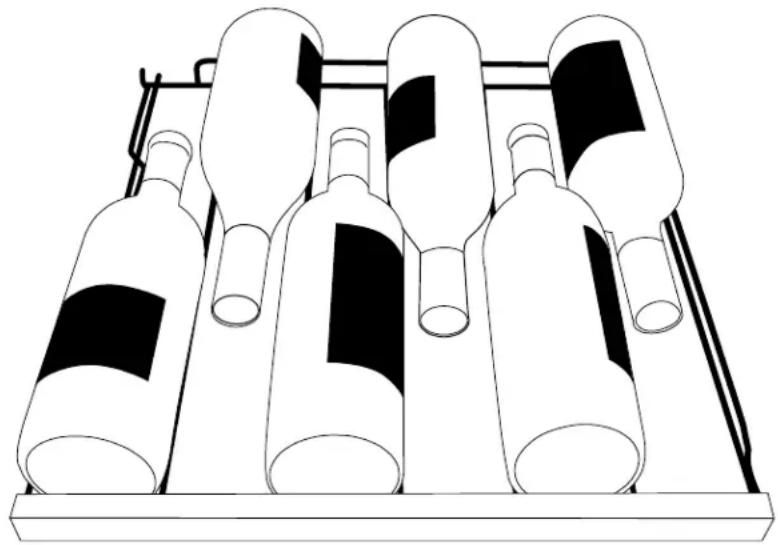
Full Shelf – 6 Bottles
natural_image
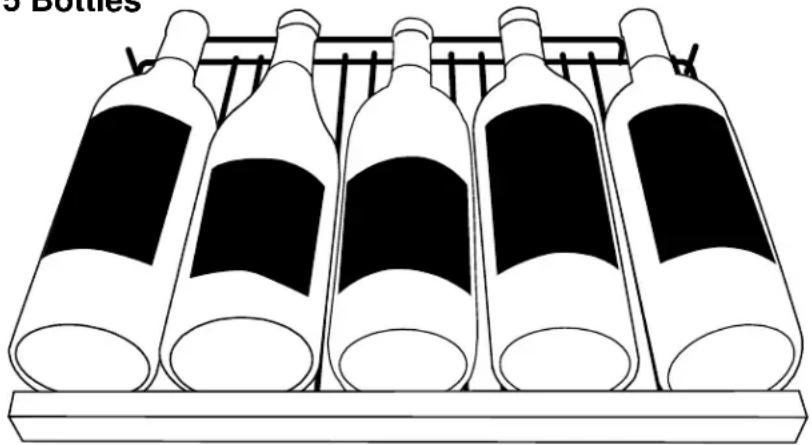
Line drawing of multiple wine bottles on a shelf, no text or symbols presentHalf Shelf – 5 Bottles
natural_image
Illustration of six wine bottles on a rack, no text or symbols presentNormal Sounds
Your new wine refrigerator may make sounds that are not familiar to you. Most of the new sounds are normal. Hard surfaces like the floor and walls can make the sounds seem louder than they actually are. The following describes the kinds of sounds that might be new to you and what may be making them.
- Rattling noises may come from the flow of the refrigerant or the water line. Items stored on top of the wine refrigerator can also make noises.
- The high efficiency compressor may make a pulsating or high-pitched sound.
- Water running from the evaporator to the water bin may make a splashing sound.
- As each cycle ends, you may hear a gurgling sound due to the refrigerant flowing in your wine refrigerator.
- You may hear air being forced over the condenser by the condenser fan.
Door Ajar Alarm
This wine refrigerator includes a door ajar alarm, which will sound if one of the doors is open for more than five (5) minutes. Leaving the door open for extended periods of time will cause poor cooling performance and may shorten the life of the refrigerator. Keep the doors closed as frequently as possible.
Defrosting
Note that under most refrigerating settings, the unit will automatically defrost under most ambient conditions. However, on colder settings, some frost may build up. Additionally, the more humid the ambient conditions, the more frost may build up. Keep the door closed as much as possible and avoid opening the door unnecessarily to minimize frost build-up. If frost is preventing the door from closing properly, you may need to power the unit off until the frost melts. Use a soft absorbent towel to dry the unit.

Warning: Never attempt to remove frost with a sharp object!
Preparing the Wine Refrigerator for Storage
If the wine refrigerator will not be used for a long time, or is to be moved to another place, it will be necessary to defrost the unit and dry the interior.
- Disconnect the wine refrigerator from the power supply by removing the power plug from the wall socket.
- Leave the door open to allow for air circulation and to prevent mold, mildew, and unpleasant smells.

Caution: Store the unit out of reach from children. If you have children, you may want to take additional precautions such as removing the door to prevent a child from being trapped inside the refrigerator!

Important:
- Do not touch the power plug when your hands are wet.
- Never unplug the unit by pulling on the plug.
Cleaning and Maintenance
Periodic cleaning and proper maintenance will ensure efficiency, top performance, and long life.
Exterior Cleaning
- The door and cabinet may be cleaned with a mild detergent and lukewarm water solution such as 2 tablespoons of baking soda to 1 quart of water. Do not use solvent based or abrasive cleaners.
- Use a soft sponge and rinse with clean water. Wipe with a soft clean towel to prevent water spotting. If the door panel is stainless steel, it can discolor when exposed to chlorine gas and moisture.
- Clean stainless steel using a cloth dampened with a mild detergent and warm water solution. Never use an abrasive or caustic cleaning agent.
Interior Cleaning
The wine refrigerator's interior should be cleaned occasionally.
-
Disconnect power to the unit.
-
Open the door and remove the contents and shelves.
-
Wait until the unit defrosts.
-
With a clean cloth, wipe down the interior of the unit.
-
Reinsert the shelves and wine.
-
Reconnect power to the unit.
Troubleshooting
Before Calling for Help
If the unit appears to be malfunctioning, read through the “Operation” section of this manual first. If the problem persists, check the Troubleshooting Guide below and on the following page. The problem may be something that can easily be solved or explained.
| Symptoms | Possible Causes | Solutions |
| The wine refrigerator turns on and off frequently. | The room temperature is higher than the recommended ambient environment. | Run the refrigerator at the appropriate ambient temperature. |
| The door is being opened too often. | Minimize the number of times the door is opened. | |
| The door is not completely closed. | Make sure the door is completely closed. | |
| The door gasket is not sealing properly. | Make sure the door gasket is sealing properly. | |
| The refrigerator does not have the suggested ventilation. | Read and follow the “Installation Clearance Requirements” section. | |
| The wine refrigerator does not turn on. | There is a power failure. | Ensure that the refrigerator is plugged in and the power outlet has power. |
| The refrigerator is not plugged in. | Plug the unit in to a power outlet that has sufficient amperage. | |
| A house fuse has blown or the circuit breaker is tripped. | Replace the broken fuse in your fuse box or reset the breaker. | |
| The wine refrigerator will not reach the desired temperature. | The refrigerator is placed too close to a heat source. | Keep the refrigerator away from direct sunlight or other heat sources. |
| The refrigerator does not have sufficient ventilation. | Read and follow the “Installation Clearance Requirements” section. | |
| The door is opened too frequently or for a long period of time. | Close the door tightly and do not open the door too frequently or for a long period of time. | |
| The wine refrigerator is making strange noises. | Certain sounds are normal. | Read the “Normal Sounds” section. |
| The unit is not level or is touching another appliance. | Check to make sure that the refrigerator is level, and that it is not in contact with another appliance or furniture. | |
| The body of the wine refrigerator is electrified. | The unit is not grounded properly. | Contact your local electrician to test your electrical grounding system. |
| Frost is forming in the wine refrigerator. | The environment is humid. | Though the unit uses an “auto-defrost” system, under certain conditions, manual defrosting may be required. If frost builds up, you can try running the refrigerator on a warmer temperature setting, minimizing the number of times you open the door, or unplugging the unit to allow the frost to melt. |
| The ambient temperature is too low. | ||
| The door is being opened too frequently. | ||
| The door will not shut properly. | The refrigerator is not level. | Make sure the refrigerator is on a level surface. |
| The door gasket is dirty. | Clean the door gasket. | |
| The door gasket is not installed correctly. | Make sure the door gasket is correctly installed. | |
| The shelves are incorrectly installed. | Install the shelves correctly. |
Specifications

Note: Technical data and performance information are provided for reference only. Specifications are subject to change. Check the rating label on the wine refrigerator for the most accurate information.
| Description of product | Freestanding Wine Refrigerator |
| Model | CWF440SZ |
| Voltage / Frequency | AC 115V~60Hz |
| Amperage | 1.5 A |
| Input Power | 120 W |
| Color | Black Cabinet; Stainless Steel Trimmed Glass Door |
| Storage Capacity | 44 Bottles* |
| Refrigerant | R600a, 1.06 oz. |
| Temperature Range | 40° F – 65° F |
| Dimensions (Height x Width x Depth) | 32 7/8" x 19 3/8" x 24 7/8" |
| Weight | 88 lbs. |

*Note on Wine Storage Capacity: The wine refrigerator can store 44 standard 750 ml. wine bottles.

*Note on Dimensions: The depth indicated includes the product handle. The depth without the handle is 23".
EdgeStar Limited Warranty
One (1) Year Parts & Ninety (90) Days Labor
This product is warranted by EdgeStar to be free from defective workmanship and materials, subject to any conditions set forth as follows:
WHAT IS COVERED:
LABOR: For a period of NINETY (90) DAYS from the date of original purchase, labor will be performed free of charge at an authorized EdgeStar repair facility. At its option, EdgeStar will repair the product with new or remanufactured parts, or exchange the defective product with a new, refurbished, or remanufactured product. If a product is replaced, it will carry the remaining warranty of the original product. After the ninety (90) day period, EdgeStar will no longer be responsible for labor charges incurred. All defective products and parts covered by this warranty will be repaired or replaced on a mail-in basis to an EdgeStar authorized repair facility.
PARTS: For a period of ONE (1) YEAR from the date of original purchase, EdgeStar will supply new, rebuilt, or refurbished parts free of charge. EdgeStar may request a defective part be returned in exchange for the replacement part. All replacement parts or products will be new, remanufactured, or refurbished. All products and parts replaced by EdgeStar under warranty service become the property of EdgeStar.
This warranty applies to the original purchaser only, and only covers defects in workmanship experienced during operation of the product under normal service, maintenance, and usage conditions. This warranty applies to the purchase and use of this product in residential settings within the contiguous United States of America.
WHAT IS NOT COVERED:
The following limitations apply to the coverage of this warranty. This warranty does not cover:
• Labor charges for installation, setup or training to use the product.
- Shipping damage, and any damage caused by improper packaging for shipment to an authorized service center, and any damaged caused by improper voltage or any other misuse, including abnormal service, handling, or usage.
• Cosmetic damage such as scratches and dents.
- Normal wear and tear on parts or replacement of parts designed to be replaced, e.g. filters, cartridges, batteries.
• Service trips to deliver, pick-up, or repair, install the product, or to instruct in proper usage of the product.
- Damages or operating problems resulting from misuse, abuse, operation outside environmental specifications, uses contrary to instructions provided in the owner's manual, accidents, acts of God, vermin, fire, flood, improper installation, unauthorized service, maintenance negligence, unauthorized installation or modification, or rental or commercial use.
• Labor, service transportation, and shipping charges incurred 91 days or more after the date of original purchase.
- The use of EdgeStar products in commercial or rental settings.
- Optional accessories, attachments, and appearance items.
- Products that have been modified to perform outside of specifications without the prior written permission of EdgeStar.
- Products lost in shipment, or theft.
- Products sold AS IS or from an unauthorized reseller.
- Products that have had their serial numbers removed or defaced. Products with serial numbers that have been invalidated.
- Damage to personal property from use of product.
- Replacement of repair of household fuses, circuit breakers, wiring, or plumbing.
OBTAINING WARRANTY SERVICE:
If you believe your product is defective, contact EdgeStar Customer Support for troubleshooting assistance and warranty service at www.edgestar.com or 1-866-319-5473. Before contacting EdgeStar, have your serial number and proof of purchase available. Once an EdgeStar authorized representative has confirmed that your product is defective and eligible for warranty service, the product must be returned to an EdgeStar repair facility. The purchaser is solely responsible for prepaying all shipping related costs to and from the repair facility. EdgeStar is not responsible for damage resulting from shipper mishandling or improper packaging. Do not return a defective product to the place of purchase. Products received without a return authorization number will be refused.
THIS WARRANTY IS IN LIEU OF ANY OTHER WARRANTY, EXPRESSED OR IMPLIED, INCLUDING WITHOUT LIMITATION, ANY WARRANTY OF MERCHANTABILITY OR FITNESS FOR A PARTICULAR PURPOSE. TO THE EXTENT ANY IMPLIED WARRANTY IS REQUIRED BY LAW, IT IS LIMITED IN DURATION TO THE EXPRESS WARRANTY PERIOD ABOVE, NEITHER THE MANUFACTURER NOR ITS DISTRIBUTORS SHALL BE LIABLE FOR ANY INCIDENTAL, CONSEQUENTIAL, INDIRECT, SPECIAL, OR PUNITIVE DAMAGES OF ANY NATURE, INCLUDING WITHOUT LIMITATION, LOST REVENUES OR PROFITS, OR ANY OTHER DAMAGE WHETHER BASED IN CONTRACT, TORT, OR OTHERWISE. IN NO EVENT AND UNDER NO CIRCUMSTANCE OF ANY TYPE OR KIND SHALL THE SELLER, MANUFACTURER AND/OR DISTRIBUTOR BE LIABLE FOR ANY REASON, UNDER ANY THEORY, FOR MORE THAN THE BASIC COST OF THE PRODUCT TO THE PURCHASER OR END USER. SOME STATES DO NOT ALLOW THE EXCLUSION OF INCIDENTAL OR CONSEQUENTIAL DAMAGES, SO THE ABOVE EXCLUSION MAY NOT APPLY TO YOU. THIS WARRANTY GIVES YOU SPECIFIC LEGAL RIGHTS. YOU MAY HAVE OTHER RIGHTS THAT VARY FROM STATE TO STATE.
- CWF440SZ
- Owner's Manual
- Important Safety Information
- Electrical Safety
- General Safety
- Table of Contents
- First Time Operating Instructions
- Introduction
- For Your Records:
- Parts Identification
- Installing the Wine Refrigerator
- Unpacking the Wine Refrigerator
- Installation
- Free-standing Installation:
- Installation Clearance Requirements
- Electrical Requirements
- Electrical Shock Hazard!
- Recommended Grounding Method
- Leveling the Wine Refrigerator
- Installing the Door Handle
- Removing and Installing Decorative Plugs
- Installing and Removing the Shelves
- To Install the Shelves:
- To Remove the Shelves
- Reversing the Door Swing
- To Reverse the Door from Right Swing to Left Swing
- Operation
- Installation Check List Before Operation
- Using the Temperature Control Panel
- Note:
- Temperature Alarm
- Bottle Positioning
- Normal Sounds
- Door Ajar Alarm
- Defrosting
- Preparing the Wine Refrigerator for Storage
- Cleaning and Maintenance
- Exterior Cleaning
- Interior Cleaning
- Troubleshooting
- Specifications
- EdgeStar Limited Warranty
- WHAT IS COVERED:
- WHAT IS NOT COVERED:
- OBTAINING WARRANTY SERVICE:
Brand : EDGESTAR
Model : CWF440SZ
Category : Wine cellar