
MN50WP - Camera MINOLTA - Free user manual and instructions
Find the device manual for free MN50WP MINOLTA in PDF.


| Product Type | Digital Camera |
| Brand | Minolta |
| Model | MN50WP |
| Waterproof | Yes (up to 10m depth) |
| Sensor Resolution | 16 Megapixels |
| Optical Zoom | 5x |
| Display | 2.7-inch LCD |
| Video Recording | 1080p Full HD |
| Dimensions (W x H x D) | 108 x 67 x 28 mm |
| Weight (with battery) | 195 g |
| Power Source | Lithium-ion rechargeable battery |
| Battery Life (shots) | Approx. 250 shots per charge |
| Storage Media | SD/SDHC/SDXC card |
| Image Stabilization | Optical |
| Flash | Built-in auto flash |
| Waterproof Rating | IPX8 |
| Shockproof | Up to 1.5m drop |
| Dustproof | Yes |
| Maintenance | Rinse with fresh water after saltwater use; dry thoroughly |
| Safety Warnings | Do not open battery door underwater; avoid sand and dust |
| Spare Parts & Repairability | Battery and charger available; service by authorized center |
| General Information | Waterproof compact camera for outdoor and underwater use |
Frequently Asked Questions - MN50WP MINOLTA
User questions about MN50WP MINOLTA
0 question about this device. Answer the ones you know or ask your own.
Ask a new question about this device
Download the instructions for your Camera in PDF format for free! Find your manual MN50WP - MINOLTA and take your electronic device back in hand. On this page are published all the documents necessary for the use of your device. MN50WP by MINOLTA.
USER MANUAL MN50WP MINOLTA
Table of Contents
1.0 Introduction....3
1.1 Buttons and Operation....9
1.2 Camera Features 11
1.3 Operating Battery Door....12
1.4 Installing the Battery....12
1.5 Installing the Memory Card....13
1.6 Charging the Battery....14
1.7 Closing and Locking the Battery Door....14
1.8 Powering the Camera On and Off....15
1.9 Switching Modes 15
1.10 Using the Zoom Function....16
1.11 LED Assistive Light 16
1.12 Using the Front Selfie Monitor 17
1.13 Connecting to a Computer....18
2.0 Video Recording 21
2.1 Video Mode 23
2.1.1 Video Mode Settings Menu....24
2.1.2 Resolution 24
2.1.3 Image Stabilization 25
2.1.4 Exposure Compensation 25
2.1.5 Date Stamp....26
2.2 Slow Motion Mode 27
2.2.1 Slow Motion Mode Settings Menu....28
2.2.2 Resolution 28
2.2.3 Exposure Compensation 29
2.2.4 Date Stamp....29
2.3 Loop Recording Mode 30
2.3.1 Loop Recording Settings Menu....31
2.3.2 Video File Length 31
2.3.3 Resolution 32
2.3.4 Image Stabilization 32
2.3.5 Exposure Compensation 33
2.3.6 Date Stamp....33
2.4 Time Lapse (Video) Mode 34
2.4.1 Time Lapse (Video) Settings Menu 35
2.4.2 Interval 35
2.4.3 Duration 36
2.4.4 Resolution 36
2.4.5 Image Stabilization 37
2.4.6 Exposure Compensation 37
2.4.7 Date Stamp 38
3.0 Photo Capturing 39
3.1 Photo Mode 40
3.1.1 Photo Mode Settings Menu 42
3.1.2 Resolution 42
3.1.3 ISO 42
3.1.4 Exposure Compensation 43
3.1.5 Quality....43
3.1.6 Date Stamp....44
3.1.7 Image Stabilization....44
3.2 Self-Timer Mode 45
3.2.1 Self-Timer Mode Settings Menu....46
3.2.2 Self-Timer Duration 46
3.2.3 Resolution 47
3.2.4 ISO 47
3.2.5 Exposure Compensation 47
3.2.6 Quality....48
3.2.7 Date Stamp 48
3.2.8 Image Stabilization....49
3.3 Photo Burst Mode 50
3.3.1 Photo Burst Mode Settings Menu 51
3.3.2 Photo Burst 51
3.3.3 Resolution 52
3.3.4 ISO 52
3.3.5 Exposure Compensation 52
3.3.6 Quality....53
3.3.7 Date Stamp....53
3.3.8 Image Stabilization 54
3.4 Time Lapse (Photo) Mode 55
3.4.1 Time Lapse (Photo) Settings Menu....56
3.4.2 Interval....56
3.4.3 Duration 57
3.4.4 Resolution 57
3.4.5 ISO 57
3.4.6 Exposure Compensation 58
3.4.7 Quality....58
3.4.8 Date Stamp....59
3.4.9 Image Stabilization....59
4.0 System Settings Menu 60
4.1 Metering....61
4.2 White Balance....61
4.3 Face Follow 61
4.4 Effect 62
4.5 Light Frequency 62
4.6 Sounds....63
4.7 Date & Time Setup....63
4.8 Time Format....63
4.9 Auto Power-Off....64
4.10 Language....64
4.11 Format Card....65
4.12 Factory Reset....65
4.13 Version....65
5.0 Playback Mode 66
6.0 Technical Specifications....67
1.0 Introduction
About this Manual:
Congratulations on purchasing the Minolta MN50WP Digital Camera! The contents of this manual are subject to change without notice. Note that the example screens and product illustrations shown in this User's Guide may differ somewhat from the screens and configuration of the actual camera.
Copyright:
This manual contains proprietary information protected by copyright. All rights are reserved. No part of this manual may be reproduced by any mechanical, electronic or other means, in any form, without prior written permission of Elite Brands Inc. © 2024.
Federal Communications Commission Interference Statement:
This equipment has been tested and found to comply with the limits for a Class B digital device, pursuant to Part 15 of the FCC Rules. These limits are designed to provide reasonable protection against harmful interference in a residential installation. This equipment generates, uses and can radiate radio frequency energy and, if not installed and used in accordance with the instructions, may cause harmful interference to radio communications. However, there is no guarantee that interference will not occur in a particular installation. If this equipment does cause harmful interference to radio or television reception, which can be determined by turning the equipment off and on, the user is encouraged to try to correct the interference by one or more of the following measures:
• Reorient or relocate the receiving antenna.
- Increase the separation between the equipment and receiver.
- Connect the equipment into an outlet on a circuit different from that to which the receiver is connected.
- Consult the dealer or an experienced radio/TV technician for help.
Caution:
Any changes or modifications not expressly approved by the party responsible for compliance could void the user's authority to operate the equipment. This device complies with Part 15 of the FCC Rules. Operation is subject to the following two conditions:
(1) This device may not cause harmful interference and
(2) This device must accept any interference received, including interference that may cause undesired operation.
RF Exposure Warning:
This equipment complies with FCC RF radiation exposure limits set forth for an uncontrolled environment. This equipment must be installed and operated in accordance with provided instructions and must not be co-located or operating
in conjunction with any other antenna or transmitter. End-users and installers must be provided with antenna installation instructions and transmitter operating conditions for satisfying RF exposure compliance.
FCC: SAR standard Value: 1.6 W/Kg, Maximal Measure: 0.4 W/kg
CE Mark Warning:
This is a Class B product, in a domestic environment, this product may cause radio interference, in which case the user may be required to take adequate measures.
Camera Information:
- Do not disassemble or attempt to service the camera yourself.
- Do not expose the camera to moisture, or extreme temperatures.
- Allow the camera to warm up when moving from cold to warm temperatures.
- Do not touch and put pressure on the camera lens.
- Do not expose the lens to direct sunlight for extended periods.
- Do not use abrasive chemicals, cleaning solvents or strong detergents to clean the product. Wipe the product with a slightly damp soft cloth.
- Do not use the flash or LED Light near a person's eyes to prevent possible eye injury.
- To prevent you from falling over or resulting in traffic accident, do not use the camera while you are walking, driving or riding a vehicle.
- Handle the camera strap with care, and never place the strap around the neck of an infant or child. Wrapping the strap around a neck may cause suffocation.
- Do not subject the LCD screen to impact.
- To prevent the risk of fire or electric shock, do not expose the inside of this product to rain or moisture.
Battery Information:
- Turn off the camera before installing or removing the battery.
- Use only the provided batteries or type of battery and charger that came with your camera. Using other types of battery or charger may damage the device and invalidate the warranty.
- Inserting the battery upside down can cause damage to the product and possibly cause an explosion.
- When the camera is used for an extended period of time, it is normal for the camera body to feel warm.
- Download all pictures and remove the battery from the camera if you are going to store the camera for a long period of time.
- Risk of explosion if battery is replaced by an incorrect type. Dispose of used batteries according to the instructions.
- Keep the batteries out of the reach of children to prevent from swallowing the batteries, which might cause poisoning.
- If the battery's color or shape changes in any way, stop using the battery immediately.
USB Adaptor Information:
- Do not expose the adapter to high temperatures or moisture places. Otherwise, it may cause fire or electric shock.
- Do not attempt to repair, disassemble, change or transform the adapter.
- Avoid sudden changes in temperature, which may cause condensation on the adapter's internal surfaces. Do not use it immediately in this situation.
- Do not touch the plug with wet hands. Otherwise, it may cause electric shock.
- Do not use the travel voltage converter or AC/DC power inverter. Otherwise, it may cause damage, overheating, malfunction or fire to the camera.
Waterproof and Dustproof Information:
- The camera can shoot images underwater at a depth of 13 feet (4 meters) for up to 30 minutes.
- The waterproof and/or dustproof performance described do not guarantee that the camera will remain completely waterproof or free from damage and trouble under all conditions.
- Do not subject the camera to excessive shock, vibration or pressure by dropping it, hitting it or placing a heavy object on it. Failure to observe this precaution could deform the camera, cause water to seep inside, or damage the airtight seals, resulting in camera malfunction.
- The battery door must be closed securely and the lock engaged in order for the camera to be waterproof. Failure to do this can allow water to enter the camera and damage it.
- Do not drop the camera, strike it against a hard object such as a rock, or throw it against a water surface.
- Do not subject the camera to shock when using it underwater.
- Do not expose to depths greater than 13 feet (4 meters) underwater.
- Do not continuously use the camera underwater for 60 minutes or more.
- Do not insert a wet memory card or battery in the camera.
- Do not open the battery cover when the camera or your hands are wet. Doing so may cause water to seep inside the camera or result in camera malfunction.
- Do not open the battery cover underwater.
- If moisture such as water droplets adheres to the outside of the camera or inside of the battery cover, immediately wipe it off with a soft dry cloth.
- If a foreign substance adheres to the outside of the camera or inside of the battery cover, immediately remove it with a soft cloth.
- Do not leave the camera in cold conditions or hot conditions of 40^ C ( 104^ F) or more for a long period of time.
- When using the camera underwater, make sure the water temperature is from 0°C-40°C (32°F to 104°F).
- Do not use the camera in hot springs.
Before Using the Camera Underwater:
Check the items below before using the camera underwater.
• Make sure that there are no foreign substances inside the battery cover.
- Make sure that the waterproof packing of the battery cover is not cracked or deformed.
- Make sure that the battery door is firmly closed and the battery cover security lock is in the LOCK position.
- Failure to follow these steps can result in damage to the camera.
Notes about Opening and Closing the Battery Door:
• Make sure the camera and your hands are not wet.
- Make sure that there are no debris inside the battery-chamber or memory card slot.
- Make sure that the battery cover is firmly closed and the security lock is in the lock position.
Precautions When Cleaning:
- Do not puncture the microphone or speaker openings with a sharp implement.
- If the inside of the camera is damaged, the waterproof performance will deteriorate.
- Do not use soap, natural detergents, or chemicals such as benzene for cleaning.
Do Not Apply Strong Impact to the Camera:
The product may malfunction if subjected to strong shock or vibration. In addition, do not touch or apply force to the lens.
Avoid Sudden Changes in Temperature:
Sudden changes in temperature, such as when entering or leaving a heated building on a cold day, can cause condensation to form inside the device. To prevent condensation, place the device in a carrying case or a plastic bag before exposing it to sudden changes in temperature.
Keep Away from Strong Magnetic Fields:
Do not use or store this device in the vicinity of equipment that generates strong electromagnetic radiation or magnetic fields. Doing so could result in loss of data or camera malfunction.
Do Not Point the Lens at Strong Light Sources for Extended Periods:
Avoid pointing the lens at the sun or other strong light source light sources for extended periods when using or storing the camera. Intense light may cause the image sensor to deteriorate or produce a white blur effect in photographs.
Power the Product Off before Removing or Disconnecting the Power Source or Memory Card:
Do not remove the battery while the product is on, or while images are being saved or deleted. Forcibly cutting power in these circumstances could result in loss of data or cause damage to the memory card or internal circuitry.
Notes about the LCD Screen:
- The LCD Screens are constructed with extremely high precision; At least 99.99% of pixels are effective, with no more than 0.01% being missing or defective. Hence, while these displays may contain pixels that are always lit (white, red, blue or green) or always off (black), this is not a malfunction and has no effect on images recorded with the device.
- Images viewed on the LCD screen may be difficult to see under certain lighting.
- Do not apply pressure to the LCD screen, as this could cause damage or malfunction.
Charging the Battery:
Check the battery level before using the camera and replace or charge the battery if necessary.
- Charge the battery indoors with an ambient temperature of 5^ C ( 41^ F) to 35^ C ( 95^ F) before use.
- A high battery temperature may prevent the battery from charging properly or completely, and may reduce battery performance. Note that the battery may become hot after use; wait for the battery to cool before charging. When charging the battery inserted into this camera using the Charging AC Adapter or a computer, the battery is not charged at battery temperature below 5°C (41°F) or above 55°C (131°F).
- When the battery is between 45°C (113°F) - 55°C (131°F), the chargeable capacity may decrease.
- Do not continue charging once the battery is fully charged as this will result in reduce battery performance.
- The battery temperature may increase during charging. However, this is not a malfunction.
• Note that the battery may become hot after use. - Do not use the battery at ambient temperatures below 0°C (32°F) or above 40°C (104°F) as this could cause damage or malfunction.
- If you notice any abnormalities such as excessive heat, smoke, or an unusual smell coming from the battery, immediately discontinue use and consult your retailer.
• After removing the battery from the camera or optional battery charger, put the battery in a plastic bag, etc. in order to insulate it.
Using the Battery When Cold:
On cold days, the capacity of batteries tends to decrease. If an exhausted battery is used at a low temperature, the camera may not turn on. Keep spare batteries in a warm place and exchange as necessary. Once warmed, a cold battery may recover some of its charge.
Recycling Used Batteries:
Replace the battery when it no longer holds a charge. Used batteries are a valuable resource and should be recycled in accordance with local regulations.
Cleaning After Using the Camera Underwater:
Follow the procedure below to rinse the camera with fresh water within 30 minutes after using it under saltwater or at the beach.
- Keep the battery cover closed and wash off the camera with fresh water. Immerse the camera in a shallow basin filled with fresh water for 10 minutes.
- Immerse the camera in fresh water and shake it sufficiently in the water to remove any foreign substances from the camera.
- When the camera is immersed in the water, a few air bubbles may come out from the water drain holes of the camera such as openings in the microphone or speakers. This is not a malfunction.
- Wipe off water droplets with soft cloth and dry the camera in a well-ventilated and shady place.
- Place the camera on a dry cloth to dry it.
- Do not dry the camera with hot air from a hair dryer or clothes dryer.
- After making sure that there are no water droplets on the camera, open the battery cover and use a soft dry cloth to gently wipe off any water or sand remaining on the waterproof packing or inside the camera.
If the cover is closed when the inside is wet, this could cause condensation or a malfunction.
Cleaning After Using the Camera in Conditions Other than Underwater:
Use a blower to remove any dust or lint that adheres to the lens, monitor or camera body. To remove fingerprints or other stains that cannot be removed with a blower, gently wipe the parts with a soft dry cloth. If you wipe with too much pressure or with a rough cloth, it may damage the camera or cause a malfunction.
Storage
If you do not intend to use the camera for an extended period, remove the battery and avoid storing the camera in any of the following types of locations:
- Places that are poorly ventilated or subject to humidity of over 60%
- Place exposed to temperatures above 50^ (122°F) or below -10°C (14°F).
Getting Started
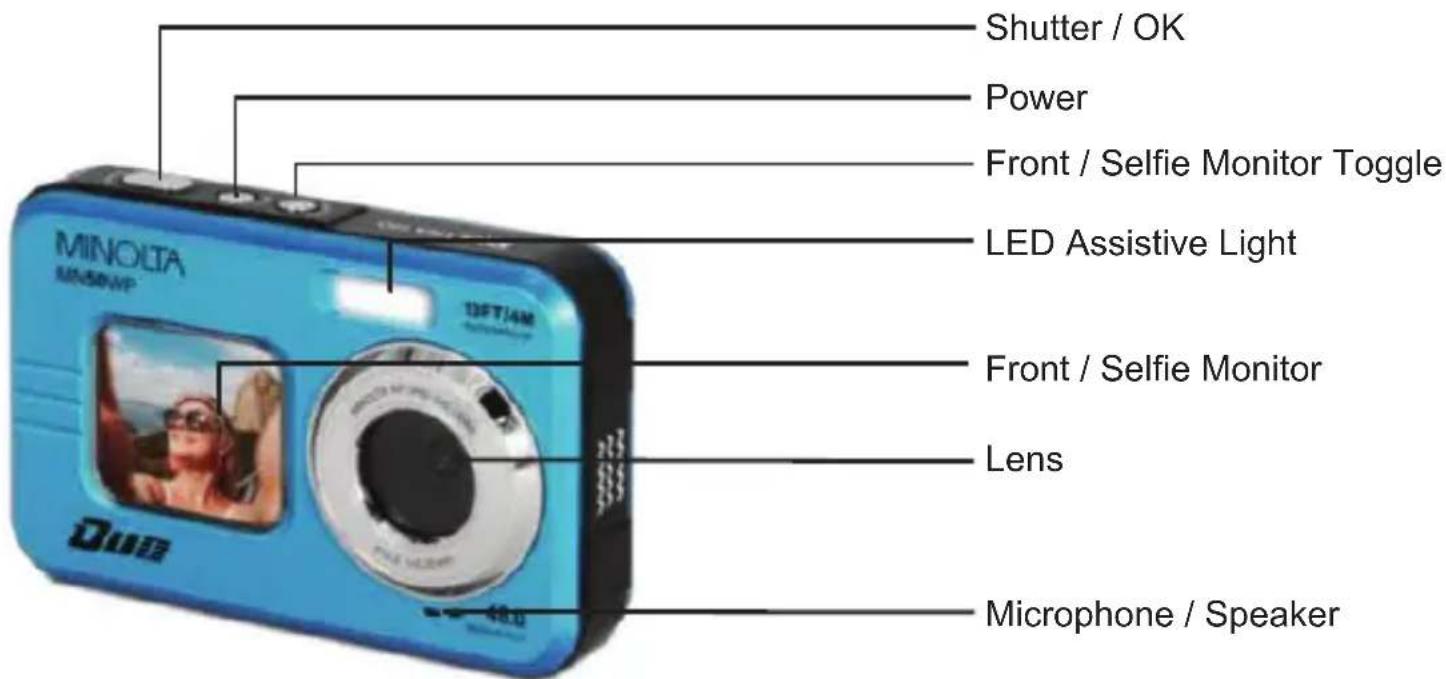
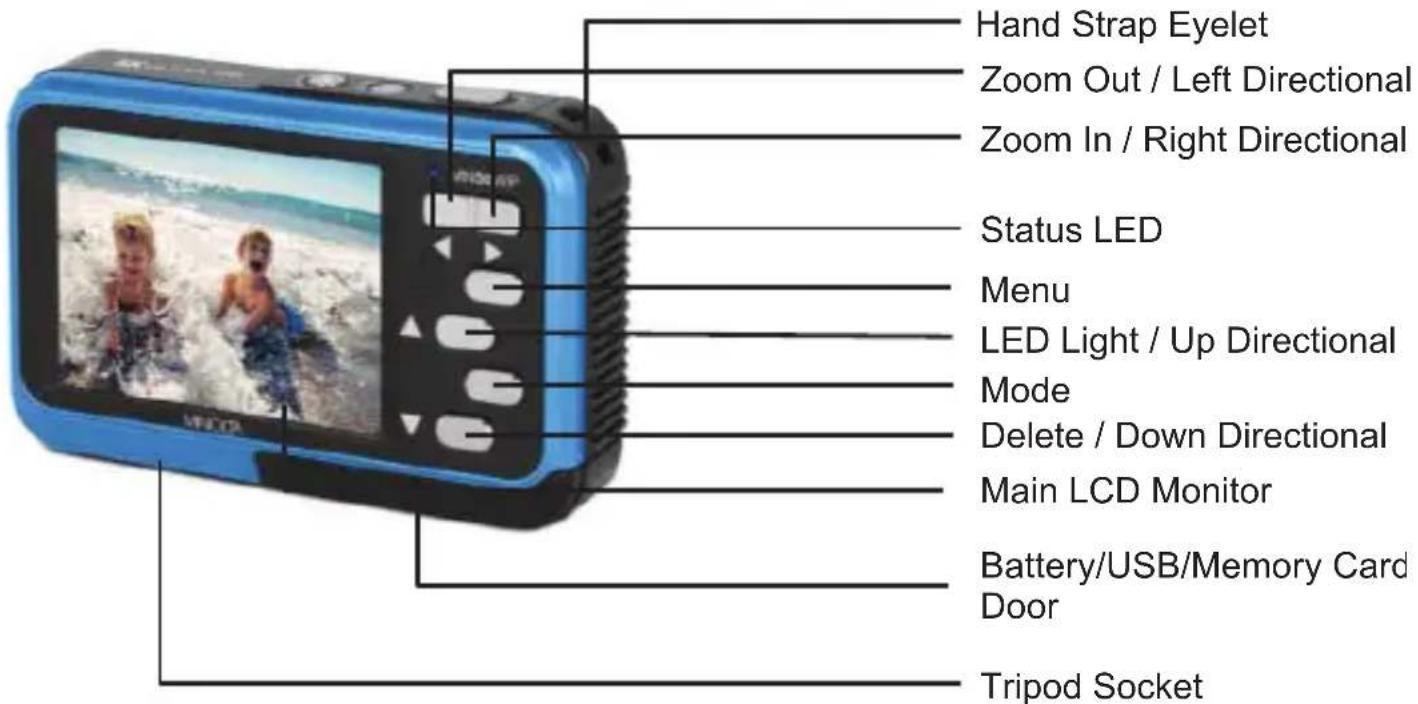
1.1 Buttons and Operation
Front
Back
| Icon: | Name: | Function: |
 | W Button / Left Directional | In Photo or Video: Press and hold to Zoom OutIn Menu or Mode: Press to move Left to selectIn Playback Selection: Press to move Left to selectIn Video Playback: Press and hold to rewind |
 | T Button / Right Directional | In Photo or Video: Press and hold to Zoom InIn Menu or Mode: Press to move Right to selectIn Playback Selection: Press to move Right to selectIn Video Playback: Press and hold to Forward |
| MENU | Menu Button Press to enter or exit the Settings menu | |
 | LED Button / Up Directional | In Photo or Video: Press to enable or disable LED LightIn Menu or Mode: Press to move Up to selectIn Playback Selection: Press to show or hide file detailIn Video Playback: Press to increase playback volume |
| MODE | Mode Button | Press to cycle through different Shooting Modes or Playback |
 | Delete Button / Down Directional | In Photo or Video: Press to delete last file savedIn Menu: Press to move Down to selectIn Playback Selection: Press to delete selected fileIn Video Playback: Press to decrease playback volume |
 | Monitor Toggle | Press to change between the Main and Front / Selfie Monitor |
 | Power Button Press for 3 seconds to power on or off | |
 | Shutter Button / OK | In Photo: Press half-way to auto focus, then full press to capture photoIn Video: Press half-way to auto focus, then full press to begin recording. Full press again to stop recording.Other Modes: Press to confirm highlighted selection |
| / Status LED | Red: Battery ChargingBlue Intermittent Flash: Recording VideoBlue Single Flash: Captured Photo | |
| / | Battery / USB / Memory Card Door | Door to access USB, battery, & memory card slot |
First Use
1.2 Camera Features
In addition to basic photo capture, the Minolta MN50WP has a variety of shooting modes to suit different situations. This section describes how to make the most of the key features of your camera. Together with the explanation of the camera's operations, it will enable you to enjoy your camera to the fullest.

natural_image
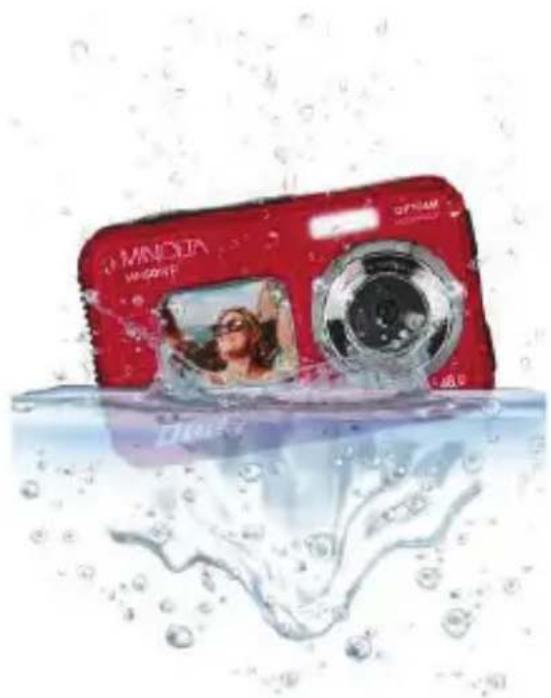
Illustration of two women relaxing in a swimming pool surrounded by plants and a pink swirl (no text or symbols)The MN50WP has a waterproof and dustproof rating of IP68. It allows you take pictures continuously 13 feet (4 meters) underwater for 30 minutes. The lock mechanism of the battery/card cover is designed for underwater picture-taking. The camera also floats in water, so no need to worry about it sinking to the bottom if you drop it.
Common Uses:
- For taking pictures while snorkeling.
- For taking pictures at the pool or while playing
in a river, lake, or beach. - For taking pictures while enjoying various outdoor activities without worrying about your camera getting a bit dirty. A quick wipe with a wet cloth is all it needs!
natural_image
Red digital camera partially submerged in water, creating splashes and bubbles (no visible text or symbols)1.3 Operating Battery Door
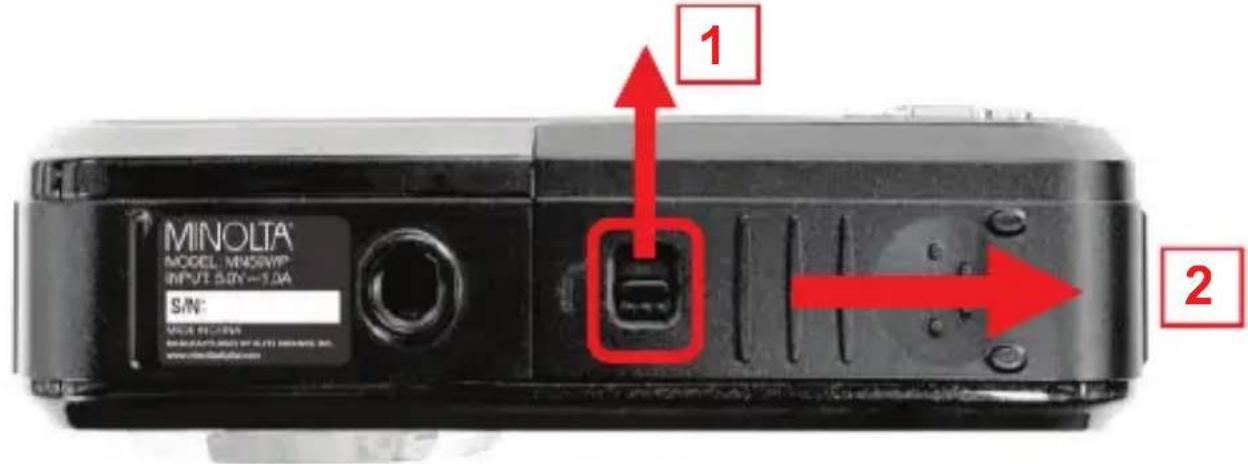
Unlock the battery door by sliding the locking latch up with your thumb and holding the latch in this position. If you let go of the latch, it will spring back down into the locked position. Use a fingertip, nail or other pointy object when sliding the locking latch up to get a better grip.
While holding the latch up as shown below, slide the battery door to the right and release. The door is now released and you can lift the cover open.
1.4 Installing the Battery
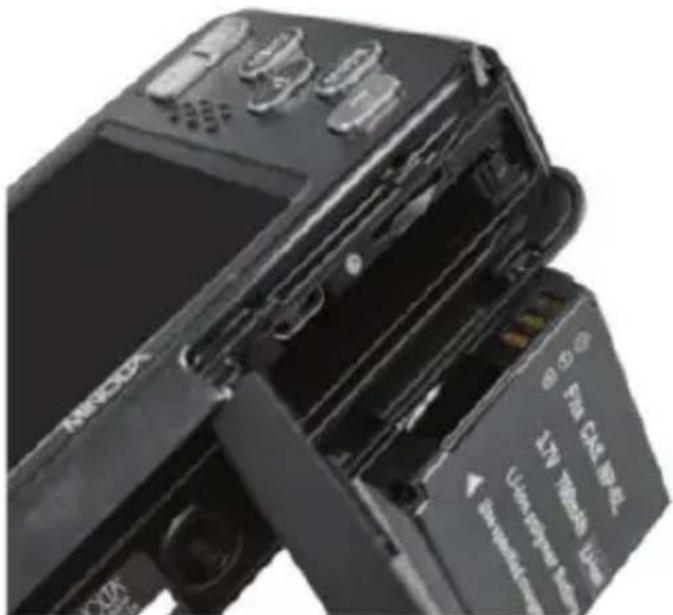
Insert the included lithium-ion battery into the battery compartment with the metal contact facing the inside right of the camera as shown in the diagram below. The camera will only power up if the metal contacts on the battery line up with the metal contact inside the battery compartment.
natural_image
Close-up of a black MINOO camera module with visible lens and control buttons (no readable text or symbols)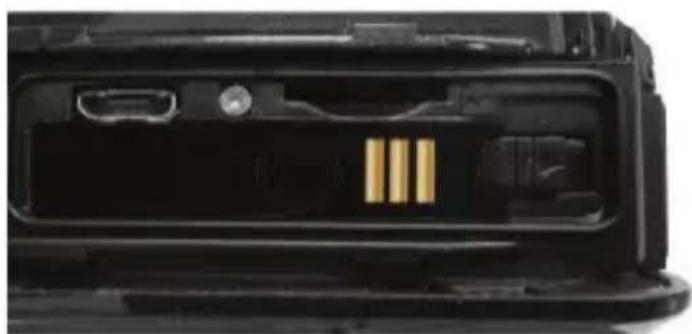
natural_image
Close-up of a black electronic device front panel showing internal components and a yellow stripe (no visible text or symbols)1.5 Installing the Memory Card
Insert the MicroSD memory card into the battery compartment with the metal contact facing down as shown in the diagram below. Push the memory card in until you hear and audible click.
The MicroSD memory card can only be inserted in one way. Do not force the card in if it will not go in smoothly. If it is not inserting smoothly, then it is likely being inserted incorrectly.
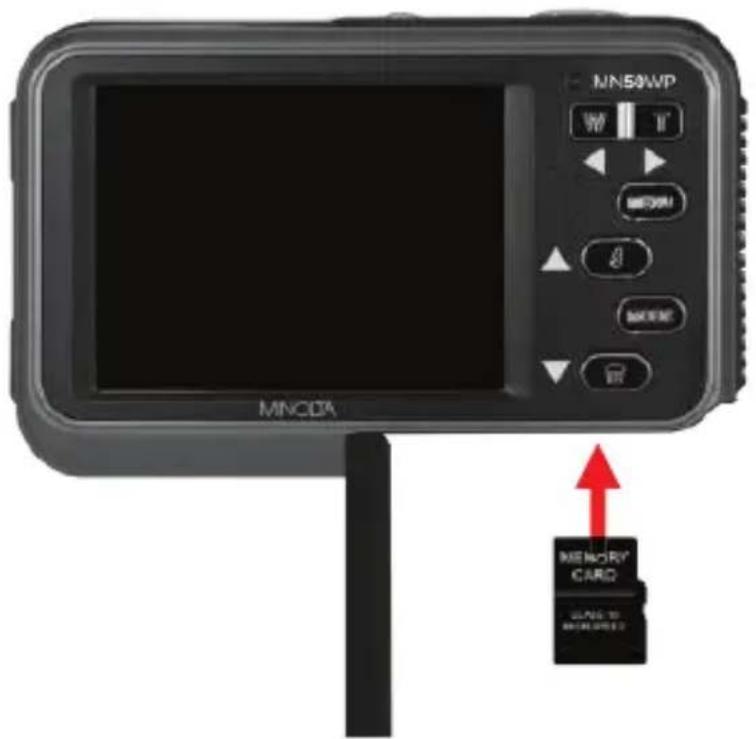
To remove the MicroSD memory card, simply push the card in and the card will eject back out.
NOTE:
- Format the memory card before using the camera (Caution: this will erase all data on the card).
- Do not remove or insert the memory card when recording. It may damage the card or cause data loss.
• Memory card rating must be Class 10 or above.
• Maximum capacity MicroSD supported is 256GB.
1.6 Charging the Battery
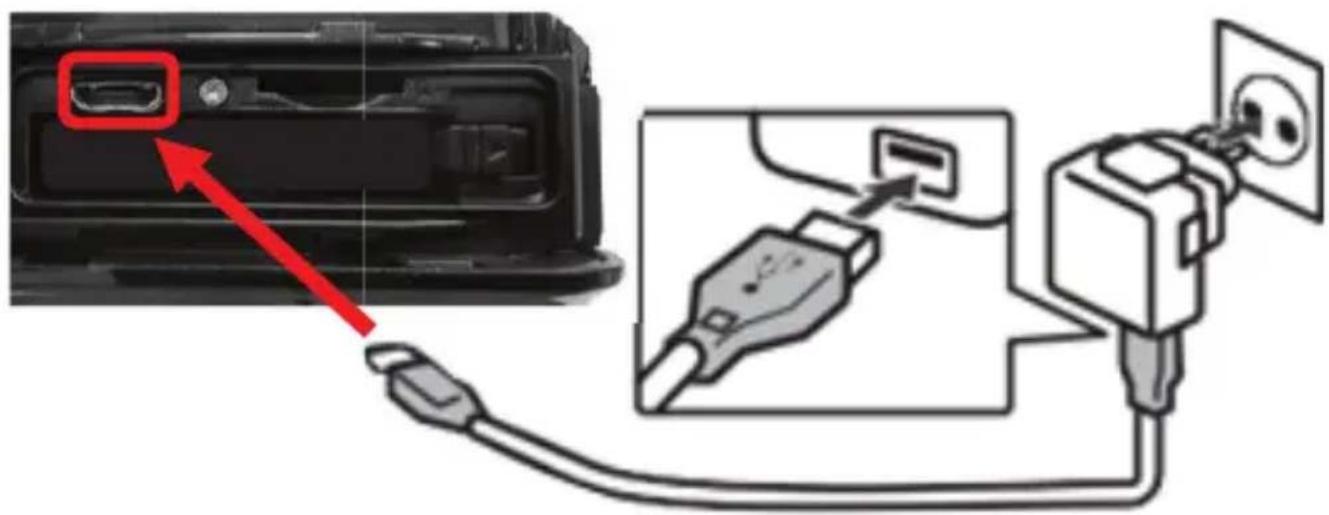
Connect your camera to the included AC adaptor with the USB cable provided for charging. Insert the small end of the USB plug into the camera's port under the battery door, and the larger end in to the included AC adaptor. While charging, the LED indicator light will light up solid red and will turn off once charging is completed.
1.7 Closing and Locking the Battery Door
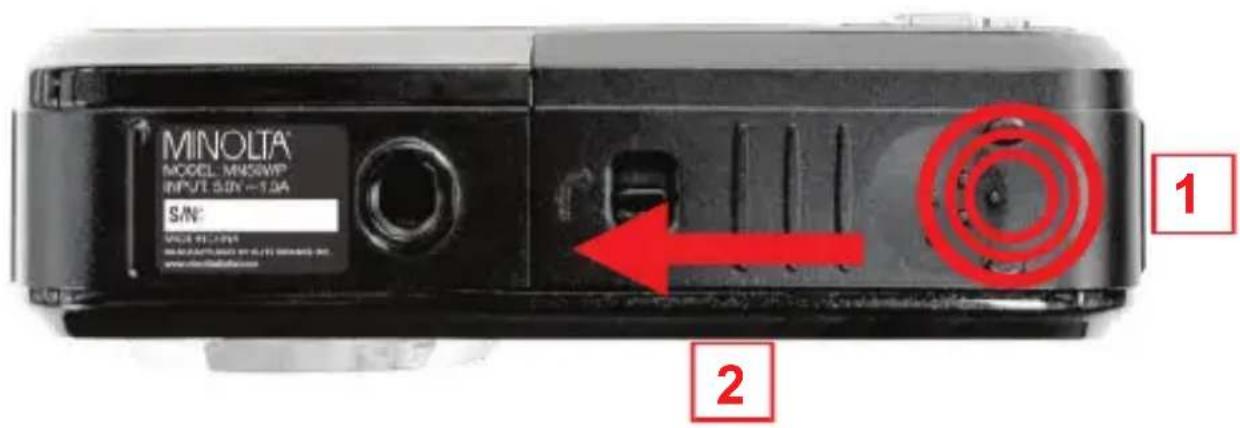
Press the battery down firmly until it is completely flat. While the battery door is pressed down, slide the door back into the closed and locked position as shown in the figure below. The battery door is fully sealed once the latch clicks into place. The latch will lock automatically once the door is secured properly.
1.8 Powering the Camera On and Off
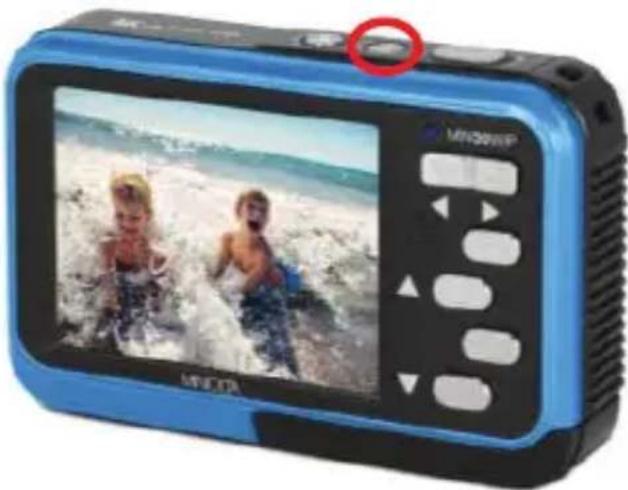
Hold the POWER button for 3 seconds to power the camera on. To power the camera off, press and hold the POWER button for a further 3 seconds. If the camera's battery is low, a "Low Battery" message will display on the screen and it will automatically shut down within a few seconds to prevent memory corruption or loss.
natural_image
Blue and black photo of a blue MiFCR digital camera displaying two children on waves, with no visible text or symbols on the device itself.1.9 Switching Modes
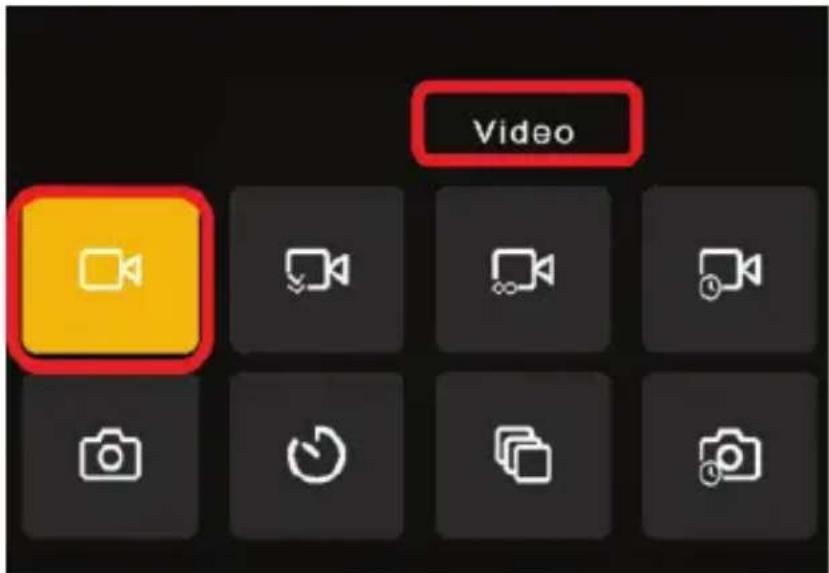
Press the MODE button to see the eight Photo and Video modes. Use the UP, DOWN, RIGHT and LEFT buttons to select your desired mode, then press the OK button to enter the highlighted mode. The selected mode name will be displayed in the top center of the screen. See below example screenshot. The selected mode is Video mode.
To enter Playback mode, press the MODE button to enter the mode selection screen, then press the MODE button again. To return back to a shooting mode,
press the MODE button again.
1.10 Using the Zoom Function
This camera is equipped with an autofocus lens and digital zoom function. Digital zoom enlarges your image electronically by cropping and enlarging the central part of the photograph. While digital zoom can be used from any distance, the quality of the image will reduce with each zoom step closer.
To operate the zoom function, press and hold the T button to zoom in closer to the subject, and press and hold the W button to zoom away from the subject.
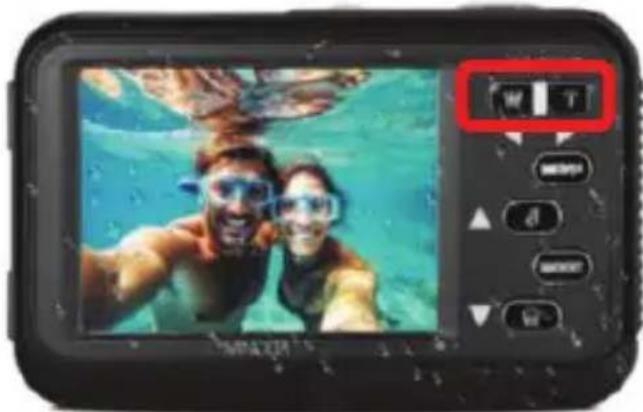
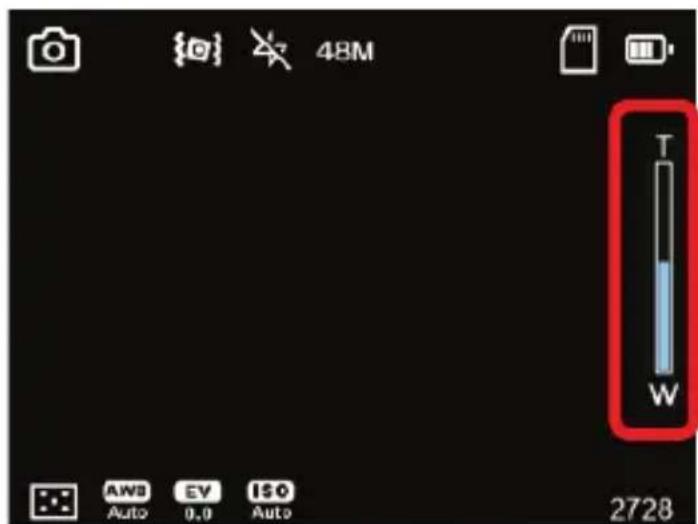
Photo Mode – Zoom Bar
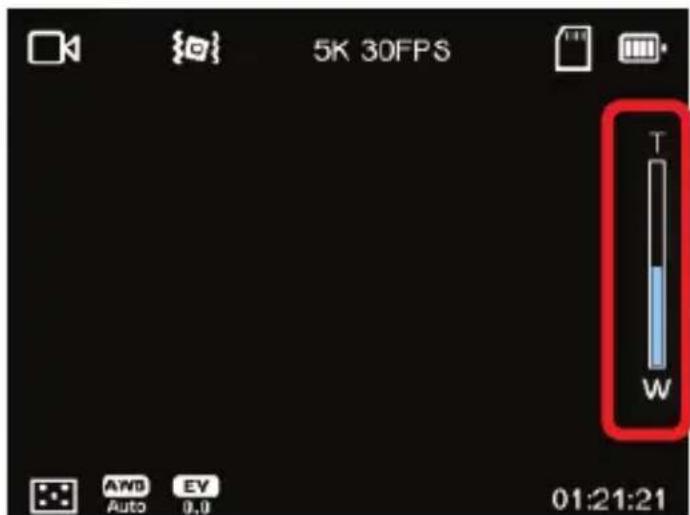
Video Mode – Zoom Bar
1.11 LED Assistive Light
Your camera is equipped with an LED light that can be activated to help illuminate darker scenes. To activate the LED light, simply press the LED button while in any photo or video modes. Press the LED button again to deactivate the light. The LED light's most effective range is 5 to 8 ft.
1.12 Using the Front Selfie Monitor
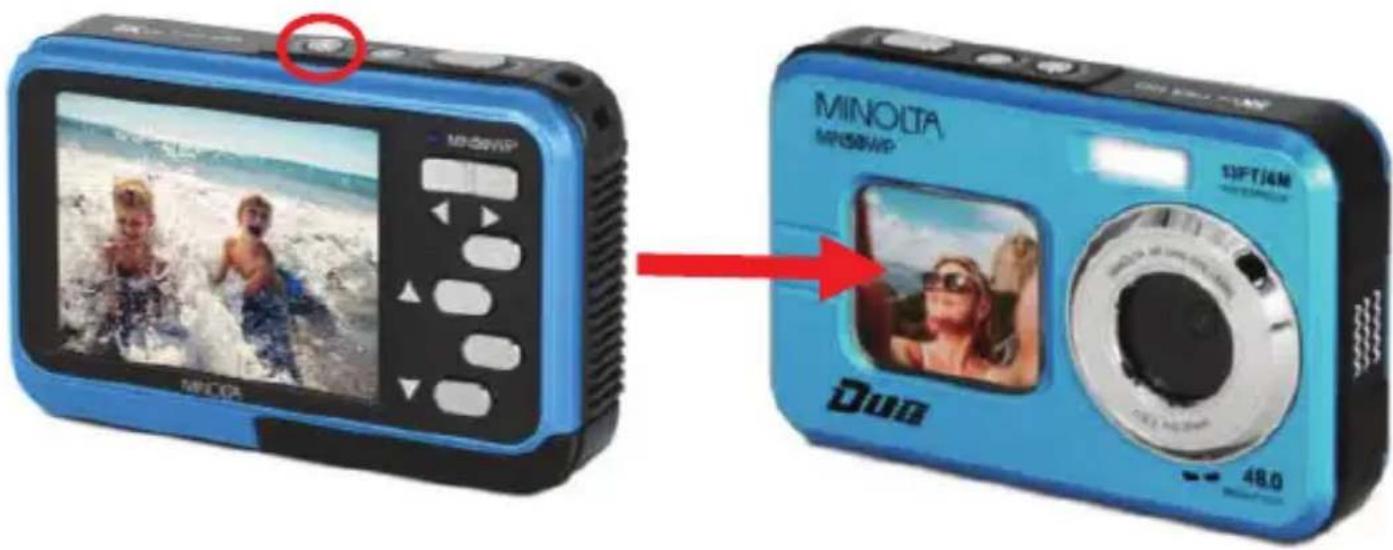
Your camera is equipped with a secondary monitor on the front of the camera. This allows you to snap creative and fun selfie shots in any shooting mode.
The front selfie LCD monitor can be used to take selfies. Simply press the MONITOR TOGGLE button and the front LCD screen will turn on. You may then use the camera as normal for a selfie or other shot. Press the MONITOR TOGGLE button again to turn the rear monitor back on.
NOTE: Only one LCD monitor is active at a time. When one of the monitors is off, this is not a malfunction.
1.13 Connecting to a Computer
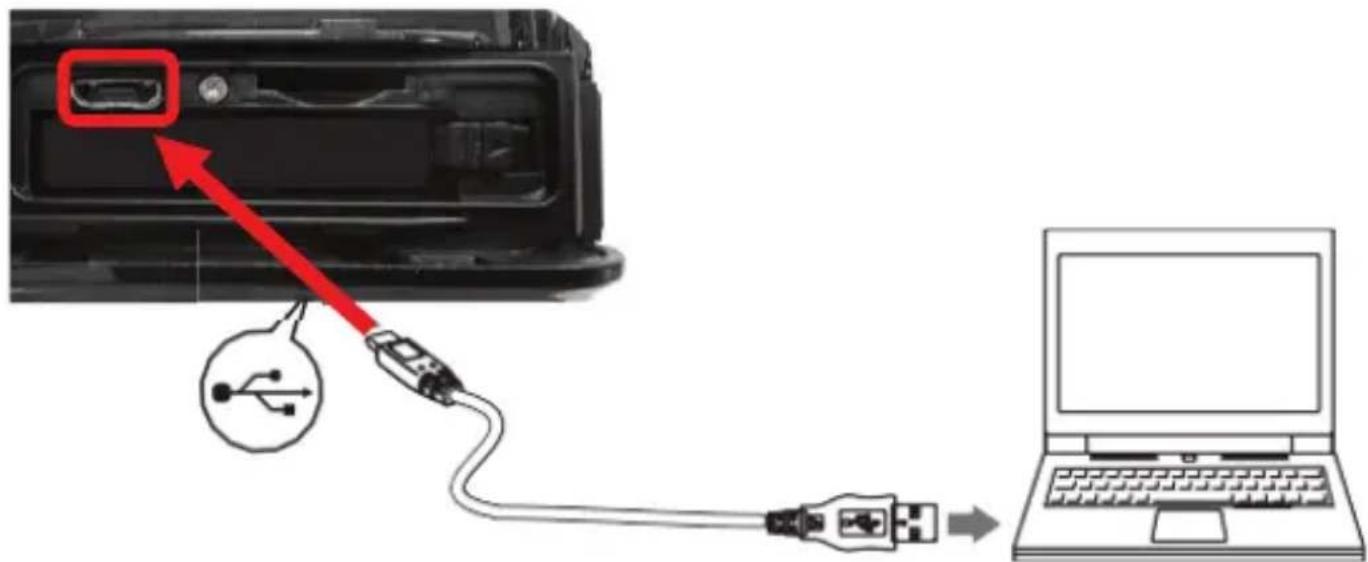
Your camera can connect to a computer to transfer photo and video files for viewing and editing, or to use your camera as a PC web cam. To connect the camera to your computer, open the battery door on the bottom of the camera to access the USB port. Insert the small end of the USB plug into the camera's port under the battery door, and the larger end in to a USB port on your computer. Once connected and powered on, the camcorder's screen will display two options as follows:
NOTE: You must plug directly into an integrated USB port and not into a USB peripheral hub or extension.
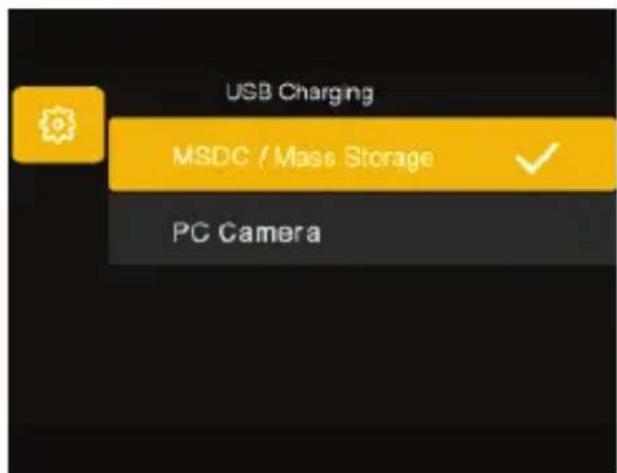
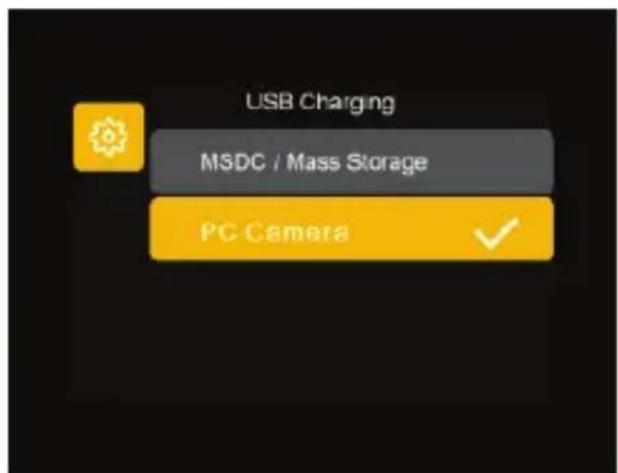
1) “MSDC” is for “Mass Storage Mode” and will allow you to access the files on the inserted memory card via your computer.
2) "PC Camera" will allow the camera to function as a PC web cam.
Use the UP or DOWN buttons to select your desired mode and press the OK button to enter into that mode.
Display Icons
Photo Capture Mode
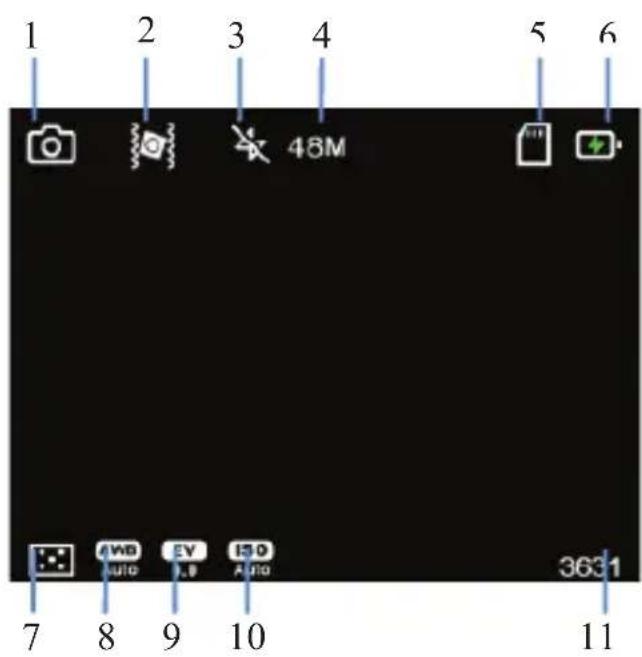
| Icon name: Description: | ||
| 1 | Photo Capture Mode | Press shutter button to capture a photo |
| 2 | Image Stabilization | Indicates that Image Stabilization is activated |
| 3 LED Assistive Light Automatic / Off / Forced / Always On | ||
| 4 | Photo Resolution | Current photo resolution setting |
| 5 | Memory Card | Indicates if a memory card is installed |
| 6 Battery Status Battery charging status or battery level | ||
| 7 | Metering | Current metering mode: Center, Multi, Spot |
| 8 White Balance Current white balance setting | ||
| 9 | Exposure Compensation | Current exposure compensation value |
| 10 | ISO | Current ISO sensitivity setting |
| 11 | Available Photo Count | Number of photos that can be captured with the memory card's current storage remaining |
Display Icons
Video Capture Mode
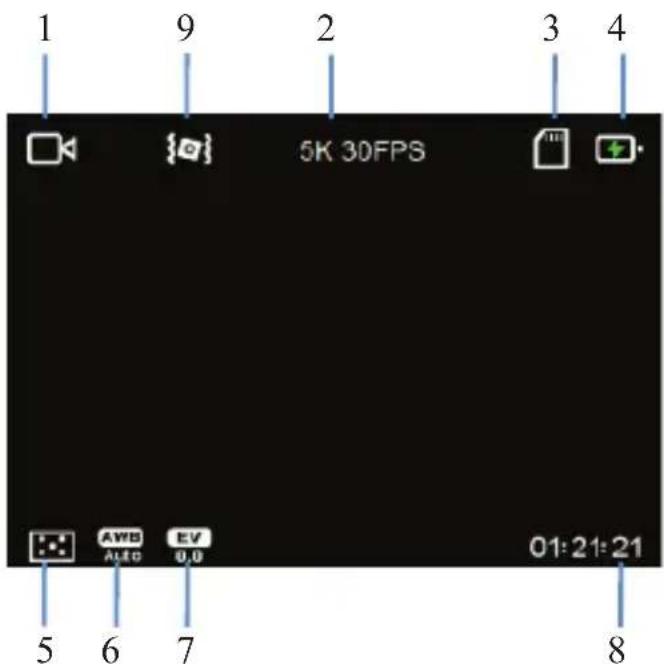
| Icon name: Description: | ||
| 1 | Video Capture Mode | Press shutter button to start recording video |
| 2 | Video Resolution Current video resolution setting | |
| 3 | Memory Card | Indicates if a memory card is installed |
| 4 | Battery Status Battery charging status or battery level | |
| 5 | Metering | Current metering mode: Center, Multi, Spot |
| 6 | White Balance Current white balance setting | |
| 7 | Exposure Compensation | Current exposure compensation value |
| 8 | Available Recording Time | Remaining available recording time with the memory card's current storage remaining |
| 9 | Image Stabilization | Indicates that Image Stabilization is activated |
Using the Camera – Video Recording
2.0 Video Recording
The MN50WP features 4 separate Video Recording / Capture modes as explained below.

Video Mode:
This is a video recording mode. Only video file can be recording per shutter press. Press the shutter button to begin recording, and press the shutter button to stop recording.

Slow-Motion:
This mode will allow you to record a slow-motion video. The camera will record a video at a higher frame rate resulting in a slower motion. The file will also play back in slower motion. The Resolution setting will determine the capture quality and play back duration. For example, a "720 8X" slow-motion setting will record a video in 720P resolution and will play back the file 8 times slower than the recorded duration. If the recorded duration of the original recording was 5 seconds, the play back duration will be 40 seconds.

Loop Recording:
This mode will allow you to enable an automatic capture of multiple Video recordings in a loop determined by the duration setting. For example, a “1 minute” setting will automatically capture 1-minute long recordings until the memory card storage depletes or until you stop the recording. To start or stop recording, simply press the Shutter button.

Time-Lapse (Video):
Time-lapse photography is a photographic technique in which the frequency at which photo frames are captured (the frame rate) is much lower than the frequency used to view the sequence. When played at normal speed, time appears to be moving faster and thus lapsing. For example, an image of a scene may be captured at 1 frame per second but then played back at 30 frames per second; the result is an apparent 30 times speed increase. This mode will capture a sequence of frames at set intervals to record changes that take place slowly over time. When the frames are shown at normal speed, or in quick succession, the action seems much faster.
When entering this shooting mode, it will allow you to enable an
automatic recording of video set by a time interval and a duration. There are 2 settings that will determine the "Interval" and "Duration".
The Interval setting is the interval in which the camera will capture photos for the time-lapse based on a default 30 frames per second. For example, an Interval setting of “5 seconds” will capture 150 images (5 seconds multiplied by 30 frames per second).
The Duration setting is the amount of time the camera will run the "Time-Lapse (Video)" program and record the scene. For example, a Duration setting of "10 Minutes" will capture video for 10 minutes and then stop. With an Interval setting of "5 seconds" and a Duration setting of "10 Minutes", the camera will record video for 10 minutes and then play it back in a compressed time of 4 seconds long.
The calculation to determine the playback length is: Duration (in seconds) / (Interval * 30 frames per second)
Using an Interval setting of "5 seconds" and a Duration setting of "10 Minutes", the calculation to determine the playback length is: 10 minutes / (5 seconds * 30 frames per second) = 600 seconds / 150 = 4
2.1 Video Mode

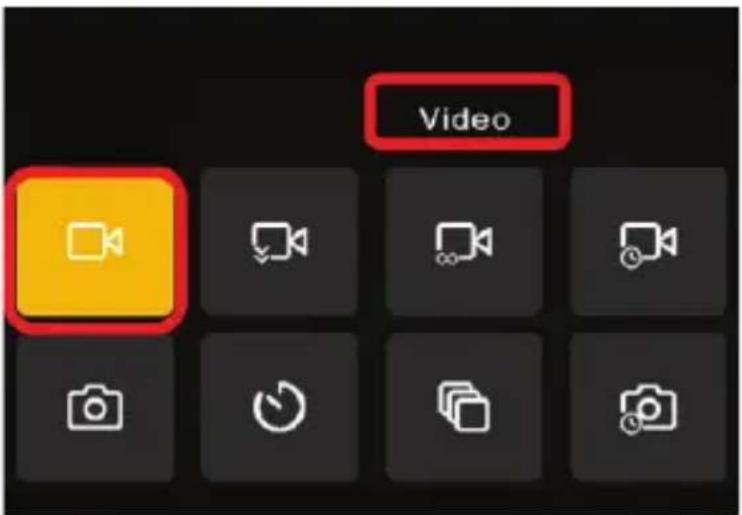
To enter Video mode, power the camera on and press the MODE button to access the mode selection screen. Use the UP, DOWN, LEFT and RIGHT buttons to navigate to and highlight the 'Video ☐' mode. Press the OK button to enter that mode. See below example screenshot. The highlighted mode is Video mode.
To begin recording a video file, follow these steps:
- Line up your shot by looking at the LCD monitor to see what is in the shot.
- Hold the camera steady and half-way press the SHUTTER to auto focus, then fully press the SHUTTER button to begin recording. You may also refocus in the middle of a recording by pressing the SHUTTER button half-way. To stop recording, fully press the SHUTTER button again.
- During a recording, the time counter will incrementally increase with each passing second.
- During standby, the available time duration of video recordings that can be captured at a particular resolution will be displayed at the bottom right corner of the screen.
- The available recording time is determined by the selected video resolution. The higher the resolution setting, the less amount of recording time you are able to be save to the memory card. Before recording any video, you can select a preferred resolution within the settings menu.
The front selfie LCD monitor can be used to take selfies. Simply press the MONITOR TOGGLE button and the front LCD screen will turn on. You may then use the camera as normal for a selfie or other shot. Press the MONITOR TOGGLE button again to turn the rear monitor back on.
2.1.1 Video Mode Settings Menu
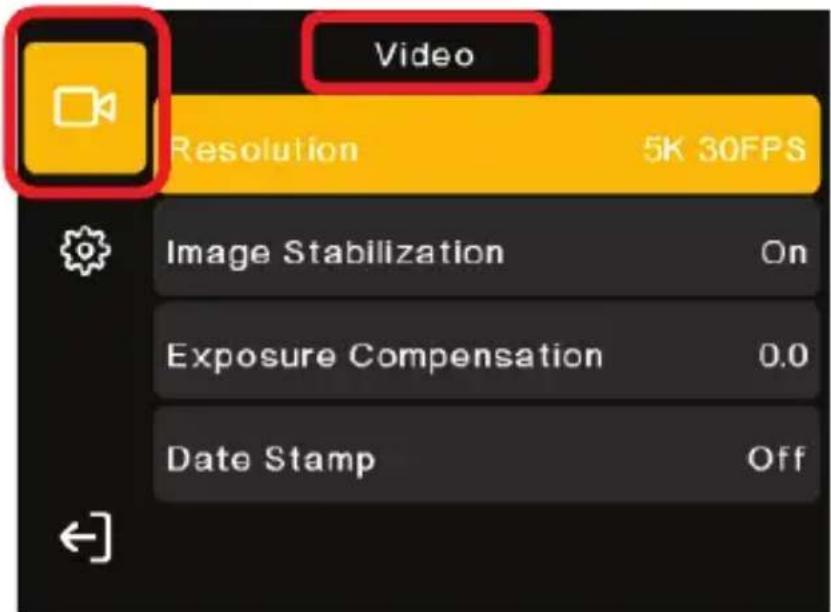
All settings in this menu will affect the videos being captured in Video mode. To access this menu, press the MENU button. Once in the menu, press the "W" or "T" buttons to toggle between Video and System submenu settings. The highlighted screenshot below shows Video mode Settings. The Video mode icon selected, and "Video" at the top center is shown.
2.1.2 Resolution
This setting sets the video resolution. The higher the resolution, the greater the video quality and the larger the file size of the video recording.
- In Video Mode press the MENU button to enter Video Settings.
- Use the "W" or "T" buttons to navigate LEFT or RIGHT to access the Video settings submenu. Once selected correctly, you will see Video at the top center of the display.
- Select 'Resolution' using the UP or DOWN buttons.
- Press the OK button to enter the highlighted setting submenu.
- Press the UP or DOWN buttons to navigate the menu, and press the OK button to confirm your selection. You may select from 5K 30FPS, 4K 30FPS, 1080P 120FPS, 1080P 60FPS, and 720P 240FPS.
- Press the MENU button to exit the settings menu and return to shooting.
2.1.3 Image Stabilization
This setting enables capture in high speed and low-light by electronically minimizing motion blur and reducing camera shake.
- In Video Mode press the MENU button to enter Video Settings.
- Use the "W" or "T" buttons to navigate LEFT or RIGHT to access the Video settings submenu. Once selected correctly, you will see Video at the top center of the display.
- Select 'Image Stabilization' using the UP or DOWN buttons.
- Press the OK button to enter the highlighted setting submenu.
- Press the UP or DOWN buttons to navigate the menu, and press the OK button to confirm your selection. You may select from On and Off.
- Press the MENU button to exit the settings menu and return to shooting.
2.1.4 Exposure Compensation
This setting adjusts the frame brightness in your video recordings.
- In Video Mode press the MENU button to enter Video Settings.
- Use the "W" or "T" buttons to navigate LEFT or RIGHT to access the Video settings submenu. Once selected correctly, you will see Video at the top center of the display.
- Select 'Exposure Compensation' using the UP or DOWN buttons.
- Press the OK button to enter the highlighted setting submenu.
- Press the UP or DOWN buttons to navigate the menu, and press the OK button to confirm your selection. You may select from -2.0, -1.0, 0.0, +1.0, and +2.0.
- Press the MENU button to exit the settings menu and return to shooting.
2.1.5 Date Stamp
This setting allows you to imprint a date and/or time stamp onto your captured video files. Once a video is recorded with the imprint, the imprint cannot be removed.
- In Video Mode press the MENU button to enter Video Settings.
- Use the "W" or "T" buttons to navigate LEFT or RIGHT to access the Video settings submenu. Once selected correctly, you will see Video at the top center of the display.
- Select 'Date Stamp' using the UP or DOWN buttons.
- Press the OK button to enter the highlighted setting submenu.
- Press the UP or DOWN buttons to navigate the menu, and press the OK button to confirm your selection. You may select from Off, Date and Date & Time.
- Press the MENU button to exit the settings menu and return to shooting.
2.2 Slow Motion Mode

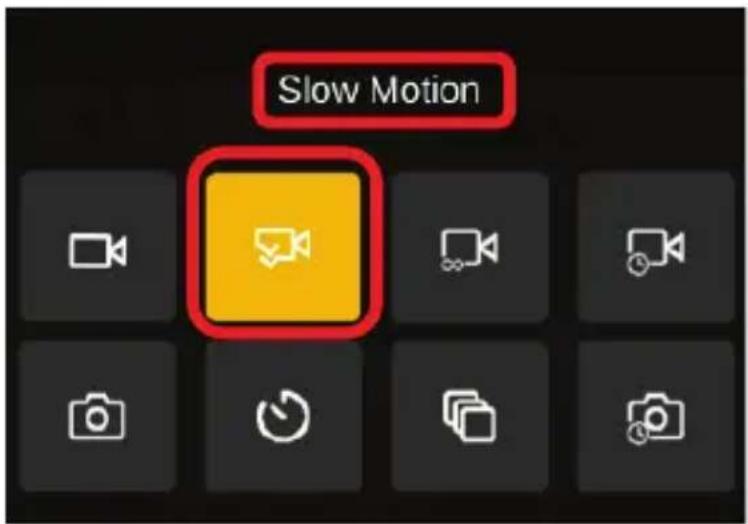
To enter Slow Motion mode, power the camera on and press the MODE button to access the mode selection screen. Use the UP, DOWN, LEFT and RIGHT buttons to navigate to and highlight the 'Slow Motion' mode. Press the OK button to enter that mode. See below example screenshot. The highlighted mode is Slow Motion mode.
In this mode, the camera will record a video at a higher frame rate resulting in a slower motion. The file will also play back in slower motion. The Resolution setting will determine the capture quality and play back duration. For example, a “720 8X” slow-motion setting will record a video in 720P resolution and will play back the file 8 times slower than the recorded duration. If the recorded duration of the original recording was 5 seconds, the play back duration will be 40 seconds.
To begin recording a video file, follow these steps:
- Line up your shot by looking at the LCD monitor to see what is in the shot.
- Hold the camera steady and half-way press the SHUTTER to auto focus, then fully press the SHUTTER button to begin recording. You may also refocus in the middle of a recording by pressing the SHUTTER button half-way. To stop recording, fully press the SHUTTER button again.
- During a recording, the time counter will incrementally increase with each passing second.
- During standby, the available time duration of video recordings that can be captured at a particular resolution will be displayed at the bottom right corner of the screen.
- The available recording time is determined by the selected video resolution. The higher the resolution setting, the less amount of recording time you are able to be save to the memory card. Before recording any video, you can select a preferred resolution within the settings menu.
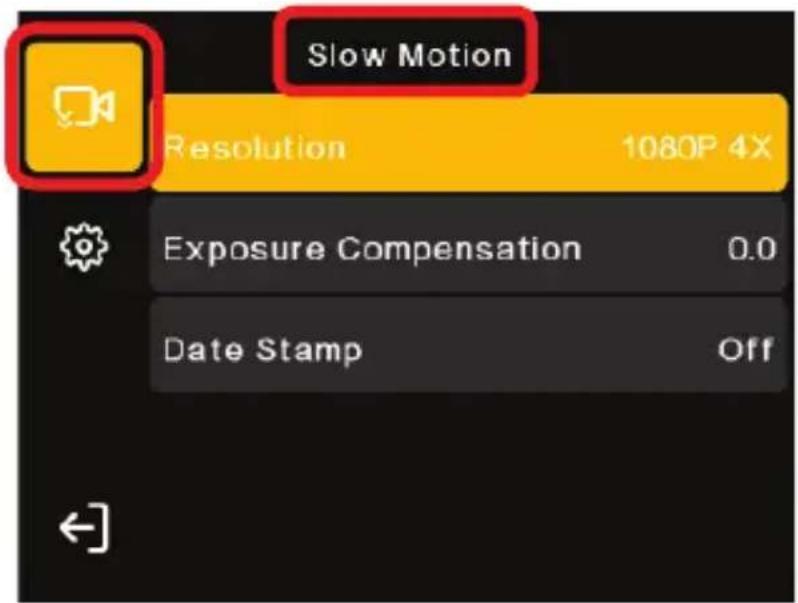
2.2.1 Slow Motion Mode Settings Menu
All settings in this MENU will affect the videos being captured in Slow Motion mode. To access this menu, press the menu button. Once in the menu, press the "W" or "T" buttons to toggle between Slow Motion and System submenu settings. The highlighted screenshot below shows Slow Motion mode Settings. The Slow Motion mode icon selected, and "Slow Motion" at the top center is shown.
2.2.2 Resolution
This setting sets the video resolution and playback duration of the video being recorded. The camera will record a video at a higher frame rate resulting in a slower motion. The file will also play back in slower motion. For example, a “720 8X” slow-motion setting will record a video in 720P resolution and will play back the file 8 times slower than the real recorded duration. If the recorded duration of the original recording was 5 seconds, the play back duration will be 40 seconds.
- In Slow Motion Mode press the MENU button to enter Slow Motion Settings.
- Use the "W" or "T" buttons to navigate LEFT or RIGHT to access the Slow Motion settings submenu. Once selected correctly, you will see Slow Motion at the top center of the display.
- Select 'Resolution' using the UP or DOWN buttons.
- Press the OK button to enter the highlighted setting submenu.
- Press the UP or DOWN buttons to navigate the menu, and press the OK button to confirm your selection. You may select from 1080P 4X, 720P 8X, and 720P 4X. As a guide, the “720P 8X” setting will record a video in 720P resolution and will play back the video 8 times slower than the real recorded duration.
- Press the MENU button to exit the settings menu and return to shooting.
2.2.3 Exposure Compensation
This setting adjusts the frame brightness in your video recordings.
- In Slow Motion Mode press the MENU button to enter Slow Motion Settings.
- Use the "W" or "T" buttons to navigate LEFT or RIGHT to access the Slow Motion settings submenu. Once selected correctly, you will see Slow Motion at the top center of the display.
- Select 'Exposure Compensation' using the UP or DOWN buttons.
- Press the OK button to enter the highlighted setting submenu.
- Press the UP or DOWN buttons to navigate the menu, and press the OK button to confirm your selection. You may select from -2.0, -1.0, 0.0, +1.0, and +2.0.
- Press the MENU button to exit the settings menu and return to shooting.
2.2.4 Date Stamp
This setting allows you to imprint a date and/or time stamp onto your captured video files. Once a video is recorded with the imprint, the imprint cannot be removed.
- In Slow Motion Mode press the MENU button to enter Slow Motion Settings.
- Use the "W" or "T" buttons to navigate LEFT or RIGHT to access the Slow Motion settings submenu. Once selected correctly, you will see Slow Motion at the top center of the display.
- Select 'Date Stamp' using the UP or DOWN buttons.
- Press the OK button to enter the highlighted setting submenu.
- Press the UP or DOWN buttons to navigate the menu, and press the OK button to confirm your selection. You may select from Off, Date and Date & Time.
- Press the MENU button to exit the settings menu and return to shooting.
2.3 Loop Recording Mode

To enter Loop Recording mode, power the camera on and press the MODE button to access the mode selection screen. Use the UP, DOWN, LEFT and RIGHT
buttons to navigate to and highlight the 'Loop Recording' mode. Press the OK button to enter that mode. See below example screenshot. The highlighted mode is Loop Recording mode.
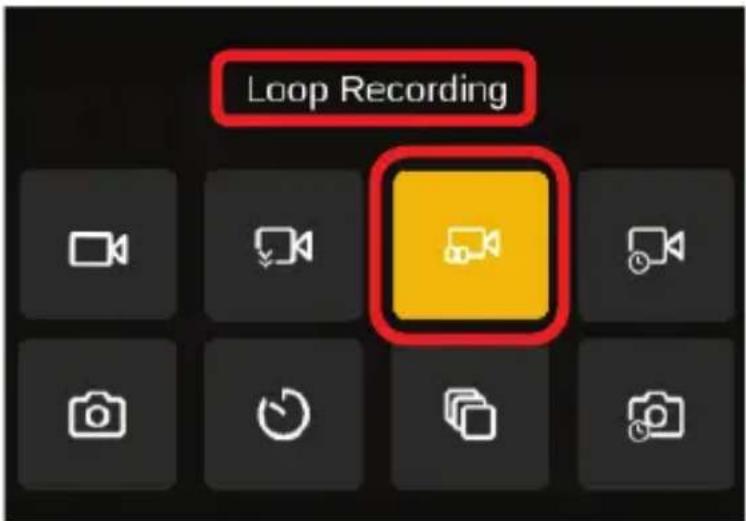
In this mode, the camera will enable an automatic capture of multiple Video recordings in a loop determined by the duration setting. For example, a “1 minute” setting will automatically capture 1-minute long recordings until the memory card storage depletes or until you stop the recording. To start or stop recording, simply press the Shutter button.
To begin recording a video file, follow these steps:
- Line up your shot by looking at the LCD monitor to see what is in the shot.
- Hold the camera steady and half-way press the SHUTTER to auto focus, then fully press the SHUTTER button to begin recording. You may also refocus in the middle of a recording by pressing the SHUTTER button half-way. To stop recording, fully press the SHUTTER button again.
- During a recording, the time counter will incrementally increase with each passing second.
- During standby, the available time duration of video recordings that can be captured at a particular resolution will be displayed at the bottom right corner of the screen.
- The available recording time is determined by the selected video resolution. The higher the resolution setting, the less amount of recording time you are able to be save to the memory card. Before recording any video, you can select a preferred resolution within the settings menu.
2.3.1 Loop Recording Settings Menu
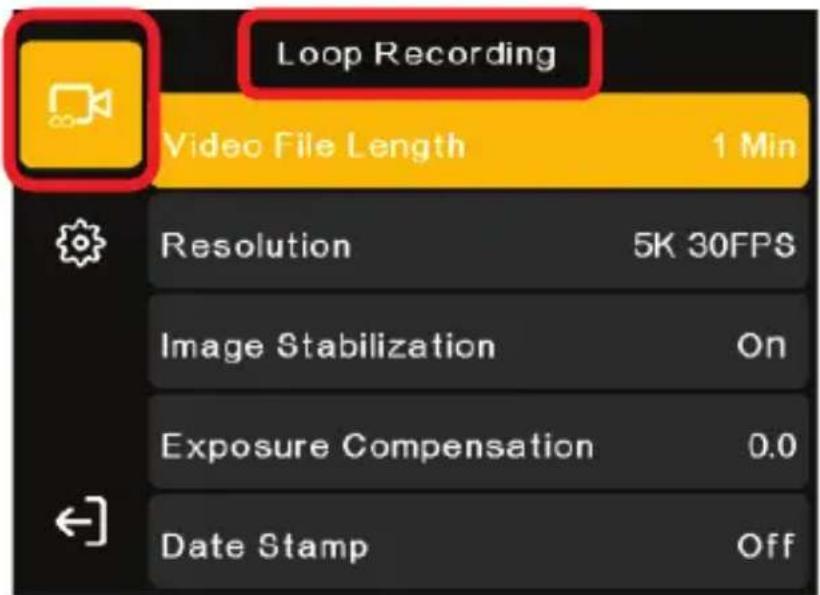
All settings in this MENU will affect the videos being captured in Loop Recording mode. To access this menu, press the menu button. Once in the menu, press the "W" or "T" buttons to toggle between Loop Recording and System submenu settings. The highlighted screenshot below shows Loop Recording mode Settings. The Loop Recording mode icon selected, and "Loop Recording" at the top center is shown.
2.3.2 Video File Length
This setting sets the time duration of each recorded loop video file. For example, a "1 minute" setting will automatically capture 1-minute long recordings until the memory card storage depletes or until you stop the recording.
- In Loop Recording Mode press the MENU button to enter Loop Recording Settings.
- Use the "W" or "T" buttons to navigate LEFT or RIGHT to access the Loop Recording settings submenu. Once selected correctly, you will see Loop Recording at the top center of the display.
- Select 'Video File Length' using the UP or DOWN buttons.
- Press the OK button to enter the highlighted setting submenu.
- Press the UP or DOWN buttons to navigate the menu, and press the OK button to confirm your selection. You may select from 1 Min, 3 Min, 5 Min, and 10 Min. As a guide, the “5 min” setting will record 5-minute-long videos before stopping and beginning another new 5-minute recording.
- Press the MENU button to exit the settings menu and return to shooting.
2.3.3 Resolution
This setting sets the video resolution. The higher the resolution, the greater the video quality and the larger the file size of the video recording.
- In Loop Recording Mode press the MENU button to enter Loop Recording Settings.
- Use the "W" or "T" buttons to navigate LEFT or RIGHT to access the Loop Recording settings submenu. Once selected correctly, you will see Loop Recording at the top center of the display.
- Select 'Resolution' using the UP or DOWN buttons.
- Press the OK button to enter the highlighted setting submenu.
- Press the UP or DOWN buttons to navigate the menu, and press the OK button to confirm your selection. You may select from 5K 30FPS, 4K 30FPS, 1080P 120FPS, 1080P 60FPS, and 720P 240FPS.
- Press the MENU button to exit the settings menu and return to shooting.
2.3.4 Image Stabilization
This setting enables capture in high speed and low-light by electronically minimizing motion blur and reducing camera shake.
- In Loop Recording Mode press the MENU button to enter Loop Recording Settings.
- Use the "W" or "T" buttons to navigate LEFT or RIGHT to access the Loop Recording settings submenu. Once selected correctly, you will see Loop Recording at the top center of the display.
- Select 'Image Stabilization' using the UP or DOWN buttons.
- Press the OK button to enter the highlighted setting submenu.
- Press the UP or DOWN buttons to navigate the menu, and press the OK button to confirm your selection. You may select from On and Off.
- Press the MENU button to exit the settings menu and return to shooting.
2.3.5 Exposure Compensation
This setting adjusts the frame brightness in your video recordings.
- In Loop Recording Mode press the MENU button to enter Loop Recording Settings.
- Use the "W" or "T" buttons to navigate LEFT or RIGHT to access the Loop Recording settings submenu. Once selected correctly, you will see Loop Recording at the top center of the display.
- Select 'Exposure Compensation' using the UP or DOWN buttons.
- Press the OK button to enter the highlighted setting submenu.
- Press the UP or DOWN buttons to navigate the menu, and press the OK button to confirm your selection. You may select from -2.0, -1.0, 0.0, +1.0, and +2.0.
- Press the MENU button to exit the settings menu and return to shooting.
2.3.6 Date Stamp
This setting allows you to imprint a date and/or time stamp onto your captured video files. Once a video is recorded with the imprint, the imprint cannot be removed.
- In Loop Recording Mode press the MENU button to enter Loop Recording Settings.
- Use the "W" or "T" buttons to navigate LEFT or RIGHT to access the Loop Recording settings submenu. Once selected correctly, you will see Loop Recording at the top center of the display.
- Select 'Date Stamp' using the UP or DOWN buttons.
- Press the OK button to enter the highlighted setting submenu.
- Press the UP or DOWN buttons to navigate the menu, and press the OK button to confirm your selection. You may select from Off, Date and Date & Time.
- Press the MENU button to exit the settings menu and return to shooting.
2.4 Time Lapse (Video) Mode

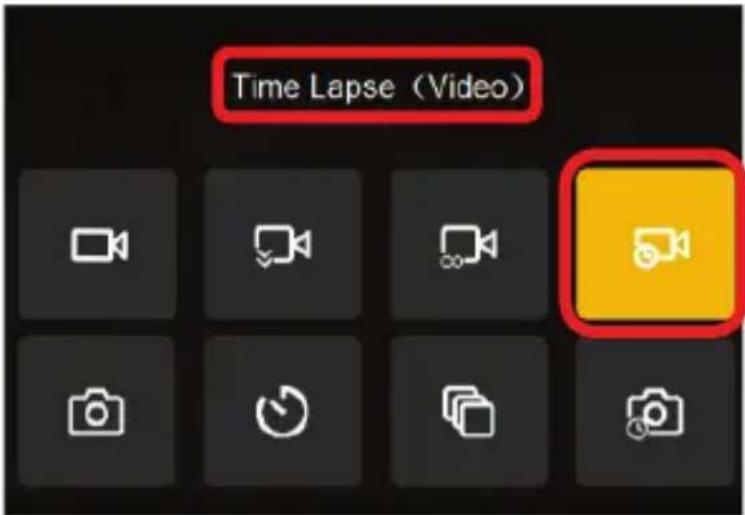
To enter Time Lapse (Video) mode, power the camera on and press the MODE button to access the mode selection screen. Use the UP, DOWN, LEFT and RIGHT buttons to navigate to and highlight the 'Time Lapse (Video) mode. Press the OK button to enter that mode. See below example screenshot. The highlighted mode is Time Lapse (Video) mode.
Time-lapse photography is a photographic technique in which the frequency at which photo frames are captured (the frame rate) is much lower than the frequency used to view the sequence. When played at normal speed, time appears to be moving faster and thus lapsing. For example, an image of a scene may be captured at 1 frame per second but then played back at 30 frames per second; the result is an apparent 30 times speed increase. This mode will capture a sequence of frames at set intervals to record changes that take place slowly over time. When the frames are shown at normal speed, or in quick succession, the action seems much faster.
When entering this shooting mode, it will allow you to enable an automatic recording of video set by a time interval and a duration. There are 2 settings that will determine the “Interval” and “Duration”. To begin recording a video file, follow these steps:
- Line up your shot by looking at the LCD monitor to see what is in the shot.
- Hold the camera steady and half-way press the SHUTTER to auto focus, then fully press the SHUTTER button to begin recording. You may also refocus in the middle of a recording by pressing the SHUTTER button half-way. To stop recording, fully press the SHUTTER button again.
-
During a recording, the time counter will incrementally increase slowly corresponding to the setting selected.
-
During standby, the available time duration of video recordings that can be captured at a particular resolution will be displayed at the bottom right corner of the screen.
-
The available recording time is determined by the selected video resolution. The higher the resolution setting, the less amount of recording time you are able to be save to the memory card. Before recording any video, you can select a preferred resolution within the settings menu.
2.4.1 Time Lapse (Video) Settings Menu
All settings in this MENU will affect the videos being captured in Time Lapse (Video) mode. To access this menu, press the menu button. Once in the menu, press the "W" or "T" buttons to toggle between Time Lapse (Video) and System submenu settings. The highlighted screenshot below shows Time Lapse (Video) mode Settings. The Time Lapse (Video) mode icon selected, and "Time Lapse (Video)" at the top center is shown.
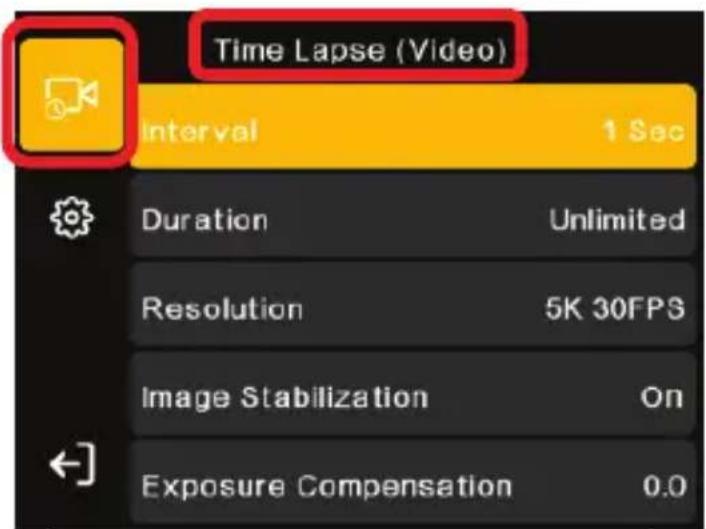
Time Lapse (Video) Mode Settings – Page 1
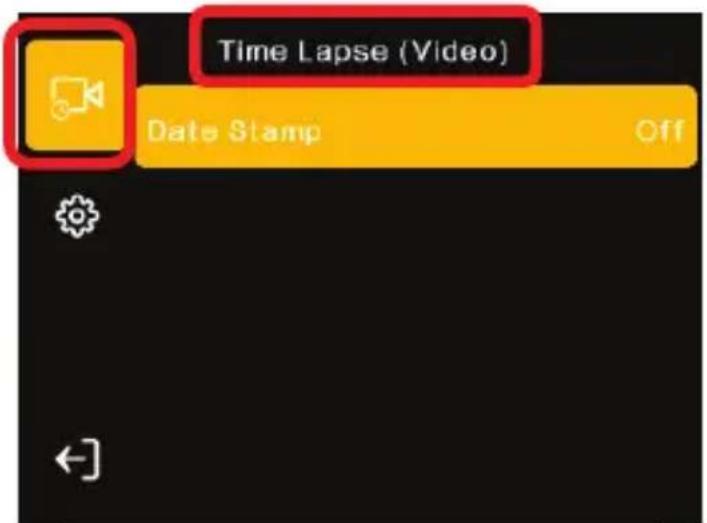
Time Lapse (Video) Mode Settings – Page 2
2.4.2 Interval
The Interval setting is the interval in which the camera will capture photos for the time-lapse based on a default 30 frames per second. For example, an Interval setting of “5 seconds” will capture 150 images (5 seconds multiplied by 30 frames per second).
- In Time Lapse (Video) Mode press the MENU button to enter Time Lapse (Video) Settings.
- Use the "W" or "T" buttons to navigate LEFT or RIGHT to access the Time
Lapse (Video) submenu. Once selected correctly, you will see Time Lapse (Video) at the top center of the display.
- Select 'Interval' using the UP or DOWN buttons.
- Press the OK button to enter the highlighted setting submenu.
- Press the UP or DOWN buttons to navigate the menu, and press the OK button to confirm your selection. You may select from 1 Sec, 3 Sec, 5 Sec, 10 Sec, 30 Sec, and 1 Min.
- Press the MENU button to exit the settings menu and return to shooting.
2.4.3 Duration
This setting is the amount of time the camera will run the “Time-Lapse” program and record the scene. For example, a Duration setting of “5 Minutes” will record video for 5 minutes and then stop. With an Interval setting of “3 seconds” and a Duration setting of “5 Minutes”, the camera will record video for 5 minutes and then play it back in a compressed time as explained above.
- In Time Lapse (Video) Mode press the MENU button to enter Time Lapse (Video) Settings.
- Use the "W" or "T" buttons to navigate LEFT or RIGHT to access the Time Lapse (Video) submenu. Once selected correctly, you will see Time Lapse (Video) at the top center of the display.
- Select 'Duration' using the UP or DOWN buttons.
- Press the OK button to enter the highlighted setting submenu.
- Press the UP or DOWN buttons to navigate the menu, and press the OK button to confirm your selection. You may select from Unlimited, 5 min, 10 Min, 15 Min, 20 Min, 30 Min and 60 Min.
- Press the MENU button to exit the settings menu and return to shooting.
2.4.4 Resolution
This setting sets the video resolution. The higher the resolution, the greater the video quality and the larger the file size of the video recording.
- In Time Lapse (Video) Mode press the MENU button to enter Time Lapse (Video) Settings.
- Use the "W" or "T" buttons to navigate LEFT or RIGHT to access the Time Lapse (Video) submenu. Once selected correctly, you will see Time Lapse (Video) at the top center of the display.
- Select 'Resolution' using the UP or DOWN buttons.
-
Press the OK button to enter the highlighted setting submenu.
-
Press the UP or DOWN buttons to navigate the menu, and press the OK button to confirm your selection. You may select from 5K 30FPS, and 4K 30FPS.
-
Press the MENU button to exit the settings menu and return to shooting.
2.4.5 Image Stabilization
This setting enables capture in high speed and low-light by electronically minimizing motion blur and reducing camera shake.
- In Time Lapse (Video) Mode press the MENU button to enter Time Lapse (Video) Settings.
- Use the "W" or "T" buttons to navigate LEFT or RIGHT to access the Time Lapse (Video) submenu. Once selected correctly, you will see Time Lapse (Video) at the top center of the display.
- Select 'Image Stabilization' using the UP or DOWN buttons.
- Press the OK button to enter the highlighted setting submenu.
- Press the UP or DOWN buttons to navigate the menu, and press the OK button to confirm your selection. You may select from On and Off.
- Press the MENU button to exit the settings menu and return to shooting.
2.4.6 Exposure Compensation
This setting adjusts the frame brightness in your video recordings.
- In Time Lapse (Video) Mode press the MENU button to enter Time Lapse (Video) Settings.
- Use the "W" or "T" buttons to navigate LEFT or RIGHT to access the Time Lapse (Video) submenu. Once selected correctly, you will see Time Lapse (Video) at the top center of the display.
- Select 'Exposure Compensation' using the UP or DOWN buttons.
- Press the OK button to enter the highlighted setting submenu.
- Press the UP or DOWN buttons to navigate the menu, and press the OK button to confirm your selection. You may select from -2.0, -1.0, 0.0, +1.0, and +2.0.
- Press the MENU button to exit the settings menu and return to shooting.
2.4.7 Date Stamp
This setting allows you to imprint a date and/or time stamp onto your captured video files. Once a video is recorded with the imprint, the imprint cannot be removed.
- In Time Lapse (Video) Mode press the MENU button to enter Time Lapse (Video) Settings.
- Use the "W" or "T" buttons to navigate LEFT or RIGHT to access the Time Lapse (Video) submenu. Once selected correctly, you will see Time Lapse (Video) at the top center of the display.
3.. - Select 'Date Stamp' using the UP or DOWN buttons.
- Press the OK button to enter the highlighted setting submenu.
- Press the UP or DOWN buttons to navigate the menu, and press the OK button to confirm your selection. You may select from Off, Date and Date & Time.
- Press the MENU button to exit the settings menu and return to shooting.
Using the Camera – Photo Capture
3.0 Photo Capturing
The MN50WP features 4 separate Photo Capture modes as explained below.

Photo Mode:
This is a standard photo capturing mode. Only one photo can be captured per shutter press.

Self-Timer:
This mode will allow you enable a countdown timer to automatically capture a photo after a set elapsed duration. For example, a “2-second” self-timer setting will automatically capture a photo 2 seconds after pressing the shutter button in this mode.

Photo Burst:
This mode will allow you to enable an automatic capture of multiple photos in sequence determined by the setting. For example, a “5 shots” setting will automatically capture 5 photos in quick sequence or “burst”, after pressing the shutter button in this mode.

Time-Lapse (Photo):
This mode will allow you to enable an automatic capture of photos set by a time interval and duration. There are 2 settings that will determine the “Interval” and “Duration”.
The Interval setting is the amount of time the camera will wait in between each auto capture. For example, an Interval setting of “10 seconds” will set the camera to automatically capture a photo every 10 seconds.
The Duration setting is the amount of time the camera will run the "Time-Lapse (Photo)" program. For example, a Duration setting of "5 Minutes" will run the Time-Lapse (Photo) capture program for 5 minutes and then stop. With an Interval setting of "10 seconds" and a Duration setting of "5 Minutes", the camera will automatically capture a photo every 10 seconds for 5 minutes and then stop automatically. So, with these settings, the camera will capture 30 photos (1 photo every 10 seconds for 5 minutes or 300 seconds total).
3.1 Photo Mode

To enter Photo mode, power the camera on and press the MODE button to access the mode selection screen. Use the UP, DOWN, LEFT and RIGHT buttons to navigate to and highlight the 'Photo' mode. Press the OK button to enter that mode. See below example screenshot. The highlighted mode is Photo mode.
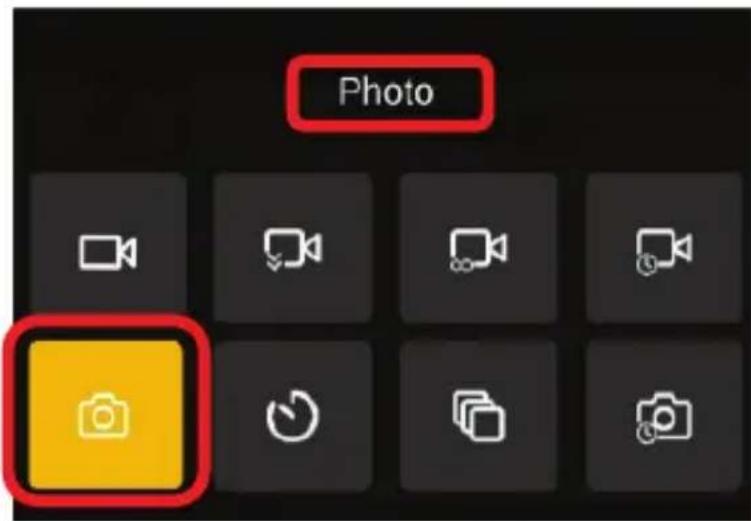
To capture a photo, follow these steps:
- Line up your shot by looking at the LCD monitor to see what is in the shot.
- Hold the camera steady and half-way press the SHUTTER button to auto focus, then fully press the SHUTTER to capture a photo.
When half-pressing the SHUTTER button, the lens will attempt to focus on your intended subject. Once a satisfactory focus is achieved, the monitor will display a green rectangle. You may then fully press the SHUTTER button to the capture the photo. If the monitor displays a red rectangle, then the lens cannot achieve a clear focus and you need to adjust your shooting distance or the photo will capture blurry.

natural_image
Split image showing a swimmer in blue water with a red square highlighting the male's face (no text or symbols)MACRO SHOOTING
Because your camera includes an autofocusing lens, it is also capable of super sharp macro or close-up shots.
To capture a macro or close-up shot, line up your shot by looking at the LCD screen to see what is in the shot. Hold the camera steady with two hands and half-way press the SHUTTER button to auto focus. If the intended subject appears blurry, adjust the distance very slightly and half-way press the SHUTTER button again. Once you are satisfied with the focus and clarify, fully press the SHUTTER to capture a photo.
NOTES
- The number of photos that can be captured at a particular resolution will be displayed at the bottom of the screen.
- The number of remaining photos is determined by the selected photo resolution. The higher the photo resolution setting, the lower the number of photos you are able to be save to the memory card. Before capturing any photos, you can select a preferred photo resolution within the settings menu.
The front selfie LCD monitor can be used to take selfies. Simply press the
MONITOR TOGGLE button and the front LCD screen will turn on. You may then use the camera as normal for a selfie or other shot. Press the MONITOR TOGGLE button again to turn the rear monitor back on.
NOTE: Only one LCD monitor is active at a time. When one of the monitors is off, this is not a malfunction.
3.1.1 Photo Mode Settings Menu
All settings in this MENU will affect the photos being captured in Photo mode. To access this menu, press the menu button. Once in the menu, press the "W" or "T" buttons to toggle between Photo and System submenu settings. The highlighted screenshot below shows Photo mode Settings. The Photo mode icon selected, and "Photo" at the top center is shown.
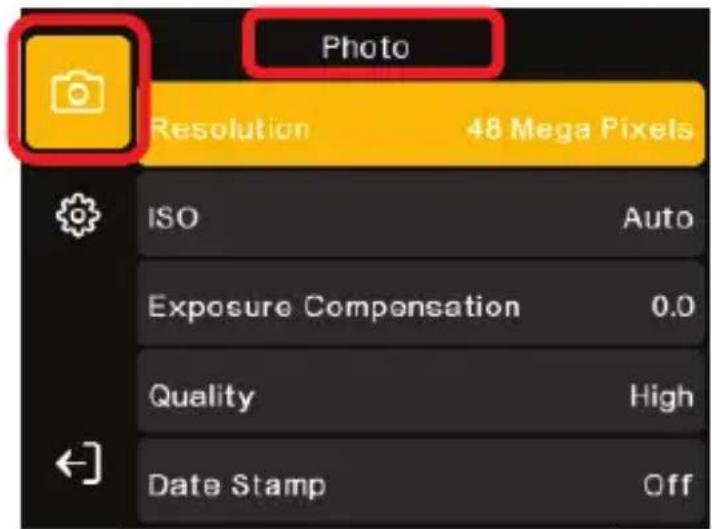
Photo Mode Settings – Page 1
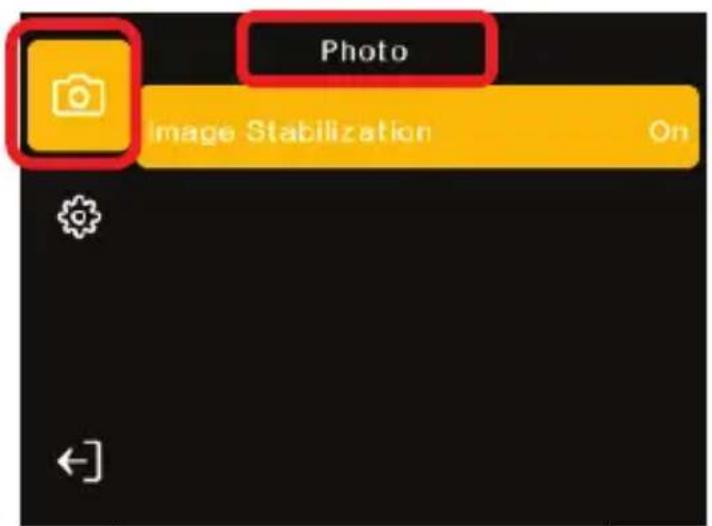
Photo Mode Settings – Page 2
3.1.2 Resolution
This setting sets the photo resolution. The higher the resolution, the greater the photo quality and the larger the file size of the photo.
- In Photo Mode press the MENU button to enter Photo Settings.
- Use the "W" or "T" buttons to navigate LEFT or RIGHT to access the Photo settings submenu. Once selected correctly, you will see Photo at the top center of the display.
- Select 'Resolution' using the UP or DOWN buttons.
- Press the OK button to enter the highlighted setting submenu.
- Press the UP or DOWN buttons to navigate the menu, and press the OK button to confirm your selection. You may select from 48 Mega Pixels, 36 Mega Pixels, 20 Mega Pixels, and 8 Mega Pixels.
- Press the MENU button to exit the settings menu and return to shooting.
3.1.3 ISO
This setting adjusts the light sensitivity in your photograph.
-
In Photo Mode press the MENU button to enter Photo Settings.
-
Use the "W" or "T" buttons to navigate LEFT or RIGHT to access the Photo settings submenu. Once selected correctly, you will see Photo at the top center of the display.
- Select 'ISO' using the UP or DOWN buttons.
- Press the OK button to enter the highlighted setting submenu.
- Press the UP or DOWN buttons to navigate the menu, and press the OK button to confirm your selection. You may select from Auto, ISO 100, ISO 200, ISO 400, ISO 800, ISO 1600 and ISO 3200.
- Press the MENU button to exit the settings menu and return to shooting.
3.1.4 Exposure Compensation
This setting adjusts the frame brightness in your photograph.
- In Photo Mode press the MENU button to enter Photo Settings.
- Use the "W" or "T" buttons to navigate LEFT or RIGHT to access the Photo settings submenu. Once selected correctly, you will see Photo at the top center of the display.
- Select 'Exposure Compensation' using the UP or DOWN buttons.
- Press the OK button to enter the highlighted setting submenu.
- Press the UP or DOWN buttons to navigate the menu, and press the OK button to confirm your selection. You may select from -2.0, -1.0, 0.0, +1.0, and +2.0.
- Press the MENU button to exit the settings menu and return to shooting.
3.1.5 Quality
This setting adjusts the visible detail of a photograph.
- In Photo Mode press the MENU button to enter Photo Settings.
- Use the "W" or "T" buttons to navigate LEFT or RIGHT to access the Photo settings submenu. Once selected correctly, you will see Photo at the top center of the display.
- Select 'Quality' using the UP or DOWN buttons.
- Press the OK button to enter the highlighted setting submenu.
- Press the UP or DOWN buttons to navigate the menu, and press the OK button to confirm your selection. You may select from High, Middle and Low.
- Press the MENU button to exit the settings menu and return to shooting.
3.1.6 Date Stamp
This setting allows you to imprint a date and/or time stamp onto your captured image files. Once an image file is captured with the imprint, the imprint cannot be removed.
- In Photo Mode press the MENU button to enter Photo Settings.
- Use the "W" or "T" buttons to navigate LEFT or RIGHT to access the Photo settings submenu. Once selected correctly, you will see Photo at the top center of the display.
- Select 'Date Stamp' using the UP or DOWN buttons.
- Press the OK button to enter the highlighted setting submenu.
- Press the UP or DOWN buttons to navigate the menu, and press the OK button to confirm your selection. You may select from Off, Date and Date & Time.
- Press the MENU button to exit the settings menu and return to shooting.
3.1.7 Image Stabilization
This setting enables capture in high speed and low-light by electronically minimizing motion blur and reducing camera shake.
- In Photo Mode press the MENU button to enter Photo Settings.
- Use the "W" or "T" buttons to navigate LEFT or RIGHT to access the Photo settings submenu. Once selected correctly, you will see Photo at the top center of the display.
- Select 'Image Stabilization' using the UP or DOWN buttons.
- Press the OK button to enter the highlighted setting submenu.
- Press the UP or DOWN buttons to navigate the menu, and press the OK button to confirm your selection. You may select from On and Off.
- Press the MENU button to exit the settings menu and return to shooting.
3.2 Self-Timer Mode

To enter Self-Timer mode, power the camera on and press the MODE button to access the mode selection screen. Use the UP, DOWN, LEFT and RIGHT buttons to navigate to and highlight the 'Self-Timer' mode. Press the OK button to enter that mode. See below example screenshot. The highlighted mode is Self-Timer mode.
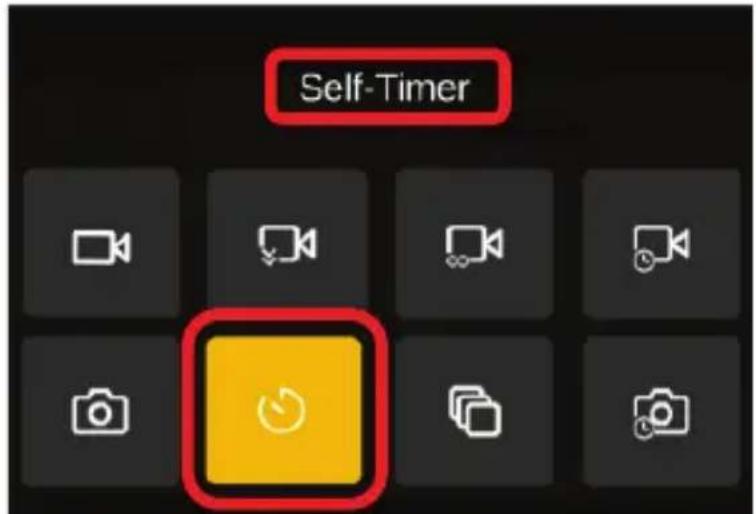
To capture a photo, follow these steps:
- Line up your shot by looking at the LCD monitor to see what is in the shot.
- Hold the camera steady and half-way press the SHUTTER to auto focus, then fully press the SHUTTER to capture a photo.
- The pre-selected timer will begin to count down and will capture a photo once the time has elapsed.
- The number of photos that can be captured at a particular resolution will be displayed at the bottom of the screen.
- The number of remaining photos is determined by the selected photo resolution. The higher the photo resolution setting, the lower the number of photos you are able to be save to the memory card. Before capturing any photos, you can select a preferred photo resolution within the settings menu.
The front selfie LCD monitor can be used to take selfies. Simply press the MONITOR TOGGLE button and the front LCD screen will turn on. You may then use the camera as normal for a selfie or other shot. Press the MONITOR TOGGLE button again to turn the rear monitor back on.
Note: Only one LCD monitor is active at a time. When one of the monitors is off, this is not a malfunction.
3.2.1 Self-Timer Mode Settings Menu
All settings in this MENU will affect the photos being captured in Self-Timer mode. To access this menu, press the menu button. Once in the menu, press the "W" or "T" buttons to toggle between Self-Timer and System submenu settings. The highlighted icon is the current menu selected. The highlighted screenshot below shows Self-Timer mode Settings. The Self-Timer mode icon selected, and "Self-Timer" at the top center is shown.
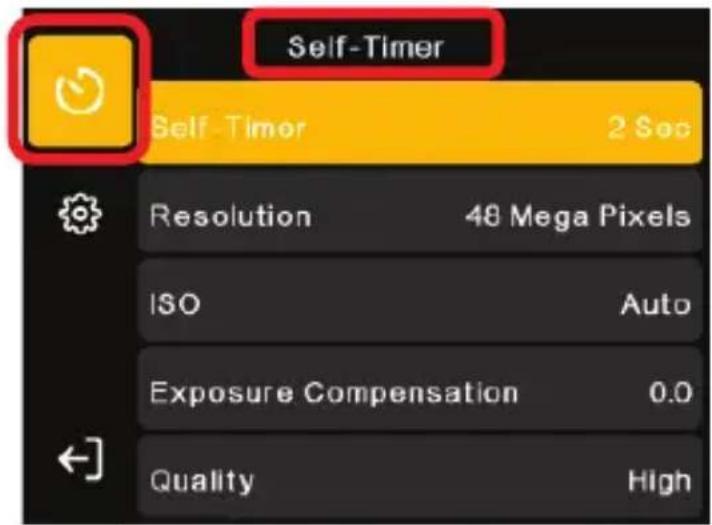
Self Timer Mode Settings – Page 1
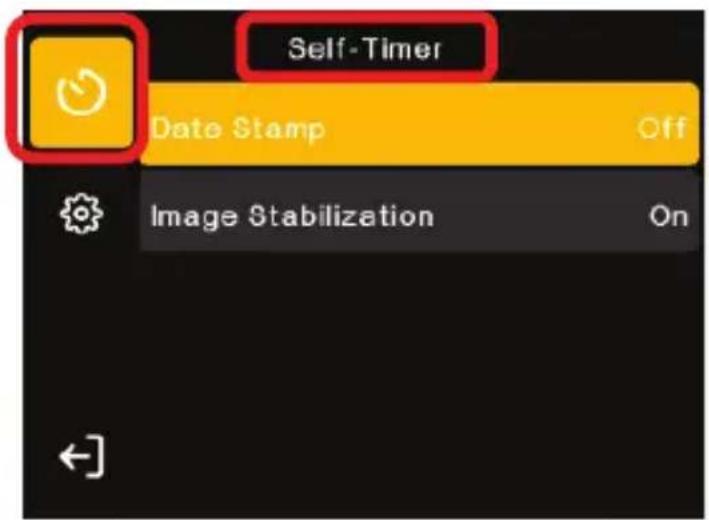
Self Timer Mode Settings – Page 2
3.2.2 Self-Timer Duration
This setting sets the countdown duration for the self-timer capture.
- In Self-Timer Mode press the MENU button to enter Self-Timer Settings.
- Use the "W" or "T" buttons to navigate LEFT or RIGHT to access the Self-Timer settings submenu. Once selected correctly, you will see Self-Timer at the top center of the display.
- Select 'Self-Timer' using the UP or DOWN buttons.
- Press the OK button to enter the highlighted setting submenu.
- Press the UP or DOWN buttons to navigate the menu, and press the OK button to confirm your selection. You may select from 2 Sec, 5 Sec, and 10 Sec. Each setting represents a duration time in seconds.
- Press the MENU button to exit the settings menu and return to shooting.
3.2.3 Resolution
This setting sets the photo resolution. The higher the resolution, the greater the photo quality and the larger the file size of the photo.
- In Self-Timer Mode press the MENU button to enter Photo Settings.
- Use the "W" or "T" buttons to navigate LEFT or RIGHT to access the Self-Timer settings submenu. Once selected correctly, you will see Self-Timer at the top center of the display.
- Select 'Resolution' using the UP or DOWN buttons.
- Press the OK button to enter the highlighted setting submenu.
- Press the UP or DOWN buttons to navigate the menu, and press the OK button to confirm your selection. You may select from 48 Mega Pixels, 36 Mega Pixels, 20 Mega Pixels, and 8 Mega Pixels.
- Press the MENU button to exit the settings menu and return to shooting.
3.2.4 ISO
This setting adjusts the light sensitivity in your photograph.
- In Self-Timer Mode press the MENU button to enter Photo Settings.
- Use the "W" or "T" buttons to navigate LEFT or RIGHT to access the Self-Timer settings submenu. Once selected correctly, you will see Self-Timer at the top center of the display.
- Select 'ISO' using the UP or DOWN buttons.
- Press the OK button to enter the highlighted setting submenu.
- Press the UP or DOWN buttons to navigate the menu, and press the OK button to confirm your selection. You may select from Auto, ISO 100, ISO 200, ISO 400, ISO 800, ISO 1600 and ISO 3200.
- Press the MENU button to exit the settings menu and return to shooting.
3.2.5 Exposure Compensation
This setting adjusts the frame brightness in your photograph.
- In Self-Timer Mode press the MENU button to enter Photo Settings.
- Use the "W" or "T" buttons to navigate LEFT or RIGHT to access the Self-Timer settings submenu. Once selected correctly, you will see Self-Timer at the top center of the display.
- Select 'Exposure Compensation' using the UP or DOWN buttons.
- Press the OK button to enter the highlighted setting submenu.
- Press the UP or DOWN buttons to navigate the menu, and press the OK button
to confirm your selection. You may select from -2.0, -1.0, 0.0, +1.0, and +2.0.
- Press the MENU button to exit the settings menu and return to shooting.
3.2.6 Quality
This setting adjusts the visible detail of a photograph.
- In Self-Timer Mode press the MENU button to enter Photo Settings.
- Use the "W" or "T" buttons to navigate LEFT or RIGHT to access the Self-Timer settings submenu. Once selected correctly, you will see Self-Timer at the top center of the display.
- Select 'Quality' using the UP or DOWN buttons.
- Press the OK button to enter the highlighted setting submenu.
- Press the UP or DOWN buttons to navigate the menu, and press the OK button to confirm your selection. You may select from High, Middle and Low.
- Press the MENU button to exit the settings menu and return to shooting.
3.2.7 Date Stamp
This setting allows you to imprint a date and/or time stamp onto your captured image files. Once an image file is captured with the imprint, the imprint cannot be removed.
- In Self-Timer Mode press the MENU button to enter Photo Settings.
- Use the "W" or "T" buttons to navigate LEFT or RIGHT to access the Self-Timer settings submenu. Once selected correctly, you will see Self-Timer at the top center of the display.
- Select 'Date Stamp' using the UP or DOWN buttons.
- Press the OK button to enter the highlighted setting submenu.
- Press the UP or DOWN buttons to navigate the menu, and press the OK button to confirm your selection. You may select from Off, Date and Date & Time.
- Press the MENU button to exit the settings menu and return to shooting.
3.2.8 Image Stabilization
This setting enables capture in high speed and low-light by electronically minimizing motion blur and reducing camera shake.
- In Photo Mode press the MENU button to enter Photo Settings.
- Use the "W" or "T" buttons to navigate LEFT or RIGHT to access the Photo settings submenu. Once selected correctly, you will see Photo at the top center of the display.
- Select 'Image Stabilization' using the UP or DOWN buttons.
- Press the OK button to enter the highlighted setting submenu.
- Press the UP or DOWN buttons to navigate the menu, and press the OK button to confirm your selection. You may select from On and Off.
- Press the MENU button to exit the settings menu and return to shooting.
3.3 Photo Burst Mode

To enter Photo Burst mode, power the camera on and press the MODE button to access the mode selection screen. Use the UP, DOWN, LEFT and RIGHT buttons to navigate to and highlight the 'Photo Burst' mode. Press the OK button to enter that mode. See below example screenshot. The highlighted mode is Photo Burst mode.
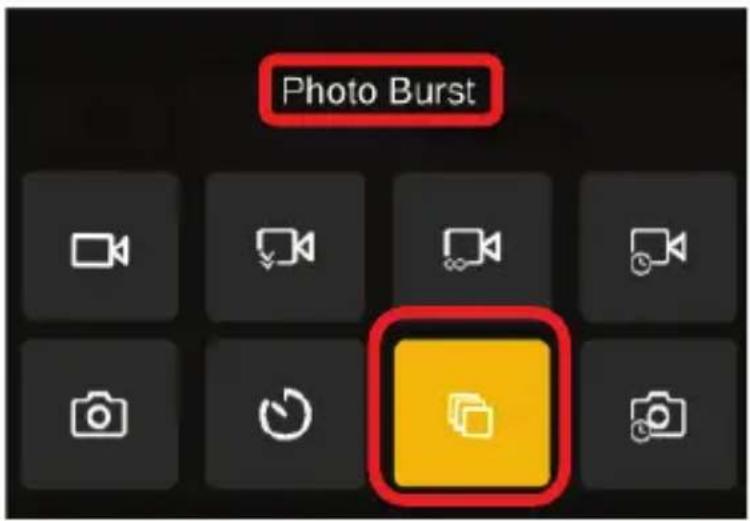
To capture a photo, follow these steps:
- Line up your shot by looking at the LCD monitor to see what is in the shot.
- Hold the camera steady and half-way press the SHUTTER to auto focus, then fully press the SHUTTER to capture a photo.
- The pre-selected Photo Burst setting will begin to capture photos based on the setting. For example, if the setting is "3 Shots", the camera will automatically capture 3 photos in quick sequence or "burst" after pressing the shutter button in this mode.
- The number of photos that can be captured at a particular resolution will be displayed at the bottom of the screen.
- The number of remaining photos is determined by the selected photo resolution. The higher the photo resolution setting, the lower the number of photos you are able to be save to the memory card. Before capturing any photos, you can select a preferred photo resolution within the settings menu.
The front selfie LCD monitor can be used to take selfies. Simply press the MONITOR TOGGLE button and the front LCD screen will turn on. You may then use the camera as normal for a selfie or other shot. Press the MONITOR TOGGLE button again to turn the rear monitor back on.
3.3.1 Photo Burst Mode Settings Menu
All settings in this MENU will affect the photos being captured in Photo Burst mode. To access this menu, press the menu button. Once in the menu, press the "W" or "T" buttons to toggle between Photo Burst and System submenu settings. The highlighted icon is the current menu selected. The highlighted screenshot below shows Photo Burst mode Settings. The Photo Burst mode icon selected, and "Photo Burst" at the top center is shown.
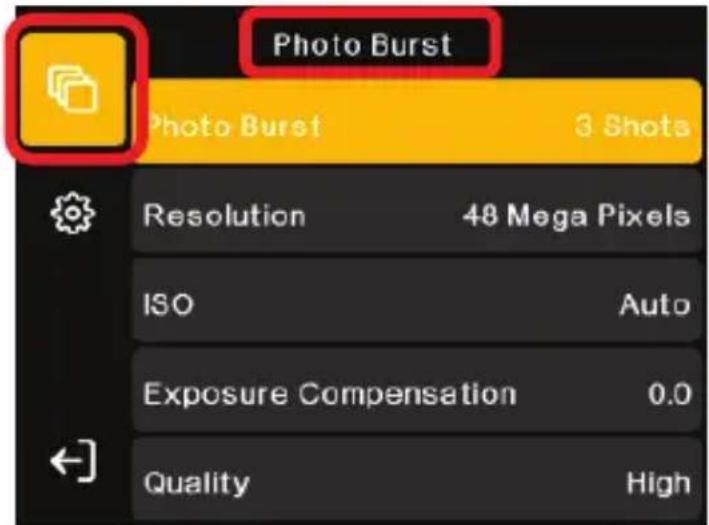
Photo Burst Mode Settings – Page 1
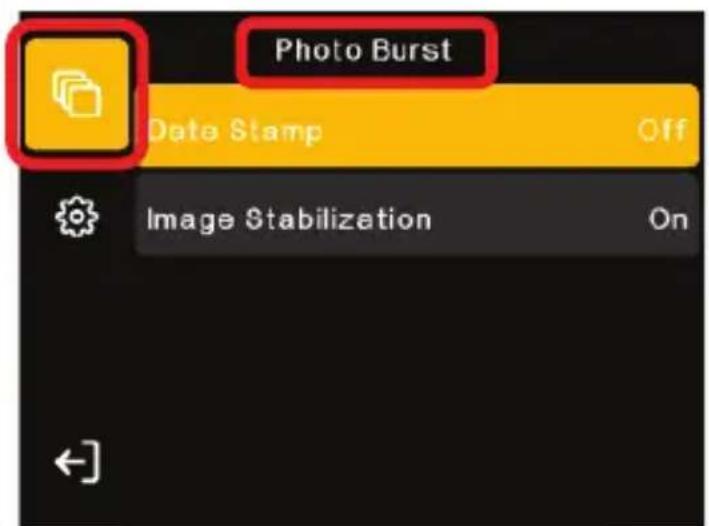
Photo Burst Mode Settings – Page 2
3.3.2 Photo Burst
This setting sets the number of photos captures each time the shutter button is pressed.
- In Photo Burst Mode press the MENU button to enter Photo Burst Settings.
- Use the "W" or "T" buttons to navigate LEFT or RIGHT to access the Photo Burst settings submenu. Once selected correctly, you will see Photo Burst at the top center of the display.
- Select 'Photo Burst' using the UP or DOWN buttons.
- Press the OK button to enter the highlighted setting submenu.
- Press the UP or DOWN buttons to navigate the menu, and press the OK button to confirm your selection. You may select from 3 Shots, 5 Shots, and 10 Shots. Each setting represents how many shots will capture each time the shutter button is full pressed.
- Press the MENU button to exit the settings menu and return to shooting.
3.3.3 Resolution
This setting sets the photo resolution. The higher the resolution, the greater the photo quality and the larger the file size of the photo.
- In Photo Burst Mode press the MENU button to enter Photo Burst Settings.
- Use the "W" or "T" buttons to navigate LEFT or RIGHT to access the Photo Burst settings submenu. Once selected correctly, you will see Photo Burst at the top center of the display.
- Select 'Resolution' using the UP or DOWN buttons.
- Press the OK button to enter the highlighted setting submenu.
- Press the UP or DOWN buttons to navigate the menu, and press the OK button to confirm your selection. You may select from 48 Mega Pixels, 36 Mega Pixels, 20 Mega Pixels, and 8 Mega Pixels.
- Press the MENU button to exit the settings menu and return to shooting.
3.3.4 ISO
This setting adjusts the light sensitivity in your photograph.
- In Photo Burst Mode press the MENU button to enter Photo Burst Settings.
- Use the "W" or "T" buttons to navigate LEFT or RIGHT to access the Photo Burst settings submenu. Once selected correctly, you will see Photo Burst at the top center of the display.
- Select 'ISO' using the UP or DOWN buttons.
- Press the OK button to enter the highlighted setting submenu.
- Press the UP or DOWN buttons to navigate the menu, and press the OK button to confirm your selection. You may select from Auto, ISO 100, ISO 200, ISO 400, ISO 800, ISO 1600 and ISO 3200.
- Press the MENU button to exit the settings menu and return to shooting.
3.3.5 Exposure Compensation
This setting adjusts the frame brightness in your photograph.
- In Photo Burst Mode press the MENU button to enter Photo Burst Settings.
- Use the "W" or "T" buttons to navigate LEFT or RIGHT to access the Photo Burst settings submenu. Once selected correctly, you will see Photo Burst at the top center of the display.
- Select 'Exposure Compensation' using the UP or DOWN buttons.
- Press the OK button to enter the highlighted setting submenu.
- Press the UP or DOWN buttons to navigate the menu, and press the OK button
to confirm your selection. You may select from -2.0, -1.0, 0.0, +1.0, and +2.0.
- Press the MENU button to exit the settings menu and return to shooting.
3.3.6 Quality
This setting adjusts the visible detail of a photograph.
- In Photo Burst Mode press the MENU button to enter Photo Burst Settings.
- Use the "W" or "T" buttons to navigate LEFT or RIGHT to access the Photo Burst settings submenu. Once selected correctly, you will see Photo Burst at the top center of the display.
- Select 'Quality' using the UP or DOWN buttons.
- Press the OK button to enter the highlighted setting submenu.
- Press the UP or DOWN buttons to navigate the menu, and press the OK button to confirm your selection. You may select from High, Middle and Low.
- Press the MENU button to exit the settings menu and return to shooting.
3.3.7 Date Stamp
This setting allows you to imprint a date and/or time stamp onto your captured image files. Once an image file is captured with the imprint, the imprint cannot be removed.
- In Photo Burst Mode press the MENU button to enter Photo Burst Settings.
- Use the "W" or "T" buttons to navigate LEFT or RIGHT to access the Photo Burst settings submenu. Once selected correctly, you will see Photo Burst at the top center of the display.
- Select 'Date Stamp' using the UP or DOWN buttons.
- Press the OK button to enter the highlighted setting submenu.
- Press the UP or DOWN buttons to navigate the menu, and press the OK button to confirm your selection. You may select from Off, Date and Date & Time. Press the MENU button to exit the settings menu and return to shooting.
3.3.8 Image Stabilization
This setting enables capture in high speed and low-light by electronically minimizing motion blur and reducing camera shake.
- In Photo Mode press the MENU button to enter Photo Burst Settings.
- Use the "W" or "T" buttons to navigate LEFT or RIGHT to access the Photo Burst settings submenu. Once selected correctly, you will see Photo Burst at the top center of the display.
- Select 'Image Stabilization' using the UP or DOWN buttons.
- Press the OK button to enter the highlighted setting submenu.
- Press the UP or DOWN buttons to navigate the menu, and press the OK button to confirm your selection. You may select from On and Off.
- Press the MENU button to exit the settings menu and return to shooting.
3.4 Time Lapse (Photo) Mode

To enter Time Lapse (Photo) mode, power the camera on and press the MODE button to access the mode selection screen. Use the UP, DOWN, LEFT and RIGHT buttons to navigate to and highlight the 'Time Lapse (Photo) mode. Press the OK button to enter that mode. See below example screenshot. The highlighted mode is Time Lapse (Photo) mode.
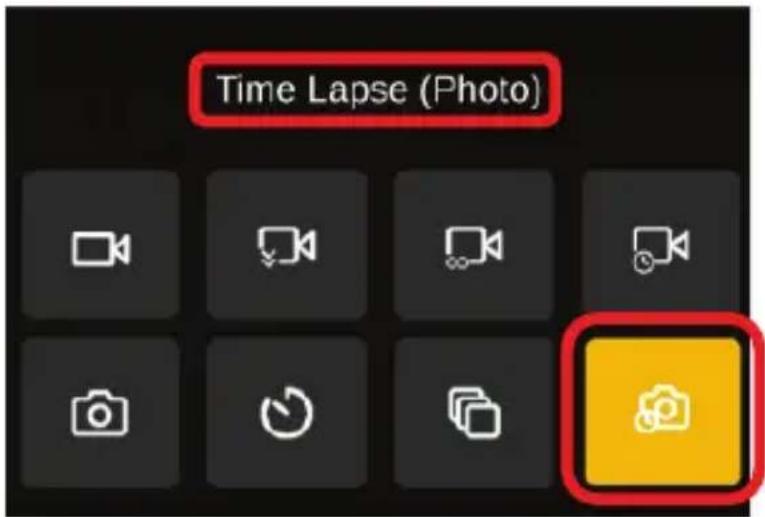
To capture a photo, follow these steps:
- Line up your shot by looking at the LCD monitor to see what is in the shot.
- Hold the camera steady and half-way press the SHUTTER to auto focus, then fully press the SHUTTER to capture a photo.
- The 2 pre-selected Interval and Duration settings will begin to capture photos based on these 2 settings. With an Interval setting of "10 seconds" and a Duration setting of "5 Minutes", the camera will automatically capture a photo every 10 seconds for 5 minutes, and then stop automatically.
- The number of photos that can be captured at a particular resolution will be displayed at the bottom of the screen.
The front selfie LCD monitor can be used to take selfies. Simply press the MONITOR TOGGLE button and the front LCD screen will turn on. You may then use the camera as normal for a selfie or other shot. Press the MONITOR TOGGLE button again to turn the rear monitor back on.
Note: Only one LCD monitor is active at a time. When one of the monitors is off, this is not a malfunction.
3.4.1 Time Lapse (Photo) Settings Menu
All settings in this MENU will affect the photos being captured in Time Lapse (Photo) mode. To access this menu, press the menu button. Once in the menu, press the "W" or "T" buttons to toggle between Time Lapse (Photo) and System submenu settings. The highlighted icon is the current menu selected. The highlighted screenshot below shows Time Lapse (Photo) mode Settings. The Time Lapse (Photo) mode icon selected, and "Time Lapse (Photo)" at the top center is shown.
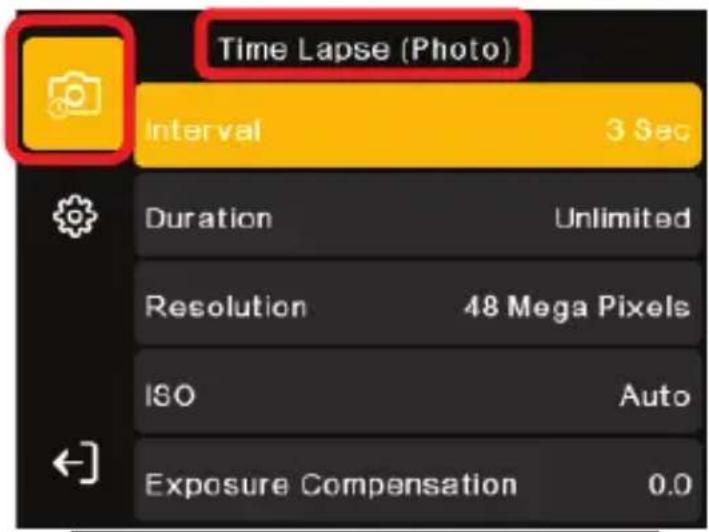
Time Lapse (Photo) Mode Settings – Page 1
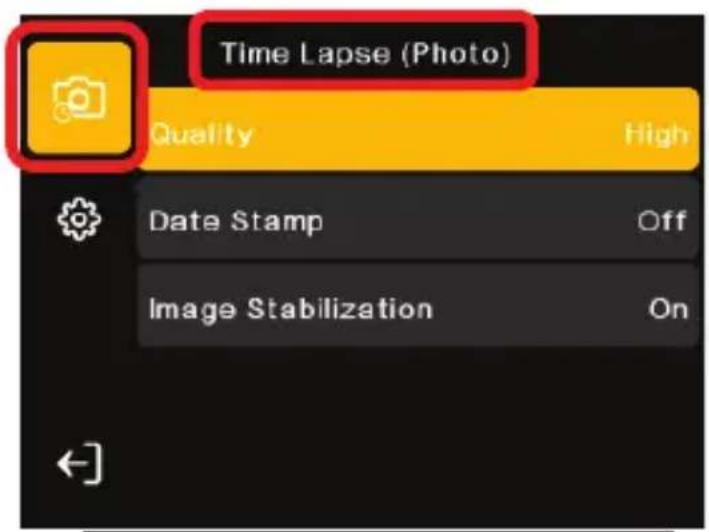
Time Lapse (Photo) Mode Settings – Page 2
3.4.2 Interval
This setting is the amount of time the camera will wait between each photo capture. For example, an Interval setting of "10 seconds" will set the camera to automatically capture a photo every 10 seconds.
- In Time Lapse (Photo) Mode press the MENU button to enter Time Lapse (Photo) Settings.
- Use the "W" or "T" buttons to navigate LEFT or RIGHT to access the Time Lapse (Photo) submenu. Once selected correctly, you will see Time Lapse (Photo) at the top center of the display.
- Select 'Interval' using the UP or DOWN buttons.
- Press the OK button to enter the highlighted setting submenu.
- Press the UP or DOWN buttons to navigate the menu, and press the OK button to confirm your selection. You may select from 3 Sec, 5 Sec, 10 Sec, 30 Sec, and 1 Min. Each setting represents the amount of time the camera will wait between each photo capture.
- Press the MENU button to exit the settings menu and return to shooting.
3.4.3 Duration
This setting is the amount of time the camera will run the Time-Lapse program. For example, a Duration setting of "5 Minutes" will run the Time-Lapse capture program for 5 minutes and then stop.
-
In Time Lapse (Photo) Mode press the MENU button to enter Time Lapse (Photo) Settings.
-
Use the "W" or "T" buttons to navigate LEFT or RIGHT to access the Time Lapse (Photo) submenu. Once selected correctly, you will see Time Lapse (Photo) at the top center of the display.
-
Select 'Duration' using the UP or DOWN buttons.
-
Press the OK button to enter the highlighted setting submenu.
-
Press the UP or DOWN buttons to navigate the menu, and press the OK button to confirm your selection. You may select from Unlimited, 5 min, 10 Min, 15 Min, 20 Min, 30 Min and 60 Min. Each setting represents how long the camera will automatically capture photos based on the set interval.
-
Press the MENU button to exit the settings menu and return to shooting.
3.4.4 Resolution
This setting sets the photo resolution. The higher the resolution, the greater the photo quality and the larger the file size of the photo.
-
In Time Lapse (Photo) Mode press the MENU button to enter Time Lapse (Photo) Settings.
-
Use the "W" or "T" buttons to navigate LEFT or RIGHT to access the Time Lapse (Photo) submenu. Once selected correctly, you will see Time Lapse (Photo) at the top center of the display.
-
Select 'Resolution' using the UP or DOWN buttons.
-
Press the OK button to enter the highlighted setting submenu.
-
Press the UP or DOWN buttons to navigate the menu, and press the OK button to confirm your selection. You may select from 48 Mega Pixels, 36 Mega Pixels, 20 Mega Pixels, and 8 Mega Pixels.
-
Press the MENU button to exit the settings menu and return to shooting.
3.4.5 ISO
This setting adjusts the light sensitivity in your photograph.
-
In Time Lapse (Photo) Mode press the MENU button to enter Time Lapse (Photo) Settings.
-
Use the "W" or "T" buttons to navigate LEFT or RIGHT to access the Time Lapse (Photo) submenu. Once selected correctly, you will see Time Lapse (Photo) at the top center of the display.
-
Select 'ISO' using the UP or DOWN buttons.
-
Press the OK button to enter the highlighted setting submenu.
-
Press the UP or DOWN buttons to navigate the menu, and press the OK button to confirm your selection. You may select from Auto, ISO 100, ISO 200, ISO 400, ISO 800, ISO 1600 and ISO 3200.
-
Press the MENU button to exit the settings menu and return to shooting.
3.4.6 Exposure Compensation
This setting adjusts the frame brightness in your photograph.
-
In Time Lapse (Photo) Mode press the MENU button to enter Time Lapse (Photo) Settings.
-
Use the "W" or "T" buttons to navigate LEFT or RIGHT to access the Time Lapse (Photo) submenu. Once selected correctly, you will see Time Lapse (Photo) at the top center of the display.
-
Select 'Exposure Compensation' using the UP or DOWN buttons.
-
Press the OK button to enter the highlighted setting submenu.
-
Press the UP or DOWN buttons to navigate the menu, and press the OK button to confirm your selection. You may select from -2.0, -1.0, 0.0, +1.0, and +2.0.
-
Press the MENU button to exit the settings menu and return to shooting.
3.4.7 Quality
This setting adjusts the visible detail of a photograph.
-
In Time Lapse (Photo) Mode press the MENU button to enter Time Lapse (Photo) Settings.
-
Use the "W" or "T" buttons to navigate LEFT or RIGHT to access the Time Lapse (Photo) submenu. Once selected correctly, you will see Time Lapse (Photo) at the top center of the display.
-
Select 'Quality' using the UP or DOWN buttons.
-
Press the OK button to enter the highlighted setting submenu.
-
Press the UP or DOWN buttons to navigate the menu, and press the OK button to confirm your selection. You may select from High, Middle and Low.
-
Press the MENU button to exit the settings menu and return to shooting.
3.4.8 Date Stamp
This setting allows you to imprint a date and/or time stamp onto your captured image files. Once an image file is captured with the imprint, the imprint cannot be removed.
- In Time Lapse (Photo) Mode press the MENU button to enter Time Lapse (Photo) Settings.
- Use the "W" or "T" buttons to navigate LEFT or RIGHT to access the Time Lapse (Photo) submenu. Once selected correctly, you will see Time Lapse (Photo) at the top center of the display.
- Select 'Date Stamp' using the UP or DOWN buttons.
- Press the OK button to enter the highlighted setting submenu.
- Press the UP or DOWN buttons to navigate the menu, and press the OK button to confirm your selection. You may select from Off, Date and Date & Time. Press the MENU button to exit the settings menu and return to shooting.
3.4.9 Image Stabilization
This setting enables capture in high speed and low-light by electronically minimizing motion blur and reducing camera shake.
- In Photo Mode press the MENU button to enter Time Lapse (Photo) Settings.
- Use the "W" or "T" buttons to navigate LEFT or RIGHT to access the Time Lapse (Photo) settings submenu. Once selected correctly, you will see Time Lapse (Photo) at the top center of the display.
- Select 'Image Stabilization' using the UP or DOWN buttons.
- Press the OK button to enter the highlighted setting submenu.
- Press the UP or DOWN buttons to navigate the menu, and press the OK button to confirm your selection. You may select from On and Off.
- Press the MENU button to exit the settings menu and return to shooting.
System Settings
4.0 System Settings Menu
All settings in this menu will affect the all photos and videos being captured. To access this menu, press the menu button. Once in the menu, press the "W" or "T" buttons to toggle between Photo (or other modes) and System submenu settings. See below example screenshot. The highlighted menu and icon selected is System.
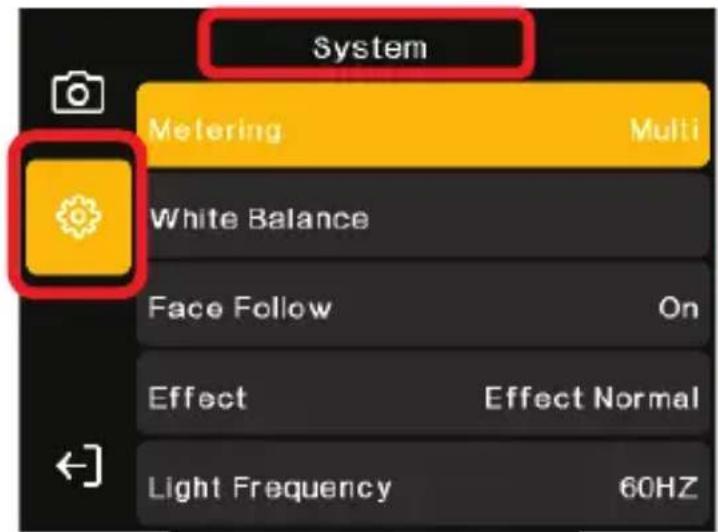
System Settings – Page 1
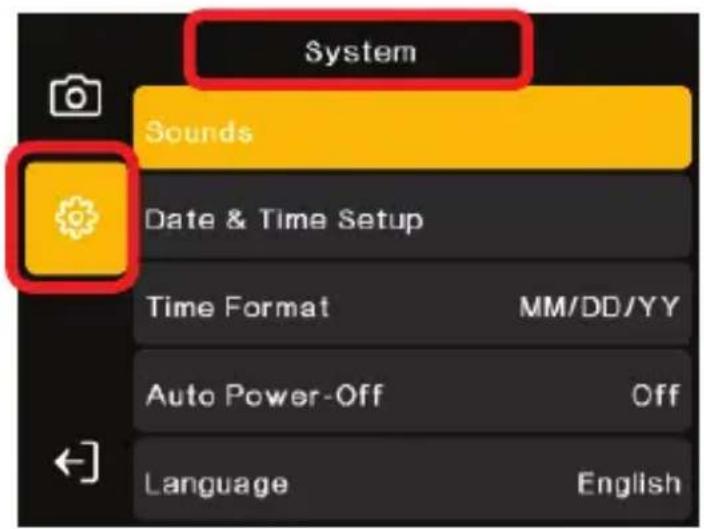
System Settings – Page 2
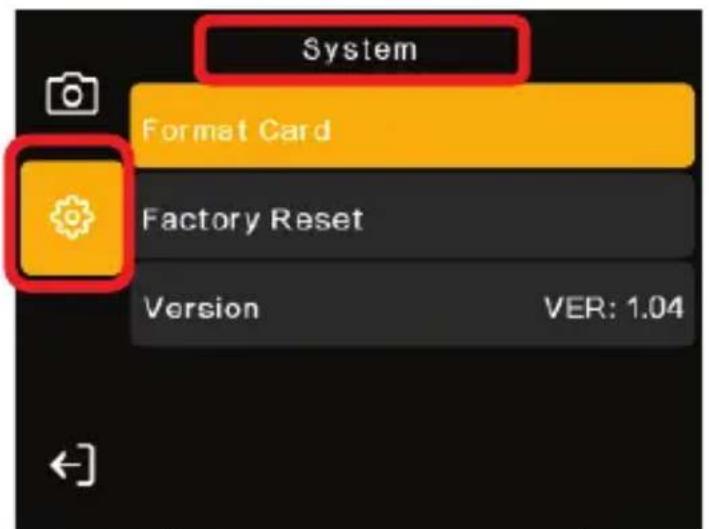
System Settings – Page 3
4.1 Metering
Metering mode refers to the way in which a camera determines the appropriate exposure (quantity of light reaching the camera lens). Spot metering will only base the exposure setting on a very small area of the scene. Center metering will use the light from the center of the monitor.
- In any capture mode press the MENU button.
- Use the "W" or "T" buttons to navigate LEFT or RIGHT to access the System submenu. Once selected correctly, you will see System at the top center of the display.
- Once in the secondary submenu, select 'Metering' using the UP or DOWN buttons.
- Press the OK button to enter the highlighted setting submenu.
- Press the UP or DOWN buttons to navigate the menu, and press the OK button to confirm your selection. You may select from Center, Multi and Spot.
- Press the MENU button to exit the settings menu and return to shooting.
4.2 White Balance
White Balance changes the color of light in your pictures, making it seem warmer or cooler depending on how the light you're shooting in affects the frame.
- In any capture mode press the MENU button.
- Use the "W" or "T" buttons to navigate LEFT or RIGHT to access the System submenu. Once selected correctly, you will see System at the top center of the display.
- Once in the secondary submenu, select 'White Balance' using the UP or DOWN buttons.
- Press the OK button to enter the highlighted setting submenu.
- Press the UP or DOWN buttons to navigate the menu, and press the OK button to confirm your selection. You may select from Auto, Daylight, Cloudy, Tungsten Light, Fluorescent (H), and Fluorescent (L).
- Press the MENU button to exit the settings menu and return to shooting.
4.3 Face Follow
Face Follow detects faces in a scene and optimizes the scenery color and focus for optimum clarity and hue.
-
In any capture mode press the MENU button.
-
Use the "W" or "T" buttons to navigate LEFT or RIGHT to access the System submenu. Once selected correctly, you will see System at the top center of the display.
- Once in the secondary submenu, select 'Face Follow' using the UP or DOWN buttons.
- Press the OK button to enter the highlighted setting submenu.
- Press the UP or DOWN buttons to navigate the menu, and press the OK button to confirm your selection. You may select from On and Off.
- Press the MENU button to exit the settings menu and return to shooting.
4.4 Effect
This function sets the color filter effect of the photo or video being captured.
- In any capture mode press the MENU button.
- Use the "W" or "T" buttons to navigate LEFT or RIGHT to access the System submenu. Once selected correctly, you will see System at the top center of the display.
- Once in the secondary submenu, select 'Effect' using the UP or DOWN buttons.
- Press the OK button to enter the highlighted setting submenu.
- Press the UP or DOWN buttons to navigate the menu, and press the OK button to confirm your selection. You may select from Effect Normal, B&W, Natural, Negative, Warm, and Contrast (H).
- Press the MENU button to exit the settings menu and return to shooting.
4.5 Light Frequency
This function sets the light frequency of the camera from 50Hz to 60Hz. Check the frequency of your geographical region and set accordingly.
- In any capture mode press the MENU button.
- Use the "W" or "T" buttons to navigate LEFT or RIGHT to access the System submenu. Once selected correctly, you will see System at the top center of the display.
- Once in the secondary submenu, select 'Light Frequency' using the UP or DOWN buttons.
- Press the OK button to enter the highlighted setting submenu.
- Press the UP or DOWN buttons to navigate the menu, and press the OK button to confirm your selection. You may select from 50Hz and 60Hz.
- Press the MENU button to exit the settings menu and return to shooting.
4.6 Sounds
This function allows to set sounds emitted by the camera during various functions. You can enable, disable and set the volume level of the Shutter sounds and Button Press (beep) sounds.
- In any capture mode press the MENU button.
- Use the "W" or "T" buttons to navigate LEFT or RIGHT to access the System submenu. Once selected correctly, you will see System at the top center of the display.
- Once in the secondary submenu, select 'Sounds' using the UP or DOWN buttons.
- Press the OK button to enter the highlighted setting submenu.
- Press the UP or DOWN buttons to navigate the menu, and press the OK button to confirm your selection for each setting of Shutter, Beep, and Volume.
- Press the MENU button twice to exit the settings menu and return to shooting.
4.7 Date & Time Setup
This menu allows to set the date and time for the camera's system.
- In any capture mode press the MENU button.
- Use the "W" or "T" buttons to navigate LEFT or RIGHT to access the System submenu. Once selected correctly, you will see System at the top center of the display.
- Once in the secondary submenu, select 'Date & Time Setup' using the UP or DOWN buttons.
- Press the OK button to enter the highlighted setting submenu.
- Press the UP or DOWN buttons to adjust each value. To continue to the next field, press the "W" or "T" buttons to navigate LEFT or RIGHT. Once you are satisfied with the date and time, press the OK button to save your selection.
- Press the MENU button twice to exit the settings menu and return to shooting.
4.8 Time Format
This menu allows to set the date format for camera's system.
- In any capture mode press the MENU button.
-
Use the "W" or "T" buttons to navigate LEFT or RIGHT to access the System submenu. Once selected correctly, you will see System at the top center of the display.
-
Once in the secondary submenu, select 'Time Format' using the UP or DOWN buttons.
- Press the OK button to enter the highlighted setting submenu.
- Press the UP or DOWN buttons to navigate the menu, and press the OK button to confirm your selection. You may select from YY/MM/DD, MM/DD/YY, and DD/MM/YY.
- Press the MENU button twice to exit the settings menu and return to shooting.
4.9 Auto Power-Off
This menu sets the duration of time in which the camera will wait with no user input before automatically powering off.
- In any capture mode press the MENU button.
- Use the "W" or "T" buttons to navigate LEFT or RIGHT to access the System submenu. Once selected correctly, you will see System at the top center of the display.
- Once in the secondary submenu, select 'Auto Power-Off' using the UP or DOWN buttons.
- Press the OK button to enter the highlighted setting submenu.
- Press the UP or DOWN buttons to navigate the menu, and press the OK button to confirm your selection. You may select from Off, 1 Min, 3 Min, and 5 Min.
- Press the MENU button twice to exit the settings menu and return to shooting.
4.10 Language
This menu sets the system wide display language in the menus and interface.
- In any capture mode press the MENU button.
- Use the "W" or "T" buttons to navigate LEFT or RIGHT to access the System submenu. Once selected correctly, you will see System at the top center of the display.
- Once in the secondary submenu, select 'Language' using the UP or DOWN buttons.
- Press the OK button to enter the highlighted setting submenu.
- Press the UP or DOWN buttons to navigate the menu, and press the OK button to confirm your selection.
- Press the MENU button twice to exit the settings menu and return to shooting.
4.11 Format Card
The format setting erases all photos, videos and data stored on your memory card.
Warning: this cannot be undone.
- In any capture mode press the MENU button.
- Use the "W" or "T" buttons to navigate LEFT or RIGHT to access the System submenu. Once selected correctly, you will see System at the top center of the display.
- Once in the secondary submenu, select 'Format Card' using the UP or DOWN buttons.
- Press the OK button to enter the highlighted setting submenu.
- Press the UP or DOWN buttons to navigate the menu, and press the OK button to confirm your selection. A ‘completed’ message will display once formatting is completed.
- Press the MENU button twice to exit the settings menu and return to shooting.
4.12 Factory Reset
Factory default settings can be restored in this menu. This function will not delete the media stored on the memory card, and will only restore all of the menu's setting back to factory default settings
- In any capture mode press the MENU button.
- Use the "W" or "T" buttons to navigate LEFT or RIGHT to access the System submenu. Once selected correctly, you will see System at the top center of the display.
- Once in the secondary submenu, select 'Factory Reset' using the UP or DOWN buttons.
- Press the OK button to enter the highlighted setting submenu.
- Press the UP or DOWN buttons to navigate the menu, and press the OK button to confirm your selection.
- Press the MENU button twice to exit the settings menu and return to shooting.
4.13 Version
This submenu displays the firmware version of the current system. This informational only and no settings cannot be accessed or changed here.
5.0 Playback Mode
To enter Playback mode, power the camera on and press the MODE button twice. You will immediately be shown the most recently captured photo or recorded video file. To exit Playback mode at any time, press the MODE button again.
- Press the “W” or “T” as LEFT or RIGHT to access and scroll though all of your stored captures.
- Press the MENU button to access settings for the highlighted file. Here, you can Delete, Rotate, or Protect your file. Use the UP or DOWN buttons to navigate the menu, and press the OK button to confirm your selection.
- Press the ↗ button to show or hide the file's informational details.
- Press the 📊 button to delete a file. You will be prompted with a Yes or No selection. Press the OK button to confirm selection.
- While viewing a recorded video, press the OK button to start playing the video, and press the OK button again to pause the video. To stop the video, press the MENU button to exit playback and continue cycling through your other captures.
- To play back all of your media into a slide show, press the MENU button and use the UP or DOWN buttons to navigate the 'Slide Show' option. Press the OK button to confirm enter the submenu, and press the OK button to select from either 2 Sec or 5 Sec. The slide show will begin immediately. Press the MENU button again to stop the slide show.
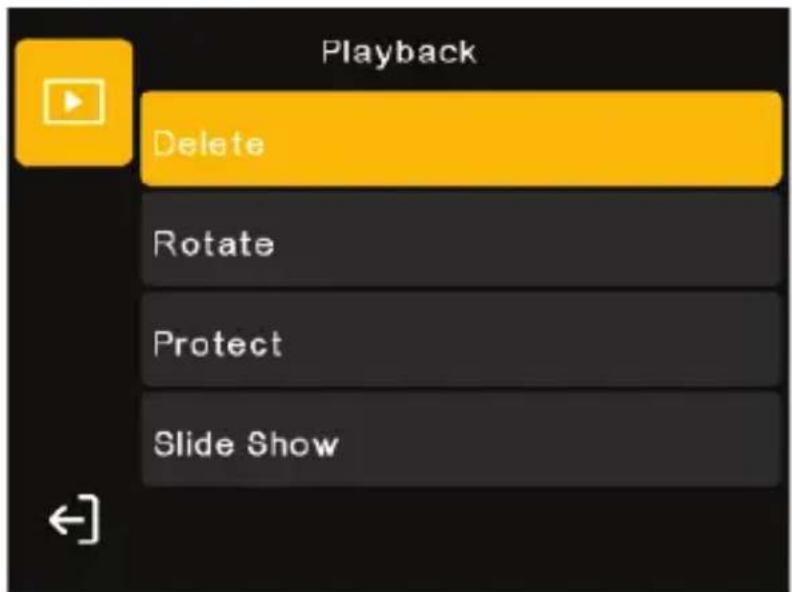
Playback Mode Menu Options
6.0 Technical Specifications
| Model Number | Minolta MN50WP |
| Lens | Auto Focus • f=3.37mm • F/2.2 • 75° Field of View |
| Zoom | 16X Digital Zoom |
| Image Sensor | 12MP CMOS Sensor |
| Shutter | Electronic • Digital Image Stabilization |
| Pixels (photo) | JPEG: 48 Mega Pixels • 36 Mega Pixels • 20 Mega Pixels • 8 Mega Pixels |
| Pixels (video) | MP4: 5K (30FPS) • 4K (30FPS) • 1080P (120FPS) • 1080P (60FPS) • 720P (240FPS) |
| ISO Sensitivity | Auto • 100 • 200 • 400 • 800 • 1600 • 3200 |
| LCD Monitor | Rear: 2.8” IPS HD LCD |
| Front: 1.7” IPS HD LCD | |
| Assistive Light | White LED (Continuous) |
| IPX Rating | IP68 - Up to 13 feet (4 meters) Waterproof Floatable |
| Power Saving | OFF • 1 Minute • 3 Minutes • 5 Minutes |
| White Balance Control | Auto • Daylight • Cloudy • Tungsten Light • Fluorescent (H) • Fluorescent (L) |
| Special Features | Slow-Motion Recording • Loop Recording • Photo Burst • Time Lapse • PC Camera Mode • Face Follow |
| Color Effects | Normal • Black and White • Negative • Natural • Warm • Contrast (H) |
| Recording Media | MicroSD • MicroSDXC; Maximum: 256GB |
| I/O Ports | Micro USB • Microphone (built-in MIC) • Speaker |
| Power | Lithium-Ion 3.7V, 800mAh (NP-6L) |
| Dimensions | 4.13 x 2.62 x 1.03 in. • 4.9 oz. |

MINOLTA®
Minolta is a registered trademark of JMM Lee Properties, LLC and is used in the United States by Elite Brands Inc. under license.
40 Wall Street, 61st Floor, New York, NY 10005 USA
www.minoltadigital.com • www.elitebrands.com
Copyright © 2024 Elite Brands Inc.


MINOLTA®
MN50WP
- Table of Contents
- Introduction
- About this Manual:
- Copyright:
- Federal Communications Commission Interference Statement:
- Caution:
- RF Exposure Warning:
- CE Mark Warning:
- Camera Information:
- Battery Information:
- USB Adaptor Information:
- Waterproof and Dustproof Information:
- Before Using the Camera Underwater:
- Notes about Opening and Closing the Battery Door:
- Precautions When Cleaning:
- Do Not Apply Strong Impact to the Camera:
- Avoid Sudden Changes in Temperature:
- Keep Away from Strong Magnetic Fields:
- Do Not Point the Lens at Strong Light Sources for Extended Periods:
- Power the Product Off before Removing or Disconnecting the Power Source or Memory Card:
- Notes about the LCD Screen:
- Charging the Battery:
- Using the Battery When Cold:
- Recycling Used Batteries:
- Cleaning After Using the Camera Underwater:
- Cleaning After Using the Camera in Conditions Other than Underwater:
- Storage
- Getting Started
- Buttons and Operation
- First Use
- Camera Features
- Common Uses:
- Operating Battery Door
- Installing the Battery
- Installing the Memory Card
- NOTE:
- Charging the Battery
- Closing and Locking the Battery Door
- Powering the Camera On and Off
- Switching Modes
- Using the Zoom Function
- LED Assistive Light
- Using the Front Selfie Monitor
- Connecting to a Computer
- Display Icons
- Using the Camera – Video Recording
- Video Recording
- Video Mode:
- Slow-Motion:
- Loop Recording:
- Time-Lapse (Video):
- Video Mode
- Video Mode Settings Menu
- Resolution
- Image Stabilization
- Exposure Compensation
- Date Stamp
- Slow Motion Mode
- Slow Motion Mode Settings Menu
- Resolution
- Exposure Compensation
- Date Stamp
- Loop Recording Mode
- Loop Recording Settings Menu
- Video File Length
- Resolution
- Image Stabilization
- Exposure Compensation
- Date Stamp
- Time Lapse (Video) Mode
- Time Lapse (Video) Settings Menu
- Interval
- Duration
- Resolution
- Image Stabilization
- Exposure Compensation
- Date Stamp
- Using the Camera – Photo Capture
- Photo Capturing
- Photo Mode:
- Self-Timer:
- Photo Burst:
- Time-Lapse (Photo):
- Photo Mode
- MACRO SHOOTING
- NOTES
- Photo Mode Settings Menu
- Resolution
- ISO
- Exposure Compensation
- Quality
- Date Stamp
- Image Stabilization
- Self-Timer Mode
- Self-Timer Mode Settings Menu
- Self-Timer Duration
- Resolution
- ISO
- Exposure Compensation
- Quality
- Date Stamp
- Image Stabilization
- Photo Burst Mode
- Photo Burst Mode Settings Menu
- Photo Burst
- Resolution
- ISO
- Exposure Compensation
- Quality
- Date Stamp
- Image Stabilization
- Time Lapse (Photo) Mode
- Time Lapse (Photo) Settings Menu
- Interval
- Duration
- Resolution
- ISO
- Exposure Compensation
- Quality
- Date Stamp
- Image Stabilization
- System Settings
- System Settings Menu
- Metering
- White Balance
- Face Follow
- Effect
- Light Frequency
- Sounds
- Date & Time Setup
- Time Format
- Auto Power-Off
- Language
- Format Card
- Factory Reset
- Version
- Playback Mode
- MINOLTA®
- MN50WP
Brand : MINOLTA
Model : MN50WP
Category : Camera