
RP4-NI13 - Air conditioner PAC - Free user manual and instructions
Find the device manual for free RP4-NI13 PAC in PDF.


| Product Type | Portable Air Conditioner |
| Brand | PAC |
| Model | RP4-NI13 |
| Cooling Capacity | 12000 BTU/h (3.5 kW) |
| Power Supply | 220-240 V ~ 50/60 Hz |
| Rated Power Input | 1500 W |
| Air Flow | 400 m³/h |
| Dimensions (W x D x H) | 700 x 450 x 350 mm |
| Weight | 25 kg |
| Refrigerant | R32 |
| Noise Level (High/Low) | 55 dB(A) / 48 dB(A) |
| Operating Modes | Cool, Fan, Dehumidify |
| Timer | 24-hour programmable |
| Remote Control | Yes, included |
| Filter | Washable mesh filter |
| Installation Kit | Window kit included |
| Drainage | Continuous drain option |
| Energy Efficiency Class | A+ |
| Safety Features | Overheat protection, auto restart, child lock |
| Maintenance | Clean filter every 2 weeks |
| Spare Parts | Filter, remote control, drain hose, window kit |
| Warranty | 2 years |
Frequently Asked Questions - RP4-NI13 PAC
User questions about RP4-NI13 PAC
0 question about this device. Answer the ones you know or ask your own.
Ask a new question about this device
Download the instructions for your Air conditioner in PDF format for free! Find your manual RP4-NI13 - PAC and take your electronic device back in hand. On this page are published all the documents necessary for the use of your device. RP4-NI13 by PAC.
USER MANUAL RP4-NI13 PAC
Introduction and Features
The RP4-NI13 interface allows the replacement of a factory radio in select Nissan vehicles with MSCAN databus radios. Using this interface will retain factory features, such as steering wheel controls (SWC), reverse camera, and the factory amplifier, when the original radio is removed. Use of this interface also allows you to program two radio functions to each SWC button by using short press, long press dual command functionality. The RP4-NI13 also provides outputs such as vehicle speed sensor (VSS), illumination and *reverse trigger.
Important Notes
- These instructions apply to R.1.5.1.4 or later revisions. The revision info can be found on a small white sticker on the interface and packaging.
- The radio select rotary switch on the side of the interface, must be adjusted to the proper radio setting before plugging the interface into the vehicle (see next page for setting chart).
- The interface comes pre-programmed for all of the vehicle's factory SWC functions, and does not require programming unless you wish to re-assign the SWC functions, or utilize short press, long press dual command functionality. The SWC can always be restored to default settings by pressing and releasing the program button on the side of the interface once, and waiting 7 seconds for the LED to flash 4 times.
- Does not retain 360 camera system.
Wiring Connection Chart
Vehicle Connector
| Yellow Battery +12v | |
| Black Ground | |
| Red Accessory 12v+ (10 amp) | |
| Pink Vehicle Speed Output | |
| Blue / White Amp Turn On Input | |
| Orange / White Illumination Output (+) | |
| Purple / White *Reverse Output (+) |
| White Front | L + input |
| White / Black Front | L - input |
| Gray Front | R + input |
| Gray / Black | Front R - input |
| Green | Rear L + input |
| Green / Black | Rear L - input |
| Purple | Rear R + input |
| Purple / Black | Rear R - input |
| Yellow RCA | *Reverse Camera Output |
SWC Connector
| Blu/Yel | Kenwood, Newer JVC |
| 3.5mm Jack | Alpine, JVC, Clarion, Fusion, Pioneer, Sony, Boyo, Dual, Lightning Audio, Visteon or Advent |
* Only available in vehicles equipped with a factory reverse camera.
Illustration / Schematic
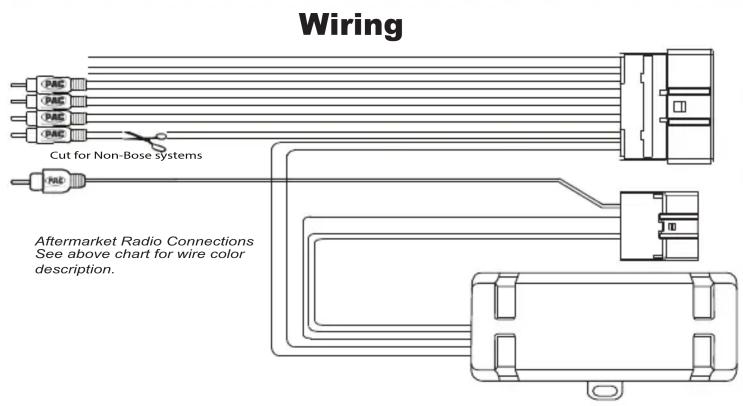
SWC Connection

Installation Steps

SET RADIO SELECT SWITCH
| Alpine | JVC | Kenwood / Lightning Audio | Clarion / Nakamichi | Pioneer / Other* | Sony | Fusion |
| 1 | 2 | 3 | 4 | 7 | 8 | 9 |
*Other - Dual / Axxera, Jensen, Rockford Fosgate
Default Steering Wheel Control Programming
IMPORTANT! The interface comes pre-programmed for all of the vehicle's factory SWC functions and does not require programming, unless you wish to re-assign the SWC functions, or utilize short press, long press dual command functionality. The SWC can always be restored to default settings by pressing and releasing the program button on the side of the interface once, and waiting 7 seconds for the LED to flash 4 times.
Default SWC Button Assignments
| Alpine JVC | Kenwood Clarion | Pioneer Sony | Fusion | ||||
| Volume + Volume + Volume - | Volume + Volume + Volume + Volume + Volume + | ||||||
| Volume - | Volume - | Volume - | Volume - | Volume - | Volume - | Volume - | Volume - |
| Source | Source | Source | Source | Source | Source | Source | Source |
| Track + | Track + | Track + | Track + | Search + | Track + | Track + | Track + |
| Track - | Track - | Track - | Track - | Search - | Track - | Track - | Track - |
| Enter | Voice | Voice | Voice | Voice | Voice | Voice | Power |
| Phone Answer | Receive | Receive | Off Hook | Send | Answer Call | Answer/End | Audio |
| Phone End | End | Reject | On Hook | End | End | Reject/Source | Mute |
Optional Steering Wheel Control Programming
If you wish to re-assign the SWC functions, or utilize short press, long press dual command functionality, the interface must be programmed in the specific order shown on the chart below. If you come across a function in the chart that your steering wheel does not have, or you do not want to program, press and release the program button on the side of the interface to skip that function. The LED will flash off and on, confirming that you have successfully skipped that function and are ready to proceed to the next one.
- Turn the key to the ignition position.
- Press and release programming button on the side of the interface.
- Within 7 seconds, press the button that is to be learned on the steering wheel. The LED will turn off when the button is pressed.
A. For short press functionality: Release the button within 1.5 seconds. The LED will turn back on.
B. For long press functionality: Hold the button until the LED starts blinking. Release the button and the LED will go back to solid. - If you need to program more buttons, repeat step 3 for each additional audio function on the steering wheel.
- If you come across a function in the chart that your steering wheel does not have, or you do not want to program, press and release the program button on the side of the interface to skip that function.
- Once programming is completed, wait seven seconds. The LED will flash three times, indicating end of programming.
- Test the interface for proper functionality. Whenever a SWC is pressed, the LED on the interface should blink. If any function does not work, repeat the programming steps.
At this point you have two options:
Optional Programming Order
| Alpine JVC Kenwood Clarion Other * Pioneer Sony Fusion | |||||||||
| 1 Volume + Volume + Volume + Volume + Volume + Volume + Volume + Volume + Volume + Volume + Volume + Volume + Volume + Volume + Volume + Volume + Volume + Volume + Volume + Volume + Volume + Volume + Volume + Volume + Volume + Volume + Volume + Volume + Volume + Volume + Volume + Volume + Volume + Volume + Volume + Volume + Volume + Volume + Volume + Volume + Volume + Volume + Volume + Volume + Volume + Volume + Volume + Volume + Volume + Volume + Volume | |||||||||
| 2 | Volume - | Volume - | Volume - | Volume - | Volume - | Volume - | Volume - | Volume - | Volume - |
| 3 | Mute | Mute | ATT | Mute | Mute | Mute | Mute | Mute | Mute |
| 4 | Preset + | Source | Source | Source | Preset + | Preset + | Preset + | Preset + | Source |
| 5 | Preset - | Track + | Play | Search + | Preset - | Preset - | Preset - | Preset - | Track + |
| 6 | Source | Track - | Track + | Search - | Source | Source | Source / End Call | Track - | Track - |
| 7 | Track + | Band / Disc + | Track - | Band | Track + | Track + | Track + | Track + | Audio |
| 8 | Track - | Preset / Disc - | Disc / FM + | Send / End | Track - | Track - | Track - | Track - | Power |
| 9 | Power | Select | Disc / AM - | Send | Band | Band | Band | ||
| 10 | Enter / Play | Attenuation | Answer | End | Answer ** | Phone Menu | Power / End Call | ||
| 11 | Band / Program | Phone Receive | Voice | Voice | End ** | Answer Call | Voice / Answer / End Call | ||
| 12 | Receive | Phone Reject | On Hook | PTT ** | End Call | Voice(Android Auto & Car Play) Answer / End Call *** | |||
| 13 | End | Voice | Off Hook | Voice | |||||
| 14 | Voice | Power | Mute | ||||||
| 15 | Preset + | ||||||||
| * Advent, Boyo, Dual, Lightning Audio, Jensen, Rockford Fosgate & Visteon ** Jensen & Advent ONLY *** XAV-AX100 ONLY | |||||||||
Testing and Verification
- Turn the ignition on. The LED on the interface will turn on, and the +12v accessory wire will turn on.
- Turn on the radio and check balance and fade.
- Verify that all SWC are functioning properly.
- The LED and radio will turn off when the key is turned off.
Product Updates (Firmware)
The RP4-NI11 can be updated with new firmware as it becomes available, using the PAC-UP interface updater (sold separately). Please visit www.pac-audio.com/firmware for available updates.
Brand : PAC
Model : RP4-NI13
Category : Air conditioner