
VCW7555S3K - Electric broom SAMSUNG - Free user manual and instructions
Find the device manual for free VCW7555S3K SAMSUNG in PDF.


| Product Type | Electric Broom / Vacuum Cleaner |
| Brand | Samsung |
| Model | VCW7555S3K |
| Application | Indoor household use only |
| Suction Control | Body power button (ON/OFF) and hose air tap for suction reduction |
| Floor Nozzle | Integrated with brush for carpet and hard floor use |
| Telescopic Pipe | Optional, adjustable length via sliding button |
| Blower Function | Yes, by connecting hose clamp to blow hole |
| Dust Filter Type | Washable sponge filter; clean when indicator turns yellow |
| Dust Bin | Removable, empty before full for best efficiency |
| Power Cord | Long cord; wind on hanger after use |
| Accessories Included | Dusting tool, upholstery tool (push-fit onto hose handle) |
| Safety Features | Overheating protection via filter cleaning; do not use on wet surfaces; keep away from heat sources |
| Maintenance | Empty dust bin, wash filter and dry in shade for 12+ hours, check for blockages |
| Storage | Park floor nozzle, hang cord on hanger |
| User Capacity | Children aged 8+ with supervision; not for children without supervision |
Frequently Asked Questions - VCW7555S3K SAMSUNG
See manual for detailed illustrations.
User questions about VCW7555S3K SAMSUNG
0 question about this device. Answer the ones you know or ask your own.
Ask a new question about this device
Download the instructions for your Electric broom in PDF format for free! Find your manual VCW7555S3K - SAMSUNG and take your electronic device back in hand. On this page are published all the documents necessary for the use of your device. VCW7555S3K by SAMSUNG.
USER MANUAL VCW7555S3K SAMSUNG
Vacuum Cleaner User Manual
* Before operating this unit, please read the instructions carefully.
* For indoor use only.
ENGLISH
imagine the possibilities
Thank you for purchasing a Samsung product.
Safety Information
SAFETY INFORMATION

- Before operating the appliance, please read this manual thoroughly and retain it for your reference.

- Because these following operating instructions cover various models, the characteristics of your vacuum cleaner may differ slightly from those described in this manual.
CAUTION/WARNING SYMBOLS USED
| WARNING | Indicates that a danger of death or serious injury exists. |
| CAUTION | Indicates that a risk of personal injury or material damage exists. |
OTHER SYMBOLS USED
| Represents something you must NOT do. | |
| Represents something you must follow. | |
| Indicates that you must disconnect the power plug from the socket. |

This vacuum cleaner is designed for domestic household use only.
Do not use this vacuum cleaner to clean building waste and debris.
Regularly keep the filters in clean conditions to prevent the collection of fine dust in them.
Do not use this vacuum cleaner with any of the filters removed.
Failure to meet these requirements could cause damage to the internal parts and void your warranty.
IMPORTANT SAFEGUARDS
- Read all instructions carefully.
Before switching on, make sure that the voltage of your electricity supply is the same as that indicated on the rating plate on the side of the cleaner.
- WARNING: Do not use the vacuum cleaner when rug or floor is wet. Do not use to suck up water.
- Close supervision is necessary when any appliance is used by or near children.
Do not allow the vacuum cleaner to be used as a toy.
Do not allow the vacuum cleaner to run unattended at any time.
Use the vacuum cleaner only for its intended use as described in these instructions.
- Do not use the vacuum cleaner without a dust bin.
Empty the dust bin before it is full in order to maintain the best efficiency.
- Do not use the vacuum cleaner to pick up matches, live ashes or cigarette butts.
Keep the vacuum cleaner away from stoves and other heat sources. Heat can deform and discolour the plastic parts of the unit.
Also do not use your vacuum cleaner to pick up sugar, salt, dust of building materials (e.g. cement, metal shavings and so on).
- Avoid picking up hard, sharp objects with the vacuum cleaner as they may damage the cleaner parts.
Do not stand on the hose assembly.
Do not put weight on the hose.
Do not block the suction or the exhaust port.
- Switch the vacuum cleaner off on the body of the machine before unplugging from the electrical outlet.
Disconnect the plug from the electrical outlet before emptying the dust bin.
To avoid damage, please remove the plug by grasping the plug itself, not by pulling on the cord.
- This appliance can be used by children aged from 8 years and above and persons with reduced physical, sensory or mental capabilities or lack of experience and knowledge if they have been given supervision or instruction concerning use of the appliance in a safe way and understand the hazards involved.
- Children shall not play with the appliance. Cleaning and user maintenance shall not be made by children without supervision.
- The plug must be removed from the socket outlet before cleaning or maintaining the appliance.
- The use of an extension cord is not recommended.
- If your vacuum cleaner is not operating correctly, switch off the power supply and consult an authorized service agent.
- If the supply cord is damaged, it must be replaced by the manufacturer or its service agent or a similarly qualified person in order to avoid a hazard.
- Don't carry the vacuum cleaner by holding the hose. Use the handle on the vacuum cleaner set.
- Unplug the cleaner when not in use. Turn off the power switch before unplugging.
ASSEMBLING THE CLEANER

06 Assembling the cleaner
MAINTAIN TOOLS AND FILTER

09 Emptying the dust bin
09 Check dust filter indicator
10 Cleaning the dust filter
11 Maintain tools
11 Power cord
11 Dust bin
TROUBLESHOOTING

Assembling the cleaner
ASSEMBLING THE CLEANER
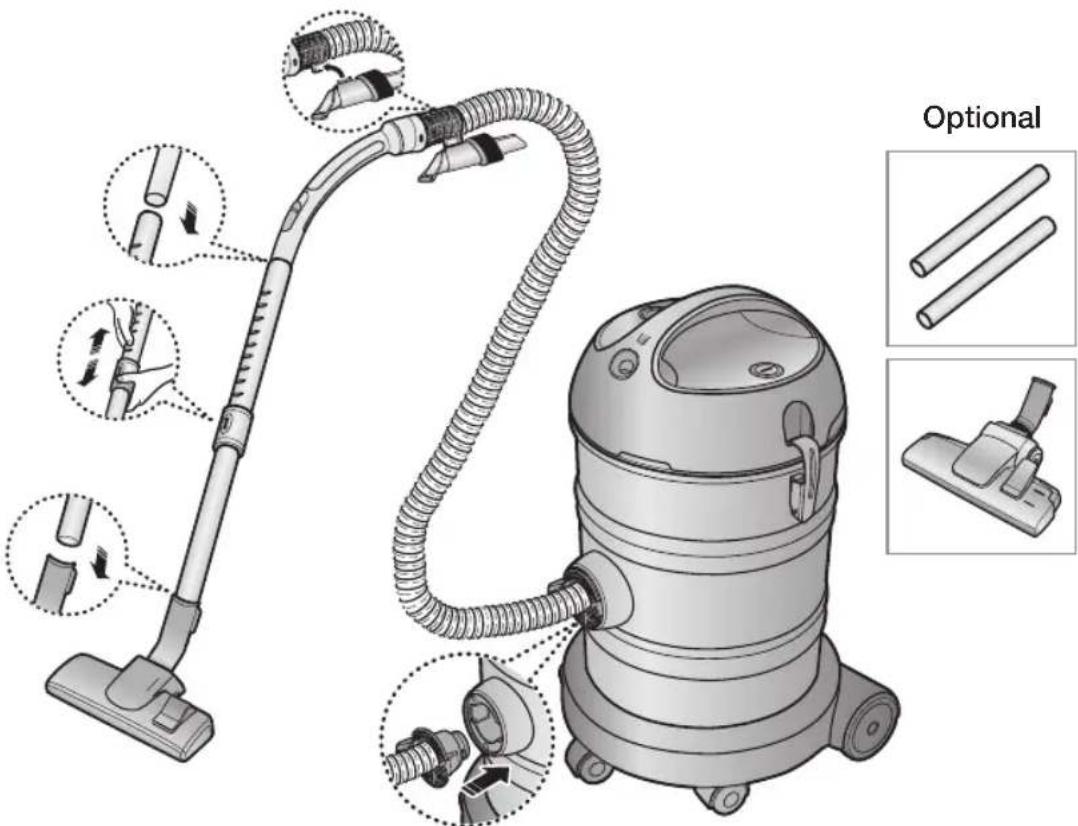

- Features may vary according to model.
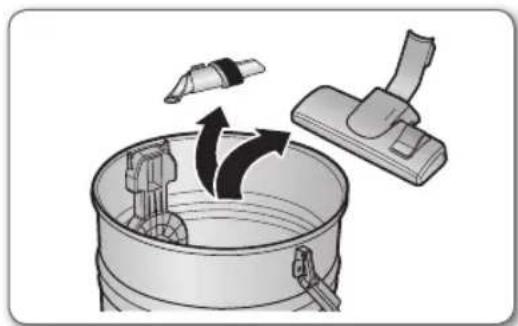
- Before using the vacuum cleaner, put the brush and cleaner accessory out of the dust bin.

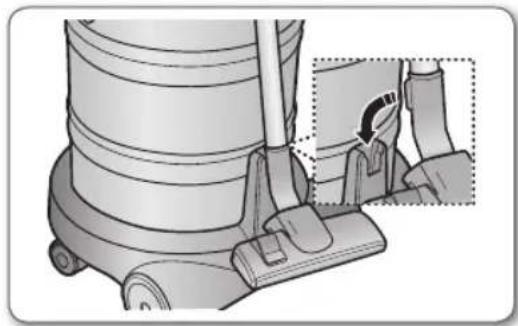
• For storage, park the floor nozzle.
operating the cleaner
POWER CONTROL
- BODY
Press the power control button repeatedly to select the correct mode.
(ON ↔ OFF)
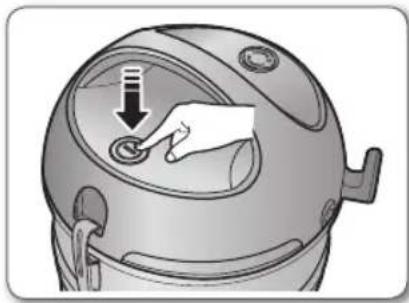

The power control button operates the vacuum cleaner or stops it.
- HOSE
To reduce suction for cleaning draperies, small rugs and other light fabrics, pull the tap air until the hole is open.
- BRUSH
FLOOR NOZZLE
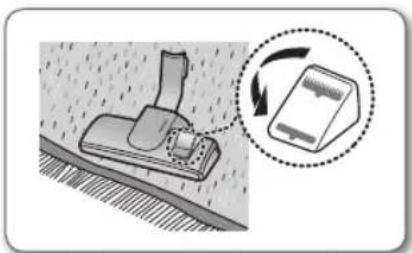
Using on carpet
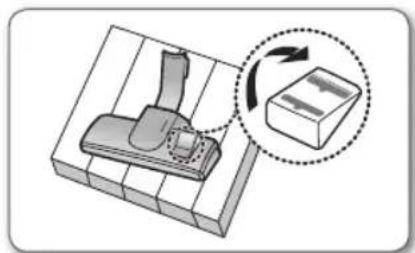
Using on tile or floor
USING ACCESSORY
Accessory
- Push the accessory on to the end of the hose handle.
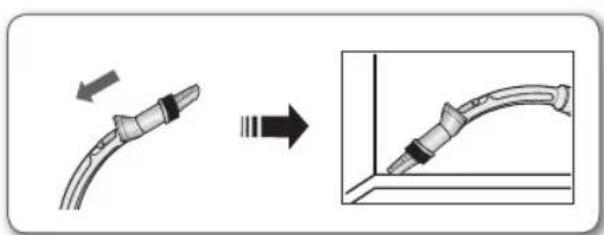
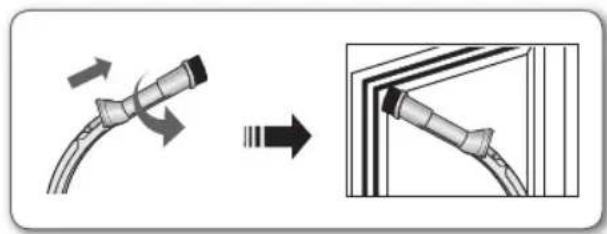
- To use the dusting tool, push the accessory onto the end of the hose handle.
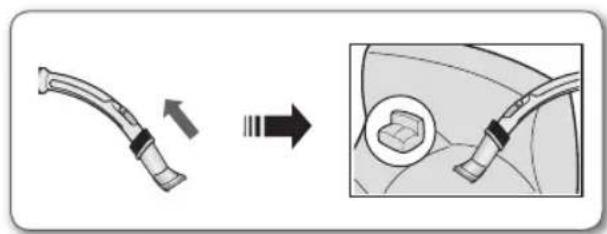
- To use the upholstery tool, push the accessory onto the end of the hose handle.
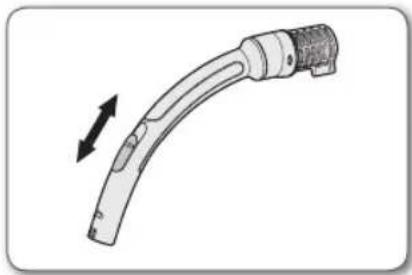
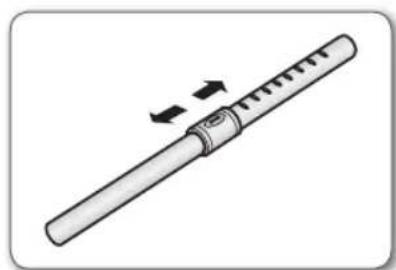
Pipe (Optional)
- Adjust the length of the telescopic pipe by sliding the length control button located in the center of the telescopic pipe back and forth.
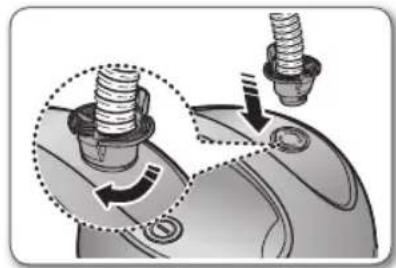
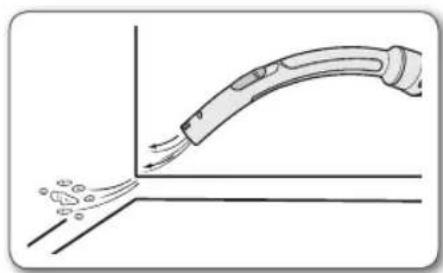
Using the blower
- Disconnect the hose from the body of the cleaner.
- Connect the hose clamper to the blow hole.
- Turn the hose clamper clockwise and lock the clamper properly.
- To use the blower, disassemble the pipe and the brush.
Maintain tools and filter
EMPTYING THE DUST BIN

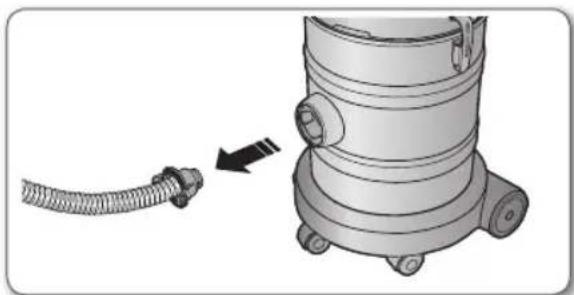
- Disassemble the suction hose clamper.
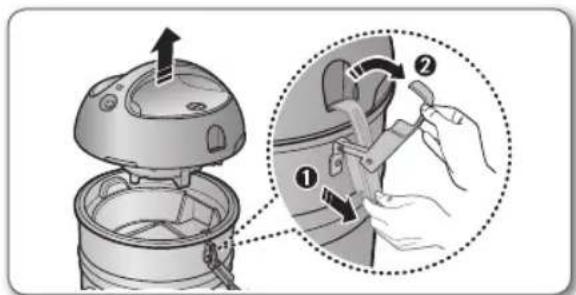
- Unlock the body clamper on both sides and lift the upper body to disassemble it from the dust tank.
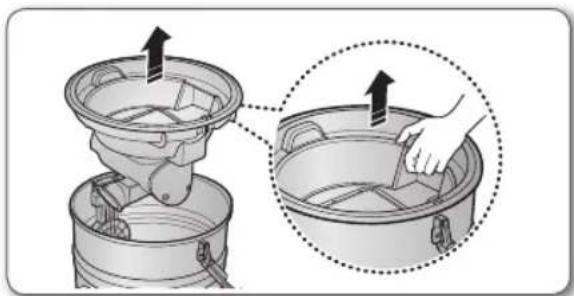
- Lift the dust cover to open and put it down carefully. Please beware of dust falling off from the dust cover.
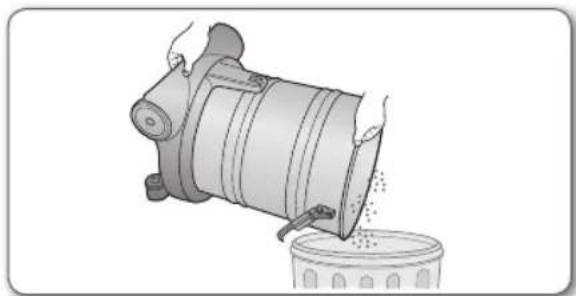
- Dispose of dust materials.
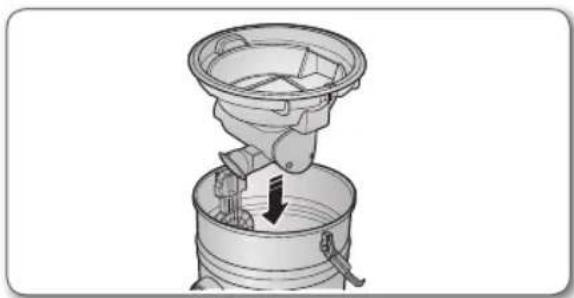
- Assemble the dust cover properly.
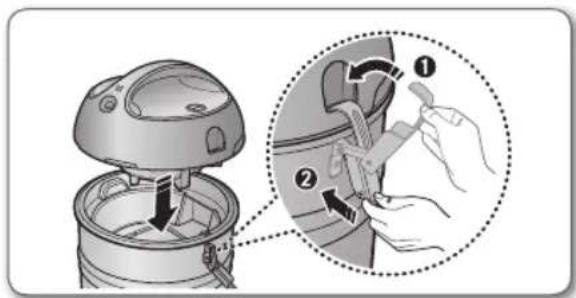
- Assemble the upper body and lock the body clamper on both sides.
CHECK DUST FILTER INDICATOR
If the indicator turns yellow while you are cleaning, the dust filter needs to be cleaned.

If the indicator continues to display yellow even after cleaning the dust filter, turn off the vacuum cleaner and check for any clogging in the hose, tube, floor nozzle, or inlet of the dust cover.
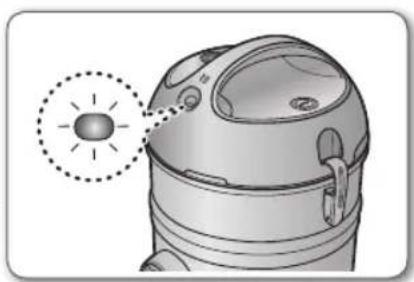
When to clean the dust filter
- When suction is noticeably reduced continuously.
- When the sponge is heavily polluted.
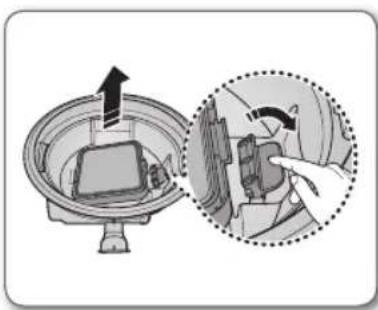
- Pull the lever and disassemble the dust filter.
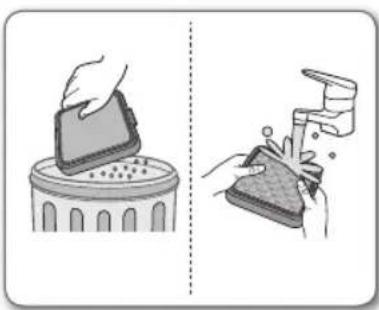
- Wash the dust filter with water.
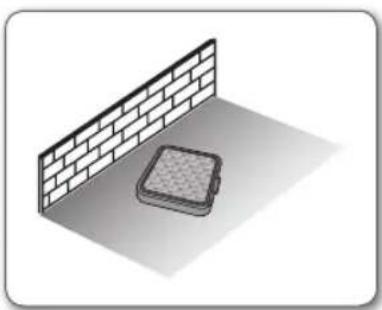
- Let the dust filter dry in the shade for more than 12 hours.
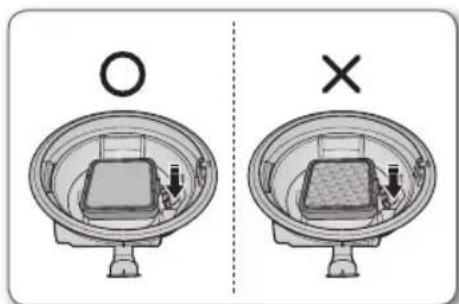
- Assemble the dust filter with the direction as shown.
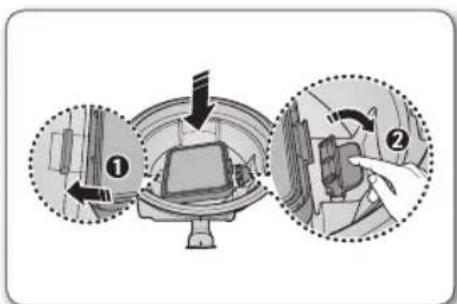
- Assemble the dust filter after pulling the lever and insert the dust filter properly.

Make sure that the dust filter is changed once a year.
If you use a vacuum cleaner very often, the filter's lifespan can be reduced.
In this case, it is recommended to change the dust filter more frequently.

Try to keep the dust filter clean constantly. Regularly check its condition.
Ignoring this requirement can lead to motor and body overheating, failure, and reduce the service life of the appliance.
Maintain tools and filter
MAINTAIN TOOLS
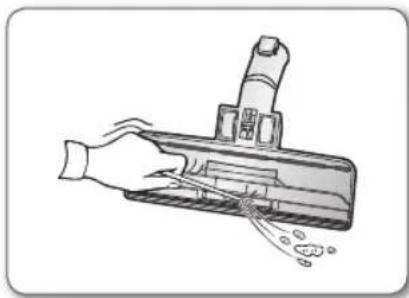
2-step brush
- Remove waste matter completely if the inlet is blocked
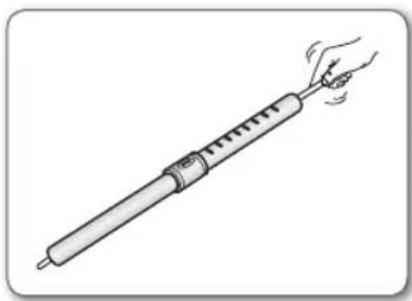
Pipe (Optional)
- To check for blockages, separate the telescopic pipe and adjust to shorten.
This allows for easier removal of waste clogging the tube.
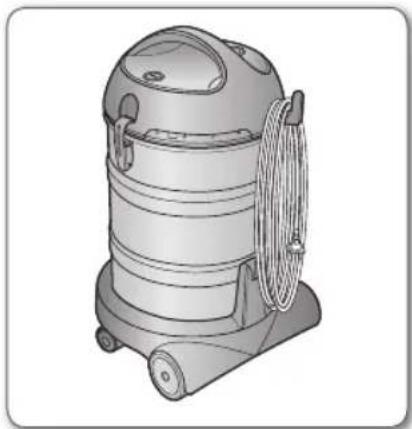
POWER CORD
After cleaning, wind the power cord and hang it on the hanger.
DUST BIN

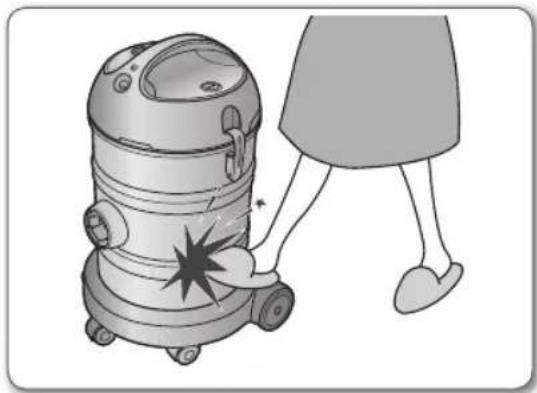
Do not give any impact to the dust bin. The dust bin can be dented by external impact.
Troubleshooting
| PROBLEM SOLUTION | |
| Motor downs and does not start. | Check cable, plug and socket.Leave to cool. |
| Suction force is gradually decreasing. | Check for blockage and remove. |
| Vacuum cleaner downs, does not pick up dirt | Check hose and replace if required. |
| Low or decreasing suction. | Please check dust filter.If required clean it as illustrated in the instruction. |
| Body overheating | Please check dust filter.If required clean it as illustrated in the instruction. |
| Unpleasant smell during vacuuming | Please note that there may be a slight smell during vacuuming when the cleaner is new (4-5 days). |
Memo
Design & specification are subject to change without notice.
SAMSUNG
6-stage brush
Tube (optional)
-Shang
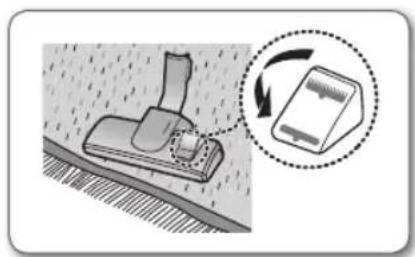
- Brush
Floor nozzle
- VACUUM CLEANER USER MANUAL
- SAFETY INFORMATION
- CAUTION/WARNING SYMBOLS USED
- OTHER SYMBOLS USED
- IMPORTANT SAFEGUARDS
- ASSEMBLING THE CLEANER
- MAINTAIN TOOLS AND FILTER
- TROUBLESHOOTING
- OPERATING THE CLEANER
- POWER CONTROL
- BODY
- HOSE
- BRUSH
- USING ACCESSORY
- ACCESSORY
- PIPE (OPTIONAL)
- USING THE BLOWER
- EMPTYING THE DUST BIN
- CHECK DUST FILTER INDICATOR
- WHEN TO CLEAN THE DUST FILTER
- MAINTAIN TOOLS
- STEP BRUSH
- POWER CORD
- DUST BIN
Brand : SAMSUNG
Model : VCW7555S3K
Category : Electric broom