
SLRWMC60 - Rowing Machine SereneLife - Free user manual and instructions
Find the device manual for free SLRWMC60 SereneLife in PDF.


| Product Type | Rowing Machine |
| Brand | SereneLife |
| Model | SLRWMC60 |
| Resistance Type | Magnetic & Air |
| Display | Digital LCD with Time, Distance, Pulse, SPM, Calories, Strokes, Watts |
| Resistance Levels | 16 |
| Connectivity | Bluetooth Smart 4.0, FitShow App (iOS/Android) |
| Heart Rate Monitoring | Wireless pulse receiver (5.3 kHz), hand grip sensors |
| Construction Material | Steel Metal Alloy, Engineered HIPS |
| Assembled Dimensions (L x W x H) | 83.5 x 19.3 x 34.8 inches |
| Folded Dimensions (L x W x H) | 34.8 x 19.3 x 83.5 inches |
| Net Weight | 73.0 lbs |
| Gross Weight | 82.7 lbs |
| Maximum User Weight | 250 lbs (120 kg) |
| Power Supply | 110V/60Hz 0.3A, Adapter output 8.0V/1.0A |
| Flywheel Size | 350 x 55 mm |
| Slide Rail Length | 45 inches |
| Rowing Distance | 33.27 inches |
| Rope Length | 70.87 inches |
| Storage | Foldable upright design with transportation wheels |
| Safety Features | Max weight limit, indoor use only, keep children away, stable base |
| Warranty / Support | Contact PYLE USA: phone (1) 718-535-1800, email support@pyleusa.com |
Frequently Asked Questions - SLRWMC60 SereneLife
User questions about SLRWMC60 SereneLife
0 question about this device. Answer the ones you know or ask your own.
Ask a new question about this device
Download the instructions for your Rowing Machine in PDF format for free! Find your manual SLRWMC60 - SereneLife and take your electronic device back in hand. On this page are published all the documents necessary for the use of your device. SLRWMC60 by SereneLife.
USER MANUAL SLRWMC60 SereneLife
natural_image
Black and white photo of a self-assembly exercise machine with visible legs, arms, and control panel (no text or symbols)

natural_image
Row of blue geometric and symbolic icons including stars, circles, and squares (no text or labels)Sports Training Row Machine
with Smartphone Fitness Monitoring App,
Portable Folding Style
USER MANUAL
IMPORTANT!
Please retain owner's manual for maintenance and adjustment instructions.
IMPORTANT SAFETY INFORMATION
To ensure your safety and health, please use this equipment correctly. It is important to read this entire manual before assembling and using the equipment. Safe and effective use can only be achieved if the equipment is assembled, maintained and used properly. It is your responsibility to ensure that all users of the equipment are informed of all warnings and precautions.
- Before starting any exercise program, you should consult your physician to determine if you have any medical or physical conditions that could put your health and safety at risk, or prevent you from using the equipment properly.
Your physician's advice is essential if you are taking medication that affects your heart rate, blood pressure or cholesterol level.
-
Be aware of your body's signals. Incorrect or excessive exercise can damage your health. Stop exercising if you experience any of the following symptoms: pain, tightness in your chest, irregular heartbeat, shortness of breath, light headedness, dizziness or feelings of nausea. If you do experience any of these conditions, you should consult your physician before continuing with your exercise program.
-
Keep children and pets away from the equipment. The equipment is designed for adult use only.
-
Use the equipment on a solid, flat level surface with a protective cover for your floor or carpet. To ensure safety, the equipment should have at least 2 feet (60 CM) of free space all around it.
-
Ensure that all nuts and bolts are securely tightened before using the equipment. The safety of the equipment can only be maintained if it is regularly examined for damage and/or wear and tear.
-
Always use the equipment as indicated. If you find any defective components while assembling or checking the equipment, or if you hear any unusual noises coming from the equipment during exercise, discontinue use of the equipment immediately and do not use until the problem has been rectified.
-
Wear suitable clothing while using the equipment. Avoid wearing loose clothing that may become entangled in the equipment.
-
Do not place fingers or objects into the moving parts of the equipment.
-
The maximum weight capacity of this unit is 120 KG.
-
The equipment is not suitable for therapeutic use.
-
To avoid bodily injury and/or damage to the product or property, proper lifting and moving is required.
-
Your product is intended for use in cool, dry conditions. You should avoid storage in extreme cold, hot or damp areas as this may lead to corrosion and other related problems.
-
This equipment is designed for indoor and home use only, it is not intended for commercial use!
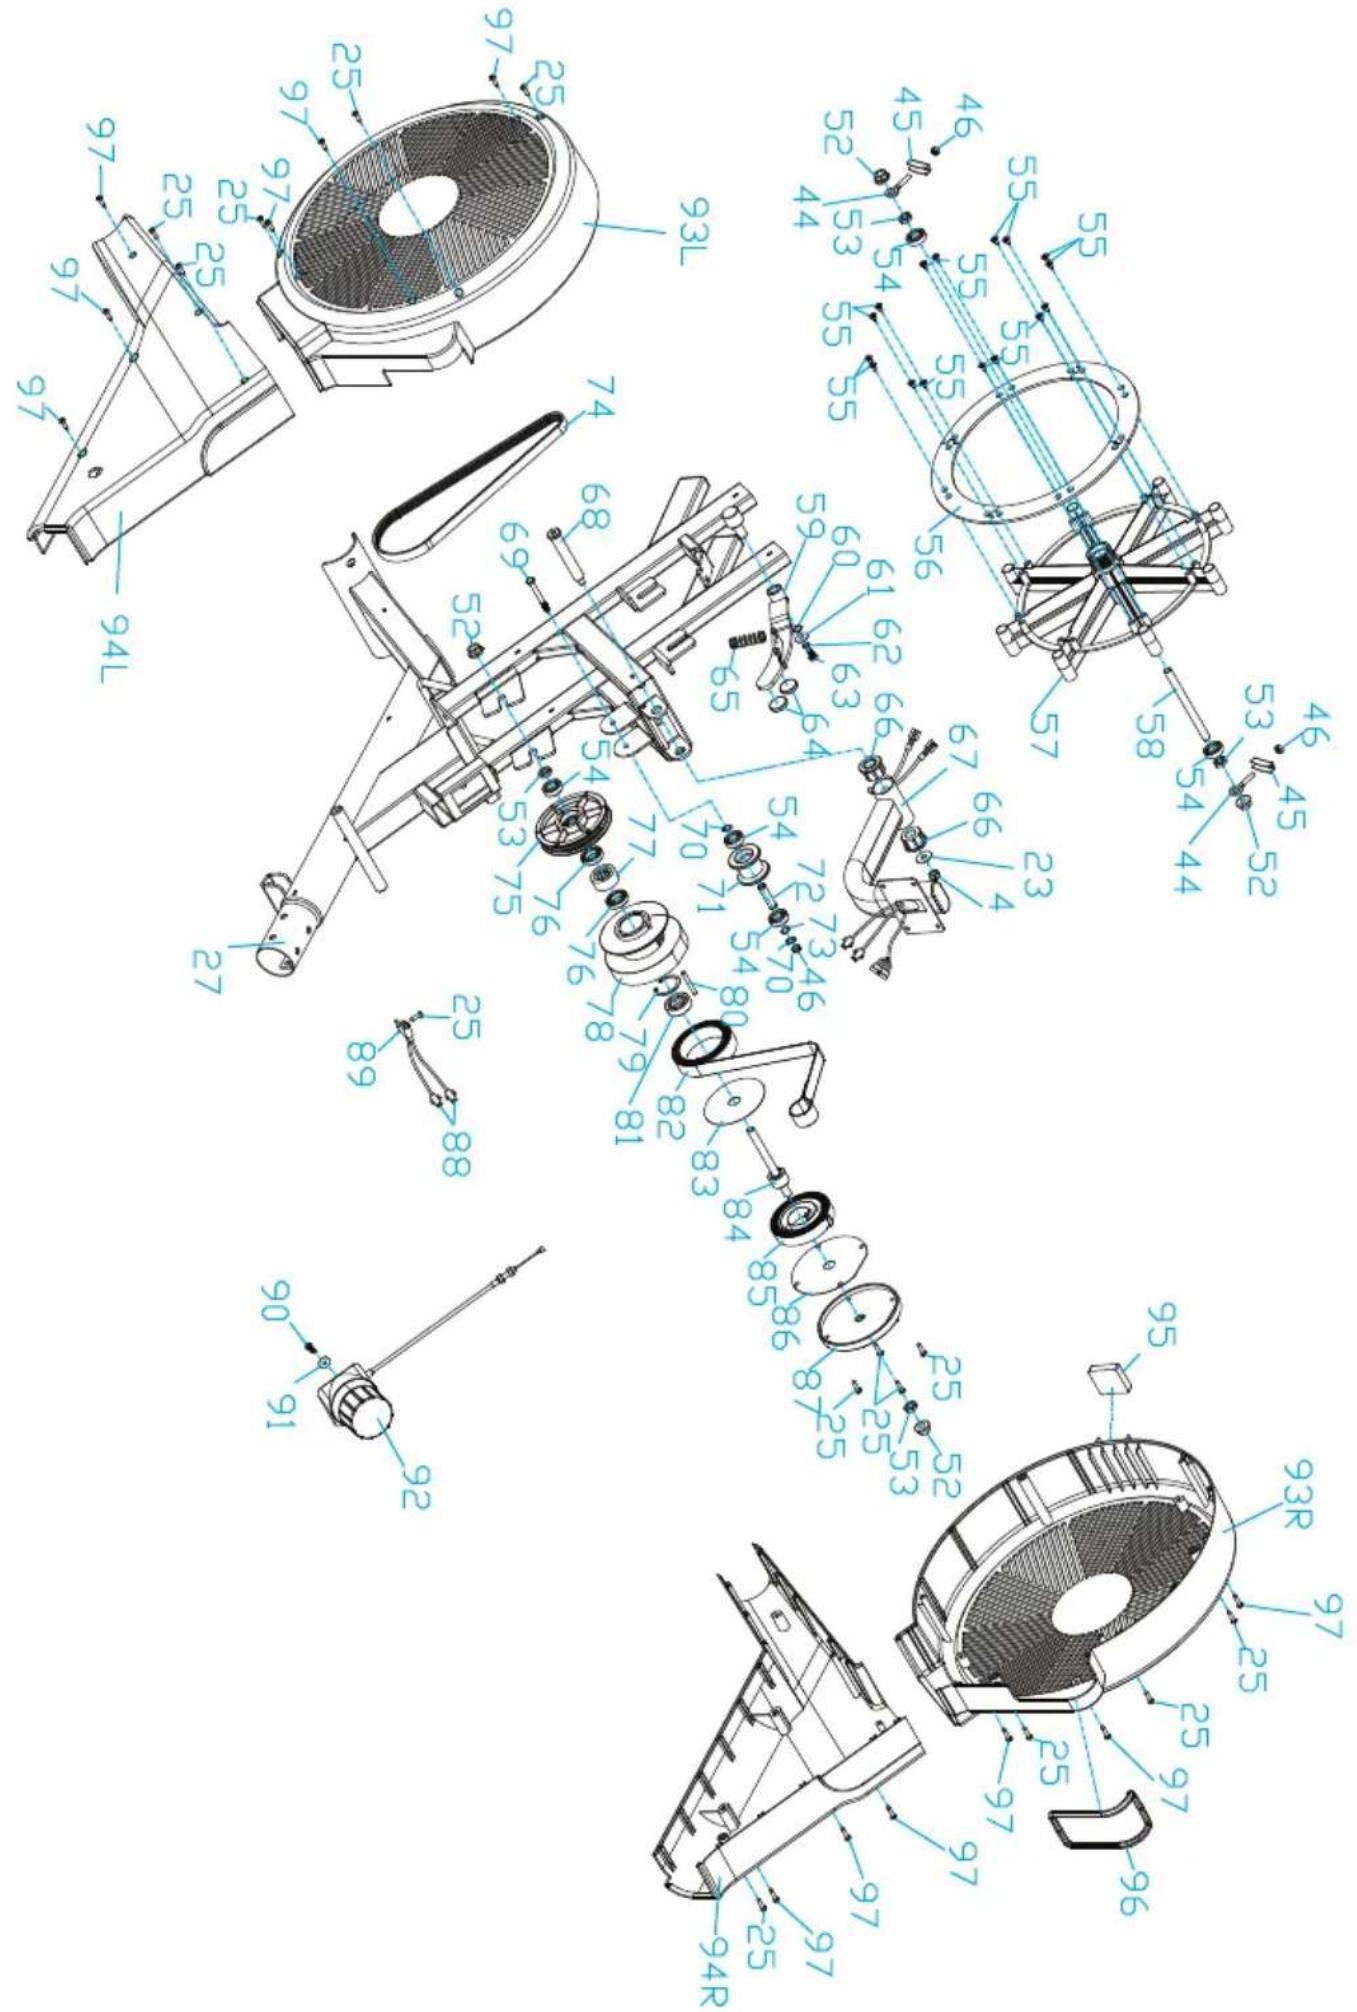
EXPLODED DIAGRAM
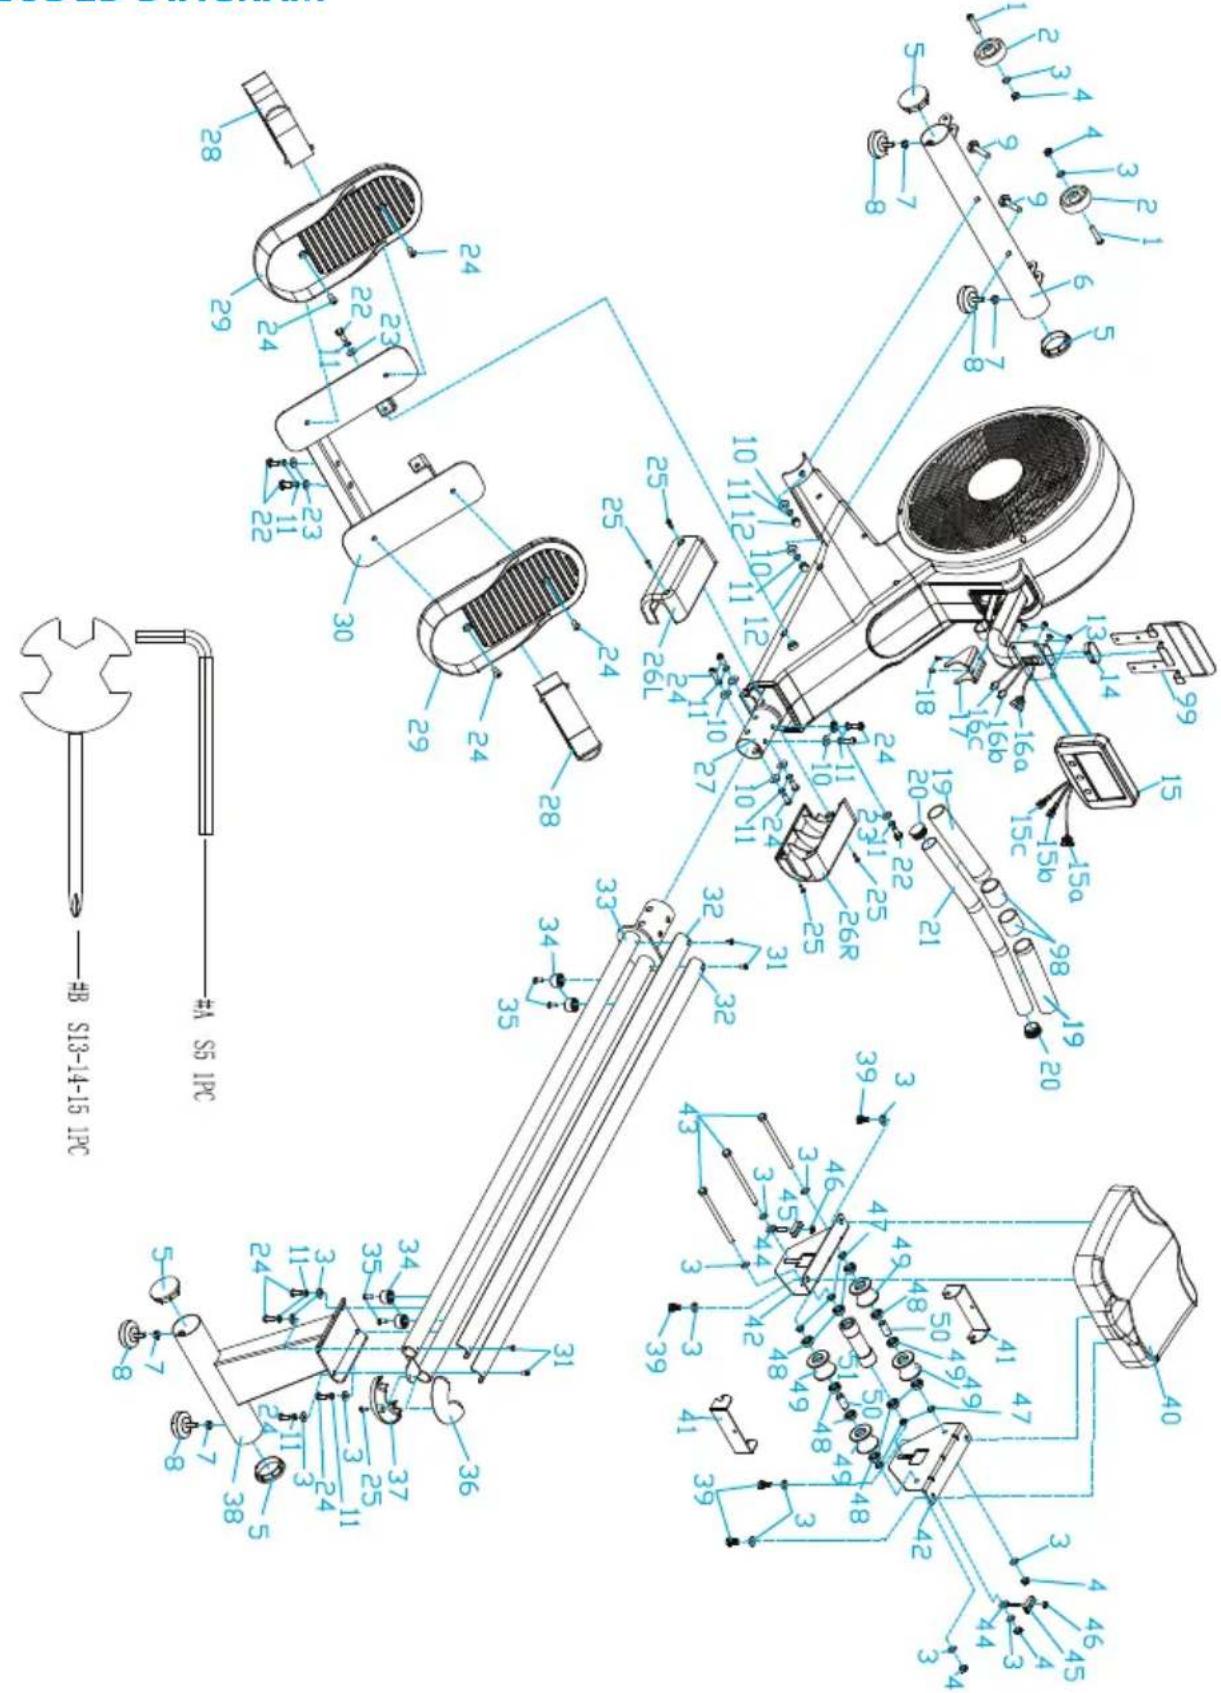
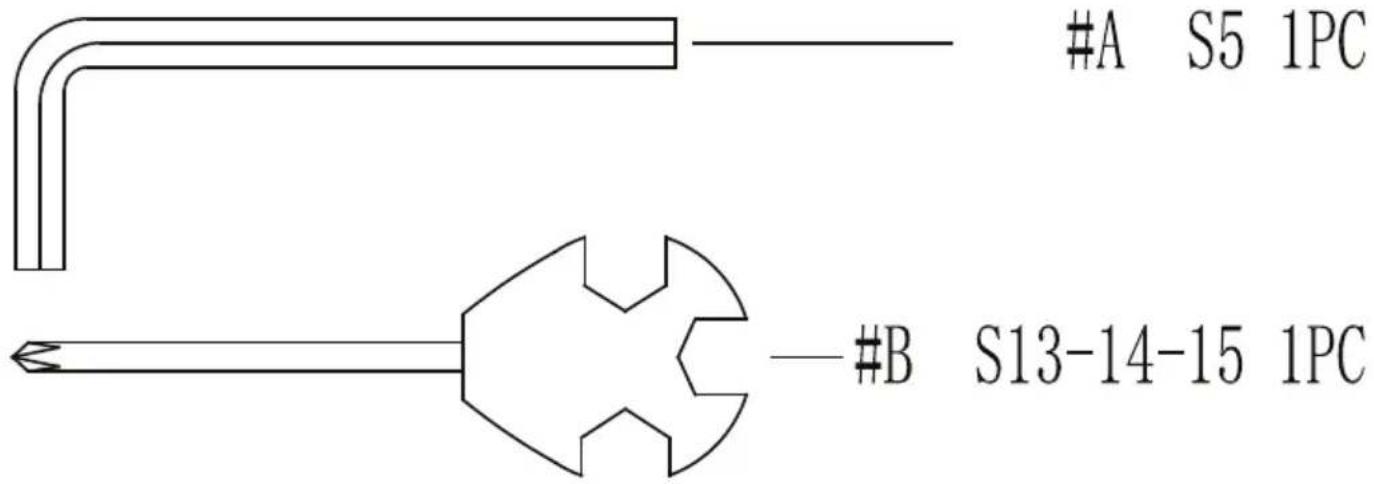
Hardware:





Parts List
| No. | Description | Qty |
| 1 Bolt M8*42*15*S6 2 33 Rail 1 | ||
| 2 Transportation Wheel 2 34 Limiter 4 | ||
| 3 | Washer d8*Φ16*1.5 | 16 |
| 4 Nylon nut M8*H7.5*S13 6 36 Rail upper cover | 1 | |
| 5 | End cap Φ60.5*17 | 4 37 |
| 6 | Front bottom tube | 1 38 |
| 7 Nut M8 | 4 39 Bo | |
| 8 | Adjustable foot pad φ52*18 | 4 |
| 9 | Bolt M8*73*20*H5 | 2 |
| 10 | Arc washer d8*Φ20*2*R30 | 8 |
| 11 Spring washer d8 | 12 | |
| 12 | Cap nut M8 | 2 |
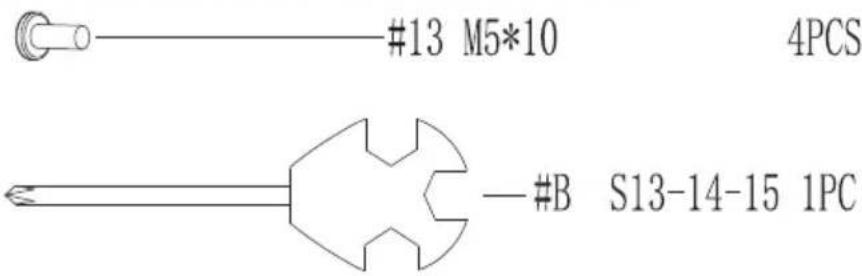
| 13 | Bolt M5*10 | 4 |
| 14 | End cap | 1 |
| 15 | Computer | 1 |
| 16 | Trunk wire | 2 |
| 17 | Handlebar holder | 1 |
| 18 | Bolt M5×10×Φ8.5 | 2 |
| 19 | Foam grip | 2 |
| 20 | End cap Φ32*17 | 2 |
| 21 | Handlebar | 1 |
| 22 | Bolt M8*20*S13 | 4 |
| 23 | Washer d8*Φ20*2 | 5 |
| 24 | Bolt M8*20*S5*φ13 | 11 |
| 25 | Screw ST4.2*16*Φ8 | 22 |
| 26L/R | Cover | 1pair |
| 27 | Main frame | 1 |
| 28 | Pedal strap | 2 |
| 29 | Pedal | 2 |
| 30 | Pedal plate | 1 |
| 31 Bolt M5*10 | 4 | |
| 32 | Rail piece | 2 |
| No. | Description | Qty |
| 35 | Bolt M6*16*φ10 | 4 |
| Rail lower cover 1 | ||
| Rear supporter | 1 | |
| M8*16*S14 | 4 | |
| 40 | Seat | 1 |
| 41 | U baffle plate | 2 |
| 42 | Left support plate of seat | 2 |
| 43 Bolt M8*135*15*S14 | 3 | |
| 44 | Chain bolt M6*40*Φ10*2.5 | 4 |
| 45 | Chain U seat | 4 |
| 46 | Nylon nut M6*H6*S10 | 5 |
| 47 | Spacer d8*Φ15*4 | 6 |
| 48 | Bearing 608Z | 10 |
| 49 | Roller Φ45*38*Φ22 | 4 |
| 50 | Spacer Φ14*Φ8.3*30 | 2 |
| 51 | Roller Φ33*106*Φ22 | 1 |
| 52 | Nut M10*1*H9.5*S15 | 4 |
| 53 | Nut M10*1*H5*S17 | 4 |
| 54 | Bearing 6000-2RS | 5 |
| 55 | Screw ST4.2*13*φ7 | 16 |
| 56 | Aluminium sheet | 4 |
| 57 | Fan | 1 |
| 58 | Flywheel shaft | 1 |
| 59 | Magnetic plate | 1 |
| 60 | Wave washer d12*Φ15.5*0.3 | 1 |
| 61 | Washer d6*Φ16*1.5 | 1 |
| 62 | Spring washer d6 | 1 |
| 63 Bolt M6*12*S10 1 | ||
| 64 | Magnet Φ24*5 | 2 |
| 65 | Spring Φ1.2*Φ15*48*N9 | 1 |
| 66 | Bushing Φ32*3.3*Φ28*16*Φ14 | 2 |
| 67 Computer post 1 86 Outer PC Board 1 | ||
| 68 | Knob Φ14*81.5*M8*S6 | 1 |
| 69 Bolt M6*55*15*S10 1 88 Sensor 2 | ||
| 70 | Washer d10 | 2 |
| 71 | Pulley Φ45*35 | 1 |
| 72 | Fixing Axle for Mesh Belt | 1 |
| 73 | Wave washer d10 | 1 |
| 74 | Belt | 1 |
| 75 | Belt plate | 1 |
| 76 | Bearing 16003-2RS | 2 |
| 77 | Bearing φ35*d17*16 | 1 |
| 78 | Mesh Belt Wheel | 1 |
| 79 | Washer d35 | 1 |
| 80 | Fixing Axle for Mesh Belt | 1 |
| 81 | Bearing 6300-2RS | 1 |
| 82 | Mesh Belt | 1 |
| 83 | PC Board for Mesh Belt Wheel | 1 |
| 84 | Axle for Mesh Belt Wheel | 1 |
| 85 | Volute Spring | 1 |
| 87 | Outer Cover for Mesh Belt Wheel | 1 |
| 89 | Sensor holder | 1 |
| 90 | Motor | 1 |
| 91 | Tension wire | 1 |
| 92 | Adapter | 1 |
| 93L/R | Front cover | 1pair |
| 94L/R | Rear cover | 1pair |
| 95 | Support pad of Housing | 1 |
| 96 | Rubber ring | 1 |
| 97 | Screw ST4.2*16*φ8 | 12 |
| 98 | Rubber ring | 2 |
| 99 | iPad holder | 1 |
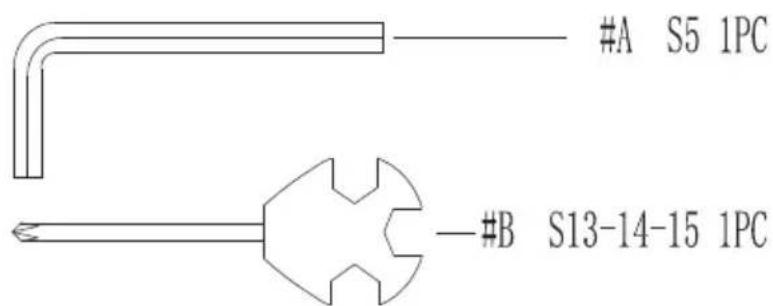
| A | Spanner S5 | 1 |
| B | Wrench S13-14-15 | 1 |
Step 1:
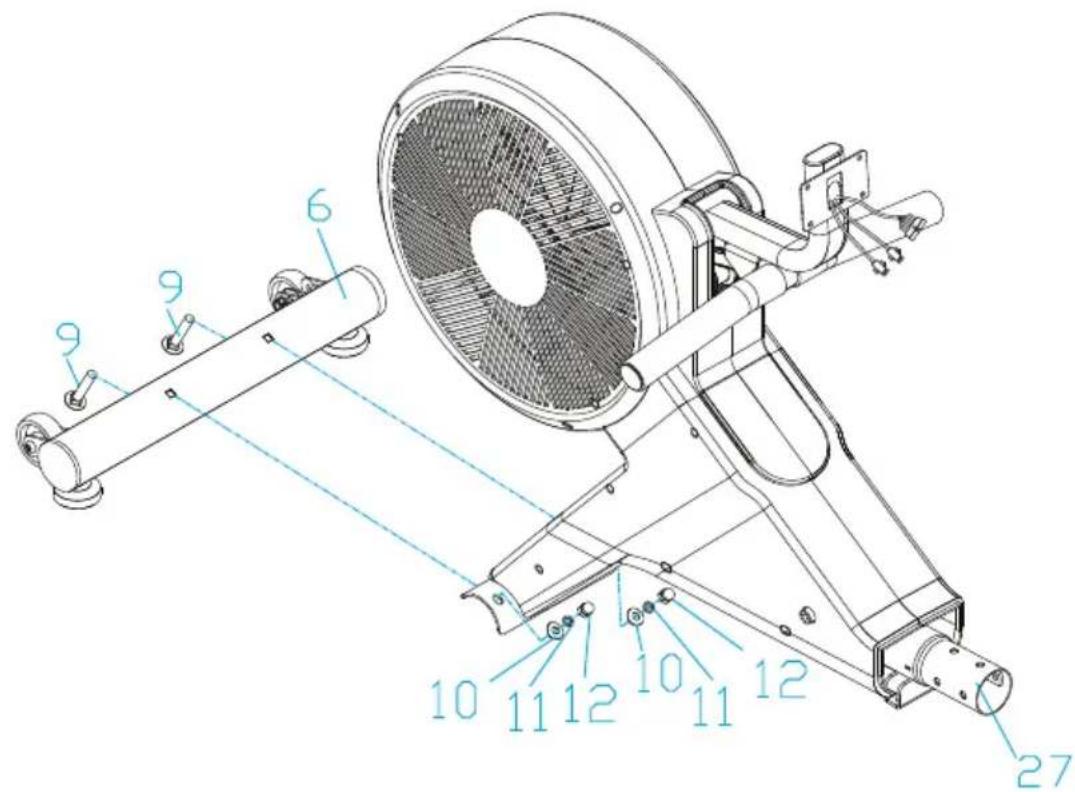
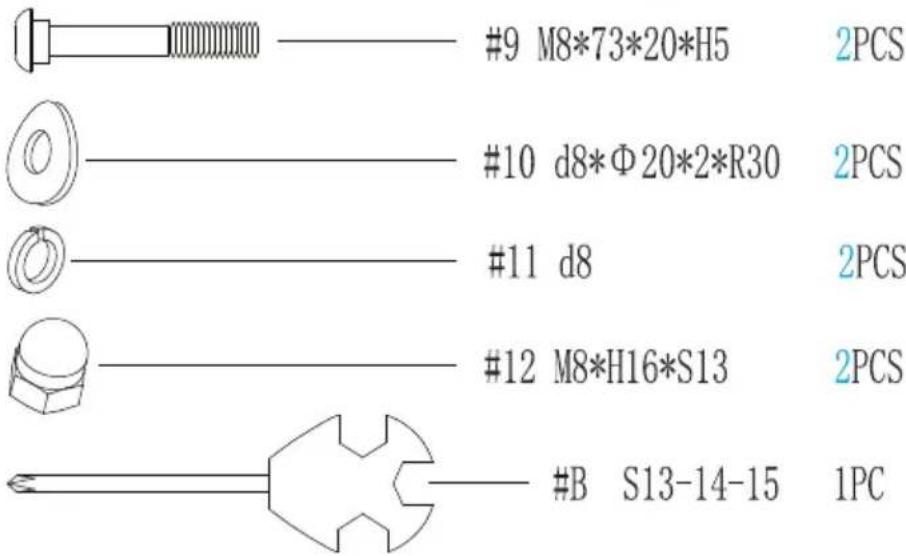
Take out the bolts(9), arc washers(10), spring washers(11) and cap nuts(12) from main frame(27) by wrench(B), then attach front bottom tube(6) to main frame(27) with bolts(9), arc washers(10), spring washers(11) and cap nuts(12) by wrench(B).
Step 2:
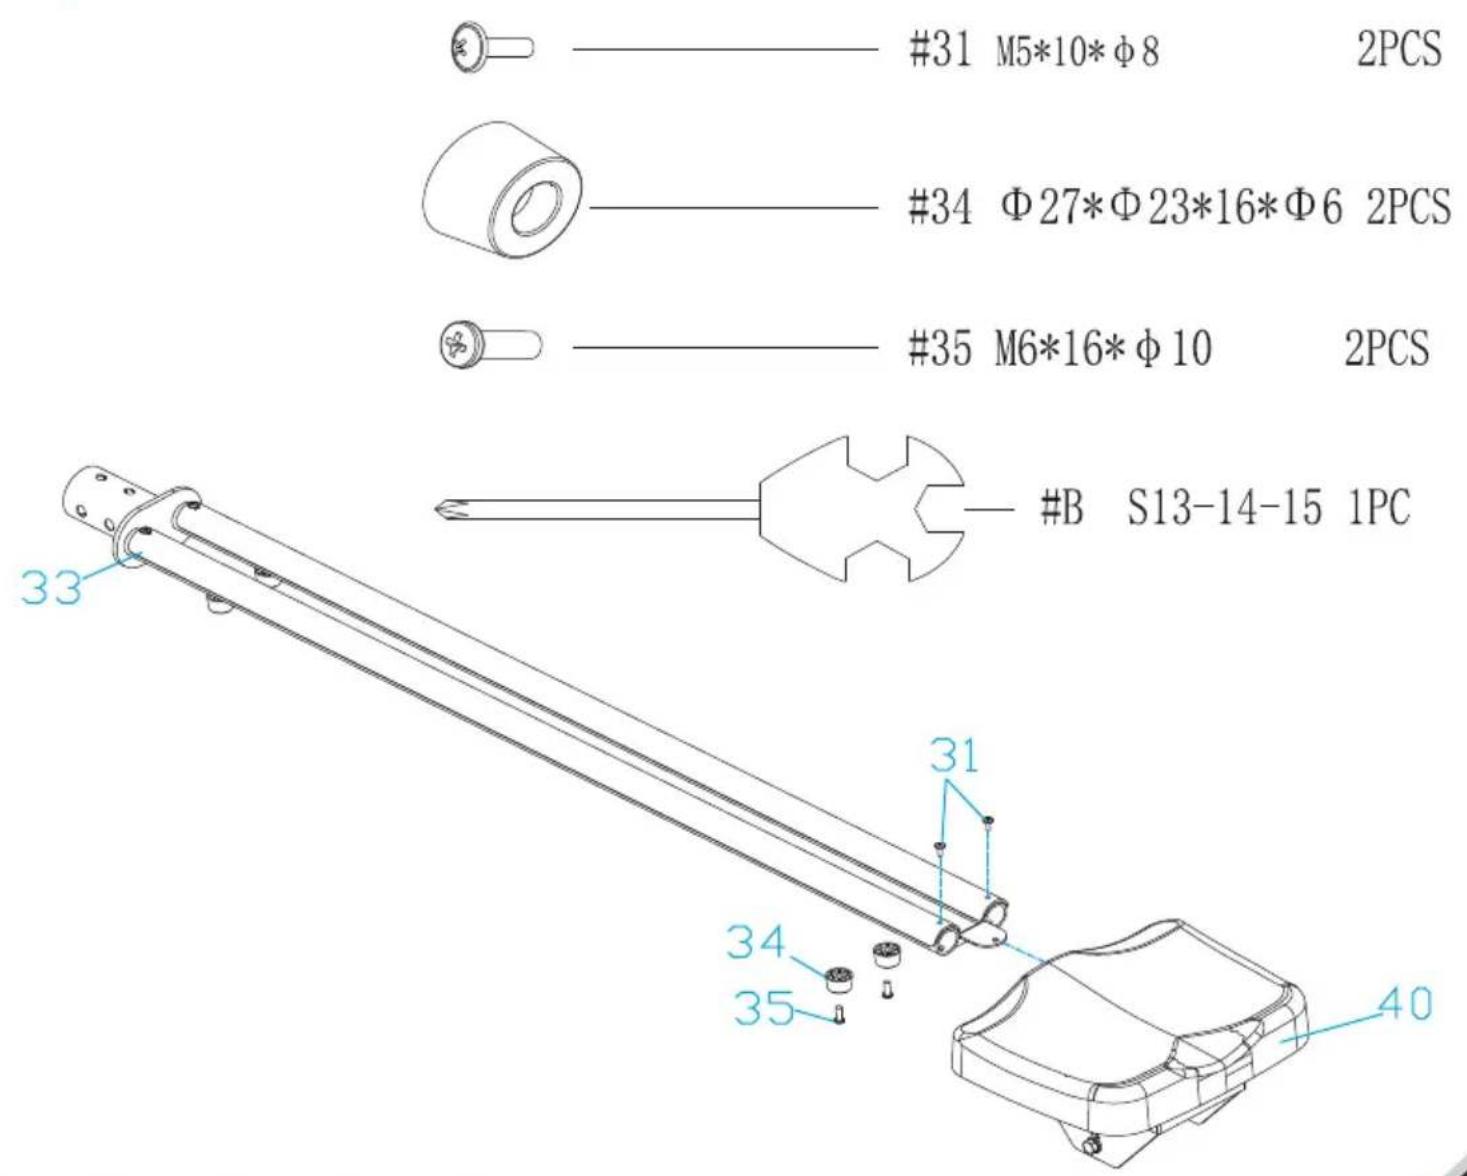
a. Take out bolts(31) from rail(33) by wrench(B);
b. Insert seat(40) into rail(33);
c. Secure rail piece(32) in the rail(33) with bolt(31) by wrench(B);
d. Secure limiter(34) in the rail(33) with bolts(35) by wrench(B).
Step 3:
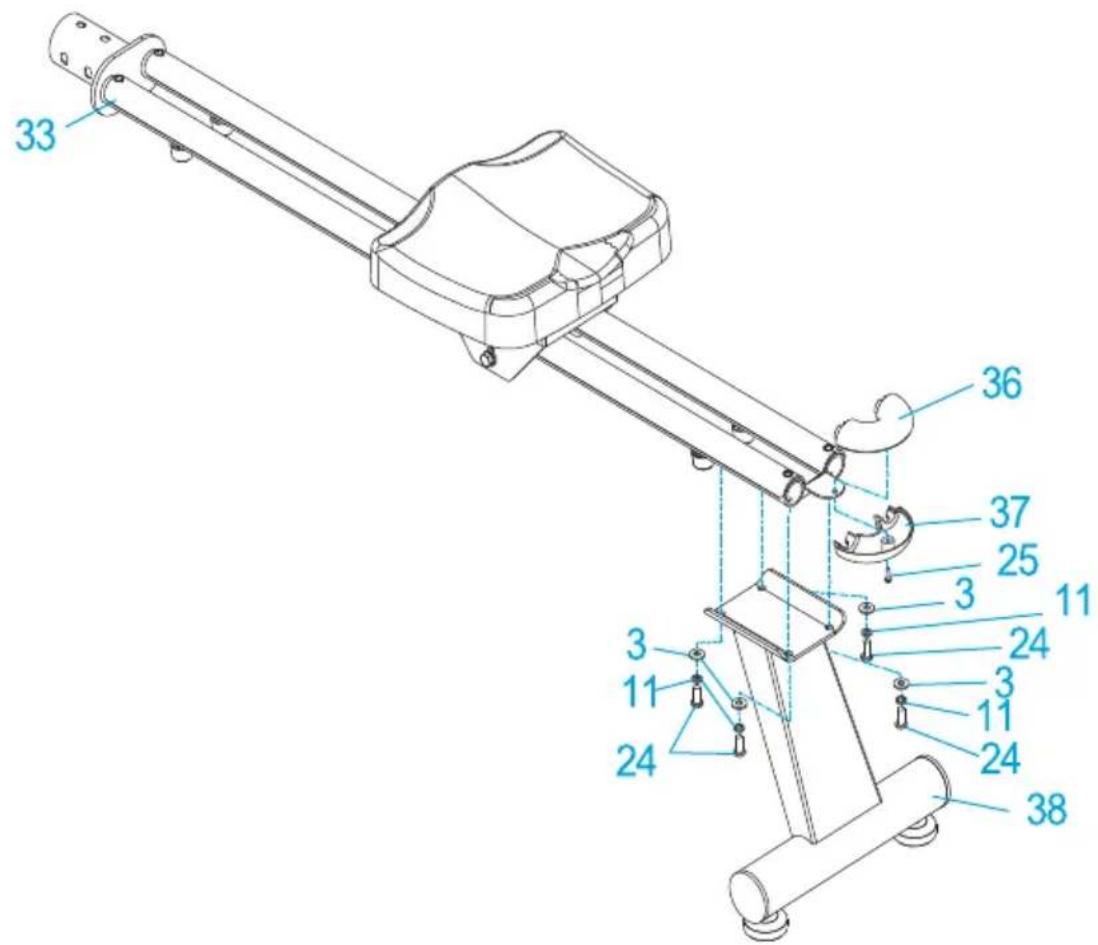
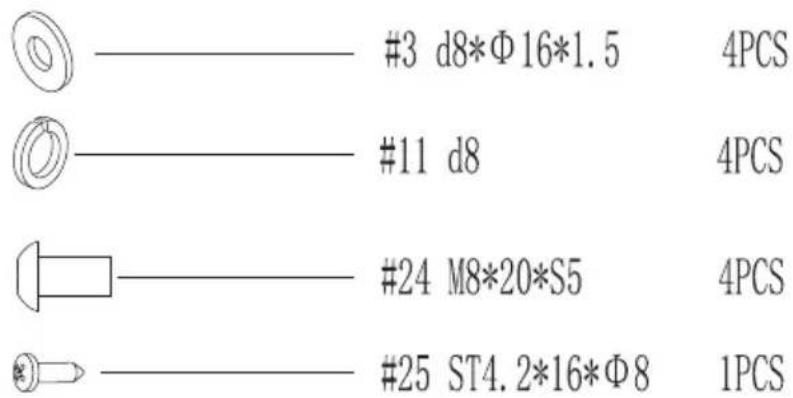
a. Take out screw(25) from rail upper and lower cover(36&37) by wrench(B);
b. Secure rail upper and lower cover(36&37) on the rail(33) with screw(25) by wrench(B);
c. Secure rear supporter(38) on the bottom of rail(33) with washers(3), spring washers(11) and bolts(24) by spanner(A).
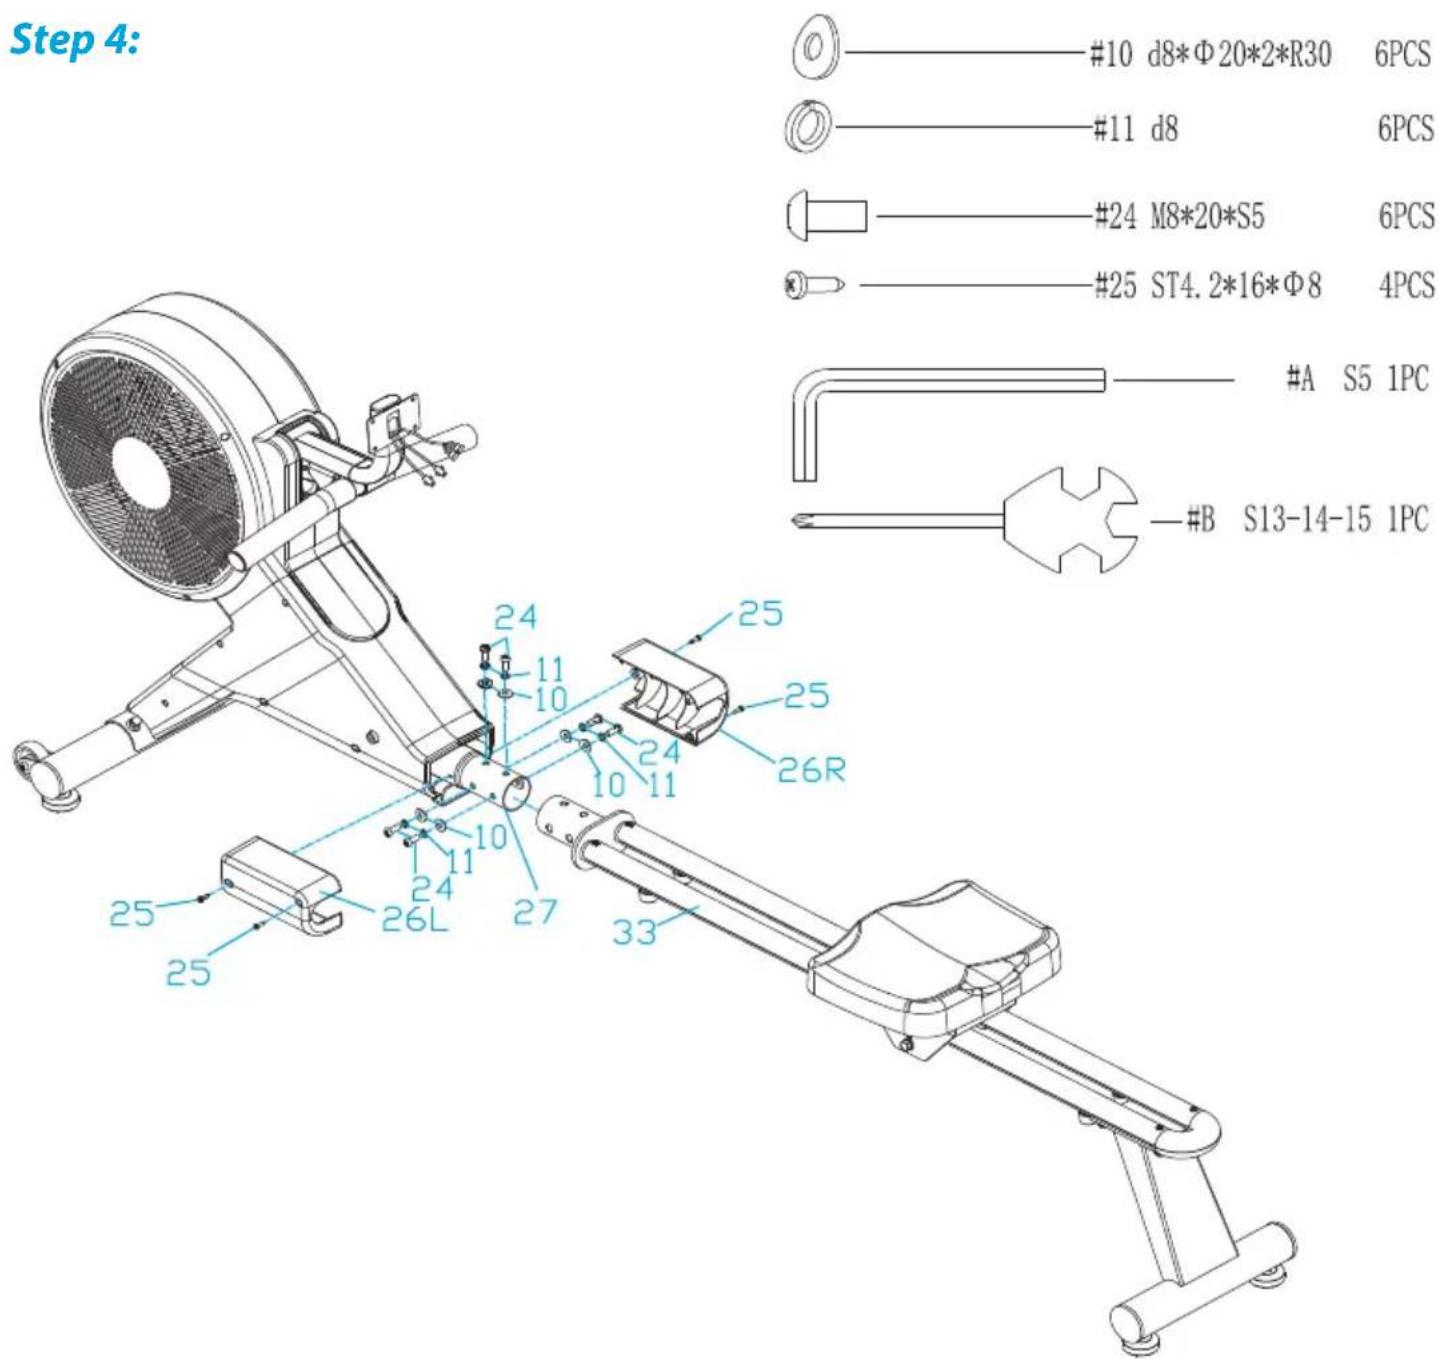
a. Take out arc washers(10), spring washers(11) and bolts(24) from main frame(27) by spanner(A);Take out screws(25) from cover(26L/R) and main frame(27) by wrench(B);
b. Attach rail(33) into main frame(27), then secure them with arc washers(10), spring washers(11) and bolts(24) by spanner(A);
c. Secure cover(26L/R) on the main frame(27) with screws(25) by wrench(B).
Step 5:
A S5 1PC
S13-14-15 1PC
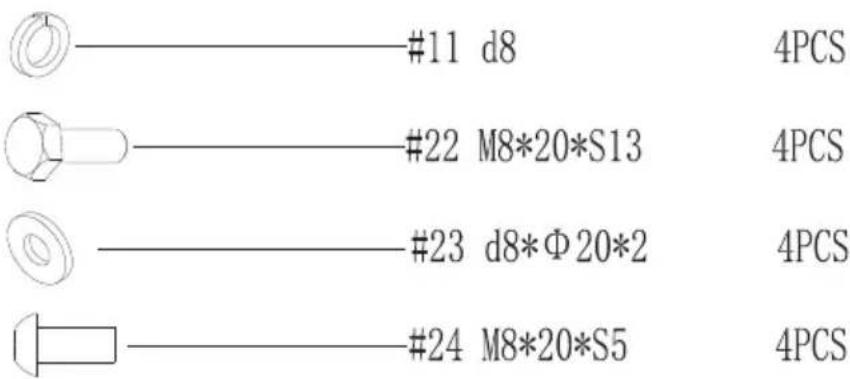
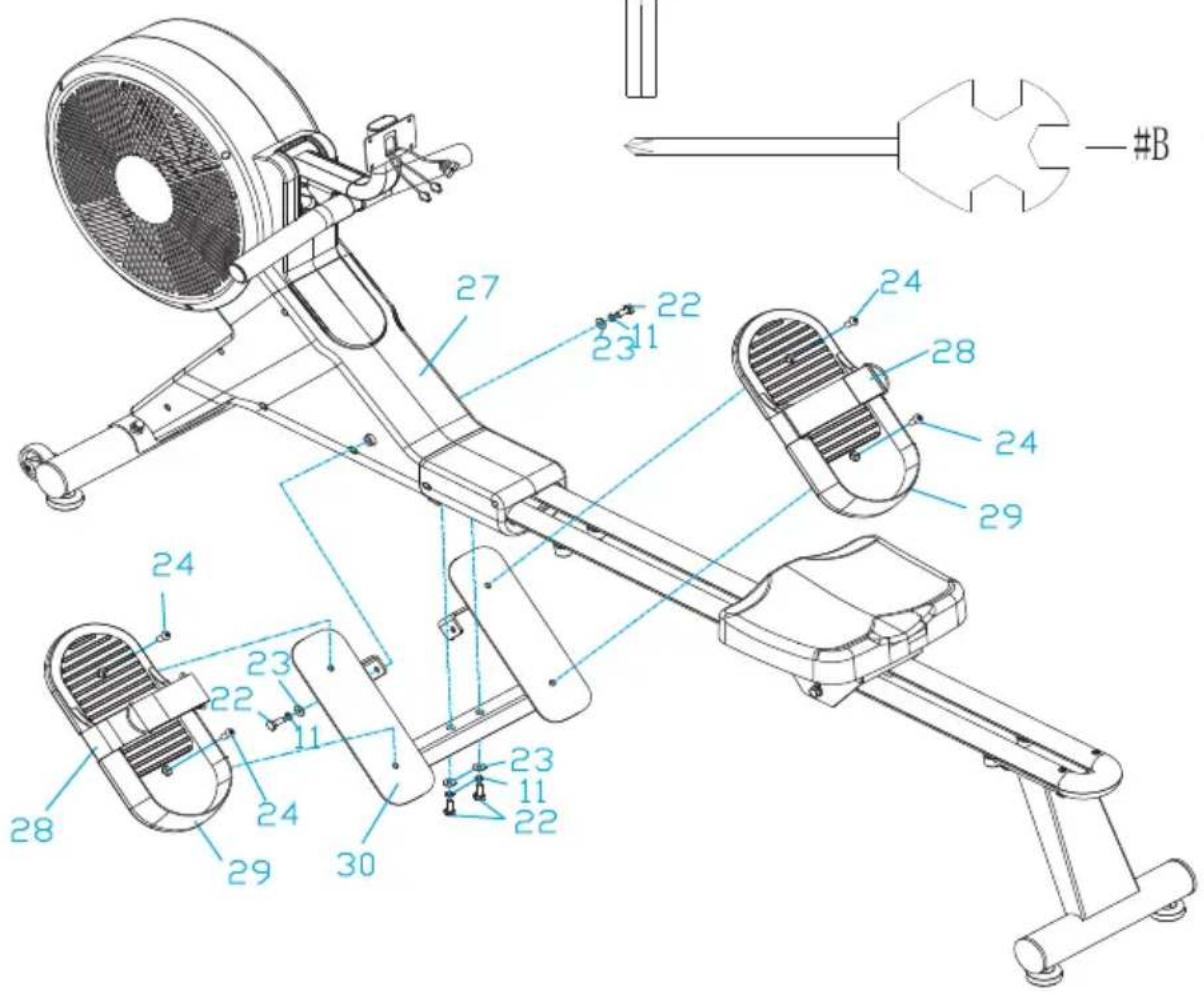
a. Take out spring washers(11), bolts(22) and washers(23) from main frame(27) by wrench(B);
b. Secure pedal plate(30) to main frame(27) with spring washers(11), bolts(22) and washers(23) by wrench(B);
c. Secure pedal(29) in the pedal plate(30) with bolts(24) by spanner(A);
Attention: The pedal strap(28) should be put in the long groove which is at the bottom of pedal(29), and the pedal(29) must not press the pedal strap(28), so that the pedal strap(29) could be free to pull up and down.
Step 6:
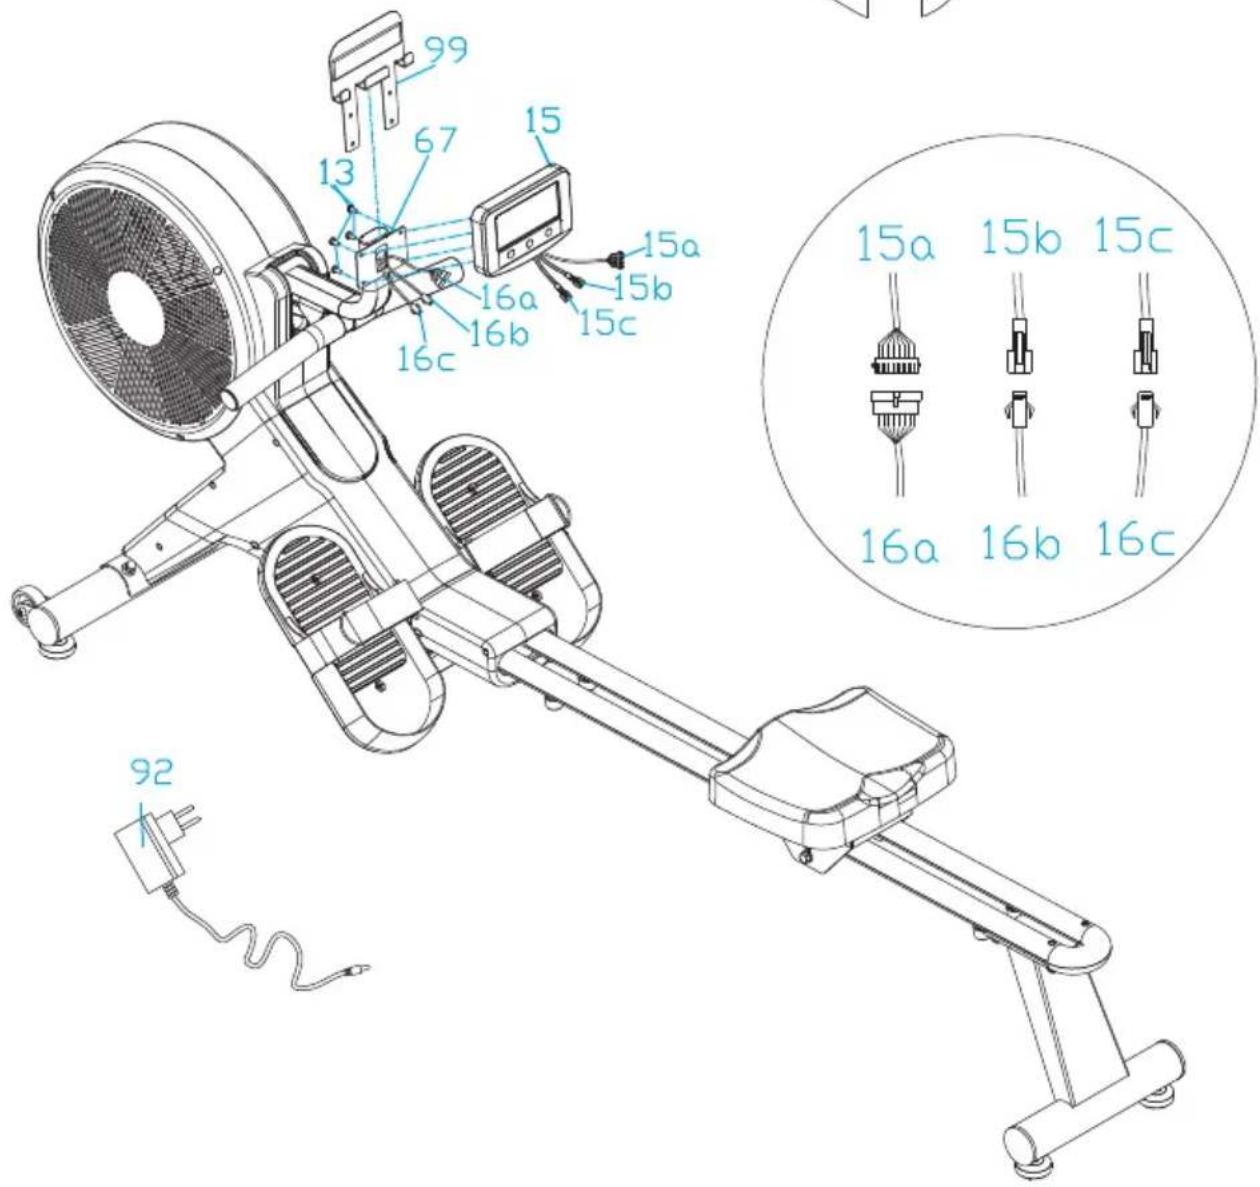
a. Pull out the trunk wire(16a/16b/16c) from computer post(67), then connect them with computer wires(15a/15b/15c), then put these wires into the computer post(67) by return;
b. Put the computer(15) on the iPad holder(99);
c. Secure computer(15) and iPad holder(99) on the computer post(67) with bolts(15) by wrench(B);
d. Insert the adapter line(38) to power hole on the front of main frame, then plug the adapter into an outlet.
Attention: Cut off the power source when don't use it long time.
ADJUSTMENTS GUIDE
1. MOVING THE MACHINE
natural_image
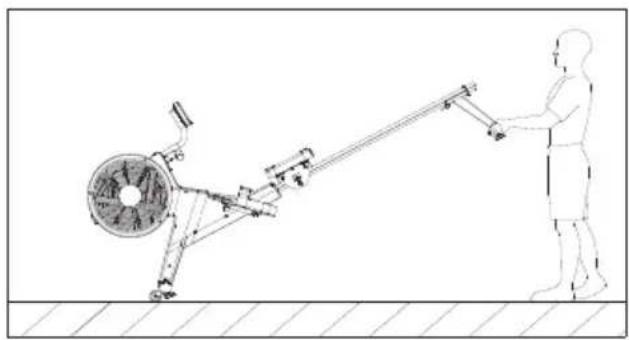
Line drawing of a person using a mechanical lever system with a circular component, no text or symbols presentTo move the machine, lift up the Rear supporter (38) until the transportation wheels on the Front bottom tube(6) touch the ground. With the wheels on the ground, you can transport the bike to the desired location with ease.
2. PEDAL ADJUSTMENT
natural_image
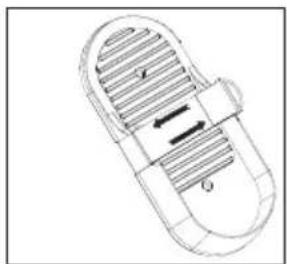
Technical line drawing of a mechanical component with internal channels and arrows indicating motion (no text or symbols)The pedal strap is adjustable and can be personalized to fit the user's foot size.
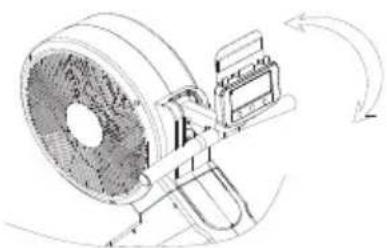
3. COMPUTER ANGLE ADJUSTMENT
natural_image
Technical line drawing of a mechanical device with rotating components and directional arrows (no text or symbols)The rotation angle of computer post can be adjusted to obtain the best view of the Computer LCD screen.
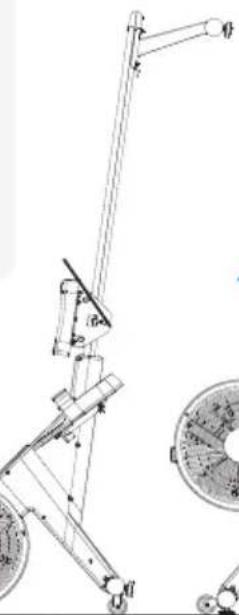
4. STORAGE
Attention!
The seat will slip when the machine is in stand up position
FIGURE A
natural_image
Technical line drawing of a mechanical linkage system with a circular dial (no text or symbols)Attention!
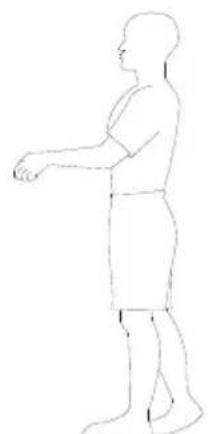
The head of user is easy to collide when the machine be stand up.
When not in use, you can stand up the machine to save the space
FIGURE B
natural_image
Line drawing of a human figure in standing posture (no text or symbols)Quick Start Guide
STRETCH EXERCISE
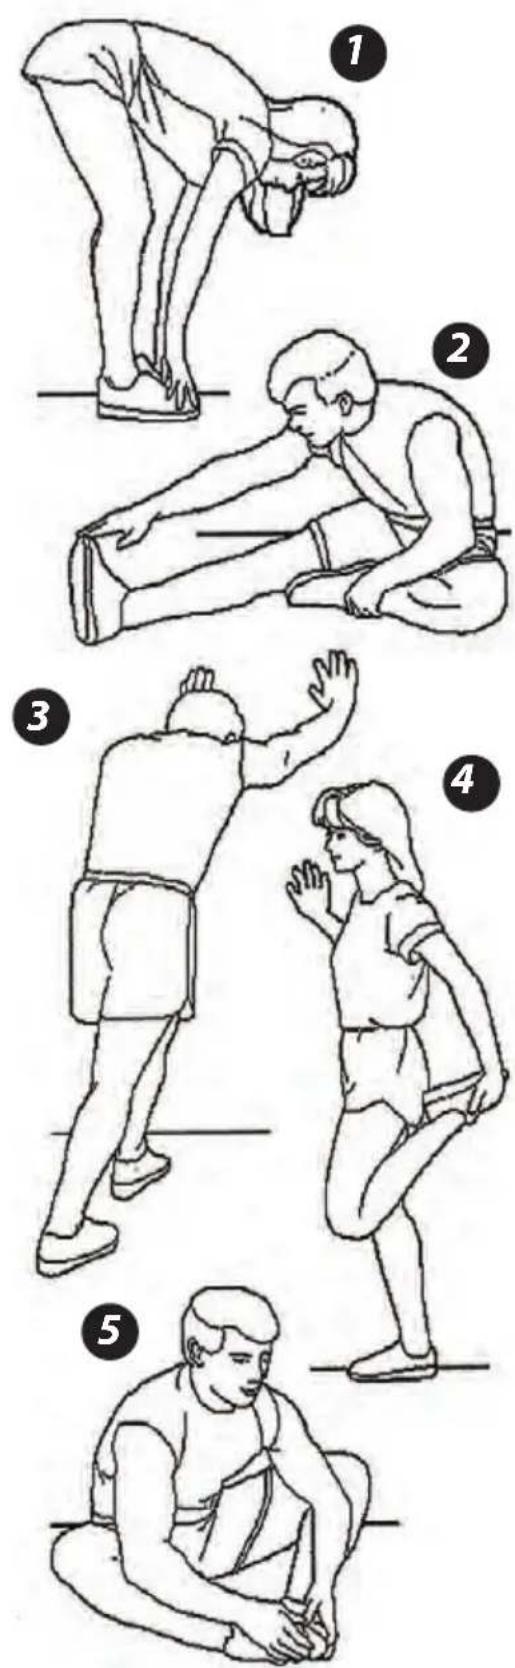
No matter how you do sports, please do some stretch at first, The warm muscle will extend easily, so warm up yourself with 5-10minutes, Then We suggest the following stretch exercise, five times.10counts for each time or longer do these exercise again after sports.
- Toe Touch: Slow bend forward from your waist, letting your back and shoulders relax as you stretch toward your toes, Reach down as far as you can and hold for 15 counts. And then relax, repeat 3 times. (pic. 1)
-
Hamstring Stretch: Sit with your right leg extend. Rest the sole of your left foot against your right inner thigh. Stretch toward your toe as far as possible. Hold for 15 counts. Relax and then repeat with left leg extend. Then relax and repeat 3 times for each leg (pic. 2)
-
Calf-Achilles Stretch: Lean against a wall with your left leg in front of the right and your arms forward. Keep your right leg straight and the left foot on the floor, then bend the left leg and lean forward by moving your hips toward the wall. Hold, then repeat on the other side for 15 counts. Then relax and repeat 3 times for each leg (pic. 3)
-
Quadriceps stretch: With one hand against a wall for balance, reach behind you and pull your right foot up. Bring your heel as close to your buttocks. Hold for 10-15 counts, relax. Repeat three times for each foot. (picture 4)
-
Inner Thigh Stretch: Sit with the soles of your feet together with your knees pointing outward. Pull your feet as close into your groin as possible. Gently push your knees towards the floor. Hold for 15 counts.Then relax and repeat 3 times. (pic. 5)
EXERCISE MONITOR INSTRUCTION MANUAL
DISPLAY INFORMATION
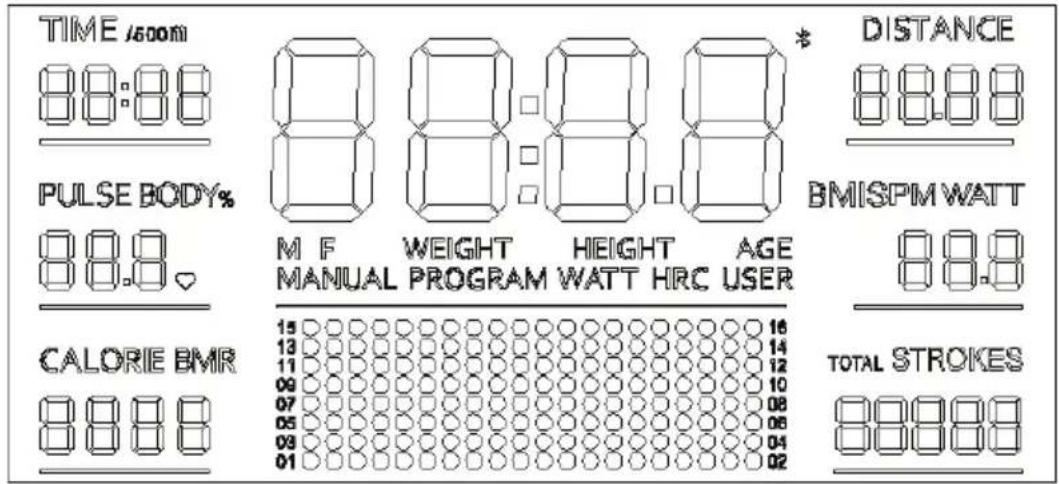
- In the main display area with motion status:
a. Scan mode: Display change according to the next items every 6 seconds, TIME→DISTANCE→PLUSE→SPM(/WATT)→CALORIE→STROKES(/TOTAL STROKES); b: Press "Display-ALT" key lets you to select and lock on to a particular function you want;
-
TIME, DISTANCE, PULSE, SPM(/WATT), CALORER, STROKES (TOTAL STROKES) display area
-
SPM/WATT, STROKES/TOTAL STROKES display area: Press "ENTER" key to change over display SPM/WATT and STROKES/TOTAL STROKES in motion status; 4. Resistance level: 16;
FUNCTION DESCRIPTION
| TIME | The time of each workout ,when starting exercise. |
| TIEM/500m | The time of each 500 meters at the current pulp velocity. |
| DISTANCE | The distances of each workout ,when starting exercise. |
| PULSE | Heart beat . |
| CALORIE | The calorie burned of each workout, when starting exercise. |
| SPM | The strokes per minute, when starting exercise. |
| STROKES | The strokes of each workout, when staring exercise. |
| TOTAL | The total strokes of all workout. |
| TIME. | 0M:00S ~ 99M:59s |
| TIME/500m | 0M:00S ~ 99M:59s |
| DISTANCE | 0.0 ~ 9999 KM |
| CALORIES | 0 ~ 9999KCAL |
| PULSE | 40-240 BPM |
| SPM | 0 ~ 999 RPM |
| WATTS | 0~899 W |
| STROKES | 0~9999 |
| TOTAL | 0~99999 |
FUNCTION DESCRIPTION
| MANUAL MODE | .PRORGAM 1: The resistance value level by manual adjustment ; |
| PROGRAM MODE | .PROGRAM2~11 : The motion mode by auto adjustment with preset value; |
| BODY FAT | .PROGRAM 12: Body fat percentage and body mass index and basal metabolic rate; |
| WATT MODE | .PROGRAM 13:The motion mode by watt target controlled ; |
| H.R.C MODE | .PROGRAM 14~17:Heartbeat target value controlled of the motion mode, 65% ,75%,85%,user-defined; |
| USER MODE | .PROGRAM18~21: The motion mode by user - defined resistance value ; |
| RECOVERY MODE | .The level of heartbeat recovery; |
| Bluetooth and APP | .Optional Bluetooth & APP; |
| Wireless pulse | .Wireless pulse receiver; |
KEY FUNCTION
| UP | . Up selector of the PRGRAM;.Adjusted upward in the Setting Mode;.Adjusted upward the resistance value level, in the motion status; |
| DOWN | . Down selector of the PRGRAM;.Adjusted downward in the Setting Mode; |
| Adjusted downward the resistance value level, in the motion status; | |
| RESET | Returns to the PROGRAM 1 in any status;All of the value clear, except the user-defined of U1-U4、WATT、PULSE。 |
| START/STOP | .Start or stop the motion status。 |
| RECOVERY | To testing the level of heartbeat recovery。 |
| ENTER | To changeover display SPM /WATT and STROKES /TOTAL STROKES in motion status;.To choose set items in the stop status needs to be set; |
| Display-ALT | .Lets you to select and lock on to a particular function you want; |
UNIT
| HEIGHT | WEIGHT | PULSE | CAL | DISTANCE | SPM | WATT |
| CM | KG | BPM | KCAL | KM | STROKES/ MIN | W |
MANUAL MODE (PROGRAM 1)
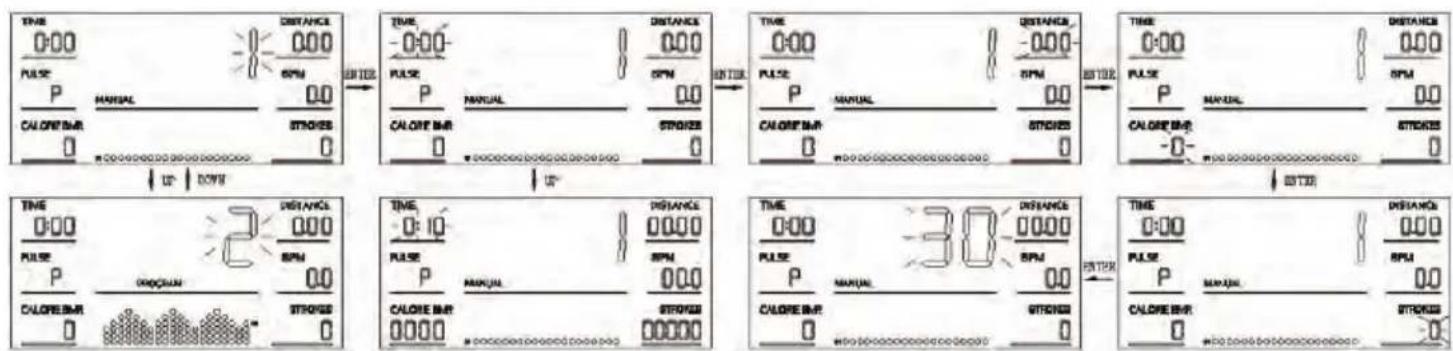
- Press "START/STOP" key to starting motion, or press "ENTER" key into setting mode.
-
In setting status, press "ENTER" key to choose setting items with relevant flashing window for TIME, DISANCE, CALORIE, STROKES, AGE;
-
Press "UP" or "DOWN" key to upward or downward adjusted, and press "ENTER" key to next item;
- Automatically exits the setting status when all operations are complete, or press "START/STOP" key in the setting status to start directly.
- It can be adjusted the resistance value level freely during the motion status, with "UP" or "DOWN" key;
- If TIME, DISTANCE, CALORIES, STROKES or any of these are setting. The corresponding value will be inverted in motion status. When any of setting value count to 0, the motion will be STOP and "DI DI" Voice Prompt;
- Press "START/STOP" key to STOP the motion, in the motion status;
PROGRAM MODE (PROGRAM 2-12)
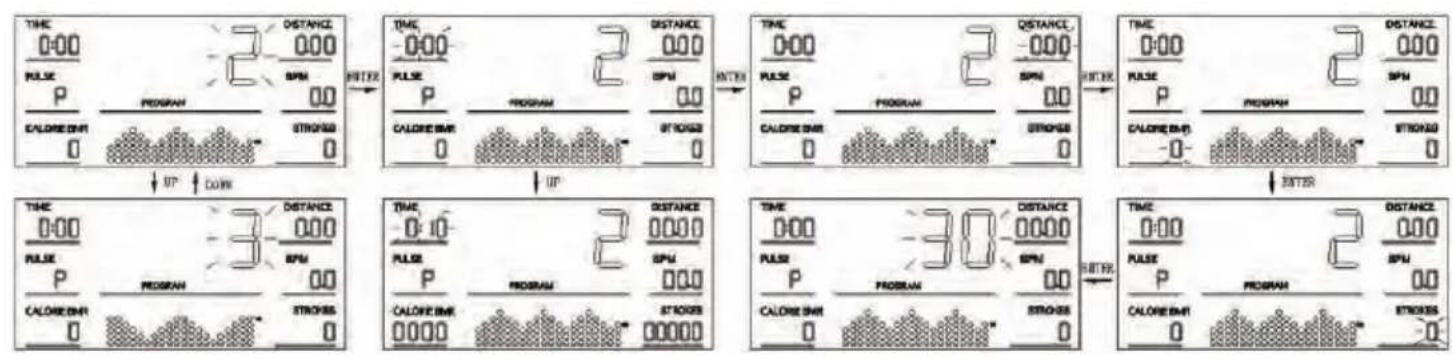
- Press "UP" or "DOWN" key to select a particular function you want;
- Press "START/STOP" key to starting motion, or press "ENTER" key into setting mode.
- In setting status, press "ENTER" key to choose setting items with relevant flashing window for TIME, DISANCE, CALORIE, STROKES, AGE;
- Press "UP" or "DOWN" key to upward or downward adjusted, and press "ENTER" key to next item;
- Automatically exits the set status when all operations are complete, or press "START/STOP" key in the settings status to start directly.
- It can be adjusted the resistance value level automatic during the motion status with program, or press "UP" "DOWN" to manual adjustment;
- If TIME, DISTANCE, CALORIES, STROKES or any of these are setting. The corresponding value will be inverted in motion status. When any of setting value count to 0, the motion will be STOP and "DI DI" Voice Prompt;
- Press "START/STOP" key to STOP the motion, in the motion status;
BODY FAT (PROGRAM 13)
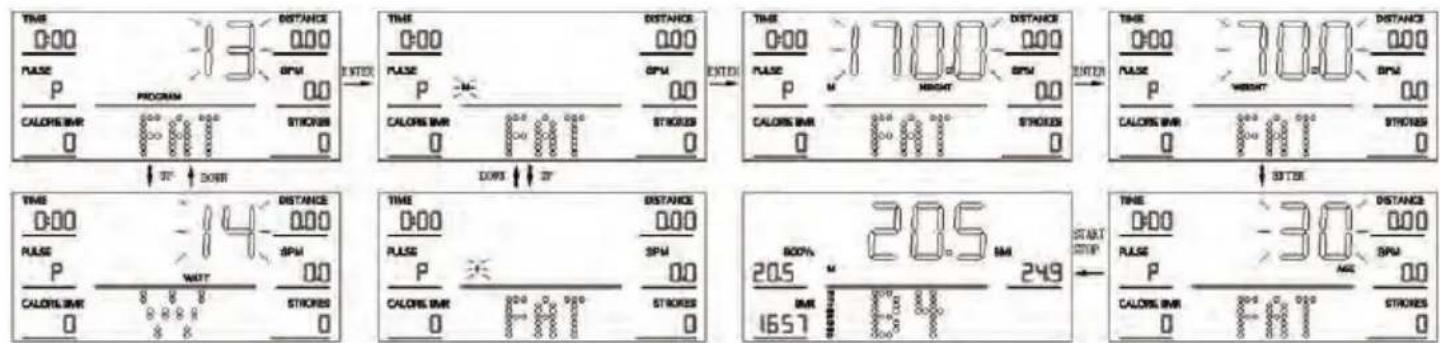
- Press "ENTER" key into setting mode;
- In setting status, press "ENTER" key to choose setting items with relevant flashing window for GENDER→HEIGHT→WEIGHT→AGE;
- Press "UP" or "DOWN" key to upward or downward adjusted, and press "ENTER" key to next item; Press "START/STOP" key to starting test and Hold the pulse sensor. Then the display will show your body fat in 8 seconds later.
- You should keep your body relaxed and your heart rate calm.
- B.M.I. (Body Mass Index)
| Gender/Age | Underweight | Healthy | Slightly Overweight | Overweight | Obese |
| Male/ ≤ 30 | < 14 | 14~20 | 20.1~25 | 25.1~35 | >35 |
| Male/ >30 | < 17 | 17~23 | 23.1~28 | 28.1~38 | >38 |
| Female/≤ 30 | < 17 | 17~24 | 24.1~30 | 30.1~40 | >40 |
| Female/ >30 | < 20 | 20~27 | 27.1~33 | 33.1~43 | >43 |
BODY FAT
| Gender | Low | Medium | Slightly High | High |
| Male | <13% | 13%-25.9% | 26%-30% | >30% |
| Female | <23% | 23%-35.9% | 36%-40% | >40% |
B.M.R (Basal Metabolic Rate)
The average number of calories burned per day for basic survival
Ref: 1300±100 (22-40years)
BODY TYPE
| B1 | B2 | B3 | B4 | B5 | B6 | B7 | B8 | B9 |
| Skinny | Thin | Slightly Thin | Slim | Healthy | Slightly Overweight | Overweight | Obese | Obesity |
WATT MODE (PROGRAM 14)
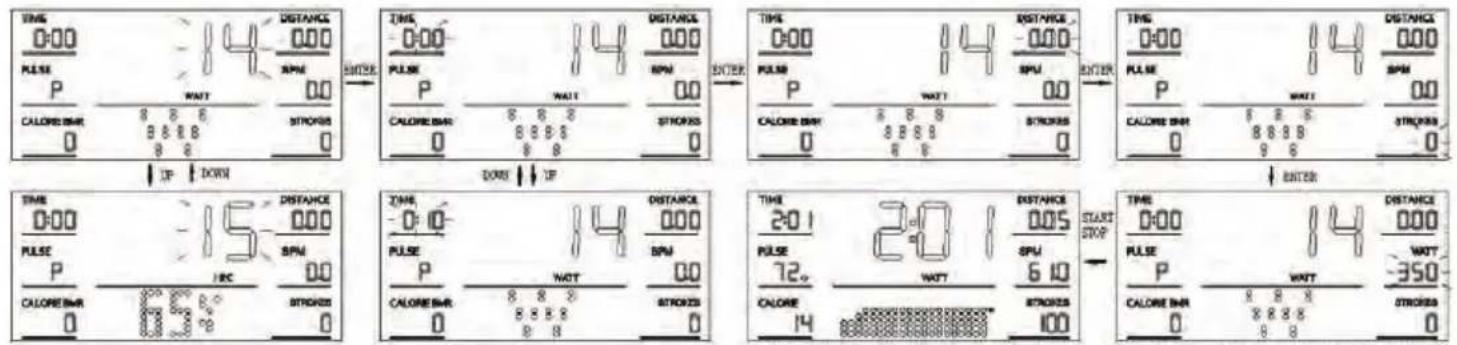
- Press "ENTER" key into setting mode;
- In setting status, press "ENTER" key to choose setting items with relevant flashing window for TIME→DISTANCE→WATT;
- Press "UP" or "DOWN" key to upward or downward adjusted, and press "ENTER" key to next item;
- Press "START/STOP" key to starting;
- It can be adjusted the resistance value level automatic during the motion status with WATT target value, or press "UP" "DOWN" to manual adjustment;
- If TIME, DISTANCE, or any of these are setting, the corresponding value will be inverted in motion status. When any of setting value count to 0, the motion will be STOP and "DI DI" Voice Prompt;
- Press "START/STOP" key to STOP the motion, in the motion status;
H.R.C MODE (PROGRAM15-18)
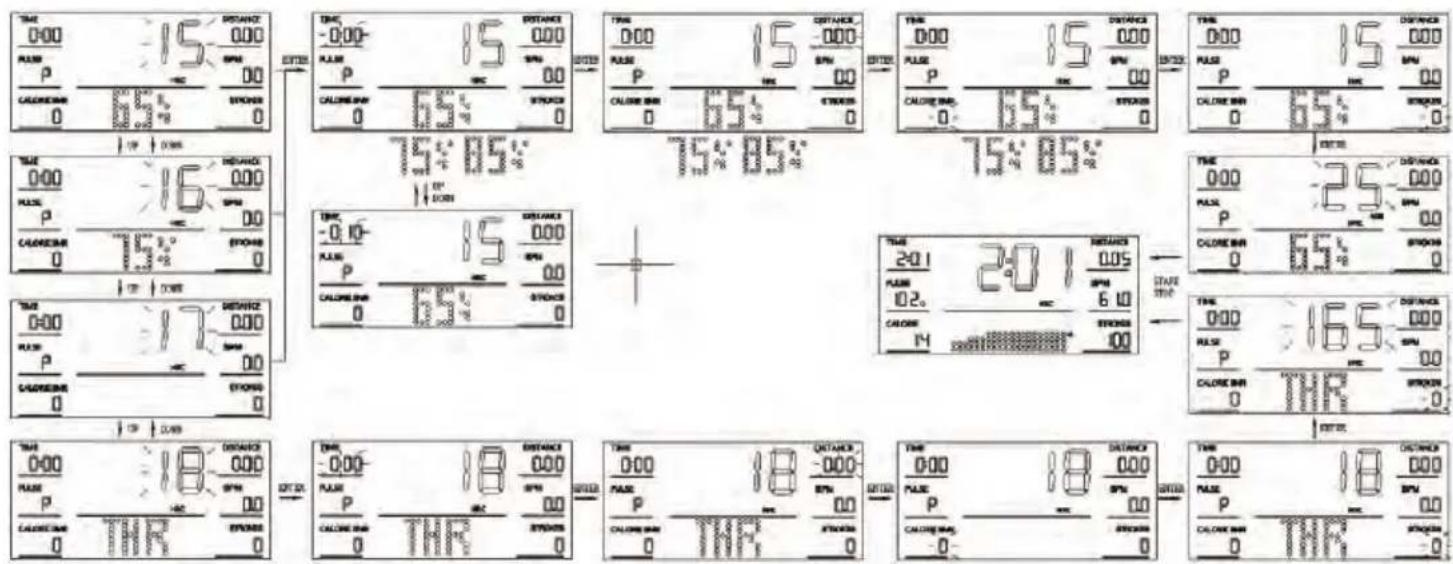
- Press "UP" or "DOWN" key to select a particular function you want;
-
Press "START/STOP" key to starting motion, or press "ENTER" key into setting mode.
-
In setting status, press "ENTER" key to choose setting items with relevant flashing window for TIME→DISTANCE→CALORIE→STROKES→AGE (only PROGRAM15 -17) → T.H.R (only PROGRAM18);
- Press "UP" or "DOWN" key to upward or downward adjusted, and press "ENTER" key to next item;
- Press "START/STOP" key to starting;
- It can be adjusted the resistance value level automatic during the motion status with T.H.R target value, or press "UP" "DOWN" to manual adjustment;
- If TIME, DISTANCE, CALORIES, STROKES or any of these are setting. The corresponding value will be inverted in motion status. When any of setting value count to 0, the motion will be STOP and "DI DI" Voice Prompt;
- Press "START/STOP" key to STOP the motion, in the motion status;
- NOTICE: You must be hold the pulse sensor in during exercise;
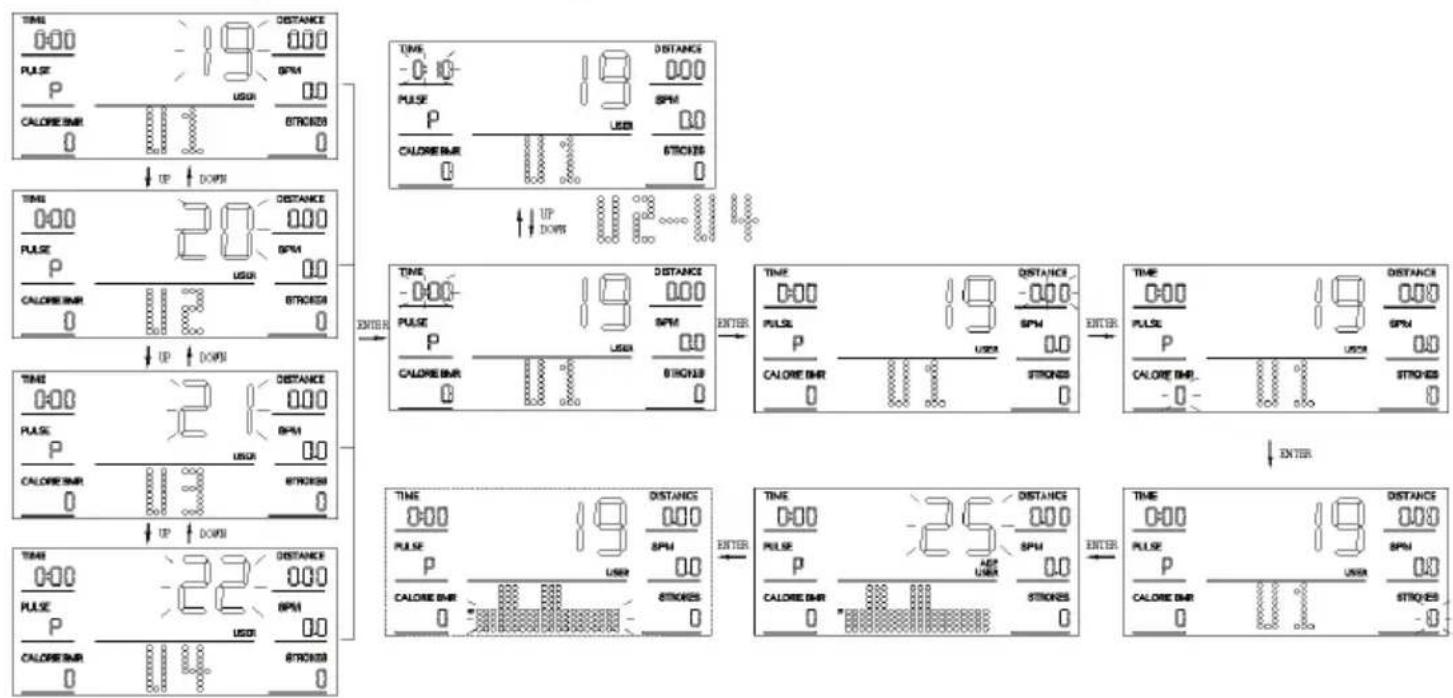
USER MODE (PROGRAM19-22)
flowchart
graph TD
    A["TIME 0:00 PULSE P CALORE BMR"] --> B["UP DOPR"]
    B --> C["TIME 0:00 PULSE P CALORE BMR"]
    C --> D["UP DOPR"]
    D --> E["TIME 0:00 PULSE P CALORE BMR"]
    E --> F["UP DOPR"]
    F --> G["TIME 0:00 PULSE P CALORE BMR"]
    G --> H["UP DOPR"]
    H --> I["TIME 0:00 PULSE P CALORE BMR"]
    I --> J["UP DOPR"]

    K["TIME 0:00 PULSE P CALORE BMR"] --> L["UP DOPR"]
    L --> M["TIME 0:00 PULSE P CALORE BMR"]
    M --> N["UP DOPR"]
    N --> O["TIME 0:00 PULSE P CALORE BMR"]

    P["TIME 0:00 PULSE P CALORE BMR"] --> Q["UP DOPR"]
    Q --> R["TIME 0:00 PULSE P CALORE BMR"]
    R --> S["UP DOPR"]
    S --> T["TIME 0:00 PULSE P CALORE BMR"]

    U["TIME 0:00 PULSE P CALORE BMR"] --> V["UP DOPR"]
    V --> W["TIME 0:00 PULSE P CALORE BMR"]
    W --> X["UP DOPR"]
    X --> Y["TIME 0:00 PULSE P CALORE BMR"]
- Press "UP" or "DOWN" key to select U1-U4 mode;
- Press "START/STOP" key to starting motion, or press "ENTER" key into setting mode.
- In setting status, press "ENTER" key to choose setting items with relevant flashing window for TIME→DISTANCE→CALORIE→STROKIES→AGE→Resistance Value;
- Press "UP" or "DOWN" key to upward or downward adjusted, and press "ENTER" key to next item;
- Press "START/STOP" key to starting;
-
It can be adjusted the resistance value level automatic during the motion status, or press "UP" "DOWN" to manual adjustment;
-
If TIME, DISTANCE, CALORIES, STROKES or any of these are setting, the corresponding value will be inverted in motion status. When any of setting value count to 0, the motion will be STOP and "DI DI" Voice Prompt;
-
Press "START/STOP" key to STOP the motion, in the motion status;
RECOVERY MODE
In exercising status, first test your pulse as above mentioned. Then press "RECEVERY" key to enter pulse recovery function. The display will show 1 minute countdown as well as your pulse rate. Hold on the pulse sensor until it counts down to zero. Then, it will pop up your pulse recovery level from F1 to F6, that is, from the fastest recovery to slowest. The fastest recovery F1 show the best;

| F1=1.0 | BEST STATE |
| 1.0 < F2 <2.0 | WELL |
| 2.0 < F3 <2.9 | GOOD |
| 3.0 < F4 <3.9 | ORDINARY |
| 4.0 < F5 <5.9 | Relatively poor |
| F6=6.0 | BAD |
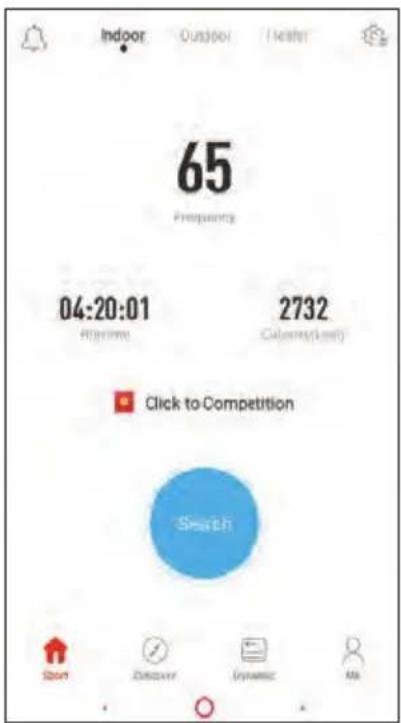
Wireless BT & APP (Optional)
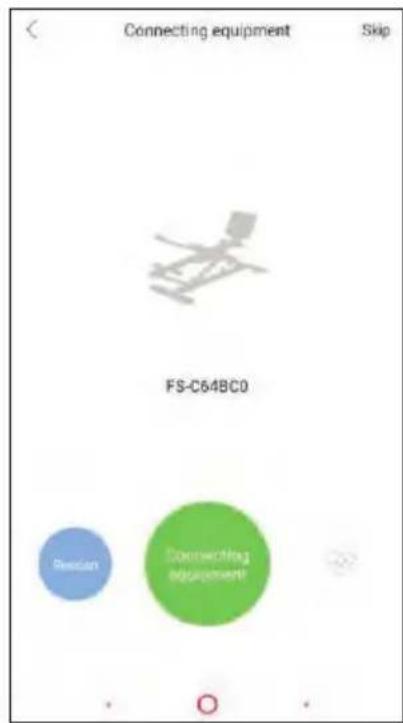
- Turn on mobile Wireless BT and APP, Click "SEARCH";
- Select a device, and click "Connecting" to control you monitor;
- The monitor ✝ icon will be show;
- Press "Start" key to starting motion, at this the monitor will close the display;
- Click "STOP", to stop the motion;
Note: Reconnect if a flashback occurs after connecting, or restart the monitor;
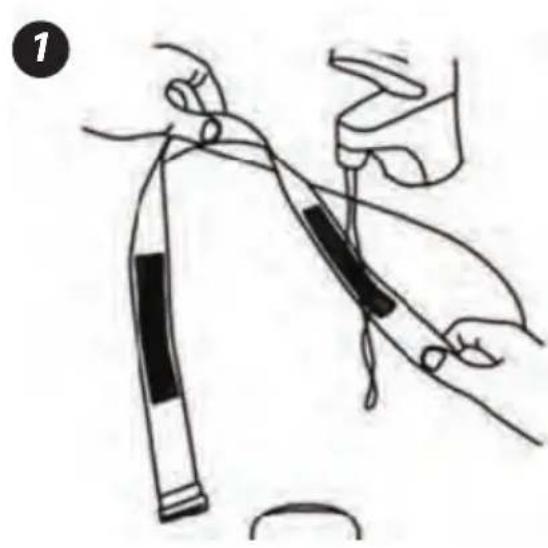
WIRELESS PULSE (Optional)
Supports the standard 5.3Khz wearing heart rate detector
-
Please wet the two electrodes of the heart rate detector
-
Wear the heart rate detector on your chest;
natural_image
Illustration of a hand holding a pen or tool with a black-and-white striped object, no text or symbols present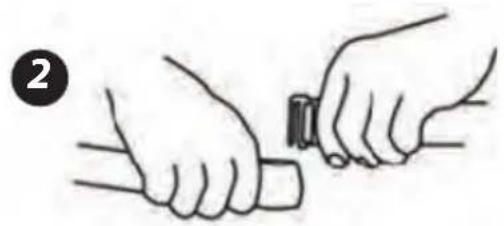
natural_image
Illustration of two hands fastening a small object with a belt buckle (no text or symbols)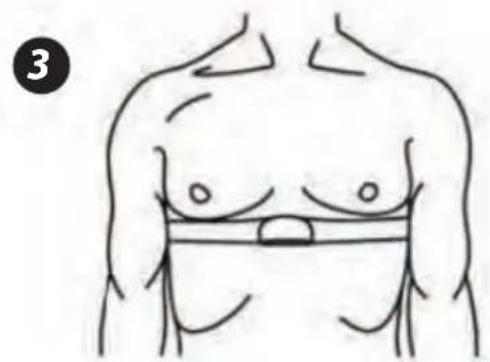
natural_image
Line drawing of a human torso with bandages and a numbered label (3), no text or symbols present.Note:
- This monitor uses a 9V/1A power adapter.
- When the monitor is abnormal, please pull out the power plug and re-insert.
Features:
• Smart Fitness Rowing Machine
- Compact Gym Exercise Rower Style
• Get Connected with the 'FitShow' App
- Pairs to Your Device via Bluetooth
- For Sports Training, Cardio Fitness, Weight Loss Fat Burning
• Measures Time, Distance, Strides, Calories Burned
• Digital LCD Display Computer Panel
- Adjustable Resistance Rower Level Setting
- Portable Folding Stand-Up Design for Easy Storage
- Quiet, Smooth-Gliding Padded Row Seat
• Comfortable Handlebar Grip and Pedal-Style Footrests
• Rugged Construction with Reinforced Handlebar Pull Cable
• Safety Certified Reliable & Lab Tested
• Auto Power-Off Battery Saving Function
• Perfect for Indoor Home & Office Gym
• Some Assembly Required
The 'Fitshow' App:
- Train Smarter & Connect with Your Favorite Devices
• Record, Collect and Review Exercise Data - Put Your Training Stats on Display & Challenge Friends
- Ability to Share Health & Fitness Data via Social Media
- Connects to the Rower via Bluetooth Smart
• Free to Download, Available for iOS and Android - Works with Smartphones, Tablets, Laptops, Computers, etc.
Wireless BT Connectivity:
- Hassle-Free Pairing, No Password Required
- Compatible with All of Today's Latest Devices
- Wireless BT Version: BLE SMART 4.0
- Wireless Range: Up to 16.4' ft.
- Pulse Connected via Wireless Receiver
Technical Specs:
- Rowing Resistance Type: Magnetic & Air
- Adjustable Time Setting: Up to 99M: 59s
• Maximum Rowing Distance Measurement: 9999 KM - Selectable Resistance / Row Intensity: 16 Levels for PMS console
- Construction Material: Steel Metal Alloy, Engineered HIPS
- User Weight Capacity: Up to 250 lbs.
• Flywheel Size: 350x55mm;
• Product Net Weight: 73.0 lbs.; Gross weight: 82.7 lbs. - Cord Length: 70.87" –inches
• Power Supply: 110V/60HZ 0.3A
• Power Output: 8.0V/1.0A - Slide Rail Length: 45" -inches, Rowing Distance: 33.27' -inches
- Folded: Collapsed Rower Size (L x W x H): 34.8" x 19.3" x 83.5" - inches
- Total Assembled Rower Size (L x W x H): 83.5" x 19.3" x 34.8"-inches
SereneLife
Questions? Issues?
We are here to help!
Phone: (1) 718-535-1800
Email: support@pyleusa.com
- IMPORTANT!
- IMPORTANT SAFETY INFORMATION
- Hardware:
- Step 5:
- A S5 1PC
- Step 6:
- ADJUSTMENTS GUIDE
- MOVING THE MACHINE
- PEDAL ADJUSTMENT
- COMPUTER ANGLE ADJUSTMENT
- STORAGE
- Attention!
- Quick Start Guide
- STRETCH EXERCISE
- EXERCISE MONITOR INSTRUCTION MANUAL
- DISPLAY INFORMATION
- FUNCTION DESCRIPTION
- KEY FUNCTION
- UNIT
- MANUAL MODE (PROGRAM 1)
- PROGRAM MODE (PROGRAM 2-12)
- BODY FAT (PROGRAM 13)
- BODY FAT
- B.M.R (Basal Metabolic Rate)
- BODY TYPE
- WATT MODE (PROGRAM 14)
- H.R.C MODE (PROGRAM15-18)
- RECOVERY MODE
- Wireless BT & APP (Optional)
- WIRELESS PULSE (Optional)
- Supports the standard 5.3Khz wearing heart rate detector
- Note:
- Features:
- The 'Fitshow' App:
- Wireless BT Connectivity:
- Technical Specs:
- SereneLife
Brand : SereneLife
Model : SLRWMC60
Category : Rowing Machine