
MN360 - Camcorder MINOLTA - Free user manual and instructions
Find the device manual for free MN360 MINOLTA in PDF.


| Product Type | Dual Lens VR Camera |
| Model | MN360 |
| Lens | Dual 1/3" Fisheye Lens, 210° FOV, Fixed Focus, f=20mm, F2.0 |
| Image Sensor | Dual 1/3" Sony CMOS, 1920x1080 pixels |
| Photo Resolution | JPEG: 8 MP, 5 MP, 3 MP |
| Video Resolution | QHD 2048x1024 @ 30fps (H.264) |
| Stitching Technology | Hardware stitch, no smartphone app required for recording |
| App | OTCam360 (iOS and Android) |
| Display Modes | Normal, VR, 4in1, Round, Asteroid |
| VR Control | Motion, Touch, Motion with Touch |
| Live Broadcast | Facebook, YouTube (requires apps) |
| Special Features | Burst (3,5,10s), Loop Record (1,2,3 min), WDR, Panorama |
| ISO Sensitivity | Auto |
| White Balance | Auto |
| Storage | microSD/microSDHC/microSDXC up to 128GB, Class 10 minimum |
| I/O Ports | Micro USB (type-B), USB 2.0, Microphone, Stereo Speakers |
| Wi-Fi | 802.11 b/g/n |
| Battery | Built-in Li-ion, 3.7V, 1300mAh, approximately 130 minutes recording time |
| Dimensions | 1.77 x 5.39 x 0.55 in (45 x 137 x 14 mm) |
| Weight | 2.92 oz (83 g) |
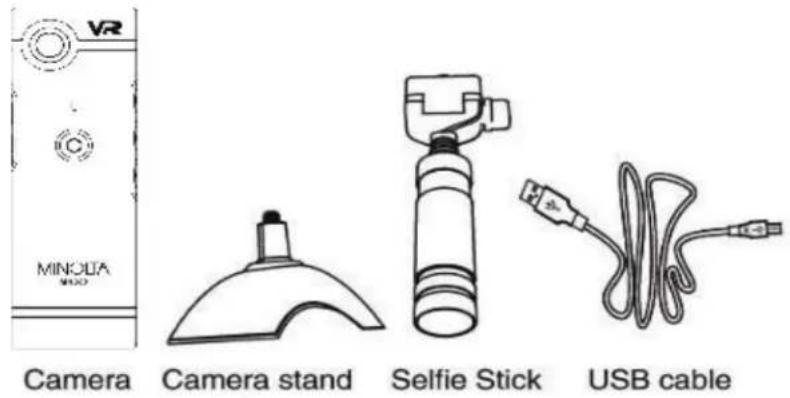
| Included Accessories | USB Cable, AC Adaptor, Pouch, Camera Stand, Selfie Stick, Quick Start Guide |
| Compatible Devices | iOS 11.0+, Android 8.0+, Windows 10, macOS 10.13 |
| Maintenance | Clean with soft dry cloth; avoid moisture and extreme temperatures |
| Safety | Do not disassemble; keep away from children; stop use if overheating |
| Spare Parts and Repairability | Contact Minolta support for authorized service; no user-serviceable parts |
Frequently Asked Questions - MN360 MINOLTA
User questions about MN360 MINOLTA
0 question about this device. Answer the ones you know or ask your own.
Ask a new question about this device
Download the instructions for your Camcorder in PDF format for free! Find your manual MN360 - MINOLTA and take your electronic device back in hand. On this page are published all the documents necessary for the use of your device. MN360 by MINOLTA.
USER MANUAL MN360 MINOLTA
natural_image
Black handheld electronic device with control buttons and a grid-patterned body (no visible text or symbols)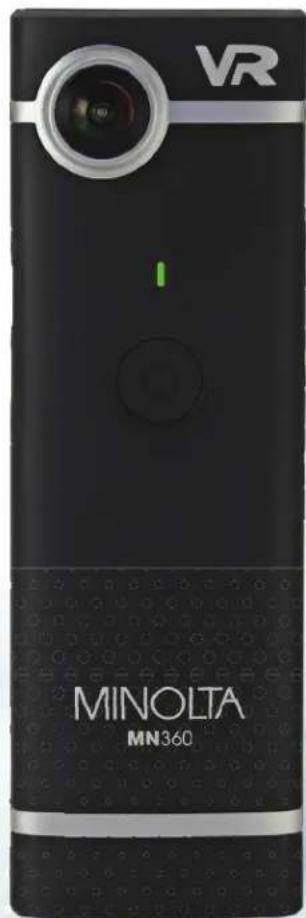
natural_image
Black MINOLTA Min360 VR headset with camera lens and control buttons (no visible text beyond branding)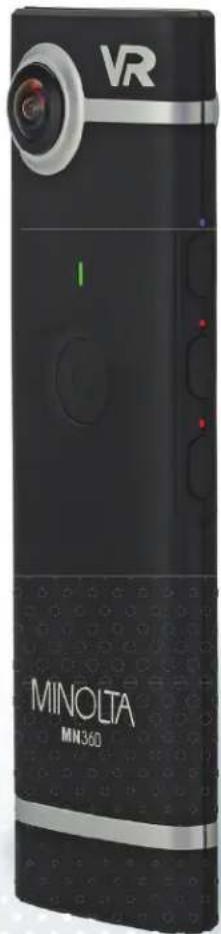
natural_image
Black Minolta Mini360 VR headset with visible camera and control buttons (no text beyond branding)MN360 User's Guide
1.1 Introduction
Congratulations on the purchase of your Minolta MN360 Dual Lens VR Camera! Capturing high-quality full 360-degree images and videos is made fast, easy and simply utilizing advanced technology.
Record every life experience without missing a single view. Ideal for reliving an immersive 360-degree virtual reality experience or shooting panoramic views, the MN360 features dual 210-degree fisheye lenses that capture your entire surroundings in vivid QHD 30-fps (2048x1024) detail. Utilizing robust hardware stitching, just grab your camera and begin shooting without the need to sync to your smartphone. With a lightweight design, simple shape and weighing only 3 ounces, the MN360 comfortably fits in the palm of your hand. A free iOS and Android app (OTCam360) creates a virtual reality experience that allows you to pan or zoom in any direction as if standing directly in the scene. You can also effortlessly share your full 360-degree footage to social media, or live-stream on popular social media platforms.
Visit our website at www.minoltadigital.com for the latest news and updates on our products.
1.2 Included in This Package
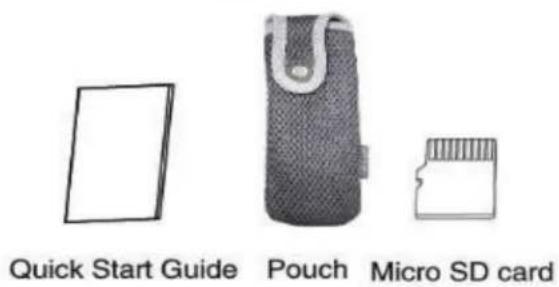
All of the items included in this package are shown and described below. The only accessory required for use is the MicroSD card. All of the other included accessories are optional and are not required for use.
1.3 MN360 Body Interface
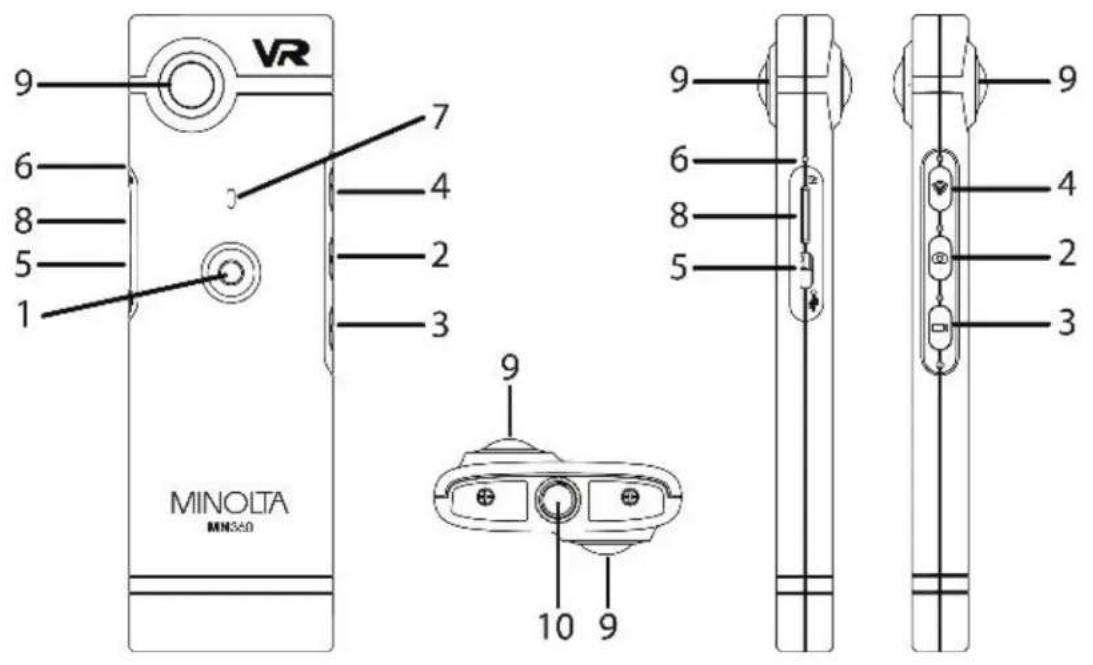
| 1) Power/Record Button | 4) Wi-Fi Button 7) Main Status | LED |
| 2) Photo Mode | 5) MicroUSB / Charging Port | 8) MicroSD Slot |
| 3) Video Mode 6) Reset | Button 9) Lenses | |
| 10) Accessory Socket |
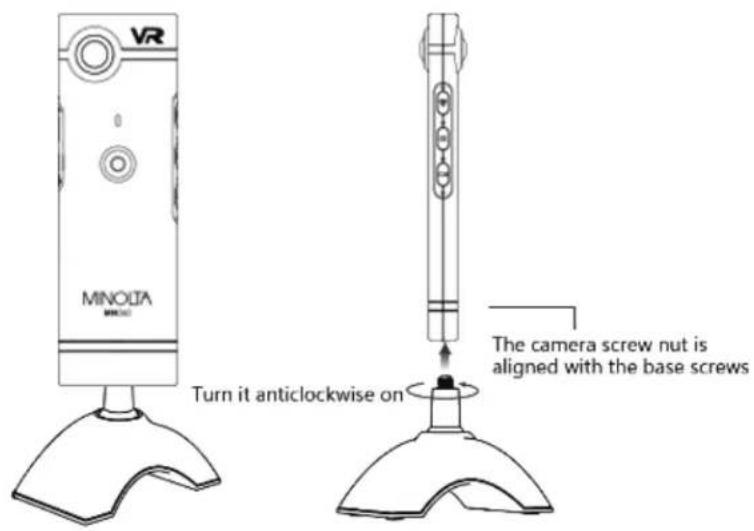
1.3.1 Accessory Installation Diagram
2. First Use
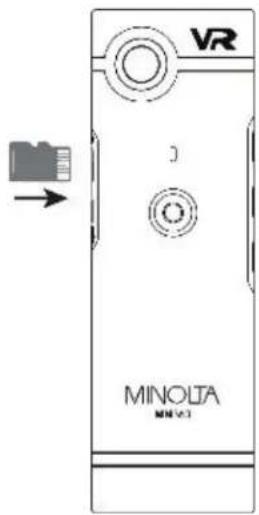
2.1 Inserting the MicroSD Memory Card
A MicroSD card is required for recording videos and capturing photo. Follow the diagram below for proper insertion of the MicroSD memory card. Please be sure to use a MicroSD card with a minimum class rating of Class 10 to ensure high quality and processing of your files.
To remove the MicroSD card, simply push the card further into the memory card slot and it will automatically pop back out. Do not insert or remove the MicroSD card while the camera is powering on or off.
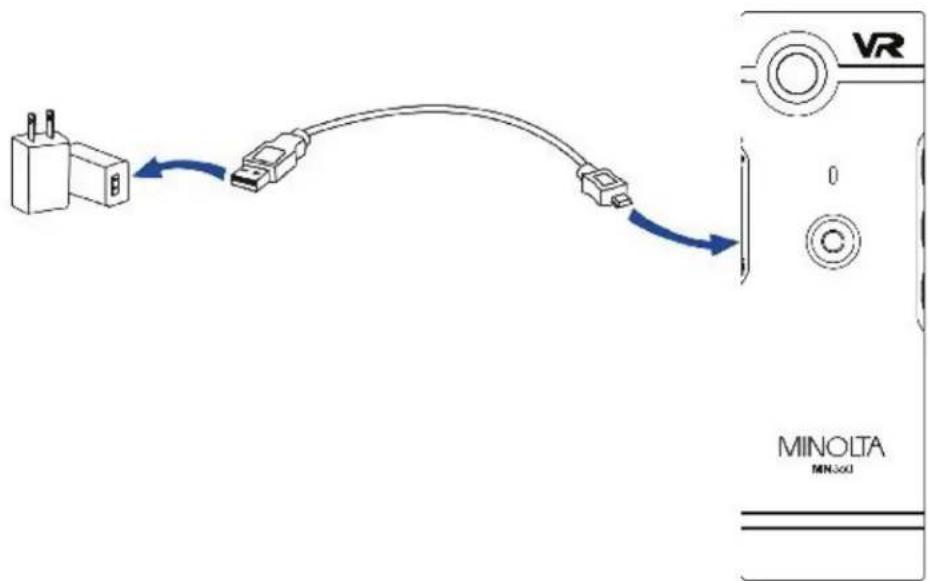
2.2 Charging the Battery
Connect your camera to the included AC adaptor with the USB cable provided for charging. When your camera connects with the USB cable, the red LED will stay solidly lit. When fully charged, the red LED turn off.
2.3 Powering On and Off + Main Status LED
To power your camera on, press the power button for 4 seconds. The camera will begin to initialize and power on. The total initialization time is 9 seconds. Once the camera emits 2 sets of audible beeps, the camera is ready for use. To power your camera off, press the power button for 4 seconds until the camera emit 3 beeps. You can then release the power button.
The powering on/off sequence was designed this way to prevent accidental recording and battery drain while the camera is packed away in your bag or pocket.
The camera's main status LED is located on the front of the camera, above the power button. This LED is for displaying the camera's overall state. Below is a chart describing each of the LED's colors and state.
| LED COLOR | FUNCTION |
| No Color | Camera is powered off |
| GREEN solidly illuminated | Camera is ready to capture; standby |
| GREEN fast flashing | Insert MicroSD card |
| GREEN slow flashing | Video is being recorded |
| GREEN single flash | Photo was captured |
| GREEN & ORANGE flash | Battery charge is running low |
2.3.1 Enabling Wi-Fi and Wi-Fi Status LED
Enabling Wi-Fi will allow you to connect your camera to your smartphone. To enable the Wi-Fi function on your camera, ensure your camera is powered on and press the Wi-Fi button located on the side of your camera for 2 seconds. The Wi-Fi's status LED will begin illuminating BLUE. To disable the Wi-Fi function, press the Wi-Fi button for 3 seconds until the camera emits an audible beep.
The Wi-Fi status LED is located on the side of the camera body, above the Wi-Fi button. This LED is for displaying the Wi-Fi's overall state. Below is a chart describing each of the LED's colors and state.
| LED COLOR | FUNCTION |
| No Color | Wi-Fi is disabled |
| BLUE fast flashing | Wi-Fi is enabled |
| BLUE slow flashing | Wi-Fi is waiting to be connected |
| BLUE solidly illuminated | Wi-Fi is connected to smartphone app |
| BLUE double flash loop | Camera is entering Live Streaming |
| RED flashing | Live Streaming mode is enabled |
2.3.2 Video Mode and Video Status LED
To begin recording video, first ensure that you are in Video mode. To enter Video mode, simply press the Video button located on the side of your camera. Once Video mode is enabled, the Video status LED will remain solidly illuminated in RED and the camera will emit an audible beep.
NOTE: Your camera enters Video mode automatically each time you power your camera on or off.
Once your camera is in Video mode, tap the power/record button once to begin recording. The camera will emit an audible beep, and the main status LED will slowly flash in GREEN.
To stop recording, tap the power/record button again and the camera will return to standby. The main status LED will return to solidly illuminated, and the camera will emit an audible beep. Your video files will be stored on your MicroSD memory card.
The Video status LED will stay solidly illuminated when Video mode is enabled.
2.3.3 Photo Mode and Photo Status LED
To capture a photo, first ensure that you are in Photo mode. To enter Photo mode, simply press the Photo button located on the side of your camera. Once Photo mode is enabled, the Photo status LED will remain solidly illuminated in RED and the camera will emit an audible beep.
NOTE: Your camera reverts back to Video mode automatically each time you power your camera on or off.
Once your camera is in Photo mode, tap the power/record button once to capture a photo. The camera will emit an audible beep, and the main status LED flash once per photo captured. Your photo files will be stored on your MicroSD memory card.
The Photo status LED will stay solidly illuminated when Photo mode is enabled.
3. Connecting Your Camera to Smartphone App
Your camera is designed to be used with or without connecting to your smartphone. Connecting your camera to your smartphone adds many extra features and conveniences.
The app offers you the following features when connected:
(1) Enables as a remote viewfinder in real time
(2) Remote control all of your camera's functions
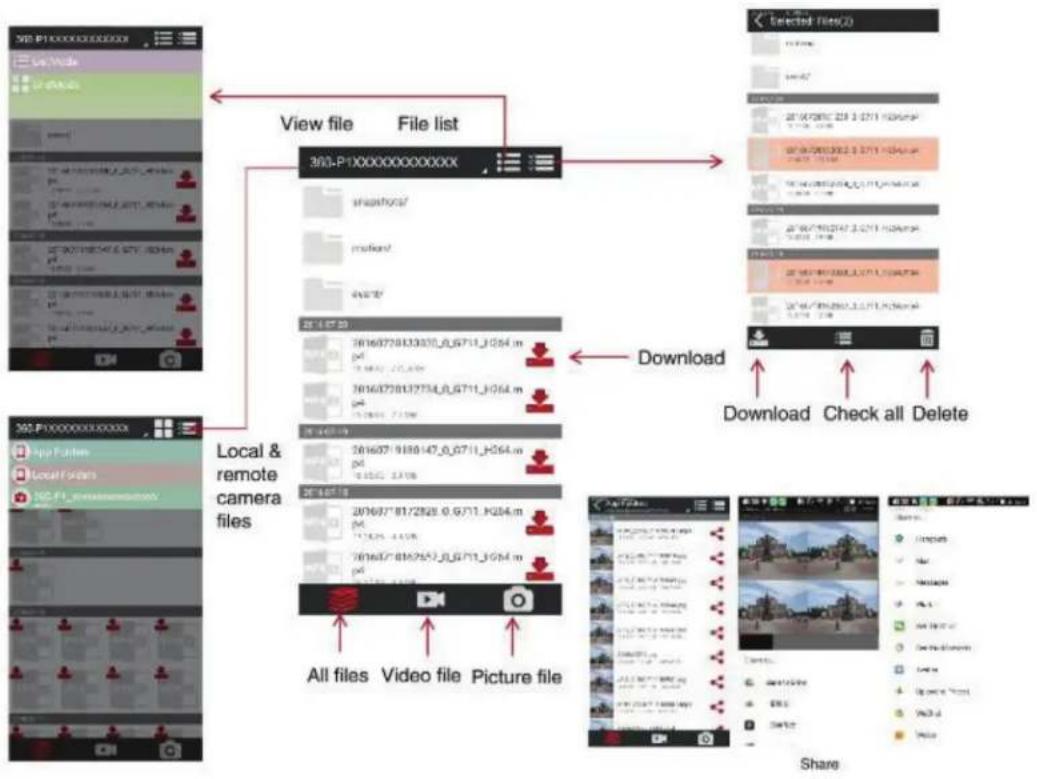
(3) Download your videos and photo directly to your smartphone
(4) Live Streaming on YouTube and Facebook
(5) Enable Photo Timer, Photo Burst Mode, WDR and Loop Record
(6) Adjust Video and Photo resolutions, quality and exposure
(7) Cycle display modes of Normal, VR, 4in1, Round and Asteroid Views
(8) Adjust camera orientation and stitch preferences
(9) Adjust VR control of touch, motion and motion + touch
(10) Adjust date & time, microphone, light frequency, auto-power, memory card formatting, resetting to default, camera Wi-Fi settings
To integrate your camera with your smartphone, follow the directions below.
App to install: OTCam360 (Available on iTunes and Google Play Store)
Camera's SSID: MN360-xxxxxxxx (represents the camera's ID number)
Wi-Fi Password: 87654321


(1) After successfully installing the OTCam360 smartphone app, enable your camera's Wi-Fi (refer to 2.3.1 in previous instructions).
(2) Once your camera's Wi-Fi is enabled, go to your smartphone's Wi-Fi settings and connect to "MN360-XXXXXXXXX" from the available Wi-Fi networks list.
(3) You will be prompted for the camera's password. Enter 87654321.
(4) Once your smartphone shows that your camera is successfully connected, launch the OTCam360 app. After a few seconds of loading, the app should show that you are connected. Your camera will also emit an audible beep, and the BLUE Wi-Fi status LED will change to solidly illuminated.
NOTE: If your camera's Wi-Fi feature is enabled and dormant for over 3 minutes, the camera will disable the Wi-Fi feature and you will need to enable Wi-Fi again by pressing the Wi-Fi button once more. Please refer to instructions 2.3.1.
3.1 App Functions and Settings
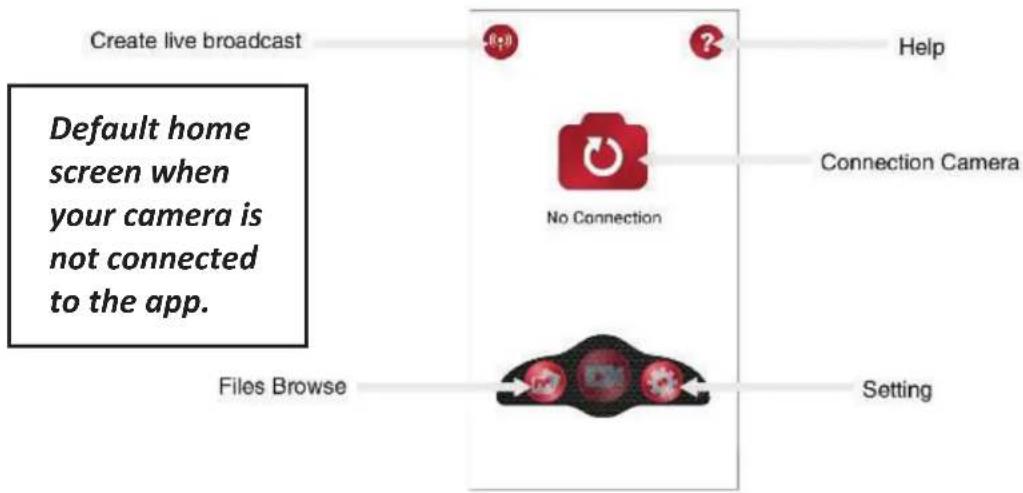
flowchart
graph TD
    A["Create live broadcast"] --> B{No Connection?}
    B --> C["Help"]
    B --> D["Connection Camera"]
    B --> E["Files Browse"]
    E --> F["Setting"]
3.1.1 Camera List
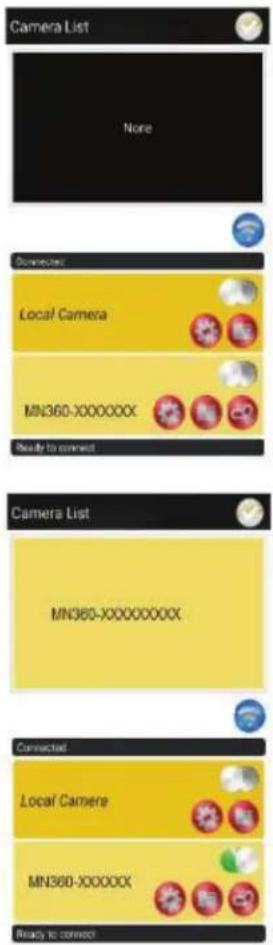
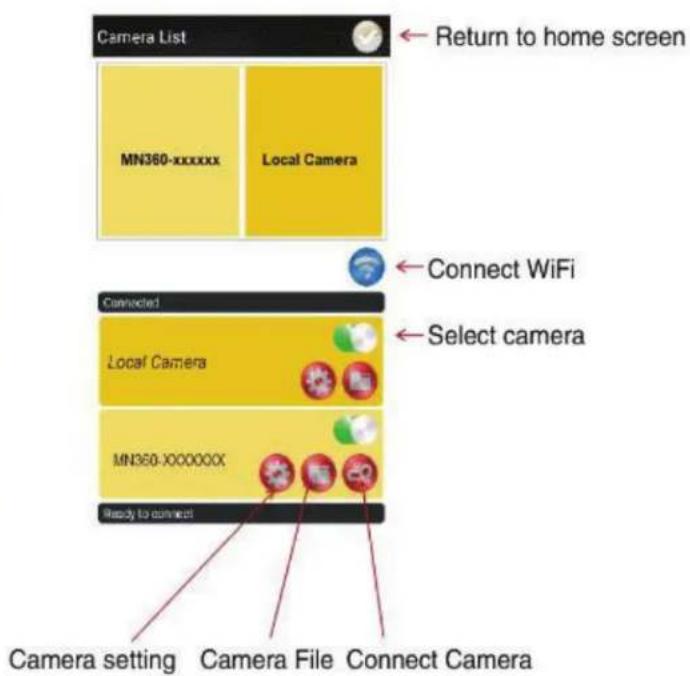
3.1.2 App Main Interface
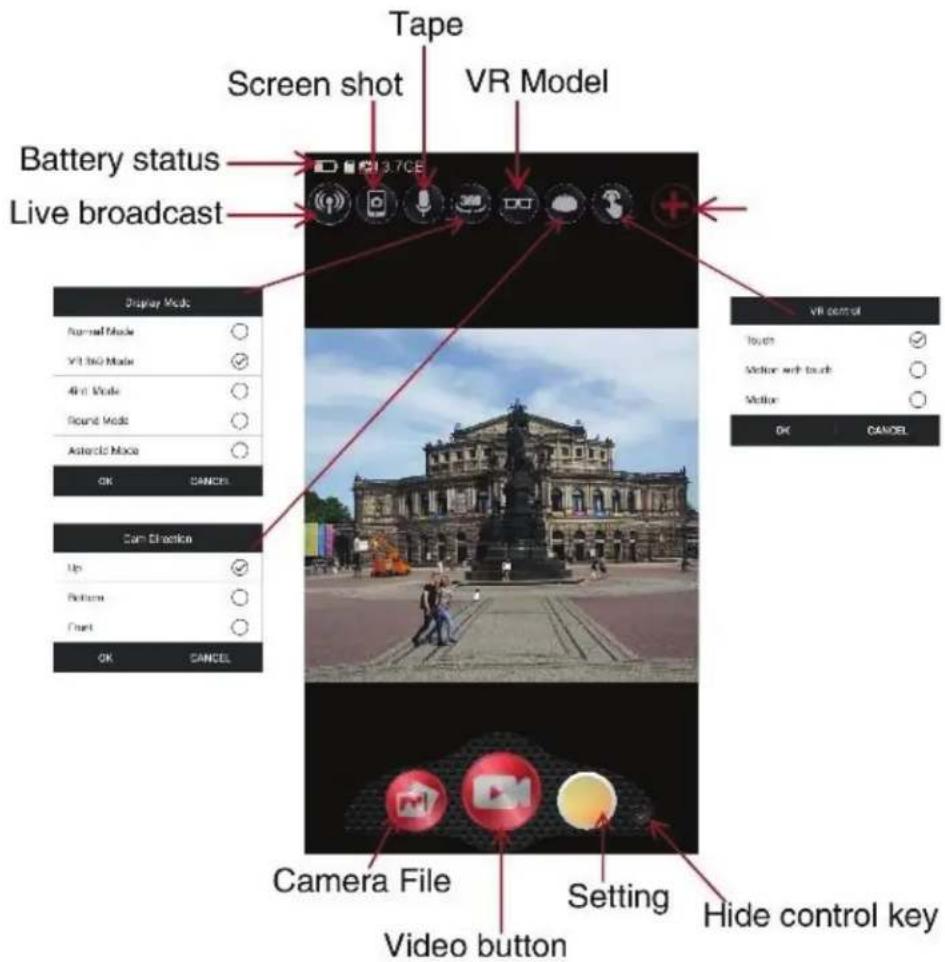
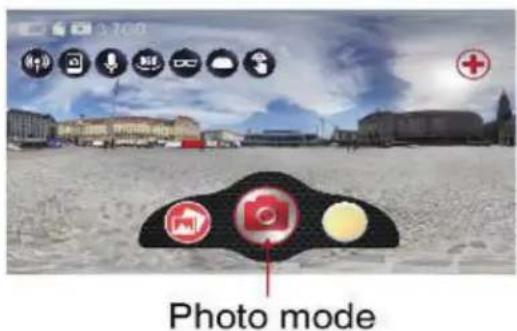
OTCam360 App displayed in landscape mode on smartphone
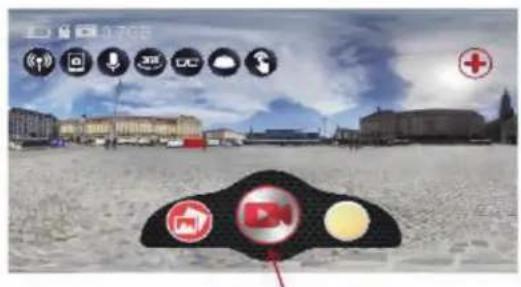
Click and drag the control button to adjust the position
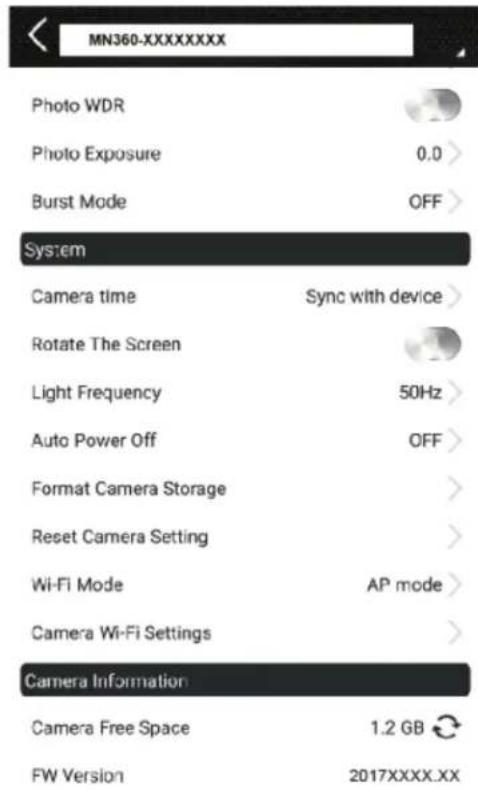
3.1.3 App Setting Menu and Quick Settings
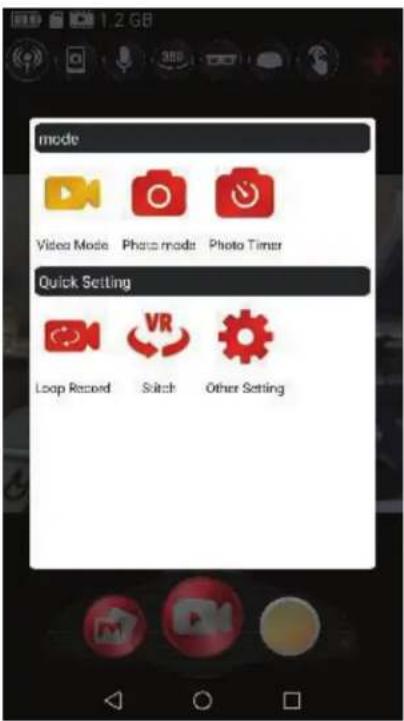
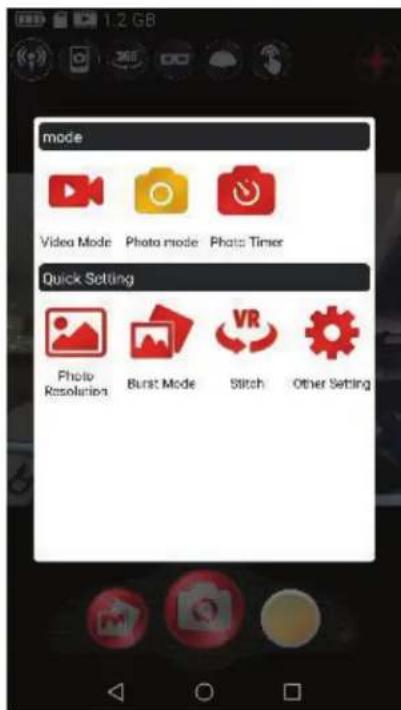
Video Mode Photo Mode Loop Record, Stitch, Settings Photo Resolution, Burst Mode, Stitch and Settings
Settings Screen NOTE: The options change depending on whether you are in PHOTO or VIDEO mode
3.1.4 App VR Display Modes
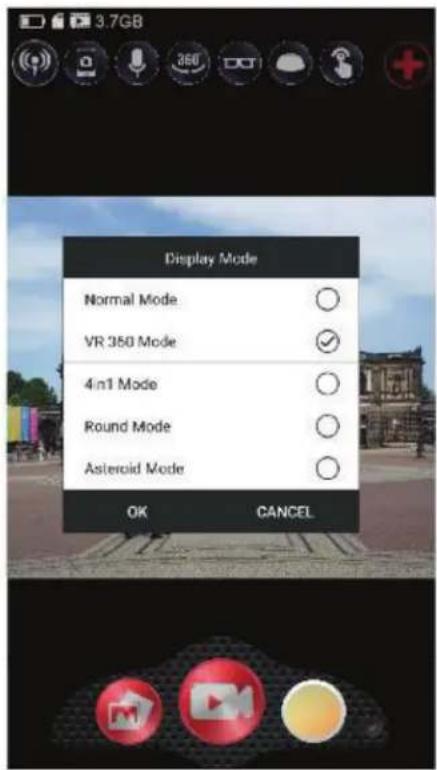
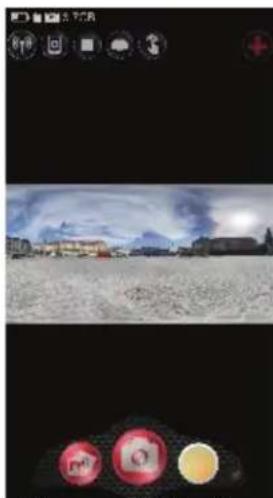
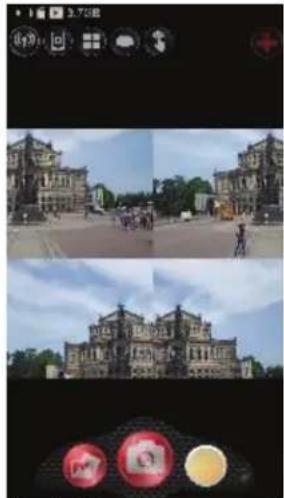
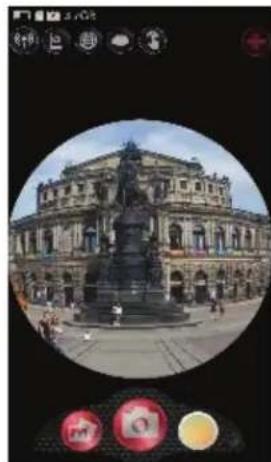
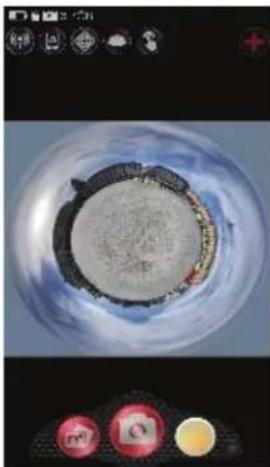
The app allows you to view your live feed or recorded clips in 4 different display modes. See below for a description and view of each mode.
Normal Mode: Standard view
VR Mode: Most native Virtual Reality experience for viewing your clips. When this mode is enabled, you can maneuver your record clip with the movement of your smartphone.
4in1 Mode: Divides the dual-lens stitched image into 4 equal parts
Round Mode: Native mode showing the true view of a single lens.
Asteroid Mode: This mode is similar to round mode. It combines the dual lens stitched image and displays it in complete circular view.
natural_image
Snowy landscape with distant buildings and a cloudy sky, no visible text or symbolsNormal Mode
natural_image
Composite image showing a historic palace with visitors and a large courtyard, alongside a close-up of a decorative circular graphic (no readable text or symbols)4in1 Mode
natural_image
Exterior view of a historic building with a prominent statue in front (no visible signage or text)Round Mode
natural_image
Top-down view of a circular object with textured surface and surrounding light, bottom-right panel showing three circular objects (no text or symbols)Asteroid Mode
3.1.5 App VR Control Modes
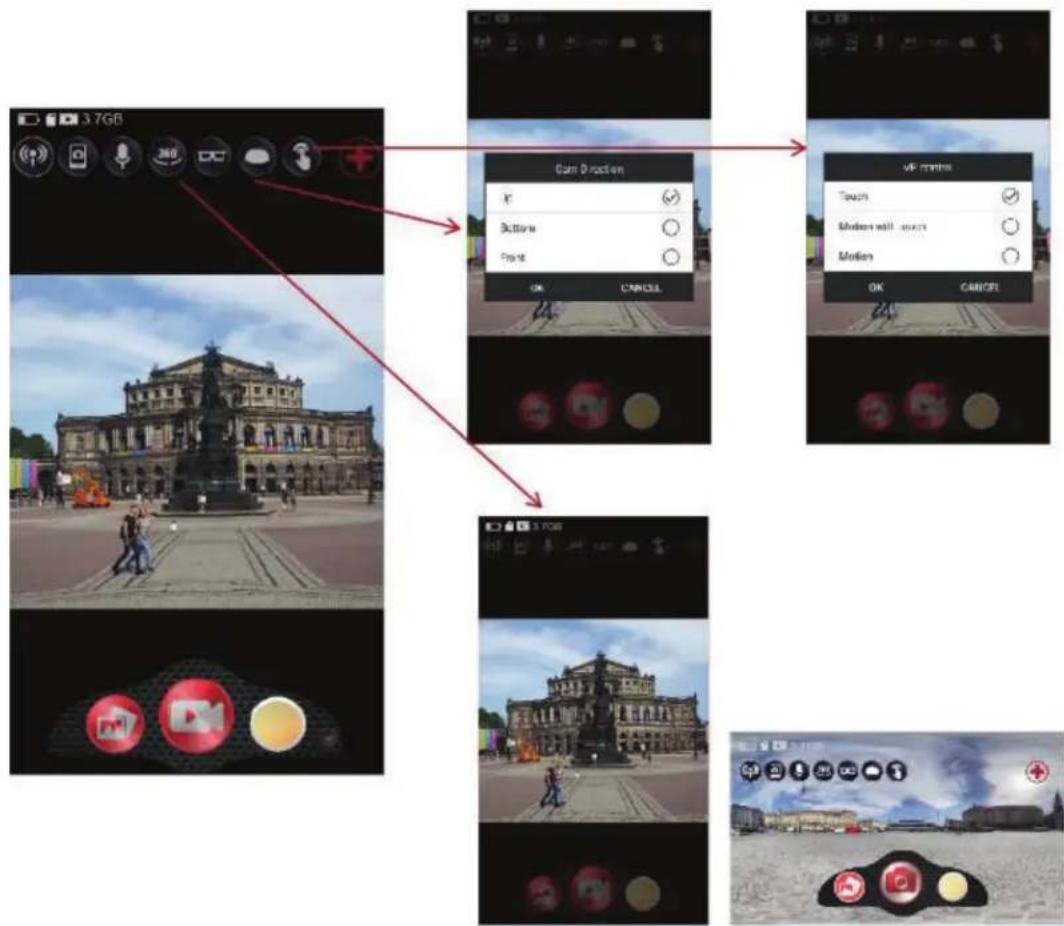
The app allows you to control your live feed or recorded clips in 4 different control modes. See below for a description and view of each mode.
Touch: This control mode allows you to maneuver your record clip with the touch and drag of your finger on your smartphone screen. You can move the image in any direction to view that recorded perspective.
Motion: This control mode allows you to maneuver your record clip with the movement of your smartphone. It is the most native Virtual Reality experience for viewing your clips. You can move the image in any direction to view that recorded perspective with the movement of your smartphone.
Motion with Touch: This control mode combines both the Touch and Motion modes into a single mode.
flowchart
graph TD
    A["Camera Direction"] --> B["VR Video"]
    B --> C["Touch"]
    B --> D["Minders with exposure"]
    B --> E["Motion"]
3.1.6 App File Browsing, Editing and Sharing
flowchart
graph TD
    A["Local & remote camera files"] --> B["Download"]
    B --> C["Share"]
    A --> D["Download Check all Delete"]
    D --> E["Share"]
    A --> F["View file File list"]
    F --> G["360-P10000000000XX"]
    F --> H["All files Video file Picture file"]
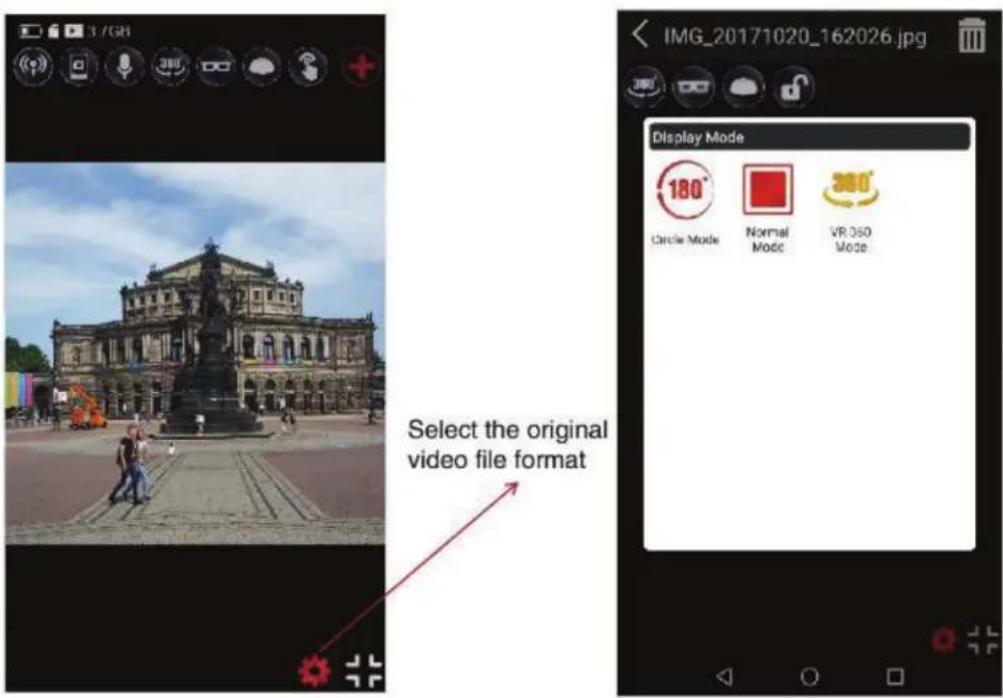
3.1.7 App File Display: Normal and Virtual Reality (VR) Mode
4. Appendix
4.1 Reset To Factory Default Settings
To reset your camera back to factory default settings, press the reset button located above the MicroSD memory card slot. Insert a thin, pointy object and press the button for 5 seconds. Your camera will power off.
Follow the instructions below to reset your camera's Wi-Fi SSID and password:
(1) Power your camera off. If your camera is frozen, reset your camera by pressing the reset button.
(2) Press the Wi-Fi button and Power buttons together for 10 seconds, until the main status LED remains solidly lit. Your Wi-Fi password will be reset back to "87654321".
4.2 Technical Specification
| Model Number | MN360 |
| Lens | Dual 1/3" Fisheye Lens • 210 Degrees FOV • Fixed Focus • f=20mm • F2.0 |
| Image Sensor | Dual 1/3" Sony CMOS; 1920x1080 pixels |
| Shutter | Electrical |
| Pixels | JPEG: 8 MP • 5 MP • 3 MP |
| H.264: 2k30fps (2048x1024) | |
| Stitching Technology | Hardware stitch (smartphone app not required for recording) |
| App Name | OTCam360 |
| Stitching Options | Normal: 1m ~ infinity • Near: 0.4m ~ 4m |
| Live View & Playback | Normal • VR • 4in1 (tiled) • Round (fisheye) • Asteroid (spherical zoomed) |
| VR Control | Motion • Touch • Motion with Touch |
| Live Broadcast | Facebook • YouTube (apps required) |
| Continuous Shooting | Burst (3, 5, 10 seconds) • Loop Recording (1, 2, 3 minutes) |
| Special Features | Panorama Shooting • Loop Recording • Auto Recording • Wide Dynamic Range (WDR) |
| ISO Sensitivity | Auto |
| White Balance Control | Auto |
| Recording Media | microSD • microSDHC • microSDXC; Maximum: 128GB |
| I/O Ports | Micro USB (type-B), USB 2.0 (high speed) • Microphone • Stereo Speakers |
| I/O Radio | Wi-Fi 802.11 b/g/n |
| Power | Built-in Lithium-Ion; 3.7v, 1300mAh; 130 minutes recording time |
| Dimensions | 1.77 x 5.39 x 0.55 in. • 2.92 oz. |
| Included Accessories | USB Cable • AC Adaptor • Pouch • Camera Stand • Selfie-Stick • Quick Start Guide |
| Compatible Devices | iOS 11.0 • Android 8.0 • Windows 10 • MacOS 10.13 |
natural_image
Blue gradient cube with a dotted pattern on its surface (no text or symbols)MINOLTA®
Minolta is a registered trademark of JMM Lee Properties, LLC and is used in the United States by Elite Brands Inc. under license.
40 Wall Street, 61st Floor, New York, NY 10005 USA Tel: 800-441-1100
www.minoltadigital.com • www.elitebrands.com Copyright © 2019 Elite Brands Inc.
If you're having difficulties with your camera, or would like further assistance, please call our toll-free technical support hotline at 800-441-1100. Please be sure to have your camera handy when calling.


natural_image
Gradient background with a halftone dot pattern, transitioning from white to light blue (no text or symbols)- Introduction
- Included in This Package
- First Use
- Inserting the MicroSD Memory Card
- Charging the Battery
- Powering On and Off + Main Status LED
- Enabling Wi-Fi and Wi-Fi Status LED
- Video Mode and Video Status LED
- Photo Mode and Photo Status LED
- Connecting Your Camera to Smartphone App
- App Functions and Settings
- Camera List
- App Setting Menu and Quick Settings
- App VR Display Modes
- App VR Control Modes
- App File Browsing, Editing and Sharing
- App File Display: Normal and Virtual Reality (VR) Mode
- Appendix
- Reset To Factory Default Settings
- MINOLTA®
Brand : MINOLTA
Model : MN360
Category : Camcorder