Trailhead - Oven TRAEGER - Free user manual and instructions
Find the device manual for free Trailhead TRAEGER in PDF.


| Product Type | Wood Pellet Grill & Smoker |
| Model | Trailhead |
| Brand | Traeger |
| Dimensions (Closed) | 22.5 x 15.5 x 11.5 inches |
| Weight | 50 lbs (22.7 kg) |
| Primary Fuel | 100% natural hardwood pellets |
| Power Supply | 120V AC, 60 Hz, 300W |
| Cooking Area | 200 sq inches (1,290 sq cm) |
| Temperature Range | 180°F to 500°F (82°C to 260°C) |
| Temperature Control | Digital controller with LED display |
| Grill Grates | Porcelain-coated steel |
| Legs | Folding legs for portability |
| Hopper Capacity | 8 lbs (3.6 kg) |
| Ignition System | Automatic hot rod igniter |
| Cleaning | Vacuum ash after every use; clean grease tray and grates with warm soapy water |
| Safety Features | Auto-shutoff when lid open, cool-touch handle |
| Warranty | 3 years limited |
Frequently Asked Questions - Trailhead TRAEGER
User questions about Trailhead TRAEGER
0 question about this device. Answer the ones you know or ask your own.
Ask a new question about this device
Download the instructions for your Oven in PDF format for free! Find your manual Trailhead - TRAEGER and take your electronic device back in hand. On this page are published all the documents necessary for the use of your device. Trailhead by TRAEGER.
USER MANUAL Trailhead TRAEGER
OWNER'S MANUAL

TRAILHEAD

WELCOME TO THE WOOD-FIRED REVOLUTION.
WE WANT YOU TO GET THE MOST OUT OF YOUR TRAEGER.
Scan here to access this manual in different languages, as well as to learn how to set up, season, and get the most out of your grill.
IMPORTANT SAFETY PRECAUTIONS
READ ALL INSTRUCTIONS BEFORE INSTALLING AND USING YOUR TRAEGER® GRILL
A MAJOR CAUSE OF FIRES IS FAILURE TO MAINTAIN REQUIRED CLEARANCES (AIR SPACES) BETWEEN COMBUSTIBLE MATERIALS AND YOUR GRILL. IT IS OF UTMOST IMPORTANCE THAT THIS PRODUCT BE INSTALLED ONLY IN ACCORDANCE WITH THESE INSTRUCTIONS.
When properly operated and maintained, cooking with a hardwood fire on a Traeger ^® Grill brings years of enjoyment – to you and your lucky friends and family. Your new Traeger ^® Grill is specially designed to make cooking easier while giving you optimal performance with the most savory-flavored food.
Please read this entire manual before installation, and anyone who uses this grill should also read the entire manual before operating it. Failure to follow these instructions could result in property damage, bodily injury, or even death. Contact local building or fire officials about restrictions and installation inspection requirements in your area. Save these instructions. If you are assembling this unit for someone else, provide this manual for the owner to read and save for future reference.
▲ DANGER Carbon Monoxide Hazard
Burning wood pellets produces carbon monoxide which may lead to illness, serious injury, and/or death. Follow these guidelines to prevent this colorless, odorless gas from poisoning you, your family, your pets, or others:
- Only use your Traeger® Grill outside in a well-ventilated area. This grill is intended for OUTDOOR USE ONLY.
- Never use your Traeger® Grill in any enclosed area or any area without adequate ventilation.
- Know the symptoms of carbon monoxide poisoning: headache, dizziness, weakness, nausea, vomiting, sleepiness, and confusion. Carbon monoxide reduces the blood's ability to carry oxygen. Low blood oxygen levels can result in loss of consciousness and death.
- See a doctor if you or others develop cold- or flu-like symptoms. Carbon monoxide poisoning, which can easily be mistaken for a cold or flu, is often detected too late.
- Alcohol consumption and drug use increase the effects of carbon monoxide poisoning.
- Carbon monoxide is especially toxic to mother and child during pregnancy, infants, the elderly, smokers, and people with blood or circulatory system problems, such as anemia or heart disease.
⚠ WARNING Fire Hazard
- When operating your Traeger® Grill, maintain a MINIMUM distance of 18 inches (45.7 cm) from the grill to any nearby combustibles, including wooden railings, home siding, window frames, furniture, trees, and trash receptacles, etc.

- Do not install or operate this grill indoors or under a combustible ceiling or overhang.
- Do not install or operate your Traeger® Grill on combustible floors or surfaces.
- Remove pots and pans while the operating appliance is unattended, to reduce the risk of fire.
▲ WARNING Fire Hazard
- Keep your Traeger® Grill clean. Grease fires are caused by not properly maintaining your grill and failing to clean its Traeger® Grease Management System on a consistent basis (see “Maintaining Your Grill” on pages 24-25).
-
Even if there is ample room in the grill, be cautious of loading excessive amounts of food or high fat content foods (e.g., bacon) that can release large quantities of flammable grease.
-
Do not place food near the edges of the grill where grease drippings may miss the grease drip tray and fall to the bottom of the grill, where they could come into contact with embers from the firepot and ignite.
- Always make sure the grease drip tray is properly seated on its locating brackets. If not installed correctly, direct heat and flame from the firepot could cause a grease fire or damage the Traeger® Grease Management System.
- Never use gasoline, lantern fuel, kerosene, lighter fluid, or other flammable materials to start or “freshen up” a fire.
- Never use or store flammable liquids or other combustibles materials near the grill.
- Never attempt to over-fire your grill by adding excess pellets or other combustible materials to the firepot or the hopper.
- Change drip tray liners frequently to reduce the risk of fire.
- Do Not use drip tray liners when cooking at temperatures above 375°F (190°C), to reduce the risk of fire.
▲ DANGER In the event of a grease fire, ensure the grill lid and hopper lid are closed, and then immediately unplug the grill if you can do so safely. Move away from the grill until the fire is completely out and grill has cooled down. Until the fire has extinguished and the grill has cooled off:
- Do Not move the grill;
- Do Not throw water on the grill;
- Do Not use salt or baking soda to put out a grease fire; and
- Do Not try to smother the fire.
With the grill lid and hopper closed, the fire will be starved of oxygen and burn itself out. Never keep the grill lid or hopper lid open during a grease fire; if the grill lid is open, use a non-combustible tool that will allow you to close the grill lid while keeping a safe distance from the grill. An all-class (class ABC) approved fire extinguisher should be used if a fire is not contained within the grill. If an uncontrolled fire does occur, immediately call the Fire Department. When the fire is completely out, allow the grill to cool completely. Remove everything from the inside of your grill, including all internal components (grill grate, grease drip tray, and firepot), pots and pans, and food. Clean the entire grill, including any grease accumulation from the Traeger® Grease Management System (TGMS) and all ash and pellets from the grill and firepot (see "Maintaining Your Grill" on pages 24-25). Replace the firepot, grease drip tray, and grill grate, restart the grill, and resume cooking.
WARNING Fire Hazard
Always allow grill to cool completely before cleaning the auger.
WARNING Burn Hazard
Ashes should always be completely cool before handling. Ashes should be placed in a metal container with a tight-fitting lid. The closed container of ashes should be placed on a noncombustible floor or on the ground, well away from all combustible materials, pending final disposal. Ashes should be retained in the closed container until they are disposed.
⚠ WARNING Burn Hazard
Many parts of the grill become very hot during operation. During operation of the grill and afterwards, care must be taken to avoid burns while the grill is hot.
- Never leave the grill unattended when young children or pets are present.
- Never move the grill when it is operating or hot. Let the grill cool thoroughly and close the grill lid before moving or attempting to transport. If you are transporting your grill in a vehicle after cooking on it, make sure the fire is completely out and the grill is cold before placing it in any vehicle. Never put water into the firepot; it will jam the auger.
- Never add pellets by hand to a hot firepot. This is dangerous and you may be seriously burned. If you run out of pellets and lose your fire while cooking, let the grill cool completely and start again.
- Never move the grill with the lid open. Always close the grill lid prior to moving.
⚠ WARNING Smoke Hazard
- If there is a delayed start and the smoke from your grill changes from transparent white smoke to unusual billowing thick non-transparent white smoke that turns to a yellow tinted smoke, immediately turn off your grill using the main power button on the back of the pellet hopper or unplug the power cord.
Do Not initiate the shutdown cycle.
- ▲ DANGER Do Not open the grill lid to air out the grill. Stay away from the grill until smoke clears and the grill completely cools.
- This may be the result of a pellet overflow condition, which is caused by partial ignition of pellets. If allowed to continue long enough, gases will build up, which can ignite. If these gases ignite they will combust all at once, making a loud noise that may startle and/or injure persons in the immediate vicinity of the grill, and the grill lid may open and close. This occurrence is sometimes referred to as a “grill burp” and should be avoided. If you have not properly maintained your grill, as described in “Maintaining Your Grill” on pages 24-25, a hazardous grease fire may also result.
IMPORTANT SAFETY PRECAUTIONS CONTINUED
- If a burp occurs, let the grill cool down completely, remove all internal components (including grill grate, grease drip tray, and firepot), and thoroughly clean all ash and pellets from the grill and firepot (see page 25, “Cleaning the Ash from Inside and Around the Firepot”) and ensure that grease and other buildup has been removed (see pages 24-25, “Maintaining Your Grill”). Remove all pellets from the pellet hopper. Run the prime auger sequence to push all pellets out of the auger and dispose of those pellets. Clean all pellets out of the firepot. Fill hopper with new pellets and prime the auger (see “Seasoning Your Grill” on page 15 for instructions on priming your auger).
- ▲ DANGER Do Not stick your hand in or near the auger located at the bottom of your pellet hopper. Severe injury will occur if the auger is turning and your hand is caught in the auger. Do not remove the honeycomb guard in your pellet hopper. No maintenance should be performed on or around the auger while the grill is turned on or plugged into power.
⚠ WARNING Electrical Shock Hazard
Hazardous voltage is present, which can shock, burn, or cause death.
- Ground Fault Circuit Interrupter (GFCI) protection must be provided on the circuit(s) or outlet(s) to be used for the operation of this Traeger® Grill.
- Disconnect the power cord before servicing the grill unless otherwise noted in this Owner's Manual.
- If using an extension cord, only use an extension cord suitable for outdoor use to prevent electric shock in accordance with the instructions and warnings accompanying that product. This type of cord is designated with "W-A" or "W" on the cord's jacket, such as an extension cord of cord type: SW-A, SOW-A, STW-A, STOW-A, SJW-A, SJOW-A, SJTW-A, or SJTOW-A.
- If using an extension cord, be sure to use a No. 14 AWG grounded extension cord.
- Do not modify the plug on your Traeger® Grill, the extension cord receptacle, or the extension cord plug in any way, including by removing the ground (earth) prong.
- Make sure your extension cord is in good condition. Inspect extension cords prior to each use for loose or exposed wires and cut or worn insulation. Replace if damaged. Never use a damaged extension cord.
- Ensure that the power cord and extension cord are securely plugged together. Do not plug extension cords into one another.
- Keep extension cord clear of snow and standing water.
- Ensure that the power cord and extension cord do not create a tripping hazard. Do not route an extension cord through a window or doorway.
- When not in use, the extension cord should be removed and stored in a location protected from the sun and out of the reach of children.
CAUTION
- Never modify this grill or install any parts or components not authorized by Traeger for use with this grill. Any modification of this grill or installation of unauthorized parts or components will void the warranty and may create a safety hazard including, without limitation, a fire.
• Children should be supervised to ensure they do not play with the grill. - Do not put a grill cover or anything flammable in the storage space area under the grill.
CAUTION Use Correct Pellets
- This grill is designed and approved only for all-natural wood cooking pellets designed for wood pellet grills. Use of any other type of fuel in this grill will void the warranty, may lead to the auger becoming jammed, and may create a safety hazard.
- For best results and flavor, use genuine TRAEGER® BRAND HARDWOOD PELLETS.
- Always store wood pellets in a dry location, away from heat-producing appliances and other fuel containers.
⚠ WARNING Do not use fuel pellets. Never use
heating fuel pellets in the grill because they may contain hazardous contaminants and additives and may damage the grill.
⚠️ CAUTION Minimum Ambient Temperature
- When the ambient temperature falls below -20^ (-29^) , damage to the controller's display may occur.
⚠ WARNING If the fire in the firepot goes out while cooking, it is important to follow these steps. Failure to do so may cause a hazardous “overfiring” of your grill due to an excess of unburned pellets in the firepot. This is often caused by improper start-up procedure and/or running out of pellets.
- Turn the main power switch at the back of the grill hopper to OFF (O) and disconnect the power cord. Allow the grill to cool thoroughly. Open the lid and remove all food, grill grate, and grease drip tray.
- Remove all unburned pellets and ash from inside and around the firepot. (See instructions for proper handling and disposal of ash on page 25.)
- Before replacing the grease drip tray and grill grate, plug the power cord into an appropriate grounded/earthed electrical outlet and turn the main power switch ON (I). Pellets should fall into the firepot and the hot rod should begin to heat (it will start to turn red).
Do not touch the hot rod. - When flames start to come out of the firepot, turn the main power switch OFF (O). Let the grill cool down. Now you're ready to place the grease drip tray, grill grate, and food back into the grill.
WARNING
WARNING
- Turn the main power switch OFF (O) and disconnect the power cord before initiating any maintenance.
-
Accumulated grease is easier to clean off when the grill is still warm—not hot. Be careful not to burn yourself. Heat-protective gloves are recommended.
-
A dedicated vacuum cleaner is the best way to remove ashes from the firepot, but this must be done with extreme care to avoid the risk of fire. Again, cleaning the ash from in and around the firepot should be done only when the grill is COLD.
- Cleaning the grill grate works best while it is still warm. Be careful not to burn yourself. Heat-protective gloves are recommended. We recommend keeping a long-handled cleaning brush near the grill. After removing your food, give the grill grate a quick brushing. It takes only a minute and it will be ready the next time you want to use the grill.
SAVE THESE INSTRUCTIONS
WELCOME
TO THE
TRAEGERHOOD
TABLE OF CONTENTS
2 IMPORTANT SAFETY PRECAUTIONS
8 FLAVOR MATTERS
10 ASSEMBLING YOUR GRILL
12 GETTING TO KNOW YOUR GRILL
natural_image
Close-up of a cut steel bar with marbled meat and sliced pieces, served on a metal grater (no text or symbols visible)Bold cuts of beef need bold wood flavors to match, like hickory or mesquite.

natural_image
Top-down view of a pizza with visible toppings including cheese, sauce, and toppings (no text or symbols)Throw in some pellets and turn your Traeger into a wood-fired pizza oven.
NO FILLERS BINDERS NO WORRIES


natural_image
Close-up of a pie chart with a creamy topping, blueberries, and fresh berries in the background (no visible text or symbols)Cherry pie cooked over fruit hardwood pellets? Yes please.
ALL NATURAL HARDWOOD PELLETS
CONSISTENT PERFORMANCE & FLAVOR
HOW OUR PELLETS ARE MADE

natural_image
Close-up of freshly cut tree logs with visible grain patterns (no text or symbols)① Traeger pellets are made from all natural hardwood sawdust.

natural_image
Close-up of a perforated metal pipe with embedded bolts, no visible text or symbols2 The sawdust is compressed into pellets using heat and pressure.
natural_image
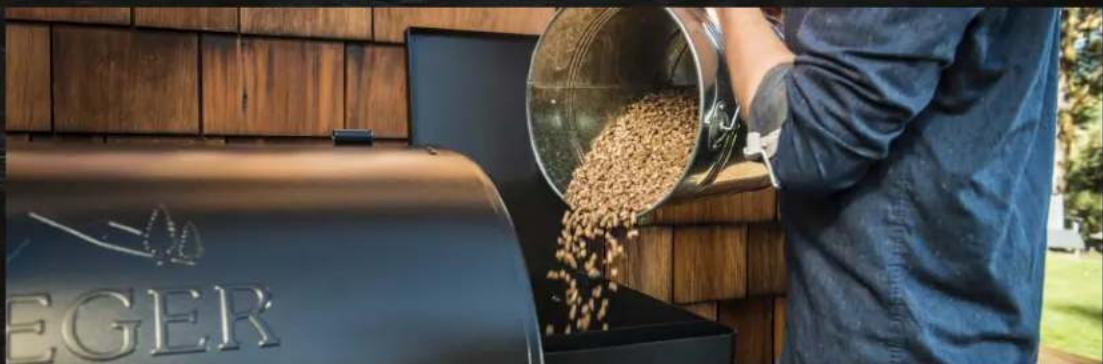
Person pouring coffee beans from a metal tray into a brown industrial stove burner (no visible text or symbols)3 Pellets fuel the fire and add flavor to make meals unforgettable.
ASSEMBLING YOUR GRILL
READ ALL INSTRUCTIONS BEFORE INSTALLING AND USING THE APPLIANCE


natural_image
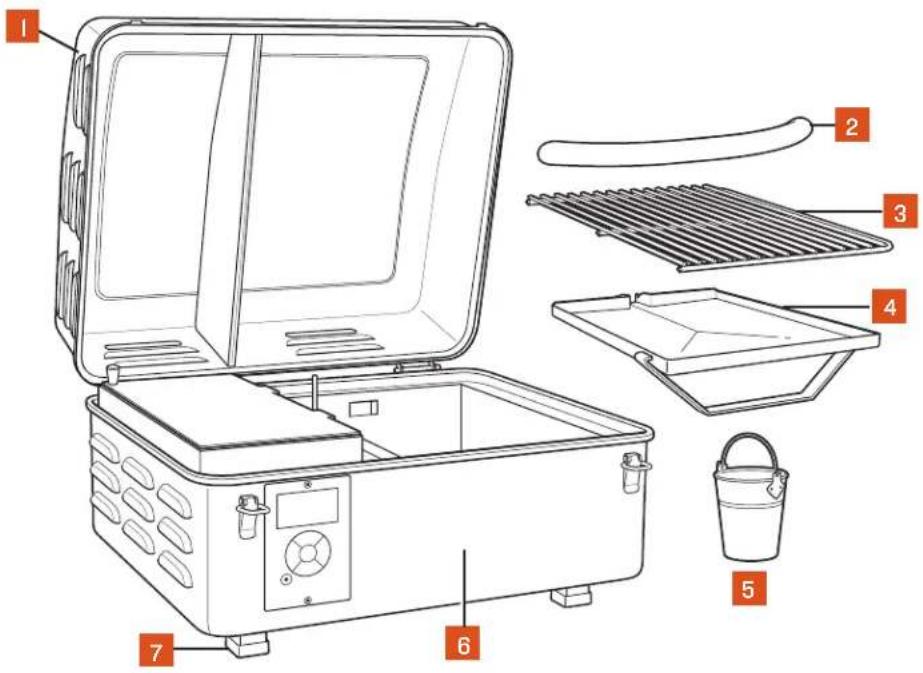
Line drawing of a screwdriver with grid-patterned head and pointed tip (no text or symbols)| PART DESCRIPTION PART DESCRIPTION | |||
| 1 GRILL LID GREASE BUCKET | |||
| 2 LID HANDLE GRILL BODY | |||
| 3 PORCELAIN-COATED GRILL GRATE FEET WITH CAPS | |||
| 4 GREASE DRIP TRAY | |||
NOTE: Handle bolts, washers, and Mica washers are shipped pre-installed on the handle, and should be removed for assembly.
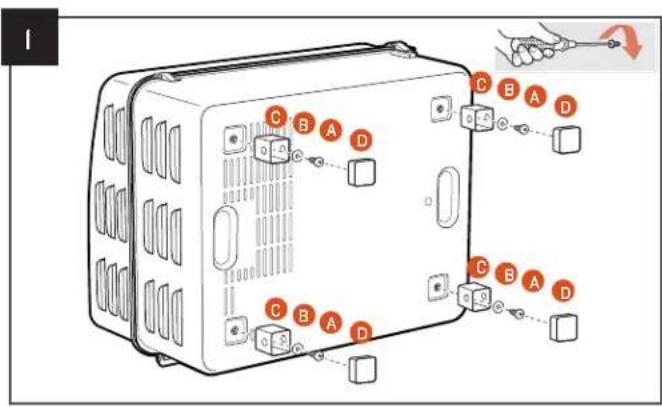
Install feet.

Install lid handle.
NOTE: Handle bolts, washers, and Mica washers are shipped pre-installed on the handle, and should be removed for assembly.

Install grease drip tray and bucket.

Install porcelain-coated grill grate.
NOTE: Be sure the grease drain spout on the grease drip tray extends through the opening in the back of the grill.
IMPORTANT: Always be sure to hang the grease bucket on the spout during use!
GETTING TO KNOW YOUR GRILL
PARTS AND FEATURES
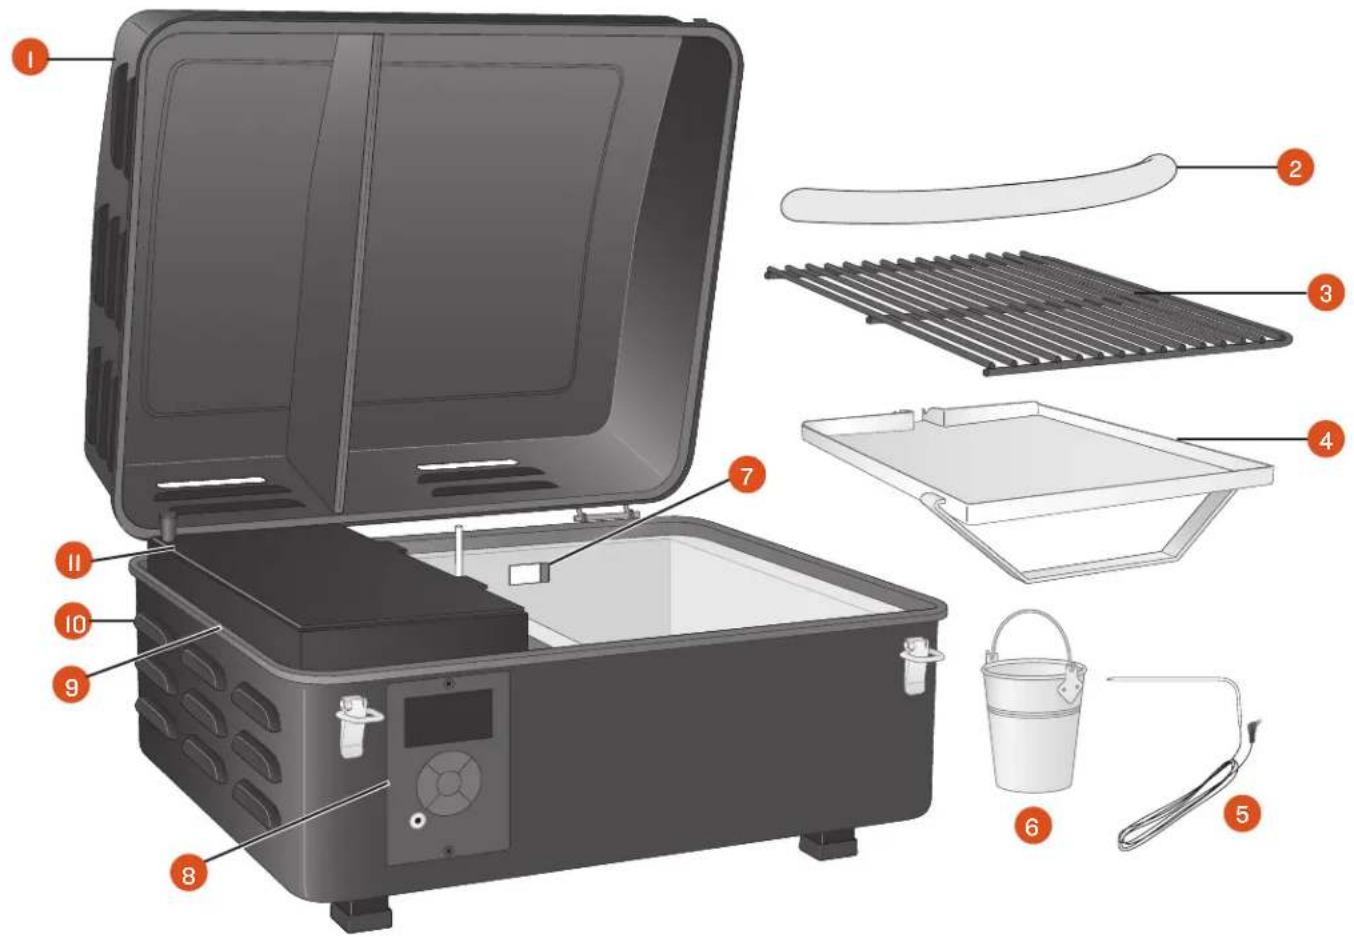
| PART DESCRIPTION PART DESCRIPTION | |||
| 1 GRILL LID GREASE DRAIN PORT (BACK OF GRILL) | |||
| 2 LID HANDLE DIGITAL ARC CONTROLLER | |||
| 3 PORCELAIN-COATED GRILL GRATE PELLET HOPPER | |||
| 4 GREASE DRIP TRAY | IO | MAIN POWER SWITCH (BACK OF GRILL) | |
| 5 MEAT PROBE PELLET HOPPER LID | |||
| 6 GREASE BUCKET | |||

A 4 lb. (1.8 kg) capacity pellet hopper will keep you cooking for hours, getting you away from the grill and back to entertaining friends and family.
natural_image
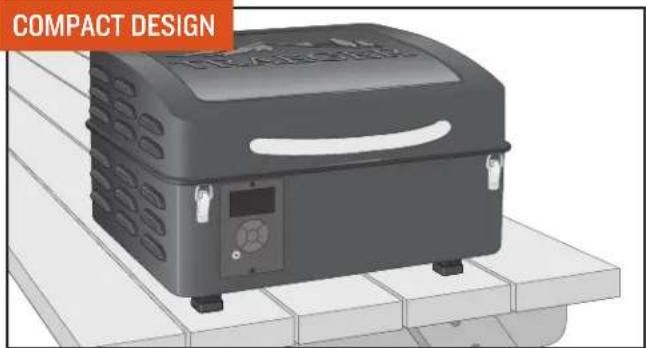
3D rendering of a compact device on a workbench, no visible text or symbolsTake Traeger'ing on the go! The compact design is perfect for camping or tailgating, allowing you to enjoy that great Traeger flavor, no matter where you go.
natural_image
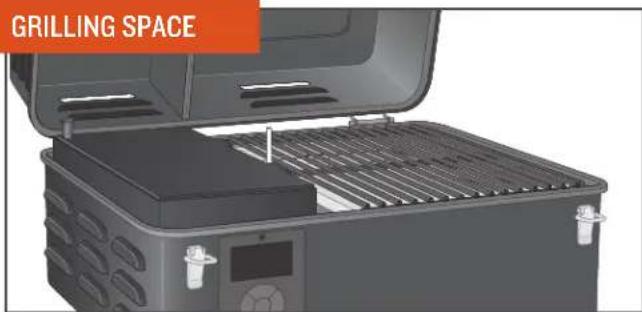
Grilling space grill with open lid and grater rack (no text or symbols visible)Your Traeger ^® Grill gives you 184 in. ^2 (0.12 m ^2 ) of grilling space in a small footprint.

You don't have to worry about drippings flaring up and causing nasty fireballs that destroy your meal, because Traeger® Wood Fired Grills cook using indirect heat. All drippings are safely channeled into an external grease bucket for easy disposal.
TIPS:
• Only operate your grill on a level surface.
Take care of your Traeger® Grill by using a new Traeger drip tray liner before each cook to help keep your grill clean.
- Keep your grill clean. See "Operating Tips" (page 26) and "Maintaining Your Grill" (page 24).
- Do not use drip tray liners when cooking at temperatures above 375°F (190°C).
GETTING TO KNOW YOUR GRILL CONTINUED
YOUR CONTROL PANEL AND DISPLAY Your Traeger® Grill is equipped with a digital controller with AGL (Advanced Grilling Logic). Before you begin using the grill, it will be helpful to familiarize yourself with the different features of the control panel.

NOTE: Temperature fluctuations are normal for Traeger ^® Grills. Any significant fluctuation could be the result of wind, air temperature, improper use, or lack of grill maintenance.
Keep Warm can be used to pause the cook cycle at any time during grilling. Simply press "Keep Warm" again to resume cooking. Keep Warm maintains the grill temperature at 215°F (102°C).
PRESS AND HOLD FUNCTIONS
NOTE: For the following, when the grill is in standby mode, press and hold the buttons indicated for 2 seconds.
PRIME THE AUGER

"Pri" will flash on the display, and the auger will prime for 30 seconds. Repeat to cancel.
GRILL SHUTDOWN

"OFF" will flash on the display nine times. Grill will display "COOL DN" for 15 minutes as it cools down. To cancel, repeat while "OFF" is flashing.
CHANGE BETWEEN °F/°C

Grill will change the display between °F and °C.
DISPLAY FIRMWARE

Firmware will scroll across the display.
NOTE: The letter "v" will display as "u."
1 STATUS DISPLAY
Shows current temperature, time remaining in timer mode, or probe cooking temperature.
2 UP/DOWN BUTTONS
Press the "Up" or "Down" button to increase or decrease temperature or time. Press and hold to increase or decrease the time rapidly.
NOTE: Press and hold the "Up" and "Down" buttons at the same time for 3 seconds to switch between Celsius and Fahrenheit.
3 IGNITE
Press IGNITE to start the grill.
4 MEAT PROBE JACK
Plug the meat probe into the jack for probe cooking.
5 KEEP WARM
This feature maintains the grill temperature at 215°F (102°C) to keep food warm.
6 CENTER BUTTON
Use this button to turn on the grill and cycle through TEMPERATURE > TIMER > PROBE ALARM modes. Press and hold for two seconds to cancel a setting.
To put the grill in the shutdown cycle, press and hold the button for two seconds in Temperature Adjustment mode.
7 INDICATOR LIGHT PANEL
The icons on this panel will light up when the corresponding feature is active.
The Timer icon will light when the timer is active.
The Meat Probe icon will light once the probe is plugged in and recognized by the grill.
The Keep Warm icon will light while this feature is active.
TO BE USED ONLY DURING INITIAL FIRING. In order to ensure proper and safe operation of the grill, follow the instructions below to prime the auger ("charge" the auger tube with pellets), season your grill, and run your grill at a high temperature (to burn off any manufacturing oils).

natural_image
Illustration of a portable food organizer with open lid and internal compartments, showing a grid-like structure (no text or symbols)Remove the grill grate and grease drip tray from the inside of the grill.

natural_image
Illustration of a switch and plug inserted into an electrical socket (no text or symbols)PLUG APPEARANCE MAY VARY BY REGION.

WARNING! GROUND FAULT CIRCUIT INTERRUPTER (GFCI) PROTECTION MUST BE PROVIDED ON THE IT OR OUTLET USED TO POWER THE GRILL.
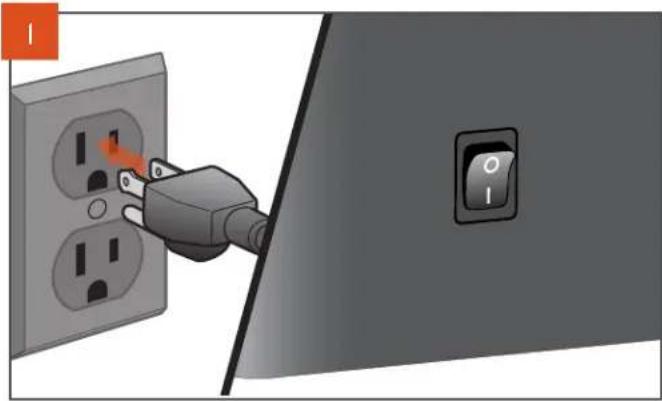
With the main power switch on the back of the grill hopper in the OFF (0) position, plug the power cord into an appropriate grounded/earthed GFCI electrical outlet.

Open the hopper lid. Make sure there are no foreign objects in the auger before adding pellets to the hopper. Turn grill on: Flip the main power switch on the back of the grill to ON (I). With the grill in standby mode, press and hold the "Up" and IGNITE buttons simultaneously. The display will flash "Pri" and the auger will begin priming.
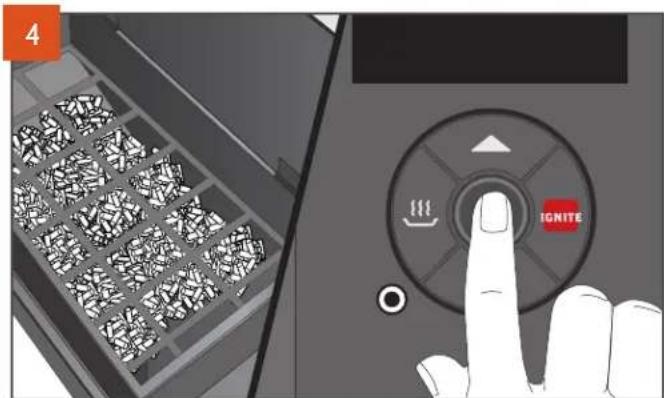
After adding pellets to the hopper, close the hopper lid. We recommend you fill the hopper with pellets at least to the safety grate in the hopper. Press the center button.
NOTE: When you turn on your grill, it will automatically enter standby mode, indicated by the display's dashed border pulsing. This indicates your grill is awaiting a command, and is

natural_image
Abstract geometric pattern with dashed lines and shaded rectangular shapes on a dark background (no text or symbols)not actively operating. The grill MUST be in standby mode to prime the auger.

WARNING! USE ONLY TRAEGER® BRAND HARDWOOD PELLETS, WHICH ARE SPECIFICALLY MADE RK IN OUR GRILLS. NEVER USE HEATING FUEL PELLETS GRILL.
SEASONING YOUR GRILL CONTINUED

natural_image
Close-up of a mechanical component with a circular socket and a hand pressing a button labeled 'ONITE' (no text or symbols on the main diagram)Continue priming until a small amount of pellets are in direct contact with the hot rod in the firepot. Press and hold the "Up" and IGNITE buttons simultaneously to stop priming and return the grill to standby mode (the display's dashed border will pulse).

natural_image
Illustration of a portable food organizer with open lid and internal compartments, showing a highlighted tray (no text or symbols)Now you're ready to place the grease drip tray and grill grate back into the grill. Hang the grease bucket on the grease drain spout on the back of the grill to catch grease drippings.
RECOMMENDATION: For easy cleanup, line the grease drip tray with Traeger® Aluminum Drip Tray Liners or heavy-duty aluminum foil. If using foil, be sure the edges and ends of the foil are tight against the bottom of the grease drip tray. Replace foil after each cook to reduce the possibility of a grease fire. Please see "Maintaining Your Grill" on page 24 for more details. Change drip tray liners frequently to reduce the risk of fire. Do not use drip tray liners when cooking at temperatures above 375°F (190°C).
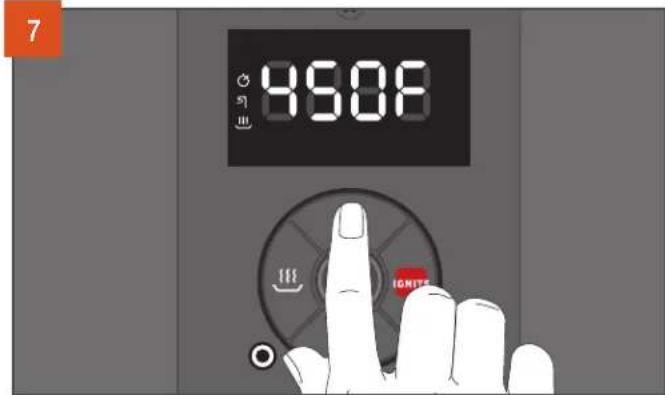
Press the "Up" button until the temperature display reads 450°F (250°C).
NOTE: To change between Celsius (C) and Fahrenheit (F), press and hold the "Up" and "Down" buttons simultaneously.

Close the lid and press the IGNITE button. Once the grill reaches 450^ F ( 250^ C), let it run for 30 minutes with the lid closed to complete the seasoning process. When seasoning is complete, shut down the grill.
SUBSEQUENT START-UP
1

natural_image
Exterior view of a gray portable food processor with ventilation grilles and control panel (no visible text or symbols)Make sure the grease drip tray and grease bucket are in place; then close the grill lid.
NOTE: Review the pre-grilling checklist on page 18 before turning on the grill.

Once the desired temperature is displayed, press IGNITE. Allow grill to preheat until desired temperature is achieved.
NOTE: If the grill fails to achieve the selected temperature, please see "Operating Tips" on page 26 for more information.

With the main power switch set to ON (I), press the center button once to wake the grill controller. Set the desired temperature with the "Up" button.
NOTE: Once you press the IGNITE button, your Traeger® Grill will always begin with an ignition and preheat cycle.

WARNING! WHEN OPERATING THIS GRILL, MAINTAIN A MINIMUM CLEARANCE OF 18 IN. (45.7 CM) FROM GRILL
TO COMBUSTIBLES.
4

natural_image
Illustration of an open portable stove with heating equipment and a tray (no text or symbols visible)Once preheating is complete, load food into the grill.
CONTROLLER SHUTDOWN CYCLE
The controller for this grill comes with an automatic shutdown cycle. When finished cooking on your grill, press and hold the center button for 3 seconds. The display will flash "OFF" for several seconds, then "COOL Dn" will scroll across the screen, followed by the actual temperature of the grill, until the grill cools down enough to put out the fire in the firepot.
While the controller is flashing "OFF," you can cancel the shutdown cycle by pressing and holding the center button for two seconds.
Always allow the shutdown cycle to completely finish (goes into standby mode) before powering off your grill at the main power switch. The shutdown cycle ensures the fire is suppressed and the grill ignites properly on the next use.

-
Check for and do needed maintenance:
-
Clean the Traeger® Grease Management System:
- Grill Grate
- Grease Drip Tray
- Grease Chute
- Grease Bucket
- Remove ash (after approximately 20 hours of cooking).
-
Check the power cord for twists, damage, or fraying.
-
Make sure the grill is correctly assembled with all parts present before using it:
- Grease Drip Tray
- Grate
- Make sure you have proper airflow:
- Ensure nothing is obstructing the exhaust.
-
Make sure the grill is a safe distance from combustibles (see page 2).
-
Make sure the grill is on a level surface.
-
Inspect the pellets:
-
Make sure the grill is a safe distance from combustibles (see page 2).
- Make sure the grill is on a level surface.
- Inspect the pellets:
• Make sure you have enough pellets in the hopper.
• Make sure the pellets are not wet, water damaged, swollen, or dull. They should be shiny and easy to snap.
• Make sure the bottom of the hopper and the auger do not have excessive sawdust.
-
Close the hopper lid.
-
Close the grill lid.
natural_image
Illustration of a plug inserted into an electrical outlet, showing power and switch symbols (no text or labels)PLUG APPEARANCE MAY VARY BY REGION.

Press the "Up," "Down," or center button to wake the grill.

WARNING! GROUND FAULT CIRCUIT INTERRUPTER (GFCI) PROTECTION MUST BE PROVIDED ON THE T OR OUTLET USED TO POWER THE GRILL.

Once your grill is on, press the "Up" button to select your desired temperature, then press IGNITE to start the preheat cycle.

natural_image
Open industrial stove burner with heating equipment and steam rising (no text or symbols visible)Once preheating is complete, load food into the grill.

WARNING!
- WHEN OPERATING THIS GRILL, MAINTAIN A MINIMUM CLEARANCE OF 18 INCHES (45.7 CM) FROM GRILL TO COMBUSTIBLES, SUCH AS WOODEN RAILINGS OR HOME SIDING.
-
NEVER OPERATE THIS GRILL UNDER A COMBUSTIBLE CEILING OR OVERHANG.
• ONLY OPERATE GRILL OUTDOORS. -
USE ONLY TRAEGER® BRAND HARDWOOD PELLETS, WHICH ARE SPECIFICALLY MADE TO WORK IN OUR GRILLS. NEVER USE HEATING FUEL PELLETS IN THE GRILL.
WE RECOMMEND YOU CLEAN THE GREASE DRIP TRAY AND TGMS FREQUENTLY TO REDUCE THE POSSIBILITY OF A GREASE FIRE. PLEASE SEE "MAINTAINING YOUR GRILL" ON PAGE 24 FOR MORE DETAILS.
USING YOUR GRILL CONTINUED
5

natural_image
Exterior view of a gray portable food appliance with ventilation slots and control panel (no visible text or symbols)Close the grill lid to proceed with cooking. Unlike a gas grill, you must keep the grill lid shut during cooking.
IN CASE OF FIRE:

natural_image
Exterior view of a modern office building (no signage)
WARNING! WITH REGULAR MAINTENANCE AND CLEANING OF YOUR TRAEGER® GRILL, A GREASE FIRE
IS UNLIKELY. IN THE UNLIKELY EVENT OF FIRE, IMMEDIATELY TURN THE GRILL OFF (0) AND LEAVE THE GRILL LID CLOSED UNTIL THE FIRE IS OUT. UNPLUG THE POWER CORD IF YOU CAN DO SO SAFELY. DO NOT THROW WATER ON THE UNIT. DO NOT TRY TO SMOTHER THE FIRE. WITH THE GRILL LID CLOSED, THE FIRE WILL BE STARVED OF OXYGEN AND BURN ITSELF OUT. IF AN UNCONTROLLED FIRE DOES OCCUR, CALL THE FIRE DEPARTMENT.
TO CARRY YOUR GRILL:
natural_image
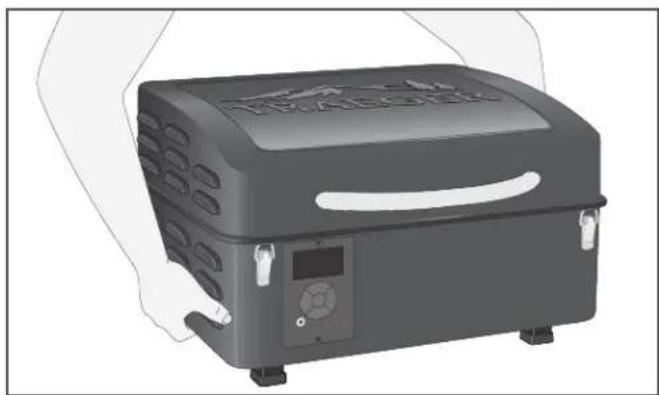
Illustration of a black industrial device with ventilation grilles and control panel (no visible text or symbols)Do not carry the grill by its handle. Always carry the grill by the bottom, using the indents located on each side. Only carry the grill when it is cooled off and not in use.
USING THE MEAT PROBE
Your Traeger ^® Grill includes a meat probe for monitoring internal food temperature, or for cooking to a goal temperature.

Insert the meat probe's plug into the jack on the lower left corner of the controller, then route the probe cable through the notch in the grill front, as shown.

Reading the temperature: Press the center button on the control twice to display the probe temperature; pressing the button only once will display the Timer. After removing your food from the grill, always use a meat thermometer to confirm that you have actually achieved the target internal meat temperature.
MEAT TEMPERATURE RECOMMENDATIONS
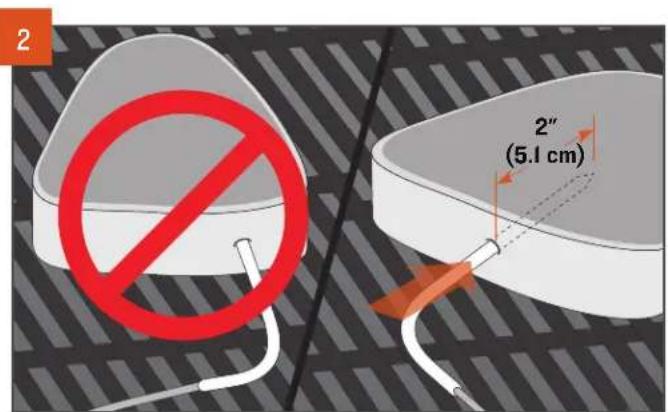
Insert the probe tip halfway into the thickest part of the protein - avoid touching any bones or particularly the fatty portion of the protein. The probe needs to be in the protein at least 2 inches (5.1 cm). This probe may not be suitable if you cannot insert the probe into the thickest part of the protein and 2 inches (5.1 cm) into the protein. After your probe has been inserted, load your food onto the preheated grill.

WARNING!
• MEAT PROBE IS EXTREMELY HOT DURING AND AFTER COOKING; USE CAUTION WHEN REMOVING.
- IMPROPER PLACEMENT OF THE MEAT PROBE OR IMPROPER MEAT PROBE CALIBRATION COULD RESULT IN RAW OR UNDERCOOKED MEATS, POULTRY, SEAFOOD, SHELLFISH, OR EGGS, WHICH MAY INCREASE YOUR RISK OF FOODBORNE ILLNESS.

WARNING! CONSUMING RAW OR UNDERCOOKED
MEATS, POULTRY, SEAFOOD, SHELLFISH, OR EGGS
Throughout this manual, you will be instructed to perform some actions while the grill is in standby mode. When the grill is in standby mode, the display's dashed border will pulse to indicate it is not actively operating and is awaiting a command. The grill automatically enters standby mode when you first turn it on.

natural_image
Abstract geometric pattern with dashed lines and a small circle on the left (no text or symbols)TIMER
Your Traeger ^® Grill comes equipped with a convenient timer. The Timer function does not impact grill operation; you can use it to notify you of other needed steps during cooking, such as loading vegetables or other shorter time cooks into the grill or basting your food.
NOTE: When adjusting time, press and hold the "Up" or "Down" buttons to advance the time rapidly.
TO SET THE TIMER:
I. With the grill controller on, press the center button once to enter Timer mode. The hours digits will flash.
2. Press the "Up" button to select hours; press the center button to confirm and move to minutes.
3. Press the "Up" button to select minutes; press the center button to confirm. The Timer icon will appear and time will begin counting down.
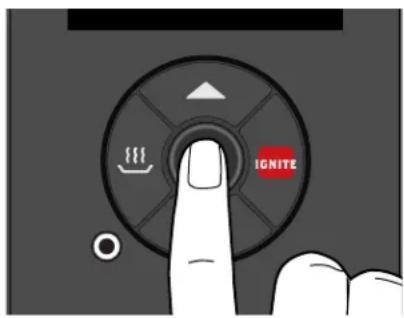
- Press the center button until the time remaining is displayed.
- Press and hold the center button for 2 seconds to cancel the Timer.
TO ADJUST THE TIMER:
- Press the center button until the time remaining is displayed.
- Use the "Up" or "Down" buttons to adjust the time as needed.
- Press the center button to confirm. The Timer icon will appear and time will resume counting down.
KEEP WARM FUNCTION

Keep Warm can be used to pause the cook cycle at any time during grilling. Press "Keep Warm" to activate the function and maintain the grill temperature at 215^ F ( 102^ C). Press "Keep Warm" again to resume cooking.

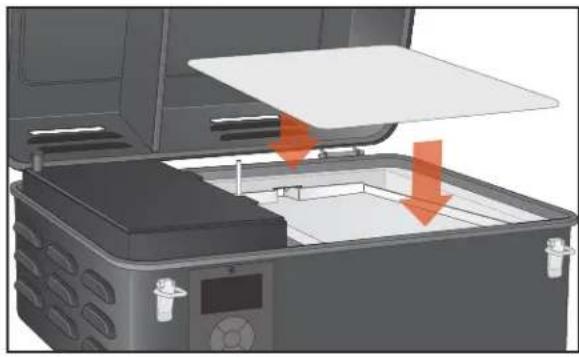
DRIP TRAY LINERS
Make grill maintenance a breeze with our drip tray liners. Made of heat-proof aluminum, they're lightweight and disposable so you can clean up quickly and Traeger on. Liners should rest fully on the grease drip tray and not cover any areas outside of the grease drip tray. Doing so will affect the temperature and performance of the grill. Change drip tray liners frequently to reduce the risk of fire. Do not use drip tray liners when cooking at temperatures above 375°F (190°C).
natural_image
3D printer internal structure diagram showing open lid, tray, and base with orange arrows indicating motion (no text or symbols)GRILL COVER
Protect your Traeger ^® Grill with a Traeger ^® brand custom-fit cover, designed to protect your grill from the elements. This durable grill cover is available at your local dealer or for purchase at traeger.com.

WARNING! FIRE HAZARD: DO NOT INSTALL YOUR GRILL COVER UNTIL THE GRILL HAS COMPLETELY COOLED.
MAINTAINING YOUR GRILL
⚠ WARNING Fire Hazard: Grease fires are most frequently caused by failing to properly maintain the grill by not cleaning the grease from the grill on a consistent basis.
⚠ WARNING Turn the main power switch on back of the grill hopper OFF (0) and disconnect the power cord before initiating any of the maintenance below.
1. CLEANING YOUR TRAEGER® GREASE MANAGEMENT SYSTEM ("TGMS"):
During your cooks, grease drippings will fall onto the grease drip tray, be channeled out of the grill through the grease drain tube, and then be collected in the grease bucket. Grease will accumulate in all of these locations and should be regularly cleaned to reduce the risk of fire.
How often you need to clean the TGMS depends on the fat content of your food. Fattier foods will require cleaning of the TGMS more often, and sometimes you will need to clean the TGMS after every cook.
Visible pieces of food and bits of hardened grease or other buildup indicate a need for cleaning.
Both components of the TGMS should be inspected before each use for signs of grease buildup.
⚠ WARNING Accumulated grease is easier to clean off when the grill is still warm—not hot. Be careful not to burn yourself. Heat-protective gloves are recommended.
Clean the grease out of the grease drain tube. We recommend cleaning this location regularly.

natural_image
Illustration of a hand spraying water onto a surface with a circular object inside (no text or symbols)Remove grill grate and the grease drip tray. This will provide access to the grease drain tube opening inside the grill. Scrape the grease accumulation from inside the grease drain tube using a stiff

natural_image
Illustration of a portable electronic device with open lid and internal compartments, showing heat transfer (no text or symbols)nonmetallic tool. Much of the loosened grease can be pushed down through the grease drain tube and will fall into the grease bucket. Wipe up remaining grease residue with paper towels or disposable rags.
Regularly clean the grease out of the grill barrel on the interior bottom and sides. If grease is allowed to build up, a grease fire could result.
Scrape the grease accumulation from inside the grill using a stiff, nonmetallic tool. Much of the

natural_image
Illustration of a hand using a tool to clean or install electronic components, with an electrical outlet showing a grid pattern (no text or symbols present)loosened grease can be removed using paper towels or disposable rags. Excessive scraped-off residue can be cleaned using a vacuum cleaner as described in Step 4 (below) when cleaning the firepot of ashes.
NOTE: Traeger's drip tray liners can help keep your grill clean and can help reduce the risk of flare-ups.
2. CREOSOTE REMOVAL:
When wood pellets are burned slowly, they produce tar and other organic vapors that combine with expelled moisture to form creosote. The creosote vapors condense in the relatively cool exhaust vent of a slow-burning fire. As a result, creosote accumulates on the exhaust vent lining. When ignited, creosote makes an extremely hot fire. Airborne grease particles will travel through the cooking chamber, and some of this airborne grease will accumulate on the exhaust vent lining, similar to creosote, which could contribute to a fire.
Periodically scrape the creosote and grease accumulation from the inside of the vertical and horizontal sections of the flue pipe or interior lining using a stiff, nonmetallic tool. A wooden paint stir stick, for example, would work for this task. Once the creosote and grease residue has been loosened from the interior lining and ventilation gaps in this downdraft system, much of it can be removed with paper towels or disposable rags. Do not spray water or other liquid cleaners onto the inside of your grill to remove creosote.
NOTE: The Traeger® Downdraft Exhaust System should be inspected at least twice a year to determine when a creosote and/or grease buildup has occurred.
When creosote or grease has accumulated, it should be removed to reduce the risk of a fire.
3. OUTSIDE STORAGE:
⚠️ CAUTION If the grill is stored outside, care should be taken to ensure that water does not get into the pellet hopper. Wood pellets expand greatly when wet and will jam your auger. Always cover your grill when not in use with a Traeger ^® Grill Cover. This custom-fit cover can be purchased at traeger.com.
4. CLEANING THE ASH FROM INSIDE AND AROUND THE FIREPOT (AFTER APPROXIMATELY 20 HOURS OF COOKING):
⚠ WARNING Make sure that the grill is COLD and ashes are extinguished and COLD before cleaning the ash.
⚠ WARNING Disposal of ashes should be done only according to the following instructions.
Excess ash in the firepot will hamper ignition and may cause your fire to go out. The firepot should be inspected occasionally and cleaned to remove the ash buildup. Again, cleaning the ash from in and around the firepot should be done only when the grill is COLD.
Remove the grill grate and grease drip tray to provide access to the firepot and the interior of the grill. Much of the ash outside of the firepot can be removed from the grill with a small metal fireplace shovel or other similar tool.

natural_image
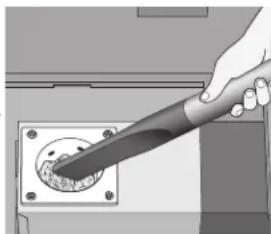
Illustration of a 3D printer with open lid and internal components, showing no text or symbols⚠ WARNING A vacuum cleaner dedicated to grill cleaning only is the best way to remove ashes from the firepot, but this must be done with extreme care to avoid the risk of fire. Again, cleaning the ash from in and around the firepot should be done only when the grill is COLD.
A utility-type vacuum cleaner having a metal collection canister without a bag would be best for this task. However, almost any vacuum cleaner will work safely if this procedure is properly followed.
natural_image
Hand holding a tool interacting with a mechanical component (no visible text or symbols)After ensuring that the ash in the firepot is COLD, vacuum the ash from the inside of the firepot.
a. If your vacuum cleaner is a bagless model, empty any previously accumulated debris from the collection chamber. Then vacuum the ash from the inside of the firepot. Once the firepot is clean, empty the collection chamber into the metal container handled in the manner described below under Disposal of Ashes without delay. Make sure that there is no remaining ash residue left in the collection chamber.
b. If your vacuum cleaner is a model that uses a disposable bag, install an unused bag in the machine. Then vacuum the ash from the inside of the firepot. Once the firepot is clean, remove the bag from the vacuum cleaner and place it in a metal container handled in the manner described under Disposal of Ashes below.
5. DISPOSAL OF ASHES:
⚠ WARNING Ashes should always be completely cool before handling. Ashes should be placed in a metal container with a tight-fitting lid. The closed container of ashes should be placed on a noncombustible floor or on the ground, well away from all combustible materials, pending final disposal. Ashes should be retained in the closed container until they are disposed.
6. CLEANING THE GRILL GRATE:
WARNING Cleaning the grill grate works best while it is still warm. Be careful not to burn yourself. Heat-protective gloves are recommended. We recommend keeping a long-handled cleaning brush near the grill. After removing your food, give the grill grate a quick brushing. It takes only a minute and it will be ready the next time you want to use the grill.
7. CLEANING OUTSIDE SURFACES:
⚠ WARNING Turn the main power switch OFF (0) and disconnect the power cord before initiating cleaning.
Use a disposable rag or cloth dampened with Traeger® All Natural Cleaner or warm, soapy water to wipe the grease from the outside of the grill. DO NOT use oven cleaner, abrasive cleansers, or abrasive cleaning pads on the outside grill surfaces.
8. TESTING THE GRILL AFTER CLEANING:
Before replacing the grease drip tray and the grill grate, plug the power cord into an appropriate grounded/earthed electrical outlet and turn the switch ON (I). After you set the temperature and press IGNITE, pellets should fall into the firepot and the hot rod should begin to heat (it will start to turn red).
⚠ WARNING Do not touch the hot rod.
When flames start to come out of the firepot, run the shutdown cycle. Let the grill cool down. Now you're ready to place the grease drip tray, grill grate, and food back onto the grill.
9. POWER CORD
If the power supply cord is damaged, it must be replaced by a special cord assembly available from Traeger.
FREQUENTLY ASKED QUESTIONS
Scan this QR code to take you to Frequently Asked Questions.

TROUBLESHOOTING
ERROR MESSAGES
Although rare, you may see an error or warning message display on your control panel. Refer to traeger.com/support for a list of error messages and how to resolve them.
OPERATING TIPS
- Only operate your grill on a level surface.
- You can change the temperature at any time during grilling to increase or decrease cooking temperature. It is best practice to give the grill some time to reach the desired temperature before making additional temperature changes.
- To change between Fahrenheit and Celsius:
a. Press and hold the "Up" and "Down" buttons simultaneously for 3 seconds.
b. Press the center button to confirm and exit.
You will now see temperatures displayed in the format you've chosen.
- Your Traeger ^® Grill is designed to operate with the lid closed.
Opening the grill lid greatly lengthens your cooking time.
- When putting frozen, raw, cold, or otherwise uncooked food on the grill, this may result in a temporary drop of your grill's internal temperature.
- Do not overload cooking surface with excessive amounts of food that reach beyond the edges of the footprint of the grease drip tray. This can lead to interference with proper cooking airflow and may lengthen the time to reach the set temperature.
-
Always take into account the type of food you are cooking:
-
Thin foods need high heat and shorter cook times, while thicker foods need low heat and longer cook times.
- Vegetables take longer to cook than meats at the same cooking temperatures.
- Always check that the internal temperature of the meat that you are cooking reaches a safe temperature for eating.
-
The Keep Warm function is not designed to properly cook your food.
-
Keep the grill clean. Regularly inspect your grill for accumulated grease. Most grease fires are caused by not properly maintaining the grill and failing to clean the Traeger® Grease Management System (TGMS) on a consistent basis (see "Maintaining Your Grill" on pages 24-25). Even if there is ample room in the grill, be cautious of loading excessive amounts of food that can release large quantities of flammable grease (for example more than a pound of bacon). If the grill has not been well maintained or if your previous cooks have produced large quantities of flammable grease, it is highly recommended that the grease be cleaned from the grill before using it again.
NOTE: Take care of your Traeger® Grill by using a new Traeger drip tray liner before each cook to help keep your grill clean.
SERVICE

TRAEGER'S LEGENDARY CUSTOMER SERVICE is the best out there. If you have any questions about your Traeger® Grill or need tips on cooking your first holiday turkey, our seasoned experts have your back. We're here for you 365 days a year, including holidays. For assistance with assembly, installation, safe operation, parts, or general customer service, you can visit our website traeger.com/support or you can phone or write us at:
TRAEGER'S CUSTOMER SERVICE
Please visit: traeger.com/support Phone: US/CA: 1-800-TRAEGER 6:00 a.m. - 10:00 p.m. MT
Address: TRAEGER PELLET GRILLS LLC
1215 E. Wilmington Ave., Suite 200
Salt Lake City, UT 84106
TRAEGER'S CUSTOMER SERVICE IS JUST A SCAN AWAY

Open the camera on your phone and point it at the QR code.

Wait for the camera to register and tap the notification or banner when it appears on your screen.
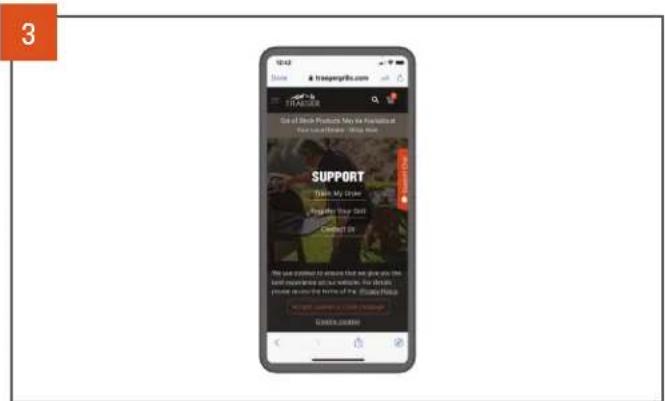
Information related to the code will automatically load.
NOTES
NOTES
TRAEGER® GRILL WARRANTY

7-YEAR LIMITED WARRANTY
Traeger Pellet Grills LLC warrants this Traeger ^51 Grill for the components, coverage, and warranty period listed in the table below under normal use and proper maintenance. This warranty gives you specific legal rights, and you may also have other rights which may vary among states and provinces. The warranty period starts from the date of original purchase from traeger.com or a Traeger authorized dealer. A list of Traeger authorized dealers is available at https://www.traeger.com/dealers (together each an “Authorized Seller”). The warranty period and coverage for the replacement parts shall be as follows:
| Warranty Periods and Coverage | ||
| Components Warranty Period Coverage | ||
| Body, Hopper Cover 7 Years Will not rust through | ||
| Grate 3 Years Will not rust through | ||
| Fan, Auger Motor, Controller 3 Years Material and Manufacturing Defects | ||
| Hooves 3 Years Material and Manufacturing Defects | ||
| Hot Rod, Cord, RTD, Thermocouple I Year Material and Manufacturing Defects | ||
| Grease Drip Tray I Year Will not rust through | ||
| Lid Gasket I Year | Will not tear or fray | |
| Meat Probe | I Year Material and Manufacturing Defects | |
Traeger's entire liability and your exclusive remedy shall be replacement of the defective parts of your Traeger® Grill, if any. Original part(s) approved for return by Traeger's Customer Service must be returned prepaid. Traeger may replace defective parts with new or refurbished parts, at Traeger's sole discretion on an as available basis within ninety days. Without limiting the exclusions stated above, there is not warranty coverage for: (i) paint damage caused by grease fires, (ii) UV exposure, (iii) normal wear and tear; and (iv) warping of the drip tray.
Traeger grills are designed to be modular for simple repair by regular users. Traeger's entire obligation under this warranty shall be to provide you with replacement of any defective parts and to provide you with instructions on how to make the replacement yourself. Traeger may replace defective parts with new or refurbished parts. Traeger reserves the right to inspect any grill (shipping paid by Traeger) and to analyze any usage information including, without limitation, any digital connected grill data (to the extent covered by our data protection policy). To validate and process a warranty claim Traeger may require that you provide reasonable evidence of your issue, including participating in video chats, phone conversations, providing photos, and providing other relevant information. Labor charges connected with the replacement of defective parts and freight charges to ship parts shall be paid at your expense.
The limitations in the following paragraph do not apply to residents of Quebec to whom the Quebec Consumer Protection Act applies.
FOR GREATER CERTAINTY AND TO FULLEST EXTENT PERMITTED BY LAW, TRAEGER PELLET GRILLS LLC SHALL NOT BE LIABLE UNDER THIS OR ANY IMPLIED WARRANTY FOR INCIDENTAL, CONSEQUENTIAL DAMAGES, INDIRECT, SPECIAL, LOSS OF DATA, EXEMPLARY, PUNITIVE OR ENHANCED DAMAGES, LOST PROFITS OR REVENUES OR DIMINUTION IN VALUE ARISING OUT OF OR RELATING TO YOUR USE OF YOUR GRILL, REGARDLESS OF (A) WHETHER SUCH DAMAGES WERE FORESEEABLE, (B) WHETHER OR NOT TRAEGER WAS ADVISED OF THE POSSIBILITY OF SUCH DAMAGES AND (C) THE LEGAL OR EQUITABLE THEORY (CONTRACT, TORT, OR OTHERWISE) UPON WHICH THE CLAIM IS BASED, AND NOTWITHSTANDING THE FAILURE OF ANY AGREED OR OTHER REMEDY OF ITS ESSENTIAL PURPOSE. THIS WARRANTY GIVES THE RETAIL CUSTOMER SPECIFIC LEGAL RIGHTS AND THE CUSTOMER MAY HAVE OTHER RIGHTS WHICH VARY AMONG STATES AND PROVINCES. BOTH YOU AND TRAEGER INTEND FOR THIS WARRANTY TO BE YOUR EXCLUSIVE REMEDY FOR A DEFECTIVE GRILL.
This warranty shall be void if: (i) the grill is not assembled or operated in accordance with Traeger's operating instructions provided with this grill; (ii) the grill is not purchased from an Authorized Seller; (iii) the grill is resold or traded to another owner; (iv) there has been use of any third party components, parts, or accessories; (v) fuels other than wood pellets designed for wood pellet grills and barbeques have been used with the grill; (vi) wood stove heating pellets are used in the grill; (vii) the grill has been used in a commercial or food service application; (viii) the user has allowed the grill to become damaged, abused, or otherwise failed to maintain the grill in accordance with Traeger's operating instructions; or (ix) there has been any unapproved modification of this grill.
Please note that because Traeger is unable to oversee or control the quality of its products sold by unauthorized sellers, Traeger's warranty is only available if you purchased your grill from an Authorized Seller. Traeger's warranty extends only to products purchased from an Authorized Seller.
To process a warranty claim, contact Traeger's customer service at the phone number or address listed above. Traeger requires proof of your date of purchase from an Authorized Seller. You should retain your sales slip or invoice along with this manual with your valuable documents.
Customers outside of the United States and Canada should note that NOT all warranty policies stated herein are consistent globally. Customers should contact the local distributor in their current country from the list at International Support for instructions regarding warranty claims specific to that country. The process described herein will not work for international warranty requests.
ADDITIONAL IMPORTANT WARRANTY INFORMATION
- We are not responsible for items lost in transit. For this reason, we highly recommend getting a tracking number or delivery confirmation when shipping your package.
• The product you send to us becomes the possession of Traeger and will not be returned to you.
Traeger will determine if your warranty claim is covered under this warranty policy at Traeger's sole and complete discretion, and failure to follow the required procedures may void your warranty claim. This warranty gives you specific legal rights, and you may also have other rights which vary among states, provinces, and countries.

WOOD FIRED GRILLS

WOOD FIRED GRILLS
WELCOME
TO THE
TRAEGERHOOD
FOLLOW US @TRAEGERGRILLS


- OWNER'S MANUAL
- TRAILHEAD
- IMPORTANT SAFETY PRECAUTIONS
- READ ALL INSTRUCTIONS BEFORE INSTALLING AND USING YOUR TRAEGER® GRILL
- ▲ DANGER Carbon Monoxide Hazard
- ⚠ WARNING Fire Hazard
- ▲ WARNING Fire Hazard
- WARNING Fire Hazard
- WARNING Burn Hazard
- ⚠ WARNING Burn Hazard
- ⚠ WARNING Smoke Hazard
- IMPORTANT SAFETY PRECAUTIONS CONTINUED
- ⚠ WARNING Electrical Shock Hazard
- CAUTION
- CAUTION Use Correct Pellets
- ⚠ WARNING Do not use fuel pellets. Never use
- ⚠️ CAUTION Minimum Ambient Temperature
- WARNING
- SAVE THESE INSTRUCTIONS
- WELCOME
- TO THE
- TRAEGERHOOD
- TABLE OF CONTENTS
- NO FILLERS BINDERS NO WORRIES
- ALL NATURAL HARDWOOD PELLETS
- ASSEMBLING YOUR GRILL
- READ ALL INSTRUCTIONS BEFORE INSTALLING AND USING THE APPLIANCE
- GETTING TO KNOW YOUR GRILL
- TIPS:
- GETTING TO KNOW YOUR GRILL CONTINUED
- PRESS AND HOLD FUNCTIONS
- PRIME THE AUGER
- GRILL SHUTDOWN
- CHANGE BETWEEN °F/°C
- DISPLAY FIRMWARE
- STATUS DISPLAY
- UP/DOWN BUTTONS
- IGNITE
- MEAT PROBE JACK
- KEEP WARM
- CENTER BUTTON
- INDICATOR LIGHT PANEL
- SEASONING YOUR GRILL CONTINUED
- SUBSEQUENT START-UP
- CONTROLLER SHUTDOWN CYCLE
- WARNING!
- USING YOUR GRILL CONTINUED
- USING THE MEAT PROBE
- TIMER
- TO SET THE TIMER:
- TO ADJUST THE TIMER:
- KEEP WARM FUNCTION
- DRIP TRAY LINERS
- GRILL COVER
- MAINTAINING YOUR GRILL
- CLEANING YOUR TRAEGER® GREASE MANAGEMENT SYSTEM ("TGMS"):
- CREOSOTE REMOVAL:
- OUTSIDE STORAGE:
- CLEANING THE ASH FROM INSIDE AND AROUND THE FIREPOT (AFTER APPROXIMATELY 20 HOURS OF COOKING):
- DISPOSAL OF ASHES:
- CLEANING THE GRILL GRATE:
- CLEANING OUTSIDE SURFACES:
- TESTING THE GRILL AFTER CLEANING:
- POWER CORD
- FREQUENTLY ASKED QUESTIONS
- TROUBLESHOOTING
- ERROR MESSAGES
- OPERATING TIPS
- SERVICE
- TRAEGER'S CUSTOMER SERVICE
- TRAEGER'S CUSTOMER SERVICE IS JUST A SCAN AWAY
- NOTES
- TRAEGER® GRILL WARRANTY
- 7-YEAR LIMITED WARRANTY
- ADDITIONAL IMPORTANT WARRANTY INFORMATION
Brand : TRAEGER
Model : Trailhead
Category : Oven