
SP37359 - Home trainer COSTWAY - Free user manual and instructions
Find the device manual for free SP37359 COSTWAY in PDF.


| Product Type | Home Trainer / Exercise Bike |
| Brand | Costway |
| Model | SP37359 |
| Resistance System | Magnetic |
| Resistance Levels | 8 |
| Display | LCD (Time, Speed, Distance, Calories, Odometer) |
| Max User Weight | 120 kg (264 lbs) |
| Folded Dimensions | Approx. 50 x 40 x 30 cm (20 x 16 x 12 in) |
| Net Weight | Approx. 10 kg (22 lbs) |
| Power Supply | 2x AAA Batteries (not included) |
| Pedals | Adjustable with safety straps |
| Seat | Adjustable height and position |
| Handlebar | Foam padded |
| Transport Wheels | Yes |
| Stabilizers | Adjustable leveling feet |
| Maintenance | Wipe with damp cloth; periodically check bolts |
| Spare Parts Availability | Through Costway customer service |
| Warranty | 1 year |
Frequently Asked Questions - SP37359 COSTWAY
User questions about SP37359 COSTWAY
0 question about this device. Answer the ones you know or ask your own.
Ask a new question about this device
Download the instructions for your Home trainer in PDF format for free! Find your manual SP37359 - COSTWAY and take your electronic device back in hand. On this page are published all the documents necessary for the use of your device. SP37359 by COSTWAY.
USER MANUAL SP37359 COSTWAY
natural_image
Line drawing of a stationary exercise bike with adjustable arms and legs (no text or symbols)USER'S MANUAL
MAGNETIC BIKE
SP37359
THIS INSTRUCTION BOOKLET CONTAINS IMPORTANT SAFETY INFORMATION. PLEASE READ AND KEEP FOR FUTURE REFERENCE.
Please give us a chance to make it right and do better!
Contact our friendly customer service department for help first.
Replacements for missing or damaged parts will be shipped ASAP!
Follow Costway


Contact Us!
Do NOT return this item.
Contact our friendly customer service department for help first.

Before You StartBefore Y
⚠️ Please read all instructions carefully.
⚠️ Retain instructions for future reference.
Separate and count all parts and hardware.
Read through each step carefully and follow the proper order.
We recommend that, where possible, all items are assembled near to the area in which they will be placed in use, to avoid moving the product unnecessarily once assembled.
Always place the product on a flat, steady and stable surface.
Keep all small parts and packaging materials for this product away from babies and children as they potentially pose a serious choking hazard.
Dear Customer, Please read this instruction very carefully before using the item.
IMPORTANT SAFETY NOTICE:
Note the following precaution before assembling or operating the machine
1、Assemble the machine exactly as the descriptions in the instruction manual.
2、Check all the screws, nuts and other connections before using the machine for the first time and ensure that the trainer is in the safe condition.
3、Set up the machine in a dry level place and leave it away from moisture and water.
4、Place a suitable base (e.g. rubber mat, wooden board etc.) beneath the machine in the area of assembly to avoid dirt and etc..
5、Before beginning training, remove all objects within a radius of 2 meters from the machine.
6、Do not use aggressive cleaning articles to clean the machine, Only use the supplied tools or suitable tools of your own to assemble the machine or repair any parts of machine. Remove drops of sweat from the machine immediately after finishing training.
7、Your health can be affected by incorrect or excessive training. Consult a doctor before beginning a training program. He can define the maximum setting (Pulse. Watts. Duration of training etc) to which you may train yourself and can get precise information during training. This machine is not suitable for therapeutic purpose.
8、Only do training on the machine when it is in normal working condition. Use only original spare parts for any necessary repairs.
9、This machine can be used for only one person's training at a time.
10、Wear training clothes and shoes, which are suitable for fitness training with the machine. Your training shoes should be appropriate for the trainer.
11、If you have a feeling of dizziness, sickness or other abnormal symptoms, please stop training and consult a doctor as soon as possible.
12、People such as children and handicapped persons should only use the machine in the presence of another person who can give aid and advice.
13、The power of the machine increases with increasing the speed, and the reverse. The machine is equipped with adjustable knob, which can adjust the resistance. Reduce the resistance by turning the adjusting knob for the resistance setting towards stage 1. Increase the resistance by turning the adjusting knob for the resistance setting towards stage 8. The maximum user's weight is 110kg. / 243 lbs.
14、 Care must be taken when lifting or moving the equipment so as not to injure your back. Always use proper lifting techniques and/or use assistance.
Exploded-View & Parts List:
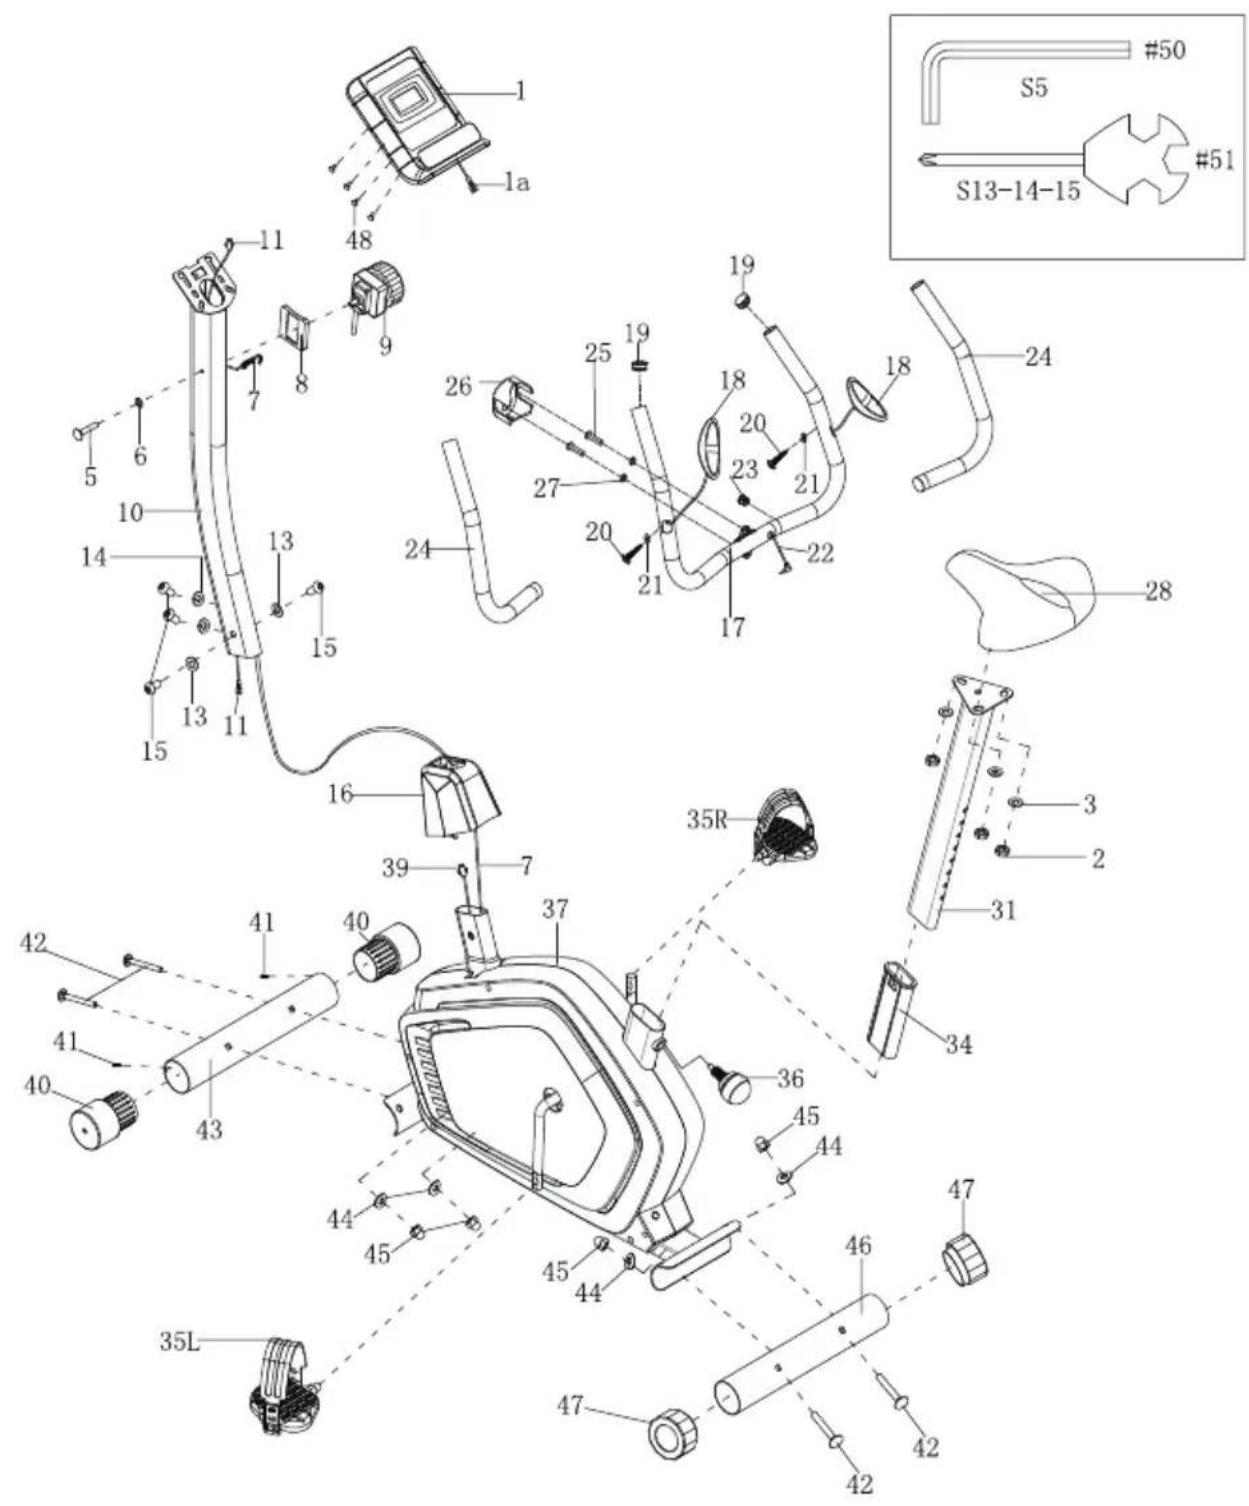
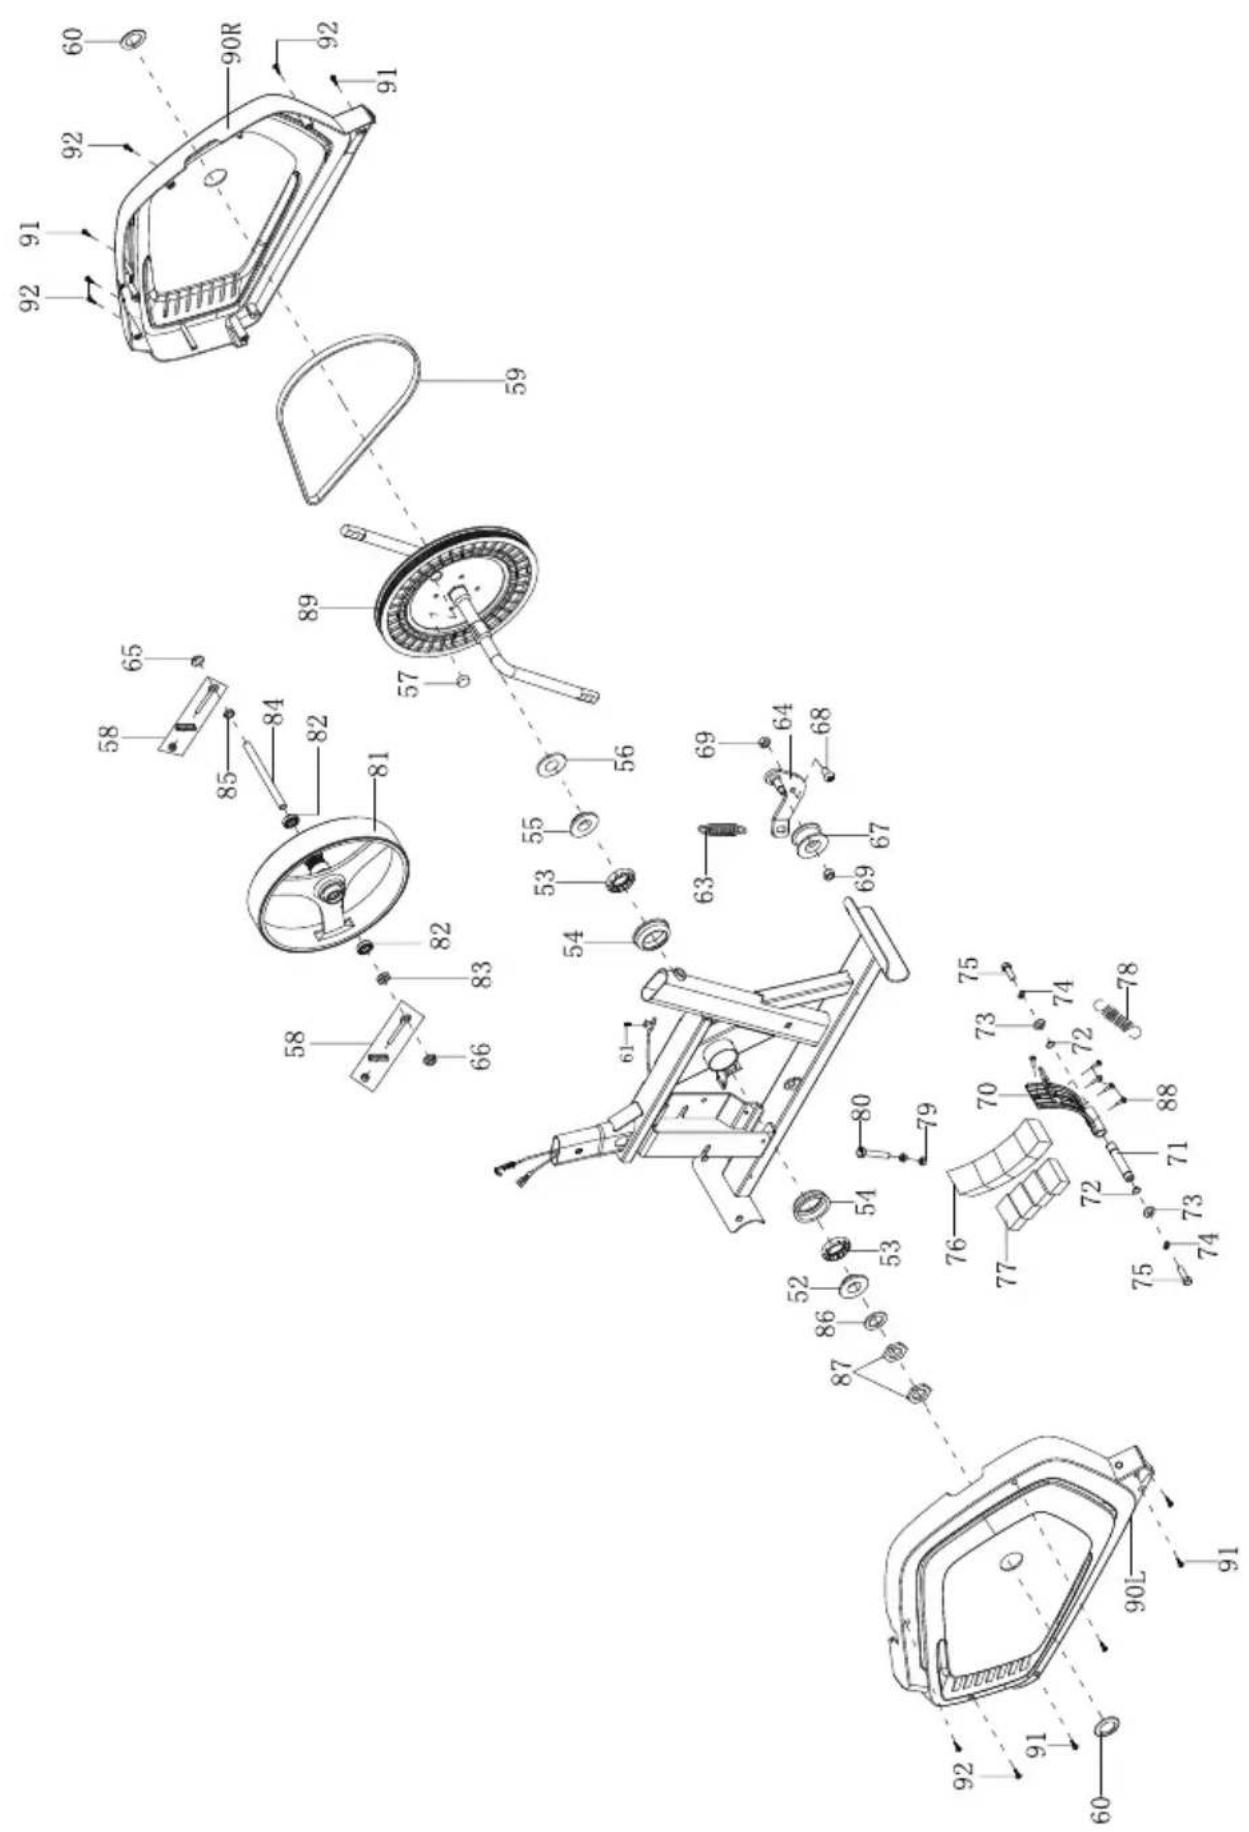
PART LIST
| No | Description | Qty |
| 1 | Computer | 1 |
| 2 | Nylon nut M8*H7.5*S13 | 3 |
| 3 | Washer d8*ø20*1.5 | 3 |
| 4 | -- | |
| 5 | Crosshead screw M5*16 | 1 |
| 6 | Washer d5*ø10*1 | 1 |
| 7 | Tension control wire | 1 |
| 8 | Socket of tension control knob | 1 |
| 9 | Tension control | 1 |
| 10 | Support tube | 1 |
| 11 | Middle wire 900MM | 1 |
| 12 | -- | |
| 13 | Washer d8*ø16*1.5 | 2 |
| 14 | Arc washer d8*ø20*R16*1.5 | 2 |
| 15 | Screw M8*16 | 4 |
| 16 | Front cover | 1 |
| 17 | Handlebar | 1 |
| 18 | Pulse | 2 |
| 19 | End cap | 2 |
| 20 | Crosshead screw ST4*19*ø7 | 2 |
| 21 | Washer d6*ø12*1 | 2 |
| 22 | Handle pulse wire 800MM | 1 |
| 23 | Stopple ø 12*11*ø 3 | 1 |
| 24 | Foam | 2 |
| 25 | Hexagon bolt M8*25*S14 | 2 |
| 26 | Small cover | 1 |
| 27 | Spring washer d8 | 2 |
| No | Description | Qty |
| 43 | Front stabilizer | 1 |
| 44 | Arc washer d8*∅ 20*2*R30 | 4 |
| 45 | Domed nut M8*H16*S13 | 4 |
| 46 | Rear stabilizer | 1 |
| 47 | End caps | 2 |
| 48 | Crosshead screw M4*12 | 4 |
| 49 | -- | 2 |
| 50 | Spanner S5 | 1 |
| 51 | Cross-end wrench S13-14-15 | 1 |
| 52 | Left collar housing | 1 |
| 53 | Collar ball | 2 |
| 54 | Collar housing | 2 |
| 55 | Right collar housing | 1 |
| 56 | Washer d24 | 1 |
| 57 | Magnet | 1 |
| 58 | Bolt group | 2 |
| 59 | Belt | 1 |
| 60 | Crank cover | 2 |
| 61 | Crosshead screw ST4.0*16 | 1 |
| 62 | Front cover | 1 |
| 63 | Tension spring | 1 |
| 64 | U bracket | 1 |
| 65 | Hexagon thin nut M10*1.0*H5 | 1 |
| 66 | Hexagon flange nut M10*1.0*H9.5 | 1 |
| 67 | Idler | 1 |
| 68 | Screw M8*19 | 1 |
| 69 | Nylon nut M8*S13*H7.5 | 2 |
| 28 | Seat | 1 |
| 29 | -- | |
| 30 | -- | |
| 31 | Vertical tube | 1 |
| 32 | -- | |
| 33 | -- | |
| 34 | Bushing | 1 |
| 35 L/R | Pedal HD-16C 1/2" | 2 |
| 36 | Knob | 1 |
| 37 | Main frame | 1 |
| 39 | Sensor 750MM | 1 |
| 40 | End cap | 2 |
| 41 | Crosshead screw ST3*10*∅5.6 | 2 |
| 42 | Carriage bolt M8*73*20*H5 | 4 |
| 84 | Axle | 1 |
| 85 | Hexagon thin bolt M10*1.0*H2 | 1 |
| 86 | Locking washer | 1 |
| 87 | Nut | 2 |
| 88 | Crosshead screw ST3.0*10 | 5 |
| 89 | Belt pulley | 1 |
| 70 | Magnetic board | 1 |
| 71 | Axle | 1 |
| 72 | Snap ring d6 | 2 |
| 73 | Washer d6 | 2 |
| 74 | Spring washer d6 | 2 |
| 75 | Hexagon bolt M6*16*S12 | 2 |
| 76 | Plastic lattice | 1 |
| 77 | Magnet | 4 |
| 78 | Tension spring | 1 |
| 79 | Hexagon nut M6 | 1 |
| 80 | Hexagon bolt M6*55*S10 | 1 |
| 81 | Flywheel | 1 |
| 82 | Bearing | 2 |
| 83 | Hexagon thin nut M10*1.0*H3 | 1 |
| 90L/R | Chain cover | 2 |
| 91 | Crosshead screw S T4.2*16 | 4 |
| 92 | Crosshead screw ST4.2*19 | 8 |
Assembly Instruction:
1.Preparation:
A. Before assembling make sure that you will have enough space around the item.
B. Use the present tooling for assembling.
C. Before assembling please check whether all needed parts are available (at the above of this instruction sheet you will find an explosion drawing with all single parts (marked with numbers) which this item consists of.
2.ASEMBLY INSTRUCTION:
Step 1
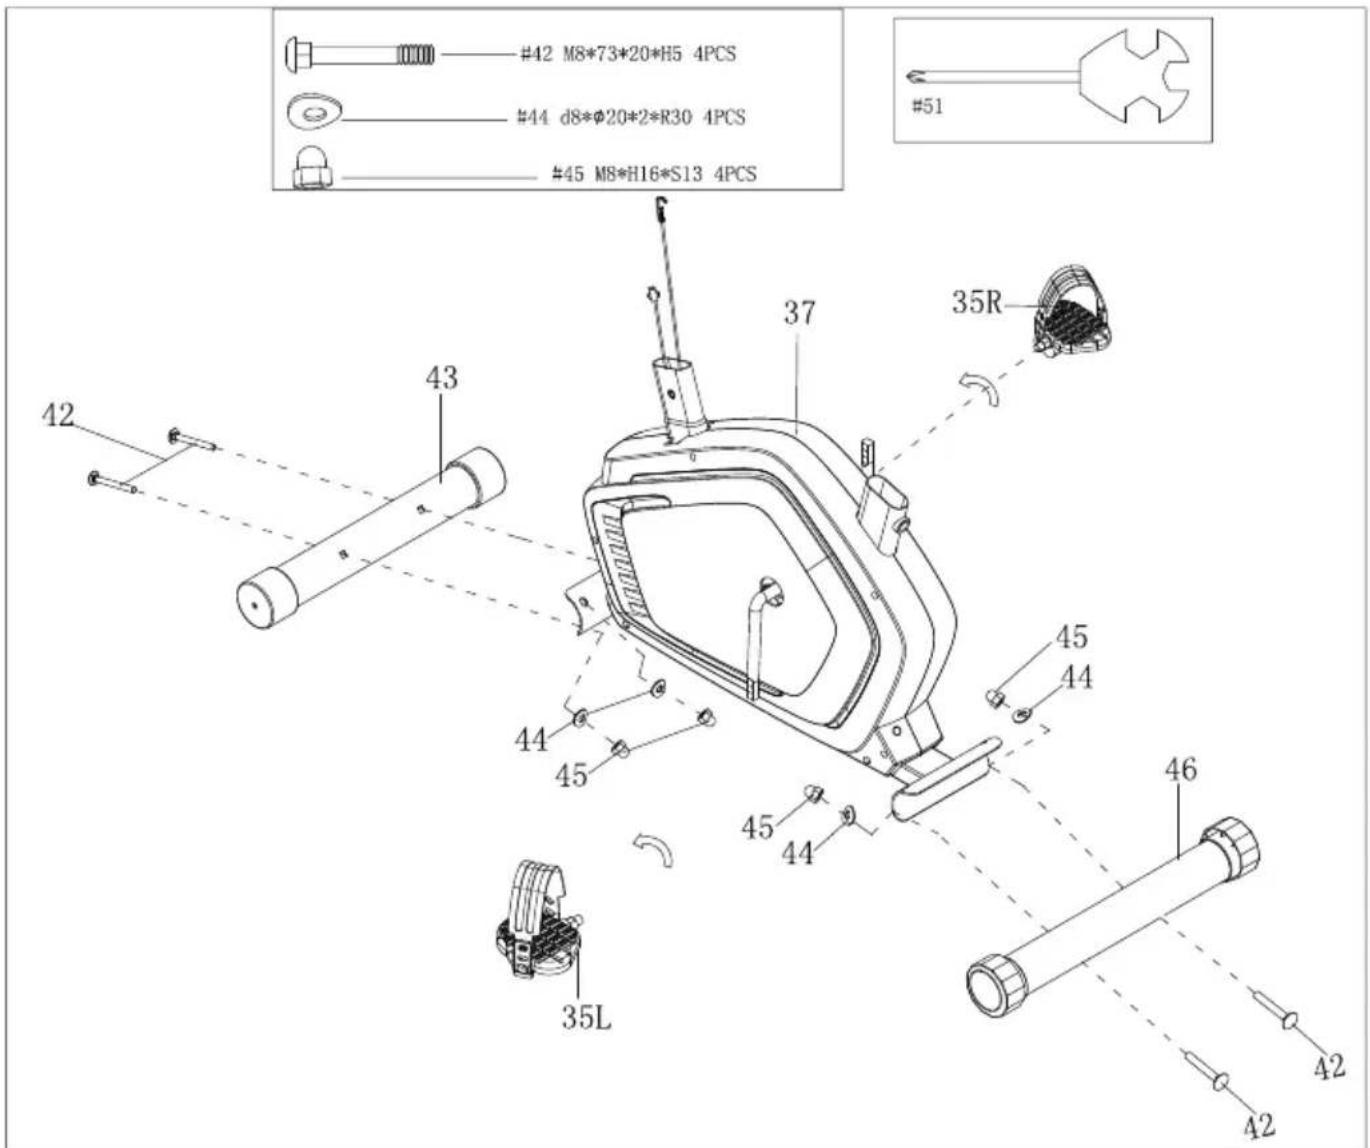
a. Attach front stabilizer (43) and rear stabilizer (46) to the main frame (37) with carriage bolt (42), domed nut (45) and arc washer (44).
b. Attach the pedal(35L/R) to the crank arms as shown.
CAUTION: be sure the right pedal (35R) marked (R) is attached to the right crank arm and tightened in the clockwise rotation direction.
The left pedal (35L) marked (L) is attached to the left crank arm and tightened in the anticlockwise direction.
Step 2
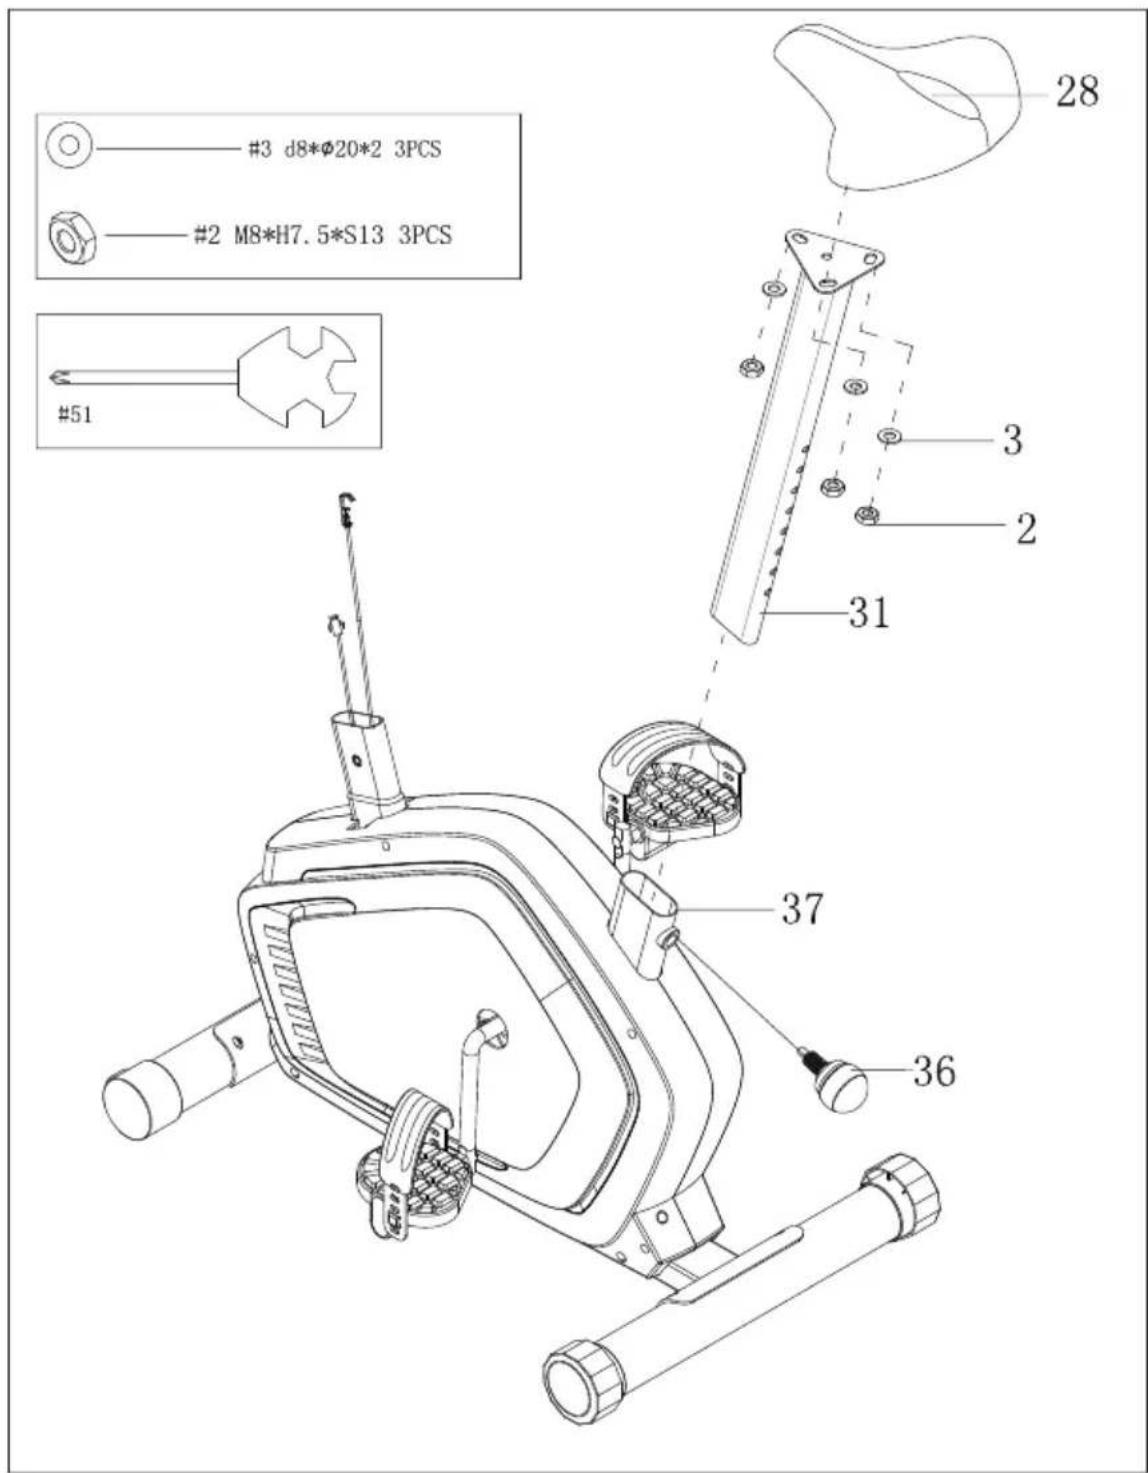
a.Slide vertical tube (31) into main frame (37), secure and tighten with knob (36).
b. Attach seat (28) to vertical tube (31) with nylon nut (2) and washer (3).
Step 3
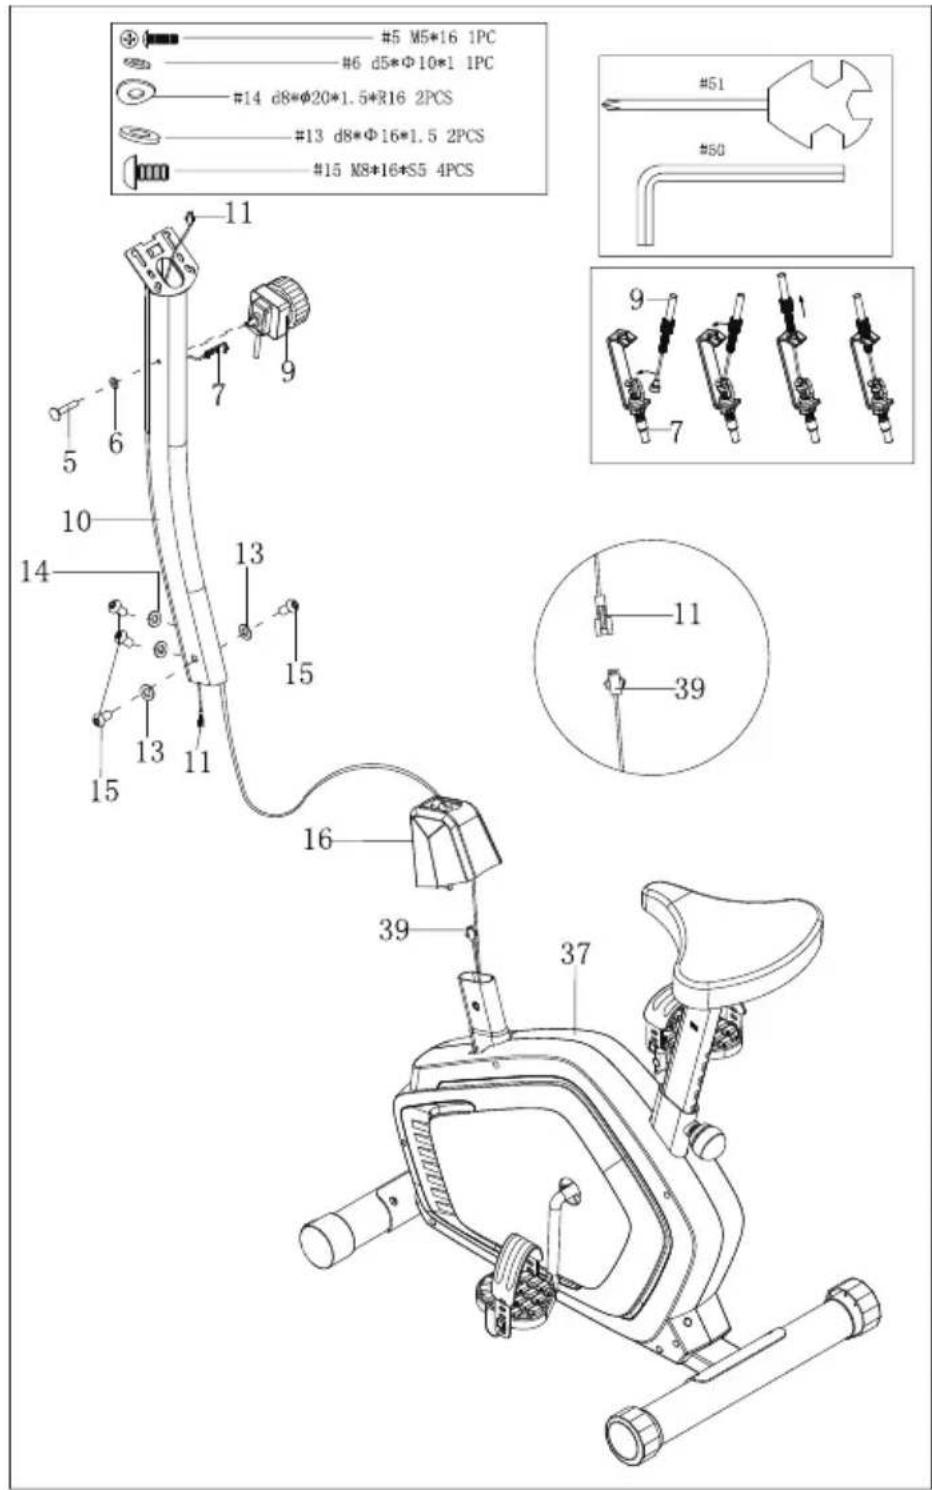
a、Pull tension wire (7) out of front cover (16) and support tube (10). Connect middle wire (11) and sensor wire (39). Pull tension wire (7) out of support tube (10), and connect tension control (9) with tension wire (7) as shown above. Then, attach tension control (9) to support tube (10) with crosshead screw (5) and washer (6).
b、Attach support tube (10) to main frame (37) with screw (15), arc washer (14) and washer (13).
Step 4:
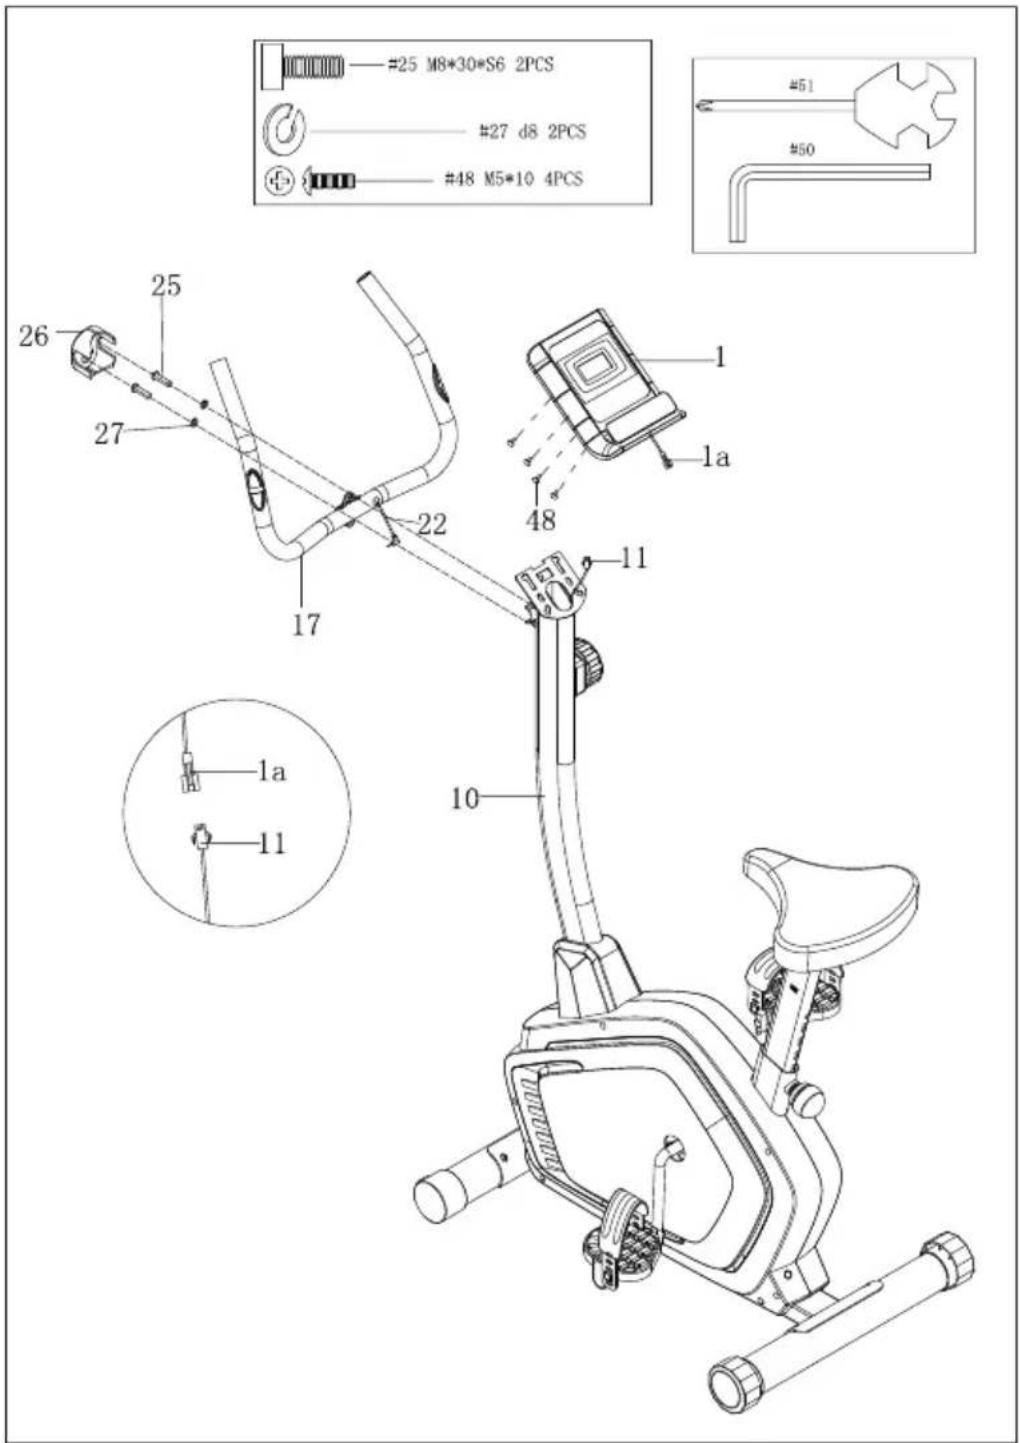
a. Remover screw (25) and spring washer (27) from support tube (10).
b. Attach handlebar (17) to support tube (10), tighten and secure with hexagon bolt (25), spring washer (27) and small cover (26).
c. Remover crosshead screw (48) from computer (1).
d. Connect computer wire (1a) and middle wire (11).
e. Attach computer (1) to support tube (10) with crosshead screw (48). Then, plug handle pulse wire (22) into the hole which is at the back of computer (1).
EXERCISE INSTRUCTIONS
Using your Upright BIKE provides you with several benefits, it will improve your physical fitness, tone muscle and in conjunction with calorie controlled diet help you lose weight.
1. The Warm Up Phase
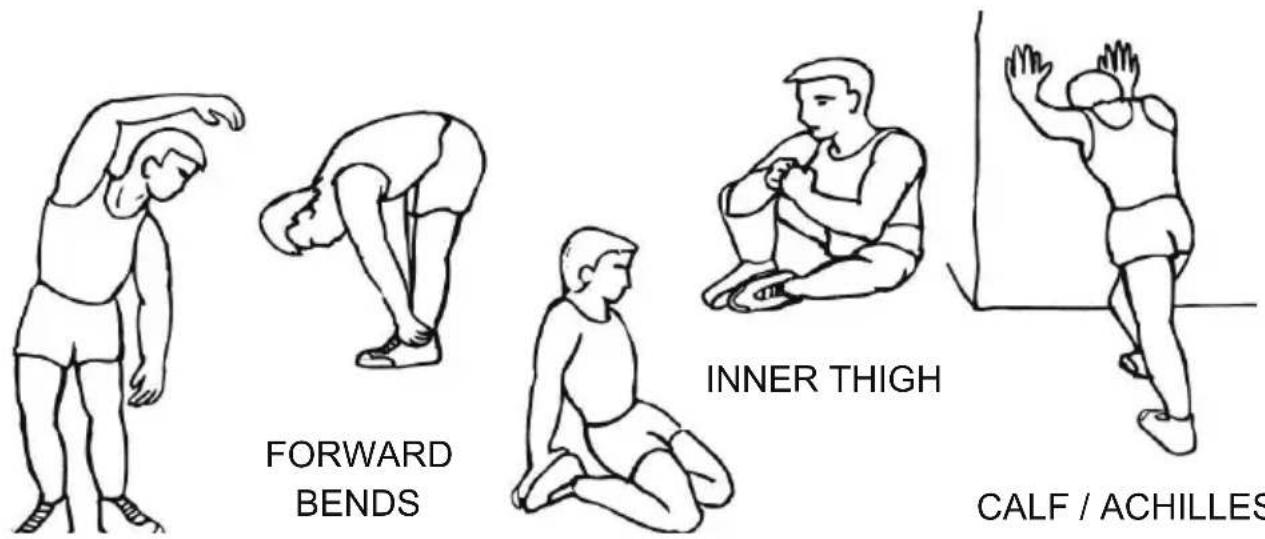
This stage helps get the blood flowing around the body and the muscles working properly. It will also reduce the risk of cramp and muscle injury. It is advisable to do a few stretching exercises as shown below. Each stretch should be held for approximately 30 seconds, do not force or jerk your muscles into a stretch - if it hurts, STOP.
2. The Exercise Phase
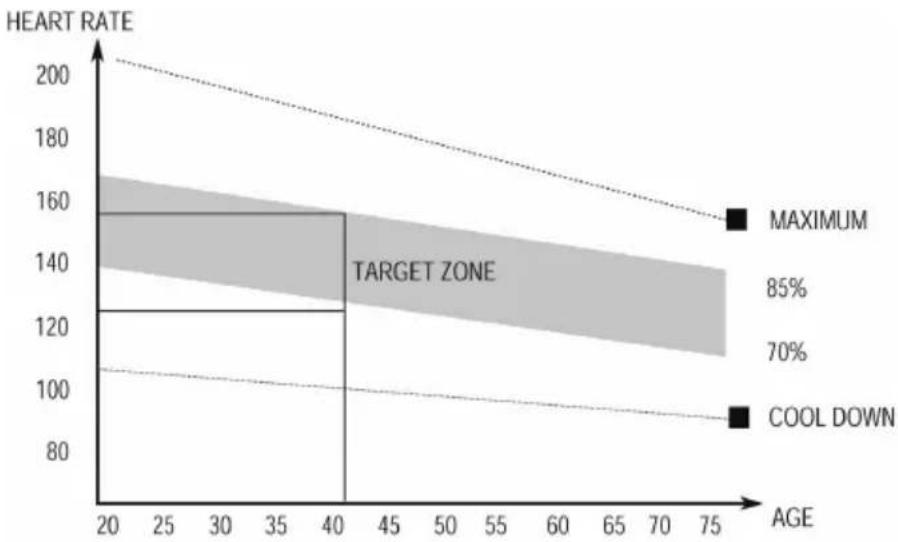
This is the stage where you put the effort in. After regular use, the muscles in your legs will become Stronger. Work to your routine but it is very important to maintain a steady tempo throughout. The rate of workout should be sufficient to raise your heart beat into the target zone shown on the graph below.
line
| AGE | HEART RATE | | --- | ---------- | | 20 | 160 | | 40 | 120 | | 75 | 100 |This stage should last for a minimum of 12 minutes though most people start at about 15-20 minutes
3. The Cool Down Phase
This stage is to let your Cardio-vascular System and muscles wind down. This is a repeat of the warm up exercise e.g. reduce your tempo, continue for approximately 5 minutes. The stretching exercises should now be repeated, again remembering not to force or jerk your muscles into the stretch.
As you get fitter you may need to train longer and harder. It is advisable to train at least three times a week, and if possible space your workouts evenly throughout the week.
MUSCLE TONING
To tone muscle while on your Upright BIKE you will need to have the resistance set quite high. This will put more strain on our leg muscles and may mean you cannot train for as long as you would like. If you are also trying to improve your fitness you need to alter your training program. You should train as normal during the warm up and cool down phases, but towards the end of the exercise phase you should increase resistance, making your legs work harden than normal. You may have to reduce your speed to keep your heart rate in the target zone.
WEIGHT LOSS
The important factor here is the amount of effort you put in. The harder and longer you work the more calories you will burn. Effectively this is the same as if you were training to improve your fitness, the difference is the goal.
USE
The tension control knob allows you to alter the resistance of the pedals. A high resistance makes it more difficult to pedal, a low resistance makes it easier. For the best results set the tension while the bike is in use.
EXERCISE MONITOR
SPECIFICATIONS:
TIME----0:00—99:59 HOUR
SPEED----0.0—99.9 KM/H
DISTANCE----0.00—999.9 KM
MODE - Press to select functions.
SET(IF HAVE)-To set the values of time, distance and calories when not in scan mode.
RESET (IF HAVE)-Press to reset time, distance and calories.
KEY FUNCTION:
SCAN: Step into auto scan mode, show every function in turn. In this mode, each function can not be set; hold this key, the computer will be reset, each function will return zero except total distance function.
TIEM: Show current time you exercise, in this mode, you can press up or down key to set the time you will exercise.
SPEED: Show current speed you exercise.
DIST: Show current distances you exercise, you can press up or down key to set the distance you will exercise.
CAL: Show current calories you exercise, you can press up or down key to set the calories you will exercise.
ODO: Show the total distances you exercise from the computer work. This mode can not be set.
Step into the pulse test: Place the palms of your hands on both of the contact pads an for 30 seconds, then the computer will show current heart rate to you.
Computer power on ,the monitor will show full screen for 1 second to enter the scan mode: In the scan mode, if no key operation is performed, it will auto scan into each mode for every 6 seconds. If you perform a key operation, it will step into the selected function.
When exercise, the time, speed, calorie, distance, odo functions will work, calculate the values of each function.
When you stop, the computer will stop work, the time mode will stop for 4 seconds. If there is no signal input for 4 minutes, the computer will step into sleep mode----the screen will power off until a signal input or key operation wakes it up.
BATTERY:
If there is a possibility to see an improper display on the monitor, please replace the batteries to have a good result.
This monitor uses two "AAA" Batteries. You can replace the batteries at the same time.
Welcome to visit our website and purchase our quality products!
With your inspiring rating, COSTWAY will be more consistent to offer you EASY SHOPPING EXPERIENCE, GOOD PRODUCTS and EFFICIENT SERVICE!
US office: Fontana, California
UK office: Ipswich

* Reward Points
* Exclusive Customer Service
* Personalized Recommendations
* Permanent Shopping Cart
* Order History
5 Star Rating

natural_image
Five black five-pointed stars arranged horizontally on white background (no text or symbols)We would like to extend our heartfelt thanks to all of our customers for taking time to assemble this product and giving us valuable feedbacks.


- Contact Us!
- Do NOT return this item.
- Before You StartBefore Y
- IMPORTANT SAFETY NOTICE:
- Assembly Instruction:
- 1.Preparation:
- 2.ASEMBLY INSTRUCTION:
- Step 3
- Step 4:
- EXERCISE INSTRUCTIONS
- The Warm Up Phase
- The Exercise Phase
- The Cool Down Phase
- MUSCLE TONING
- WEIGHT LOSS
- USE
- EXERCISE MONITOR
- SPECIFICATIONS:
- KEY FUNCTION:
- BATTERY:
- Welcome to visit our website and purchase our quality products!
- Star Rating
Brand : COSTWAY
Model : SP37359
Category : Home trainer