iQube ST - Scooter TVS - Free user manual and instructions
Find the device manual for free iQube ST TVS in PDF.


| Product Type | Electric Scooter |
| Brand | TVS |
| Model | iQube ST |
| Dimensions (L x W x H) | 1870 mm x 680 mm x 1150 mm |
| Wheelbase | 1285 mm |
| Ground Clearance | 160 mm |
| Seat Height | 765 mm |
| Kerb Weight | 108 kg |
| Battery Type | Lithium-ion |
| Battery Capacity | 2.2 kWh |
| Motor Power (Peak) | 4.4 kW |
| Top Speed | 78 km/h |
| Range (IDC) | 75 km |
| Charging Time | 4.5 hours (standard charger) |
| Charger Type | Portable 5A charger |
| Front Brake | Disc (220 mm) |
| Rear Brake | Drum (130 mm) |
| Front Suspension | Telescopic fork |
| Rear Suspension | Adjustable hydraulic shock absorber |
| Lighting | Full LED |
| Instrument Cluster | Digital LCD |
| Connectivity | Bluetooth, TVS SmartXonnect |
| Warranty | 3 years or 30,000 km (battery 3 years) |
| Maintenance | Regular brake, tire, and battery check; clean with damp cloth |
| Safety Features | Side stand sensor, IP67 battery, regenerative braking |
Frequently Asked Questions - iQube ST TVS
User questions about iQube ST TVS
0 question about this device. Answer the ones you know or ask your own.
Ask a new question about this device
Download the instructions for your Scooter in PDF format for free! Find your manual iQube ST - TVS and take your electronic device back in hand. On this page are published all the documents necessary for the use of your device. iQube ST by TVS.
USER MANUAL iQube ST TVS
natural_image
Composite image showing electric scooters and a charging device against a yellow background, with no visible text or symbols.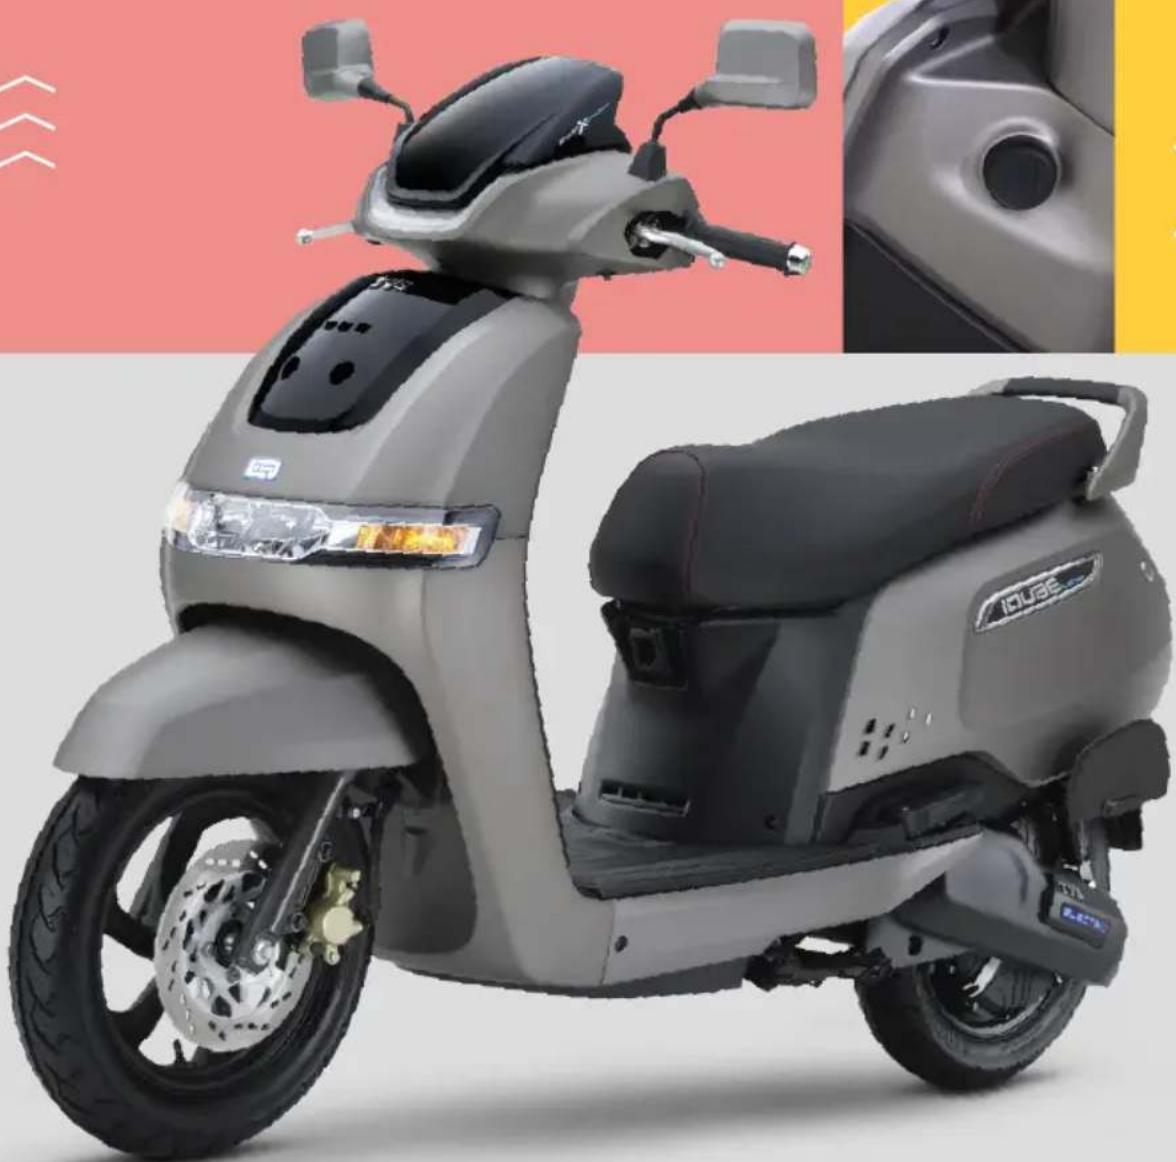
natural_image
Exterior view of a gray Iouae scooter with black seat, shown from front and side angles (no text or symbols on the scooter body)TVS
iQU3E
ELECTRIC
FOREWORD
Hello!
You are now a proud owner of the iQube Electric ST scooter from the house of TVS Motor Company.
The iQube Electric ST is an electric scooter like no other. It gives you the unmatched combination of performance, connected technology and practicality of use. So now you can ride in style and comfort, with all the savings benefits of an electric vehicle.
For getting the best out of your iQube Electric ST, please read the manual carefully and understand all features and operations of your vehicle. Follow the instructions and enjoy a smart and convenient experience that comes with your iQube Electric ST.
To ensure a worry free journey on your TVS iQube Electric ST, we urge you to get your vehicle serviced only at TVS Motor Company Authorized Dealers.
We hope you enjoy every aspect of being a proud owner of TVS iQube Electric ST and being a part of our community of smart, next-gen and sustainable riders.
Happy riding!
TVS MOTOR COMPANY LIMITED
TVS Green Initiative
Congratulations on buying your TVS electric vehicle! By choosing an Electric Vehicle you are not only embracing cutting edge technology but also demonstrating your commitment towards environmental sustainability.
Your choice to drive an electric vehicle significantly reduces the stress on our environment, helping to combat climate change and preserve our planet for future generations.
Thank you for your contribution to a cleaner, greener world!
With zero tailpipe emissions, the vehicle will reduce the amount of greenhouse gases in the environment. This avoidance of emission of greenhouse gases translates into Environmental Attributes.
TVS, in a step towards our Corporate Responsibility and to show our dedication towards the environment, pooling these environmental attributes.
As a customer of TVS electric vehicle (EV), you hereby consent to transfer the environmental attributes, or any other similar benefits associated with your TVS EV to TVS Motor Company Limited. By using the vehicle, you acknowledge and agree to the following terms and conditions:
- Ownership of Environmental Attributes: TVS Motor Company Limited shall permanently have the sole rights on the environmental attributes, or any other similar benefits generated by the operation of your TVS EV for its lifetime.
- Exclusive Ownership: You understand and acknowledge that upon transfer, TVS Motor Company Limited shall have exclusive ownership rights to the environmental attributes and may use them for any legal purpose, including but not limited to carbon offsetting or trading.
You can ask any query related to this program by writing to us on sustainability@tvsmotor.com
CONTENTS
FOREWORD 1
CONTACTS FOR SUPPORT 3
INTRODUCTION 5
SAFETY INFORMATION 6
UNIQUE FEATURES OF TVS iQubE Electric ST 7
ACCESSORIES FOR YOUR SCOOTER 10
VEHICLE PERFORMANCE VARIATION 12
CONTROLS 17
INSTRUMENT CLUSTER 23
CHARGING THE VEHICLE 66
VEHICLE CHARGING 68
CHARGER DO's & DON'Ts 69
MAINTENANCE SCHEDULE 70
WARRANTY INFORMATION 74
TECHNICAL SPECIFICATIONS 78
GENERAL INFORMATION 80
TAMILNADU-1, 3 & 4
1. TVS Motor Company Limited
V Floor, Gee Gee Universal,
No. 2, MC Nichols Road,
Chetpet, Chennai - 600 031.
Phone: 044-28361651/28361654
Email : AO.Chennai@tvsmotor.com
AO.Madurai@tvsmotor.com
TAMILNADU-2
2. TVS Motor Company Limited
No. 10, 2nd floor,
Shree Shanmugapriya Towers,
Kannuswamy Street,
Behind Hotel Annapoorna,
R S Puram, Coimbatore - 641 002.
Phone: 0422-4350060/2541035
Email : AO.Coimbatore@tvsmotor.com
KERALA
3. TVS Motor Company Limited
Ambady Towers, Second Floor,
Door No. 27/631, A6,
Edappally-Pookkattupady Road,
Edappally PO., Cochin - 682 024.
Phone : 0484-2544578/2556938
Email : AO.Cochin@tvsmotor.com
KARNATAKA-1, 2 & GOA
4. TVS Motor Company Limited
No. 600, Anand Surya, 2nd Floor,
15th Cross, 6th Phase, JP Nagar,
Opp. BMTC Bus Stop,
Bangalore - 560 078.
5. TVS Motor Company Limited
Rukumani Towers, First Floor,
No. 3-11-30, Plot No. 11,
Paigha Colony, Behind Anand Theater,
Secunderabad - 500 003.
Phone: 040-27840590/27844419
Email : AO.Hyderabad@tvsmotor.com
AO.Vijayawada@tvsmotor.com
MAHARASHTRA-1 & 2
6. TVS Motor Company Limited
No. 401, 4th Floor, The Chambers,
Plot No. 4/12/3, Near Ganapati Chowk,
Viman Nagar, Pune - 411 014.
Phone : 020-26632111/26632110
Email : Service.pune@tvsmotor.com
MAHARASHTRA-3 & CHATTISGARH
7. TVS Motor Company Limited
No. 502B, 6th Floor, B Wing,
Shriram Shyam Towers,
Near LIC Square, Sardar,
Nagpur - 440 001.
Phone: 0712-2569932
Email : Service.Nagpur@tvsmotor.com
AO.Raipur@tvsmotor.com
CHATTISGARH
8. TVS Motor Company Limited
Office No. 526, 527 & 528,
Magneto Offizo,
5th Floor, Magneto The Mall,
Labhandi, NH-6, Raipur - 492 001.
Phone: 0771-4260006
Email : AO.Raipur@tvsmotor.com
GUJARAT
9. TVS Motor Company Limited
1208-1213, Shivalik Satyamev,
Below Bopal Over Bridge,
Ambli-SP Ring Road Junction, Bopal,
Ahmedabad- 380 058.
Phone: 079-65443748
Email : AO.Ahmedabad@tvsmotor.com
MADHYA PRADESH-1 & 2
10. TVS Motor Company Limited
No. 211-212, 2nd Floor,
Chinar Incube Business Centre,
Chinar Fortune City,
Near Brindhavan Dhaba,
Hosangabad Road,
Bhopal - 462 026.
Phone : 0755-2499406/2499306
Email : AO.Bhopal@tvsmotor.com
AO.Indore@tvsmotor.com
RAJASTHAN-1 & 2
11. TVS Motor Company Limited
Plot No. 17-18,
2nd Floor of National Motors Building,
Jhotwara Industrial Area,
Jaipur - 302 012.
Phone : 0141-5150901/5150902
Email : AO.Jaipur@tvsmotor.com
AO.Udaipur@tvsmotor.com
DELHI & HARYANA
12. TVS Motor Company Limited
D-3 & D-4, 2nd Floor,
Sector - 10, Noida,
Uttar Pradesh - 201 301.
Phone : 011-29834640/29834773
Email : AO.Delhi@tvsmotor.com
PUNJAB & CHANDIGARH
13. TVS Motor Company Limited
4th Floor, Royal Business Park,
Chandigarh Ambala Highway,
Zirkapur - 140 603.
Phone : 01762-464777/465777
Email : AO.Chandigarh@tvsmotor.com
UTTAR PRADESH WEST
14. TVS Motor Company Limited
D-3 & D-4, 2nd Floor,
Sector - 10, Noida,
Uttar Pradesh - 201 301.
Phone : 011-29834640/29834773
Email : AO.Delhi@tvsmotor.com
UTTAR PRADESH CENTRAL & EAST
15. TVS Motor Company Limited
1st Floor, Cyber Tower, TC-34/V-2,
Vibhuti Khand, Gomti Nagar,
Lucknow - 226 010.
Phone : 0522-4918300/4918301
Email : AO.Lucknow@tvsmotor.com
WEST BENGAL
16. TVS Motor Company Limited
Ground Floor & First Floor,
133 A. S. P. Mukherjee Road,
Opp. Tollygunge Police Station,
Kolkata - 700 026
Phone : 033-24617096/24617092
Email : AO.Kolkata@tvsmotor.com
BIHAR
17. TVS Motor Company Limited
N-Plaza, Jamal Road,
P.S. Kotwali,
Patna - 800 001.
Phone : 0612-2200068/2200069
Email : AO.BNJ@tvsmotor.com
JHARKHAND
18. TVS Motor Company Limited
Seconf floor, Lucas Service Building,
Argora Byepass Road,
Ranchi - 834 002.
Phone: 0651-2244715
Email : AO.Ranchi@tvsmotor.com
ORISSA
19. TVS Motor Company Limited
No. 303, 3rd Floor,
Creative Plaza, Rasulgarh,
Bhubaneshwar - 751 010.
Phone: 0674-2580019
Email : AO.Bhubaneshwar@tvsmotor.com
NORTH EAST STATES
20. TVS Motor Company Limited
147, Udayan, Ganesh Guri,
Near Hotel D Courtyard,
R G B. Road, Guwahati - 781005.
Phone : 0361-2202030/2202031
Email : AO.Guwahati@tvsmotor.com
Or
Toll Free Number Relationship Manager : 1800-572-1818 (Mon - Fri: 9am to 6pm)
Toll Free Number Roadside Assistance : 1800-258-7111 (Available 24 x 7)
Email: customercare@tvsmotor.com
INTRODUCTION
One of the finest and modern technology products of TVS Motor is waiting to be unveiled; an electric scooter which is futuristic and contains plenty of features and technological advancements. However, before delving further into this manual, let us first have a glimpse of what your electric two wheeler is and how it is different from an internal combustion engine powered vehicle. The below info-graphic provides a broad idea about an electric two wheeler;
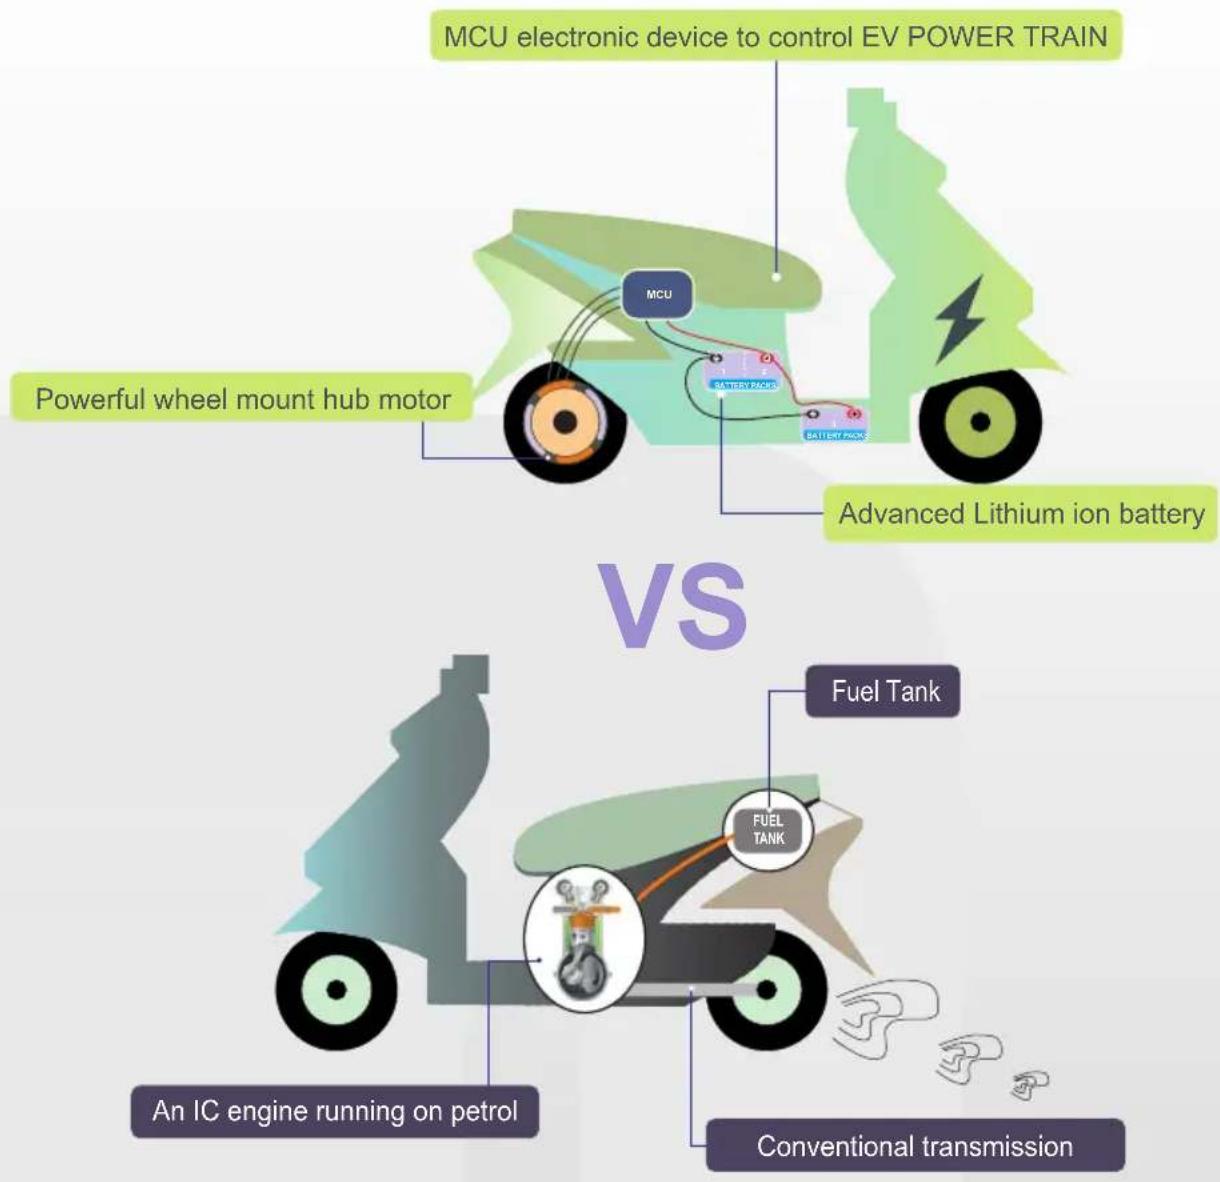
flowchart
graph TD
    A["MCU electronic device to control EV POWER TRAIN"] --> B["MCU"]
    B --> C["BATTERY RANK"]
    C --> D["BATTERY RANK"]
    D --> E["Powerful wheel mount hub motor"]
    F["Advanced Lithium ion battery"] --> G["FUEL TANK"]
    G --> H["FUEL TANK"]
    H --> I["An IC engine running on petrol"]
    J["Conventional transmission"] --> K["An IC engine running on petrol"]
    style A fill:#99ccff,stroke:#333
    style F fill:#99ccff,stroke:#333
    style J fill:#99ccff,stroke:#333
TVS iQube Electric ST model comes in two variants - iQube ST 17 with 3 battery packs with a range of 150 km and iQube ST 12 with 2 battery packs with a range of 100 km
SAFETY INFORMATION
Operating this vehicle safely is an important responsibility of the rider. To help you make safe decisions while operating the vehicle, we have provided necessary operating procedures and other information in this manual. This information alerts you on potential hazards that could cause injury to you or others. Since it is not possible to warn you about all the hazards associated with operating or maintaining the vehicle, you must use your own judgement.
You will find important safety information in following form in this manual. These words carry the following connotations:

Note
This message provides further clarification for clear understanding of any particular.

Caution
This message indicates special procedures or precautions to be followed to avoid damage to the vehicle.

Warning
Disregarding this message might result in accidents or injury to the rider.

Note
All information, illustrations, photographs and specifications contained in this owners manual are based on the latest product information available at the time of this publication. TVS Motor Company Limited may, however, incorporate modifications or improvements on its vehicles at any time without notice and therefore, in such events it is possible that the relevant part of the owner's manual does not apply to your vehicle.
Prior permission of TVS Motor Company Limited is required for quoting, copying or reproducing any part of the owner's manual.
Accessories shown in the picture may not be part of the standard equipment.
Pictures shown in this manual are of TVS iQube Electric ST 17 version unless specified.
UNIQUEFEATURESOFTVSIQUBE ELECTRIC ST
TOUCH LCD / TFT INSTRUMENT CLUSTER
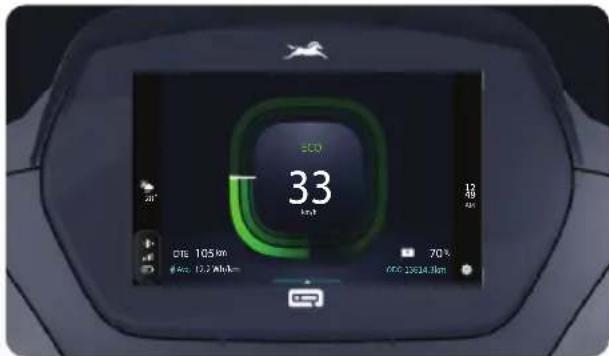
Unlike conventional scooters, this vehicle is having a digital Touch LCD / TFT instrument cluster which ensures brighter display and allows ease of interaction between vehicle and the rider.
RETRACTABLE BAG HOOKS
natural_image
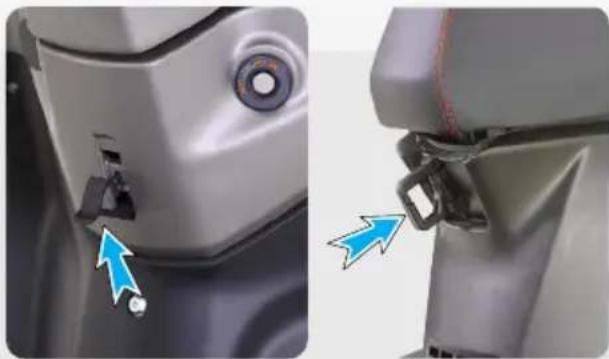
Close-up of a scooter seatbelt component showing adjustment arrows (no text or symbols)Your scooter has two retractable Bag Hooks to carry light luggage like carry bags weighing up to 3 kg.
One hook is located below the handle bar on the rear panel and the other one is located on the cover front below the front end of seat Refer page No. 22 for details
TELESCOPIC FRONT FORK
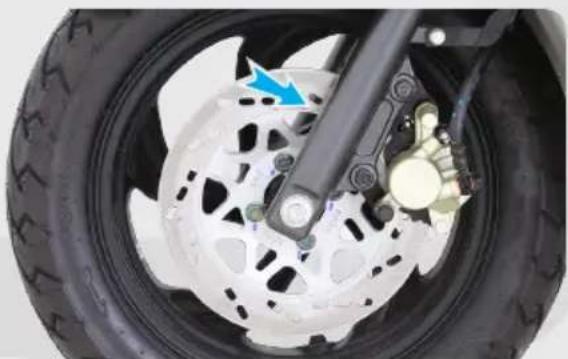
natural_image
Close-up of a car tire and brake caliper assembly with a blue arrow pointing to the wheel (no text or symbols visible)Your Scooter has Motorcycle-like 'Telescopic Front Suspension' for extreme comfort for excellent riding comfort even on bad roads.
ADJUSTABLE REAR SHOCK ABSORBER
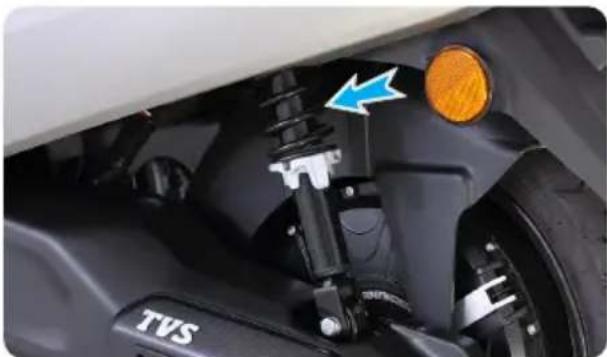
natural_image
Close-up of a motorcycle's front wheel and suspension system, showing mechanical components and a blue arrow indicating direction (no text or symbols)Your Scooter comes with Adjustable Shock Absorber, a first-in-the-industry feature. This allows you to adjust the required level of hardness / softness as per the usage requirement with just a push of a lever. Refer page No. 73 for details
TUBELESS TYRES
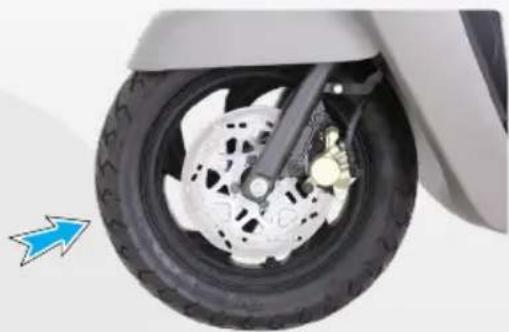
natural_image
Close-up of a car wheel with brake disc and tire, showing mechanical assembly (no text or symbols visible)Another important unique feature in your scooter is 'Tubeless Tyres'. Tubeless tyres reduce the chances of getting punctured. Even if there is a puncture, sudden leakage of air is avoided, thereby providing better safety and convenience. It is also very easy to repair the punctured tyres.
ALL BLACK LARGER ALLOY WHEELS
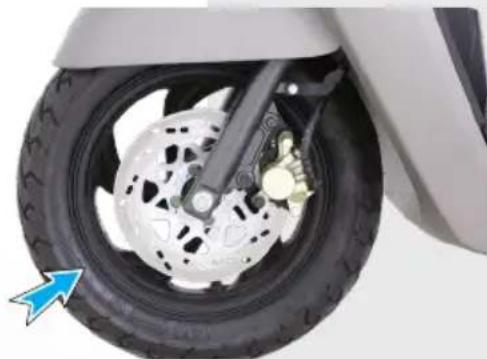
natural_image
Close-up of a car wheel and brake disc assembly (no visible text or symbols)All 'Black Larger Alloy Wheels' with high mechanical advantage gives progressive braking of your scooter, results in best-in-class 'shortest distance' braking. It also provide superior comfort in bad road conditions.
natural_image
Close-up of a car's electrical plug with a blue arrow pointing to the handle (no text or symbols visible)'Parking Brake' is another unique safety feature which protects your scooter from falling due to wheel rotation when it is parked with the side stand on a slope. Refer page No. 19 for details.
DISC SYNCHRONISED BRAKE TECHNOLOGY
(SBT)
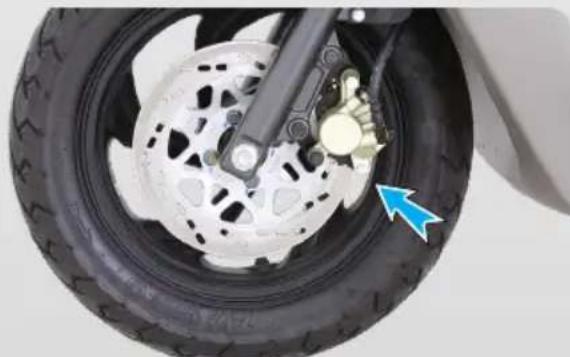
natural_image
Close-up of a car tire and brake disc with a blue arrow pointing to the wheel (no text or symbols visible)Taking technological innovation to next level, your scooter comes with 'Synchronised Brake Technology (SBT)'. This feature enhances the safety by avoiding skidding during sudden braking.
UNDER-SEAT STORAGE (UTILITY BOX)
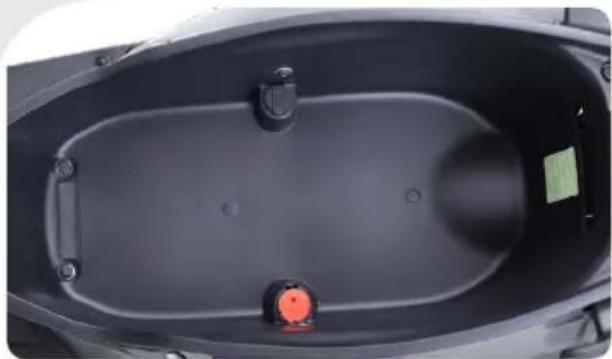
natural_image
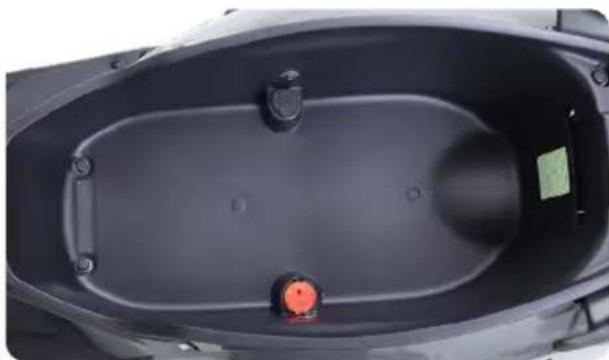
Top-down view of a dark plastic enclosure with a small orange sensor and a green label (no text or symbols visible)Your scooter has a 32 litre under-seat storage space to carry your luggage belongings. Refer page No. 22 for details.
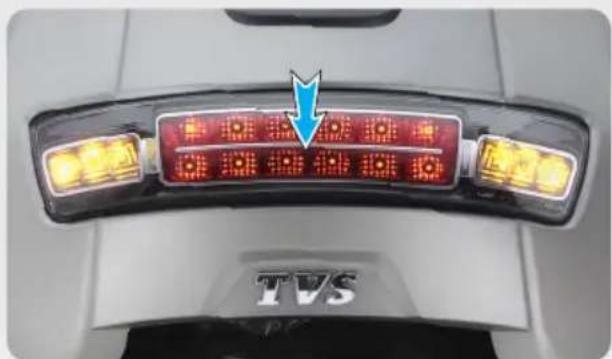
ALL LED ILLUMINATION
natural_image
Front view of a car's TVS logo on the front (no readable text or symbols beyond branding)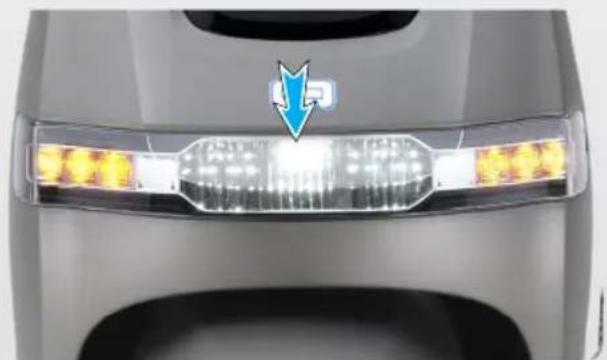
natural_image
Close-up of a car's rear windshield with LED lights and a blue arrow pointing to the top section (no text or symbols visible)Your Scooter comes in with premium LED lamps. Efficient and bright, this gives TVS iQube Electric ST a totally upgraded Look and Style with better visibility for night rides. LED lamps consume less power with increased luminous intensity.
SIDE STAND INDICATION
Vehicle will be immobile and side stand indication will be shown in the instrument cluster if the vehicle is on side stand.

natural_image
Silhouette of a person walking, wearing a hat (no text or symbols)
Caution
Always release the side stand to its full up position before moving the vehicle.
MALFUNCTION INDICATION AND SERVICE REMINDER
Malfunction indicator Service reminder

Malfunction indication notifies you if there is an impending warning or if there is a fault to take the vehicle for diagnosis and troubleshooting. Whereas service reminder recalls you to take the vehicle for periodic maintenance (care) at Authorised Service station based on the alert.
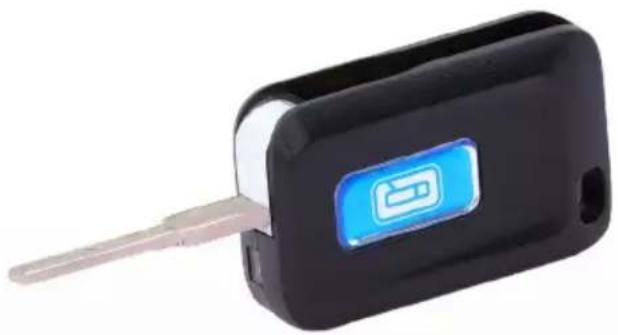
FLIP KEY WITH LED LIGHT
natural_image
Close-up of a black key with a blue logo and metallic tip, isolated on white background (no text or symbols visible)Foldable key with LED light helps you to see ignition lock in dark.
PLEASANT HORN TONE
A newly designed horn produces a pleasant tone when pressed by user.
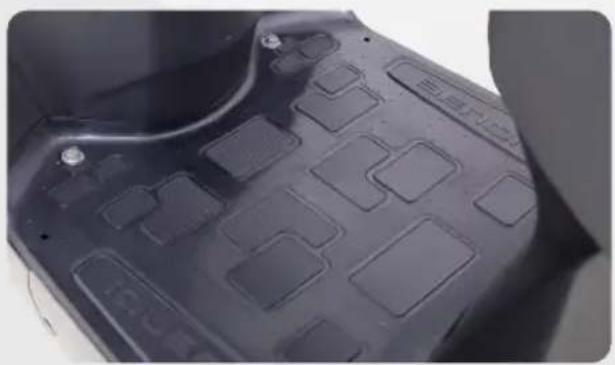
TEXTURED FLOORBOARD
natural_image
Close-up of a black plastic car trunk with multiple rectangular cutouts (no text or symbols visible)Your scooter comes with a stylish textured floor board.
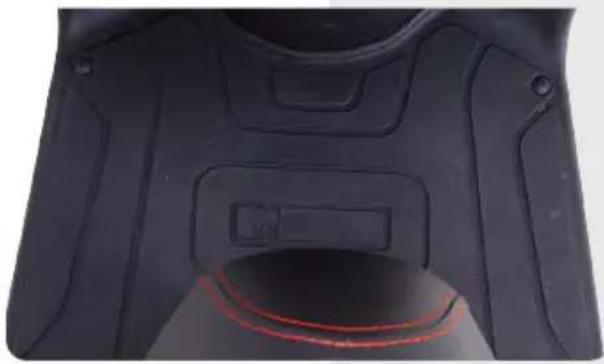
TEXTURED FLOOR MAT
natural_image
Close-up of a black plastic mechanical component with a red highlighted area, no visible text or symbols.Your scooter comes with a stylish textured floor mat.
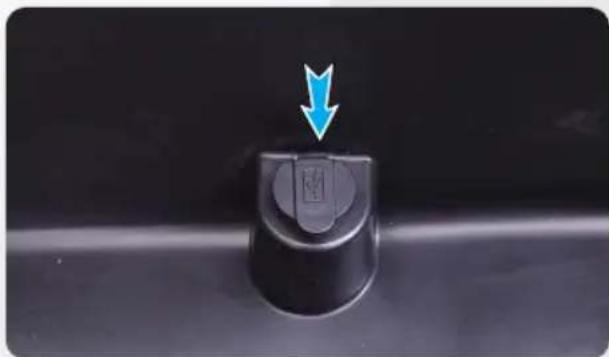
ACCESSORIES FOR YOUR SCOOTER SMART PHONE CHARGER
natural_image
Close-up of a black mechanical knob with a blue arrow pointing downward (no text or symbols visible)Smart phone charging socket is fitted in your TVS iQube Electric ST for charging your smart phone even while you are traveling and it is located in the utility box below the seat assembly. Refer page No. 23 for usage details.
CENTRE STAND\*
The centre stand is an optional accessory. If this E-Z centre stand is fixed on your scooter reduces the effort required to place the scooter on stand. Refer page No. 20 for details.
SIDE STAND
Side stand is fitted at the factory and supplied along with the vehicle. Refer page No. 21 for side stand operating procedure.
* optional accessory will be charged extra

Caution
-
Leaving the ignition cum steering lock in 'ON' position for a prolonged time will drain the battery when the vehicle is not in use. Switch 'OFF' and take the key out when the vehicle is not in use.
-
Always lock the steering while parking for safety.
-
It is recommended to use the tool kit in case of emergency only. It is always advisable to take your vehicle to TVS Motor Company Authorized Main Dealer.
-
Never sit on vehicle when it is supported by stands.
-
Utility box can be used to carry a load of maximum 10 kg.
-
Do not carry perishable items inside the utility box. It is not fully sealed. Do not allow / spray water inside the utility box. Take care not to spill liquid into the utility box.
-
Care should be taken not to attach the luggage which hangs out of your scooter. Please note that the luggage attached to your scooter should not interfere with your feet movement.
-
The charging time of the vehicle may vary, depending on the vehicle's battery state of charge.
-
The flap has been designed to prevent water entry inside the charging port and is not replaceable. No warranty for charger is applicable in case of flap damage.
-
Always release the side stand to its full up position before moving the vehicle.
-
Be aware of reverse park assist mode. In this mode, the vehicle will move in reverse when throttle is given.
-
Always park the vehicle on a flat, firm surface, in shaded area and away from flood, fire and other unsafe environments.
-
Do not park the vehicle in direct sunlight or water logged areas for long time.
-
Do not ride the vehicle in flooded roads.
-
While charging vehicle always switch on AC supply, only after plugging in both end of the charging cord at their respective positions.

Warning
-
Never attempt to move the vehicle when the steering is locked, you may lose balance.
-
Use appropriate head lamp beam 'high / low' as per the traffic and road conditions for your safety and avoid inconvenience to other riders.
-
Operating the TVS iQube Electric ST overloaded will hamper riding stability and may lead to loss of control. Hence, it is advisable to carry the recommended amount of load only.
-
Don't touch any open cables or terminals.
-
Do not leave your vehicle without charging for a long period of time (Vehicles should be charged to 30% SOC atleast once in 15 days).
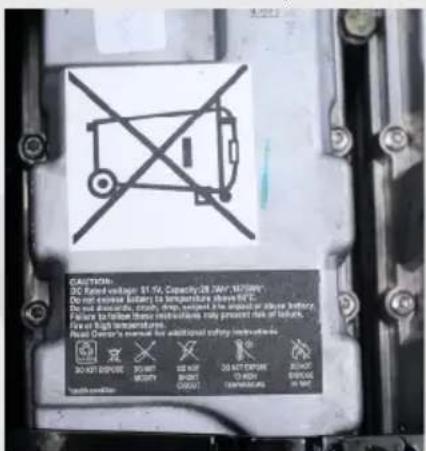
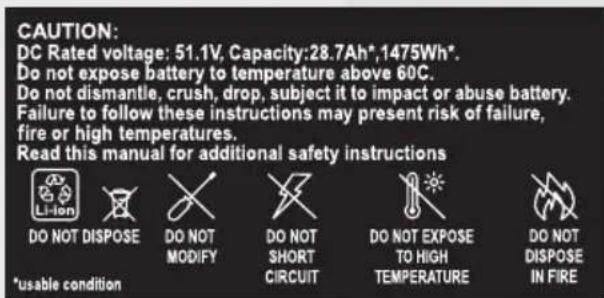
Vehicle Performance Variation
We at TVS, value your safety and comfort and hence have taken certain measures to ensure the best riding experience of your TVS iQube Electric ST.
In line with this, we have deployed a safety measure for critical vehicle parts like the motor, battery and the MCU.
To ensue the safety of you and your TVS iQube Electric ST, in high temperature condition, overloaded condition or continuous peak performance usage whenever the temperature of vehicle components reaches a critical point, as a safety measure performance of some systems are deliberately reduced to optimize the temperature. This is indicated by the MIL on your dashboard glowing after sometime accompanied by a message.
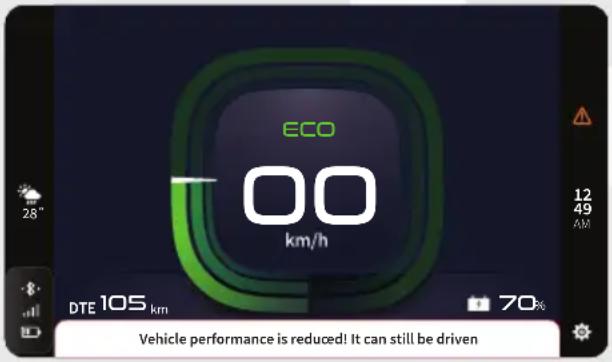
For example, if you have accelerated the scooter with brakes applied, the temperature of the motor and the MCU starts increasing. Once it reaches a critical point, the Motor Controller Unit starts “derating” the vehicle to control the increase in temperature beyond critical point, thus slowing the vehicle down a little. This may result in loss of vehicle performance to a certain extent, and you may experience some drop in performance.
In extreme conditions, for example; when ambient temperature is extremely high and vehicle is being driven continuously in overloaded condition, even after the MIL indication on your cluster is on, it may result in the vehicle coming to a complete stop.
In any such situation that you may face, it is recommend to allow the vehicle to cool down by riding it in slow speed in Eco Mode or stop the vehicle for some time till the MIL indicator on your connected instrument cluster goes away. Usually this should only take a few minutes. This will ensure the safety of you as well as life of electric components in the scooter.
Incase if the MIL indicator is glowing continuously even when vehicle is in cold condition, take your vehicle to TVS Motor Company Authorised Main Dealer for rectification.

Note
Real world performance may vary with road, load, and driving patterns. All parameters at TVSM are tested under ideal conditions. Refer specifications sheet.
It is not suitable to ride uphill when the vehicle is under performance optimisation.
KNOW YOUR TVS IQUBE ELECTRIC ST
VEHICLE IDENTIFICATION NUMBER
The frame and traction motor serial numbers are the only means of identifying your vehicle from others of the same type. They are also required to assist your Dealer for ordering parts or referring to special information.
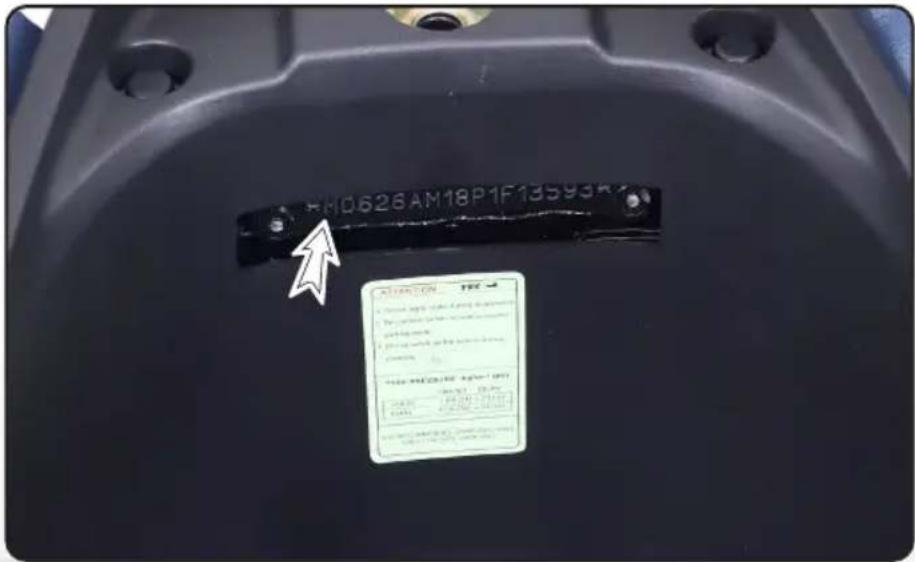
The frame serial number is stamped on the frame, at the rear end below the seat assembly. Open the seat assembly and remove the VIN cover to read the frame number.
natural_image
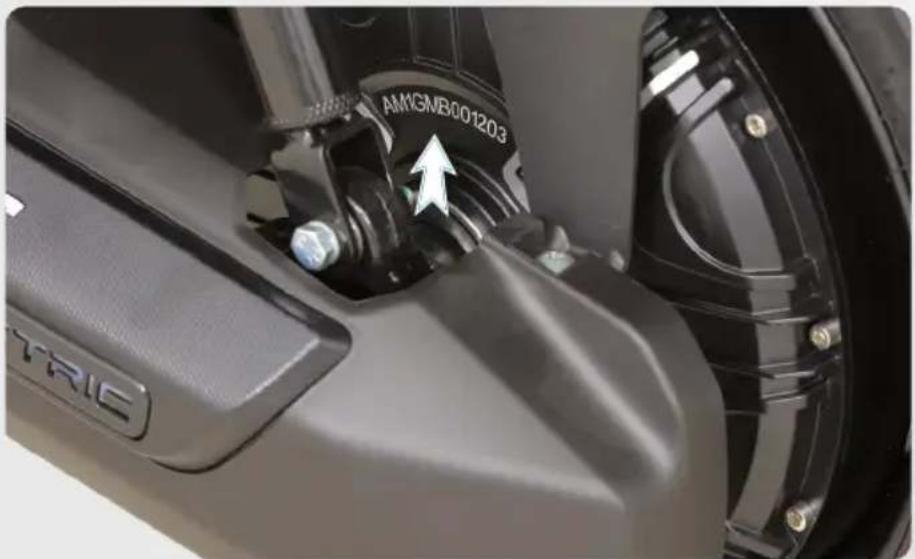
Close-up of a car brake caliper assembly with visible brand mark AMGMB00120.3 and 'TRIC' logo (no text beyond label)The traction motor serial number is stamped on the hub of the rear wheel assembly. Rotate the rear wheel assembly to read the motor number.
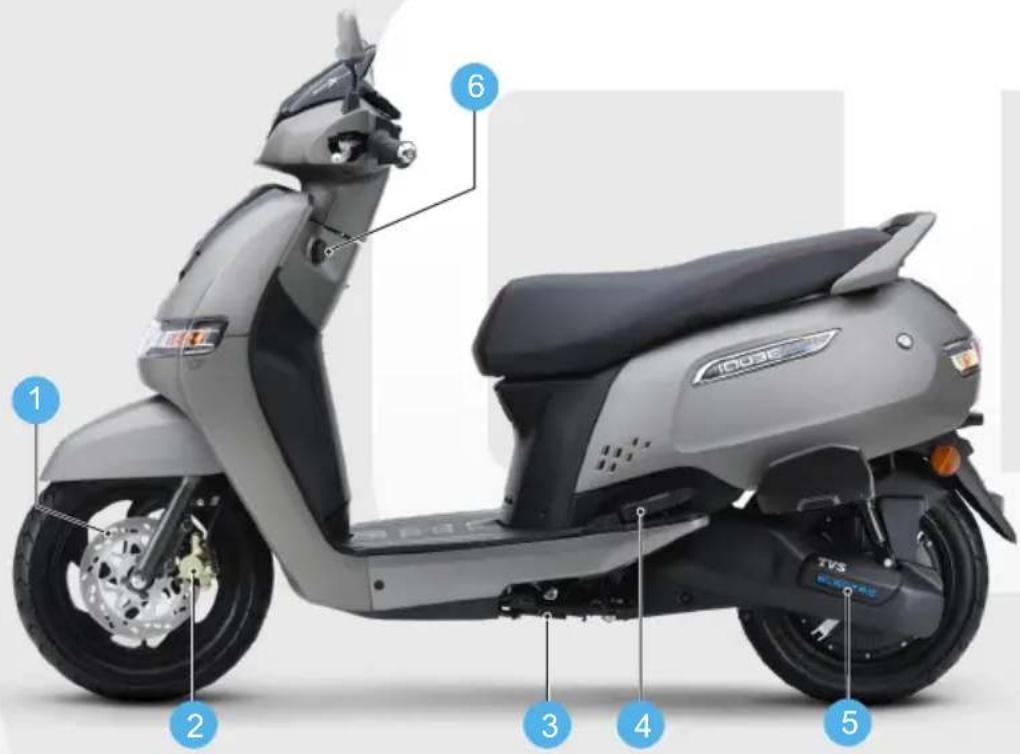
VEHICLE LEFT SIDE
- Brake Disc
- Front caliper assembly
- Side stand
- Pillion foot rest L
- Illuminating logo
- Charging port
VEHICLE RIGHT SIDE
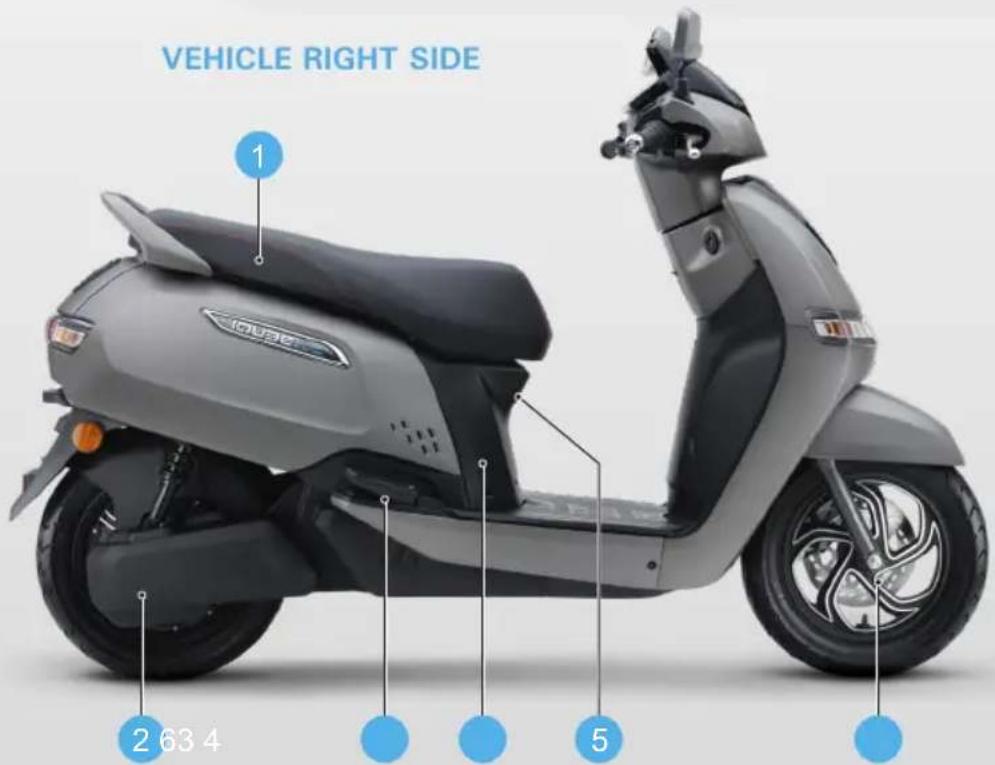
- Seat assembly
- Crash Guard
- Pillion foot rest R
- Cover front
- Bag hook (rear)
- Front wheel axle nut
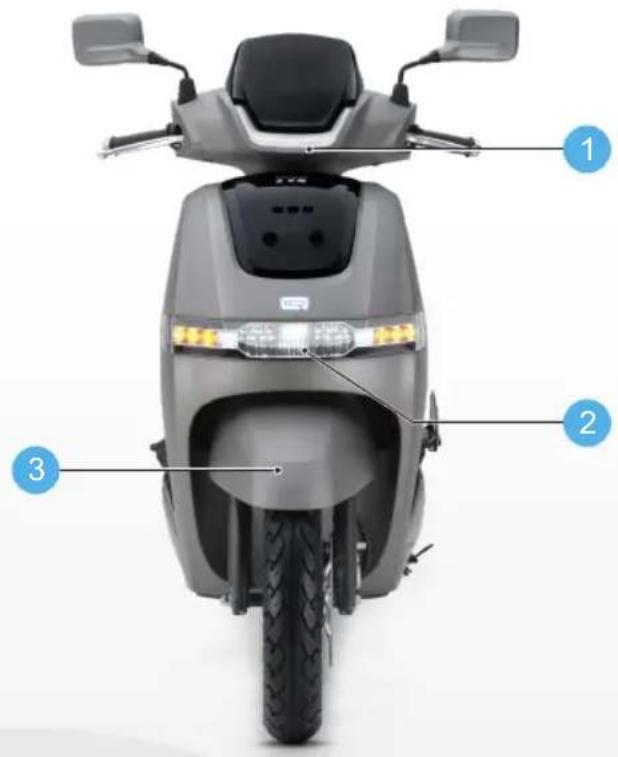
VEHICLE FRONT SIDE
- Front Position Lamp
- Integrated LED Head Lamp (AHO) and Turn Signal Lamps (TSL)Headlamp (AHO)
- Front fender
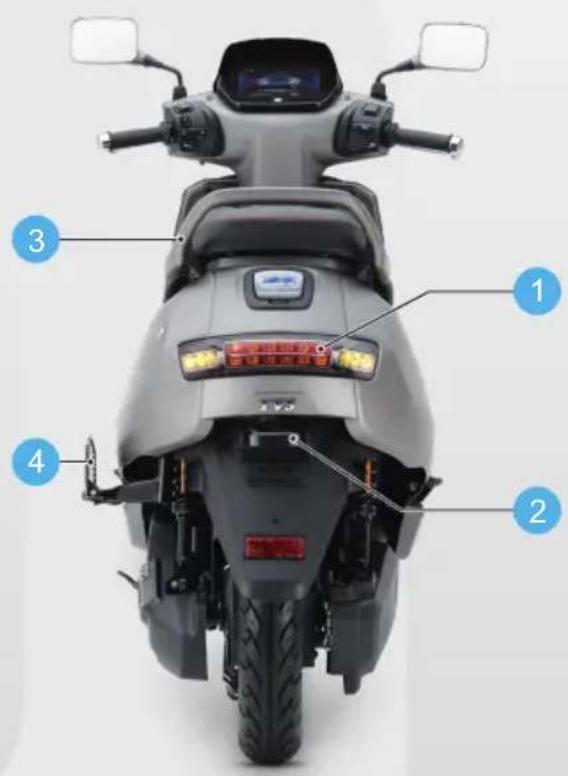
VEHICLE REAR SIDE
- Integrated LED Tail/Brake Lamp and Rear Turn Signal Lamps (TSL)
- License plate lamp
- Pillion handle
- Lady Pillion Footrest* (Optional accessory)
VEHICLE TOP SIDE
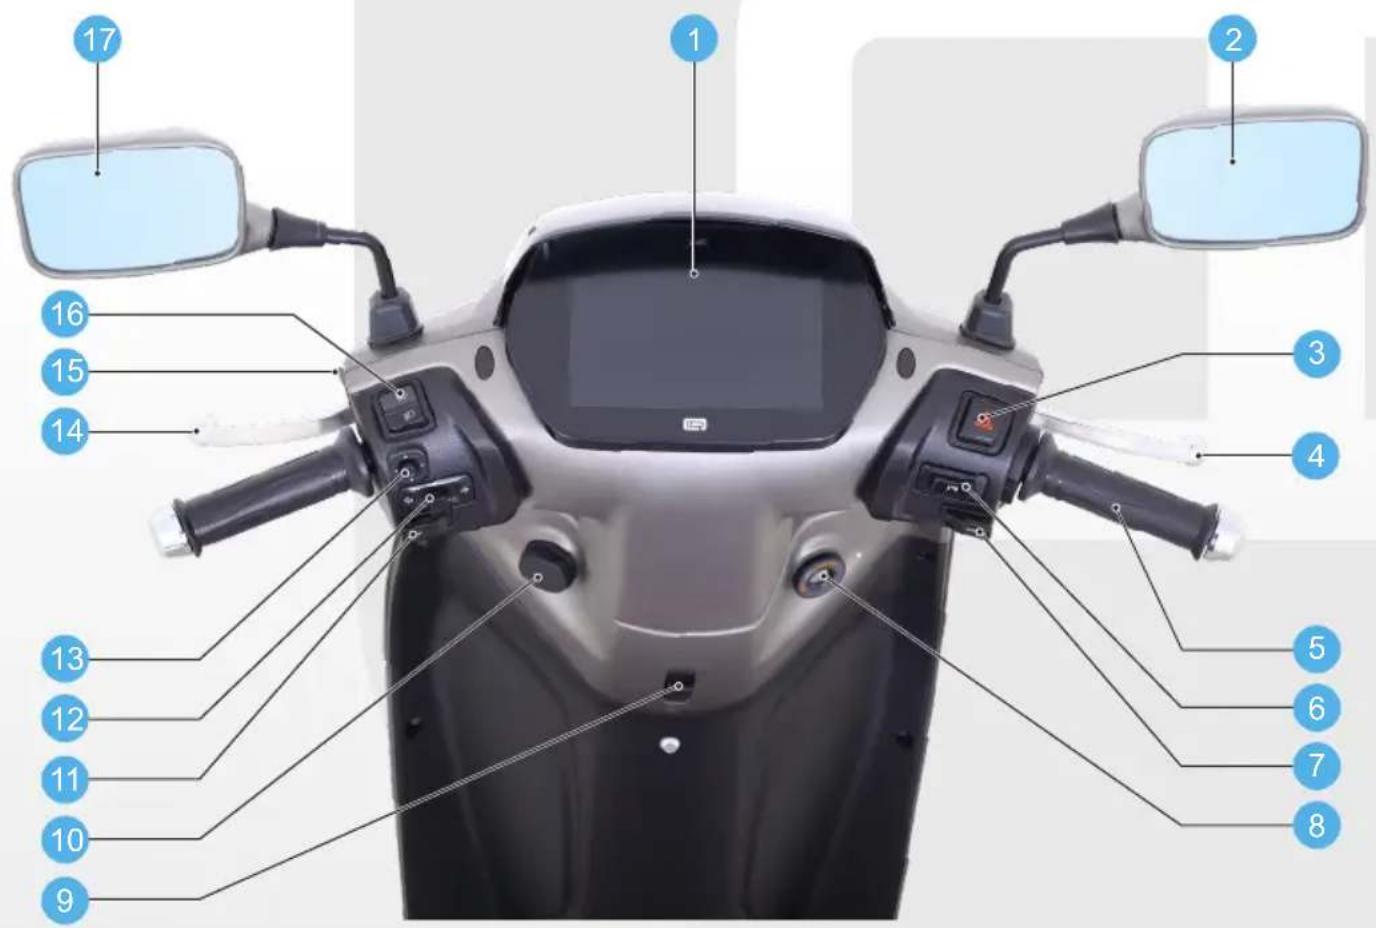
- Touch Enabled instrument cluster 10. Charging socket
- Rear view mirror R 11. Horn switch
- Hazard switch 12. Turn signal lamp switch
- Front brake lever 13. HMI Switch
- Throttle grip 14. Rear brake lever
- Park assist switch 15. Rear brake lever lock
- Mode switch 16. High/low beam switch
- Ignition cum steering lock 17. Rear view mirror L
- Bag hook (front)
CONTROLS
Your TVS iQube Electric ST comes with a pair of control keys. These keys are to operate ignition cum steering lock and seat lock.
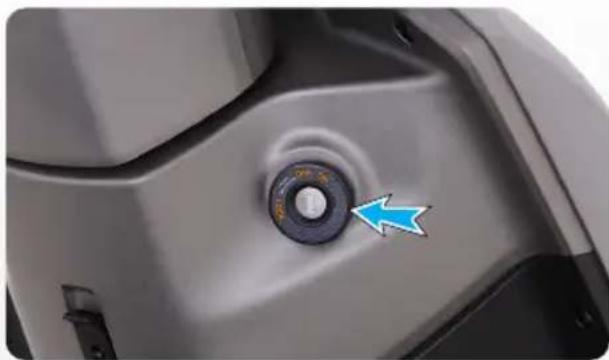
IGNITION CUM STEERING LOCK
The ignition switch enables and disables the electrical circuit and steering lock. The three positions of the switch are described below.
natural_image
Close-up of a car's front wheel component with a blue arrow pointing to the knob (no text or symbols visible)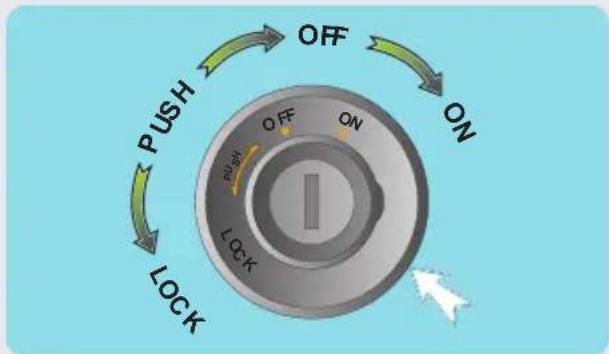
flowchart
graph TD
    A["Push"] --> B["OFF"]
    B --> C["ON"]
    C --> D["LOCK"]
    D --> E["PUSH"]
    E --> F["OFF"]
    F --> G["ON"]
    G --> H["LOCK"]
- 'OFF' position
All electrical circuits are deactivated. The key can be removed from the lock.
- 'ON' position
All electrical circuits are activated. Vehicle's instrument cluster will wake up and the vehicle can be shifted to drive mode.
Control key cannot be taken out from the lock in this position.
- 'LOCK' position
Your TVS iQube Electric ST steering can be locked in both 'left' and 'right' directions. Turn the handlebar to the 'left' or 'right'. Press the key in and rotate it to the 'LOCK' position from 'OFF' position.
All electrical circuits are deactivated and the steering is locked. Control key can be removed from the lock.
Insert the key into the lock and press the key in and turn it to 'OFF' or 'ON' position to unlock the steering.
Note
Instrument cluster background illumination, front position lamp, illuminating logo, automatic headlamp on (AHO) and tail lamp will glow automatically once the ignition key is turned 'ON' without activating any other switches.
Caution
Leaving the ignition cum steering lock in 'ON' position for a prolonged time will drain the battery when the vehicle is not in use. Switch OFF and take the key out when the vehicle is not in use.
Always lock the steering while parking for safety.
Warning
Never attempt to move the vehicle when the steering is locked, you may lose balance.
HANDLE BAR LEFT SIDE
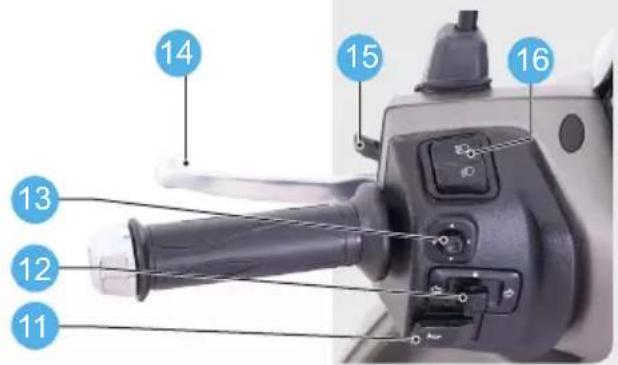
- Horn switch
Press the switch ' to operate the horn.
- Turn signal lamp switch
Slide the turn signal lamp switch to left '← or right side '→' to operate respective turn signal lamps (LH / RH). Press the centre button of the switch to turn 'OFF'.
- HMI switch
The HMI switch is used to operate the menu screens on the cluster.
- Rear brake lever
The rear brake is applied by squeezing the left hand brake lever gently towards the handle grip. The brake lamp glows on application of rear brake.
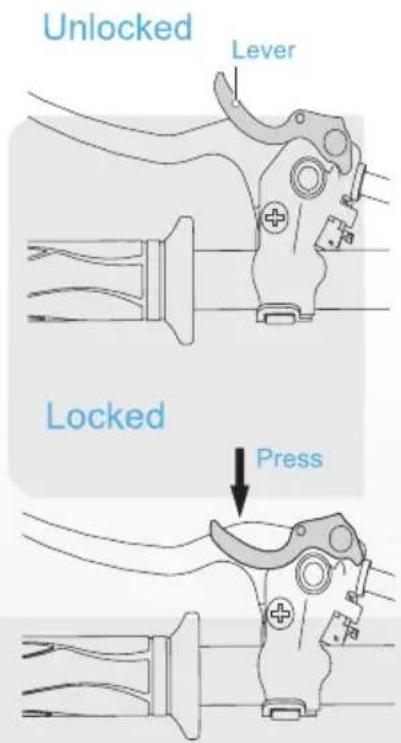
- Rear brake lever lock
The brake lever lock is useful when your scooter is parked with side stand on a slope to avoid falling.
To apply the brake lever lock, squeeze the left hand brake lever fully towards the grip. Hold the brake lever at the same position, press and hold the left hand brake lever lock. Now release the brake lever and ensure that the brake is locked properly.
To release the left hand brake lever lock, squeeze the left hand brake lever further in and the lock will release automatically, release the brake lever upon releasing the brake lever lock.
- High/low beam switch
With the head lamp 'ON', press the switch towards '☐' to operate head lamp high beam or press it towards '☐' to operate head lamp low beam.
Note
Ensure that the brake lever lock is released (if applied) before riding the vehicle.
Caution
Use appropriate head lamp beam 'high / low' as per the traffic and road conditions for your safety and avoid inconvenience to other riders.
HANDLE BAR RIGHT SIDE
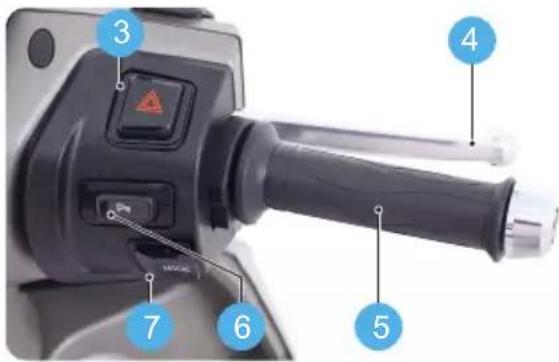
- Hazard Switch
Whenever it is necessary to park TVS iQube Electric ST in a hazardous location, press the hazard switch in ignition 'ON' condition to start simultaneously flashing of all turn signal lamps, so as to make others aware of your vehicle presence. Press the switch again to turn-off the lamps.
- Front brake lever
The brake lever controls a hydraulic circuit while squeezing and the hydraulic circuit operates the front brake system. The brake lamp glows on application of front brake.
- Throttle grip
Vehicle speed is controlled by the rotation of the throttle grip. Twist it towards you to increase the vehicle speed and twist it away from you or release it to decrease the vehicle speed.
- Park assist switch
Park assist switch activates park assist mode and allows vehicle to roll forward or backward in restricted speed thereby to reduce the effort of parking by yourself.
- Mode switch
Mode switch allows to switch between following modes;
-
Economy mode
-
Power mode
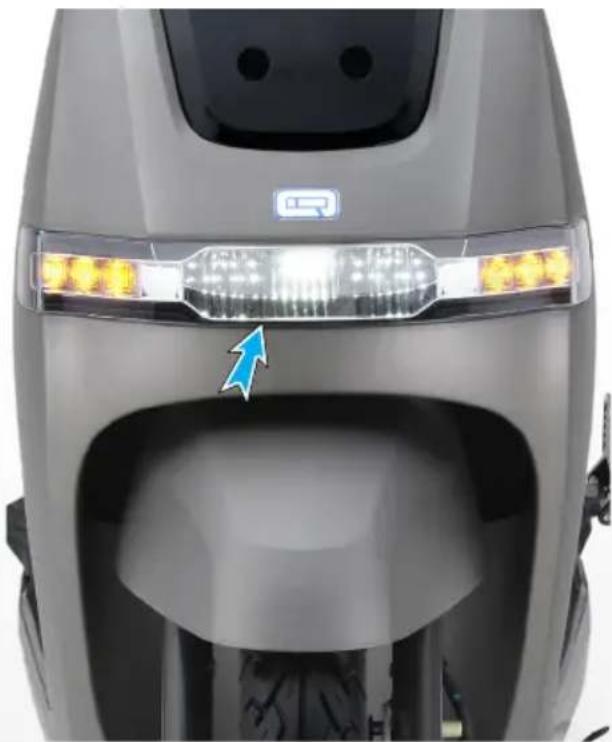
AUTOMATIC HEAD LAMP ON (AHO)
natural_image
Front view of a modern electric scooter's head and side (no visible text or symbols)TVS iQube Electric ST comes with a Automatic Headlamp ON (AHO) LED lamp which glows automatically once the ignition is turned 'ON'.
EFFORTLESS E-Z CENTRE STAND\*
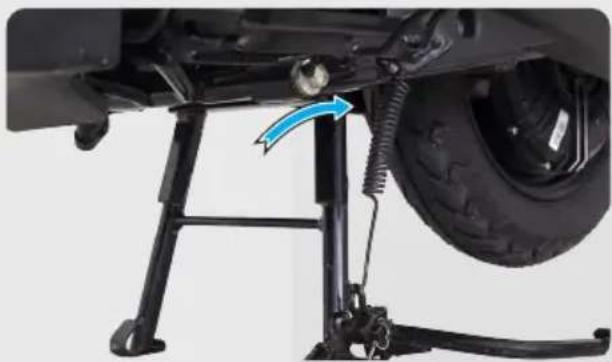
TVS iQube Electric ST is equipped with a effortless centre stand. The centre stand (1) has a pivoted flexible spring loaded lever arm (stand extension) (2) to increase the lever ratio, which enables parking on centre stand effortlessly and very conveniently.
natural_image
Mechanical assembly diagram showing a vehicle's lower leg and suspension system with a blue arrow indicating motion direction (no text or symbols)To place the vehicle on centre stand, hold the handle bar left grip with left hand, place your foot firmly on the centre stand extension (2) while ensuring that both the stand shoes are touching the ground, press the stand extension.
* Mandatory and optional accessory will be charged extra
SIDE STAND
natural_image
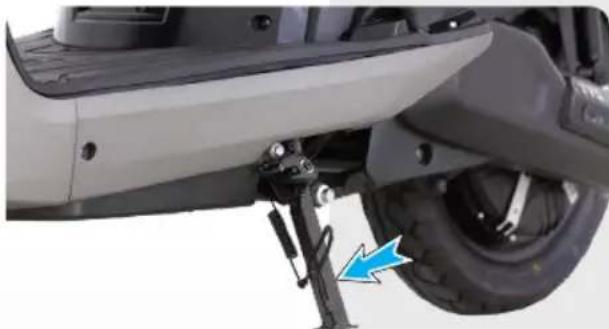
Close-up of a white electric vehicle's lower body and suspension system, showing mechanical components and a blue arrow indicating motion direction (no text or symbols)Side stand can be operated by sitting on vehicle with your left foot by pushing it away from the vehicle till it stops.

Note
Mandatory accessory will be charged extra.

Caution
Never sit on vehicle when it is supported by stands. Always park the vehicle on a flat, firm surface.

Warning
Always release the side stand to its full up position before moving the vehicle.
natural_image
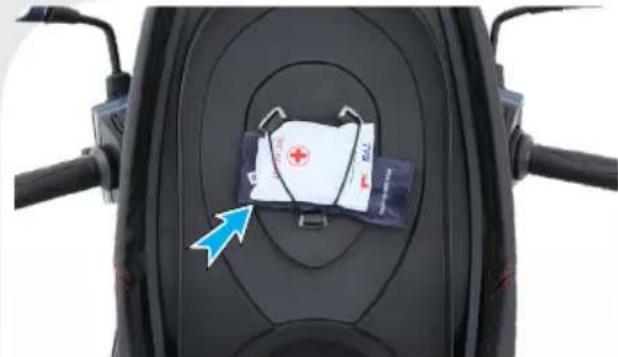
Close-up of a black scooter seat with a medical device and blue arrow pointing to the side (no visible text or symbols)The tool kit consists one number each of the following. Ensure the contents of the tool kit.
- 10x12 mm spanner
- Tool bag
- Screw driver handle
- Combination screw driver bit

Caution
It is recommended to use the tool kit in case of any emergency only. It is always advisable to take your vehicle to TVS Motor Company Authorised Main Dealer.
TOOL KIT AND FIRST AID KIT
natural_image
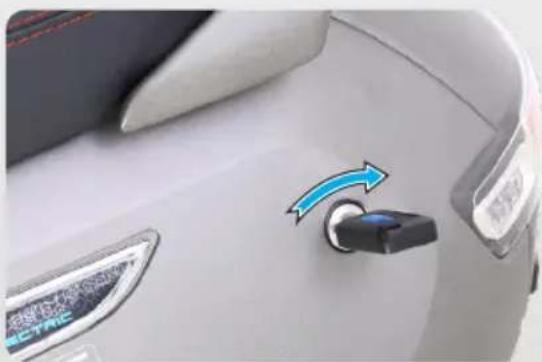
Close-up of a car's front wheel with a blue directional arrow indicating rotation (no text or symbols visible)To assist you in performing certain aspects of periodic maintenance and emergency repairs, a tool kit is supplied along with the vehicle and it is located inside the utility box. To access the tool kit, insert the control key into seat lock and rotate it in clockwise direction. Lift and open the seat.
UTILITY BOX
natural_image
Top-down view of a dark gray automotive seat with a red sensor and green sticker (no text or symbols visible)Utility box is located below the seat. Lift the seat by unlocking the seat lock as explained in the previous section, to access the utility box.

Caution
- Utility box can be used to carry a load of maximum 10 kg.
- Do not carry perishable items inside the utility box. It is not fully sealed. Do not allow / spray water inside the utility box.
- Do not keep heat-sensitive items inside as it may get hot on long rides.
- Do not keep valuable items inside the utility box when leaving the vehicle unattended.

Warning
Operating the TVS iQube Electric ST in an overloaded condition will hamper riding stability and may lead to loss of control. Hence, it is advisable to carry the recommended amount of load only.
BAG HOOKS
natural_image
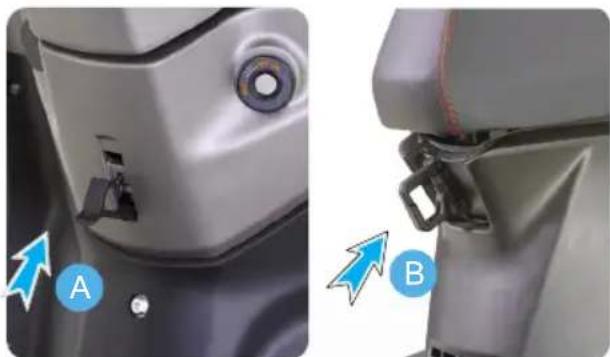
Close-up of a car seat corner with blue arrows and labels A and B indicating adjustment points (no text or symbols on the main subject)There are two bag hooks provided with your scooter to carry light luggage like carry bags weighing up to 3 kg. One hook is located below handle bar on the rear panel.
Just pull out the hook from the top (A) to hang your luggage. Push back the hook once it is free.
Similarly, the other one (B) is located on the cover front below front end of the seat assembly. Pull out the hook from its position. Open the top lid and hang your cargo. Lid will get close automatically. Push back the hook to its original position once it is free.

Caution
Care should be taken not to attach the luggage which hangs out of your scooter. Please note that the luggage attached to your scooter should not interfere with your feet movement.
SMART PHONE CHARGER
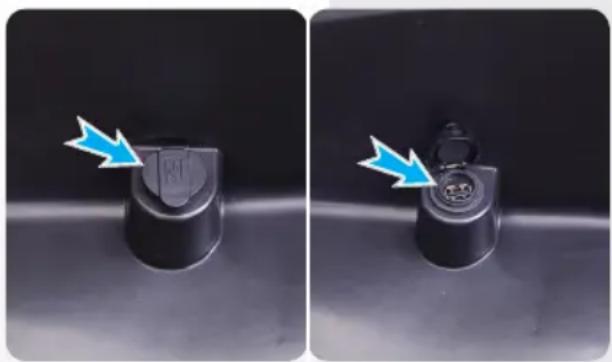
All new smart phone charger has been provided in the utility box of your vehicle. Please follow the guidelines mentioned below for using it properly:
DO's
- Ensure that no water enters into the unit, by closing the USB flap properly.
natural_image
Close-up of a black mechanical component with a blue arrow pointing to a small inset detail (no text or symbols visible)- Use approved, standard USB cable for charging mobile phones.
- Do make sure the flap is not damaged while opening / inserting the USB cable.
DON'Ts
- Do not leave the USB charging flap open / partially closed.
- Do not attempt to use / charge any other device, other than mobile phones. Only one mobile phone should be charged at a given time.
- Do not try to force the USB connector in, check whether it is inserted in the appropriate direction, to prevent the damage to the charger.

Caution
The charging time of the mobile may vary, depending on the mobile's battery state of charge. The rubber flap in the unit has been designed to prevent water entry and is not replaceable. No warranty will be applicable for charger in case of rubber flap cut.
ILLUMINATING LOGO
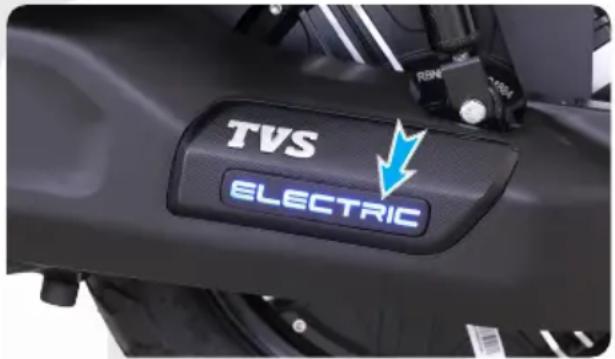
Illuminating logo will display the vehicle type name as 'ELECTRIC' during the vehicle in zero speed conditions. During charging of the vehicle, illuminating logo will blink. The LED color of the illuminating logo is Blue. Illuminating logo is mounted on the swing arm cover as shown above.
INSTRUMENT CLUSTER
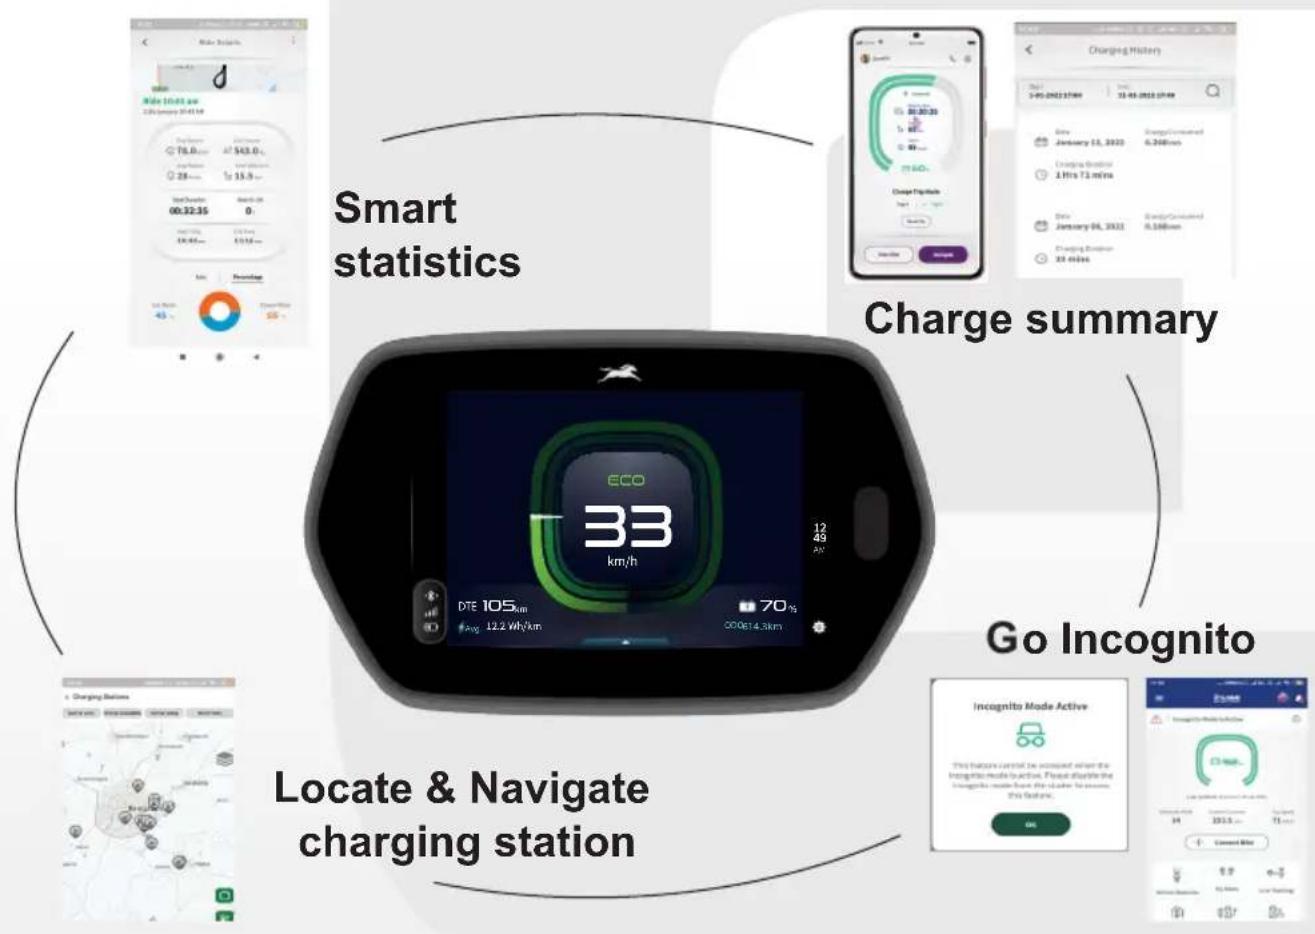
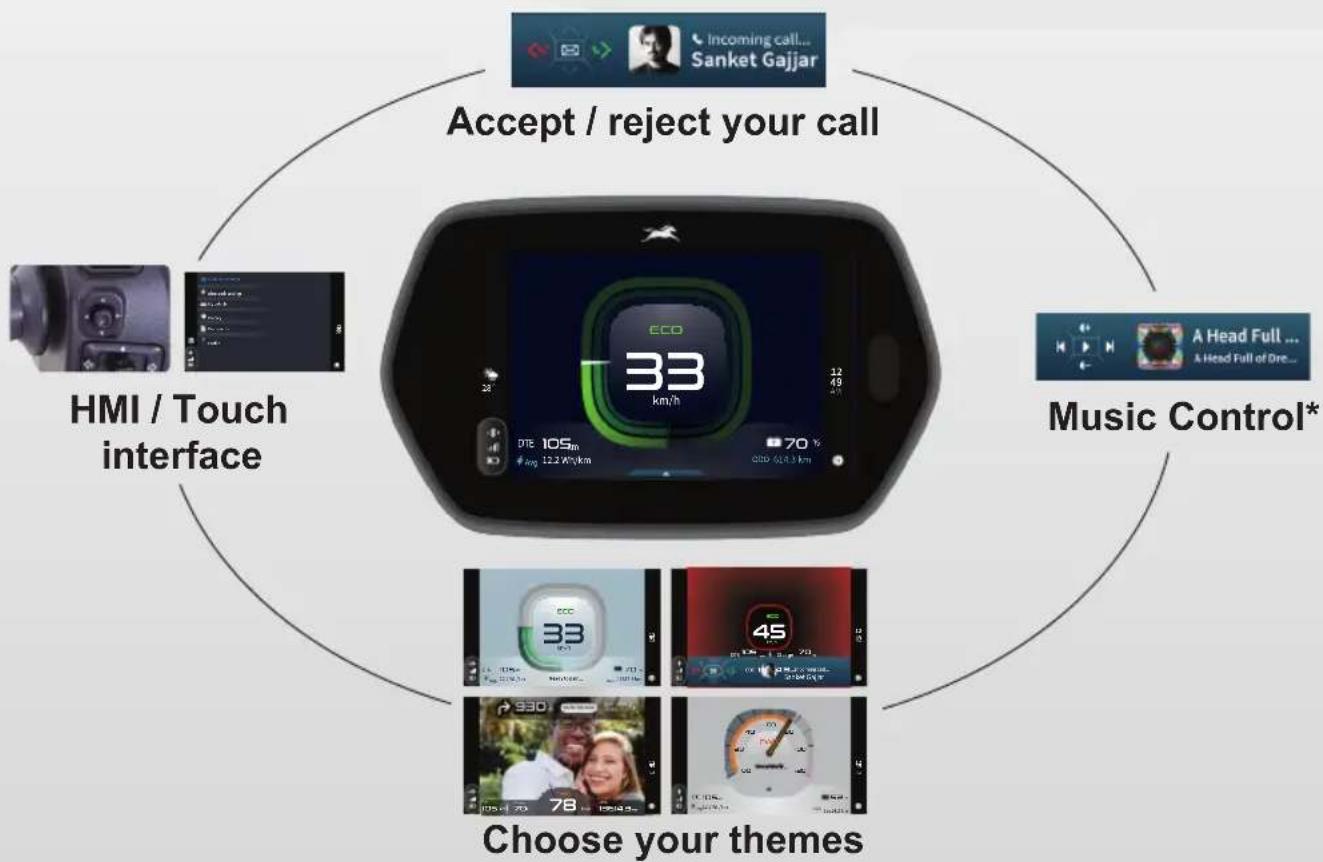
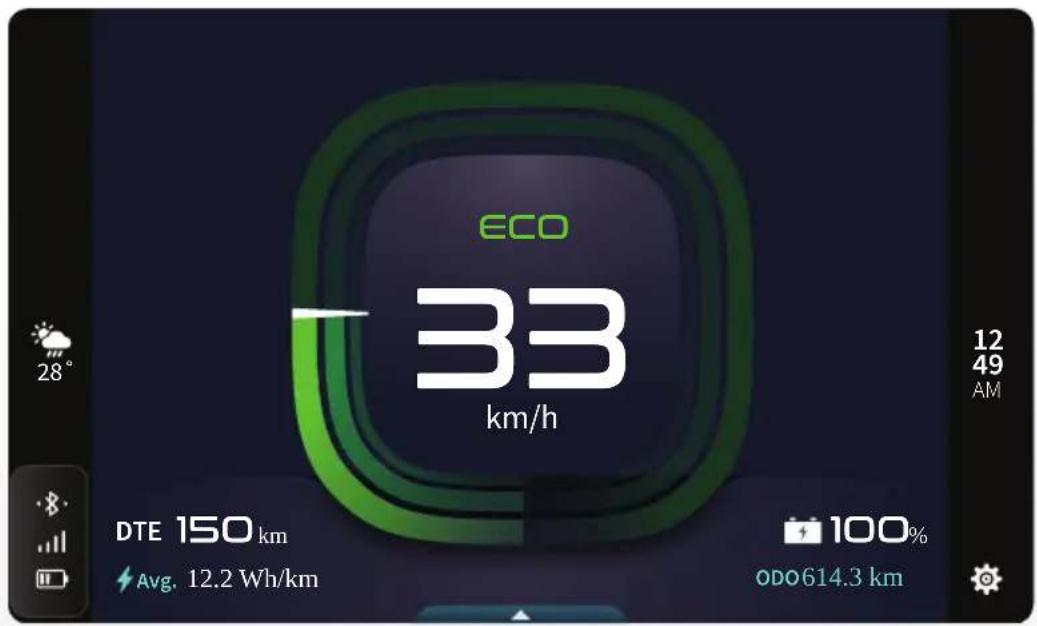
Your TVS iQube Electric ST is provided with a fully digital touch enabled connected instrument cluster with lots of feature and modes like Economy, Power, Parking, navigation assist, Bluetooth connected app for mobile devices, customize your color themes, personalize your wallpaper etc. Moreover your vehicle's instrument cluster is provided with several tell tales & alerts to inform you about the vehicles current condition, let us have a glimpse of them.
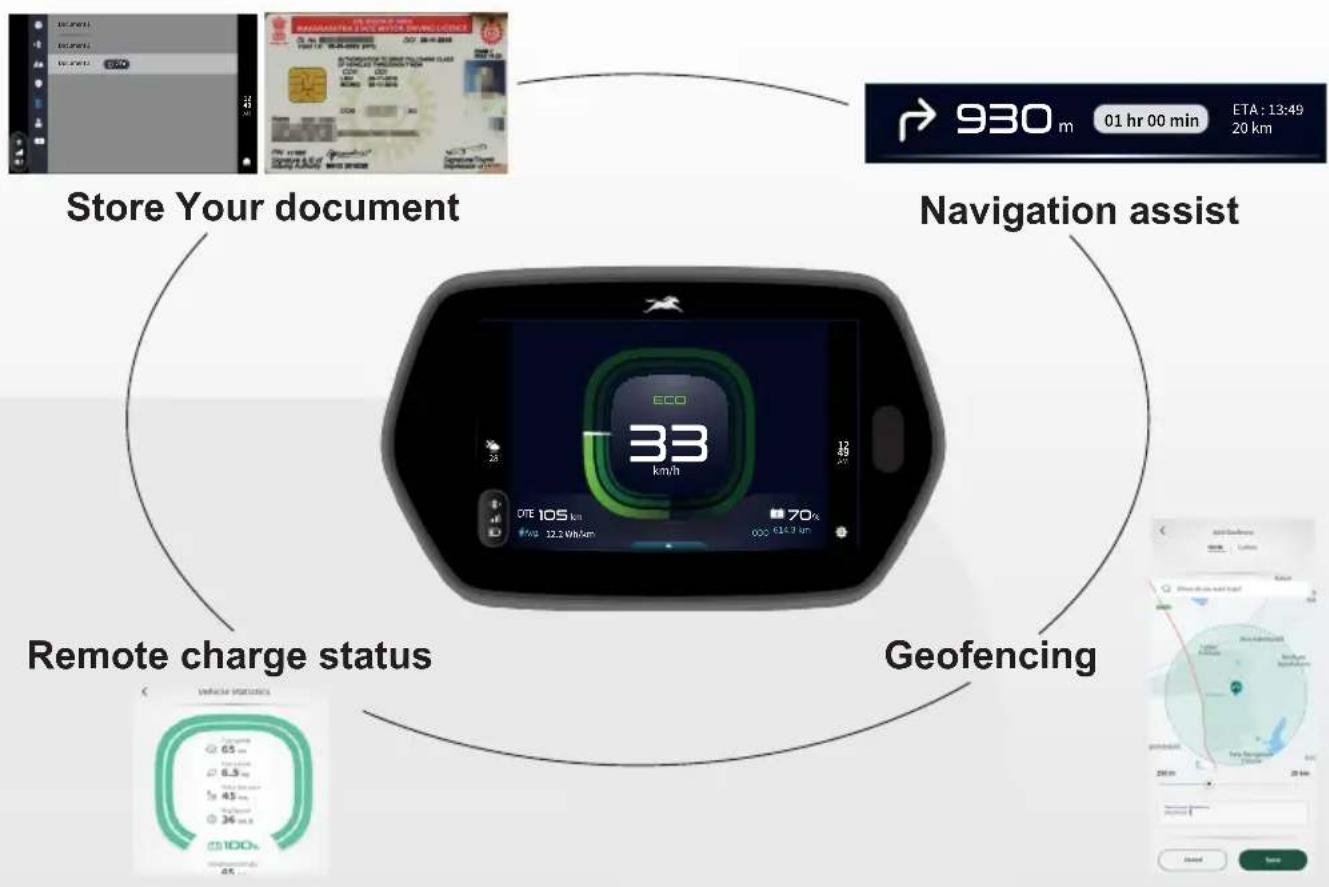
flowchart
graph TD
    A["Store Your document"] --> B["Navigation assist"]
    B --> C["Remote charge status"]
    C --> D["Geofencing"]
    D --> A
* Tested with Spotify(TM) functionality might vary based on your application.
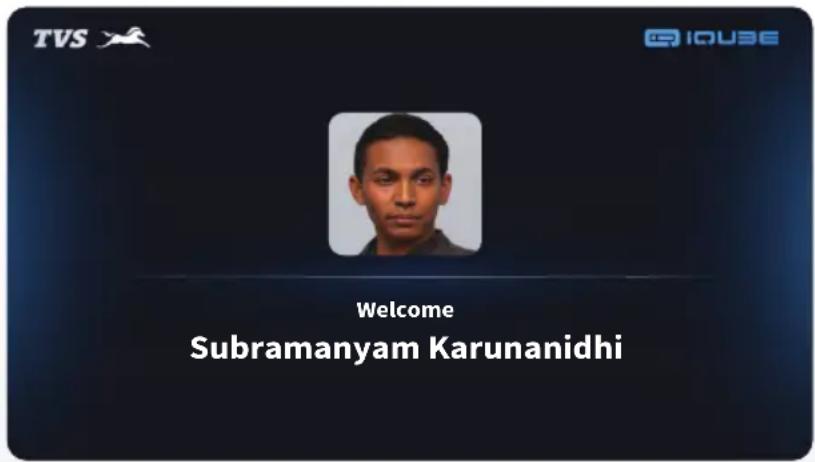
WELCOME SCREEN
Rider name and profile picture will get updated in welcome screen.

Note
The name and the profile picture will be same as updated in the mobile app.
IDLE SCREEN
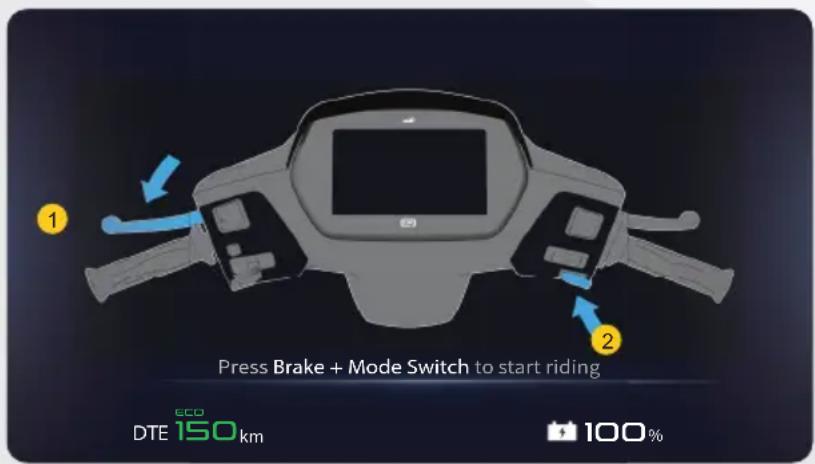
Apply brake (1) and press mode switch (2) to come out of idle mode and start riding.
TFT - CLUSTER TELL TALES
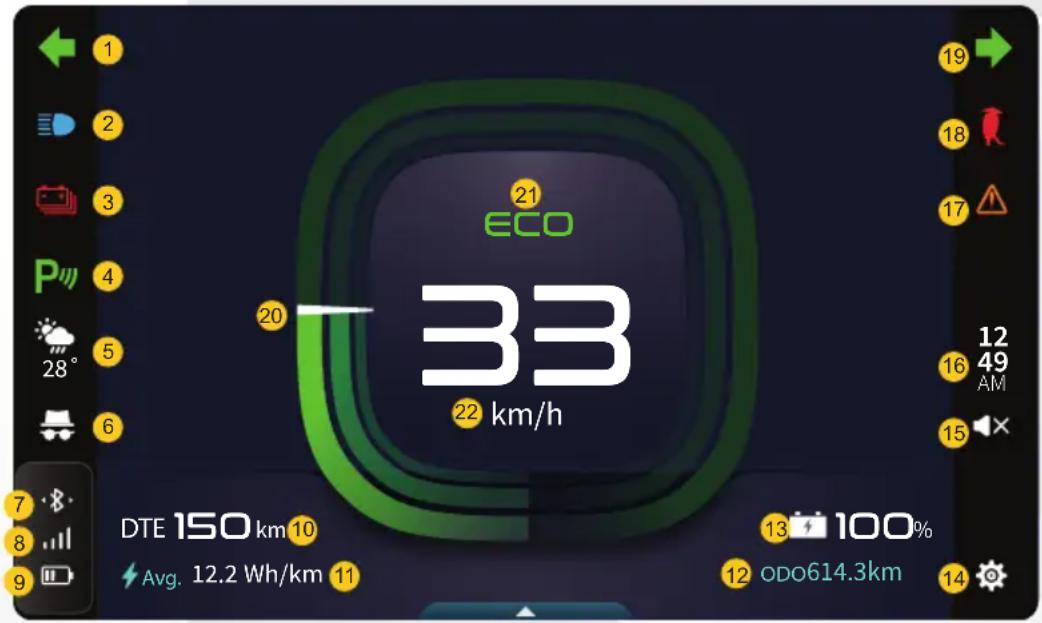
- Turn signal indicator lamp left - Flashes when the left side turn signal indication is activated.
- High beam indicator lamp - Glows when the head lamp high beam is activated.
- Low battery charge indicator - It is yet another unique feature of your scooter which indicates you to charge the vehicle, when the charge percentage goes below minimum safe level.
- Park assist indicator - Park assist indicator turns 'ON' when the parking switch is pressed. Refer page No. 29.
- Weather Info** - shows the current weather condition, when the connected to your mobile.


- Incognito Mode - Indicates that the incognito mode is ON. Refer page No. 42.
- Bluetooth - Indicates vehicle is connected with rider's mobile via mobile app.
- Mobile network - Indicates signal strength of your mobile device once connected with vehicle via bluetooth.
- Mobile battery - Indicates rider's mobile battery level once connected with vehicle via bluetooth.
-
DTE - Shows distance to empty, indicates the distance that the vehicle can go with current level of battery charge, depending on riding pattern and road load. Refer page No. 31.
-
Average energy consumed - Indicates the average energy consumed since the last charged.
- Odometer - Shows the total distance covered by the vehicle till date
- Battery level indicator (SOC) - Indicates remaining State of Charge of the vehicle's battery in percentage.
- Menu Icon - press to enter Menu.
- Sound off -Indicates that the system sound is OFF.
- Time & Date indicator - Shows current time and date.
- Malfunction indicator lamp (MIL) - Malfunction indication activation notifies you if there is an impending warning or if there is a fault in the vehicle. Immediately contact nearest TVS Motor Company Authorised Dealers for diagnosis and troubleshooting.
- Side stand indicator - The side stand warning indicator turns 'ON' to alert you whenever the vehicle's side stand is deployed and continuous beep sound will be released from the vehicle to alert the rider to retract side stand before starting the vehicle.
Note
If the side stand is deployed the vehicle will not enter into drive mode. Retract the side stand fully to enter into drive mode and start riding.
- Turn signal indicator lamp right - Flashes when the right side turn signal indication is activated.
- Power flow indication - Indicates following two condition of vehicle;
a. Driving condition: Vehicle is driven by motor by consuming power from the battery.
b. Regeneration condition: Indicates regeneration of power is happening.
- Speedometer - Indicates vehicle current speed.
- Mode display - Indicates whether the vehicle is in economy or power mode.
SELECTABLE RIDING MODES
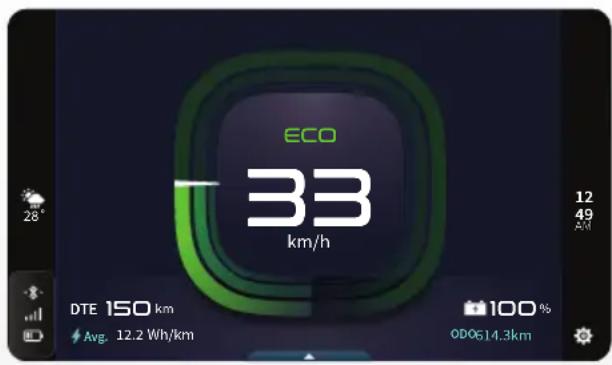
Economy
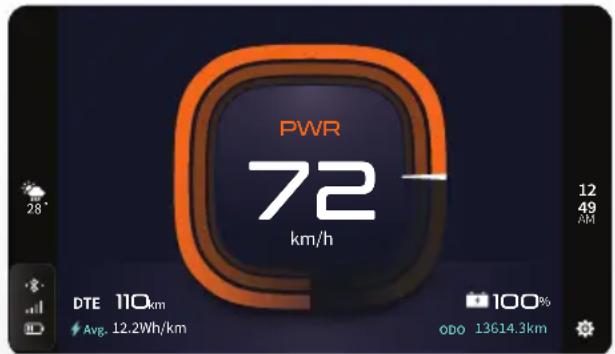
Power
REGENERATIVE BRAKING
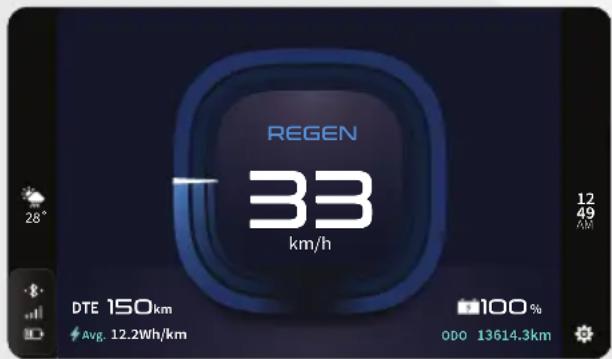
It recuperates energy lost during braking / deceleration of traction motor under specified conditions and charges the battery. Regen might not be active when the state of charge is high (higher the remaining range, lesser the regen) or when the battery temperature is high.
DAY / NIGHT MODE
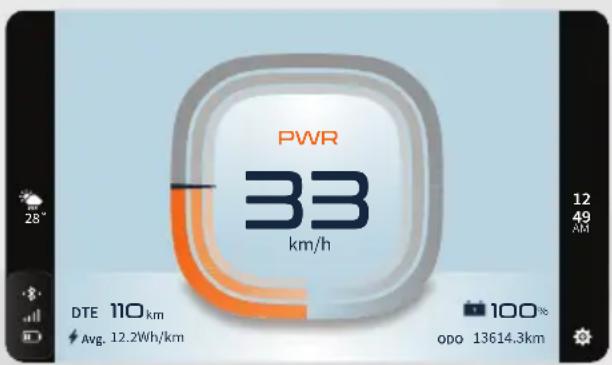
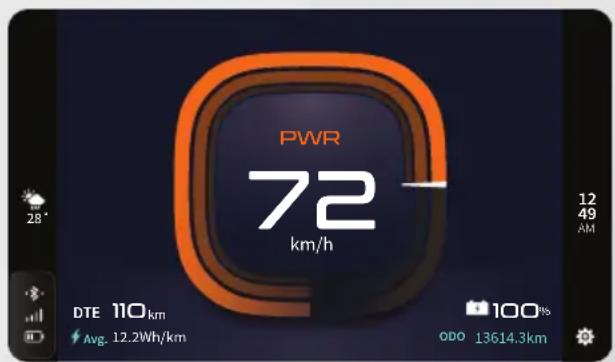
Day / Night mode can be automatically changed based on the level of ambient light. Also you can manually set the mode according to your preference.
PARKING / REVERSE ASSIST
natural_image
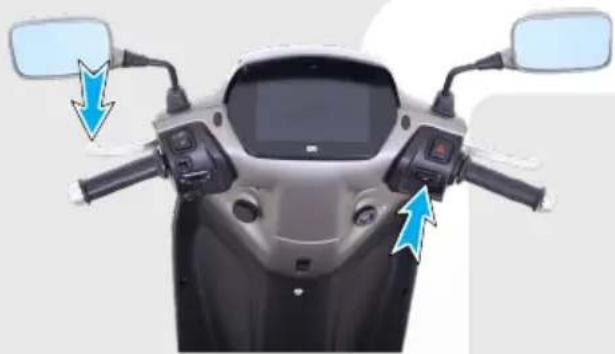
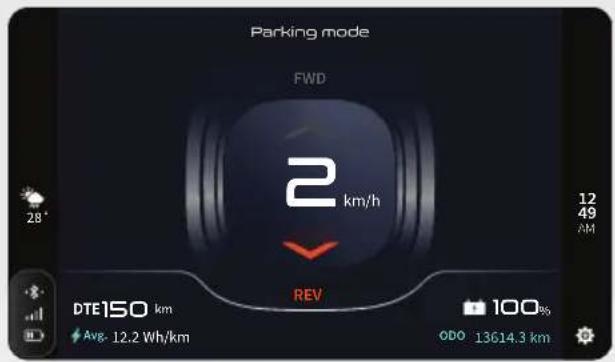
Front view of a scooter's front bumper with blue arrows pointing to the dashboard (no text or symbols visible)Press Brake + Park Assist Switch to enter / exit to Park assist mode.
To toggle between forward or reverse movement press the Park Assist Switch. Maximum speed in Forward Park assist mode is limited to 10 kmph and in Reverse mode it is limited to 3 kmph.
It reduces the effort of parking for you by allowing controlled movement of the vehicle in forward or reverse direction with minimal speed.
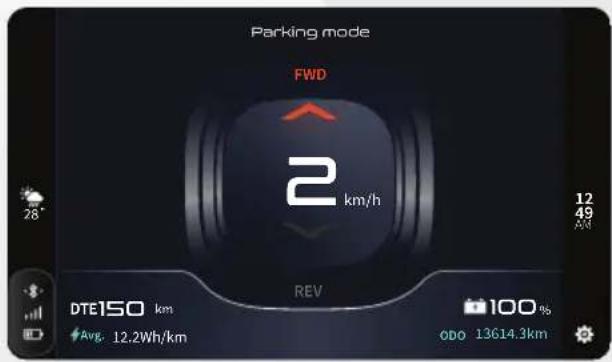
Forward condition
Reverse condition
Your vehicle is provided with 7 inch touch TFT display. Which can be used for navigating your instrument cluster, when the vehicle is static
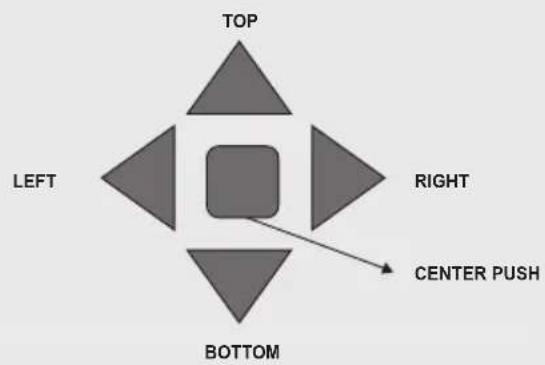
HMI SWITCH INTERFACE WITH TFT CLUSTER
natural_image
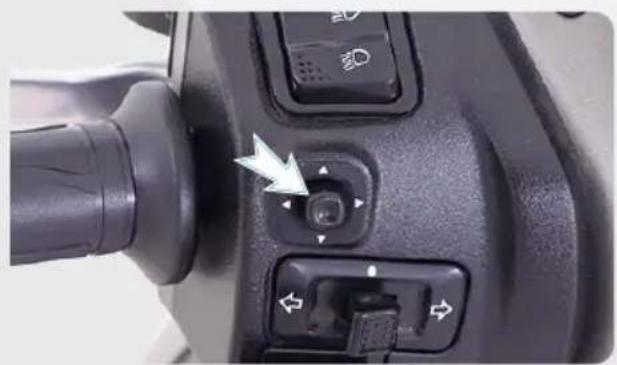
Close-up of a camera control panel with adjustment knob and directional arrows (no text or symbols visible)In addition to the touch screen, to operate the menu screens on the cluster, the HMI switch is used in the following manner:
- Top and Bottom – To scroll the menus
- Centre – To enter into menu screen / To enter into selected menu
- Left – To go back to previous screen
- Right – To scroll the widgets in the selected menu in horizontal direction
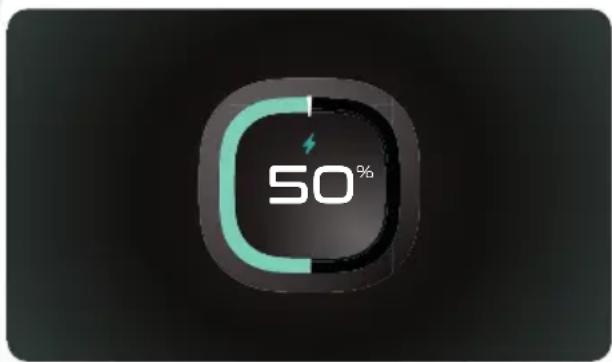
BATTERY CHARGE LEVEL & DTE
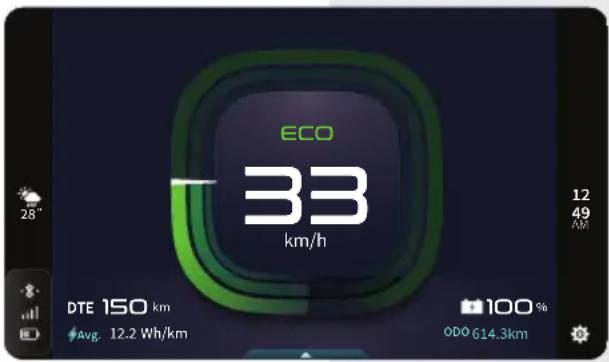
Battery level indication helps you to know how much battery charge is left in the vehicle by displaying percentage of SOC (Stage of Charge).
DTE (Distance to Empty) helps the user to know how much distance can be travelled with the remaining battery charge.
Average energy consumed Indication helps you know the average energy consumed since the last charged.
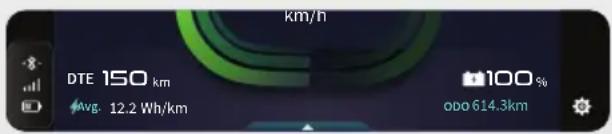
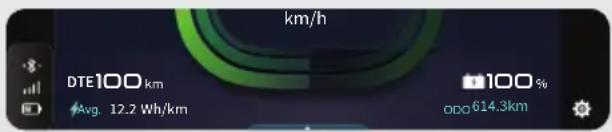
TVS iQube Electric ST model comes in two variants - iQube ST 17 with 3 battery packs with a range of 150 km and iQube ST 12 with 2 battery packs with a range of 100 km
TVS iQube Electric ST - 17
TVS iQube Electric ST - 12
Note
DTE is an estimation which varies based on the rider's driving pattern.
PLUG IN CHARGING
When the charger is plug in the vehicle starts to charge and vehicle cannot to operate during charging.
Settings can accessed by touching ⚙️ ' setting icon in the right side bottom of the instrument cluster.
Setting can be navigated by using the HMI switch or by touch when the vehicle is static.
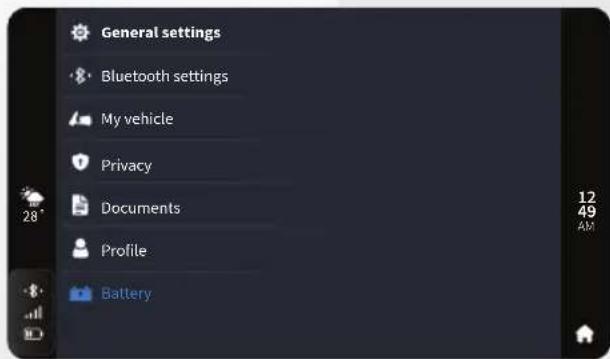
The following options are available in settings.
- General settings
- Bluetooth settings
- My vehicle
- Privacy
- Documents
- Profile
- Battery
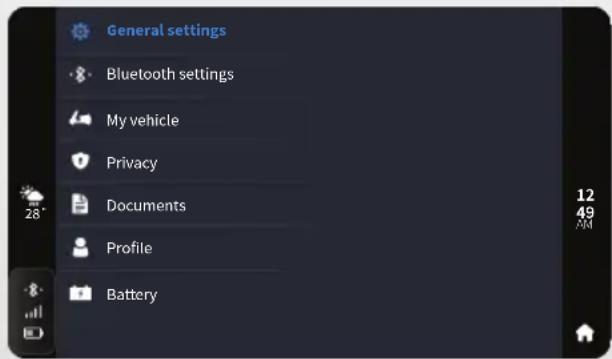
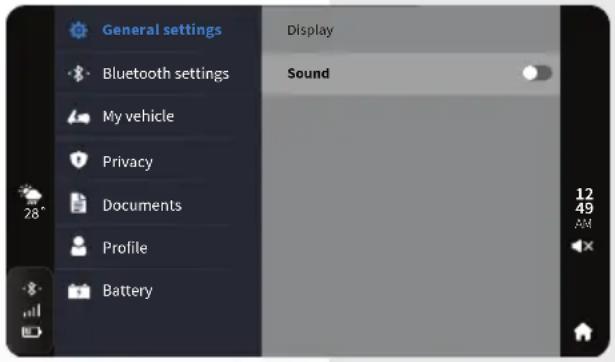
General settings
In general settings, you can control the Brightness, personalize themes, display mode and sound.
General setting has the following options.
-
Display
-
Sound
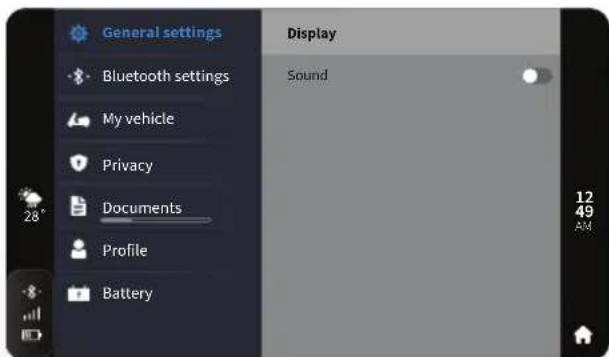
Display
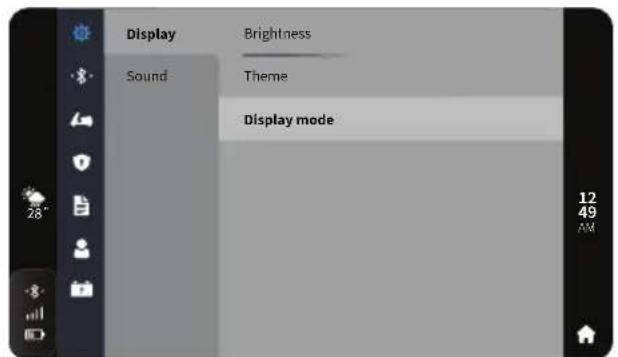
Display has the following options.
-
Brightness
-
Theme
-
Display mode
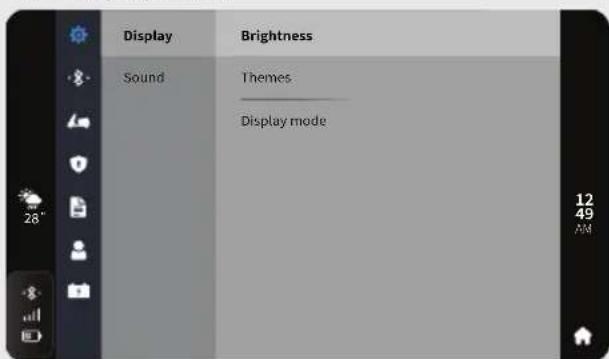
Brightness
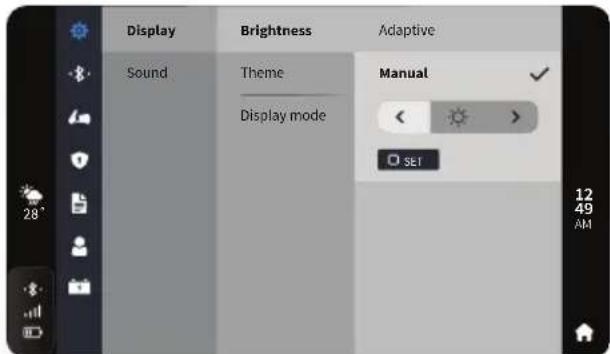
Display brightness can be adjusted either through selecting adaptive mode or manual mode.
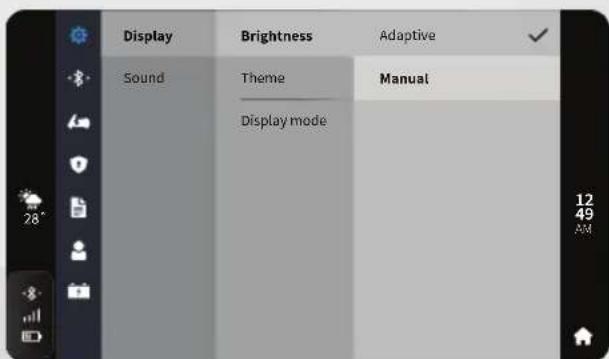
By selecting adaptive mode, the brightness will be automatically adjusted. This option is available in Default and analogue theme modes only.
By selecting manual mode, the brightness can be set by using HMI right and left switch or touch.
Theme
Themes has the following options.
-
Default
-
Analogue
-
Custom image
-
Custom color
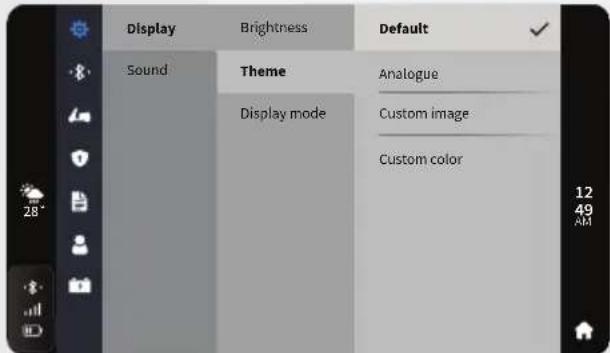
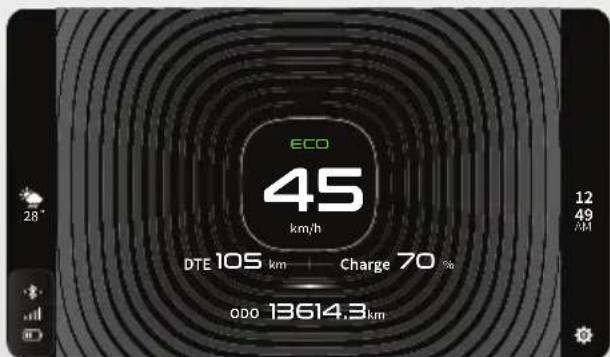
Default theme
In default theme will display the standard screens.
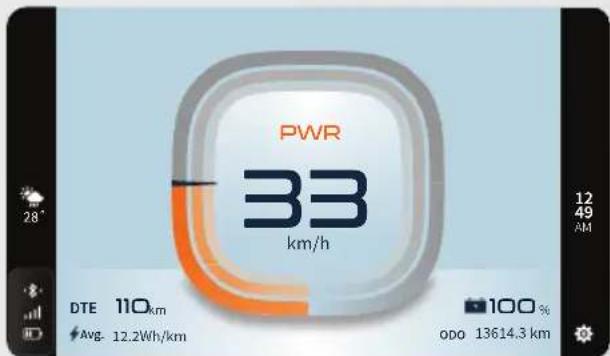
Analogue theme
By selecting the analogue theme, you can chose a classic analogue theme.
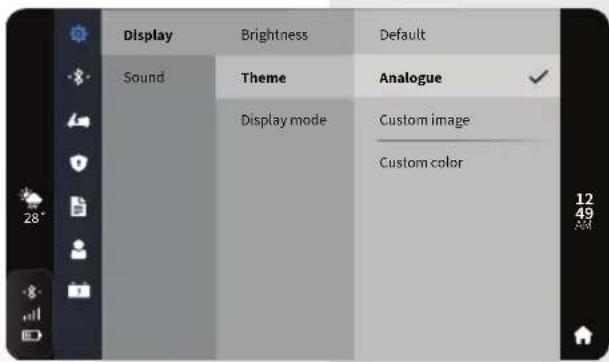
Analogue
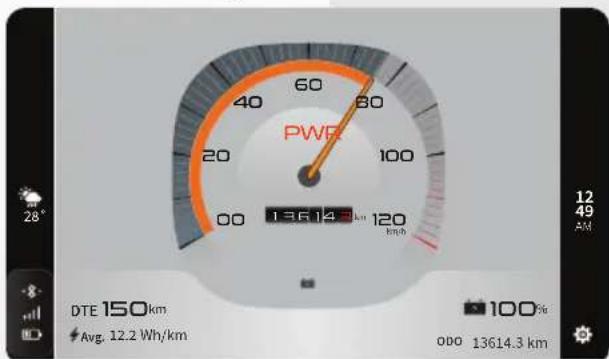
gauge
| Metric | Value | |--------|-------| | Current | 13614.3 km | | Avg. | 12.2 Wh/km | | DTE | 150 km | | Avg. | 12.2 Wh/km | | 100% | 100 % |Custom theme
By selecting the custom theme, you can upload a image using TVS Connect app and use it as display screen.
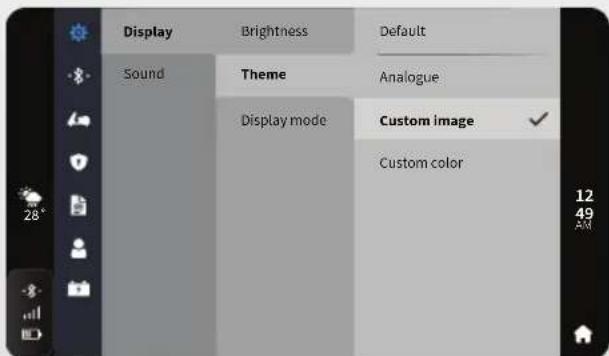
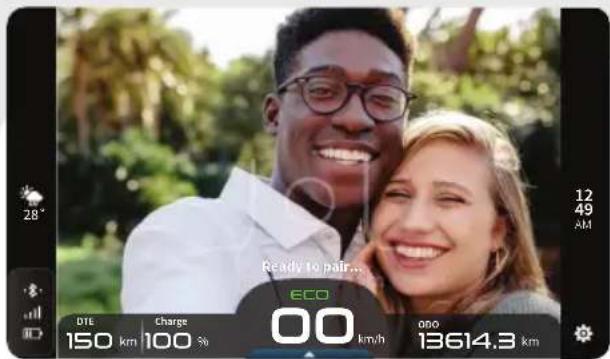
Note
Custom image can be uploaded to the instrument cluster via TVS Connect app
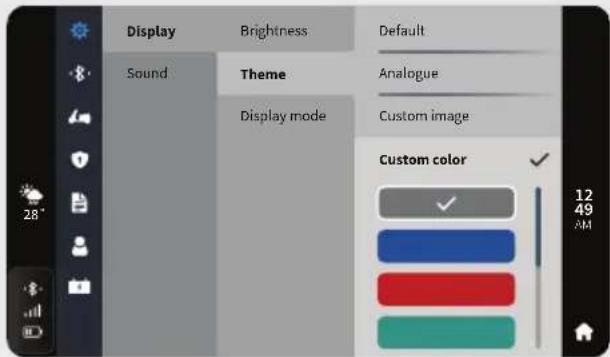
Custom color theme
In Custom color theme you can chose between six different color themes.
Display mode
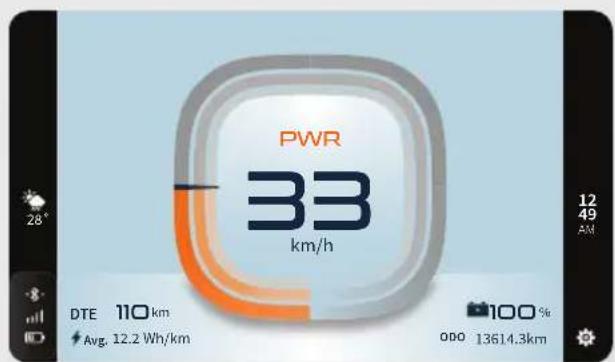
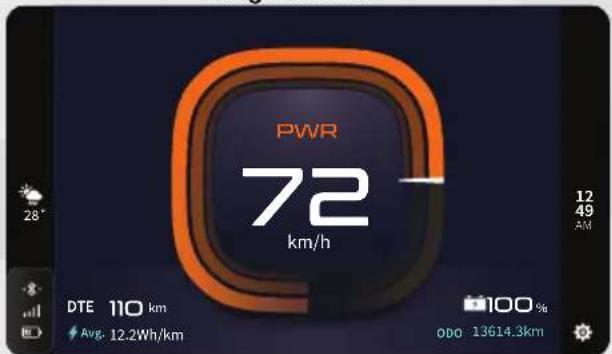
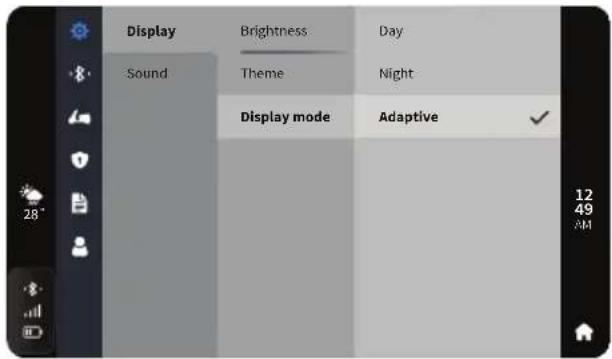
In display mode, you have the option to select between day mode, night mode, or adaptive mode. The adaptive mode enables the instrument cluster to automatically switch between day and night mode by utilizing the ambient light sensor, which detects the level of surrounding light.
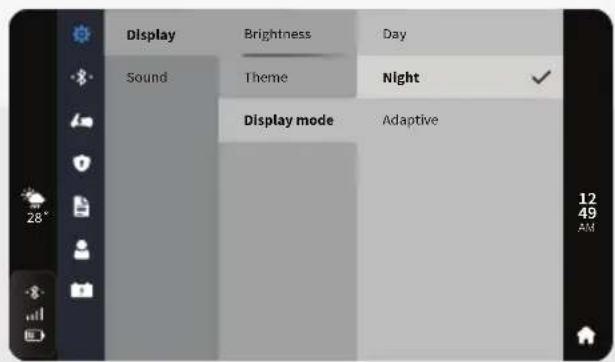
Day mode
Night mode
Adaptive mode
Note
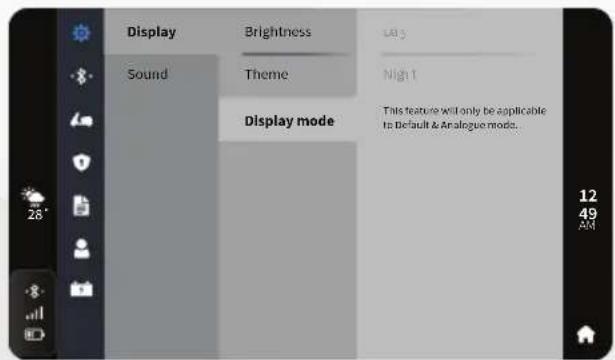
This feature will only be applicable to default and analogue mode.
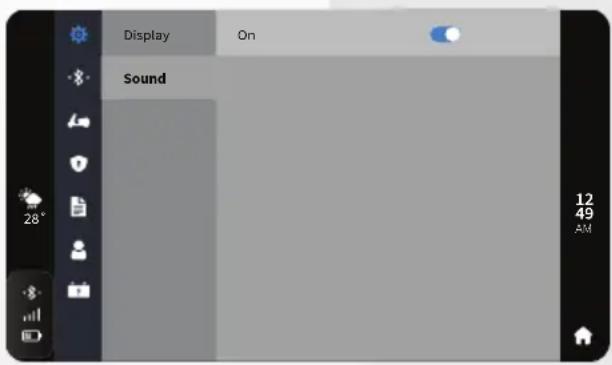
Sound
The instrument cluster sound can be turned ON or OFF.
Bluetooth setting
You can connect the instrument cluster using TVS Connect app to get access through various features like message notification, call accept / reject options etc. on the go.
Telematic unit is used for identifying the vehicle location.
Ride Data Sync (optional) helps you to know about your ride data and many other functions on the TVS Connect app.
Refer page no. 44 for how to connect with smart phone, TVS Connect app, etc.
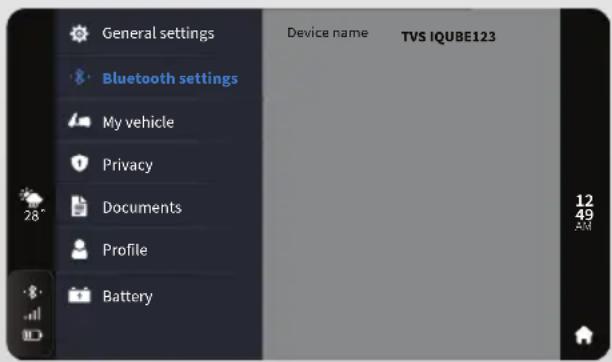
To connect bluetooth with TVS Connect app,
- In setting press or touch Bluetooth Setting.
My vehicle
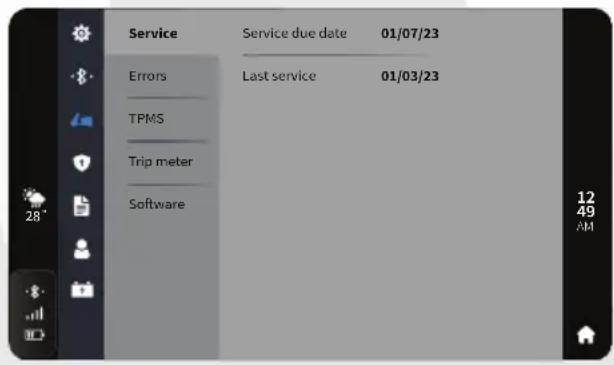
My vehicle has the following options.
- Service
- Errors
- TPMS
-
Software
-
Trip meter
The date and time displayed on the cluster screen of the vehicle is pulled from GPS satellite data. This might lead to a lag in date and time getting displayed on your cluster, since the update happens based on GPS satellite visibility and is dependant on your vehicle having open and clear skies above it.
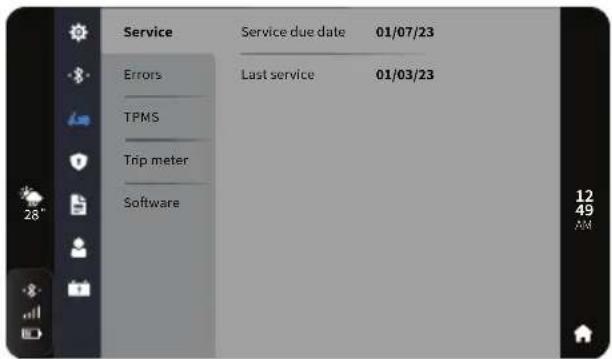
Service
On selecting service you can view the next service due date and last service date.
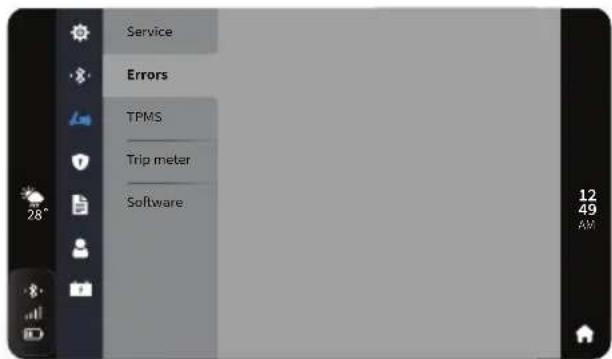
Errors
On selecting the errors option will display the vehicle errors description with codes, if any errors are active.
Error List and Warning Messages
| Sl. No. | Error / Warning Code Description to be Displayed | |
| 1 | Error 000 Error 000 | - Contact Road Side Assistance (Call - 18002587111) |
| 2 Error | 001 Error 001 - Contact | Road Side Assistance (Call - 18002587111) |
| 3 Error | 002 Error 002 - Contact | Road Side Assistance (Call - 18002587111) |
| 4 Error | 003 Error 003 - Contact | Road Side Assistance (Call - 18002587111) |
| 5 Error | 004 Error 004 - Contact | Road Side Assistance (Call - 18002587111) |
| 6 Error | 005 Error 005 - Contact | Road Side Assistance (Call - 18002587111) |
| 7 Error | 006 Error 006 - Contact | Road Side Assistance (Call - 18002587111) |
| 8 Error | 007 Error 007 - Contact | Road Side Assistance (Call - 18002587111) |
| 9 Warning | 001 Warning 001 - Close the throttle. | |
| 10 Warning | 002 Warning 002 - Restart the vehicle. | |
| 11 Warning | 003 Warning 003 - Vehicle needs to cool down. | |
| 12 Warning | 004 Warning 004 - Close the throttle and Restart the vehicle. | |
| 13 Warning | 005 Warning 005 - Restart the vehicle. | |
| 14 B1 | Warning 000 B1Warning 000 - Restart the vehicle | |
| 15 B1 | Warning 001 B1Warning 001 - Restart the vehicle | |
| 16 B1 | Warning 002 B1Warning 002 - Restart the vehicle | |
| 17 B1 | Error 003 Contact Road Side Assistance (Call - 18002587111) | |
| 18 B1 | Error 004 Contact Road Side Assistance (Call - 18002587111) | |
| 19 B1 | Error 005 Contact Road Side Assistance (Call - 18002587111) | |
| 20 B1 | Error 006 Contact Road Side Assistance (Call - 18002587111) | |
| 21 B1 | Error 007 | Battery at most critical condition. Please exit the vehicle and stand far away from it. |
| 22 B2 | Warning 000 B2Warning 000 - Restart the vehicle | |
| 23 B2 | Warning 001 B2Warning 001 - Restart the vehicle | |
| 24 B2 | Warning 002 B2Warning 002 - Restart the vehicle | |
| 25 B2 | Error 003 Contact Road Side Assistance (Call - 18002587111) | |
| SI. No. | Error / Warning Code Description to be Displayed | |
| 26 B2 | Error 004 Contact Road Side Assistance (Call - 18002587111) | |
| 27 B2 | Error 005 Contact Road Side Assistance (Call - 18002587111) | |
| 28 B2 | Error 006 Contact Road Side Assistance (Call - 18002587111) | |
| 29 B2 | Error 007 | Battery at most critical condition. Please exit the vehicle and stand far away from it. |
| 30 B3 | Warning 000 B3Warning 000 - Restart the vehicle | |
| 31 B3 | Warning 001 B3Warning 001 - Restart the vehicle | |
| 32 B3 | Warning 002 B3Warning 002 - Restart the vehicle | |
| 33 B3 | Error 003 Contact Road Side Assistance (Call - 18002587111) | |
| 34 B3 | Error 004 Contact Road Side Assistance (Call - 18002587111) | |
| 35 B3 | Error 005 Contact Road Side Assistance (Call - 18002587111) | |
| 36 B3 | Error 006 Contact Road Side Assistance (Call - 18002587111) | |
| 37 B3 | Error 007 | Battery at most critical condition. Please exit the vehicle and stand far away from it. |
| 38 Error 008 Contact Road Side | Assistance (Call - 18002587111) | |
| 39 Error 009 Contact Road Side | Assistance (Call - 18002587111) | |
| 40 Warning 006 Vehicle needs to cool down. | ||
| 41 Warning 007 Vehicle needs to cool down. | ||
| 42 Error 010 Contact Road Side | Assistance (Call - 18002587111) | |
| 43 Error 011 Contact Road Side | Assistance (Call - 18002587111) | |
| 44 Error 012 Contact Road Side | Assistance (Call - 18002587111) | |
| 45 Error 013 Contact Road Side | Assistance (Call - 18002587111) | |
| 46 Error 014 Contact Road Side | Assistance (Call - 18002587111) | |
| 47 Error 015 Contact Road Side | Assistance (Call - 18002587111) | |
| 48 Error 016 Contact Road Side | Assistance (Call - 18002587111) | |
| 49 Error 017 Contact Road Side | Assistance (Call - 18002587111) | |
| 50 Error 018 Contact Road Side | Assistance (Call - 18002587111) | |
TPMS\*
On selecting the TPMS, you can view the tyre pressure of your vehicle.
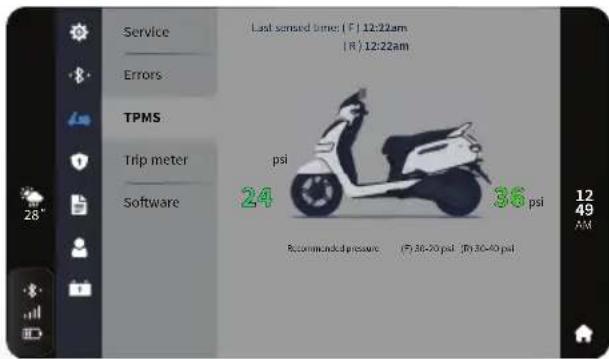
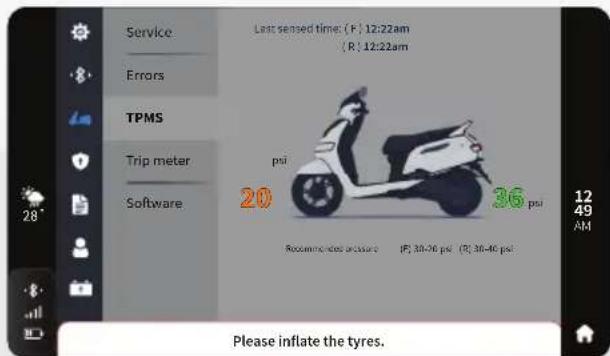
In case of low tyre pressure a message will pop up as "Please inflate the tyres."

Note
TPMS will show reliable tyre pressure values only after vehicle has been run for some time post ignition on.
Trip meter
On selecting the trip meter, there are Trip A, Trip B and Last trip data. Trip A and Trip B can be used to measure to & fro distance between two locations as per your requirement with following details Total distance covered, Total time travelled, top speed and energy consumed.
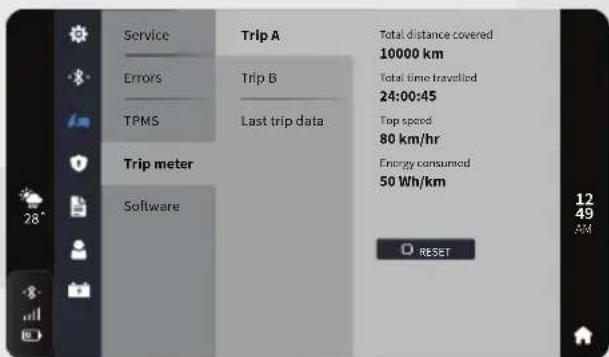
In last trip data, the following details such as Total distance covered, Total time travelled, top speed and energy consumed can be viewed.
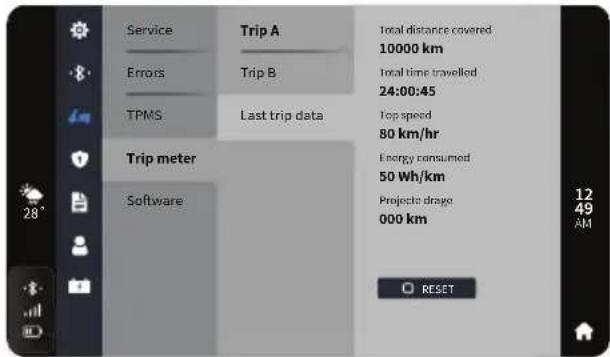
These data can be rested by pressing the RESET icon " RESET".
SOFTWARE
The software of your vehicle can be updated remotely whenever a new software is released via OTA (over the air). The update gets downloaded via telematic unit automatically, when the update is available.
OTA software is downloaded in the background if good network connectivity is available. However, in case you are aware of a new campaign being released and still update has not come to your vehicle, then please follow the below steps (Step 1 and Step 2) otherwise skip to Step 3.
Step 1: In case where a new OTA update campaign is released, but it has not yet downloaded on a specific vehicle, ensure that the vehicle is parked in an area with good mobile data connectivity for downloading the OTA software package.
Step 2: If download is not completed (showing blue dot as mentioned in Step 3), switch the vehicle ON and keep it in idle condition for 20 minutes (To ensure the software package is downloaded by the TCU and stored in its memory).
Step 3: Check the Blue/ Green dot on the settings option.
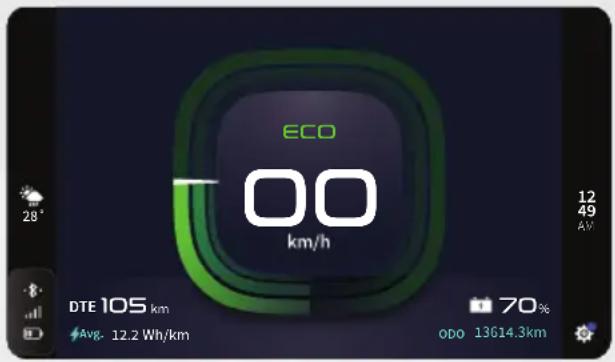
Step 4: Blue dot indicates that SW package is downloading, green dot indicates SW package downloaded and ready to flash. If Blue dot is there, wait for it to turn green.
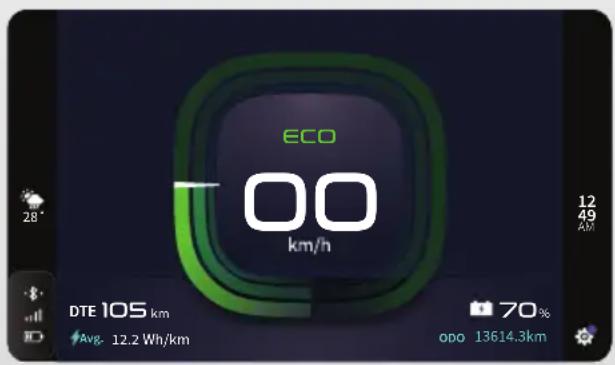
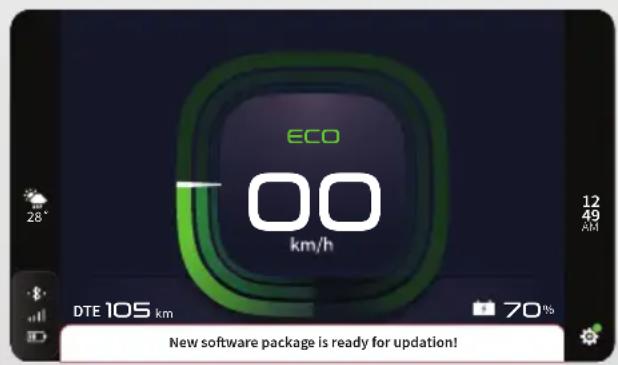
Step 5: Step 5: If the green dot is available, then proceed for flashing. Select Settings -> My vehicle -> Software -> Update -> Update. User must provide consent two times for the software flashing to initiate.
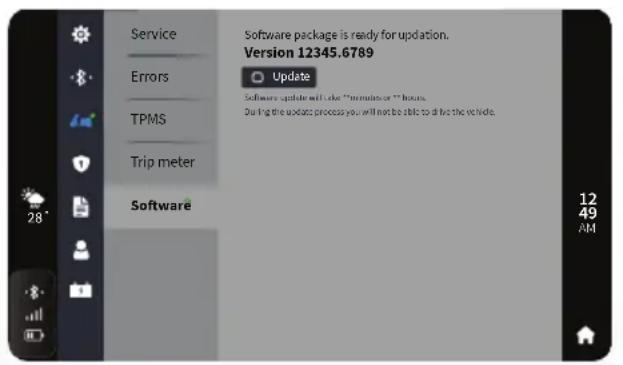
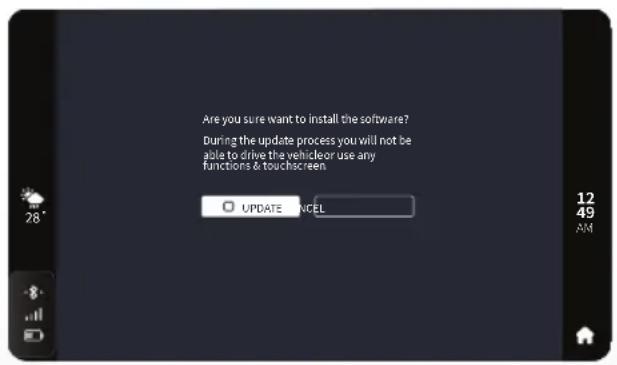
Step 6: Please wait for atleast 5 sec for flashing screen to come after the update is clicked for the second time.
Step 7: Wait for up to 30 minutes (depends on the software package) for successful OTA software update of the intended control units. Check for second image below for 'Software package has been updated' which indicates successful OTA software update.
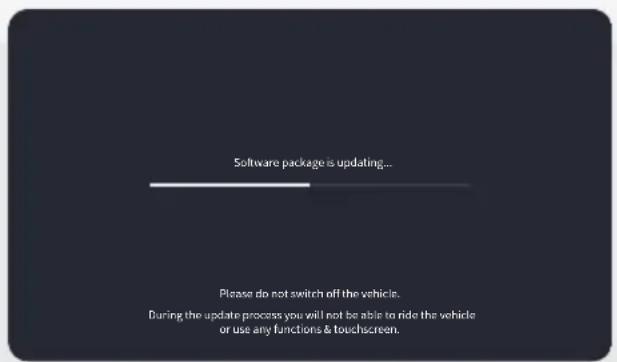
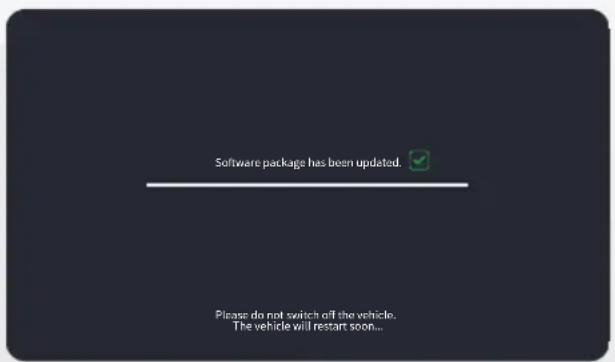
Step 8: After successful flashing, vehicle might restart depending on the controller updated. After restart wait for a minute or 2 and check for Software version in Select Settings -> My vehicle -> Software -> Software Version.
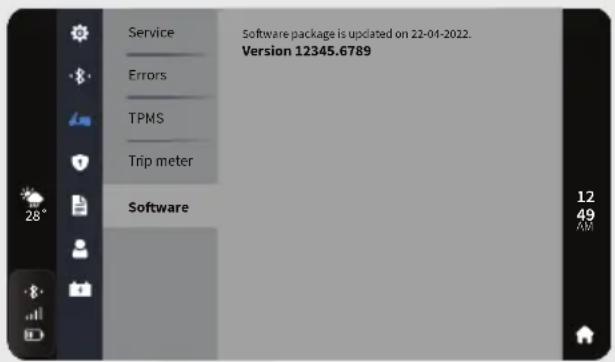
Note
If the green dot is available and there is no SW version displayed in cluster
Click Update and check after 30 minutes for successful flashing of vehicle. Ensure screen has changed to software flashing progress screen.
Next, check for SW version in Select Settings -> My vehicle -> Software -> Software Version
If the version has changed compared to the previous software version, the vehicle is loaded with updated software.
Process followed by TCU if OTA flashing fails:
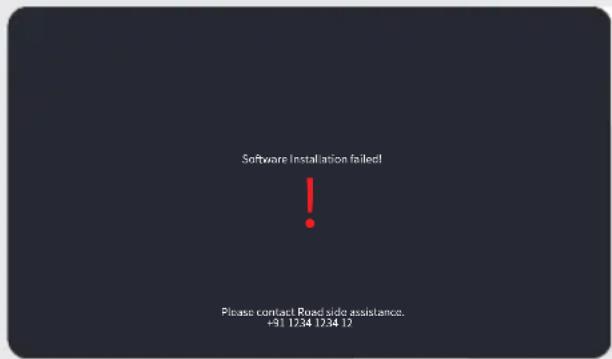
- If OTA update has failed, Cluster will display Software installation failed message and screen will transform to idle screen after 5 seconds.
- TCU will start flashing the baseline software for VCU, BMS, MCU & TCU after 10-15 min without any intervention from the user, this is called Rollback Flashing.
- Rollback flashing will be only attempted 3 times, before being considered complete failure.
- After rollback flashing starts, screen will change to Software update progress.
- Rollback flashing will be completed within 30-35 minutes depending on the baseline package size.
- Same DO's and DON'TS for regular flashing to be followed.
- The overall time taken from general OTA failure to complete rollback flashing is around 45 minutes.
- TCU will take up to 15 minutes to start flashing rollback software from failure time.
- If the OTA rollback flashing fails consecutively after 3 retries, then rollback will not be attempted furthermore.
- For recovery in case of OTA and Rollback failure, diagnostic tool must be used to flash the ECU's.
DO'S:
- Though software download happens in the background while riding or while parked if vehicle is in charging or ignition in ON condition, parking the vehicle in good network coverage area may provide faster downloading of Software to vehicle.
- Please charge the vehicle to at least 20% before attempting to update the Software.
- Keep the vehicle in Idle mode before approving software update.
- Keep the vehicle Ignition in ON condition while updating, even if the screen goes blank or vehicle stops responding, wait for at least 30 min. This ensures that the maximum time taken for flashing of all controllers is covered.
- Ensure that the vehicle is not disturbed during entire flashing process (Do not use throttle, side stand, switches etc.)
DONT's
- DO NOT switch OFF the vehicle once software update process has started.
- DO NOT move the vehicle till the software update completes, keep the vehicle in Idle position.
- DO NOT switch OFF the vehicle ignition if update is clicked in the software screen.
- DO NOT connect charger if update is clicked in the software screen.
- DO NOT turn off the ignition anytime during OTA update or rollback, even if the display goes blank or the update seems stuck.

Warning
During the update process you will not be able to drive the vehicle or use any functions & touch screen.
Privacy
Privacy has the following options.
- Connectivity
- Incognito
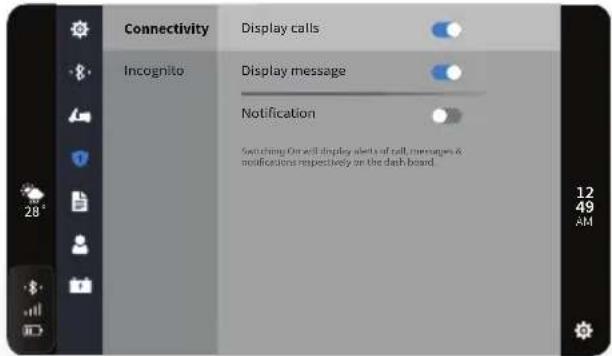
Connectivity
In connectivity, you have the option to enable or disable the notifications on cluster display for display calls, Display message and social media apps notification.
Incognito
Incognito mode will switch off the location tracking and navigation when enabled.
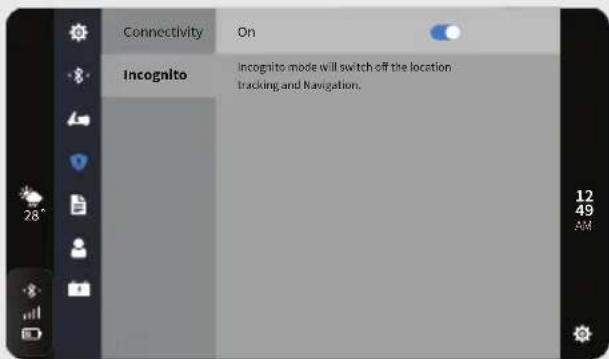

Caution
If vehicle incognito mode is activated, some connected mobile application features might not work.
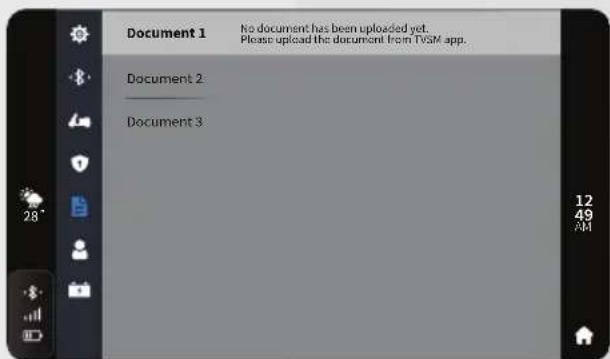
Documents
In documents you can upload up to three digital documents. The documents can be uploaded to the instrument cluster via TVS Connect appreferpage no. 50 for procedure.
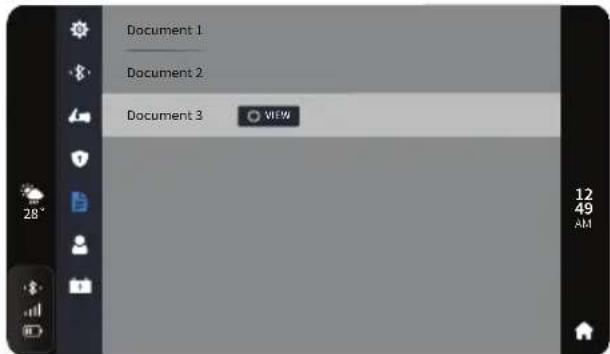
Press view to view the document.
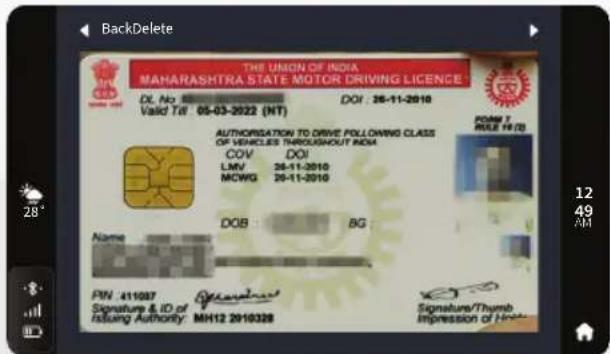
The documents can be deleted as per the your convenience in the instrument culture itself.
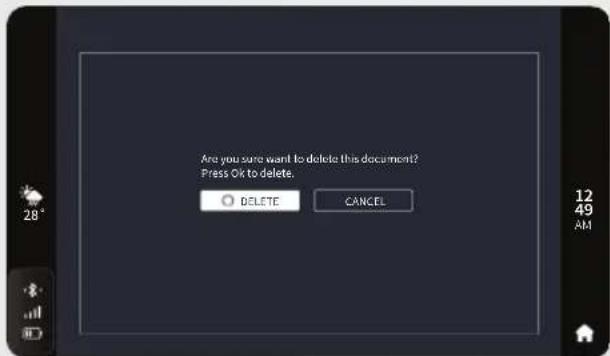
If no document is available the bellow message will display.
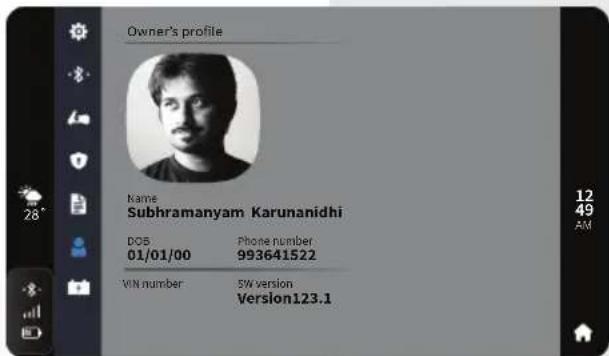
Profile
In profile, you can set your profile picture, name, date of birth and phone number using the TVS Connect app.
Battery
On selecting the Battery you can view the battery percentage of each battery.
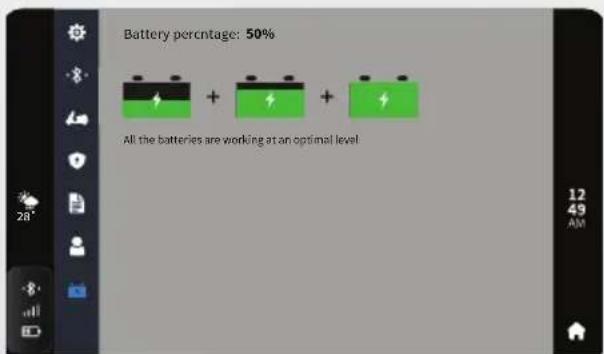
In case of any battery malfunction, a warning message will be indicated in this option. If so it is advisable to take your vehicle to TVS Motor Company Authorized Dealer.
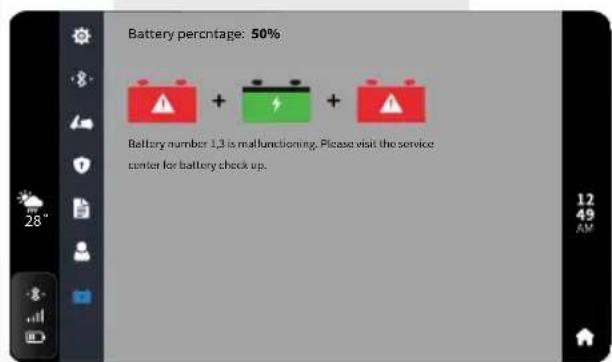

Note
Different charge levels among the individual battery packs can occur during normal operation of vehicle. The same can be balanced by charging the vehicle to 100%.
SMARTXONNECT
Mobile phones can be connected with vehicle instrument cluster using Bluetooth, which helps you to know about your ride data and many other functions. Once Bluetooth connection is established between instrument cluster and mobile phone, Bluetooth symbol will glow.
Your vehicle also comes with a Telematic unit. This Telematic unit is under the concept of TVS SMART × CONNECT and it is equipped with electronics to monitor and transmit various vehicle data such as battery, motor and other electrical systems. The vehicle data allows for various remote function services, some of which are as follows.
Remote monitoring of charging status – The charging status of the vehicle can be checked using your internet enabled smart phone (TVS Connect app) even if you are not near to vehicle.
Live tracking – The live status of the vehicle can be checked remotely at any time using TVS Connect app prescribed for this vehicle.
Geo-fencing – The telematics system can be set to provide alerts if your vehicle is moved out of a set geographical boundary (can be defined through mobile app).
Theft notifications – The telematic system can be used to track unauthorised usage but cannot prevent it. The system will notify the unauthorized movement of a vehicle with live location status. The notifications can be checked on the mobile app.
Voice assist - The voice assist can be use your voice to control or know status of various functions like Increase instrument cluster brightness, what is the charging status etc.
Alexa skillset - The alexa skillset can be use your voice to know stauts of varius functions list Battery SOC, get enery cinsumed etc, through alexa app from your smart phone.
Scan QR codes for downloading the mobile app and then follow on screen instructions.

Android IOS

Note
"TVS Motor Company Ltd. does not recommend usage of any type of Mobile Hand Held Devices, and applications / features whether installed or associated with the vehicle which deprives the rider's attention and focus while riding the Two Wheeler. The customers and riders are strictly advised to understand the applicable laws, road safety Rules and the local laws on usage of electronic devices while operating the vehicle. Usage of any Mobile or hand held devices, and /or applications / features while riding the vehicle is totally at customer's / rider's risk. The product and features have technical limitations and are for general overview only."
Bluetooth parring
First time bluetooth paring
To pair your Android smart phone or iPhone with your TVS iQube Electric ST connected instrument cluster, via Bluetooth, for the first time, follow the procedure as described below :
- Switch 'ON' the vehicle.
-
Instrument cluster can be in any mode for first time pairing.
-
Open the app and press the 'CONNECT' tab, ensure the smart phone is near to the vehicle.
-
The app searches for all Bluetooth devices near by and displays the list of devices available.
-
The connected instrument cluster's Bluetooth name is prefixed by TVS IQUBE and followed by alpha-numeric digits. Ex: 'TVS IQUBE123'. This Bluetooth name can be found by changing the cluster mode into BT pair mode.
-
Now, select the 'TVS IQUBE123' in app to initiate the pairing process.
-
On pairing, a Bluetooth icon, phone's battery icon and signal strength icon '...' will be displayed on the speedometer's TFT display. In Addition to this icons, weather details will be displayed on connected instrument cluster TFT display.
-
For initiating first time pairing, logout from the app, login again using your login credentials and then press 'CONNECT'.

Note
During the course of pairing process, if there is any occurrence of error, the connected instrument cluster should be turned 'OFF' and 'ON', and the application also need to be restarted.
Please remember that all the smart phones are not compatible for pairing with the TVS iQUBE connected instrument cluster.
During the search of Bluetooth devices in app, if the vehicle connected instrument cluster's Bluetooth device ID is not visible, try for one or two more iterations.

Note
Any number of Android phones can be auto-paired with the instrument cluster, but only one at any point of time will be in actively connected with the speedometer.
Only one iPhone can be auto-paired with a single instrument cluster at a time. If the user need to connect multiple iPhones with the single instrument cluster, the previous connected iPhone has to be forgotten by clicking, 'Forget This Device' from Bluetooth settings in the iPhone.
If the vehicle battery is reset or fuse is blown, then 'Forget This Device' from Bluetooth settings.
Steps to "Forget This Device" in iPhone:
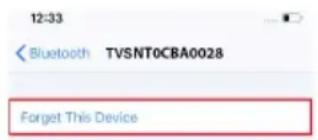
If the user needs to connect multiple iPhones with the single instrument cluster, the previous iPhone has to be forgotten using "Forget This Device" from Bluetooth settings in the following manner:
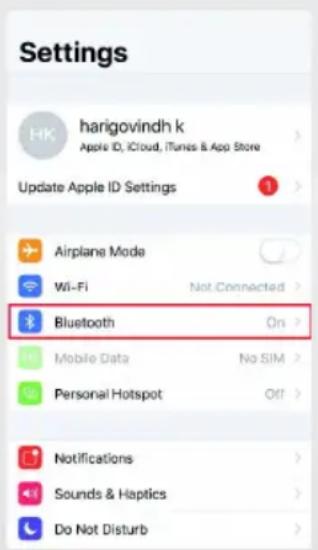
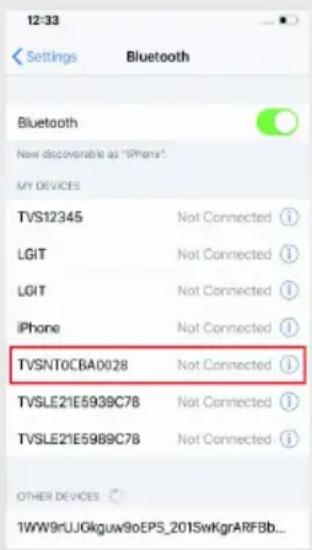
- In the previous connected iPhone, open the SETTINGS -> BLUETOOTH.
- Select the instrument cluster, which was connected previously.
- Click on the "Forget this device".
Auto pairing
Once the first time pairing is done between vehicle's instrument cluster and your smart phone, the phone will automatically connect with the vehicle when the following conditions are met:
- Vehicle is switched 'ON' and vehicle is near to the smart phone.
- Smart phone's Bluetooth is turned 'ON'
- First time pairing is ensured.
- In case of iPhone, the 'TVS Connect' app should be open or be open in background for auto-pairing to happen.
Every time auto-pairing happens, app will open automatically and connect with the Instrument cluster. The connected instrument cluster's display shows 'iQube is now connected'.
Note
If the phone enters battery saver mode, auto-pairing might not happen. It takes maximum of five minutes for auto-pairing and it can happen in vehicle running also.
Auto-pairing happens only if the application is locked in the RAM in multitasking screen of the phone which has customized OS (Ex : MI, Vivo etc.)
In case of Android phones with Android OS version above 8.0, for App to work seamlessly, any battery optimization setting to be removed in the TVS Connect App and GPS shall be allowed to run in background in high accuracy mode.
Even if your phone's Bluetooth is already paired to other gadgets like smart watch, health band or helmet, the auto-paring works with your TVS iQube's connected instrument cluster.
If the application unfortunately stops due to unforeseen circumstances, close and reopen the application and do the manual pairing for the first time, then auto pairing will happen subsequently.
For first time pairing, logout from the app, login again with your login credential and press 'CONNECT' tab.
Once the connected instrument cluster of your TVS iQube is connected with your smart phone, the connected instrument cluster displays Bluetooth icon, your mobiles battery level icon and network providers signal strength icon.

Note
Incase multiple SIM cards are used in smart phone, by default, SIM 1's network provider's signal strength is shown in the display of connected instrument cluster.
Signal strength displayed in the connected instrument cluster might vary from the display in smart phone as the former is referred from telephonic standards.
Onboard a TVS Vehicle
On opening the TVS Connect app for the first time you have to login using your mobile number. Then enter the OTP which is received from TVS Motor Company Limited.
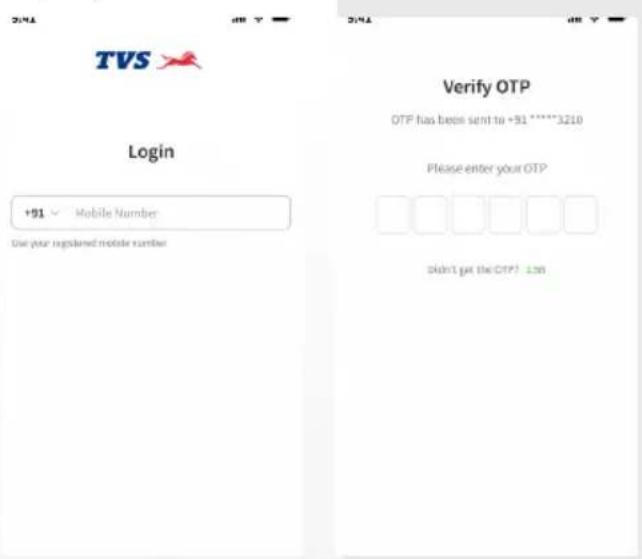
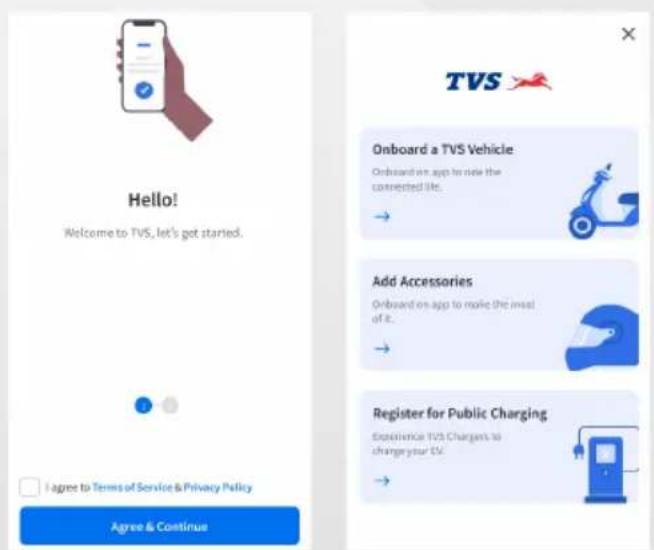
On submitting the OTP. You need to agree to terms of service and privacy policy and click agree and continue. Now click onboard a TVS Vehicle.
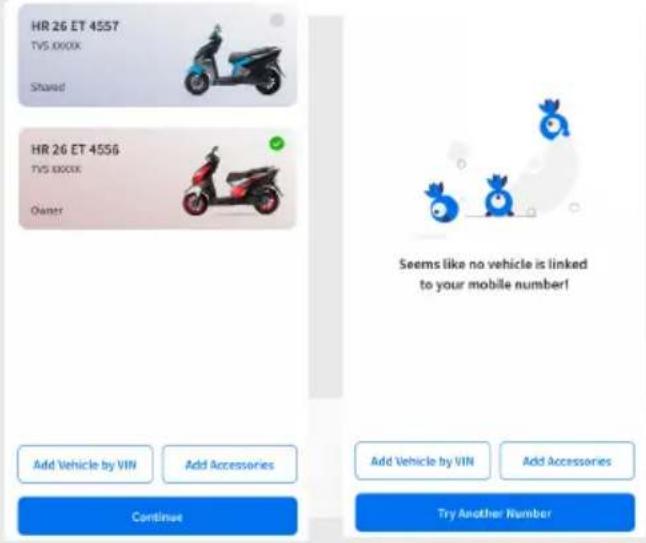
Select your vehicle that need to be linked to your App. If no vehicle linked with your mobile number. A vehicle can be added using VIN / chassis number, of the vehicle.
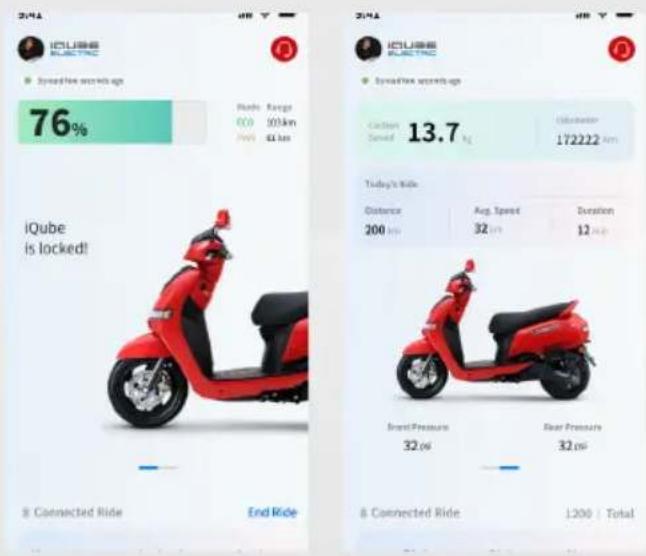
After successful verification of your chassis number, the Home screen of the app opens.
TVSM has developed internet / mobile application (TVS Connect) in order to provide navigation services. TVSM may use the personal driving data details to provide assistance to locate and track the vehicle on good effort basis.
By purchasing TVS iQube, Customer acknowledges and consent to the collection and utilization of vehicle telematics data, including but not limited to battery performance, number of kilometers the vehicle has run, for the use of connected features for TVS Connect app by the Customer.
The information relating to the vehicle collected by TVSM does not include any personal information provided by you, shall be deemed to be TVSM proprietary information and shall be solely owned by TVSM. TVSM may use such information in the manner deems fit and necessary.
TURN BY TURN NAVIGATION
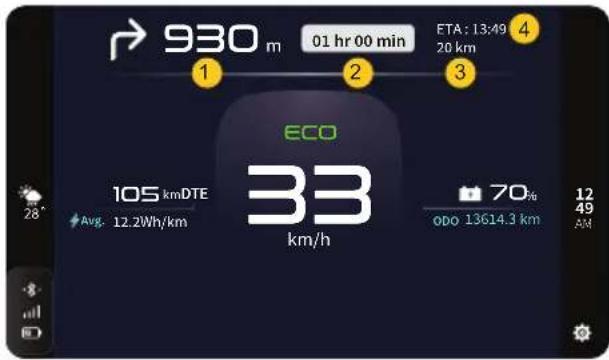
Instrument cluster displays navigation instructions of your desired destination while connected with your smart phone app, just connect and get turn by turn navigation directly on your display. It indicates the following details,
- Navigation instructions
- Travel duration
- Distance left
- Estimated time of arrival
INCOMING CALL ALERT
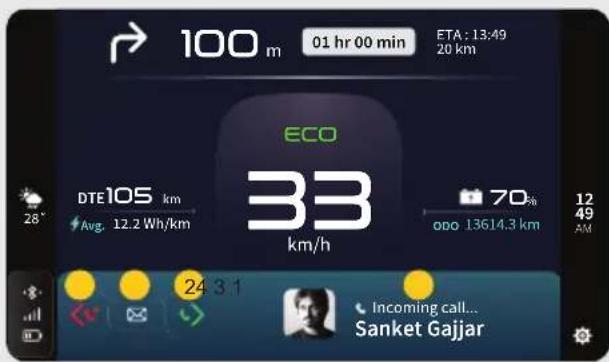
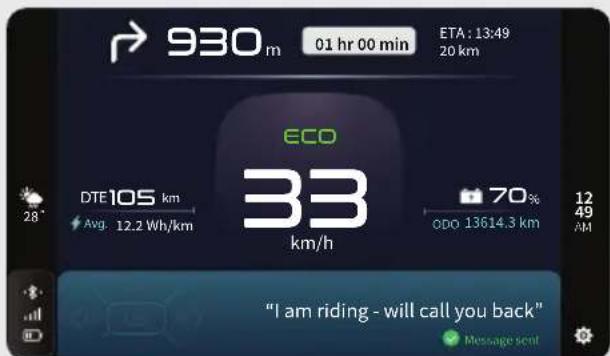
Once mobile app is connected with vehicle instrument cluster, incoming call options (1) will be shown in instrument cluster while you are riding the vehicle as shown above.
If it's an important call, you can pull over safely and attend to it. If it's not, then just keep riding.
- Touch or push the HMI switch towards right (2) to accept the call.
- Touch or Push the HMI switch towards centre (3) to send a message.
- Touch or push the HMI switch towards left (4) to reject the call.
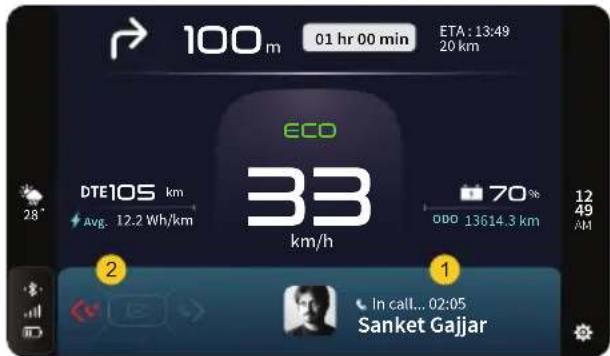
- Call duration (1) will be shown in the instrument cluster.
- If you receive a second call, Touch or push the HMI switch towards Left (2) to reject the second call.
- Calls can be rejected by predefined messages. That can be navigated by pressing HMI switch upwards or downwards and to send, press the centre button.
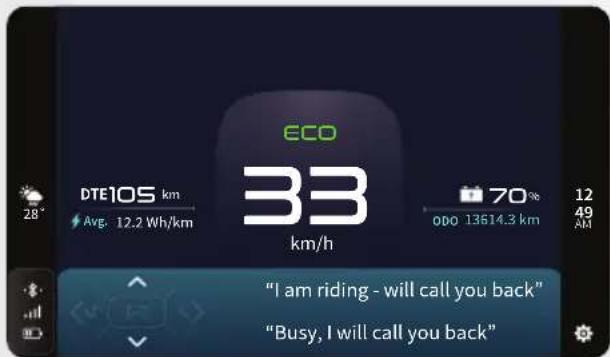
Note
Touch display can be used only when the vehicle is static.
MESSAGE ALERT
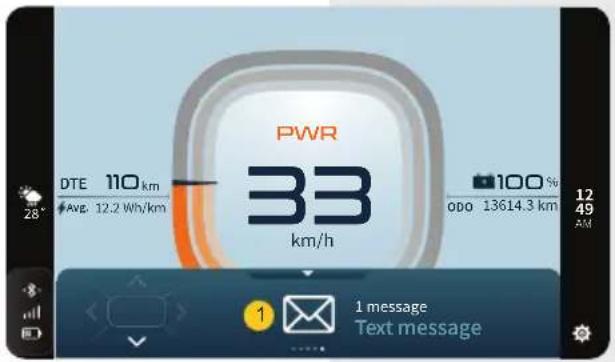
Once the smart phone is connected with the vehicle's instrument cluster, incoming messages (1) notification will be displayed on cluster as shown above.
MUSIC CONTROLS#
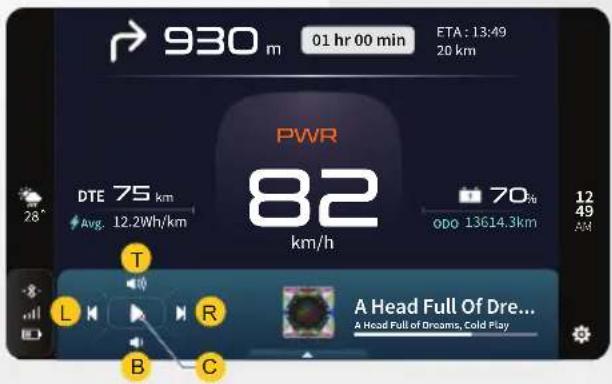
Music playing in the connected smart phone will be displayed in the instrument cluster and it can be controlled using HMI switch.
To select the song or adjust the volume, the HMI switch is used in the following manner:
- Top (T) – To Increase volume
- Bottom (B) – To Decrease volume
- Centre (C) – To Pause / Play
- Left (L) – To Play previous song
• Right (R)– To Play next song
SOCIAL MEDIA NOTIFICATIONS
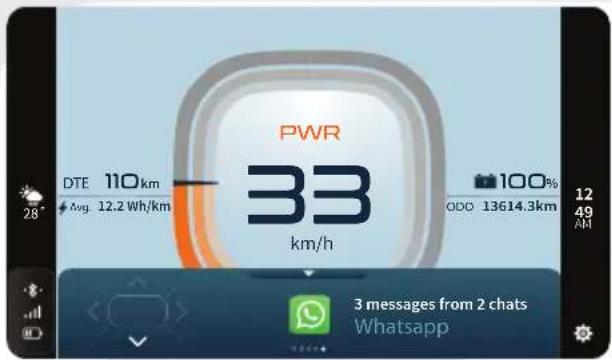
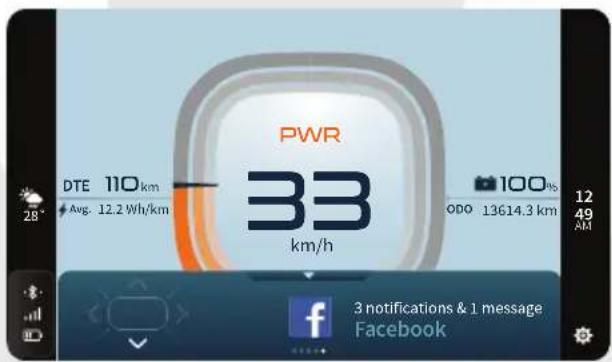
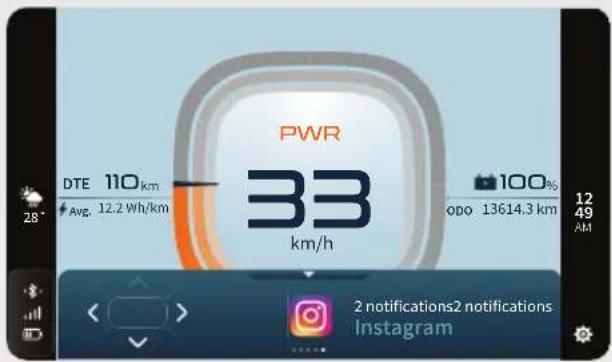
The screen displays only the number of messages, conversations or notifications of social media.
DIGI DOCUMENTS
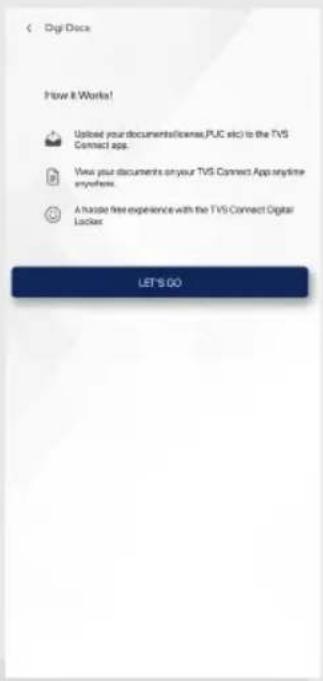
In Digi Documents, you can upload up to three digital documents. These documents can be viewed in the instrument cluster. Refer page no. 41 to view documents in the instrument cluster.
Open TVS Connect app.
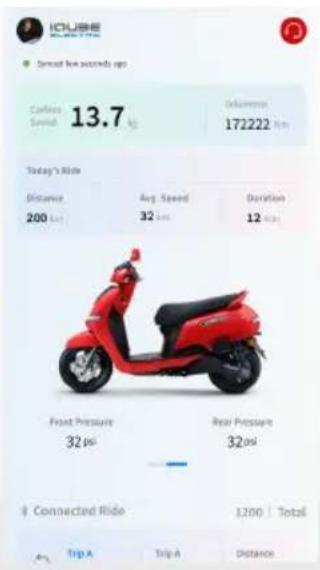
Click your profile picture.Digi docs is available in the drop down list and a screen on how it works will appear. Read it and click Lets Go.
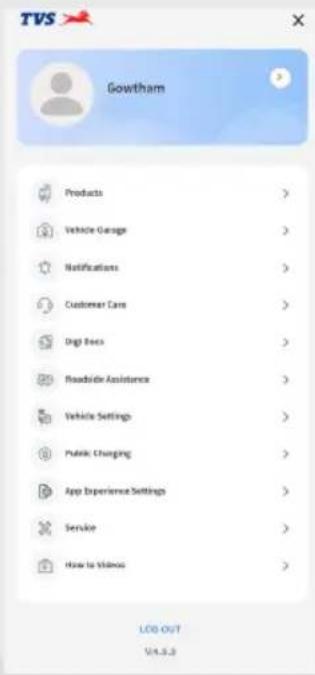
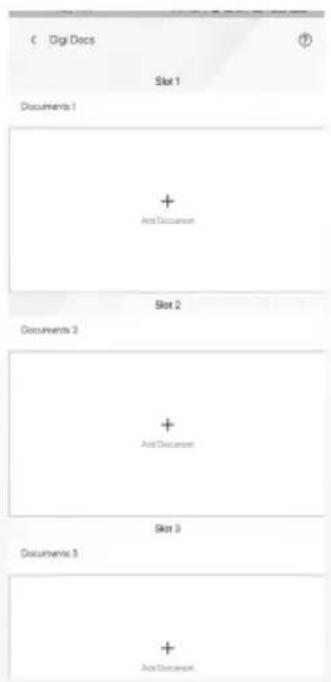
You upload up to three documents in jpg format, click +Add Document
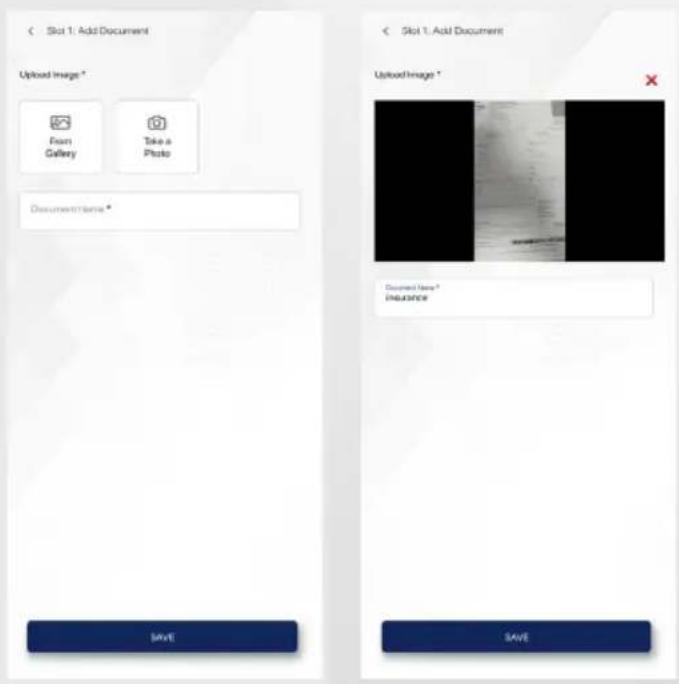
You can upload images from the gallery or Take a photo directly from your smart phone and name the document, then press Save.
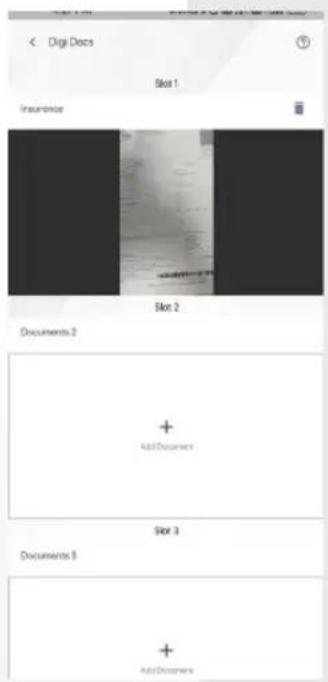
Once the document is uploaded to the TVS Connect app, you can select the document and click Sync docs to Vehicle.
The Syncing can be also in instrument cluster in Select Settings -> Documents-> Documents 1
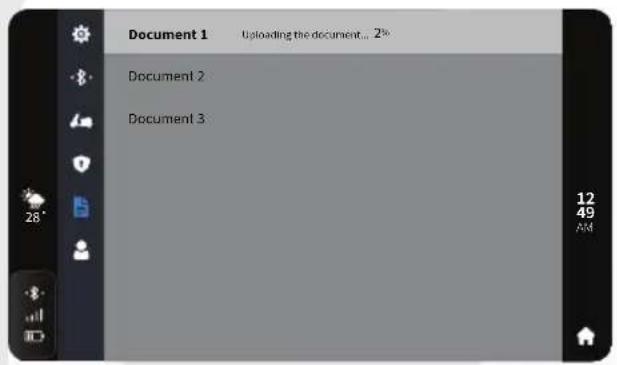
On clicking Sync docs to Vehicle, a syncing screen appears and the documents start uploading to your vehicle.
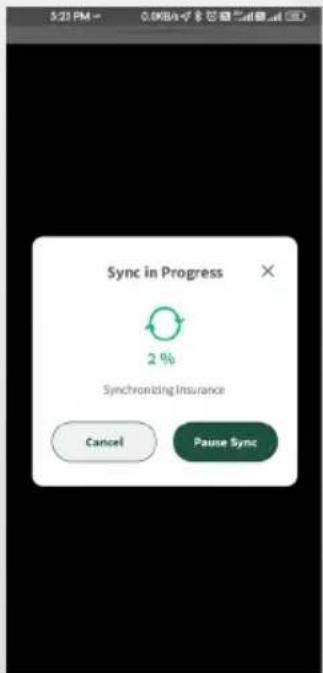
Note
Syncing from the TVS Connect app to the vehicle happens only when the vehicle is in ON condition.
SERVICE DUE NOTIFICATION
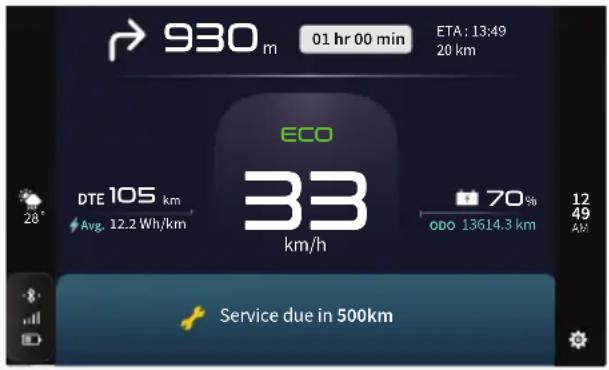
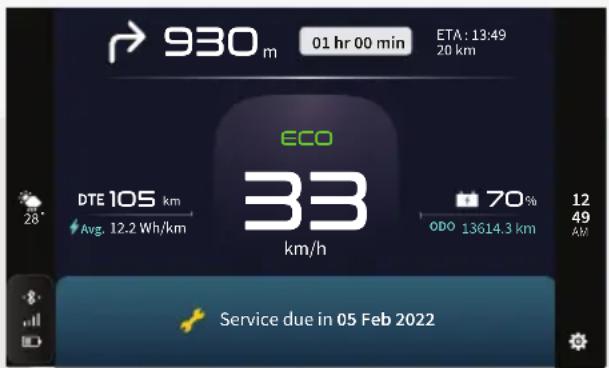
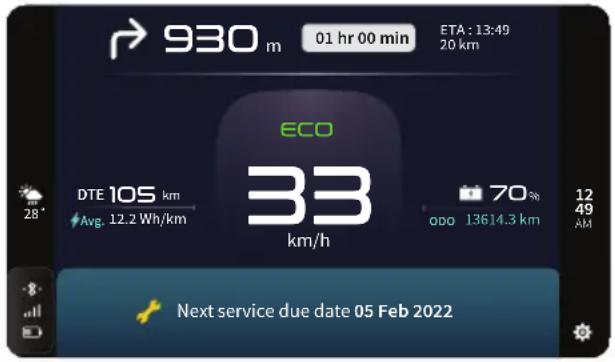
If the service is due, whenever the vehicle is turned on the service due notification will pop up for few seconds with any of the following messages based on the due date.
Service due in 500km
Service due in 05 Feb 2023
Service due in 04 days
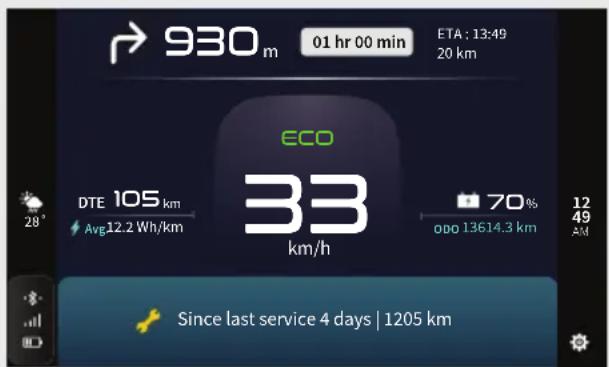
Get the vehicle serviced at TVS Motor Company Authorised Main Dealer.
Note
Next service due date and days will only appear if programmed during previous service.
Also the next service due will also will be displayed.
VOICE ASSIST\*
Introducing 'Hey TVS' voice assist feature. This will enable iQube customers to speak out certain commands after invoking with 'Hey TVS' and execute tasks handsfree.
Voice assist can also be invoked by the following methods
- By long centre push of HMI switch. (This will work only when vehicle is connected via Bluetooth to TVS Connect application and mobile is not in power saving mode).
- By pressing the voice assist icon in the app live dashboard. This will work irrespective of vehicle is 'ON/OFF'.

Note
Voice assist usage and activation for the first time would require download of a large data file.
Location, Microphone, Files & Media Storage, Accessories, Call & Bluetooth, or any other requested permissions need to be granted with ALLOW ALL THE TIME selected, for proper functioning of all TVS connect app and voice assist functions.
Voice assist will work with screen lock condition /app background condition.
Use wired / wireless headphone for listening and talking. Voice feedback will work only if a wired / wireless headphone is connected.
Option to enable / disable voice assistant and voice feedback is available in App settings.
After invoking voice assist, "Hello, How can i help you?" will appear on the application screen and a, speak now, will be heard from the headset.
This is when we have to start speaking / providing the command.
The following are the list of intents recognized by voice assist.
| S. No. | Domain Function | Voice Cloud Server Response | Example Commands / Utterances | |
| 1 | Navigation Search by Place Name | Place name spoken by user If Confirmation is provided, Latitude and longitude shall be returned for the place name | Hey TVS, Take me to Bangalore | |
| Navigate me to Bangalore | ||||
| Take me to forum mall in whitefield | ||||
| Start navigation to --- | ||||
| 2 Navigation Nearby POI | Nearby POI: Hotels, ATM, TVSM service center, Hospital, Petrol bunk | Hey TVS, Find an ATM nearby | ||
| Take me to nearest petrol pump | ||||
| Locate a restraunt nearby | ||||
| I'm hungry / i'm feeling hungry | ||||
| find a place to hang out | ||||
| Navigate to nearest charging station | ||||
| Is there any hospital here? | ||||
| 3 Navigation | Location awareness | Request detected: Current location TTS Message with location | Hey TVS, How long till we reach the destination | |
| What is the EDR/ETA | ||||
| how much distance is left | ||||
| By when can/will we reach the "destination"/ office, "place name"? | ||||
| How much distance is remaining to reach office | ||||
| How much time remaining to reach destination | ||||
| Will we reach destination on time | ||||
| 4 | Navigation Resume/Pause/ Stop Navigation | Request detected: Resume/ Pause/Stop Navigation | Hey TVS, pause/resume/stop navigation | |
| Don't show navigation | ||||
| Stop showing navigation | ||||
| Resume navigation after sometime | ||||
| 5 Navigation Voice Alerts | Mute Navigation Alerts/ Turn by Turn instruction / audio alerts | "Hey TVS, Mute Navigation Voice Alerts | ||
| I don't want to hear TBT instructions/navigation alerts | ||||
| Navigation alerts are disturbing | ||||
| turn off navigation alert output | ||||
| shut down the navigation alerts | ||||
| S. No. | Domain Function | Voice Cloud Server Response | Example Commands / Utterances | |
| 6 C&C | Last parked location | Request detected: Last parked location | Hey TVS, Where are you | |
| What is your location | ||||
| Where is my vehicle | ||||
| Find my bike/vehicle | ||||
| I can't find my bike | ||||
| Please help me find my vehicle | ||||
| 7 C&C | Brightness control Speedometer | Increase / decrease brightness commands, level of change or value/min/max | Hey TVS, increase/decrease brightness | |
| Increase/decrease brightness to max/min | ||||
| Increase/ decrease cluster brightness | ||||
| Increase/decrease screen brightness | ||||
| I can't see display? | ||||
| Can you please increase brightness | ||||
| 8 C&C | Speedometer Control | Reset command- Trip A mode / Trip B mode Reset - Lap timer Mode change - Trip A, Trip B, | Hey TVS, Reset Trip. | |
| Reset Trip A/B | ||||
| Change to trip A/B | ||||
| Record this ride in Trip A/Trip B | ||||
| 9 C&C | Show Distance to Empty/Range | Request detected: Show DTE | Hey TVS, how far can I travel | |
| Show Range | ||||
| Show DTE | ||||
| Can I travel xx Km | ||||
| When will my vehicle stop?" | ||||
| 10 C&C | Auto Brightness | Enable/ Disable - Auto brightness | Hey TVS, enable auto brightness | |
| Change display settings to auto brightness | ||||
| 11 C&C | Vehicle Data | Show Next Service Due, TPMS, Trip , Statistics, Lap | Hey TVS, Show my next service due. | |
| When is my next service due | ||||
| When do I need to service my vehicle | ||||
| 12 C&C | Top/Average Speed | Speed | Hey TVS, What is my top speed | |
| How fast have I ever went? | ||||
| Do my vehicle remain in safe speed limits | ||||
| Has my vehicle crossed overspeed threshold | ||||
| 13 TTS | TTS Alerts for harsh driving | Harsh braking / acceleration alert with date and time | TTS Alerts for harsh drive with location , tag and timing | |
| 14 Greeting | Announce first time connection first time in a day | TTS for "Vehicle Connected" or TTS for "Wish for Birthday/ Anniversary if set" | TTS Message | |
| 15 Greeting Greeting | TTS for "Hello Rider name" | TTS Message | ||
| S. No. | Domain Function | Voice Cloud Server Response | Example Commands / Utterances | |
| 16 Cal | I/SMS | Incoming call notify | TTS for Incoming call notify with name | TTS Message |
| 17 Cal | I/SMS | Make call single match | Matched Contact name | Hey TVS, Call Bala |
| Dial Bala | ||||
| Make a call to Bala | ||||
| Give a call to Bala | ||||
| Can u pls call Bala | ||||
| 18 Cal | I/SMS | Accept / Reject Call | Accepting / Rejecting call while phone ringing | Hey TVS, Reject Call |
| Decline/ Decline call | ||||
| 19 Cal | I/SMS | Make call multiple match | Multiple matched contacts found with contact name | Hey TVS, Call Bala |
| Dial Bala | ||||
| Make a call to Bala | ||||
| Can u pls call Bala | ||||
| 20 Cal | I/SMS Call Log | Request detected: Last caller / missed call count | Hey TVS, Who is my last caller | |
| Whom did I call last | ||||
| Whom did I talk to last | ||||
| What is my call history | ||||
| Whom did I speak to recently | ||||
| Who called me last | ||||
| Who is in the top list my recents | ||||
| 21 Cal | I/SMS Dial a Number Dial phone number | Hey TVS, Call 10 digit number | ||
| Dial “” a number“” | ||||
| Make a call to ———————— | ||||
| Give a call to ———————— | ||||
| I would like to speak to ———————— | ||||
| 22 Cal | I/SMS | Emergency Contact -SOS | Call Specific Keyword / Emergency | Hey TVS, Call SOS |
| SOS | ||||
| Call emergency services | ||||
| I need an emergency support | ||||
| Call an emergency support/help | ||||
| 23 Cal | I/SMS TVS Service Call TVS Service | Hey TVS, Call TVS Service | ||
| 24 C&C DND Do not disturb mode | Hey TVS, Enable / Disable Do Not | |||
| Disturb Mode | ||||
| Enable/disable DND mode | ||||
| please don’t disturb me | ||||
| I don’t want to be disturbed with notifications | ||||
| S. No. | Domain Function | Voice Cloud Server Response | Example Commands / Utterances | |
| 25 | Phone Settings | Announce low battery | TTS for “Phone battery low, please connect to mobile charger” | TTS Message |
| 27 | Phone Settings | Announce poor network | TTS for “Poor network” TTS | Message |
| 28 | Media Control | Playback control | Hey TVS, Play next/previous song | |
| Change to next/previous song | ||||
| Next/previous song please | ||||
| Move/previous to next song | ||||
| Pause/play/resume/stop playing/start playing music/song | ||||
| 29 | Media Control | Volume control | Increase/ decrease / max/min volume | Hey TVS, increase/decrease/reduce volume |
| Increase decrease volume to max/min | ||||
| 30 Weather | Weather forecast specific | Climatic condition, temperature as per specified location, time | "Hey TVS, will it rain now/Is there any chance of rain today | |
| Should I take an umbrella/raincoat outside | ||||
| When will it stop raining | ||||
| How is the weather | ||||
| What's the climate outside" | ||||
| 31 Weather | Weather related queries non specific | Climatic condition, temperature at current location, current time | Hey TVS, Give me weather updates for Sunday/any day or time | |
| How is the weather | ||||
| How/what's the climate | ||||
| How the weather is going to be Sunday/tomorrow/today/time | ||||
| 32 Weather Weather | Report Weather with location | Hey TVS, Give me weather updates of Bangaluru for Sunday/any day or time | ||
| How is the weather in Bengaluru | ||||
| How/what's the climate in specified location | ||||
| How the weather is going to be Sunday/tomorrow/today/time | ||||
| Should I travel to Bangalore tomorrow? | ||||
| 33 WuW SOS SOS Command detected | SOS (SOS will work as a wake up word) | |||
| 34 | Vehicle Health & Prognostics | Announce Low battery | TTS for “Low battery, pls charge ur vehicle” | TTS Message |
| 35 | Vehicle Health & Prognostics | Announce service | TTS for “The next service is in **** kms” | TTS Message |
| 36 C&C | Geofence Create Geofence | Hey TVS, Create a geofence of 1 km | ||
| Create a geofence/bundary ““name”” of ““radius”” | ||||
| Create a circular geofenceboundary | ||||
| Create a circular geofence/boundary of ““radius”” | ||||
| 37 C&C | Battery Query Show the battery SOC | Hey TVS, What is the battery SOC | ||
| What is my battery level | ||||
| How much is my battery/vehicle/ bike/iQube charged? | ||||
| Can I take my vehicle out? | ||||
| 38 C&C | Charging Status | Show whether the vehicle is getting charged or not | Hey TVS, What is my charging status? | |
| Is my vehicle charging | ||||
| Is my vehicle kept on charge? | ||||
| 39 C&C | Time to full charge | Tell the time required to full charge the vehicle | Hey TVS, How much time to charge full | |
| When will my vehicle be full charged | ||||
| How much time will it take to charge my vehicle fully | ||||
| 40 C&C | Odometer Value | Show the current odometer value | Hey TVS, What is my odometer value | |
| How much distance did we cover? | ||||
| What is the total distance covered by my vehicle? | ||||
| 41 C&C | Overspeed Threshold Query | Set/Show the overspeed threshold saved in app | Hey TVS, What is my overspped threshold? | |
| What is the safe speed limit set? | ||||
| 42 C&C | Incognito status query | Incognito ON/OFF status | "Hey TVS, What is my incognito status | |
| Can I know my vehicle's location | ||||
| 43 | Vehicle Control | Hey TVS, Connect to the vehicle | Connect to the vehicle | |
| Connect me to the vehicle | ||||
| Connect my vehicle | ||||
| Connect to iQube | ||||
| 44 | Vehicle Health & Prognostics | Tyre pressure | What is the tyre pressure | |
| Is the vehicle tyre pressure in safe limits | ||||
| 45 | Media Control | Hey TVS, mute / unmute volume | Mute/unmute volume/sound | |
| Reduce volume to 0 | ||||
| 46 Call/SMS | Hey TVS, Call Emergency services | Hey TVS, Call SOS | ||
| SOS | ||||
| Call emergency services | ||||
| I need an emergency support | ||||
| Call an emergency support/help | ||||
| 47 Call/SMS | Hey TVS, Enable Auto SMS | Hey TVS, Enable Auto SMS | ||
| 48 Call/SMS | Hey TVS, Disable Auto SMS | Hey TVS, Disable Auto SMS | ||
| 49 TTS TTS for end ride TTS Message | ||||
| 50 TTS | TTS for enter/exit Geofence | TTS Message | ||
Note
The list of commands and intent will be updated periodically. Please refer to the command list mentioned in the mobile app to stay updated.
Things to do while using voice assistant:
- We recommend to use ANC (Active Noise Canceling) Bluetooth devices for better performance.
- Ensure Microphone is kept near to your mouth while giving out commands.
- Please ensure that it is not exposed to outside environmental noise such as wind noise, other vehicles' noise etc.
- We recommend you to go through the sample command list before trying your intent.
- Kindly refer to the voice feedback of the detected place name when you provide voice command for navigation.
- Make sure you have the application running when voice assist is invoked through vehicle switch.
Things not to do while using voice assistant:
- We recommend you not to use the method of invoking voice assist through mobile App while riding.
- Please do not use voice assist functionality during heavy traffic condition.
Terms & Conditions
- SmartXconnect feature is now enhanced with Voice Assistance capability. This will enable the user to control certain characteristics of the vehicle in a safe manner.
- Customers can use the voice commands listed as part of the voice assistance feature to improve their riding experience.
- SmartXconnect Voice Assistance is intended to minimize the use of Mobile phones while riding, in turn providing an exciting experience with the Bluetooth enabled system. We recommend users to take caution when providing voice commands.
- SmartXconnect Voice Assistance can be experienced with the help of following entities - TVS Connect App, TVS iQube and a suitable Bluetooth accessory having a microphone and speaker. Users are recommended to wear certified helmets always while riding.
• In cases where customer uses a Bluetooth neckband or headset, it is recommended to always wear helmet. - The Bluetooth® word mark and logos are registered trademarks owned by Bluetooth SIG, Inc., and any use of such marks by TVS Motor Company Limited., is under license.
- Customers must always be cautious of the surroundings when using the SmartXconnect Voice Assist feature, especially while crossing intersections, in traffic, etc. Customers must always observe the roadway, signs, and signals carefully. Lack of attention can cause serious injury or loss of life. TVSM is not liable for any such mishaps.
- Customers must always obey traffic laws while riding. TVSM is not liable for any penalty caused due to user's lack of caution in obeying traffic laws
- Costs of network communication and communication equipment necessary for the use of SmartXconnect voice assist feature shall be borne by the user himself/herself.
- Some smartphones may not be compatible with the SmartXconnect Voice Assistance feature. We shall not be liable if there is delayed response from the voice assistance feature due to poor internet connection or the phone's performance limitations.
- Use of mobile phones while riding is not safe and is prohibited as per Motor Vehicle law and rules as framed by central / state governments. Hence, Customers should not use the mobile phone while riding. We shall not be liable for any penalties, damages for any violation or trouble in the use of smartphone while riding.
- Bluetooth hands free devices are not included as part of the package
- SmartXconnect Voice assist feature also provides display information in the cluster. Users are advised to verify the voice guidance and information in the meter provided by the system carefully. If you are unsure, proceed with caution. Always use your own good judgement, and obey traffic laws while riding
- Changes in operating systems, hardware, software, and other technology integral to providing SmartXconnect Voice assistance feature, as well as new or revised governmental regulations, may result in a decrease or cessation of SmartXconnect Voice assist functionality and services. TVSM cannot and does not provide any warranty or guarantee of future SmartXconnect Voice assist performance or functionality.
Alexa voice assist
You can use Amazon alexa to know the status of your vehicle like location, battery status etc.
To activate TVS iQube skill in your alexa app, follow the below steps. Download the alexa app via play store for android or app store for iphone.
- Open alexa app.

- Click on Your smart home skills.
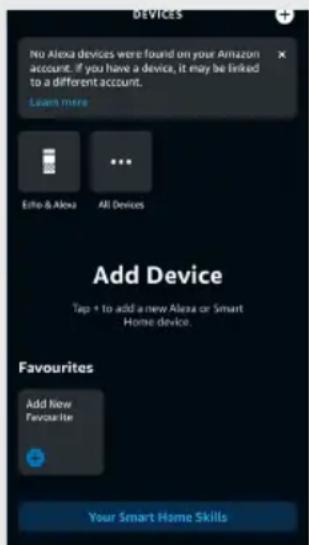
• Search for TVS iQube.
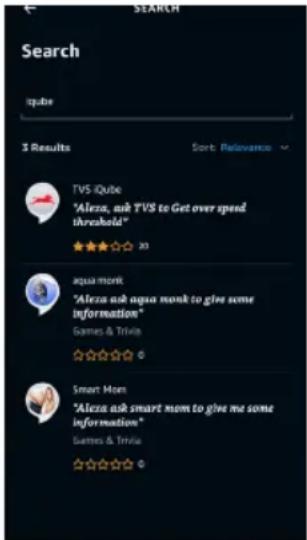
- Click on launch.
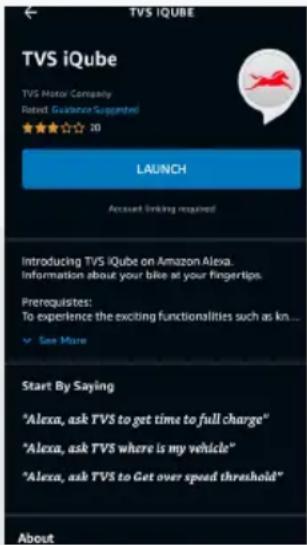
- Enter the registered mobile number and enter OTP to verify.
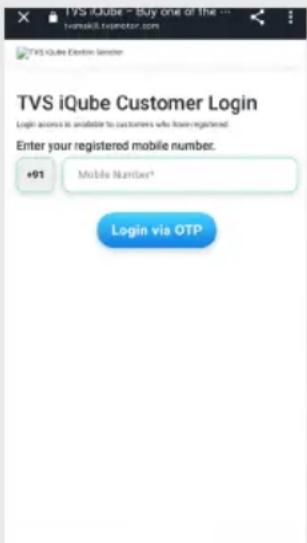
| S. No. | Command Utterances | |
| 1 | Battery SOC | What is the battery level? |
| 2 | Last updated time stamp When did I ride last? | |
| 3 | Location | Where are you? |
| Where is my vehicle? | ||
| What is your/my location? | ||
| 4 | Battery status What is the charging status | |
| 5 | Incognito mode Status What's my incognito status? | |
| 6 | Get Top speed | What is/was the top speed of my vehicle? |
| What was my top speed in the last ride? | ||
| 7 | Get Average Speed What was my average speed? | |
| 8 | Total Drive Time | How long did I ride? |
| How long was our last ride? | ||
| 9 | Get Last Charged Date When was my vehicle last charged? | |
| 10 | Get Energy Consumed | How much energy was consumed in the last charge |
| How much energy was consumed by bike in the last charge? | ||
| How much energy was consumed by bike? | ||
| 11 | Get Last Charge Duration | How long did I charge my vehicle? |
| How long did it take to charge? | ||
| What was the charging duration last time? | ||
| 12 | Geofence list - to be implemented | What are geofences created? |
| What are my vehicle boundaries?/ what are the boundaries? | ||
| How many geofences are available for my vehicle? | ||
| Is there any geofence created? | ||
| Are there any boundaries of my vehicle? | ||
| 13 | Create Geofence Create Geofence. | |
| 14 | Rename Geofence Rename Geofence | |
| 15 | Delete Geofence Delete Geofence | |
| 16 | Range - to be implemented | Show Range |
| Show DTE/ What is the DTE? | ||
| How far can I travel with remaining charge | ||
| How far can I go? / How far can I travel? | ||
| What is the distance I can travel? | ||
| Can I go "X" km with remaining charge? | ||
| What is the range of my vehicle? | ||
| 17 | TPMS Data - to be implemented | What is the tyre pressure |
| is the tyre pressure of my vehicle in safe limits? | ||
| What is the tyre pressure of the vehicle? | ||
| Do I need to refill my vehicle tyre? / Do I need to refill my tyre? | ||
| Is tyre pressure Ok / in normal condition? | ||
| 18 | Overspeed threshold - to be implemented | What is the Overspeed threshold set? |
| What is the Overspeed threshold? | ||
| What are my/the safe drive limits? | ||
| How fast can I go? | ||
| 19 | Call TVS service - to be implemented | Call TVS Service. |
| Can you call TVS Service? | ||
| I need TVS support. | ||
| 20 | Time to charge full - to be implemented | How much time will it take to charge full? |
| Is my vehicle fully charged? | ||
| 21 | Odometer value - to be implemented | What is the odometer value? |
| How much total distance travelled by the vehicle? | ||
| What is the total distance travelled? | ||
DRIVING THE VEHICLE
Switch on the vehicle by turning the key (8) clockwise.
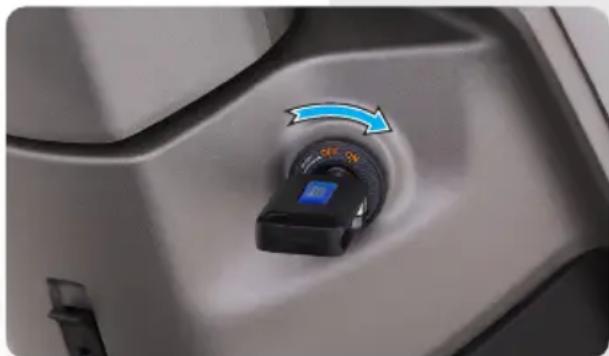
natural_image
Close-up of a car's front-mounted control knob with blue arrow indicating rotation (no text or symbols visible)The instrument cluster will display TVSM logo as shown below, welcome message along with name and profile picture for few seconds (if configured through app) and it will enter into idle mode.
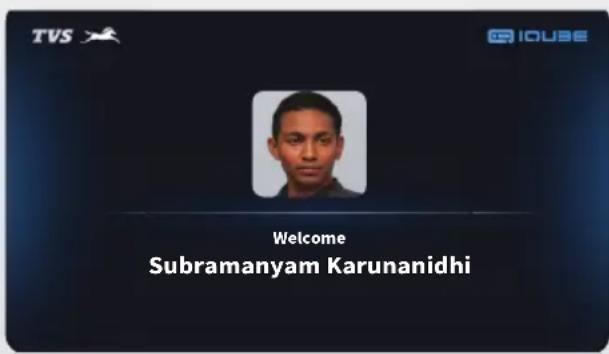
To activate the vehicle-
Press mode switch (7) and either one of the brake switch [(4) / (14)] simultaneously until you hear a beep sound. Once the vehicle is activated, it will enter into economy mode-
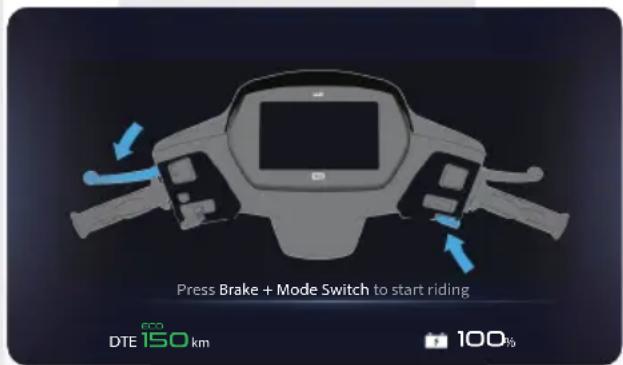
Give throttle to start the vehicle in economy mode or press mode switch again to drive in power mode.
ECONOMY MODE
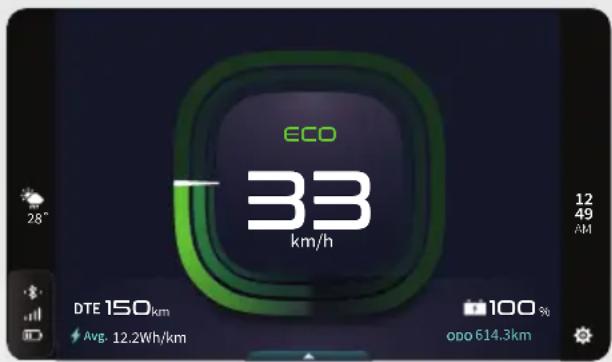
While in power mode, press mode switch (7) to come in economy mode.
In this mode the vehicle speed reaches up to 45 km/h.
We can attain more range as compared to power mode.
POWER MODE
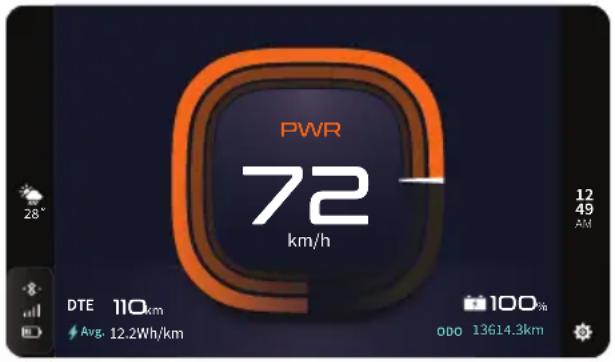
While in economy mode, press mode switch (7) to come in power mode.
In this mode the vehicle speed reaches up to 78 km/h.
This mode will provide better acceleration than economy mode.

Note
User can change the mode from economy to power, while the vehicle is running by pressing mode switch (not applicable during re-generation mode).

Caution
Park assist will be activated only when vehicle speed is 0 km/h.
PARKING THE VEHICLE
User can select Park assistance while parking, by pressing park assist switch (6) & either of the brake switch [(4) / (14)] simultaneously.
The cluster will enter into park assist forward mode as shown, apply throttle to move.
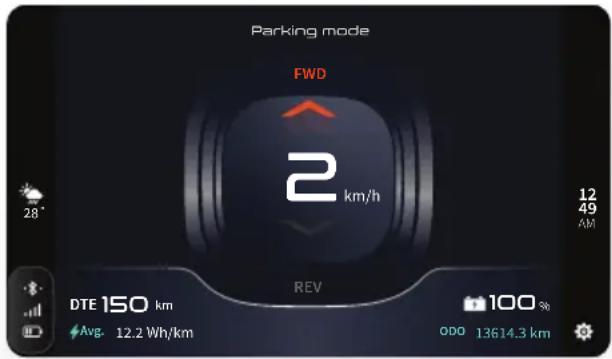
Press park assist switch once again, for shifting to reverse mode as shown, apply throttle to move.
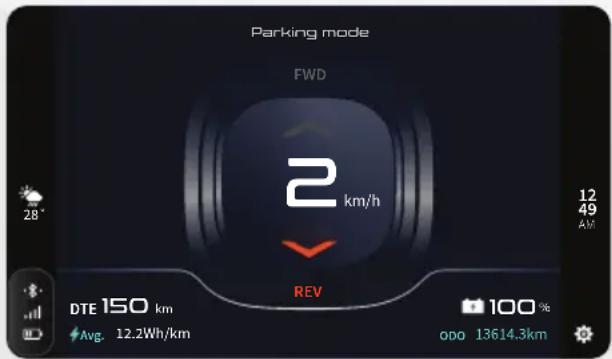
During forward movement the speed is limited to 10 km/h and during reverse speed is limited to 3 km/h.
CHARGING THE VEHICLE CHARGER SOCKET
The Phase, Neutral & Earth terminals should be placed as per the image.
Use the Tester to find out the Phase line.

Caution
Any electrical work should be performed by authorized electrician only. Failure to do so might result in sever injury or risk to life.
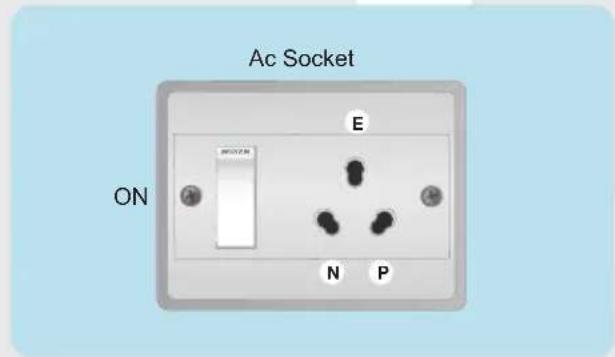
Multimeter
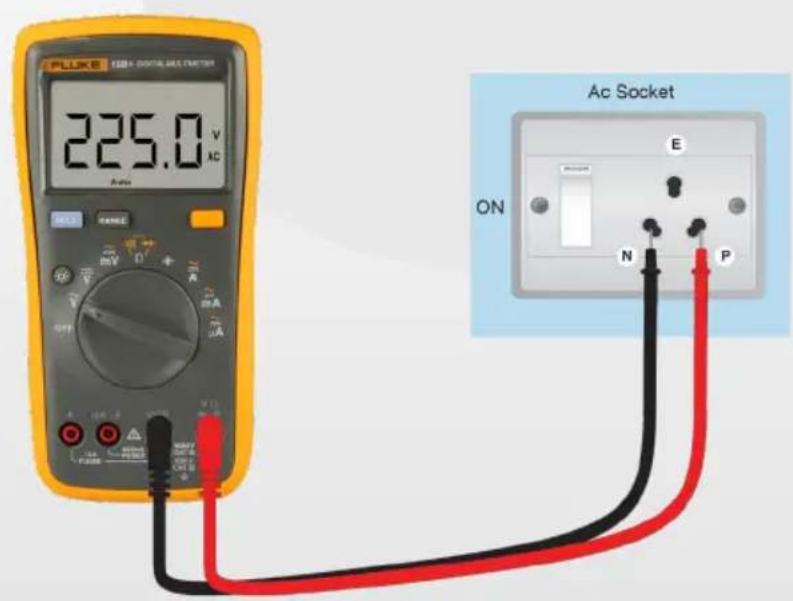
As shown in this picture, you can check the input voltage of the available socket.
Normally the reading would be 230 ± 5V .

Note
- Multimeter selector should be as shown in the picture for measuring AC voltage of domestic power socket.
- The selector position will vary in each multimeter brand.
- Red & Black couplers need to be connected as shown in the picture with Multimeter as well as the domestic 5A power socket.

Caution
- You should adhere to the electric tester usage guidelines before checking the power supply.
- Input AC voltage should be within the range of 220 to 240V.
- Need to ensure proper earth connection in the AC domestic power socket.
- Do not use extension cable or box to charge the vehicle for safety purpose.
- Plug the charger in Single phase AC domestic socket only.
• Proper installation of power socket/board along with separate MCB and fuse should be ensured. - Cables utilized for socket connection, should be free of tapping and cuts.
- Power socket cables should be properly routed without any hanging cables and must be enclosed in a conduit.
- Vehicle and charger positioning should be in such a way that, during charging the cables are not overly stretched and connectors are properly locked in sockets.
- The charging location should be separate and away from other vehicles or combustible materials and in well-ventilated areas.
- Unattended charging of the vehicles should be avoided.
- Charger should be placed away from the vehicle above the ground level while charging.
• The charger fan and side vents should not be obstructed, and fan should be upward facing while charging.
VEHICLE CHARGING
Charger
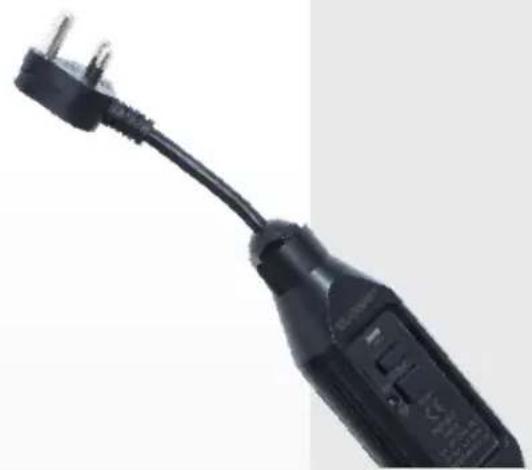
natural_image
Close-up of a black electrical plug with terminal connectors (no visible text or symbols)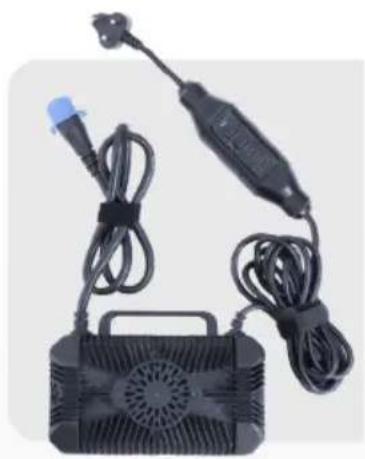
natural_image
Electric shock absorber with attached power strip and control box (no visible text or symbols)AC 3 Pin 5A plug with Residual Current Device (RCD).
CONNECTING FOR CHARGING*
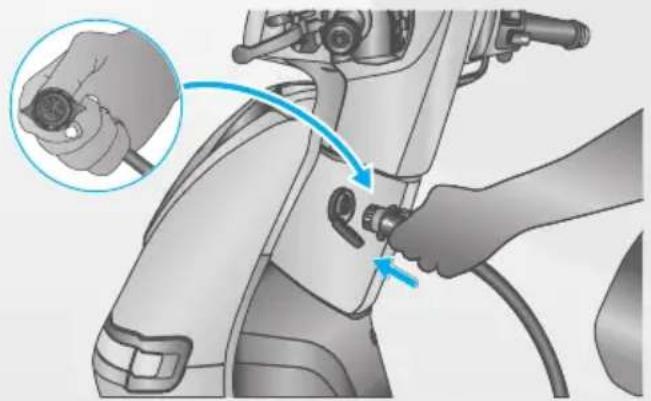
natural_image
Illustration of a hand adjusting a car's seatbelt with a blue arrow indicating the adjustment (no text or symbols present)Plug in cable to vehicle charging socket
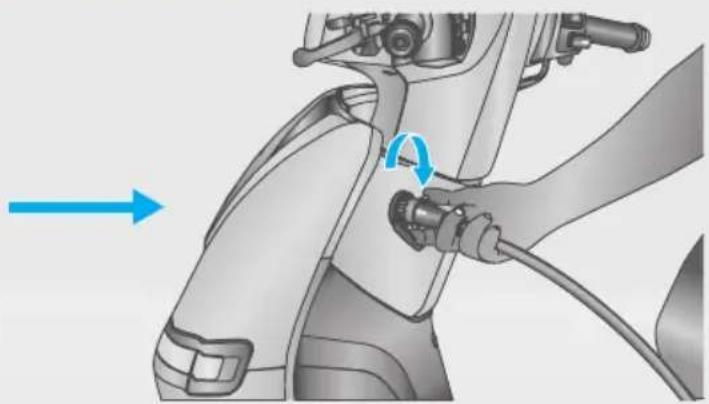
natural_image
Mechanical assembly diagram showing a hand holding a plug and cable, with a blue arrow indicating direction (no text or symbols present)Rotate clock wise
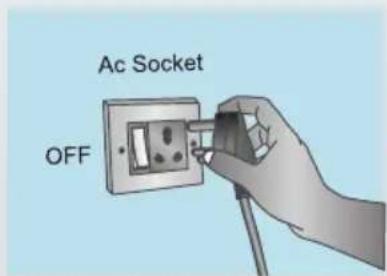
Plug in cable AC end to AC socket

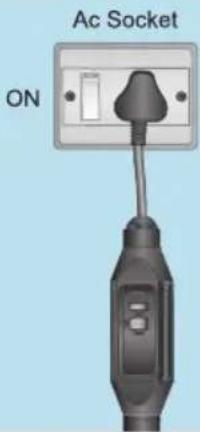
RCD Power LED will glow once the switch in AC Domestic socket is turned ON.
i Note
If RCD LED indication is not observed while power is available in the domestic AC socket, please press 'Reset' button and the LED would glow.
DISCONNECTING CHARGER
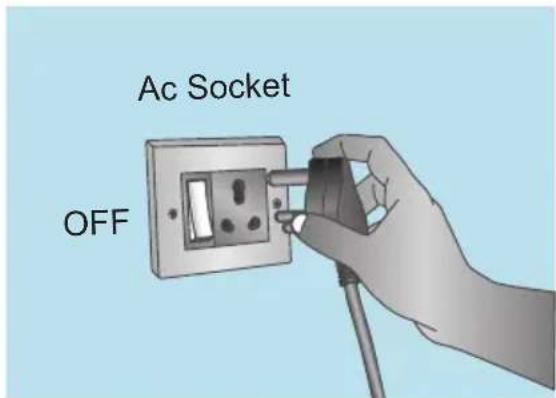
Turn off and take out cable AC end from AC socket
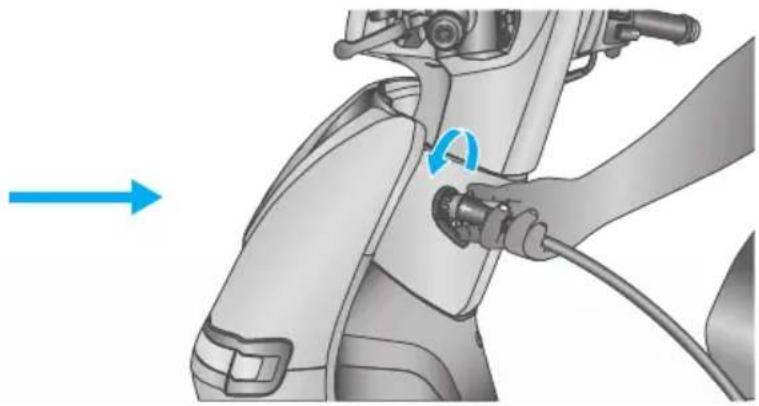
natural_image
Mechanical assembly diagram showing a hand holding a cable with a blue circular arrow indicating rotation (no text or symbols present)Rotate counter clock wise to plug out cable other end from vehicle charging socket & close vehicle charging socket cap
CHARGER DO's & DON'Ts
- Never use the charger with damaged housing or cable.
- Never modify a charger or open its housing.
- Connect the charger to a regular outlet only.
- Never carry the charger by its electrical cable or pull at the cable.
- For charging always connect the charger input plug into the power socket and charger connected to the vehicle before switching on the power supply.
- For disconnection of the charger, remove it through the plug and not by pulling the cable.
• Use original TVSM recommended chargers only. - Don't use the charger in the rooms and areas with high intensity of electromagnetic disturbances (Ex: Surgical equipment room, RF shielded room etc.).
- Disconnect the charger before cleaning the charger. Do not leave the connector on the ground to avoid damage through dust and water ingress.
- Don't use chemical cleaning agents.
• Use dry cloth only to clean the surface. - Never spray or immerse the charger in water or any liquid.
• The charger is maintenance free. In case of any faults, kindly contact the nearest dealer. - The charger should be stored in clean, dry environment only. It should not be stored in corrosive, or with other fluids which might be harmful to it.
Caution
Sole responsibility of adhering to safe charging guidelines lies with the user. Any consequences due to non-adherence to guidelines or external factors have to be bourne by user.
MAINTENANCE SCHEDULE
The maintenance schedule indicates the intervals between periodic services. At the end of each interval, be sure to inspect, check, replace, adjust, lubricate and service as instructed. If the maintenance is not done periodically, it will result in rapid wear and severe damage to the vehicle. If the vehicle is used under high stress conditions such as continuous full throttle operation or is operated in dusty area, certain jobs should be performed more often to ensure reliability of the vehicle. Steering components, suspension and wheel components etc., are key items and require very special and careful servicing.
TVS Motor Company Limited strongly recommends that the jobs as per the maintenance schedule be performed by your TVS Motor Company Authorised Main Dealer.
Periodic inspections may reveal one or more parts that may need replacement. Whenever replacing parts of TVS iQube Electric ST, it is recommended that you use only the TVS Motor Company Genuine parts.

Caution
Proper maintenance is mandatory for making certain that your vehicle is reliable and gives optimum performance at all times. Make sure that the periodic maintenance is performed thoroughly in accordance with the instructions given in this owner's manual.
| "PAY SERVICE INTERVALS (months or km which ever occurs earlier)" | SERVICE 1st 2nd 3rd 4th 5th | |||||
| LIST OF OPERATIONS SCHEDULE | MONTHS 6 | 12 24 36 | 48 | |||
| km x 1000 4 | 8 12 16 | 20 | ||||
| HBS cable free play | I, L & A | I, L & A | I, L & A | I, L & A | I, L & A | |
| Steering operation | I & A | I & A | I & A | I & A | I & A | |
| Front and rear axle nut tightness | I & A | I & A | I & A | I & A | I & A | |
| Swing arm bolt tightness | I & A | I & A | I & A | I & A | I & A | |
| Centre and side stand pivot (optional) | - | C, L & A | - | C, L & A | - | |
| All electrical indication and cluster functions | I | I | I | I | I | |
| Side stand switch mounting bolt tightness | I & A | I & A | I & A | I & A | I & A | |
| Tyre pressure front and rear at cold condition | I & S | I & S | I & S | I & S | I & S | |
| Brake cam and shoe wear rear | I & A | C, L & A | I & A | C, L & A | I & A | |
| Brake rear free play* | I & A | I & A | I & A | I & A | I & A | |
| Brake pad wear | I | I | I | I | I | |
| Brake fluid | I & T | I & T | I & T | I & T | R | |
| Brake hose | I | I | I | I | R | |
| Master cylinder cups | - | - | - | - | R | |
| Charger and charging operation | I | I | I | I | I | |
| Rear wheel noise and smooth rotation | -I & C - I & C - | |||||
| Fork oil** | - | - | - | - | - | |
| Controller cable bolt tightness | I & TO | I & TO | I & TO | I & TO | I & TO | |
| Vehicle software version | I & U | I & U | I & U | I & U | I & U | |
After 2nd service, each service interval will be at 4000 Km or 1 year which ever is earlier.
- R - Replace; I - Inspect; T - Top up; C - Clean; A - Adjust; U - Update; L - Lubricate; TI - Tighten; S - Set; To - Torque
Reset service reminder and check for DTC's using diagnostic tool and correct it if any at every service.
O Test drive the vehicle and ascertain smooth functioning of all controls and parts.
- Clean the vehicle before delivery.
*Check the rear brake play periodically. However the brake play needs to be adjusted more frequently depending upon the usage.
O **Fork oil has to be replaced at every 24000 km.
O Tyre replacement has to be done based on the assessment of tyre wear as specified in page No. 74.
SELF - MAINTENANCE PROCEDURES
- Measure the free play of the rear brake lever at the lever end as shown in the figure.
- Free play of brake lever before the engagement of brake should be between 10 - 15 mm.
- If the measured distance is more than the limit, adjust the nut provided at the rear wheel end to obtain the correct play.
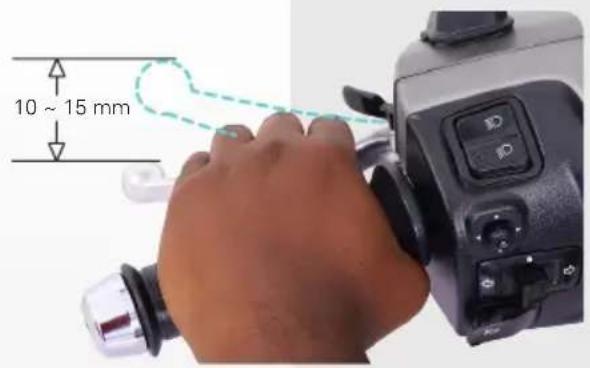
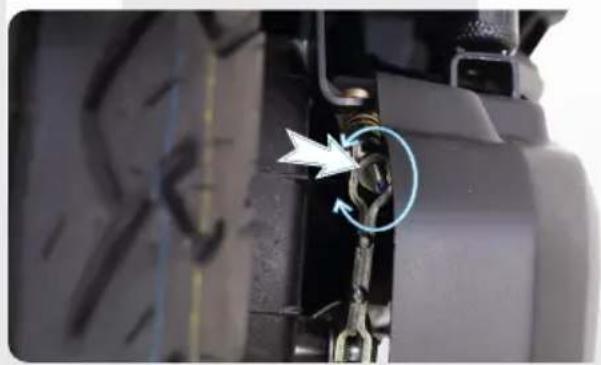
natural_image
Close-up of a vehicle's rear wheel assembly with a blue circular component and directional arrows indicating motion (no text or symbols)- Turn the adjuster nut in clockwise direction for reducing free play or in anti-clockwise direction for increasing the free play.

Caution
Replace the brake shoes as a set, if the wear limit indicator shows beyond the wear limit even after indexing the lever.
REAR SHOCK ABSORBER
TVS iQube Electric ST is provided with 3 step adjustable rear shock absorbers to meet different road and load. There are 3 notches for adjusting spring load.
If the spring is adjusted to the minimum notch, then the shock absorber will be softer which is good for light loads. If the spring is adjusted to maximum notch, then it will be stiffer which is good for heavy loads.
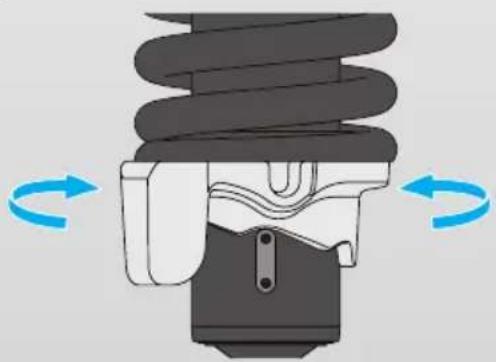
natural_image
Mechanical component diagram showing a helical spring assembly with blue rotation arrows (no text or symbols)Adjust the spring pre-load by shifting the adjuster to the required notch according to the different load conditions. The more you compress the spring, the suspension becomes more stiff.
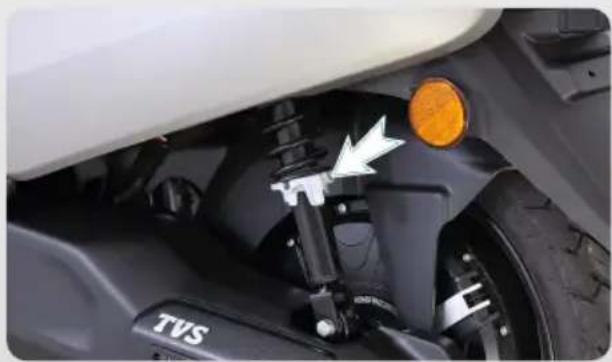
natural_image
Close-up of a car's lower body showing suspension components and a white arrow pointing to a specific vehicle (no text or symbols visible)TYRE TREAD CONDITION
Operating the vehicle with excessively worn tyres will decrease riding stability and can lead to loss of control. It is recommended to replace the tyre when the tyre wears off to the tyre wear indicator level (indicated by TWI (A) on the tyre).
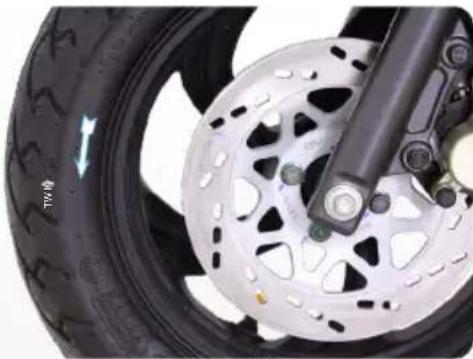
natural_image
Close-up of a motorcycle wheel and tire assembly (no visible text or symbols)TYRE ROTATION DIRECTION
While reassembling the tyres, after removing from the wheel rim, ensure that the arrow mark facing the direction of wheel rotation while fixing the tyre on the wheel rim.
TYRE PUNCTURE
Your scooter is fitted with a tubeless tyre on both front and rear wheel. In case of any puncture / tyre damage, it is advised to visit the nearest tyre manufacturer Dealer or the tyre repair shops who knows the repairing method of tubeless tyre.
It is not necessary to remove the tyre from wheel rim always to attend a puncture.
Even though, if there is need of tyre removal, it is strongly recommended to use a tyre removal / fitment machine.
If at all, tyre levers needs to be used, the levers should be free from sharp edges. Care should be taken not to damage the tyres and rims.
Warning
The tyre inflation pressure in cold condition and the tyre tread condition are extremely important for the performance and safety of the rider. Check the tyres frequently for inflation pressure as well as the wear pattern on it.
Use of a tyre other than the standard may cause instability.
Caution
The side walls of the tubeless tyre which in contact with the wheel rim are only seals the air inside the wheel assembly. Hence care should be taken not to damage the side walls of the tyres during removal / reassembly.
Note
Tyre pressure is a very important parameter in the daily operation of the vehicle. In order to extract the best possible range and performance.
WARRANTY INFORMATION
TVS Motor Company Limited ('the Company') give this warranty with respect to the TVS iQube Electric ST manufactured by the Company.
While the Company has taken every care to maintain quality in the manufacture of the iQube Electric ST, the above said warranty is subject to other terms of warranty :
Warranty is applicable during 3 years from the date of purchase or first 50,000 km run of the vehicle whichever is earlier for parts like battery, motor, controller and charger.
The Company's obligation under this warranty is limited to repairing or replacing, with new or equivalent of the affected parts at no cost to customer for part or labour. The affected parts must be proven to Company's satisfaction to have manufacturing defect due to faulty material or workmanship and in such cases the Company's decision either to repair or replace the affected parts will be final. In the event of replacement of parts, the Company also reserves the right to use parts of the same brand as the affected parts or any other brand which is used by the Company in the course of manufacture. All parts replaced under this warranty will become the property of the Company and must be returned to the company.
Limitations of Warranty :
The warranty does not cover damage or defects arising from the following conditions:
- Misuse, abuse, or neglect of the Vehicle or the Battery, such as but not limited to:
• The original serial number on the frame, motor or Battery being removed, distorted or altered.
• The Battery cover is damaged or broken.
- Battery cover is opened or attempted to open by force.
- Short circuit due to misuse or wrongful testing.
- Uneven charging of all the Batteries in a Vehicle.
• Leaving battery under fully discharged condition for a long time. (Vehicles should be charged to 30% SOC atleast once in 15 days).
• Replacing/swapping of the Battery associated with a given Vehicle, with that from another vehicle.
- Not using Manufacturer recommended charger for charging of the Battery along with or in exclusion of the Vehicle.
• The Vehicle not being at rest for at least 3 hours in a day
- Exposure of Battery to direct sunlight or radiation of heat (above 25°C). Any natural wear and tear, including without limitation, aging.
-
Warranty claims on proprietary items such as tyres, tubes etc., should be preferred by the user directly on the respective manufacturer, as per their warranty terms and the Company shall not be liable in any manner in respect to the same.
-
Parts repaired or replaced under this warranty are warranted only throughout the remainder of the original warranty period.
-
The Company is not liable for any delay in servicing due to reasons beyond the control of the Company or any of its Authorised Main Dealers.
-
In any event, the Company is not liable for indirect, remote, incidental or consequential damages.
-
The Company may make any modification or improvement to vehicles in future production at any time without prior notice and without any obligation to install the same on vehicles previously dispatched for sale.
- Any claim under this warranty will be valid only when the customer:
- Takes his vehicle to an Authorised Main Dealer of the Company and reports the problem he / she felt in the vehicle to enable the Authorised Main Dealer to inspect the same and assess the cause for the reported problems.
- This is the only warranty given by the Company for the TVS iQube Electric ST. No employee, Dealer or other persons authorised to extend or enlarge this warranty.

Warning
Modifications to this vehicle not approved by the TVS Motor Company may cause loss of performance and render it unsafe for use and disqualifies for warranty coverage also.
ITEM WHAT TO CHECK FOR
Normal Maintenance operations
Fastener re-tightening, brakes as well as other normal adjustments.
Wear and tear items Brake linings, fasteners, shims, washers, etc.
Electrical Bulbs and fuses.
Service Maintenance Parts Brake fluid, fork oil etc.
Rubber, rexine & plastic items All hoses, pipes and plastic aesthetics
Proprietary Items
Tires and tubes (the warranty terms are subject to our agreement with proprietary OEM).
Parts of the vehicle getting affected due to atmospheric effect / environmental factors (rusting, paint peel off etc.). However, depending on the vehicle usage condition, warranty would be accepted up to 2 years from the date of purchase.
Parts of the vehicle which have been tampered with, altered, repaired or replaced by persons not authorised by the Company and which in the sole judgement of the Company affect the performance of the vehicle.
Parts which are used in conjunction with parts not made or recommended by the Company.
Parts suffering damage or resultant damage by accident, misuse, negligent treatment, use of bad quality lubricants or by omission to follow the guidance and instructions contained in this owner's manual.
- Vehicles on which motor number or chassis number is deleted, defaced or altered.
Vehicles on which any warranty service including scheduled paid service is not availed when it falls due (at TVS Motor Company Authorised Main Dealer / Authorised Dealer).
* Vehicles sold or transferred by original retail purchaser.
- Vehicles used for racing or any competition or used otherwise than for ordinary personal transportation.
* Vehicles attached with side cars etc.
* Vehicles which have been taken out of India.
- Vehicles affected by natural calamities like flood, earthquake, tsunami, storm etc.
Others Factors
WARRANTY OF GPS DEVICE
Please note that the warranty on GPS device is offered by the manufacturer of GPS device and the same shall be available independently to the customer who owns this vehicle. All or any defects or issues with the GPS device shall be governed by and subjected to the warranty terms offered by the GPS device manufacturer. TVS Motor Company Limited shall not provide warranty to the GPS device independently and shall not be liable in any manner in respect to the same. In order to facilitate you to avail any warranty support from the GPS device Manufacturer, you may please contact Service department, TVS Motor Company Ltd, Harita, PB No. 4, Hosur-635 109, Tamilnadu. Email: customercare@tvsmotor.com
Contact information of such manufacturer of GPS device to avail warranty related support or queries shall be provided to you on your request.
Please refer to product website for further details on terms and conditions of the GPS device.
Periodic maintenance always helps good performance of an automobile and our services are planned to keep your TVS iQube Electric ST performing good. Please note that carrying out the services for your vehicle at scheduled intervals at any of the TVS Motor Company Authorised Main Dealer / Authorised Dealer is necessary for availing of warranty. And please also remember that, after the services are over, periodic servicing of your vehicle at appropriate intervals, depending upon its extent of use, will keep your vehicle at its best level of performance.
In case you need any clarification or assistance, please feel free to write to us mentioning the frame serial number, traction motor serial number and date of purchase of your vehicle also the name and place of the Authorised Main Dealer / Authorised Dealer from whom you bought the vehicle and getting it serviced.
Service Department
TVS MOTOR COMPANY LIMITED
P.O. Box No. 4, Harita, Hosur - 635 109,
TAMILNADU, INDIA.
Toll free no:- 1800-572-1818
| DESCRIPTION TVS iQube Electric ST 12 TVS iQube Electric ST 17 | ||
| MANUFACTURER | TVS MOTOR COMPANY LIMITEDP. B. No.4, Harita, Hosur - 635 109, India. | |
| POWER TRAIN | ||
| Type Plug in EV | ||
| Battery type Li-ion | ||
| No. of batteries 2 Packs 3 Packs | ||
| Rated voltage 52V | ||
| Charger specifications 950W Off Board charger | ||
| Charging time (0 to 80% SOC)** | 80% SOC - 3 hrs. (Approx) 80% | SOC - 4.18 hrs. (Approx) |
| Motor type BLDC | ||
| Motor output power | 3.0 kW(Rated) 4.4 kW (Peak)# | |
| Motor output torque 33 Nm (Rated) | 140 Nm (Peak) | |
| CHASSIS | ||
| Overall length 1805 mm | ||
| Overall width 645 mm | ||
| Overall height 1140 mm | ||
| Ground clearance 157 mm | ||
| Wheel base 1301 mm | ||
| Kerb weight 118 kg 129.7 kg | ||
| Pay load | 130 kg | |
| Maximum laden weight | 248 kg 259.7 kg | |
| Gradability | 10° | |
| Frame | Duplex tubular frame | |
| Front suspension | Telescopic hydraulic type | |
| Rear suspension | Adjustable, Hydraulic Twin tube shock absorber | |
| TYRE | ||
| Tyre size : | ||
| Front | 90/90-12 54J (Tubeless) | |
| Rear | 90/90-12 54J (Tubeless) | |
| Front tyre pressure | 1.69 kg/cm2 (24 psi) | |
| Rear tyre pressure - Solo | 2.25 kg/cm2 (34 psi) | |
| Rear tyre pressure - Dual | 2.54 kg/cm2 (36 psi) | |
* At component level.
* Rated time is with 950W charger when used with a 220V 50Hz sinusoidal AC input without interference. The charging duration might be higher or lower depending on the power rating, input voltage and battery capacity of the vehicle.Front and 34 PSI for Rear tyre)
| DESCRIPTION TVS iQube Electric ST 12 TVS iQube Electric ST 17 | ||
| BRAKES | ||
| Front Drum / Disc 220 mm dia disc | ||
| Rear Hand operated internally expanding shoe type,130 mm dia drum | ||
| ILLUMINATION & TELL - TALES | ||
| Head lamp (High / Low) 13.5V, 13W / 8.5W LED | ||
| Position lamp 13.5V, 5.5W LED | ||
| Tail / brake lamp 13.5V, 0.4W / 2.1W LED | ||
| Turn signal lamp (F/ R) 13.5V, 2.5W / 1.6W LED | ||
| Number plate lamp 5V, 2A | ||
| Horn 12V, 2.5A | ||
| INSTRUMENT CLUSTER | ||
| Power rating 13.5V, 10W TFT | ||
| Display 800 x 480 | ||
| Display type TFT / Touch | ||
| Luminous emittance 1000 Lux | ||
| FUSES | ||
| DC-DC fuse 58V, 5A | ||
| Charger fuse 58V, 40A | ||
| Load fuse before Ignition lock | 32V, 10A | |
| Load fuse after Ignition lock | 32V, 7.5A | |
| CAPACITIES | ||
| Range per charge (ECO) | 100 km at full charge# | 150 km at full charge# |
| Front fork oil grade | Gabriel front fork fluid | |
| Front fork oil capacity 91 ± 1 cc | ||
| Brake fluid | TVS (DOT 3 / DOT 4) | |
| Top Speed | 78 km/h | 82 km/h |
Note
Specifications are subject to change without notice.
#
Real world range may vary with road, load, driving patterns and ageing of battery packs. The real range for the iQube model is 75km under standard riding conditions, which consists of a solo rider of average weight (between 70 - 80kg, might be mentioned only if queried) riding on city roads in Eco mode without any extra payload. The standard conditions also involve the vehicle being used without brake and accelerator being applied together and the recommended tyre pressure being filled up. (cold tyre air pressure of 26 PSI for Front and 34 PSI for Rear tyre)
Warning
Using fuses other than the specified rating can result in overloading of the electrical system and would result in premature failure of the vehicle
GENERAL INFORMATION
Dear Customer,
It is mandatory under the Motor Vehicles Act to insure all motor vehicles. No motor vehicle can be used in a public place without a valid policy of insurance issued by an authorised insurer. Driving a motor vehicle without any such insurance is an offense under Motor Vehicles Act.
To assist our Customers on their insurance requirements such as the prompt issue and renewal of policies as well as expeditious settlement of claims if any, our preferred insurers are:




suraksha ka / naya nazariya


WITH YOU ALWAYS
RELIANCE
GENERAL INSURANCE

- FOREWORD
- TVS MOTOR COMPANY LIMITED
- TVS Green Initiative
- CONTENTS
- TAMILNADU-1, 3 & 4
- TVS Motor Company Limited
- TAMILNADU-2
- TVS Motor Company Limited
- KERALA
- TVS Motor Company Limited
- KARNATAKA-1, 2 & GOA
- TVS Motor Company Limited
- TVS Motor Company Limited
- MAHARASHTRA-1 & 2
- TVS Motor Company Limited
- MAHARASHTRA-3 & CHATTISGARH
- TVS Motor Company Limited
- CHATTISGARH
- TVS Motor Company Limited
- GUJARAT
- TVS Motor Company Limited
- MADHYA PRADESH-1 & 2
- TVS Motor Company Limited
- RAJASTHAN-1 & 2
- TVS Motor Company Limited
- DELHI & HARYANA
- TVS Motor Company Limited
- PUNJAB & CHANDIGARH
- TVS Motor Company Limited
- UTTAR PRADESH WEST
- TVS Motor Company Limited
- UTTAR PRADESH CENTRAL & EAST
- TVS Motor Company Limited
- WEST BENGAL
- TVS Motor Company Limited
- BIHAR
- TVS Motor Company Limited
- JHARKHAND
- TVS Motor Company Limited
- ORISSA
- TVS Motor Company Limited
- NORTH EAST STATES
- TVS Motor Company Limited
- INTRODUCTION
- SAFETY INFORMATION
- Note
- Caution
- Warning
- UNIQUEFEATURESOFTVSIQUBE ELECTRIC ST
- SIDE STAND INDICATION
- MALFUNCTION INDICATION AND SERVICE REMINDER
- FLIP KEY WITH LED LIGHT
- PLEASANT HORN TONE
- TEXTURED FLOORBOARD
- TEXTURED FLOOR MAT
- ACCESSORIES FOR YOUR SCOOTER SMART PHONE CHARGER
- CENTRE STAND\*
- SIDE STAND
- Vehicle Performance Variation
- KNOW YOUR TVS IQUBE ELECTRIC ST
- VEHICLE IDENTIFICATION NUMBER
- VEHICLE LEFT SIDE
- VEHICLE RIGHT SIDE
- VEHICLE FRONT SIDE
- VEHICLE REAR SIDE
- VEHICLE TOP SIDE
- CONTROLS
- IGNITION CUM STEERING LOCK
- HANDLE BAR LEFT SIDE
- EFFORTLESS E-Z CENTRE STAND\*
- TOOL KIT AND FIRST AID KIT
- SMART PHONE CHARGER
- DO's
- DON'Ts
- ILLUMINATING LOGO
- INSTRUMENT CLUSTER
- WELCOME SCREEN
- IDLE SCREEN
- PARKING / REVERSE ASSIST
- PLUG IN CHARGING
- Setting can be navigated by using the HMI switch or by touch when the vehicle is static.
- General settings
- Display
- Brightness
- Theme
- Default theme
- Analogue theme
- Custom theme
- Custom color theme
- Sound
- Bluetooth setting
- My vehicle
- Service
- Errors
- TPMS\*
- Trip meter
- SOFTWARE
- Process followed by TCU if OTA flashing fails:
- DO'S:
- DONT's
- Privacy
- Connectivity
- Incognito
- Documents
- Profile
- Battery
- SMARTXONNECT
- Bluetooth parring
- First time bluetooth paring
- Steps to "Forget This Device" in iPhone:
- Auto pairing
- Onboard a TVS Vehicle
- DIGI DOCUMENTS
- SERVICE DUE NOTIFICATION
- VOICE ASSIST\*
- Things to do while using voice assistant:
- Things not to do while using voice assistant:
- Terms & Conditions
- Alexa voice assist
- DRIVING THE VEHICLE
- PARKING THE VEHICLE
- CHARGING THE VEHICLE CHARGER SOCKET
- VEHICLE CHARGING
- i Note
- DISCONNECTING CHARGER
- CHARGER DO's & DON'Ts
- MAINTENANCE SCHEDULE
- TVS Motor Company Limited strongly recommends that the jobs as per the maintenance schedule be performed by your TVS Motor Company Authorised Main Dealer.
- SELF - MAINTENANCE PROCEDURES
- REAR SHOCK ABSORBER
- TYRE TREAD CONDITION
- TYRE ROTATION DIRECTION
- TYRE PUNCTURE
- WARRANTY INFORMATION
- Limitations of Warranty :
- ITEM WHAT TO CHECK FOR
- WARRANTY OF GPS DEVICE
- GENERAL INFORMATION
- Dear Customer,
Brand : TVS
Model : iQube ST
Category : Scooter