CSTEB-5C - Steamer Atosa - Free user manual and instructions
Find the device manual for free CSTEB-5C Atosa in PDF.


| Product Type | Electric Steamer |
| Brand | Atosa |
| Model | CSTEB-5C |
| Dimensions (W x D x H) | 760 x 730 x 450 mm (estimated) |
| Weight | 32 kg (estimated) |
| Power Supply | 208-240V, 50/60Hz |
| Rated Power | 4.5 kW (estimated) |
| Cooking Capacity | 5 x 1/2 size steam table pans |
| Number of Trays | 5 |
| Material | Stainless Steel (interior and exterior) |
| Control Type | Manual dials for timer and temperature |
| Safety Features | Overheat protection, automatic shut-off, pressure release valve |
| Cleaning | Removable drip tray, easy-clean interior |
| Spare Parts Availability | Available from Atosa authorized dealers |
| Warranty | 1 year parts and labor (typical) |
| Certifications | ETL, NSF (common for commercial) |
Frequently Asked Questions - CSTEB-5C Atosa
User questions about CSTEB-5C Atosa
0 question about this device. Answer the ones you know or ask your own.
Ask a new question about this device
Download the instructions for your Steamer in PDF format for free! Find your manual CSTEB-5C - Atosa and take your electronic device back in hand. On this page are published all the documents necessary for the use of your device. CSTEB-5C by Atosa.
USER MANUAL CSTEB-5C Atosa
Electric Steam Table
MODEL:
CSTEA-2/CSTEA-3/CSTEA-4/CSTEA-5
CSTEB-3/CSTEB-4/CSTEB-5
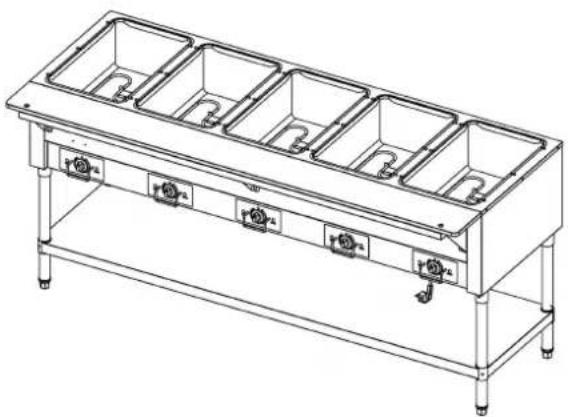
natural_image
Technical line drawing of a multi-tiered stainless steel table with four rectangular compartments and mounting fixtures (no text or symbols)

INTENDED FOR OTHER THAN HOUSEHOLD USE
Please read and keep these instructions.
UNIT MUST BE KEPT CLEAR OF COMBUSTIBLES AT ALL TIMES

FOR YOUR SAFETY: Do not store or use gasoline or other flammable vapors and liquids in the vicinity of this or any other appliance.


WARNING: Improper installation, adjustment, alteration, service or maintenance can cause property damage, injury or death. Read the Installation, Operating and Maintenance Instructions thoroughly before installing or servicing this equipment.


WARNING: In Europe, appliance must be connected by an earthing cable to all other units in the complete installation and thence to an independent earth connection in compliance with EN 60335-1 and/or local codes.


WARNING: An earthing cable must connect the appliance to all other units in the complete installation and from there to an independent earth connection.

1) OWNER'S INFORMATION
General Information:
- Always clean equipment thoroughly before first use.
- Check rating label for your model designation and electrical rating.
- For best results, use stainless steel counter tops.
General Operation Instructions:
- All food-service equipment should be operated by trained personnel.
- Do not allow your customers to come in contact with any surface labeled "CAUTION HOT".
- Never pour cold water into dry heated units.
- Do not cook, or hold food directly in wells. Always use steam table pans or inserts.
- Never hold food below 150^ F
2) SAFETY INFORMATION
CookRite equipment is designed, built, and sold for commercial use and should be operated by trained personnel only. Clearly post all CAUTIONS, WARNINGS and OPERATING INSTRUCTIONS near each unit to insure proper operation and to reduce the chance of personal injury and/or equipment damage. This product is used for the cooking, defrosting or re-thermalization of food products only.
Always disconnect power before servicing the unit.
Surfaces will remain hot after power has been turned off.
Allow unit to cool before cleaning or servicing.
Never clean the unit by immersing it in water.
The unit is not protected against water jets;
DO NOT CLEAN THE STEAM TABLE WITH A WATER JET.
Always clean equipment properly before first use.
Safety Signs and Messages
The following Safety signs and messages are placed in this manual to provide instructions and identify specific areas where potential hazards exist and special precautions should be taken. Know and understand the meaning of these instructions, signs, and messages. Damage to the equipment, death or serious injury to you or other persons may result if these messages are not followed.

This message indicates an imminently hazardous situation which, if not avoided, will result in death or serious injury.
This message indicates a potentially hazardous situation, which, if not avoided, could result in death or serious injury.
This message indicates a potentially hazardous situation, which, if not avoided, may result in minor or moderate injury. It may also be used to alert against unsafe practices.

This message is used when special information, instructions or identification are required relating to procedures, equipment, tools, capacities and other special data.
3) ELECTRICAL SPECIFICATIONS:
| MODEL | VOLTS | Wells | WATTS/well | Total WATTS | PH |
| CSTEA-2 | 120V | 2 | 500 | 1000 | 1 |
| CSTEA-3 | 120V | 3 | 500 | 1500 | 1 |
| CSTEA-4 | 120V | 4 | 500 | 2000 | 1 |
| CSTEA-5 | 120V | 5 | 500 | 2500 | 1 |
| CSTEB-3 | 240V | 3 | 750 | 2250 | 1 |
| CSTEB-4 | 240V | 4 | 750 | 3000 | 1 |
| CSTEB-5 | 240V | 5 | 750 | 3750 | 1 |
The Data plate is located on the front panel.
Power Cord:
Six (6) foot, 3 wire grounded cord. If the supply cord is damaged, the manufacturer, or an authorized service agent, must replace it in order to avoid a hazard and warranty. Please contact the factory by calling the 800 # located on the unit.
![22 1/2" [570mm] 7" [178mm] 2 WELLS: 30" [762mm] 3 WELLS: 44 1/8" [1120mm] 4 WELLS: 58" [1479mm] 5 WELLS: 72 1/2" [1836mm] 15" [381mm] 11 1/2" [292mm]](/content/2026/05/957560/images/1233d0dad4fd2e9e4b1424102e1aad48a5e3f490d79df4731e3cb1d6c4f4a8b0.jpg)
TOP VIEW
![33½" [851mm] 12 ½" [317mm] 13 ½" [343mm] 1 ½" [40mm] 6" [152mm] 20" [508mm]](/content/2026/05/957560/images/8e77355afbc70a83fb10657dfa03a77ef58d76e76455fbed3fd2e7d2ca9be527.jpg)
FRONT VIEW
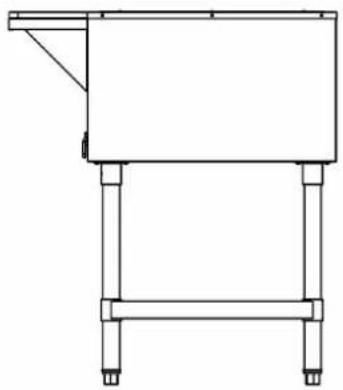
natural_image
Technical line drawing of a simple mechanical device with no text or symbolsSIDE VIEW
4) DIMENSIONS:
| MODEL | Length | Width | Height | Top Opening | Cube ft. Crated | Weight | ||||
| in | mm | in | mm | in | mm | Lbs. | kg | |||
| CSTEA-2 | 30 | 762 | 29 1/2 | 748 | 33 1/2 | 851 | 2 | 10.59 55.6 25.2 | ||
| CSTEA-3 | 44 1/8 | 1120 | 29 1/2 | 748 | 33 1/2 | 851 | 3 | 14.5 83.7 38 | ||
| CSTEA-4 | 58 | 1479 | 29 1/2 | 748 | 33 1/2 | 851 | 4 | 18.7 108.7 49.3 | ||
| CSTEA-5 | 72 1/2 | 1836 | 29 1/2 | 748 | 33 1/2 | 851 | 5 | 28.6 130.5 59.2 | ||
| CSTEB-3 | 44 1/8 | 1120 | 29 1/2 | 748 | 33 1/2 | 851 | 3 | 14.5 | 83.7 38 | |
| CSTEB-4 | 58 | 1479 | 29 1/2 | 748 | 33 1/2 | 851 | 4 | 18.7 | 108.7 49.3 | |
| CSTEB-5 | 72 1/2 | 1836 | 29 1/2 | 748 | 33 1/2 | 851 | 5 | 28.6 | 130.5 | 59.2 |
5) INSTALLATION INSTRUCTION
If the carton appears damaged, or damage is discovered once the carton is opened, stop immediately and contact the freight company to file a damage claim.

CAUTION: The Steam Table is shipped without the legs, under shelf or cutting board shelf attached. Please read the installation and operation instruction before operating the unit. Remove all supports and packaging materials before operating the unit. Failure to remove all packaging materials may lead to a fire and / or damage to the appliance.

- Remove all external packaging that is protecting top portion of unit
- Remove all internal packaging to the unit, if present.
- Visually inspect all external and internal portions of unit for damage.
- Wipe down the exterior of the unit using a damp cloth with warm water. Do not use abrasive pads or cleaners as they will damage the stainless steel surface.
Note: Ambient Conditions - Make sure that the operating location is in an area where the ambient temperature is held constant (minimum 70^ F). Please avoid areas such as near exhaust fans and air conditioning ducts.
Warning! Operating environment
Ensure that operation location is at a reasonable distance from combustible walls and materials otherwise combustion or discoloration could occur.
Caution! Operating environment
Place unit on a stable, level floor. The unit must be level, both front and back and left to right, in order to maintain an equal water depth throughout the wells. To eliminate rocking or adjust height turn the adjustable feet in the proper direction until the desired results are obtained.
Note: Maximum adjustment is 1 inch
- Before plugging unit into wall outlet or permanently electrical connecting, the unit should be adjusted to the desired height and align with other equipment.
- The voltage and wattage ratings of this steam table are given on the device nameplate. Connect the steam table to a circuit having a voltage and type of current similar to that stamped on the device nameplate. For movable equipment a proper cord and plug are included for connection to the matching power supply outlet.
- Plug unit into grounded electrical outlet with correct voltage, and plug configuration.
a. Warning! Using any receptacle that is not designed to match the attached cord and plug MAY cause personal injury and WILL void your warranty. Please attach the Steam Table, to an individual branch circuit
- For permanent installations, connections to supply line may be made through conduit or armored cable. Use copper wire for power supply or suitable copper to aluminum wire connector.
- The body of the appliance should be grounded by connecting the ground stud provided in the junction box to a good electrical ground.
- The steam table is not fused and consequently must be connected to a fused circuit equipped with suitable disconnect means, as required by local code authorities.
- To assembly the units follow steps 1 thru 6 listed below.
NOTICE
UNIT IS SHIPPED UNASSEMBLED. TO MEET NATIONAL SANITATION FOUNDATION STANDARDS, THE INSTALLER MUST USE A NSF APPROVED SILICONE SEALANT TO SEAL THE SEAMS BETWEEN THE UNIT AND ASSEMBLED PARTS.

Step 1
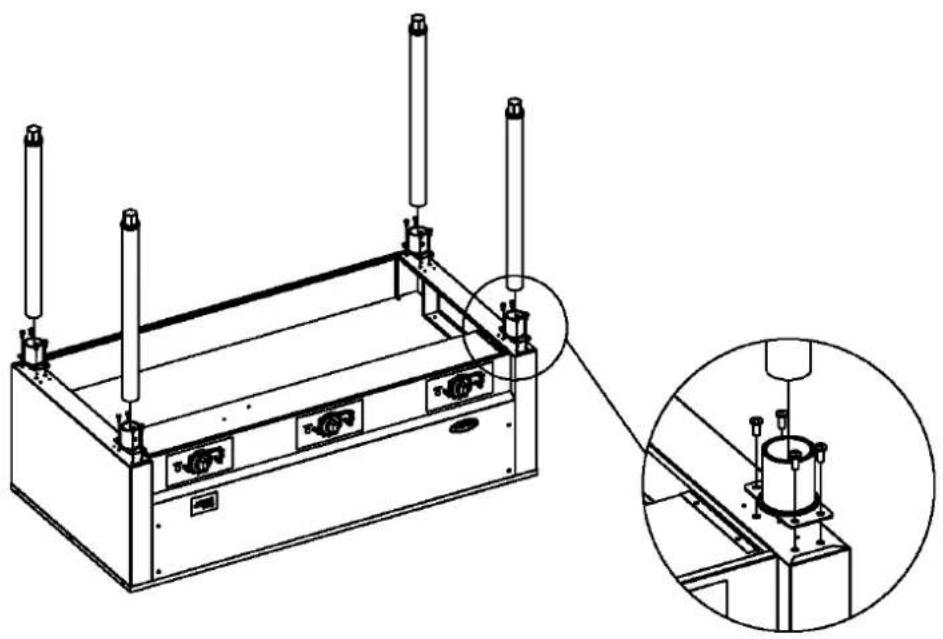
Insert the bullet leg into the 4 tubes.
CAUTION
When inserting bullet legs use a soft mallet only. To avoid damaging the leg inserts.
natural_image
Technical line drawing of a mechanical assembly with mounting brackets and a close-up inset showing internal components (no text or symbols)Step 2
Place the unit on the floor upside down. Be sure to protect the top surface and well from damage when the unit is placed on it top on the floor. Once the legs are in place tighten the set screws in the leg inserts.
natural_image
Technical line drawing of a mechanical enclosure with mounting feet and internal compartments (no text or symbols)Step 3
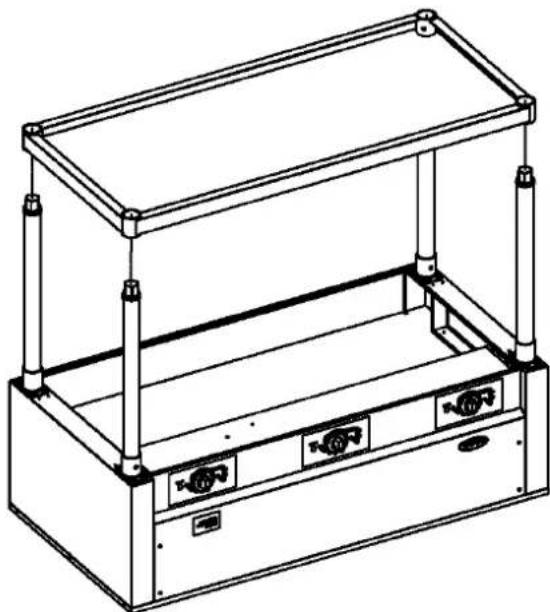
Slide the shelf over the legs.
natural_image
Technical line drawing of a multi-level industrial machine or storage unit with mounting feet and internal compartments (no text or symbols)Step 4
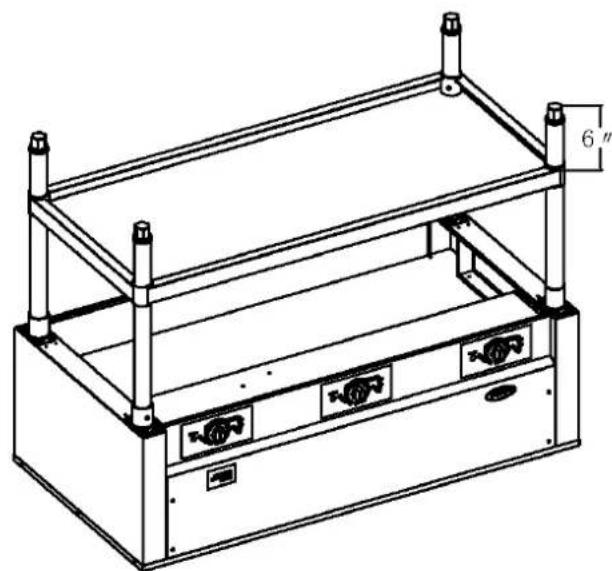
Locate the shelf at minimum 6 inches from the floor to allow for cleaning and to comply with NSF standards. Tighten the 4 set screws located in each corner of the shelf leg inserts.
natural_image
Technical line drawing of a mechanical assembly with three rectangular chambers and a base plate, showing internal components and a magnified inset (no text or symbols)Step 5
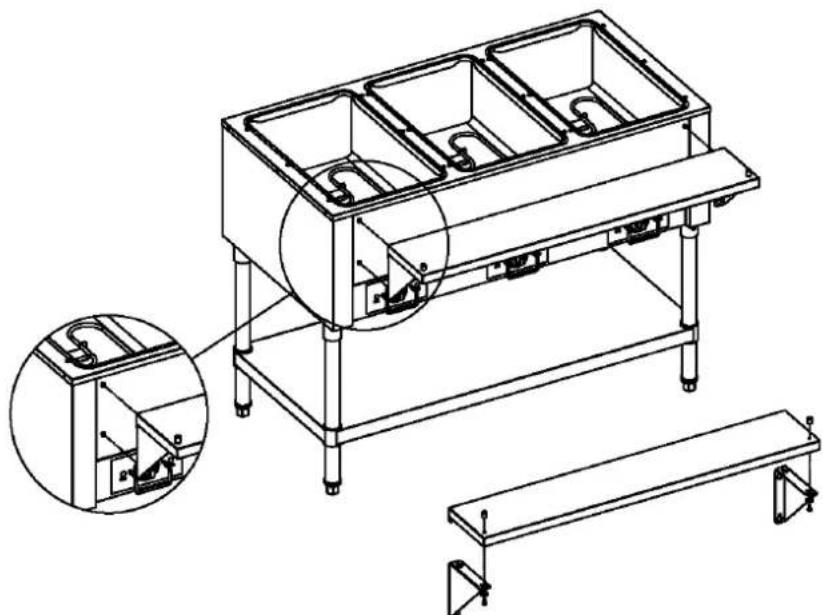
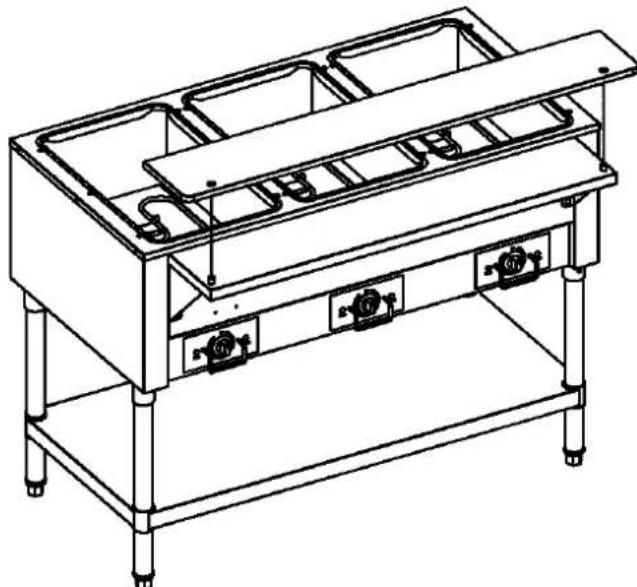
Install the supporting board on the fixing brackets first, then positioning this part in the front of the shell by screws.
natural_image
Technical line drawing of a multi-level stainless steel kitchen appliance with mounting base (no text or symbols)Step 6
Install the cutting board stops through the shelf and the shelf support brackets at each end as shown.
- PREHEAT - To preheat individual sections, turn the switch dial to high for 10 - 20 minutes before the foods are placed in the compartments. Insure that pan openings are covered to prevent loss of heat.
- If only part of the food warmers is needed, the compartment not in use does not need to be heated.
- SWITCH SETTINGS
a. The most satisfactory switch settings must be determined by experience based on the nature of the foodservice and the type of operation as well as individual preference of the restaurant operator. The proper switch setting necessary to keep foods at the desired temperature will vary dependent upon the frequency of turnover, size of food containers, amount of food in each container, room temperature, location of food warmer with respect to range or other heated equipment, air outlets, fans, doors and passageways.
7) CLEANING
Insure the appliance has been turned off and has had sufficient time for all surfaces to cool down before cleaning.
DAILY CLEANING
- Turn the control knob to the OFF position and allow unit to cool before cleaning.
- Clean or remove water from the well.
CAUTION: Do not allow water to splash or run on to the controls or wiring.
- Use a soft cloth or sponge with a mild detergent to clean the entire warmer assembly. Rinse completely with warm water and then dry.
- A plastic scouring pad and a mild detergent may be used to remove hardened food.
NOTICE: Do not use steel wool.
WEEKLY CLEANING
- Scale deposits due to the mineral content of the water may be removed using a plastic scouring pad and a de-scaling agent approved for use on stainless steel. It is important to keep these deposits from building up as they may cause corrosion of the stainless steel well.
- After de-scaling, the well assembly should be rinsed thoroughly with a solution of vinegar and water to neutralize all cleaner residues.
- Wipe the well assembly dry and leave uncovered.
WARNING
Do not use any highly caustic cleaners, acids or ammonia. These may cause corrosion and/or damage to the stainless steel well. Do not allow water to stand in the well.
Water must be removed from the well and the well cleaned after each use.
CLEANING PROCEDURES FOR THE CUTTING BOARDS
When high pressure cleaning equipment is not available; use hot water, a granular cleanser or detergent and a stiff bristle brush. (Abrasive action is necessary, as simply wiping the board will not suffice.) After Scrubbing, rinse thoroughly with hot water. Allow to lie flat.
Several excellent germicidal cleaners are also available, including Calgon's "Big Cat" and Johnson's "Break Up". Clorox is another good cleaner and is USDA approved.
The tabletop material is cut into sections not larger than 36" in any plane, and no section weighs more than fifty (50) pounds. These are stipulations of the National Sanitation Foundation to facilitate cleaning. The tops should be turned over daily to reduce possibility of warping and should never be stood on end. Periodically, go over the board with a clean, flat stainless steel scraper to help seal some of the knife marks.
The use of cleavers on synthetic boards or tabletops is not recommended.
8) TROUBLESHOOTING
Always ask and check the following:
TROUBLE SHOOTING GUIDE
- Problem: Unit does not heat:
a. Has unit been connected to a proper electrical source of the proper voltage?
b. Is electric turned on at the main? Check the circuit breaker or fuse.
c. Are the control knobs set to the "ON" position?
- Problem: Unit does not maintain proper food temperature.
a. Are the controls set to the proper setting?
b. Has unit been pre-heated appropriately?
c. Were pans of food placed into unit at or above desired temperature?
d. Has the food been kept covered?
e. Are there air conditioning ducts, take-up air ducts or fans located near or over unit, causing cool drafts?
f. Has unit been connected to a proper electrical source of the proper voltage? If so, is there a "low" voltage condition?
9) PREVENTATIVE MAINTENANCE SCHEDULE
Please follow the cleaning section for the daily and weekly preventative maintenance schedule.
- Use the proper tools.
When cleaning stainless steel products, use non-abrasive tools. Soft cloths and plastic scouring pads will not harm steel's passive layer. Stainless steel pads also can be used but the scrubbing motion must be in the direction of the manufacturers' polishing marks.
- Clean with the polish lines
Some stainless steel comes with visible polishing lines or "grain." When visible lines are present, always scrub in a motion parallel to the lines. When the grain cannot be seen, play it safe and use a soft cloth or plastic scouring pad.
- Use alkaline, alkaline chlorinated or non-chloride containing cleaners.
While many traditional cleaners are loaded with chlorides, the industry is providing an ever-increasing choice of non-chloride cleaners. If you are not sure of chloride content in the cleaner used, contact your cleaner supplier. If your present cleaner contains chlorides, ask your supplier if they have an alternative. Avoid cleaners containing quaternary salts; it also can attack stainless steel and cause pitting and rusting.
- Keep your food equipment clean.
Use alkaline, alkaline chlorinated or non-chloride cleaners at recommended strength. Clean frequently to avoid build-up of hard, stubborn stains. If you boil water in stainless steel equipment, remember the single most likely cause of damage is chlorides in the water. Heating cleaners that contain chlorides have a similar effect.
- Rinse.
If chlorinated cleaners are used, wipe equipment and supplies dry immediately. The sooner you wipe off standing water, especially when it contains cleaning agents, the better. After wiping equipment down, allow it to air dry; oxygen helps maintain the stainless steels passivity film.
-
Never use hydrochloric acid (muriatic acid) on stainless steel.
-
Regularly restore/passivate stainless steel.
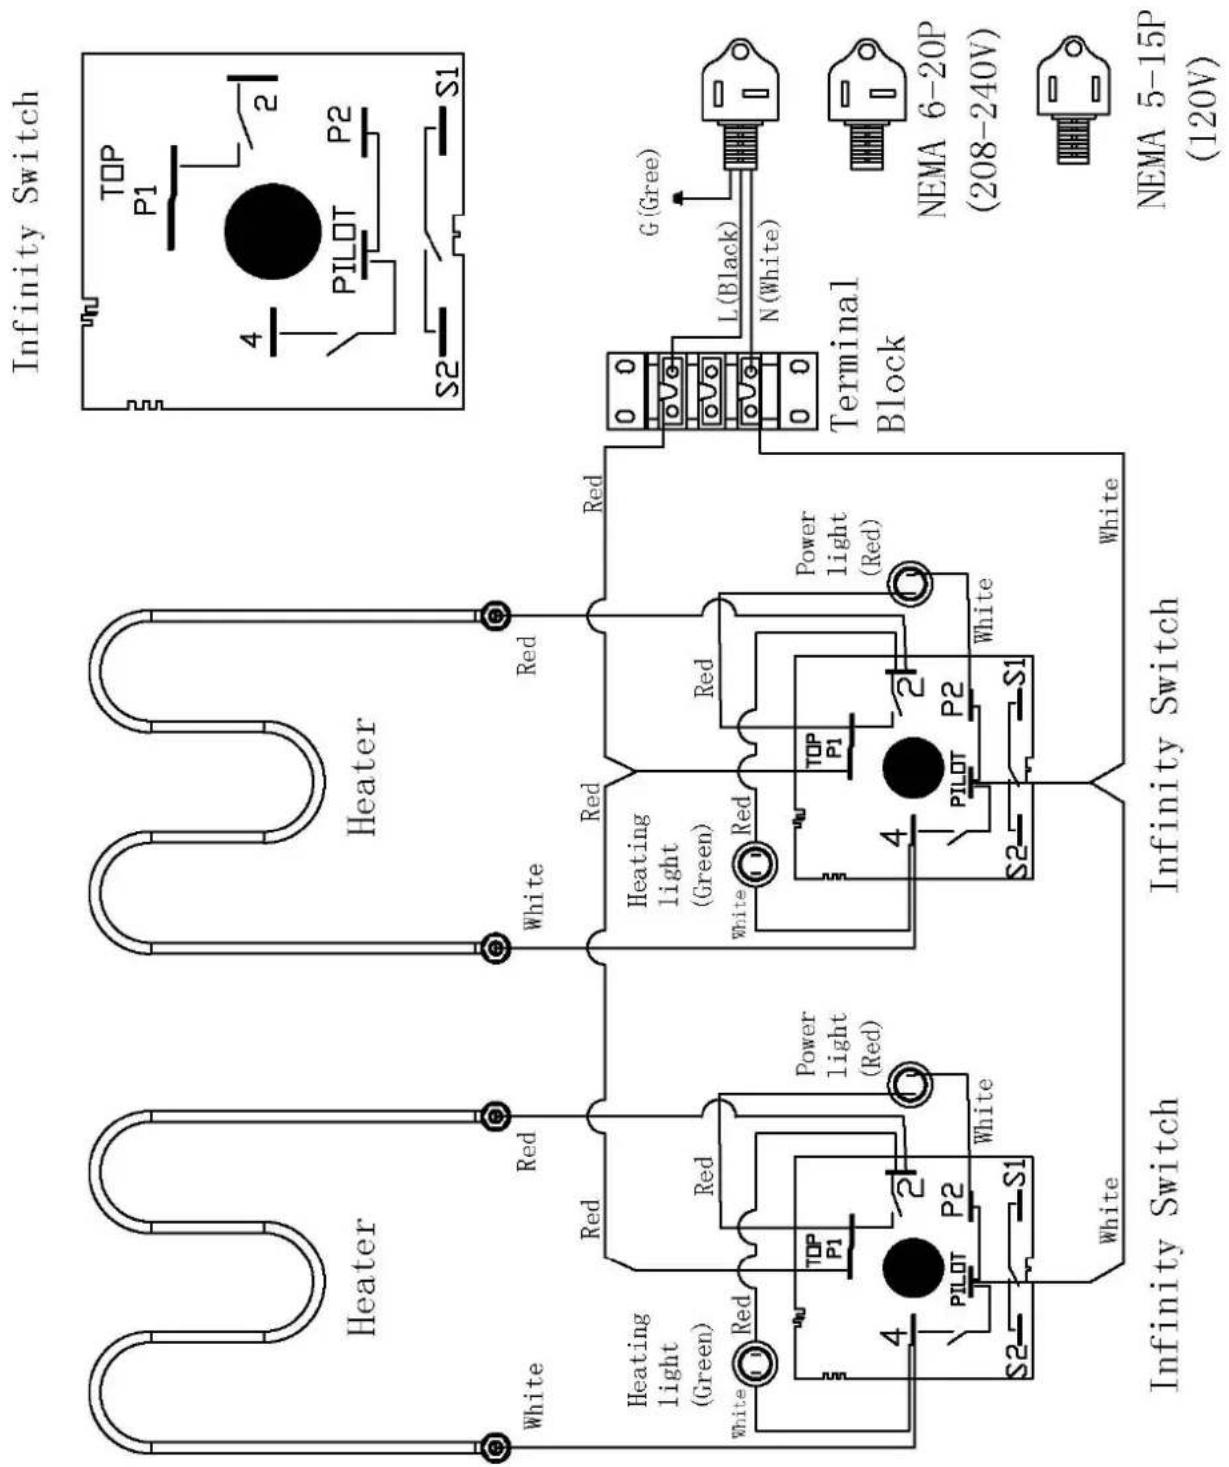
CSTEA-2 Wiring Diagram
CSTEA-3/CSTEB-3 Wiring Diagram
Infinity Switch
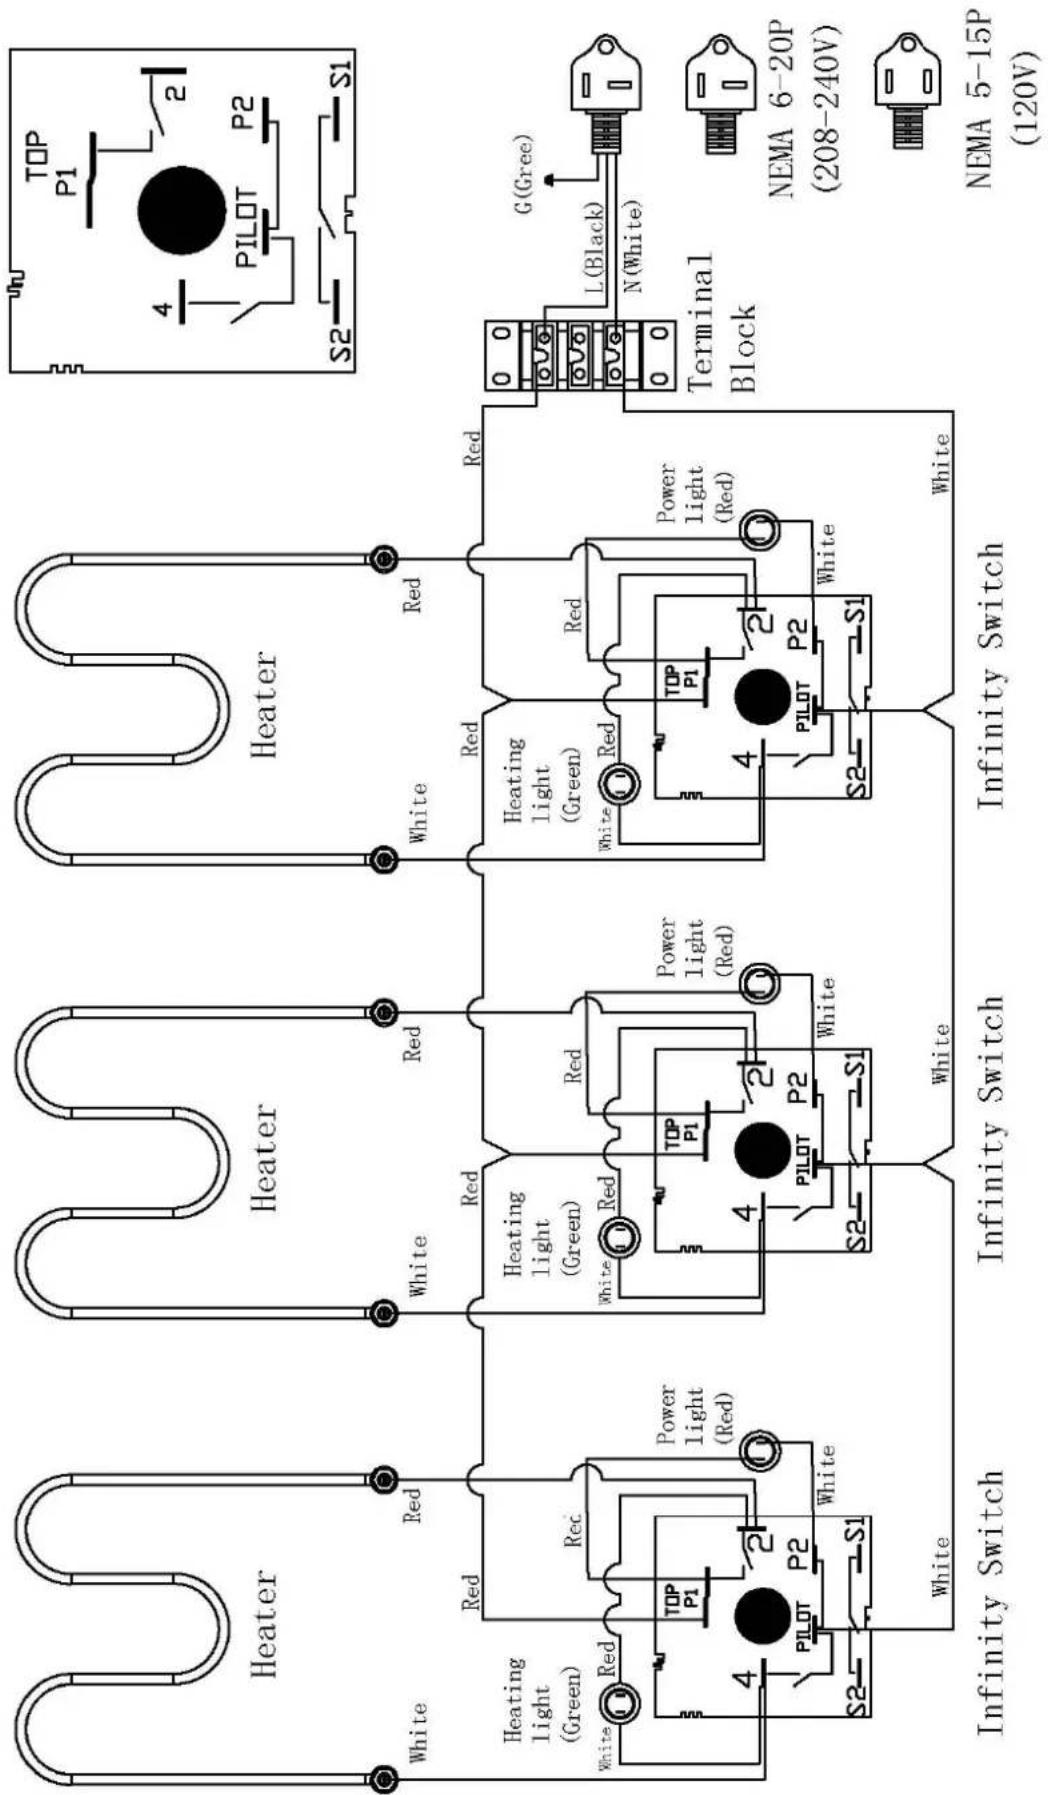
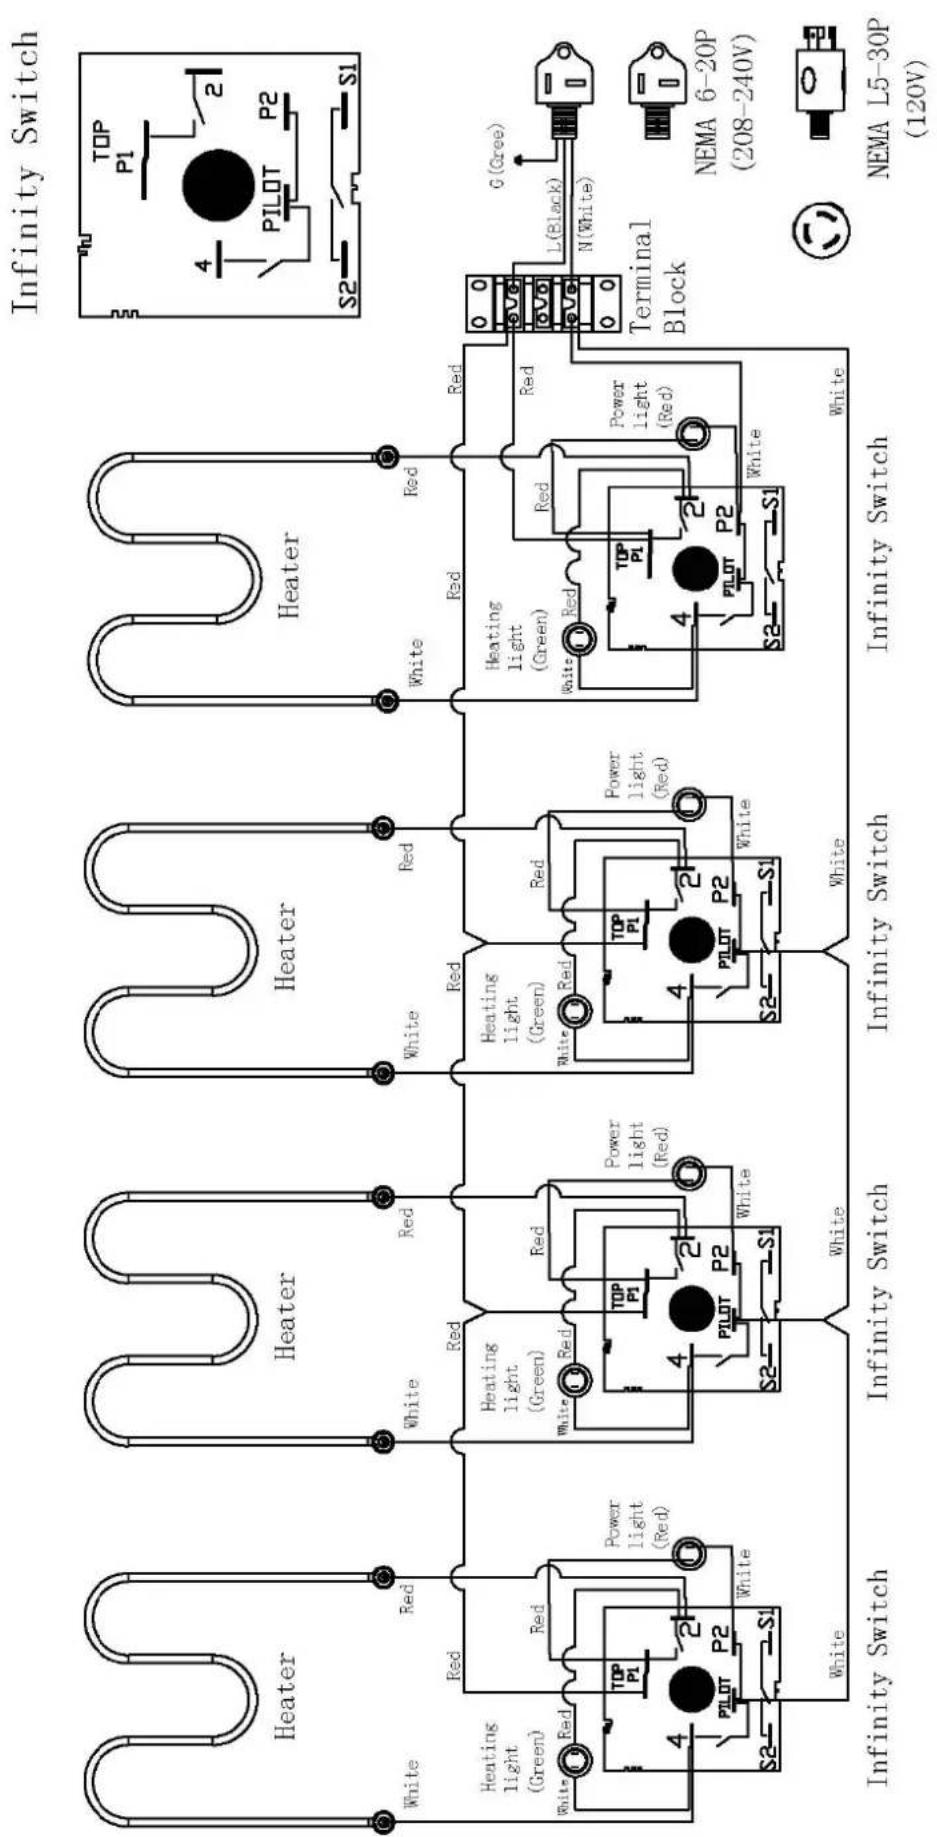
CSTEA-4/CSTEB-4 Wiring Diagram
flowchart
graph TD
    subgraph "Infinity Switch"
        A1["White"] --> B1["Heating light (Green)"]
        A2["White"] --> B2["Power light (Red)"]
        A3["White"] --> B3["Heating light (Green)"]
        A4["White"] --> B4["Power light (Red)"]
        A5["White"] --> B5["Heating light (Green)"]
        A6["White"] --> B6["Power light (Red)"]
    end

    subgraph "Infinity Switch"
        C1["White"] --> D1["Heating light (Green)"]
        C2["White"] --> D2["Power light (Red)"]
        C3["White"] --> D3["Heating light (Green)"]
        C4["White"] --> D4["Power light (Red)"]
        C5["White"] --> D5["Heating light (Green)"]
        C6["White"] --> D6["Power light (Red)"]
    end

    subgraph "Infinity Switch"
        E1["White"] --> F1["Heating light (Green)"]
        E2["White"] --> F2["Power light (Red)"]
        E3["White"] --> F3["Heating light (Green)"]
        E4["White"] --> F4["Power light (Red)"]
        E5["White"] --> F5["Heating light (Green)"]
        E6["White"] --> F6["Power light (Red)"]
    end

    subgraph "Infinity Switch"
        G1["White"] --> H1["Heating light (Green)"]
        G2["White"] --> H2["Power light (Red)"]
        G3["White"] --> H3["Heating light (Green)"]
        G4["White"] --> H4["Power light (Red)"]
        G5["White"] --> H5["Heating light (Green)"]
        G6["White"] --> H6["Power light (Red)"]
    end

    subgraph "Infinity Switch"
        I1["White"] --> J1["Heating light (Green)"]
        I2["White"] --> J2["Power light (Red)"]
        I3["White"] --> J3["Heating light (Green)"]
        I4["White"] --> J4["Power light (Red)"]
        I5["White"] --> J5["Heating light (Green)"]
        I6["White"] --> J6["Power light (Red)"]
    end

    subgraph "Infinity Switch"
        K1["White"] --> L1["Heating light (Green)"]
        K2["White"] --> L2["Power light (Red)"]
        K3["White"] --> L3["Heating light (Green)"]
        K4["White"] --> L4["Power light (Red)"]
        K5["White"] --> L5["Heating light (Green)"]
        K6["White"] --> L6["Power light (Red)"]
    end

    subgraph "Infinity Switch"
        M1["White"] --> N1["Heating light (Green)"]
        M2["White"] --> N2["Power light (Red)"]
        M3["White"] --> N3["Heating light (Green)"]
        M4["White"] --> N4["Power light (Red)"]
        M5["White"] --> N5["Heating light (Green)"]
        M6["White"] --> N6["Power light (Red)"]
    end

    subgraph "Infinity Switch"
        O1["White"] --> P1["Heating light (Green)"]
        O2["White"] --> P2["Power light (Red)"]
        O3["White"] --> P3["Heating light (Green)"]
        O4["White"] --> P4["Power light (Red)"]
        O5["White"] --> P5["Heating light (Green)"]
        O6["White"] --> P6["Power light (Red)"]
    end

    subgraph "Infinity Switch"
        Q1["White"] --> R1["Heating light (Green)"]
        Q2["White"] --> R2["Power light (Red)"]
        Q3["White"] --> R3["Heating light (Green)"]
        Q4["White"] --> R4["Power light (Red)"]
        Q5["White"] --> R5["Heating light (Green)"]
        Q6["White"] --> R6["Power light (Red)"]
    end

    subgraph "Infinity Switch"
        S1["White"] --> T1["Pilot"]
        S2["Pilot"]
        S3["Pilot"]
        S4["Pilot"]
    end

    subgraph "Infinity Switch"
        U1["NEMA 6-20P (208-240V)"]
    end

    subgraph "Infinity Switch"
        V1["NEMA L5-30P (120V)"]

    W1["G(Cree)"] --> X1["L(Black)"] --> Y1["N(White)"] --> Z1["Terminal Block"]
    style W1 fill:#f9f,stroke:#333
    style X1 fill:#ccf,stroke:#333
    style Y1 fill:#cfc,stroke:#333
    style Z1 fill:#fcc,stroke:#333
CSTEA-5/CSTEB-5 Wiring Diagram
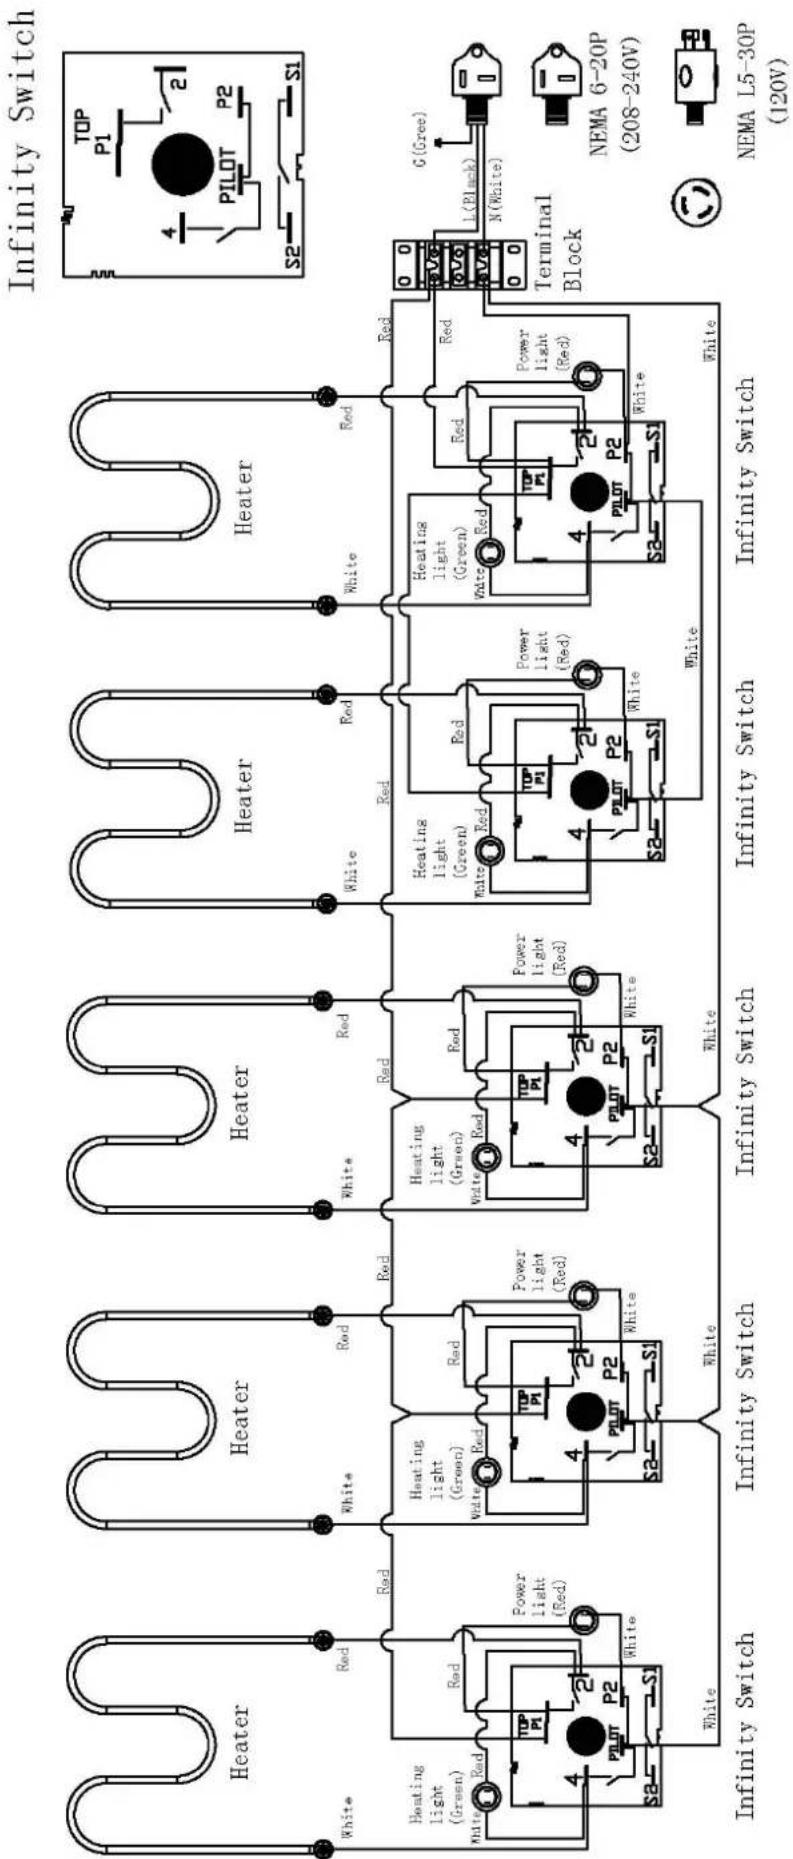
flowchart
graph TD
    subgraph "Infinity Switch"
        A1["Heater"] -->|White, Red, Red| B1["Heating light (Green)"]
        A1 -->|White, Red, White| C1["Power light (Red)"]
        A2["Heater"] -->|White, Red, Red| D1["Heating light (Green)"]
        A2 -->|White, Red, White| E1["Power light (Red)"]
        A3["Heater"] -->|White, Red, Red| F1["Heating light (Green)"]
        A3 -->|White, Red, White| G1["Power light (Red)"]
        A4["Heater"] -->|White, Red, Red| H1["Heating light (Green)"]
        A4 -->|White, Red, White| I1["Power light (Red)"]
        A5["Heater"] -->|White, Red, Red| J1["Heating light (Green)"]
        A5 -->|White, Red, White| K1["Power light (Red)"]
        A6["Heater"] -->|White, Red, Red| L1["Heating light (Green)"]
        A6 -->|White, Red, White| M1["Power light (Red)"]
        A7["Infinity Switch"]
    end

    subgraph "Infinity Switch"
        A7["Heating light (Green)"]
        A7 -->|White, Red, White| B7["Power light (Red)"]
        A8["Heating light (Green)"]
        A8 -->|White, Red, White| C7["Power light (Red)"]
        A9["Heating light (Green)"]
        A9 -->|White, Red, White| D7["Power light (Red)"]
        A10["Heating light (Green)"]
        A10 -->|White, Red, White| E7["Power light (Red)"]
        A11["Heating light (Green)"]
        A11 -->|White, Red, White| F7["Power light (Red)"]
        A12["Heating light (Green)"]
        A12 -->|White, Red, White| G7["Power light (Red)"]
        A13["Heating light (Green)"]
        A13 -->|White, Red, White| H7["Power light (Red)"]
        A14["Heating light (Green)"]
        A14 -->|White, Red, White| I7["Power light (Red)"]
        A15["Heating light (Green)"]
        A15 -->|White, Red, White| J7["Power light (Red)"]
        A16["Heating light (Green)"]
        A16 -->|White, Red, White| K7["Power light (Red)"]
        A17["Heating light (Green)"]
        A17 -->|White, Red, White| L7["Power light (Red)"]
        A18["Heating light (Green)"]
        A18 -->|White, Red, White| M7["Power light (Red)"]
        A19["Heating light (Green)"]
        A19 -->|White, Red, White| N7["Power light (Red)"]
        A20["Heating light (Green)"]
        A20 -->|White, Red, White| O7["Power light (Red)"]
        A21["Heating light (Green)"]
        A21 -->|White, Red, White| P7["Power light (Red)"]
        A22["Heating light (Green)"]
        A22 -->|White, Red, White| Q7["Power light (Red)"]
        A23["Heating light (Green)"]
        A23 -->|White, Red, White| R7["Power light (Red)"]
        A24["Heating light (Green)"]
        A24 -->|White, Red, White| S7["Power light (Red)"]
        A25["Heating light (Green)"]
        A25 -->|White, Red, White| T7["Power light (Red)"]
        A26["Heating light (Green)"]
        A26 -->|White, Red, White| U7["Power light (Red)"]
        A27["Heating light (Green)"]
        A27 -->|White, Red, White| V7["Power light (Red)"]
        A28["Heating light (Green)"]
        A28 -->|White, Red, White| W7["Power light (Red)"]
        A29["Heating light (Green)"]
        A29 -->|White, Red, White| X7["Power light (Red)"]
        A30["Heating light (Green)"]
        A30 -->|White, Red, White| Y7["Power light (Red)"]
    end

    subgraph "Infinity Switch"
        B1
        B2
        B3
        B4
        B5
        B6
        B7
        B8
        B9
        B10
        B11
        B12
        B13
        B14
        B15
        B16
        B17
        B18
        B19
        B20
        B21
        B22
        B23
        B24
        B25
        B26
        B27
        B28
        B29
        B30
    end

    subgraph "Infinity Switch"
        C1
        C2
        C3
        C4
        C5
        C6
        C7
        C8
        C9
    end

    subgraph "Infinity Switch"
        D1
        D2
        D3
        D4
        D5
        D6
        D7
    end

    subgraph "Infinity Switch"
        E1
        E2
        E3
        E4
    end

    subgraph "Infinity Switch"
        F1
        F2
    end

    subgraph "Infinity Switch"
        G1
    end

    subgraph "Terminal Block"
            H1["G(Gree)"] --> I1["L(Black)"] --> J["N(White)"] --> K["NEMA 6-20P(208-240V)"] --> L["NEMA L5-30P(120V)"] --> M["NEMA L5-30P(120V)"] --> N["NEMA L5-30P(120V)"] --> O["NEMA L5-30P(120V)"] --> P["NEMA L5-30P(120V)"] --> Q["NEMA L5-30P(120V)"] --> R["NEMA L5-30P(120V)"] --> S["NEMA L5-30P(120V)"] --> T["NEMA L5-30P(120V)"] --> U["NEMA L5-30P(120V)"] --> V["NEMA L5-30P(120V)"]
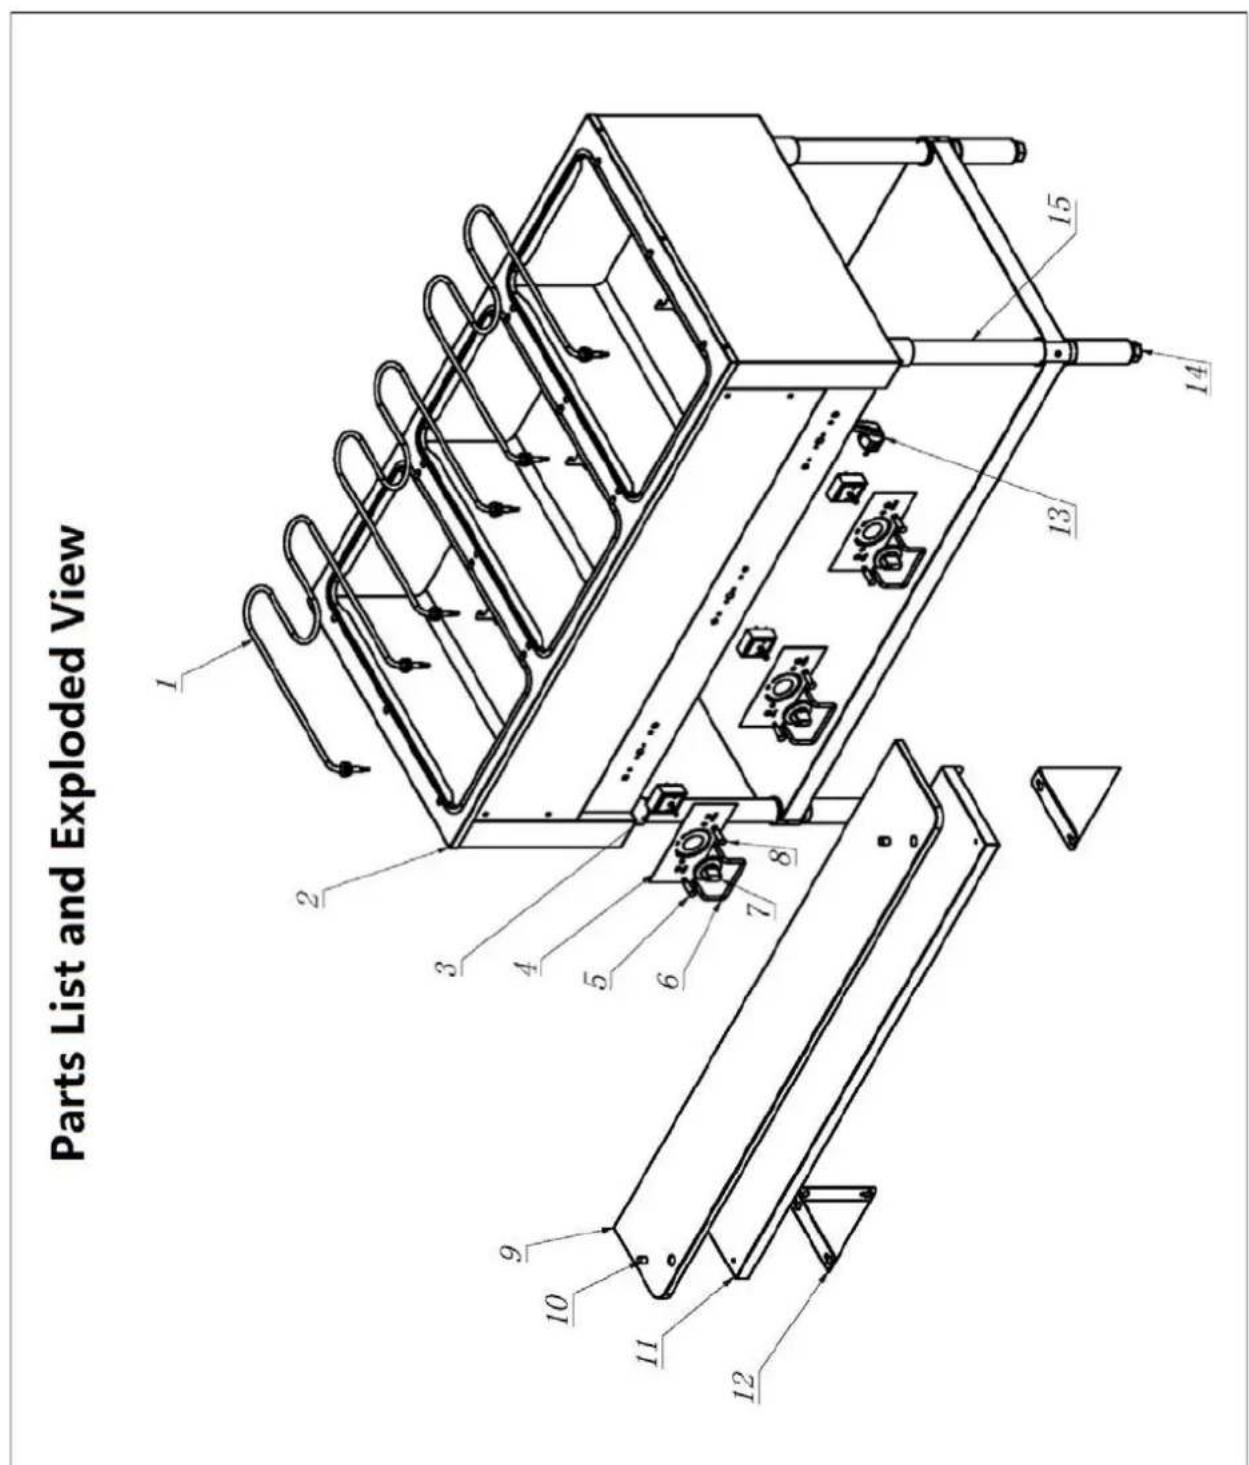
PARTS LIST
| Item# | Description | CSTEA-2 | CSTEA-3 | CSTEA-4 | CSTEA-5 |
| 1 | Heating element-120V:500W | CSTEA-2-001 | |||
| 2 | Body-SUS | CSTEA-2-002 | CSTEA-3-002 | CSTEA-4-002 | CSTEA-5-002 |
| 3 | Thermostat-120V:13A | CSTEA-2-003 | |||
| 4 | Control panel-PET | CSTEA-2-004 | |||
| 5 | Power light-120V 56K LED | CSTEA-2-005 | |||
| 6 | knob guard-Q235 Chromed | CSTEA-2-006 | |||
| 7 | Knob-PA | CSTEA-2-007 | |||
| 8 | Heating light-120V 56K LED | CSTEA-2-008 | |||
| 9 | Cutting board-PE | CSTEA-2-009 | CSTEA-3-009 | CSTEA-4-009 | CSTEA-5-009 |
| 10 | Position shaft-SUS | CSTEA-2-010 | |||
| 11 | Supporting board-SUS | CSTEA-2-011 | CSTEA-3-011 | CSTEA-4-011 | CSTEA-5-011 |
| 12 | Fixing bracket-SUS | CSTEA-2-012 | |||
| 13 | Power cord | CSTEA-2-014 | CSTEA-4-014 | ||
| 14 | Adjustable feet-SUS | CSTEA-2-013 | |||
| 15 | Round tube-SUS | CSTEA-2-015 | |||
PARTS LIST
| Item# | Description | CSTEA-3 | CSTEA-4 | CSTEA-5 |
| 1 | Heating element-208-240V:750W | CSTEB-3-001 | ||
| 2 | Body-SUS | CSTEA-3-002 | CSTEA-4-002 | CSTEA-5-002 |
| 3 | Thermostat-208-240V:13A | CSTEB-3-003 | ||
| 4 | Control panel-PET | CSTEA-2-004 | ||
| 5 | Power light-250V 156K LED | CSTEB-3-005 | ||
| 6 | knob guard-Q235 Chromed | CSTEA-2-006 | ||
| 7 | Knob-PA | CSTEA-2-007 | ||
| 8 | Heating light-250V 156K LED | CSTEB-3-008 | ||
| 9 | Cutting board-PE | CSTEA-3-009 | CSTEA-4-009 | CSTEA-5-009 |
| 10 | Position shaft-SUS | CSTEA-2-010 | ||
| 11 | Supporting board-SUS | CSTEA-3-011 | CSTEA-4-011 | CSTEA-5-011 |
| 12 | Fixing bracket-SUS | CSTEA-2-012 | ||
| 13 | Power cord | CSTEB-3-014 | ||
| 14 | Adjustable feet-SUS | CSTEB-3-013 | ||
| 15 | Round tube-SUS | CSTEA-2-015 | ||
- Electric Steam Table
- 1) OWNER'S INFORMATION
- General Information:
- General Operation Instructions:
- 2) SAFETY INFORMATION
- Safety Signs and Messages
- 3) ELECTRICAL SPECIFICATIONS:
- Power Cord:
- 5) INSTALLATION INSTRUCTION
- Warning! Operating environment
- Caution! Operating environment
- NOTICE
- Step 1
- CAUTION
- Step 2
- Step 3
- Step 4
- 7) CLEANING
- DAILY CLEANING
- WEEKLY CLEANING
- WARNING
- CLEANING PROCEDURES FOR THE CUTTING BOARDS
- 8) TROUBLESHOOTING
- TROUBLE SHOOTING GUIDE
- 9) PREVENTATIVE MAINTENANCE SCHEDULE
Brand : Atosa
Model : CSTEB-5C
Category : Steamer