
CCH-3 - Food processor CUISINART - Free user manual and instructions
Find the device manual for free CCH-3 CUISINART in PDF.


| Product Type | Food Processor |
| Brand | Cuisinart |
| Model | CCH-3 |
| Dimensions (H x W x D) | Approximately 10.5 x 8.5 x 7.5 inches |
| Weight | Approximately 7.5 lbs |
| Power Supply | 120V ~ 60Hz, 350W |
| Bowl Capacity | 7 cups (1.65 L) |
| Feed Tube Width | Large feed chute for whole fruits and vegetables |
| Blades Included | Stainless steel chopping blade, slicing disc, shredding disc |
| Dough Blade | Included for mixing and kneading dough |
| Controls | Off/Pulse/On dial, easy-to-use |
| Safety Features | Interlocking lid and bowl for safe operation |
| Non-Slip Base | Suction feet for stability during use |
| Dishwasher Safe Parts | Bowl, lid, and blades are dishwasher safe |
| BPA Free | Yes, all plastic parts are BPA-free |
| Cord Length | Approximately 36 inches |
| Warranty | Limited 18-month warranty |
| Country of Origin | China |
| Spare Parts Availability | Yes, contact Cuisinart customer service |
Frequently Asked Questions - CCH-3 CUISINART
User questions about CCH-3 CUISINART
0 question about this device. Answer the ones you know or ask your own.
Ask a new question about this device
Download the instructions for your Food processor in PDF format for free! Find your manual CCH-3 - CUISINART and take your electronic device back in hand. On this page are published all the documents necessary for the use of your device. CCH-3 by CUISINART.
USER MANUAL CCH-3 CUISINART
Cuisinart® INSTRUCTION & RECIPE BOOKLET
natural_image
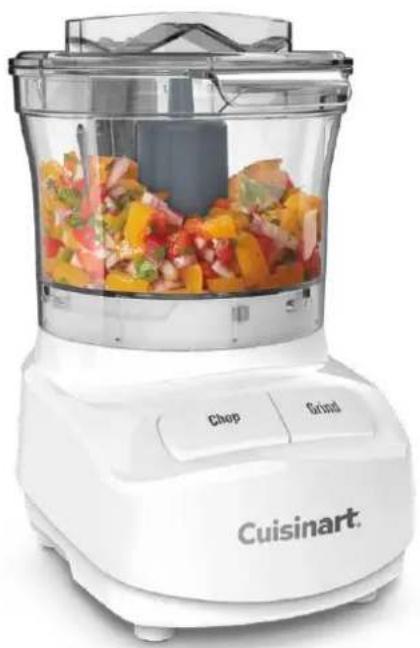
White Cuisinart kitchen blender with visible food mixture and control buttons (no text or symbols on the device itself)Cuisinart® 3-Cup Mini Chopper
CCH-3 Series
For your safety and continued enjoyment of this product, always read the instruction book carefully before using.
IMPORTANT UNPACKING INSTRUCTIONS
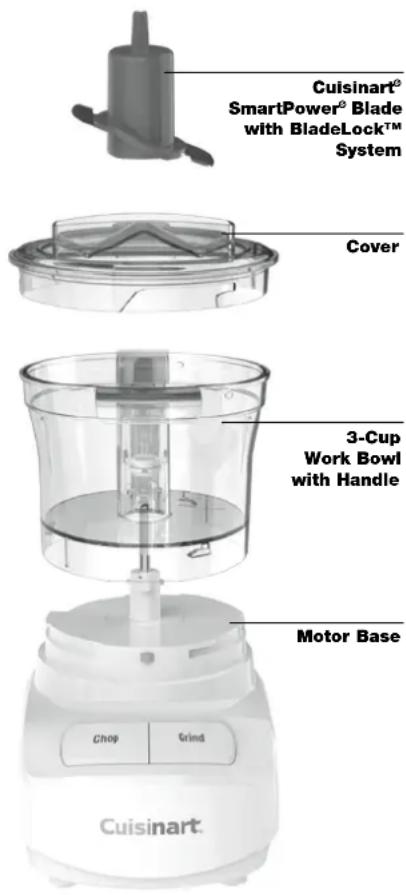
This package contains a Cuisinart ^® 3-Cup Mini Chopper and the standard parts for it: SmartPower ^® metal chopping/grinding blade with BladeLock ^™ System and instruction/recipe booklet.
CAUTION: THE CHOPPING/GRINDING BLADE HAS VERY SHARP EDGES.
To avoid injury when unpacking, please follow these instructions:
- Place the box on a table or kitchen counter. Be sure the box is right side up.
- Lift and remove the cardboard lid from the work bowl cover.
- Grasping the work bowl handle, lift the unit up and out of the box and place on the tabletop.
- Turn the work bowl counterclockwise to unlock it from the unit base. Lift up and remove.
- CAREFULLY REMOVE THE CHOPPING/GRINDING BLADE BY GRASPING THE CENTER GREY HUB AND LIFTING IT STRAIGHT UP. NEVER TOUCH THE BLADE, AS IT IS RAZOR SHARP.
- Read the instructions thoroughly before using the machine.
NOTE: We recommend that you visit our website, https://registria.cuisinart.com, for a fast, efficient way to complete your product registration.
CONTENTS
Important Safeguards....2
Introduction....3
Assembly Instructions....3
Tips for Processing Food ....4
Processing Food 4
Cleaning, Storage, and Maintenance....5
Troubleshooting....5
Operating Techniques Chart....6
Recipes....7
Warranty 13
IMPORTANT SAFEGUARDS
When using an electrical appliance, basic safety precautions should always be adhered to, including the following:
1. Read all instructions.
- To protect against risk of electric shock, do not put motor base in water or other liquids
-
This appliance is not intended for use by children or by persons with reduced physical, sensory, or mental capabilities, or lack of experience and knowledge. Close supervision is necessary when any appliance is used near children. Children should be supervised to ensure that they do not play with the appliance.
-
Always unplug from outlet when not in use, before assembling or dissembling parts, and before cleaning. To unplug, grasp the plug and pull from the outlet. Never pull from the power cord.
-
Avoid contact with moving parts.
-
Do not operate any appliance that has a damaged cord or plug or after it has been
dropped or damaged in any way. Contact our Consumer Service Center at 1-800-762-0190 for information on examination, repair, or adjustment.
-
The use of attachments not recommended or sold by Cuisinart may cause fire, electric shock, or injury.
-
Do not let cord hang over edge of table or counter, or touch hot surfaces, including the stove.
-
Do not use outdoors.
-
Keep hands and utensils away from moving blade while processing to prevent the risk of severe injury to persons or damage to the mini chopper. A scraper may be used, but only when the mini chopper is not running.
-
Blade is extremely sharp. Handle carefully when removing, inserting, or cleaning. Always allow blade to stop moving before removing cover.
-
To reduce the risk of injury, never place cutting blade on base without first putting work bowl properly in place.
-
Be certain cover is securely locked in place before operating appliance. Do not attempt to remove cover until blade has stopped rotating.
-
Do not attempt to defeat the cover interlock mechanism, as serious injury may result.
-
Before using, check work bowl for presence of foreign objects.
-
Do not operate your appliance in an appliance garage or under a wall cabinet. When storing in an appliance garage, always unplug the unit from the electrical outlet. Not doing so could create a risk of fire, especially if the appliance touches the walls of the garage or the door touches the unit as it closes.
SAVE THESE INSTRUCTIONS FOR HOUSEHOLD USE ONLY
NOTICE
This appliance has a polarized plug (one blade is wider than the other). As a safety feature, this plug will fit only one way in a polarized outlet. If the plug does not fit fully in the outlet, reverse the plug. If it still does not fit, contact a qualified electrician. Do not attempt to defeat this safety feature.
INTRODUCTION
Congratulations on your new Cuisinart® 3-Cup Mini Chopper! It handles a variety of food preparation tasks, such as chopping, grinding, puréeing, emulsifying, and blending. The patented SmartPower® auto-reversing blade features an incredibly sharp edge for delicate chopping and puréeing soft foods. The reverse edge is blunt to grind through spices and harder foods. And the exclusive BladeLock™ System enables the blade to lock into the bowl, so you can pour ingredients out of the bowl without first having to remove the blade.
The powerful high-speed motor works hard and fast to accomplish small jobs with ease. Chop herbs, onions, garlic; grind spices, hard cheese; purée baby foods; and blend homemade mayo and flavored butter all in this single compact machine. You have virtually unlimited options with the Cuisinart® 3-Cup Mini Chopper. Enjoy!
ASSEMBLY INSTRUCTIONS
- With the motor base on the tabletop, place the work bowl firmly on the motor base.
- Turn the work bowl clockwise to lock onto base.
- CAREFULLY pick up the blade by its hub and place on the center stem until it drops to the bottom of the stem. Firmly push to ensure that the blade is locked into position. IMPORTANT: HANDLE WITH CARE. The blade is razor sharp.
- Add food to be processed.
- Place the cover on the work bowl with the small tab to the left of the white column in the back of the work bowl.
- Turn cover clockwise (toward the back column) to securely lock.
- Plug unit into wall socket.
- You are ready to chop/grind.
TIPS FOR PROCESSING FOOD
Preparing the Food
Size
Always cut large pieces of food into smaller pieces of even size – about 12 to 1 inch (12mm) in size or as specified in the Operating Techniques Chart on page 6. If you don't start with pieces that are small and uniform, you will not get an even chop.
Quantity
Do not overload the work bowl. Overloading causes inconsistent results and it strains the motor. As a rule of thumb, most foods should not reach more than two-thirds of the way up the work bowl. Use the quantities given in the following chart and recipe section as a guide.
NOTE: Due to the powerful motor provided with this unit, we recommend using one hand to support the Cuisinart® 3-Cup Mini Chopper during operation.
Selecting the Right Operating Control
Use the Chop function for chopping, puréeing, and mixing. It is the right choice, for example, for chopping foods such as herbs, celery, onions, garlic, and most cheeses. It is also the right choice for puréeing cooked vegetables, making mayonnaise, and mixing salad dressing.
Pulse action is best when you are using the Chop function. Two or three pulses are often enough. Be sure to check the food frequently to prevent overprocessing. If you overprocess, you are likely to get a watery paste instead of a fine chop.
Use the Grind function for grinding spices and for chopping hard foods such as peppercorns, seeds, chocolate, and nuts.
Continuous-hold action is best when you are using the Grind function. You may have to run the Cuisinart® 3-Cup Mini Chopper for several seconds with some foods to achieve the desired results – or as long as 20 seconds for some seeds.
When you operate the unit for more than 10 seconds, use a pulse action every 10 seconds or so to allow food to drop to the bottom of the work bowl. This provides more consistent results.
NOTE: The work bowl and cover may become scratched when you use them for grinding grains and spices. This does not affect the performance of the Cuisinart® 3-Cup Mini Chopper. However, you may want to reserve the original bowl for grinding these items and purchase an additional bowl and cover set for other uses. You can order an additional work bowl and cover by calling our Consumer Service Center toll-free at 1-800-726-0190.
Adding Liquid
You can add liquids such as water, oil, or flavoring while the machine is running. For example, you might want to add oil when making mayonnaise or salad dressing. Pour the liquid through one of the openings in the cover.
IMPORTANT: Add liquid through only one opening at a time. The other opening must be left free to allow air to escape. If both openings are blocked, liquid cannot flow smoothly into the bowl.
Removing Food from the Sides of the Bowl Occasionally, food will stick to the sides of the bowl as you process. Stop the machine to clear food away. AFTER THE BLADE HAS STOPPED MOVING, remove the cover, and use a spatula to scrape the food from the sides of the bowl back into the center. Do not put hands into bowl unless unit is unplugged.
NOTE: HANDLE WITH CARE. The blade is razor sharp.
PROCESSING FOOD
- Place food in the assembled work bowl. Be sure the food is cut into even, small pieces, and the bowl is not overloaded.
- Lock the cover into position.
- Press the Chop or Grind button, depending on the food you are processing.
- When you have finished processing the food, stop the machine by releasing the control button.
- WHEN THE BLADE STOPS MOVING, unplug the unit.
- Remove cover and work bowl.
a. Turn work bowl cover counterclockwise to remove.
b. Turn work bowl counterclockwise to unlock it and lift it off base.
- To remove liquids and sauces from bowl: Simply pour contents out of work bowl. Our convenient BladeLock™ System keeps blade safely in place.
- To remove thicker ingredients from bowl: Carefully remove the SmartPower ^® blade by holding the stem on the top and gently pulling up to disengage blade lock. Remove food with a spatula. You can also remove contents while the bowl is still on the base.
NOTE: HANDLE WITH CARE. THE BLADE IS RAZOR SHARP.
Tips: When making a recipe that involves multiple steps, always process the dry ingredients first and then the wet to avoid having to clean the bowl and blade between each task.
Never operate the Cuisinart® 3-Cup Mini Chopper with an empty work bowl.
CLEANING, STORAGE, AND MAINTENANCE
To simplify cleaning, rinse the work bowl, cover, and blade immediately after each use so that food won't dry on them. Wash blade, work bowl, and cover in warm, soapy water. Rinse and dry. Wash the blade carefully. Avoid leaving blade in soapy water where it may disappear from sight.
The work bowl and cover can be washed on the top rack of a dishwasher. Insert the work bowl upside down and the cover right side up. The blade can be washed in the cutlery basket. Unload the dishwasher carefully to avoid contact with the sharp blade. Wipe the motor base clean with a damp sponge or cloth. Dry it immediately. Never submerge the motor base or the plug in water or other liquids.
The Cuisinart ^® 3-Cup Mini Chopper stores neatly on the countertop. When it is not in use, be sure to leave it unplugged. The hidden cord storage underneath the motor base will help to keep excess cord off the countertop. Store the unit assembled to prevent loss of parts. Store the blade as you would sharp knives – out of the reach of children.
The Cuisinart® 3-Cup Mini Chopper is intended for HOUSEHOLD USE ONLY.
Maintenance: Any service other than cleaning and normal user maintenance should be performed by an authorized Cuisinart Service Representative.
TROUBLESHOOTING
Motor doesn't start or blade doesn't rotate.
- Check that plug is securely inserted into outlet.
- Check that work bowl and cover are securely locked into place.
- Be sure to press only one operation control button at a time.
- This appliance comes with a resettable protection device to prevent damage to the motor in the case of extreme overload. Should unit shut off unexpectedly, unplug it and let it cool for at least 15 minutes before continuing.
Food is unevenly chopped.
- Try cutting food into smaller, even-sized pieces.
- Try processing smaller amounts of food per batch.
Food is chopped too fine or is watery.
- The food has been overprocessed. Use brief pulses, or process for a shorter time. Let blade stop completely between pulses.
Food collects on work bowl cover or sides of prep bowl.
- This is normal; turn machine off. When blade stops rotating, remove cover and clean bowl and cover with spatula.
Food catches on blade.
- You may be processing too much food. Carefully remove blade. Remove food from blade with a spatula and begin processing again.
OPERATING TECHNIQUES CHART
With the Cuisinart® 3-Cup Mini Chopper, you can chop, grind, or purée a variety of foods. As a rule of thumb, most foods should not reach more than two-thirds of the way up the work bowl.
| Food Preparation, Max Quantity, and Tips | |
| Bread for Breadcrumbs | Bread can be fresh, stale, or toasted (cooled). Use 1-inch pieces and pulse on Chop to break up, then process until desired fineness. |
| Butter for dips, spreads, and compound butters | Up to 4 ounces (1 stick). Butter should be room temperature and cut into 1-inch pieces. Pulse on Chop and then run continuously, alternating between Chop and Grind, to produce a smooth result. If flavoring, e.g. herbs or citrus zest, process the mix-ins first and then add the butter. |
| Cheese (hard) | Up to 4 ounces, cut into 1⁄2-inch cubes. Pulse on Chop to break up and then run continuously on Chop until desired consistency. |
| Cream Cheese | Up to 4 ounces (1⁄2 standard package). Cut into 2-inch pieces and bring to room temperature prior to processing. Alternate between Chop and Grind to produce a smooth result. |
| Chocolate | Up to 1 ounce of chocolate, either chips or 1⁄2-inch pieces. Pulse on Chop to break up and then either pulse or run continuously on Chop until desired size. |
| Cookies for crumb crusts and desserts | Break cookies into 1-inch pieces. Pulse on Chop to break up and then process continuously on Chop until desired consistency. |
| Fruits for purées and smoothie bowls | Up to 3⁄4 cup of fruit pieces (1-inch pieces). Fruit should be peeled and pitted if necessary. Pulse on Chop; process on Chop if a smooth purée is desired. |
| Garlic | Up to 6 cloves (peeled). Pulse on Chop to achieve a rough chop. Process on Chop to achieve a fine chop. |
| Ginger | Peel and cut into 1⁄2-inch pieces, up to 1⁄4 cup of pieces. Pulse on Chop and then run continuously on Chop to achieve a fine chop. |
| Herbs, fresh | Up to 1⁄2 cup fresh herbs, dried very well. Pulse on Chop until desired fineness. |
| Meat (raw) Up to 4 ounces, cut into 1⁄2-inch pieces. Pulse on Chop until desired consistency. | |
| Nuts | Up to 1⁄2 cup. Pulse on Chop to roughly chop. Run continuously on Chop to achieve a finer consistency. |
| Onion | Up to 1⁄2 medium onion, cut into 1⁄2-inch pieces. Pulse on Chop until desired consistency. |
| Peppercorns | Up to 1⁄4 cup. Run continuously on Grind until desired fineness. Hard spices may scratch the interior of the bowl. |
| Spices (cinnamon and other hard spices) | Up to 2 cinnamon sticks, halved. Pulse on Grind to break up and then run continuously on Grind until desired fineness. Hard spices may scratch and/or discolor the interior of the bowl. |
| Vegetables, cooked for purées | Up to 1 cup cooked vegetables. Pulse on Chop and then run continuously, alternating between Chop and Grind, until desired consistency. |
*Surface scratches that may occur will not impair the function of the Cuisinart® 3-Cup Mini Chopper. You may want to consider purchasing a second work bowl specifically for grinding hard spices.
Recipes
Dips, Spreads, and Schmears
Chunky Guacamole 8
Everything Bagel Labneh 8
Herbed Feta Dip 8
Honey Jalapeño Butter 9
Peach Salsa 9
Peppadew Cheese Spread 9
Roasted Red Pepper Hummus 10
Bites to Share
Ricotta Bruschetta 10
Mediterranean Nachos 10
Dressings and Sauces
Cheater's Caesar Dressing 11
Romesco Sauce 11
Sweet Treats
Chocolate Avocado Mousse 12
CHUNKY GUACAMOLE
Our fresh guacamole is perfect for the Sunday game or served alongside quesadillas for a festive dinner.
Makes about 1 ^1/3 cups
1 small garlic clove, peeled
½ jalapeño, cut into 1-inch pieces (rib and seeds removed, if desired)
1 scallion, cut into 1-inch pieces
1 tablespoon fresh cilantro leaves, stems discarded
2 ripe avocados, halved, pitted, and peeled
2 tablespoons fresh lime juice
^3/_4 teaspoon kosher salt
- Put the garlic, jalapeño, scallion, and cilantro in the work bowl. Pulse 8 to 10 times on Chop to roughly but evenly chop.
- Scrape down the sides of the bowl. Add the avocados, lime juice, and salt to the work bowl. Pulse, alternating Chop and Grind, until you reach your desired consistency. For a smoother guacamole, run on Chop continuously.
Nutritional information per serving (1/3 cup):
Calories 118 (74% from fat) • carb. 7g • pro. 1g • fat 10g • sat. fat 1g chol. 0mg • sod. 434mg • calc. 13mg • fiber 5g
This dip is delicious with fresh vegetables or spread on a bagel.
Makes 1 ^3 / _4 cups
2 cups plain whole-milk Greek yogurt
1 teaspoon kosher salt, more to taste
2 tablespoons everything bagel seasoning, more to taste
-
To make the labneh, combine the yogurt and salt in a medium bowl. Place a fine-mesh strainer lined with cheesecloth over another medium bowl. Transfer the yogurt to the strainer and cover with plastic wrap. Let the yogurt strain in the refrigerator overnight, or up to 24 hours (once strained, it is labneh). The labneh should be a consistency similar to cream cheese.
-
Transfer the labneh to the work bowl and process on Chop until silky smooth. Add the everything bagel seasoning and pulse on Chop to combine.
-
Taste and adjust seasoning, then serve.
Nutritional information per serving:
Calories 20 (50% from fat) • carb. 0g • pro. 1g • fat 1g • sat. fat 1g chol. 3mg • sod. 158mg • calc. 0mg • fiber 0g
HERBED FETA DIP
A lovely accompaniment to a crudité platter, or as a spread on a sandwich paired with crunchy cucumber slices.
Makes about 2 cups
2 tablespoons fresh parsley leaves
2 tablespoons fresh dill
1 garlic clove, peeled
1 ½-inch piece lemon peel
8 ounces feta cheese, broken into 1-inch pieces
73 cup plain Greek yogurt (any fat percentage)
Pinch freshly ground black pepper
Pinch crushed red pepper flakes
2 tablespoons extra-virgin olive oil
- Put the parsley and dill in the work bowl. Pulse on Chop until finely chopped. Scrape down the sides of the bowl and then add the garlic and lemon peel. Process continuously on Chop until finely chopped.
- Add the feta, yogurt, black pepper, and pepper flakes. Pulse on Chop to first break up and roughly chop, then add the oil and process on Chop until smooth. Serve immediately, or store in an airtight container in the refrigerator for up to 5 days. Bring to room temperature before serving.
Nutritional information per serving (2 tablespoons):
Calories 59 (72% from fat) • carb. 1g • pro. 3g • fat 5g • sat. fat 2g chol. 13mg • sod. 163mg • calc. 85mg • fiber 0g
HONEY JALAPEÑO BUTTER
While we love this butter spread on warm cornbread, it's also great atop a piece of grilled chicken.
Makes 1 cup
14 jalapeño, seeded and halved
8 tablespoons (1 stick) good-quality unsalted butter, room temperature, cut into 1-inch pieces
2 tablespoons honey
Pinch kosher salt
1. Put the jalapeño in the work bowl. Pulse on Chop and then process continuously on Chop until fine and evenly chopped. Scrape down the sides of the bowl and add the butter, honey, and salt. Process continuously, alternating between Chop and Grind, until combined, about 30 seconds, stopping to scrape down the bowl as needed.
2. Transfer the butter to a sheet of waxed paper. With the aid of the paper, form the butter into a log. Roll and wrap well in plastic wrap. Store in the refrigerator for up to 2 weeks or in the freezer for up to 1 month.
Nutritional information per serving (2 tablespoons):
Calories 115 (85% from fat) • carb. 4g • pro. 0g • fat 11g • sat. fat 7g chol. 30mg • sod. 18mg • calc. 24mg • fiber 0g
PEACH SALSA
The sweetness of this salsa makes it surprisingly versatile. While it can be served with tortilla chips, it also works well on a piece of grilled fish or crab cakes. We also love how it works on our Ricotta Bruschetta on page 10.
Makes about 1½ cups
14 large red bell pepper, cored, seeded, and cut into 12 -inch pieces
1 small garlic clove, peeled
1 small jalapeño, halved and seeded, cut into 12 -inch pieces
12 small red onion, cut into 12 -inch pieces
2 peaches, peeled and pitted, cut into 12 -inch pieces
1½ tablespoons fresh cilantro or parsley
2 teaspoons fresh lime juice
1½ teaspoons rice (or raspberry or white balsamic) vinegar
12 teaspoonhoney
Pinch kosher salt
- Put the red pepper in the work bowl and pulse on Chop to roughly chop. Transfer to a mixing bowl.
- Put the garlic, jalapeño, and onion in the work bowl. Pulse on Chop until roughly chopped. Transfer to the bowl with the red pepper.
- Add the peaches and cilantro to the work bowl, and pulse on Chop until the peaches are roughly chopped. Transfer to the bowl with the chopped vegetables. Stir in the lime juice, vinegar, honey, and salt. Cover and let the salsa rest for at least 30 minutes to allow the flavors to develop. Taste and adjust seasoning as desired.
Nutritional information per serving (2 tablespoons):
Calories 10 (5% from fat) • carb. 2g • pro. 0g • fat 0g sat. fat 0g • chol. 0mg • sod. 6mg • calc. 2mg • fiber 0g
PEPPADEW CHEESE SPREAD
A piquant spread that's a cross between Southern pimento cheese and fromage fort. You can always swap some of the Cheddar here for whatever leftover bits of cheese you have on hand.
Makes 1 ^1/3 cups
1 small garlic clove, peeled
4 ounces good-quality sharp Cheddar, cut into 12 -inch to 1-inch cubes, at room temperature
4 ounces goat cheese, softened
2 tablespoons salted butter, softened
2 ounces (about 8 or 9) hot, sweet, pickled Peppadew peppers, drained and halved
2 tablespoons dry white wine
Pinch kosher salt Butter crackers, for serving
- Put the garlic in the work bowl. Process continuously on Chop to finely chop, about 5 seconds. Add the Cheddar and pulse 10 to 12 times on Chop to roughly chop, then run on Chop continuously until finely chopped. The Cheddar should be coarsely crumbled.
- Break up the goat cheese in the work bowl, then add the butter, Peppadews, wine, and salt. Process on Chop continuously until well blended and mostly smooth, scraping down the bowl as necessary. The finished spread will be somewhat chunky, with some visible bits of Cheddar and flecks of pepper throughout.
- Transfer to a bowl and serve immediately with the crackers. Alternatively, cover the bowl and chill for a firmer consistency, at least 1 hour.
Tip: For an impressive presentation, transfer the spread to a small plastic wrap-lined bowl; tap on the counter to remove air pockets, and smooth the top with an offset spatula or butter knife. Cover with plastic wrap and refrigerate to set, at least 2 hours. Unmold the spread onto a serving dish or platter. Let come to room temperature before serving, 15 to 20 minutes.
Nutritional information per serving (2 tablespoons):
Calories 95 (73% from fat) • carb. 2g • pro. 4g • fat 8g • sat. fat 5g chol. 26mg • sod. 134mg • calc. 78mg • fiber 0g
ROASTED RED PEPPER HUMMUS
A different take on traditional hummus, the roasted red pepper gives a sweet and tangy flavor to this popular spread.
Makes about 1 cup
2 tablespoons fresh Italian parsley
1 cup canned chickpeas, drained and rinsed
14 cup roasted red pepper, chopped
1 garlic clove, peeled
2 tablespoons fresh lemon juice
1 tablespoon tahini
2 teaspoons extra-virgin olive oil
12 teaspoon kosher salt
- Put the parsley in the work bowl. Process on Chop until finely chopped.
- Add the chickpeas, red pepper, garlic, lemon juice, tahini, oil, and salt, and process continuously, alternating between Chop and Grind, until smooth, stopping to scrape down the sides of the work bowl with a spatula as necessary.
- Transfer to a serving dish and serve immediately with pita bread triangles or crackers.
Nutritional information per serving (2 tablespoons): Calories 79 (52% from fat) • carb. 8g • pro. 2g • fat 5g • sat. fat 1g chol. 0mg • sod. 244mg • calc 20g • fiber 2g
RICOTTA BRUSCHETTA
A super simple appetizer either served on its own or paired with our Peach Salsa.
Makes 12 bruschetta
12 12 -inch-thick slices baguette
1 garlic clove, smashed
1½ tablespoons extra-virgin olive oil
1 cup ricotta, strained
12 ounce Parmesan, cut into 12 -inch cubes
12 teaspoon kosher salt
12 teaspoon freshly ground black pepper 12 to 1 tablespoon honey, optional
- Preheat the oven to 375^ F with the rack in the upper position.
- While the oven is preheating, rub one side of each slice of bread with the garlic and then brush with the olive oil.
- Bake in the preheated oven for 2 to 3 minutes per side, or until lightly toasted.
- While the bread is toasting, put the ricotta, Parmesan, salt, and pepper in the work bowl. Pulse on Grind until well combined.
- Turn on the broiler. Divide the ricotta mixture evenly among the bread slices. Return to the oven and then broil for about 2 minutes, or until the cheese is fully warned.
- Drizzle the honey, if using, over the bruschetta and serve immediately.
Nutritional information per slice:
Calories 106 (68% from fat) • carb. 11g • pro. 4g • fat 5g • sat. fat 2g chol. 8mg • sod. 236mg • calc. 83mg • fiber 1g
MEDITERRANEAN NACHOS
This variation of classic nachos features a Kalamata olive-banana pepper twist on traditional salsa and is perfect for entertaining or for an easy weeknight dinner.
Makes 10 servings
12 cup banana pepper rings
14 cup pitted Kalamata olives
14 small red onion, cut into 1-inch pieces
1 cup grape tomatoes
2 tablespoons plus ¼ cup fresh parsley leaves, torn, divided
14 teaspoon freshly ground black pepper
1½ quarts (about 7 ounces) pita chips
1½ cups shredded white Cheddar cheese
14 cup feta cheese, crumbled
1 tablespoon fresh dill, torn
- Preheat the oven to 350^ F. Line a baking sheet with parchment paper; reserve.
- Put the banana peppers, olives, and onion in the work bowl. Process on Chop to roughly chop. Transfer to a small mixing bowl.
- Add the tomatoes and 2 tablespoons of the parsley to the work bowl and pulse on Chop until the tomatoes are roughly chopped. Transfer to the mixing bowl with the pepper-olive mixture, add the black pepper, and stir well to combine.
- Spread half of the pita chips on the prepared baking sheet, followed by half of the Cheddar, the remaining chips, then the remaining Cheddar. Bake until the cheese is melted, about 5 minutes. Remove from the oven and top with the pepper-olive salsa, feta, remaining parsley, and dill. Serve immediately.
Nutritional information per serving (based on 10 servings):
Calories 180 (68% from fat) • carb. 15g • pro. 8g • fat 10g • sat. fat 4g chol. 21mg • sod. 420mg • calc. 153mg • fiber 1g
CHEATER'S CAESAR DRESSING
Mayonnaise substitutes for raw egg yolks in this velvety fuss-free dressing.
Makes 1 cup
2 garlic cloves, peeled
2 ounces Parmesan cut into 1/2-inch cubess
6 oil-packed anchovy fillets, drained and halved
2 teaspoons Dijon mustard
14 cup mayonnaise
2 tablespoons fresh lemon juice
2 teaspoons red wine vinegar
12 teaspoon kosher salt
12 teaspoon freshly ground black pepper
^1/_3 cup extra-virgin olive oil
- Put the garlic in the work bowl. Process on Chop continuously to finely chop, about 5 seconds. Add the Parmesan and pulse 10 to 12 times on Chop to roughly chop. Add the anchovies and mustard, and then Process on Chop continuously until the mixture is finely crumbled. Scrape down the bowl, then continue to process until the mixture forms a paste, 30 to 35 seconds.
- Add the mayonnaise, lemon juice, vinegar, salt, and pepper. With the machine running, add the olive oil in a steady stream, through one of the drizzle holes on top of the cover, until emulsified. Process on Grind for an additional 15 seconds. The finished dressing will be quite thick.
- Taste and adjust seasoning and/or acidity, if needed. Use immediately to dress salad greens or as desired.
Nutritional information per serving (2 tablespoons):
Calories 160 (90% from fat) • carb. 1g • pro. 3g • fat 16g • sat. fat 3g chol. 9mg • sod. 416mg • calc. 104mg • fiber 0g
ROMESCO SAUCE
You can thank Spain for this smoky, robust sauce. It's delicious with grilled meat and fish, or try it heaped on roasted cauliflower steaks.
Makes 2 cups
1 dried ancho chile pepper, rinsed, stemmed, and seeded
1 ½-inch slice sourdough or country-style bread (about 2 ounces)
1 large red bell pepper, stemmed
1 large tomato, or 2 plum tomatoes, cored
12 cup whole raw almonds, blanched (see Tip)
1 large garlic clove, peeled
14 cup loosely packed parsley leaves
2 tablespoons sherry vinegar
1 teaspoon smoked paprika
12 teaspoon kosher salt
Pinch crushed red pepper flakes
12 cup extra-virgin olive oil
- Place the ancho chile in a bowl and cover with hot water. Let soak for 15 minutes, until softened.
- Meanwhile, preheat the broiler on high with a rack positioned in the upper third of the oven. Put the bread on the rack and broil 2 to 3 minutes on each side, using tongs to flip, until toasted. Remove the crust, and then tear the bread into 1-inch pieces; reserve.
- Place the pepper and tomato on a large rimmed baking sheet and broil, rotating frequently with the tongs, until evenly blackened and blistered on all sides. Transfer the tomato and pepper to a bowl; cover with plastic wrap and set aside for 10 minutes. The steam will help to loosen the skins.
-
Turn off the broiler and preheat the oven to 350^ F. Put the almonds on the baking sheet and toast for 8 to 10 minutes, until just fragrant.
-
When the pepper and tomato are cool enough to handle, peel off and discard the skins. Slice the pepper to remove the core and seeds. Use a knife to roughly chop the tomato and pepper; set aside. Gently scrape the softened flesh of the ancho chile from its papery skin; discard the skin.
- Put the garlic in the work bowl. Process on Chop continuously to finely chop, about 5 seconds. Add the almonds and pulse 10 to 12 times on Chop to roughly chop. Add the pepper, tomato, ancho chile, and toasted bread, and continue to pulse on Chop until mostly incorporated.
- Scrape down the bowl and add the parsley, vinegar, paprika, salt, and crushed red pepper. With the machine running, add the olive oil in a steady stream. Scrape down the bowl. Process on Grind continuously to your desired consistency. The final sauce should have some texture from the almonds.
- Taste and adjust seasoning and/or acidity, if needed. Serve as desired.
Tip: If you cannot find blanched almonds, you can easily blanch your own. Place whole almonds (with skins) in a bowl, cover with boiling water, and let stand for 1 minute. Drain almonds and immediately rinse under cold water. Gently squeeze almonds to loosen and slip off skins.
Nutritional information per serving (1/4 cup):
Calories 195 (18% from fat) • carb. 7g • pro. 3g • fat 18g • sat. fat 2g chol. 0mg • sod. 75mg • calc. 33mg • fiber 2g
CHOCOLATE AVOCADO MOUSSE
You may find the combination unusual, but the creamy flesh of avocados magically combines with bittersweet chocolate in a decadent mousse that is also rich in healthy fat—a no-brainer dessert!
Makes 4 servings
2 ounces bittersweet chocolate chips, preferably 60% cacao
2 ripe avocados, halved and pitted
14 cup pure maple syrup
14 cup unsweetened cocoa powder
2 tablespoons strong-brewed espresso or coffee
1 teaspoon pure vanilla extract Pinch sea salt Raspberries for serving, optional
- Place the chocolate chips in a heatproof bowl set over a saucepan of barely simmering water. Stir until thoroughly melted. Remove from the heat and let cool.
- Scoop out the avocado flesh, in pieces, directly into the work bowl. Pulse on Chop to start processing, and then run on Chop continuously until puréed, 15 to 20 seconds. Scrape down the bowl and add the melted chocolate, maple syrup, cocoa powder, espresso, vanilla, and salt. Run on Chop continuously until fully incorporated and smooth.
- Divide the mousse evenly among 4 small dessert glasses or bowls. Cover and chill for at least 1 hour before serving. Serve the mousse with raspberries, if desired.
Nutritional information per serving (approximately 12 cup): Calories 310 (58% from fat) • carb. 31g • pro. 4g • fat 22g • sat. fat 7g chol. 0mg • sod. 78mg • calc. 12mg • fiber 12g
WARRANTY
Limited 18-Month Warranty
This warranty is available only to U.S. consumers who purchase products directly from Cuisinart or an authorized Cuisinart ^® reseller. You are a consumer if you own a Cuisinart ^® 3-Cup Mini Chopper that was purchased at retail for personal, family, or household use. Except as otherwise required under applicable law, this warranty is not available to retailers or other commercial purchasers or owners or consumers who purchase from unauthorized Cuisinart ^® resellers. We warrant that your Cuisinart ^® 3-Cup Mini Chopper will be free of defects in materials and workmanship under normal home use for 18 months from the date of original purchase.
We recommend that you visit our website, https://cuisinart.registria.com, for a fast, efficient way to complete your product registration. However, product registration does not eliminate the need for the consumer to maintain the original proof of purchase in order to obtain the warranty benefits. In the event that you do not have proof of purchase date, the purchase date for purposes of this warranty will be the date of manufacture.
CALIFORNIA RESIDENTS ONLY
California law provides that for In-Warranty Service, California residents have the option of returning a nonconforming product (A) to the store where it was purchased or (B) to another retail store that sells Cuisinart products of the same type. The retail store shall then, according to its preference, either repair the product, refer the consumer to an independent repair facility, replace the product, or refund the purchase price less the amount directly attributable to the consumer's prior usage of the product. If neither of the above two options results in the appropriate relief to the consumer, the consumer may then take the product to an independent repair facility, if service or repair can be economically accomplished. Cuisinart and not the consumer will be responsible for the reasonable cost of such service, repair, replacement, or refund for nonconforming products under warranty. California residents may also, according to their preference, return nonconforming products directly to Cuisinart for repair or, if necessary, replacement by calling our Consumer Service Center toll-free at 1-800-726-0190. Cuisinart will be responsible for the cost of the repair, replacement, and shipping and handling for such nonconforming products under warranty.
HASSLE-FREE REPLACEMENT WARRANTY
Your ultimate satisfaction in Cuisinart products is our goal, so if your Cuisinart ^® 3-Cup Mini Chopper should fail within the generous warranty period, we will repair it or, if necessary, replace it at no cost to you. To obtain a return shipping label, complete the product inquiry form at www.cuisinart.com/customer-care/product-assistance/product-inquiry/. Or call our Consumer Service Center toll-free at 1-800-726-0190 to speak with a representative.
Your Cuisinart ^® 3-Cup Mini Chopper has been manufactured to the strictest specifications and has been designed for use only in 120-volt outlets and only with authorized accessories and replacement parts. This warranty expressly excludes any defects or damages caused by attempted use of this unit with a converter, as well as use with accessories, replacement parts, or repair service other than those authorized by Cuisinart. This warranty does not cover any damage caused by accident, misuse, shipment, or other than ordinary household use. This warranty excludes all incidental or consequential damages. Some states do not allow the exclusion or limitation of these damages, so these exclusions may not apply to you. You may also have other rights, which vary from state to state.
Important: If the nonconforming product is to be serviced by someone other than Cuisinart's Authorized Service Center, please remind the servicer to call our Consumer Service Center at 1-800-726-0190 to ensure that the problem is properly diagnosed, the product is serviced with the correct parts, and the product is still under warranty.
©2024 Cuisinart
Glendale, AZ 85307
Printed in China
23CE087305
IB-17970-ESP-A
- Cuisinart® INSTRUCTION & RECIPE BOOKLET
- Cuisinart® 3-Cup Mini Chopper
- CCH-3 Series
- IMPORTANT UNPACKING INSTRUCTIONS
- CAUTION: THE CHOPPING/GRINDING BLADE HAS VERY SHARP EDGES.
- CONTENTS
- IMPORTANT SAFEGUARDS
- Read all instructions.
- SAVE THESE INSTRUCTIONS FOR HOUSEHOLD USE ONLY
- NOTICE
- INTRODUCTION
- ASSEMBLY INSTRUCTIONS
- TIPS FOR PROCESSING FOOD
- Preparing the Food
- Size
- Quantity
- Selecting the Right Operating Control
- Adding Liquid
- PROCESSING FOOD
- NOTE: HANDLE WITH CARE. THE BLADE IS RAZOR SHARP.
- CLEANING, STORAGE, AND MAINTENANCE
- TROUBLESHOOTING
- Food is unevenly chopped.
- Food is chopped too fine or is watery.
- Food collects on work bowl cover or sides of prep bowl.
- Food catches on blade.
- OPERATING TECHNIQUES CHART
- Recipes
- Dips, Spreads, and Schmears
- Bites to Share
- Dressings and Sauces
- Sweet Treats
- CHUNKY GUACAMOLE
- Makes about 1 1/3 cups
- Makes 1 3 / _4 cups
- HERBED FETA DIP
- Makes about 2 cups
- HONEY JALAPEÑO BUTTER
- Makes 1 cup
- PEACH SALSA
- Makes about 1½ cups
- teaspoonhoney
- Pinch kosher salt
- PEPPADEW CHEESE SPREAD
- Makes 1 1/3 cups
- Pinch kosher salt Butter crackers, for serving
- ROASTED RED PEPPER HUMMUS
- Makes about 1 cup
- RICOTTA BRUSCHETTA
- Makes 12 bruschetta
- MEDITERRANEAN NACHOS
- Makes 10 servings
- CHEATER'S CAESAR DRESSING
- ROMESCO SAUCE
- Makes 2 cups
- CHOCOLATE AVOCADO MOUSSE
- Makes 4 servings
- WARRANTY
- Limited 18-Month Warranty
- CALIFORNIA RESIDENTS ONLY
- HASSLE-FREE REPLACEMENT WARRANTY
Brand : CUISINART
Model : CCH-3
Category : Food processor