PC-AUR44 - Soundcard Sonifex - Free user manual and instructions
Find the device manual for free PC-AUR44 Sonifex in PDF.


| Product Type | Professional PCIe Analog Sound Card |
| Model | PC-AUR44 (Auricon 4.4) |
| Brand | Sonifex |
| Channels | 4 stereo inputs & 4 stereo outputs (configurable as 8 mono) |
| Hardware Sampling Rate | 48 kHz, 96 kHz, 192 kHz |
| Hardware Resolution | 24-bit |
| Software Sampling Rates | Up to 192 kHz (various standard rates) |
| Dynamic Range | 114 dB typical (unweighted) |
| Input Impedance | 20 kΩ (balanced) |
| Output Impedance | 40 Ω (balanced) |
| Maximum Signal Level | +24 dBu (34.6 Vp-p) |
| Frequency Response | DC to 88 kHz (DC coupling); 1 Hz to 88 kHz (AC coupling) |
| Connector Type | 44-pin high-density D-type female |
| Interface | PCI Express (single lane) |
| Form Factor | Full-height PCIe card |
| Dimensions (Raw) | 14 cm x 12.5 cm x 2 cm (5.5" x 4.9" x 0.8") |
| Supported Operating Systems | Windows XP, Server 2003, Vista, Server 2008, 7, 8, 10, Server 2012, 2016 (32/64-bit) |
| Power Supply | Voltage selectable 115V or 230V AC, mains operated |
| Safety Class | Class I (protective earth connection required) |
| Maintenance | No user-serviceable parts; keep in dry, temperature-controlled environment |
| Warranty | 1 year standard, extendable to 2 years with online registration |
| Accessories Included | Handbook, driver CD |
| Repairs & Returns | Contact Sonifex or supplier for return procedure |
Frequently Asked Questions - PC-AUR44 Sonifex
User questions about PC-AUR44 Sonifex
0 question about this device. Answer the ones you know or ask your own.
Ask a new question about this device
Download the instructions for your Soundcard in PDF format for free! Find your manual PC-AUR44 - Sonifex and take your electronic device back in hand. On this page are published all the documents necessary for the use of your device. PC-AUR44 by Sonifex.
USER MANUAL PC-AUR44 Sonifex
Manufacturers of audio & video products for radio & TV broadcasters
SONIFEX
PC-AUR44 Handbook
For the latest Sonifex handbook information please visit the Sonifex website at www.sonifex.co.uk
This handbook is for use with the following product:
PC-AUR44 Auricon 4.4 PCIe Analogue Sound Card
Stock Code: 30-306
AW10677
©Sonifex Ltd, 2020
All Rights Reserved
Revision 1.08, February 2020
Sonifex Ltd, 61, Station Road, Irthlingborough,
Northants, NN9 5QE, England.
Tel: +44 (0)1933 650 700
Fax: +44 (0)1933 650 726
Email: sales@sonifex.co.uk
Website: https://www.sonifex.co.uk
Information in this document is subject to change without notice and does not represent a commitment on the part of the vendor. Sonifex Ltd shall not be liable for any loss or damage whatsoever arising from the use of information or any error contained in this manual.
No part of this manual may be reproduced or transmitted in any form or by any means, electronic or mechanical, including photocopying, recording, information storage and retrieval systems, for any purpose other than the purchaser's personal use, without the express written permission of Sonifex Ltd. Unless otherwise noted, all names of companies, products and persons contained herein are part of a completely fictitious adaptation and are designed solely to document the use of Sonifex product.
Made in the UK by SONIFEX
Contents
Contents
Product Warranty - 2 Year Extended iii
Sonifex Warranty & Liability Terms & Conditions iii
Unpacking Your Product v
Repairs & Returns v
CE Conformity v
Safety & Installation of Mains Operated Equipment v
Voltage Setting Checks v
Fuse Rating v
Power Cable & Connection v
WEEE Directive vi
Atmosphere/Environment vi
Introduction 1
Notes Regarding Windows Version Differences 2
Installation 2
Configuration 3
Operation on Windows 10, Server 2016, Windows 8, 7, Vista and
Server 2012, 2008-R2, 2008 4
Audio Endpoints 4
Mixer API 4
Audio Engine 5
Windows Vista/7/8 Mono Recording Bug 5
DirectSound and WDM Kernel Streaming 5
WaveRT on Windows 10, Server 2016, 8, 7, Vista and Server
2012, 2008-R2 and 2008 5
Topology 6
Extended Bit Depth Audio 6
Hyperthreading & Audio 6
Connecting the Auricon 4.4 to Unbalanced Inputs and Outputs 7
Functional Description 8
Auricon 4.4 Pinout 8
Auricon 4.4 Topology 9
Output Mixing 10
5.1 & 7.1 Surround Sound Playback and Recording Driver 11
Overview 11
Technical Specification For PC-AUR44 14
Figures
Fig 1-1: Auricon 4.4 Properties>Config Page 3
Fig 1-2: Connecting the Auricon 4.4 to Unbalanced Inputs 7
Fig 1-3: Connecting the Auricon 4.4 to Unbalanced Inputs Without a
Transformer 7
Fig 1-4: Connecting the Auricon 4.4 to Unbalanced Outputs 7
Table 1-1: Auricon 4.4 Pinout 8
Fig 1-5: Auricon 4.4 Topology 9
Fig 1-6: Output Mixing 10
Fig 1-7: Sound Playback Tab 11
Fig 1-8: Speaker Properties General Tab 12
Fig 1-9: Speaker Properties Levels Tab 12
Fig 1-10: Speaker Setup Dialog 13
Warranty Registration
SONIFEX
Register Online for an Extended 2 Year Warranty
As standard, Sonifex products are supplied with a 1 year back to base warranty.
If you register the product online, you can increase your product warranty to 2 years and we can also keep you informed of any product design improvements or modifications.
Product: ____ Serial No: ____
To register your product, please go online to www.sonifex.co.uk/register
SONIFEX
Sonifex Limited • 61 Station Road • Irthlingborough • Northamptonshire • NN9 5QE • United Kingdom
Tel: +44 (0)1933 650 700 • Fax: +44 (0)1933 650 726 • Email: technical.support@sonifex.co.uk • Internet: www.sonifex.co.uk
Product Warranty - 2 Year Extended
As standard, Sonifex products are supplied with a 1 year back to base warranty. In order to register the date of purchase and so that we can keep you informed of any product design improvements or modifications, it is important to complete the warranty registration online. Additionally, if you register the product on the Sonifex website, you can increase your product warranty to 2 years. Go to the Sonifex website at: www.sonifex.co.uk/register to apply for your 2 year warranty.
Sonifex Warranty & Liability Terms & Conditions
1. Definitions
'the Company' means Sonifex Ltd and where relevant includes companies within the same group of companies as Sonifex Limited.
'the Goods' means the goods or any part thereof supplied by the Company and where relevant includes: work carried out by the Company on items supplied by the Purchaser; services supplied by the Company; and software supplied by the Company.
'the Purchaser' means the person or organisation who buys or has agreed to buy the Goods.
'the Price' means the Price of the Goods and any other charges incurred by the Company in the supply of the Goods.
'the Warranty Term' is the length of the product warranty which is usually 12 months from the date of despatch; except when the product has been registered at the Sonifex website when the Warranty Term is 24 months from the date of despatch.
'the Contract' means the quotation, these Conditions of Sale and any other document incorporated in a contract between the Company and the Purchaser.
This is the entire Contract between the parties relating to the subject matter hereof and may not be changed or terminated except in writing in accordance with the provisions of this Contract. A reference to the consent, acknowledgement, authority or agreement of the Company means in writing and only by a director of the Company.
2. Warranty
a. The Company agrees to repair or (at its discretion) replace Goods which are found to be defective (fair wear and tear excepted) and which are returned to the Company within the Warranty Term provided that each of the following are satisfied:
i. notification of any defect is given to the Company immediately upon its becoming apparent to the Purchaser;
ii. the Goods have only been operated under normal operating conditions and have only been subject to normal use (and in particular the Goods must have been correctly connected and must not have been subject to high voltage or to ionising radiation and must not have been used contrary to the Company's technical recommendations);
iii. the Goods are returned to the Company's premises at the Purchaser's expense;
iv. any Goods or parts of Goods replaced shall become the property of the Company;
v. no work whatsoever (other than normal and proper maintenance) has been carried out to the Goods or any part of the Goods without the Company's prior written consent;
vi. the defect has not arisen from a design made, furnished or specified by the Purchaser;
Warranty
vii. the Goods have been assembled or incorporated into other goods only in accordance with any instructions issued by the Company;
viii. the defect has not arisen from a design modified by the Purchaser;
ix. the defect has not arisen from an item manufactured by a person other than the Company. In respect of any item manufactured by a person other than the Company, the Purchaser shall only be entitled to the benefit of any warranty or guarantee provided by such manufacturer to the Company.
b. In respect of computer software supplied by the Company the Company does not warrant that the use of the software will be uninterrupted or error free.
c. The Company accepts liability:
(i) for death or personal injury to the extent that it results from the negligence of the Company, its employees (whilst in the course of their employment) or its agents (in the course of the agency);
(ii) for any breach by the Company of any statutory undertaking as to title, quiet possession and freedom from encumbrance.
d. Subject to conditions (a) and (c) from the time of despatch of the Goods from the Company's premises the Purchaser shall be responsible for any defect in the Goods or loss, damage, nuisance or interference whatsoever consequential economic or otherwise or wastage of material resulting from or caused by or to the Goods. In particular the Company shall not be liable for any loss of profits or other economic losses. The Company accordingly excludes all liability for the same.
e. At the request and expense of the Purchaser the Company will test the Goods to ascertain performance levels and provide a report of the results of that test. The report will be accurate at the time of the test, to the best of the belief and knowledge of the Company, and the Company accepts no liability in respect of its accuracy beyond that set out in Condition (a).
f. Subject to Condition (e) no representation, condition, warranty or other term, express or implied (by statute or otherwise) is given by the Company that the Goods are of any particular quality or standard or will enable the Purchaser to attain any particular performance or result, or will be suitable for any particular purpose or use under specific conditions or will provide any particular capacity, notwithstanding that the requirement for such performance, result or capacity or that such particular purpose or conditions may have been known (or ought to have been known) to the Company, its employees or agents.
g. (i) To the extent that the Company is held legally liable to the Purchaser for any single breach of contract, tort, representation or other act or default, the Company's liability for the same shall not exceed the price of the Goods.
(ii) The restriction of liability in Condition (g)(i) shall not apply to any liability accepted by the Seller in Condition (c).
h. Where the Goods are sold under a consumer transaction (as defined by the Consumer Transactions (Restrictions on Statements) Order 1976) the statutory rights of the Purchaser are not affected by these Conditions of Sale.
Unpacking Your Product
Each product is shipped in protective packaging and should be inspected for damage before use. If there is any transit damage take pictures of the product packaging and notify the carrier immediately with all the relevant details of the shipment. Packing materials should be kept for inspection and also for if the product needs to be returned.
The product is shipped with the following equipment so please check to ensure that you have all of the items below. If anything is missing, please contact the supplier of your equipment immediately.
| Item | Quantity |
| Product unit 1 | |
| Handbook | 1 |
Driver CD 1
If you require a different power lead, please let us know when ordering the product.
Repairs & Returns
Please contact Sonifex or your supplier if you have any problems with your Sonifex product. Email technical.support@sonifex.co.uk for the repair/ upgrade/returns procedure, or for support & questions regarding the product operation.
CE Conformity
The products in this manual comply with the essential requirements of the relevant European health, safety and environmental protection legislation.
The technical justification file for this product is available at Sonifex Ltd.
The declaration of conformity can be found at: https://www.sonifex.co.uk/declarations
Safety & Installation of Mains Operated Equipment
There are no user serviceable parts inside the equipment. If you should ever need to look inside the unit, always disconnect the mains supply before removing the equipment covers. The cover is connected to earth by means of the fixing screws. It is essential to maintain this earth/ground connection to ensure a safe operating environment and provide electromagnetic shielding.
Voltage Setting Checks
Ensure that the machine operating voltage is correct for your mains power supply by checking the box in which your product was supplied. The voltage is shown on the box label. The available voltage settings are 115V, or 230V. Please note that all products are either switchable between 115V and 230V, or have a universal power supply.
Fuse Rating
The product is supplied with a single fuse in the live conducting path of the mains power input. For reasons of safety it is important that the correct rating and type of fuse is used. Incorrectly rated fuses could present a possible fire hazard, under equipment fault conditions. The active fuse is fitted on the outside rear panel of the unit.
Power Cable & Connection
An IEC power connector is supplied with the product which has a moulded plug attached.
The mains plug or IEC power connector is used as the disconnect device. The mains plug and IEC power connector shall remain readily operable to disconnect the apparatus in case of a fault or emergency.
The mains lead is automatically configured for the country that the product is being sent to, from one of:
Safety & Installation
Territory Voltage IEC Lead Type Image
| UK & Middle East 230V UK 3 pin to IEC lead | ||
| Europe 230V | European Schuko round 2 pin to IEC lead | |
| USA, Canada and South America | 115V 3 flat pin to IEC lead | |
| Australia & New Zealand | 230V Australasian 3 flat pin to IEC lead | |
Connect the equipment in accordance with the connection details and before applying power to the unit, check that the machine has the correct operating voltage for your mains power supply.
This apparatus is of a class I construction. It must be connected to a mains socket outlet with a protective earthing connection.
Important note: If there is an earth/ground terminal on the rear panel of the product then it must be connected to Earth.
WEEE Directive

The Waste Electrical and Electronic Equipment (WEEE) Directive was agreed on 13 February 2003, along with the related Directive 2002/95/EC on Restrictions of the use of certain Hazardous Substances in electrical and electronic
equipment (RoHS). The Waste Electrical and Electronic Equipment Directive (WEEE) aims to minimise the impacts of electrical and electronic equipment on the environment during their life times and when they become waste. All products manufactured by Sonifex Ltd have the WEEE directive label placed on the case. Sonifex Ltd will be happy to give you information about local organisations that can reprocess the product when it reaches its “end of use”, or alternatively all products that have reached “end of use” can be returned to Sonifex and will be reprocessed correctly free of charge.
Atmosphere/Environment
This apparatus should be installed in an area that is not subject to excessive temperature variation (<0°C, >50°C), moisture, dust or vibration.
This apparatus shall not be exposed to dripping or splashing, and no objects filled with water, such as vases shall be placed on the apparatus.
Introduction
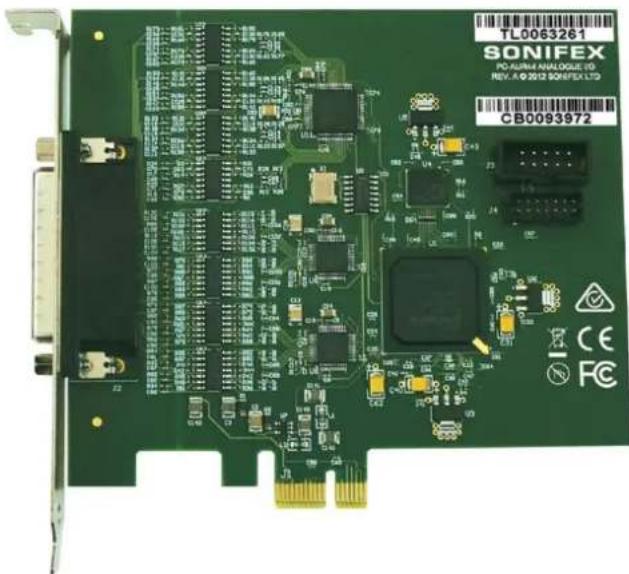
The Auricon 4.4 is a professional quality 4 stereo input and 4 stereo output analogue PCIe audio card. The inputs and outputs can be reconfigured as separate mono channels, giving eight inputs and outputs.
It is supplied with a Windows WDM driver to provide full sound card functionality under Windows XP, Server 2003, Vista, Server 2008, Windows 7, Server 2008R2, Windows 8, Server 2012, Windows 10 and Windows Server 2016.
The card uses 24-bit 192kHz sigma-delta converters which pass data to and from the PC via a single lane PCI Express interface. An onboard FPGA
provides audio buffering, level adjustment and mixing functions. Hardware sampling rates of 48kHz, 96kHz and 192kHz are available, with the Windows sampling rate converter transparently providing support for other rates. The card supports extended bit depths to 32 bit and the software sampling rate and bit depth (32, 24, 16 or 8 bits PCM) can be set independently for each input and output channel.
Windows Wave, DirectSound and DirectShow API's are supported, as are a variety of audio compression modes via the Windows Audio Compression Manager or other software compression systems. On Windows Vista/Server 2008 and later systems, the Core Audio API is also fully supported.
There are four configuration settings for the Auricon 4.4, these being Mode (stereo/mono), H/W Sampling Rate, Input Coupling and Maximum Line Level. The mode may be configured as either stereo or mono. In mono mode the number of input and output channels that Windows sees is doubled. The maximum line level can be set to +15dBu, +16dBu, +18dBu, +20dBu, +22dBu or +24dBu. The input coupling can be set to either DC or AC (the default is AC).
The playback topology consists of a master output level, mute control and peak meter, and input monitor level and mute controls for each of the line inputs. The record topology consists of a master input level, mute control and peak meter, and level controls and mutes for the physical input and digital loopback. The digital loopback allows the output of the card to be digitally mixed back into the input. The range on the input and output master controls and individual line controls is -96dB to 0dB.
Multiple cards may be installed in a single PC.
Two 44-pin high-density D-type connector to XLRs breakout leads are offered as an option; either 4 stereo inputs and 1 stereo output, or 4 stereo outputs and 1 stereo input.
1 Installation
Notes Regarding Windows Version Differences
Windows XP and Server 2003 are the only current versions of Windows that provide complete support for “traditional” WDM audio drivers. Windows 10, 8, 7, Vista and corresponding server versions provide limited support for applications using the legacy audio APIs, while adding a new Core Audio API offering greater functionality. The following limitations apply when using the Auricon 4.4 with various versions of Windows.
- Windows 10, 8, 7, Vista and corresponding server versions virtualise the mixer API to each application, providing only a mute and volume control on each input and output. These controls affect only the audio levels going to and from that application. A Windows XP compatibility mode is available in Windows Vista to provide full mixer access to the hardware if needed.
- Peak meters for WDM drivers are only available through the mixer API under Windows XP and Server 2003 (and Windows Vista running in XP-compatibility mode). Windows 10, 8, 7, Vista and corresponding server versions provide an IAudioMeterInformation interface as part of their EndpointVolume API, but this isn't supported on any of the earlier platforms.
- In all versions prior to Windows Vista, Microsoft's sampling rate converter, which is automatically switched in when playing or recording audio streams at sampling rates other than the card's hardware rate, is slightly inaccurate when doing some conversions. The error is typically at most about 0.3%. The most common conversion, that of 44.1kHz to or from 48kHz, is handled correctly, though, as are simple 2:1 ratios.
Installation
The software package consists of the driver installation file (Auricon44.inf or Auricon44x64.inf), the kernel-mode driver (Auricon44.sys), the configuration DLL (Auricon44Coinstaller32.dll or Auricon44Coinstaller64.dll) and the catalogue file (Auricon44.cat or Auricon44x64.cat).
Switch off the computer and carefully install the Auricon card in any free PCIe slot, observing the normal precautions against static electricity discharge.
Then switch the computer back on and boot Windows.
Windows XP, Server 2003, Vista, Server 2008 - Windows will report that new hardware has been found and the New Hardware wizard will start. Insert the driver CD supplied with the card and proceed through the wizard. Allow Windows to search for the driver – do NOT specify a driver location or file name.
Windows 10, Server 2016, 8, 7, Server 2008 R2, Server 2012 – Windows no longer searches removable media for drivers. Open Device Manager, where the Auricon will be listed under Other Devices as a Multimedia Audio Controller. Right-click on it, select Update Driver Software, then click on Browse my computer for driver software and click on the Browse button to navigate to the driver's location. Click on Next to install the driver.
On Windows XP and Server 2003, you may be warned that the driver has not passed Windows Logo testing. Click on Continue Anyway to proceed with the installation.
Windows 10, Server 2016, 8, 7, Vista, Server 2012, 2008-R2 and 2008 will recognise Sonifex/Innes Corporation's own digital signature on the driver and invite you to proceed with the installation. If you wish you can tick the box to always accept Innes Corporation drivers.
At the completion of the installation process a loudspeaker symbol should appear in the toolbar at the bottom of the screen. Your Auricon is now fully operational. If the speaker does not appear, it may be necessary to reboot your PC. This typically happens if there has been no sound card previously installed in the PC. Windows XP (prior to Service Pack 1) and Server 2003 by default have the loudspeaker symbol turned off. To enable it, go into Control Panel, select Sounds, Speech and Audio Devices, then click on Sounds and Audio Devices, and finally tick the box marked Place volume icon in the task bar.
Installing on Windows Server 2012 & Server 2016 – For any audio devices to function correctly on this platform, the following steps need to be performed.
- Open the Add Roles and Features Wizard and, under User Interfaces and Infrastructure, select Desktop Experience and install it.
- After rebooting, go to Control Panel – System and Security – Administrative Tools – Services and scroll down to Windows Audio Service. Right-click on this, select Properties and change the Startup type to Automatic.
- Do the same for the Windows Audio Endpoint Builder.
- Close the Service Manager and reboot the system. Check that the speaker symbol in the bottom right hand corner of the screen is enabled.
Configuration
There are four configuration settings for the Auricon 4.4, these being stereo/mono mode, hardware sampling rate, input coupling, and maximum line level.
The mode may be configured as either stereo or mono. In mono mode the number of input and output channels that Windows sees is doubled.
Hardware sampling rates of 48kHz, 96kHz and 192kHz are available, with the Windows sampling rate converter transparently providing support for other rates.
The input coupling can be set to either DC or AC (the default is AC). The AC coupling corner frequency is approximately 0.1Hz. Note this is applied after the analogue amplifiers, so a differential DC offset on the inputs can cause premature clipping.
The maximum line level can be set to +15dBu, +16dBu, +18dBu, +20dBu, +22dBu or +24dBu.
To change the configuration, right-click on the My Computer icon on the desktop (or in the Start menu in the case of XP, Server 2003, Vista, Server 2008 and 7), select Properties, then click on Device Manager. On Windows 10, Server 2016, Windows 8 and Server 2012, open the Control Panel, go to System and Security and then System, and open Device Manager from the
link in the left hand pane. Open Sound, video and game controllers, then right-click on Auricon 4.4 and select Properties.
Now click on the Configuration tab and select the desired mode, line level and/or topology. Under Windows XP and Server 2003 it may take a minute or so for Windows to reconfigure itself and the screen may flicker during this time. Be patient!
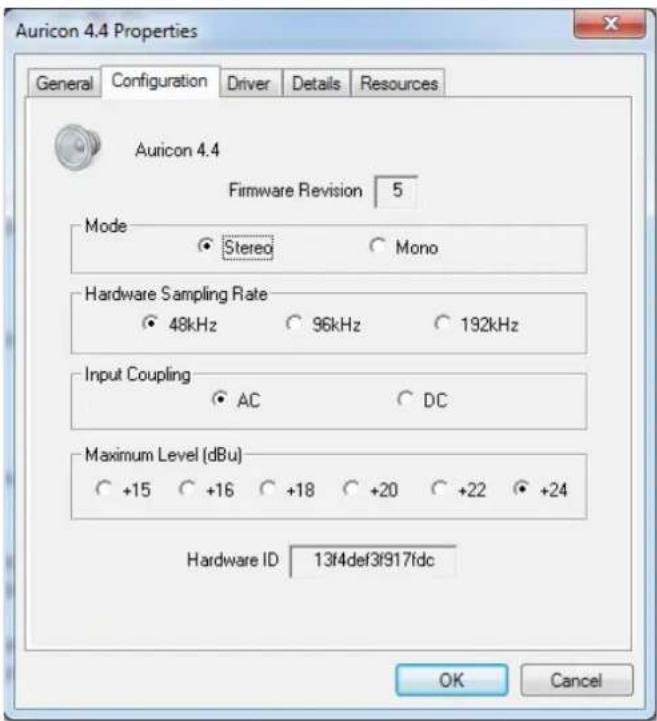
Fig 1-1: Auricon 4.4 Properties>Config Page
1 Configuration
Operation on Windows 10, Server 2016, Windows 8, 7, Vista and Server 2012, 2008-R2, 2008
The audio subsystem of Windows 10, 8, 7, Vista and corresponding server versions has changed from earlier versions of Windows, although most applications should continue to work without modification. The major differences likely to affect users of the Auricon 4.4 follow.
Audio Endpoints
Key to the new system is the concept of audio endpoints. These are the physical audio sources and destinations, such as microphones, speakers and line connectors.
Previously, an audio capture device would typically have multiple inputs which were combined in a mixer or selector. Under Windows Vista and later, each input is represented by its own device, and Windows itself operates the card's selector to route the chosen source to the A/D converter.
In the case of the Auricon 4.4, each of the physical line inputs is represented by an endpoint device, and as the hardware has separate A/D converters for each one, they can be used simultaneously. There are also virtual endpoint devices for the digital loopback sources, although by default these are disabled. To enable these sources, right-click on the loudspeaker symbol at the bottom right-hand corner of the screen, select Recording Devices, right-click anywhere in the window and select Show Disabled Devices. Now right-click on the desired Wave Out Mix device and select Enable. This source will now appear as one of the available audio recording devices. Note that when an application is recording from a loopback endpoint, the corresponding line input is unavailable, and vice versa.
Windows has a default playback endpoint and a default recording endpoint, which are typically used by applications where the input or output device cannot be explicitly chosen. After the Auricon 4.4 driver is installed,
the first channel is set as the default for playback and record but this can be changed by right-clicking on the loudspeaker symbol, selecting Playback Devices or Recording Devices, and then right-clicking on the desired endpoint and selecting Set as Default Device. The default device is remembered across reboots and should not need to be set again.
Mixer API
By default, the mixer API is virtualised for each application, providing just a mute and volume control for each endpoint and affecting only the audio going to and from that application. The hardware controls on the card itself are not accessible from the mixer API in this default mode.
For applications that need direct access to the hardware mixer controls, or that need access to the line input monitor controls or peak meter nodes, there are two options. Firstly, if it is a new application being written specifically for Windows Vista or later system, it can be designed to use the Core Audio APIs, which include the DeviceTopology API and the EndpointVolume API (which includes the IAudioEndpointVolume and IAudioMeterInformation interfaces). These are documented in the Windows 7 SDK which is available from Microsoft, however note that these APIs don't work with earlier versions of Windows.
Alternatively, applications can be given access to the hardware mixer controls through the mixer API by right-clicking on the application's icon, selecting Properties, clicking on the Compatibility tab and selecting Run this program in compatibility mode for Windows XP Service Pack 2. Be aware, though, that in this compatibility mode, the Auricon 4.4 card is represented by a single mixer device with destination lines for each of the individual inputs and outputs, which is slightly different to its behaviour under Windows XP where each input/output pair had its own mixer device. How this will work with any particular application that uses the mixer API can only be determined by experimentation.
Audio Engine
The Windows audio engine runs at a fixed sampling rate and bit depth. By default, the Auricon 4.4 driver sets the sampling rate to the card's hardware rate and the bit depth to 24-bit for all the inputs and outputs. The Windows sampling rate converter is used whenever a different sampling rate or bit depth is requested by applications. The engine bit depth for each endpoint can be changed to 16-bit if required by selecting the endpoint, clicking on Properties, and then clicking on the Advanced tab.
If your applications will be playing or recording at rates higher than 48kHz, you will need to set the card's hardware rate to 96kHz or 192kHz otherwise Windows will down-sample to 48kHz.
Windows Vista/7/8 Mono Recording Bug
Windows Vista/7/8 has a bug which causes mono recording streams to capture only the left channel of the source, rather than mixing the left and right as previous versions did. As a workaround until this is fixed, the driver provides a Mono Mix recording endpoint for each of the card's inputs. By default these are disabled, but can be individually enabled as follows.
Right-click on the loudspeaker symbol in the bottom right hand corner of the screen and select Recording Devices. Right-click on any of the sources and check Show Disabled Devices, which should then reveal two additional sources called Input 1 Mono Mix and Input 2 Mono Mix. To enable these, right-click on them and select Enable. Note that, after enabling, it will still show as currently unavailable as these endpoints are multiplexed with the normal stereo inputs and are only activated when opened by a recording application. Also be aware that, for the same reason, the stereo and mono mix endpoints for the same source can't be used simultaneously.
The Mono Mix endpoints should be used for communications applications such as Skype which open a mono capture stream.
DirectSound and WDM Kernel Streaming
Microsoft's DirectSound and Windows Driver Model (WDM) are designed to work hand in hand to take full advantage of audio card hardware and provide kernel-mode software emulation of features not directly supported. Kernel streaming allows audio data to be passed directly between driver modules resulting in a robust, high performance integrated sound processing system.
With its WDM driver, the Auricon can play MIDI files and audio CDs in addition to Wave files. The kernel mixer allows multiple sounds from the same or different applications to be played simultaneously, while the kernel splitter automatically splits an input source to multiple applications. Sampling rate conversion is automatically inserted if any of the playback or recording streams differ from the card's hardware sampling rate.
WaveRT on Windows 10, Server 2016, 8, 7, Vista and Server 2012, 2008-R2 and 2008
The AurIcon 4.4 uses the WaveRT driver model on Windows 10, 8, 7, Vista and corresponding server versions, giving the card's PCI controller and digital signal processor direct access to the audio engine's buffers and position registers. This allows audio transfers to proceed without any driver code involvement, eliminating transitions to and from kernel mode and thus improving efficiency and responsiveness. The card supports both pull mode (the native mode for Windows 7 and 8) and push mode.
1 Configuration
Topology
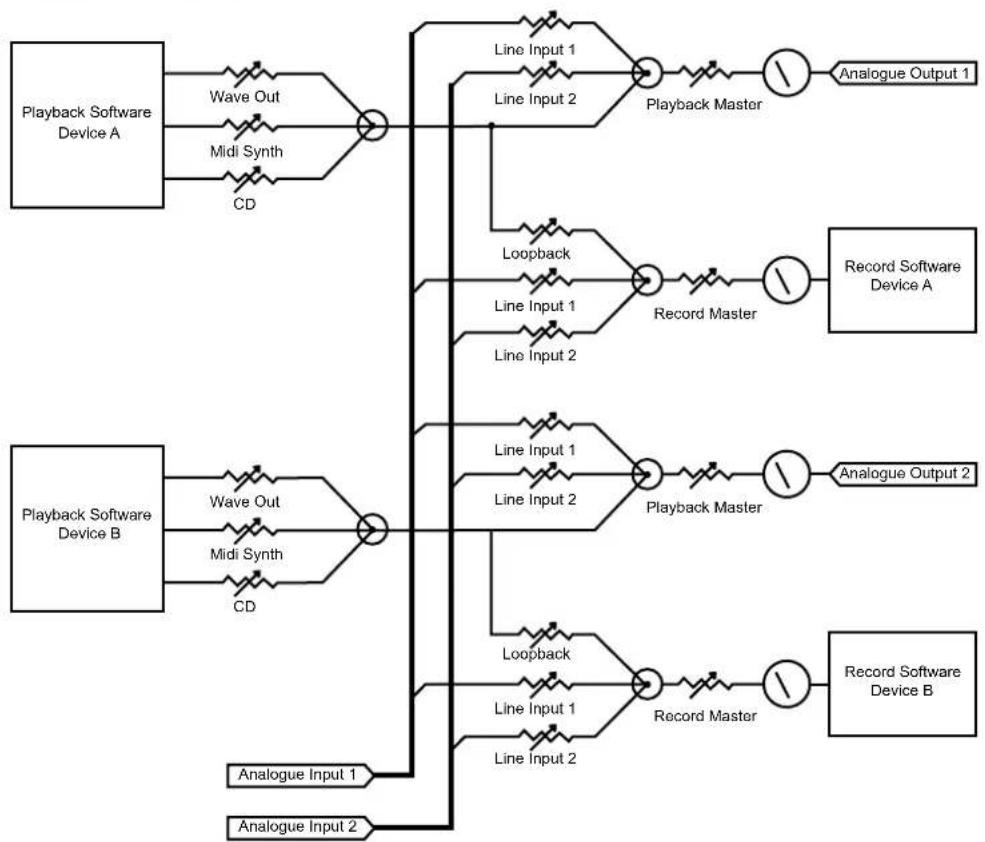
The Auricon 4.4 topology is shown in the diagrams at the end of this manual.
The playback topology consists of a master output level, mute control and peak meter, and input monitor level and mute controls for each of the line inputs. To these the kernel mixer adds virtual level and mute controls for wave, synthesizer and CD outputs.
The record topology consists of a master input level, mute control and peak meter, and level controls and mutes for the physical input and digital loopback.
The digital loopback allows the output of the card to be digitally mixed back into the input. This function is muted when Windows' Digital Rights Management detects that protected audio is being played, in accordance with Microsoft's specifications. Note: Under Windows 10, 8, 7, Vista and corresponding server versions, the loopback endpoint is disabled by default. See the section on Windows 10, 8, 7, Vista and Server 2016, 2012, 2008-R2 and 2008 above for instructions on how to enable it.
The range on the input and output master controls and individual line controls is -96dB to 0dB.
To access the playback and record mixer controls on Windows XP, Server 2003 and earlier, double-click on the loudspeaker symbol at the bottom right hand corner of the screen. On Windows Vista and later, right-click on the loudspeaker symbol, select Playback Devices or Recording Devices, select the desired endpoint, click on Properties, and then click on the Levels tab.
Extended Bit Depth Audio
Traditionally, PC-based audio capture and playback has been restricted to either 8 bit or 16 bit encoding, with the WAVE_FORMAT_PCM descriptor used to define the audio parameters such as samples per second, bits per sample and number of channels.
With the advent of 24 bit A/D and D/A converters, there was a need to support extended bit depth. To achieve this, Microsoft introduced a new data format descriptor called WAVE_FORMAT_EXTENSIBLE. This provides additional information, including the number of valid bits per sample and support for specifying channel placement in multi-channel streams.
The WAVE_FORMAT_EXTENSIBLE descriptor may be used in place of the normal WAVE_FORMAT_PCM in setting up playback and recording through either the Winmm (wave) API or the DirectSound API. For further information refer to the Microsoft DirectX 8 documentation.
Some audio editing applications, such as Syntrillium's Cooledit 2000 and Adobe Audition, support extended bit depth audio and work well with the Auricon 4.4 using 24 or 32 bit recording.
Hyperthreading & Audio
Some motherboard processors offer hyperthreading, a technology lying midway between single core and fully independent multiple processor cores. A hyperthreaded processor provides parallel execution paths for multiple threads, however there remain some shared resources such as the memory caches and the floating point processor.
For most applications this is fine and results in a substantial improvement in performance for a given processor complexity, however for time-critical audio applications a problem can arise, when a low-priority thread is using a shared resource that the high-priority audio thread requires. Since the processor has no concept of thread priorities, the high-priority thread is blocked until that resource becomes free, resulting in gaps on playback or skipping while recording.
If this proves to be a problem on a hyperthreaded system, the hyperthreading can usually be disabled in one of the BIOS settings. Refer to the motherboard or system documentation for details on how to do this.
Note that this problem does not occur on true multicore processors.
Connecting the Auricon 4.4 to Unbalanced Inputs and Outputs
Most professional audio equipment, including the Auricon sound card, uses high level balanced audio interconnections. Commercial radio stations in Australia typically use a nominal programme level of +8dBu, while the ABC, SBS and many production houses use +4dBu. In the USA 0dBu is commonly used.
By contrast, domestic audio equipment uses low level unbalanced interconnections, typically at a level of about 100mV RMS (about -18dBu). The best way to interconnect between these two systems is with a balancing amplifier. Failing that, it is still possible to achieve an acceptable interconnection, particularly when going from a high level balanced output to a low level unbalanced input.
In the diagram below, the transformer does the balanced to unbalanced conversion and the resistors adjust the level. It is preferable to use a 1:1 transformer and the resistive attenuator rather than a stepdown transformer as this will help minimise capacitive coupling of common mode noise across the transformer windings.
Note that you should never ground one side of a balanced output. Doing so will most likely damage the output drivers.
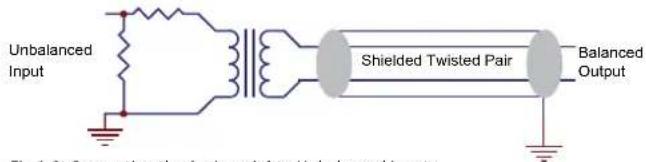
Fig 1-2: Connecting the Auricon 4.4 to Unbalanced Inputs
It is possible to achieve an acceptable connection without using a balancing amplifier or transformer, provided the cable distance is short, and the following connection method is followed:

Fig 1-3: Connecting the Auricon 4.4 to Unbalanced Inputs Without a Transformer
In the diagram above, the non-phase output signal is left disconnected, this is necessary to prevent damage to the Auricon 4.4 output amplifier.
The output level will be 6dB lower than expected due to the non-connection of the non-phase signal.
Should there be a phase error in your system, simply disconnect the phase output signal and connect the non-phase signal to the unbalanced input instead.

Fig 1-4: Connecting the Auricon 4.4 to Unbalanced Outputs
Going the other way from unbalanced to balanced is easy if the signal level is adequate. Simply connect the balanced input across the active and earth of the unbalanced output. In most cases, though, the level at the unbalanced output will be too low so you will need an amplifier. If this is the case it is probably best to do the job properly and use a balancing amplifier.
Finally, note that the shields on the audio cables should only be connected at one end. In the world of balanced audio, the shields are simply that - electrostatic screens - and should not be used for earth returns.
1 Configuration
Functional Description
The balanced audio inputs are buffered, attenuated and filtered prior to being coupled into the A/D converters. From the D/A converters, differential line driver amplifiers provide a maximum output level of +24dBm and also incorporate low pass filtering to attenuate the out-of-band noise produced by the converters.
Digitized audio is passed in serial form between the converters and the Xilinx Spartan 6 FPGA. The FPGA provides circular buffers as short term FIFO storage to cover latency times between PCIe transfers, and also performs the level adjustment and mixing functions. Card-initiated bus mastering is used for audio data transfer through the FPGA's integrated PCIe endpoint.
The converters operate at a sampling rate of 48kHz, 96kHz or 192kHz according to the driver setting.
The Auricon supports standby and hibernation power management modes.
Auricon 4.4 Pinout
High Density 44-Pin Female Connector
| Input Pin Output Pin | ||
| 1 Left + 7 1 Left + 44 | ||
| 1 Left - 22 1 Left - 14 | ||
| 1 Right + 36 1 Right + 29 | ||
| 1 Right - 6 1 Right - 43 | ||
| 2 Left + 35 2 Left + 28 | ||
| 2 Left - 5 2 Left - 42 | ||
| 2 Right + 20 2 Right + 12 | ||
| 2 Right - 34 2 Right - 27 | ||
| 3 Left + 19 3 Left + 11 | ||
| 3 Left - 33 3 Left - 26 | ||
| 3 Right + 3 3 Right + 40 | ||
| 3 Right - 18 3 Right - 10 | ||
| 4 Left + 2 4 Left + 39 | ||
| 4 Left - 17 4 Left - 9 | ||
| 4 Right + 31 4 Right + 24 | ||
| 4 Right - 1 4 Right - 38 |
Ground: 4, 8, 13, 15, 16, 21, 23, 25, 30, 32, 37, 41
When configured for mono operation, channel A is 1 left, channel B is 1 right, etc.
Table 1-1: Auricon 4.4 Pinout
Auricon 4.4 Topology
flowchart
graph TD
    A["Playback Software Device A"] --> B["Wave Out"]
    A --> C["Midi Synth"]
    A --> D["CD"]
    B --> E["Line Input 1"]
    B --> F["Line Input 2"]
    E --> G["Playback Master"]
    F --> H["Playback Master"]
    G --> I["Analogue Output 1"]
    H --> J["Record Software Device A"]
    E --> K["Loopback"]
    F --> L["Record Master"]
    K --> M["Line Input 1"]
    K --> N["Line Input 2"]
    L --> O["Record Master"]
    M --> P["Line Input 1"]
    N --> Q["Playback Master"]
    O --> R["Analogue Output 2"]
    P --> S["Playback Master"]
    Q --> T["Record Master"]
    U["Playback Software Device B"] --> V["Wave Out"]
    U --> W["Midi Synth"]
    U --> X["CD"]
    V --> Y["Playback Master"]
    W --> Z["Playback Master"]
    X --> AA["Playback Master"]
    Y --> AB["Playback Master"]
    Z --> AC["Record Master"]
    AA --> AD["Record Master"]
    AB --> AE["Record Master"]
    AC --> AF["Record Master"]
    AD --> AG["Record Master"]
    AF --> AH["Record Master"]
    AG --> AI["Record Master"]
    AH --> AJ["Record Master"]
    AI --> AK["Analogue Output 1"]
    AJ --> AL["Analogue Output 2"]
Fig 1-5: Auricon 4.4 Topology
1 Configuration
Output Mixing
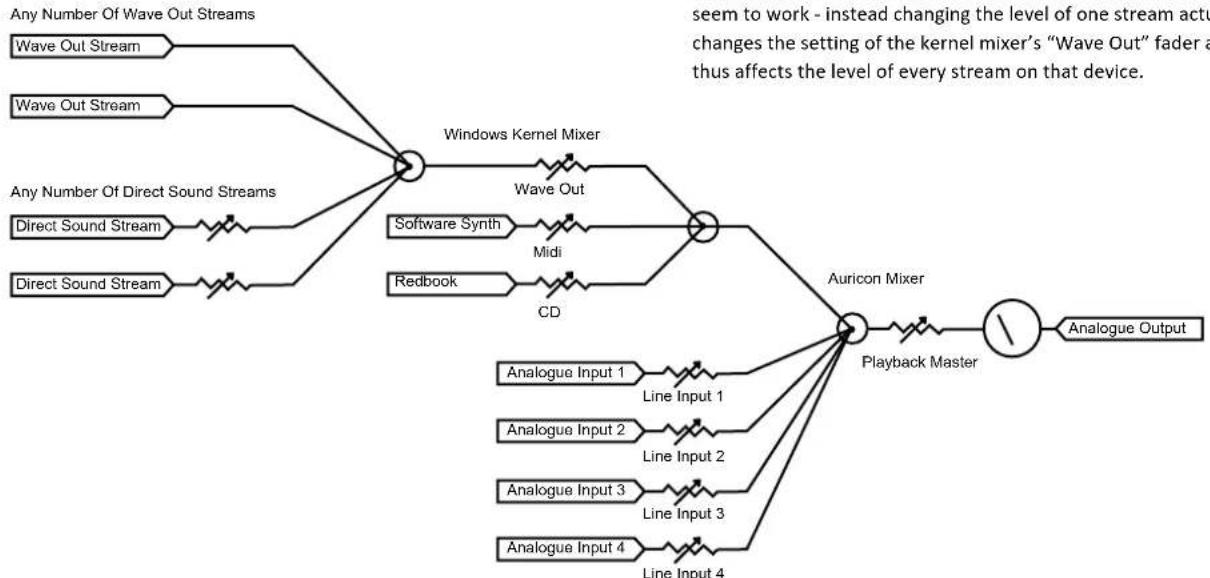
The Auricon 4.4 presents itself to the operating system as multiple independent wave output devices. Each device can support any number of output streams, courtesy of the Windows Kernel Mixer or Audio Engine.
The topology of each output device is shown below. It consists of the kernel mixer that combines any number of individual waveOut and DirectSound audio streams (applying sampling rate conversion if need be), followed by the "Wave Out" level control. Midi and CD streams are also added at this point. This is then followed by the Auricon mixer (implemented in the on-card FPGA) that adds the input sources (four if configured as stereo and
eight if configured as mono), master level control and peakmeter. All level controls include a mute control as well.
Each waveOut stream is created by opening an instance of the waveOut device. Each DirectSound stream corresponds to a DirectSoundBuffer object. There is no limit to the number of streams that can be opened on each device. Note that with versions of Windows prior to Vista, only DirectSound streams have individual level controls – these are set using the DirectSoundBuffer.SetVolume method. The Windows documentation suggests that waveOutSetVolume should also adjust the level of individual waveOut streams but this doesn't seem to work - instead changing the level of one stream actually changes the setting of the kernel mixer's "Wave Out" fader and thus affects the level of every stream on that device.
flowchart
graph TD
    A["Any Number Of Wave Out Streams"] --> B["Windows Kernel Mixer"]
    C["Wave Out Stream"] --> B
    D["Wave Out Stream"] --> B
    E["Any Number Of Direct Sound Streams"] --> B
    F["Direct Sound Stream"] --> B
    G["Direct Sound Stream"] --> B
    H["Software Synth"] --> B
    I["Redbook"] --> B
    J["CD"] --> B
    K["Software Synth"] --> L["Midi"]
    M["Redbook"] --> L
    N["Auricon Mixer"] --> O["Playback Master"]
    P["Analogue Input 1"] --> Q["Line Input 1"]
    R["Analogue Input 2"] --> S["Line Input 2"]
    T["Analogue Input 3"] --> U["Line Input 3"]
    V["Analogue Input 4"] --> W["Line Input 4"]
    X["Analogue Output"] --> Y["Playback Master"]
    style A fill:#f9f,stroke:#333
    style C fill:#f9f,stroke:#333
    style E fill:#f9f,stroke:#333
    style F fill:#f9f,stroke:#333
    style G fill:#f9f,stroke:#333
    style H fill:#f9f,stroke:#333
    style J fill:#f9f,stroke:#333
    style K fill:#f9f,stroke:#333
    style M fill:#f9f,stroke:#333
    style N fill:#f9f,stroke:#333
    style P fill:#f9f,stroke:#333
    style Q fill:#f9f,stroke:#333
    style R fill:#f9f,stroke:#333
    style S fill:#f9f,stroke:#333
    style T fill:#f9f,stroke:#333
    style U fill:#f9f,stroke:#333
    style V fill:#f9f,stroke:#333
    style W fill:#f9f,stroke:#333
Fig 1-6: Output Mixing
Inputs 3 And 4 Only Present In Mono Configuration
5.1 & 7.1 Surround Sound Playback and Recording Driver
Overview
With hardware revision 4 and driver version 8.0.0.3503, the Auricon 4.4 exposes additional eight-channel input and output subdevices which are overlaid onto the existing four stereo channels. Eight-channel audio output is mixed with that of the corresponding stereo outputs, while captured audio is replicated in both the 8-channel input and the stereo inputs. Separate level and mute controls are provided for each format.
The 8-channel output subdevice is defined as a speaker endpoint, allowing speaker locations to be assigned for the playback of 7.1 and 5.1 surround sound.
Since Windows doesn't assign locations for multi-channel inputs, the 8-channel input is simply defined as another line connector.
Requirements
• Auricon 4.4 card with firmware revision 4 or later.
• Auricon 4.4 driver version 8.0.0.3503 or later.
- Windows Vista or later (the driver doesn't support surround sound on XP).
- The card must be configured for stereo on the driver configuration page.
- The card must have four stereo inputs (for 8-channel input) and/or four stereo outputs (for 8-channel output). For cards set to fewer channels, an expansion key can be purchased.
Setup
- The 8-channel input and output subdevices are disabled by default, so as not to disturb any existing applications expecting to see only four stereo inputs and outputs on the card.
• To enable them, follow this procedure: -
Right-click on the loudspeaker symbol in the bottom right and corner of the screen and select Playback devices.
-
Right-click on one of the existing devices and tick Show disabled devices. A disabled playback device called Speakers (Auricon 4.4) should appear.
- Right-click on this device and select Enable.
- Repeat this for the recording devices.
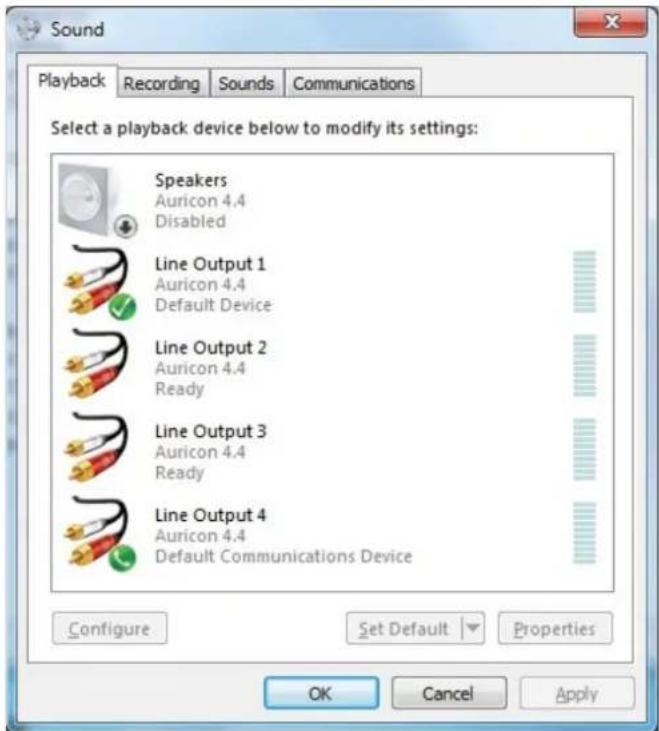
Fig 1-7: Sound Playback Tab
2 Appendix A – Surround Sound Playback and Recording Driver
The Properties page for the Speakers device appears as follows:
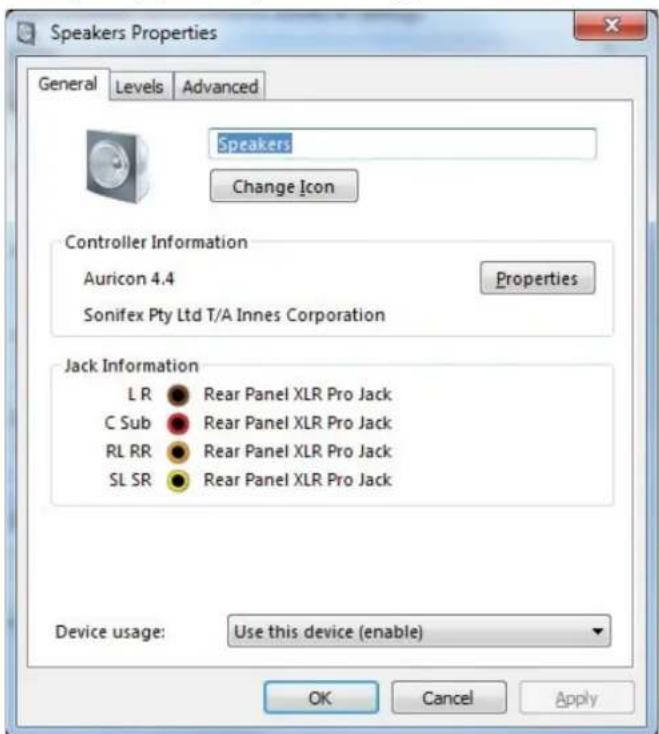
Fig 1-8: Speaker Properties General Tab
The output levels can be set under the Levels tab, with a master output fader and individual faders for wave output and input monitoring. Each fader has a Balance button which allows the eight individual channels to be adjusted.
The default master input and output levels correspond to a gain setting of 0dB. When set to full scale, a 6dB boost is applied.
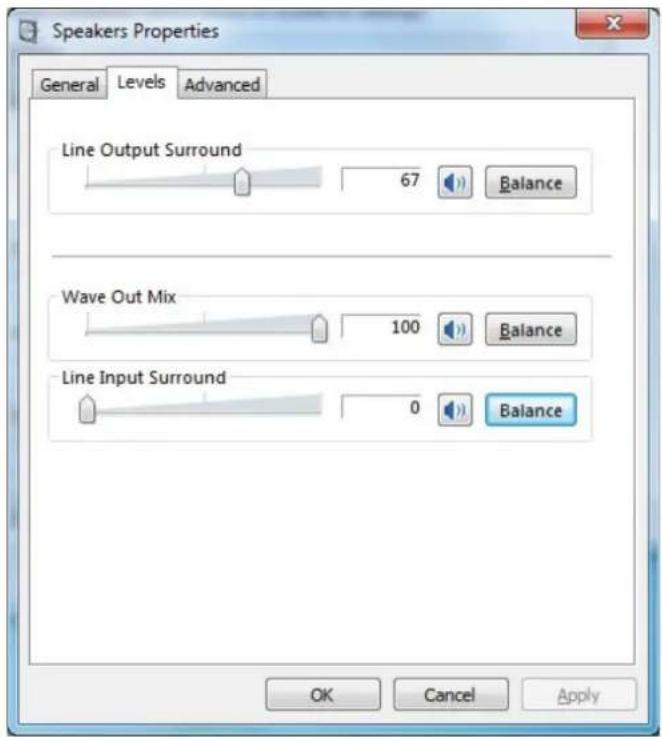
Fig 1-9: Speaker Properties Levels Tab
Output Mapping
The playback speaker mapping can be tested by opening the Windows playback devices, selecting the Auricon 4.4 speakers device and clicking on the Configure button.
Appendix A – Surround Sound Playback and Recording Driver
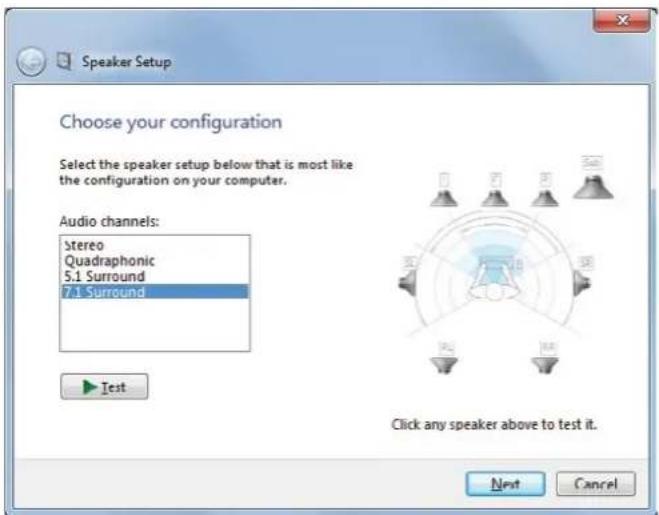
Fig 1-10: Speaker Setup Dialog
Select the surround sound mode for the card (7.1, 5.1, Quadraphonic or Stereo). Click on the Next button and follow the procedure.
The 7.1 speaker locations are mapped onto the physical output channels as follows:
| Front left / right Channel 1 L/R | |
| Centre / LFE Channel 2 L/R | |
| Back left / right Channel 3 L/R | |
| Side left / right Channel 4 L/R | |
The 5.1 speaker locations are mapped onto the physical output channels as follows:
| Front left / right Channel 1 L/R | |
| Centre / LFE Channel 2 L/R | |
| Back left / right Channel 3 L/R | |
The Quadraphonic surround sound speaker locations are mapped onto the physical output channels as follows:
| Front left / right Channel 1 L/R |
| Back left / right Channel 2 L/R |
Note that when the card is configured for 7.1, there is some confusion as to whether the rear channels of 5.1 audio are mapped to the side speakers or back speakers, with different players doing different things from the same source material. Configuring the card as 5.1 will remove this ambiguity.
Limitations
- It appears that multi-channel hardware peak meters are not yet properly supported in Windows. The 8-channel input and output subdevices therefore don't have peak meter nodes, with Windows instead creating software peak meters. The recording software peak meter however is disabled when the input is opened by an application in exclusive mode.
- Windows will always name a speaker endpoint as "Speakers", with the driver unable to override this.
- Windows will try to make a speaker endpoint the default playback device. This can be manually overridden if need be, but any driver update will undo this.
3 Technical Specification
Technical Specification For PC-AUR44
Operating Systems Supported
Platform: Supports Windows - XP, Server 2003, Vista, Server 2008, Windows 7, Server 2008 R2, Windows 8, Server 2012 (32-bit and x64 versions), Windows 10, Server 2016
Audio Specification
Hardware Sampling Rate: 48kHz, 96kHz or 192kHz
Hardware Resolution: 24 bits
Software Sampling Rates: 192kHz, 96kHz, 88.2kHz, 64kHz, 48kHz, 44.1kHz, 32kHz, 24kHz, 22.05kHz, 16kHz, 12kHz, 11.025kHz and 8kHz
Dynamic Range: 114dB typical (unweighted)
Input Impedance: 20k (balanced)
Output Impedance: 40Ω (balanced)
Maximum Signal: +24dBu (34.6Vp-p)
Frequency Response: Input – DC to 88kHz (DC coupling) 1Hz to 88kHz (AC coupling) Output – DC to 88kHz (192kHz hardware sampling rate)
Connector: 44-pin high-density D-type female
Equipment Type
PC-AUR44 Auricon 4.4 PCIe analogue sound card
Physical Specification
Dimensions (Raw): 14cm (L) x 12.5cm (H) x 2cm (D) 5.5" (L) x 4.9" (H) x 0.8" (D)
Dimensions (Boxed): 27cm (L) x 22.5cm (H) x 6cm (D) 10.6" (L) x 8.9" (H) x 2.4" (D)
- PC-AUR44 Handbook
- Contents
- Figures
- SONIFEX
- Register Online for an Extended 2 Year Warranty
- Product Warranty - 2 Year Extended
- Sonifex Warranty & Liability Terms & Conditions
- Definitions
- Warranty
- Warranty
- Unpacking Your Product
- Repairs & Returns
- CE Conformity
- Safety & Installation of Mains Operated Equipment
- Voltage Setting Checks
- Fuse Rating
- Power Cable & Connection
- Safety & Installation
- WEEE Directive
- Atmosphere/Environment
- Introduction
- Installation
- Notes Regarding Windows Version Differences
- Installation
- Configuration
- Configuration
- Operation on Windows 10, Server 2016, Windows 8, 7, Vista and Server 2012, 2008-R2, 2008
- Audio Endpoints
- Mixer API
- Audio Engine
- Windows Vista/7/8 Mono Recording Bug
- DirectSound and WDM Kernel Streaming
- WaveRT on Windows 10, Server 2016, 8, 7, Vista and Server 2012, 2008-R2 and 2008
- Topology
- Extended Bit Depth Audio
- Hyperthreading & Audio
- Connecting the Auricon 4.4 to Unbalanced Inputs and Outputs
- Functional Description
- Auricon 4.4 Pinout
- Output Mixing
- & 7.1 Surround Sound Playback and Recording Driver
- Overview
- Requirements
- Setup
- Appendix A – Surround Sound Playback and Recording Driver
- Output Mapping
- Appendix A – Surround Sound Playback and Recording Driver
- Limitations
- Technical Specification
- Technical Specification For PC-AUR44
- Operating Systems Supported
- Audio Specification
- Equipment Type
- Physical Specification
Brand : Sonifex
Model : PC-AUR44
Category : Soundcard