
BEHDIN98 - Pregnant BOSS - Free user manual and instructions
Find the device manual for free BEHDIN98 BOSS in PDF.


| Product Type | Direct Fit Multimedia Receiver for Harley-Davidson® Motorcycles |
| Brand | Boss Audio Systems |
| Model | BEHDIN98 |
| Compatibility | 1998-2013 Harley-Davidson® Electra Glide®, Street Glide®, Road Glide® |
| Dimensions (W x H x D) | Approx. 214 x 68 x 213 mm (8.43 x 2.68 x 8.39 in) |
| Weight | Approx. 1.5 kg (3.3 lbs) |
| Power Supply | 9.6–14.4 VDC (max 7A) |
| Maximum Output Power | 72 W x 4 @ 2 Ω, 48 W x 4 @ 4 Ω |
| Amplifier Class | A/B (2 Ω stable) |
| Speaker Impedance | ≥ 2 Ω |
| Frequency Response | 20 Hz – 20 kHz |
| Display | 3" (76.2 mm) Monochrome LCD |
| Bluetooth Version | 5.1 (A2DP, AVRCP) |
| Bluetooth Range | Up to 10 m (33 ft) |
| USB Playback | USB 2.0 (Type A, FAT32), MP3/WMA, up to 1.5A charging |
| Radio Bands | FM (87.5–107.9 MHz USA / 87.5–108 MHz Europe), AM (530–1710 kHz USA / 522–1620 kHz Europe) |
| Audio Inputs | 3.5 mm AUX-IN, USB, Bluetooth |
| Audio Outputs | Front Line Out (RCA, 2V, L/R) |
| Water Resistance | IPX6 front panel, IPX4 chassis |
| UV Protection | Yes (front panel) |
| Chassis Material | ZAM® coated corrosion-resistant steel |
| Conformal Coated PCB | Yes |
| Included Accessories | Receiver unit, wiring harness, mounting brackets, user manual, warranty card |
| Warranty | Refer to warranty card |
Frequently Asked Questions - BEHDIN98 BOSS
User questions about BEHDIN98 BOSS
0 question about this device. Answer the ones you know or ask your own.
Ask a new question about this device
Download the instructions for your Pregnant in PDF format for free! Find your manual BEHDIN98 - BOSS and take your electronic device back in hand. On this page are published all the documents necessary for the use of your device. BEHDIN98 by BOSS.
USER MANUAL BEHDIN98 BOSS
BEHDIN98 USER MANUAL
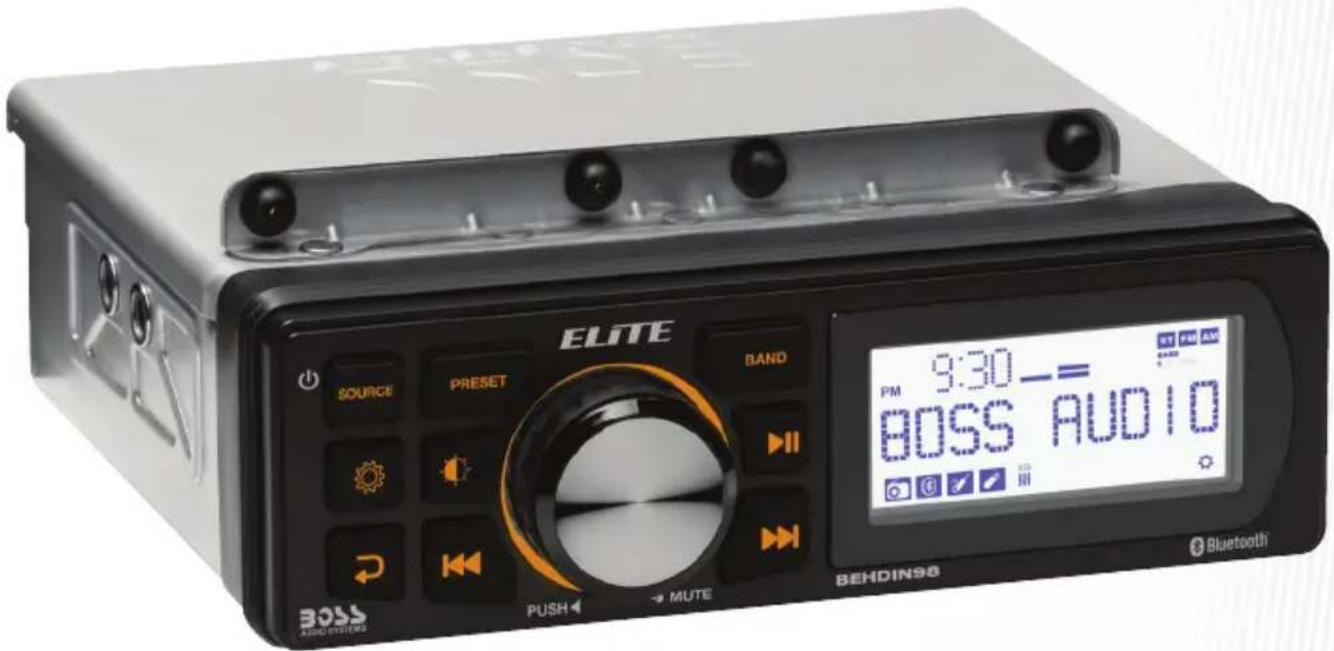
HARLEY-DAVIDSON® DIRECT FIT | 288 WATTS BLUETOOTH® MP3/WMA AM/FM RECEIVER
FEATURING 3" (76.2 mm) MONOCHROME LCD DISPLAY AND DIRECT FIT FOR HARLEY-DAVIDSON®* ELECTRA GLIDE®, STREET GLIDE® AND ROAD GLIDE® MODELS
BOSS®
AUDIO SYSTEMS
Thank you for choosing our product!
Please read the instructions carefully so you will know how to operate your product properly.
If there are any technical questions, please contact:
Customer care: (805) 751-4853 & Live chat
Online support: www.bossaudio.com/support
IMPORTANT
Please enter below the Serial No. which is located on the exterior of the product. Retain this information for future reference.
Model No. ____
Serial No. ____
Date of Purchase ____
Table of Contents
Introduction and Compatibility....2
Package Contents ....3
Important ....3
Control Panel Description....4
Wiring 5
Mounting....6
Power On/Off 7
Set Clock 7
Adjust Volume....7
Adjust Screen/Button Illumination....7
Key-Press Tone 7
FM/AM Radio....8
Bluetooth Streaming....9
USB Playback....10
Sound Settings 11
System Settings....12
Audio Input 12
Audio Output 12
Troubleshooting....13
Specifications 14
Introduction and Compatibility
- The unit is designed to provide a direct fit to replace factory radio for 1998-2013 Harley-Davidson® models (Electra Glide®, Street Glide® and Road Glide®).
- Connect your factory wiring harness and connectors to this unit to retain functionality including handlebar audio controls. However, the following features are not compatible: factory amplified systems, intercom, CB, rear volume controls, 1998-2005 Ultra rear speakers, and factory equipped satellite radio systems.
Package Contents
When first unpacking this product, please check that the package contains each of the items listed below. If something is missing, contact the store where you purchased the product.
- 1 x Multi-media receiver (with multiple cable connectors)
- User manual and warranty card
Important
Please read and understand all instructions before you use your product. Failure to follow the instructions could result in injury and/or damage that could potentially void the warranty.
Safety Precautions
- Do not disassemble or modify this product. This can result in short circuits, fires, electric shocks or other hazards.
-
Be sure to observe the following guidelines:
-
Do not increase speaker volume so high that you cannot hear what is around you.
- Use caution or temporarily discontinue use in potentially hazardous situations.
- Do not make any adjustment on the product when driving or in other situations where distractions can be hazardous. Responsible and safe driving is your primary responsibility when operating a vehicle.
- Start volume at a low setting then gradually increase the volume until you can hear it comfortably, without sound distortion or ear discomfort.
- In the event of smoke, strange noise or odor emitted from the product or any other abnormal operational signs appearing on the product, disconnect the product from the power supply. Discontinue use and contact your dealer or our technical support. Using the product in this condition may result in permanent damage to the system.
• Servicing must only be carried out by a technician. Contact our technical support for any service questions.
Installation Precautions
- WARNING: Always consult a professional installer.
• Installation must be performed by a professional. Contact our technical support for any installation questions. - Use only installation parts provided with the product.
- Before installation, disconnect the negative terminal of the vehicle battery to prevent damage to the product, fire, and/or possible injury.
- Observe the safety and operating instructions of the devices which are connected to the product.
- This product is resistant against splashing water. Do not submerge.
Environmental Care
Do not throw away the product with normal household waste at the end of its life. Follow your local laws if/when disposing of electronic products. By doing this, you help preserve the environment.
Control Panel Description
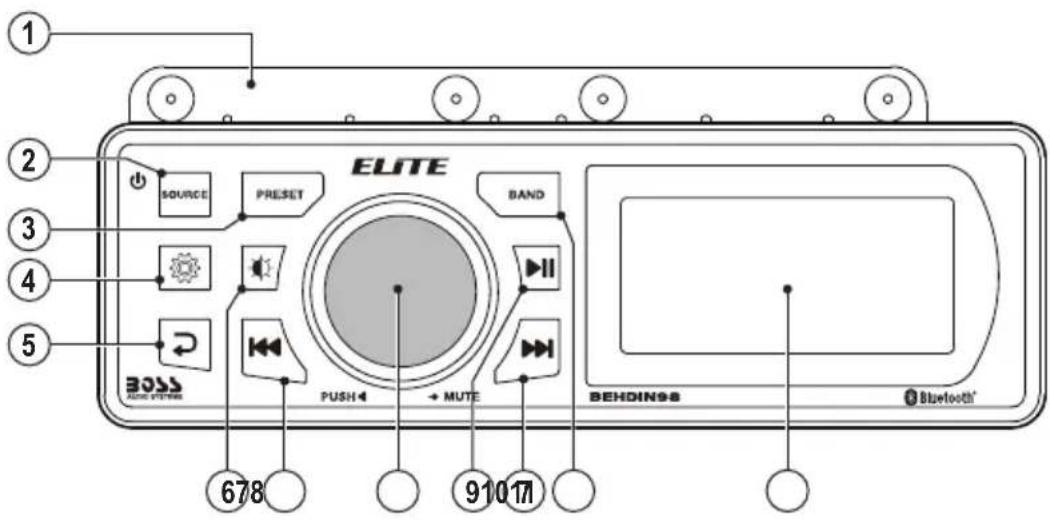
1 Dedicated mounting bracket
Use the accessory mounting bracket to secure a dedicated external amplifier, such as BOSS model BHD3F, to the top of the unit.
BHD3F (sold separately) includes an amplifier and two speakers.
2 SOURCE
- Press to power the unit on; Hold down to power the unit off.
- Select a source.
3 PRESET
- Select a preset radio station.
- Press and hold to preset the current station.
4
- Press to enter sound settings.
- Press and hold to enter system settings.
5
Return to the previous menu option level, or exit the menu.
6

- Press to adjust brightness of screen and button lights: high, medium and low.
- Press and hold to switch between amber or white button illumination colors.
7
- During USB or Bluetooth audio play, select the previous or next audio file; hold down to fast search.
• In radio source, press briefly to tune to a radio station. - Navigate menu options.
8 Function knob
- Rotate to adjust volume, or to change menu setting values.
- Press to mute or restore volume.
9 ▶||
Press to start, pause or resume play.
10 BAND
In radio source, select a radio band (FM1/FM2/FM3/AM1/AM2).
11 LCD display
flowchart
graph TD
    A["23-Pin Male Connector"] --> B["35-Pin Male Connector"]
    B --> C["USB/Charging Port"]
    C --> D["BT Antenna (Never cut)"]
    C --> E["Blue/White"]
    C --> F["Radio Antenna"]
    C --> G["AUX-IN (3.5mm)"]
    C --> H["Power Antenna/Amplifier Remote"]
    C --> I["Blue"]
    I --> J["Front Line Out"]
    J --> K["White (L)"]
    J --> L["Red (R)"]
    J --> M["Ground"]
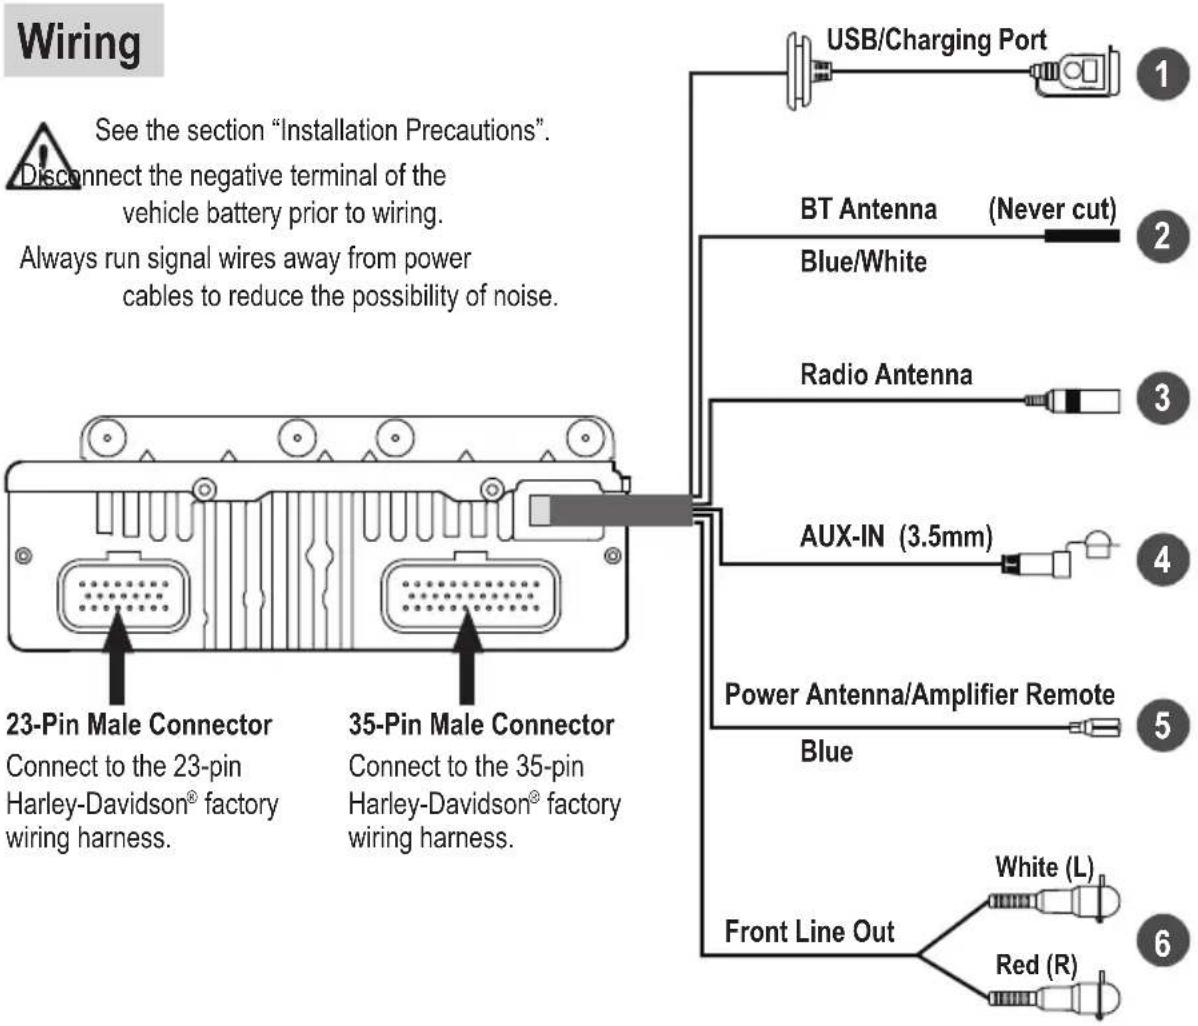
Power Connection (Plug and Play)
To power the unit, simply connect your Harley-Davidson® factory harness to the unit.
Other Connections
1: Connect to a USB flash drive for music playback; or charge a mobile phone (1.5A).
2: Bluetooth antenna for better reception. Never cut, short or ground this wire.
3: Connect to a FM/AM radio antenna (not included) for radio reception.
4: Connect to a mobile phone or MP3 player for music playback.
5: Connect to an external device/amplifier (not included) for power control.
6: Connect to the front audio input on an external amplifier (not included).
Mounting

See the section "Installation Precautions".
Disconnect the negative terminal of the vehicle battery prior to installation.
Install the unit where it does not interfere with your driving.
If you must modify the vehicle for the installation, make sure you do not impair the safety and structural integrity of the vehicle.
Before you drill or cut any holes, investigate your vehicle's layout very carefully. Take special care when you work near the fuel tank, fuel lines, hydraulic lines and electrical wiring.
Mount the Unit
This unit is designed to replace your factory stereo, and use your existing factory wire harness to plug and play.
- Finish wiring connection to the unit. (P.5)
- Power on the unit. Perform a function test to ensure correct operation.
- Access the factory fairing stereo opening. Correctly place the unit in the opening, Secure the unit on both sides using four factory bolts.
Ensure the unit is firmly attached to avoid vibration while riding.
Make sure connection cables are not pinched or damaged by sharp objects or moving parts.
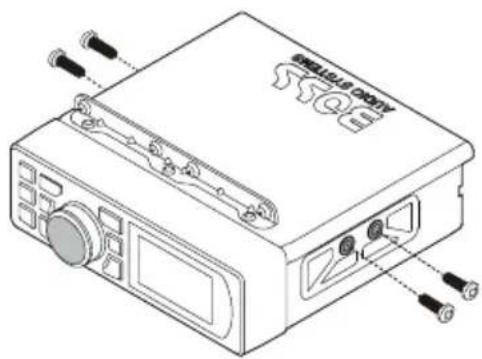
Mount a Dedicated Amplifier (Optional)
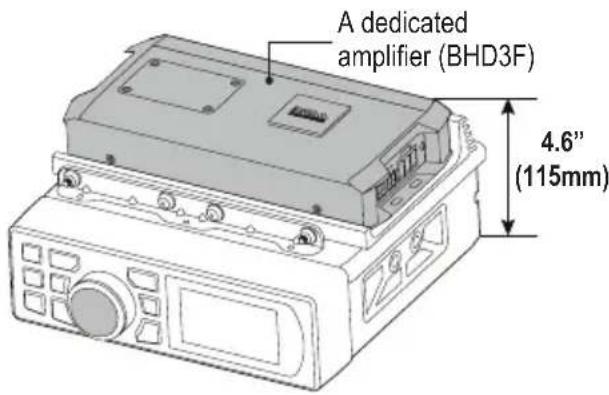
This unit is equipped with a fixed OEM style mounting bracket that can be used to secure a third-party accessory such as a dedicated amplifier (BOSS model BHD3F - sold separately) on top of the unit.
What You Need
- Make sure your Harley-Davidson ^ motorcycle has sufficient factory stereo opening space (minimum 4.6"/115mm height) to mount a dedicated amplifier on top of this unit.
• Purchase the product (BOSS model BHD3F) which comes with the dedicated amplifier and two speakers. - Mount the dedicated amplifier on top of this unit. For mounting instructions, refer to the Installation Instructions provided with BHD3F.
Power On/Off
• To power the unit on, press .SOURCE
- When powered on, the unit switches to the last selected source and the button lights are illuminated.
• To power the unit off, press and hold SOURCE
- When powered off, the display and the button lights are turned off.
Set Clock
- Press and hold ⚠️ enter system settings.
-
Press A to display the following clock options.
-
CLOCK SET (Hour-Minute)
- CLOCK 12H/24H
-
CLOCK AM/PM
-
When "CLOCK SET" is displayed, rotate the function knob counterclockwise to set hours; rotate the function knob clockwise to set minutes.
When 12/24H option is displayed, rotate the function knob to select 12 or 24 hour format.
When AM/PM option is displayed, rotate the function knob to select AM or PM.
- Press to exit the settings. The new settings will be saved.
Adjust Volume
- To increase or decrease volume, rotate the function knob.
- To mute or restore volume, press the function knob.
Adjust Screen/Button Illumination
- Press to select a brightness level for screen and button lights: High, Medium or Low.
- Press and hold to switch button illumination color between amber or white.
Key-Press Tone
You can turn on or off key-press tone (sound made when pressing a button).
- Press and hold enter system settings.
- Press ◀◀▶◀BEEP ON" or "BEEP OFF" is displayed.
- Rotate the function knob to select "BEEP ON" or "BEEP OFF" to activate or deactivate key-press tone.
- Press to exit the settings. The new settings will be saved.
FM/AM Radio
You can listen to FM or AM radio, and preset the radio stations. The preset radio stations will be retained if the unit is disconnected from the vehicle's battery.
Select a Radio Band
- Press source radio source. The radio icon is displayed.
- Press B and Datedly to select FM1, FM2, FM3, AM1 or AM2.
Tune to a Radio Station
- Select an FM or AM radio band.
- Press ◀◀/▶▶ briefly. The unit will find a station with strong reception.
- If an FM radio station with stereo signal is reached, "ST" will be displayed.
- Repeat the steps above until your find your desired station.
To tune to a weak station
- Press and hold ◀◀/▶▶ to enter manual tuning mode. "M" is displayed and flashing.
- When "M" is flashing, press I / I repeatedly to search by frequency step until you find a desired station with acceptable reception.
- Note: Manual tuning mode will automatically exit after five seconds of button inactivity.
Store Radio Stations
Each radio band (FM1/FM2/FM3/AM1/AM2) can store six radio stations.
- In radio source, hold down 🎨vice to enter radio setting menu.
- Press | | AUTO STORE" is displayed.
- Press the function knob to start searching radio stations.
- All FM or AM stations will be stored in FM or AM bands. The first stored station will be automatically broadcast.
Preset a Radio Station
You can preset six radio stations in each radio band (FM1/FM2/FM3/AM1/AM2).
- Select a radio band and tune to a radio station.
- Press and hold PRESET program mode. "MEM P1" is displayed.
- Rotate the function knob to allocate a number (1-6) to the current station.
- Press the function knob to confirm the selection.
To select a preset station
- Select a radio band.
- Press PRESET to select a preset station.
- The current preset number is displayed.
- If an FM radio station is broadcast with stereo, "ST" is displayed.
Radio Settings
You can access the radio menu to change settings for your radio.
- In radio source, hold down 🎨vice to enter radio settings menu.
- When a radio menu option is displayed, press ◀◀/▶▶ briefly to select an option. Then rotate the function knob to change an option setting.
• AREA USA/ AREA EUR: Select America or Europe you are in to receive radio signal.
- LOCAL ON/LOCAL OFF: Select "LOCAL ON" when most FM stations are strong enough (e.g. in urban areas). Only the stations with strong signal will be received.
Select "LOCAL OFF" when most FM stations are weak (e.g. in the countrysides). Stations with both strong and weak signals will be received.
- FM ST/ FM MONO: Select stereo or mono reception. When FM signal is weak, select mono to improve sound quality (stereo will be lost).
-
AUTO STORE: Press the function knob to search and store FM or AM radio stations.
-
Press to exit the settings.
Bluetooth Streaming
When you can stream music from your mobile device (e.g. a mobile phone) to the unit for the first time, you must pair the unit with your mobile device through Bluetooth.
- Press source Bluetooth source.
- "BT AUDIO" is displayed briefly, then "NO DEVICE" is displayed. The ⚙️ icon flashes to indicate that the unit is now in pairing mode.
- On your mobile device, enable Bluetooth then select "Boss Audio ELITE BEHDIN98" to pair the unit with your mobile device. If prompted for password, input "0000" on your mobile device.
- When the unit connects to your mobile phone, the 📞on turns to be steady from flashing.
- The unit automatically connects the last paired device each time the two are powered on. To connect a second Bluetooth device, you have to disconnect the currently connected device then repeat the steps above to pair with a second device.
Playback Control
-
When the unit connects to your mobile device, you can then play audio files from your mobile device. Music will be streamed to the unit.
-
During playback, the display scrolls the following information: Artist Name/Song Title/Play Time/Album Name.
- For best sound performance, set the volume of your mobile device to maximum, then adjust the volume through the control on the unit.
-
Note: If there is distortion heard, you may need to turn the volume of the mobile device down a level or two.
-
Control playback as follows.
-
To pause or resume play, press ▶II
• To select the previous or next music file, press
• To search fast, press and hold for.
- If there is an incoming call during playback, music will automatically pause and resume after the call ends.
Disconnect/ Re-connect Bluetooth Connection
You can disconnect and reconnect the current Bluetooth connection through this unit.
- Press and hold enter system settings.
- Press ◀◀/▶▶ briefly until "BT CONNECT" or "BT DISCONNECT" is displayed.
- Rotate the function knob to select "BT DISCONNECT" or "BT CONNECT" to disconnect or re-connect Bluetooth connection.
USB Playback
This unit can play audio files stored on a USB flash drive.
- Insert a USB flash drive to the USB port on the unit.
- Press to select USB source.
- "USB PLAY" is displayed briefly, then audio files from the USB device will play automatically. The USB icon is displayed.
- During playback, the display scrolls the following information: Artist Name - Song Title - Play Time - Album Name.
- Control playback as follows.
• To pause or resume play, press ▶II
• To select the previous or next music file, press
• To search fast, press and hold for.
Select Play Mode
- During USB playback, hold down 📄vice to enter USB settings menu.
-
When a USB menu option is displayed, press ◀◀/▶▶ briefly until "REPEAT" or "RANDOM" option is displayed. Then rotate the function knob to select a play mode.
-
REPEAT ONE: Play the current track repeatedly.
- REPEAT FLD: Play the current music folder repeatedly.
- REPEAT ALL: Play all the audio files repeatedly.
- RANDOM FLD: Play the current music folder randomly.
- RANDOM ALL: Play all the audio files randomly.
- RANDOM OFF: Cancel random play mode.
Search by file
You can browse USB files and select a file to play.
- During USB playback, hold down device to enter USB settings menu.
- When a USB menu option is displayed, press ◀◀/▶▶ briefly until "USB BROWSE" option is displayed.
- Press the function knob to confirm the selection. The file being played is displayed.
- Rotate the function knob to select a file. Press ↩ to go to the folder level.
- To play the selected file, press the function knob.
Sound Settings
This section helps you change the sound settings of this unit.
- When powered on, press ⚙ enter sound settings.
-
Press ◀◀/▶▶ repeatedly to select a setting option (shown below). Then rotate the function knob to adjust values or settings. Press → exit the settings and the new settings will be saved.
-
EQ: Select a preset sound mode (a preset equalizer setting): FLAT, ROCK, POP, DANCE, JAZZ, CLASSIC, or USER.
- BASS: Change output level for bass sound (applicable only when selecting USER option).
- MIDDLE: Change output level for midrange (applicable only when selecting USER option).
- TREBLE: Change output level for treble sound (applicable only when selecting USER option).
• BAL: Adjust left-and-right speaker volume balance. - FADER: Adjust front-and-rear speaker volume balance.
System Settings
This section helps you change the system settings of this unit.
- When powered on, press and hold to enter system settings.
- Press ◀◀/▶▶ repeatedly to select a setting option (shown below). Then rotate the function knob to adjust values or settings. Press → exit the settings and the new settings will be saved.
- CLOCK 00.00: Set hours and minutes.
- CLOCK 12H/24H: Set 12 or 24 hour format.
- CLOCK AM/PM: Set AM or PM time.
- BEEP ON/OFF: Enable or disable key-press tone (sound made when pressing a button).
- BT DISCONNECT/CONNECT: Disconnect or re-connect Bluetooth connection.
- MCU 23XXXXXXX: Display the firmware version of this unit ("X" stands for a number).
- SYSTEM RESET: Restore the factory settings and all the manual presets will be removed. To trigger system reset, press the function knob.
Audio Input
This unit can play audio from a mobile phone or MP3 player through 3.5 mm audio input.
- Connect the 3.5 mm audio input (labeled AUX-IN) on the unit to the headphone jack on your mobile phone (or MP3 player), using the following cable.
- For a mobile phone with a headphone jack, use a 3.5 mm audio cable (not included).
- For a mobile phone with a USB-C port, use a USB-C to 3.5 mm audio cable (not included).
-
For an iPhone, use a lightning to 3.5 mm audio cable (not included).
-
Press SOURCE to select AUX input source. "AUX IN" is displayed.
-
Start music playback on your mobile phone. Audio will play through the unit.
-
For best sound performance, set the volume of the connected device to maximum.
- Use the controls on the connected device for playback control.
Audio Output
You can output audio from the unit to an amplifier.
-
Using RCA audio cables (not included), connect the RCA audio outputs (white/red, labeled Front Line Out L/R) on the unit to the RCA audio inputs on an amplifier (not included).
-
Start music playback on this unit. Audio will be output to the connected amplifier.
Troubleshooting
If you have problems using this product, check the following points before you request service. If you still have a problem, contact our Customer Service for further assistance.
| Problem Solution | |
| Unit not responsive Restart | the unit by turning the vehicle off for a few seconds, then turning the vehicle back on.If the problem still persists, disconnect the unit from the source battery for a few minutes and then reconnect. |
| No power This unit is powered | through connection to your Harley-Davidson ® factory wiring harness. Connect the factory harness to this unit for power supply. |
| Check that the power/ignition/ground wire of your Harley-Davidson® harness are correctly connected. | |
| Check that the vehicle ignition power (ACC) is switched on. | |
| No sound Check that playback is not paused, or turn up the volume. | |
| Bluetooth not connected / Streaming not possible | Check that Bluetooth on your mobile device is enabled. |
| Make sure your mobile device is located in Bluetooth range. | |
| This unit is connected with another Bluetooth device. Disconnect the current Bluetooth connection. | |
| Poor audio quality from Bluetooth connection. | Move your mobile device closer to the unit, or remove obstacles or sources of interference that are affecting Bluetooth reception. |
| USB not playable Files are not supported, or the USB device is not compatible with the unit.Change the media files or USB device. | |
Specifications
Audio
Max output power....72 W x 4 (@ 2 Ohms), 48W x 4 (@ 4 Ohms)
Amplifier class ...... A/B (2 Ohms stable)
Speaker impedance.....≥2 Ω
Frequency response....20 Hz - 20 kHz
3.5mm AUX input sensitivity 1000 mV
Pre-amp outputs....front left and right RCA sockets (2V)
FM Radio
Frequency range 87.5 – 107.9 MHz (USA)
87.5 - 108 MHz (Europe)
Frequency step.... 200 kHz (USA)
50 kHz (Europe)
AM Radio
Frequency range 530 - 1710 kHz (USA)
522 – 1620 kHz (Europe)
Frequency step.... 10 kHz (USA)
9 kHz (Europe)
Bluetooth
Bluetooth version....5.1
Bluetooth profiles.... A2DP, AVRCP
Bluetooth frequency.... 2402 - 2480 MHz
Transmission power.... <4 dBm
Transmission distance up to 33 ft /10 m (line of sight)
USB
Compatibility.... Type A, USB 2.0 (High-Speed)
File system ...... FAT32
Charging current....5VDC, max 1.5A
Audio playback....MP3,WMA
General
Power supply 9.6 - 14.4VDC
Current consumption .... max 7A
Screen 3" (76.2 mm), monochrome LCD display
Ingress protection.... IPX6-rated front panel (water resistant, dustproof)
IPX4-rated chassis
UV protected front panel.....Yes
Chassis material....ZAM ^® coated corrosion-resistant steel
Conformal coated PCB......Yes
Cable length.... USB (24"/600mm), AUX-IN (6"/150mm),
RCA output (11"/276mm), Radio antenna (5"/120mm),
Amplifier remote (11"/276mm), BT antenna (13"/327mm)
Dimension Drawings
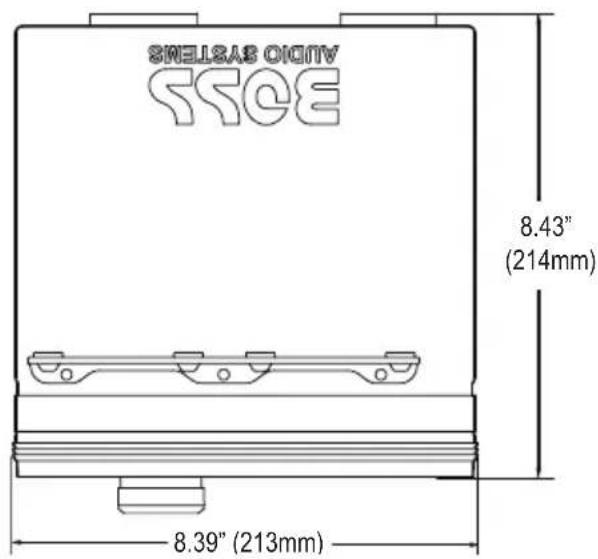
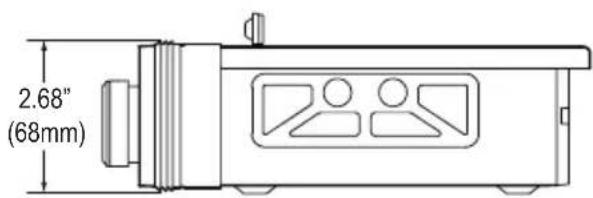
Specifications are subject to change without notice.
BOSS Audio Systems
3451 Lunar Court · Oxnard, CA 93030
www.bossaudio.com
805-751-4853 Customer Service
Tech Support: www.bossaudio.com/support


0623
- BEHDIN98 USER MANUAL
- HARLEY-DAVIDSON® DIRECT FIT | 288 WATTS BLUETOOTH® MP3/WMA AM/FM RECEIVER
- BOSS®
- AUDIO SYSTEMS
- IMPORTANT
- Table of Contents
- Introduction and Compatibility
- Package Contents
- Safety Precautions
- Installation Precautions
- Environmental Care
- Control Panel Description
- Dedicated mounting bracket
- SOURCE
- PRESET
- 4
- 5
- 6
- 7
- Function knob
- ▶||
- BAND
- LCD display
- Power Connection (Plug and Play)
- Other Connections
- Mounting
- Mount the Unit
- Mount a Dedicated Amplifier (Optional)
- What You Need
- Power On/Off
- Set Clock
- Adjust Volume
- Adjust Screen/Button Illumination
- Key-Press Tone
- FM/AM Radio
- Select a Radio Band
- Tune to a Radio Station
- To tune to a weak station
- Store Radio Stations
- Preset a Radio Station
- To select a preset station
- Radio Settings
- Bluetooth Streaming
- Playback Control
- Disconnect/ Re-connect Bluetooth Connection
- USB Playback
- Select Play Mode
- Search by file
- Sound Settings
- System Settings
- Audio Input
- Audio Output
- Troubleshooting
- Specifications
- Audio
- FM Radio
- AM Radio
- Bluetooth
- USB
- General
Brand : BOSS
Model : BEHDIN98
Category : Pregnant