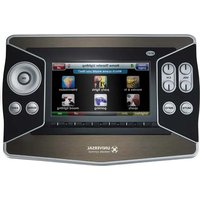
MX-6000 - Remote control UNIVERSAL REMOTE CONTROL - Free user manual and instructions
Find the device manual for free MX-6000 UNIVERSAL REMOTE CONTROL in PDF.


| Product Type | Universal Remote Control |
| Brand | Universal Remote Control |
| Model | MX-6000 |
| Dimensions (approx.) | 7.0 x 2.2 x 1.2 inches |
| Weight (without batteries) | 6.5 oz (184 g) |
| Power Source | 2 x AA batteries (not included) |
| Battery Life | Approximately 6 months with normal use |
| Control Type | Infrared (IR) with learning capability |
| Number of Devices Supported | Up to 15 devices |
| Memory | Non-volatile, retains settings without batteries |
| Key Features | Learning, macro programming, backlit buttons, LCD display |
| Compatibility | Most brands of TVs, DVD players, cable boxes, audio systems |
| Programming Method | Direct code entry or learn from original remote |
| Display | Backlit LCD screen for status and device names |
| Operating Range | Up to 30 feet (9 meters) line of sight |
| Maintenance | Clean with a soft, dry cloth; avoid moisture |
| Safety | Do not expose to water or extreme temperatures |
| Spare Parts & Repairability | Batteries are user-replaceable; no other spare parts available |
| General Information | Designed for home entertainment systems; user manual available online |
Frequently Asked Questions - MX-6000 UNIVERSAL REMOTE CONTROL
User questions about MX-6000 UNIVERSAL REMOTE CONTROL
0 question about this device. Answer the ones you know or ask your own.
Ask a new question about this device
Download the instructions for your Remote control in PDF format for free! Find your manual MX-6000 - UNIVERSAL REMOTE CONTROL and take your electronic device back in hand. On this page are published all the documents necessary for the use of your device. MX-6000 by UNIVERSAL REMOTE CONTROL.
USER MANUAL MX-6000 UNIVERSAL REMOTE CONTROL
Operating Your System
With The MX-6000
Two Way Touch Screen

This remote control was Custom Programmed for you by:
For questions about your Custom Programming call:
Custom Programming of a complex home theater and/or a multi-room system is one of the most challenging tasks within an audio/video installation. It involves an intimate knowledge of how the components interact and exact details on the proper sequences of control.
Only a Complete Control dealer has the requisite experience and training to quickly and effectively customize a remote control for true automated operation.
Congratulations on your choice!
MX-6000 Owners Manual © 2008 Universal Remote Control, Inc.
The information in this manual is copyright protected. No part of this manual may be copied or reproduced in any form without prior written consent from Universal Remote Control, Inc.
UNIVERSAL REMOTE CONTROL, INC. SHALL NOT BE LIABLE FOR OPERATIONAL, TECHNICAL OR EDITORIAL ERRORS/OMISSIONS MADE IN THIS MANUAL.
The information in this manual may be subject to change without prior notice.
Complete Control is a registered trademark of Universal Remote Control, Inc. Entertainment Made Simple is a trademark of Universal Remote Control, Inc.
All other brand or product names are trademarks or registered trademarks of their respective companies or organizations.

UNIVERSAL®
remote control
500 Mamaroneck Avenue, Harrison, NY 10528
Phone: (914) 835-4484 Fax: (914) 835-4532
Connecting the Battery Pack 5
Using the Charging Base 5
Two Way via WiFi 5
Optional RF "No Rules" Operation 6
Operating Your System 7
Using Two Way Personal Server Features 8
Displaying the Settings Screen 11
Sleep Settings 11
Brightness 11
Button Light 11
Vibrate/Sound 12
Date and time 12
Power Settings 12
System 12
Pickup Settings 13
Network 13
Calibration 13
Factory Default 13
Exit 13
USA Limited Warranty Statement 14
Information to the End User 15
Maintaining Your MX-6000 16
Specifications 16
You've purchased a unique synthesis of hardware and software engineering, the Complete Control MX-6000. The twin goals of the design team were to improve the elegance and usability of touch screens through the physical design while providing a new standard in brightness, clarity and animation for the touch screen itself.

Easy Operation
By assigning the important home theater operational buttons to the natural resting place of the end users thumbs, the MX-6000 achieves a new standard in use and comfort.
Automatic Backlighting
The integral motion sensor detects any movement of the touch screen and automatically backlights the screen. You do not have to press any button to display the screen. Any movement of the MX-6000 renews the backlighting. To adjust the backlighting, see page 11.
Programming the MX-6000
To fully automate an audio/video system and integrate two way automation of servers etc. the programmer must have a detailed knowledge of each component, LAN configuration, WiFi optimization and how the system is connected and operated. Only a trained and certified professional audio/video installer can install an MX-6000 automation system in a timely and efficient manner.
Integrated Stylus
Stowed away in the top right hand corner storage slot, is a custom made stylus for your convenience.
Connecting the Battery Pack
Unlock the rear cover by pressing down on the two locking tabs and sliding the battery cover forward.
Remove the cover. For shipment from the factory, the battery is left out of the MX-6000. Place the battery into the battery compartment, making sure you align the contacts on the battery to the contacts on the MX-6000. The battery will snap into place when aligned properly.
Replace the cover and snap it into place.
Using the Charging Base
Plug the 6V DC adapter into a power outlet and into the back of the charging base.
Gently place the MX-6000 into the cradle of the charging base. It automatically aligns itself to the contacts on the charging base.
The Status light should immediately light. Red indicates that it is charging. Blue shows that it is fully charged. There is no harm in leaving the MX-6000 on its charging base whenever it is not in use.
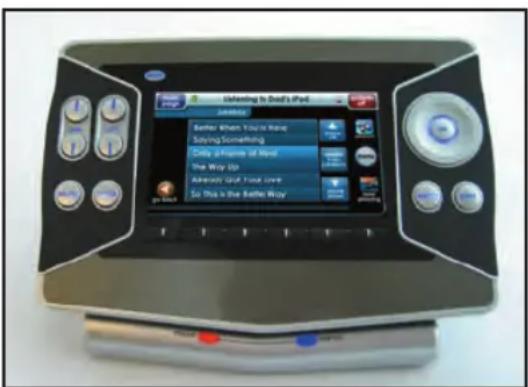
Red indicates charging, Blue that the remote is fully charged.
Two Way via WiFi
To use the MX-6000 with any two way companion product, the MX-6000 must be configured by your installer to be part of a LAN (local area network) via a WiFi b/g access point or router. This is not user configurable. If you have any questions, consult with your custom installer.
Optional RF "No Rules" Operation
In combination with an MSC-400 Master System Controller, or an RF Base Station, the MX-6000 can control your system without being in line-of-sight of the equipment.
The MSC-400 enhances the capabilities of the MX-6000 by storing and issuing Smart Macros to your main system components. It is triggered by RF Smart Macro commands via RF (radio frequency). In addition, your MX-6000 can control components in secondary rooms and systems via MRF-350 or MRF-260 RF base stations.
- The MX-6000 sends radio waves in every direction, so you don't have to point the remote anymore!

natural_image
Illustration of a smart home control device with a digital display and antenna, surrounded by red dotted circular patterns (no text or symbols)-
The RFX-250 RF Sensor can be freely positioned for optimal reception.
-
The MSC-400 can control IR, RS232 and Relay controlled devices.

- Self-adhesive "Flashers" affix to the Infrared sensors on the front panels of your components. Uniquely, all Complete Control base stations can also connect to components with rear panel IR Inputs via adjustable IR Line Outputs. The MSC-400 offers RS-232 control via rear panel connections as well.

natural_image
Close-up of a white electronic device with control knobs and buttons (no visible text or symbols)Operating Your System
The MX-6000's main pages display the activities and devices in your system. Press the main page button to see what your choices are. Large systems may have more than one page. Press either of the Page buttons if you don't see all your devices.
Gently press any screen button with your finger to select an activity or a device. The screen will change to a display of the buttons you need for that activity/device. The Page buttons may reveal additional buttons for some devices and activities.
When you would like to control another device, press the main page button and select a new device from the main page.
The main page button in the upper left always displays the main menu pages.
The combination Scroll Wheel and 4 way cursor buttons enable you to both scroll lists of artists, albums or songs from your Music Server or to navigate on screen guides and menus with ease.
Stylus storage slot
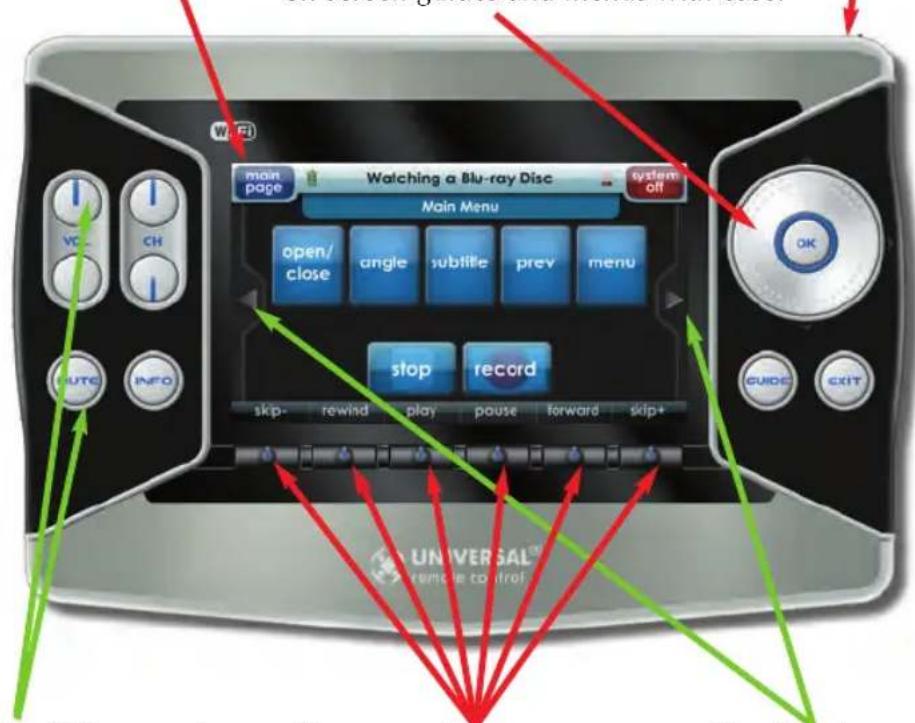
The Volume and Mute buttons are always available regardless of what screen is displayed.
The screen buttons are labeled dynamically and make commonly used functions easy to find by feel.
The Page buttons display additional pages of controls.
Using Two Way Personal Server Features
Step 1 – Insert an iPod into the PSX-1. The Universal Remote Control screen appears on the iPod. This means it's connected to the dock and ready for use with the MX-6000 remote control.
Step 2 – Select the dock you want to listen to from the Main page of your MX-6000.

Step 3 – If the system has just been turned on, you may see the mes-
sage, "Connecting to iPod Dock". Once the MX-6000 has connected to the iPod Dock, the iPod menu screen appears. If the iPod is already playing, the "Now playing screen" appears.

Step 4 – When you browse for new content, operate the MX-6000 as you would the iPod. Press the Menu button, then place your thumb on the scroll wheel and rotate to navigate, then press the “OK” button to make your selection. The iPod Now Playing Screen appears after a selection is made.
Press the Menu button Rotate the Scroll wheel Press the OK button to display iPod menus. to navigate. to select content.

Your unique personal server features are accessed from the left side of the screen of your MX-6000. Simply tap the feature you want:
Shortcuts to finding playlists, albums, artists, etc. without using the Menu button.
Shuffle exactly what you want (this album, this artist, this genre, etc.)

More from this artist, this album, this genre, even this composer...
Jukebox lets you build and manage your own playlist without accessing your PC.
Shortcuts:
The "Shortcuts" button makes navigating your iPod easier than ever before. Touch any button to jump directly to that menu. Example: Touch the "Artists" button to jump directly to the Artists menu.


Shuffle:
The "Shuffle" button opens an expanded menu of shuffle options. Touch any of the choices to enjoy your music in a random order.
The "Play More From" button opens up a menu of choices to add to your current selection. By touching the "More from this Artist" button, all the additional songs, from the current Artist, will be added to the song queue.


Jukebox:
The “Jukebox” button opens a menu of choices allowing you to create a jukebox playlist in real time. Touch the “add song to Jukebox” icon or “add album to jukebox” to add the currently playing song or album to the jukebox. To play the jukebox, touch the "play jukebox" icon. To edit the jukebox, touch the "view jukebox" icon. Note: the Jukebox playlist is cleared when the iPod is replaced or in the event of a power failure.
Edit Jukebox:
Songs can be moved up, down or deleted from the jukebox list by using the control keys on the right of the "view jukebox" screen. To exit from the "View Jukebox" screen, touch either the" Go Back" button or the "Now Playing" icon.


Using the Alpha Search Feature: The “search” button appears in the upper right whenever you are looking at a Menu or Jukebox screen. Once you click on Search, an alphabetical keyboard appears. Simply type in what you’d like to search for and touch “Go”.
The 1, 2, 3 [icon] opens the numeric keypad screen.
The qwerty keyboard Ⓞ toggles between a qwerty style keyboard and a simple a,b,c keyboard.
The "Go Back" takes you back to the menu screen.
Displaying the Settings Screen
You can adjust the settings of the MX-6000 whenever you like by pressing and holding both the MUTE and OK buttons for five seconds. When you do, the screen will change to the SETTINGS screen. If you do not press any button on the SETTINGS screen within 30 seconds time out and automatically return to @ 1minute, the MX-6000 will normal operation.

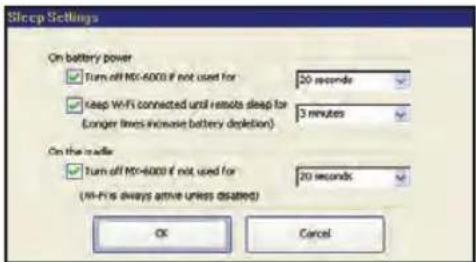
Sleep Settings
WiFi and Backlighting can be separately adjusted to conserve battery life. Note that if WiFi is disconnected, the MX-6000 will take an additional 4-10 seconds to connect to the network when a two way device is started.
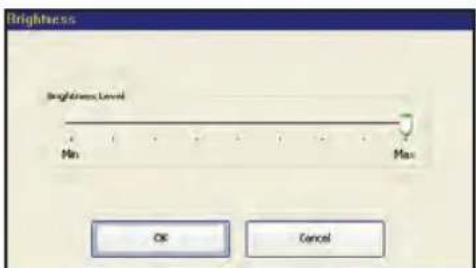
Brightness
Adjust the screen brightness by moving the slider. Min is the dimmest setting and Max is the brightest setting.
Button Light
You can adjust the brightness of the LEDs that backlight the buttons of the MX-6000. Move the slider to the left to dim the backlighting and move it to the right to brighten the backlighting.

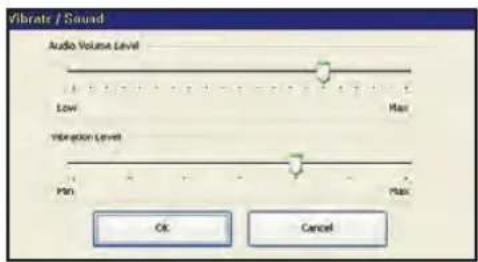
You can adjust the volume or touch vibration to any level you like by touching and dragging the volume control.
Date and time
Your MX-6000 may have been programmed to display the time or date on the touch screen. If you need to, you can adjust the time displayed by changing the settings on this screen. If you live in a part of the country that uses daylight savings time, check the box next to: "Automatically adjust time for daylight savings time".

Power Settings
You can display the remaining charge by selecting Power.
You can also adjust when the low battery warning screen will appear.

System
The System Information screen displays data about your MX-6000's operating system, memory etc.
You can set your MX-6000 to only turn on when touched, or every time you move it. Simply select on or off.

Network
WARNING! Only use this button when instructed to by Technical Support. The Network screen displays network information about your MX6000 and the wireless network it is connected to. Do not make any changes on this screen!
Calibration
If you like, you can calibrate where you tap by running the calibration. You will need a pen top or PDA stylus to do this. Do not attempt to calibrate using your fingers.
Factory Default
WARNING! Only use this button when instructed to by Technical Support. It resets the memory of the MX-6000 to the factory condition. All your programming will be lost!
Exit
When you have finished adjusting Settings, simply tap the EXIT button to return to normal operation.

USA Limited Warranty Statement
Your Universal Remote Control, when delivered to you in new condition, is warranted against defects in materials or workmanship as follows: UNIVERSAL REMOTE CONTROL, INC. warrants this product against defects in material or workmanship for a period of one (1) year and as set forth below. Universal Remote Control will, at its sole option, repair the product using new or comparable rebuilt parts, or exchange the product for a comparable new or rebuilt product. In the event of a defect, these are your exclusive remeies.
This Limited Warranty covers only the hardware components packaged with the Product. It does not cover technical assistance for hardware or software usage and it does not cover any software products whether or not contained in the Product; any such software is provided "AS IS" unless expressly provided for in any enclosed software Limited Warranty.
To obtain warranty service, you must deliver the product, freight prepaid, in its original packaging or packaging affording adequate protection to Universal Remote Control at the address provided in the Owner's Manual. It is your responsibility to backup any macro programming, artwork, software or other materials that may have been programmed into your unit. It is likely that such data, software, or other materials will be lost during service and Universal Remote Control will not be responsible for any such damage or loss. A dated purchase receipt, Bill of Sale, Installation Contract or other verifiable Proof of Purchase is required. For product support and other important information visit Universal Remote Control's website: http://www.UniversalRemote.com or call the Customer Service Center (914) 835-4484.
This Limited Warranty only covers product issues caused by defects in material or workmanship during ordinary consumer use. It does not cover product issues caused by any other reason, including but not limited to product issues due to commercial use, acts of God, third-party installation, misuse, limitations of technology, or modification of or to any part of the Universal Remote Control product. This Limited Warranty does not cover Universal Remote Control products sold as USED, AS IS, REFURBISHED, so-called "B STOCK" or consumables (such as batteries). This Limited Warranty is invalid if the factory-applied serial number has been altered or removed from the product. This Limited Warranty is valid only in the United States of America. This Limited Warranty specifically excludes products sold by unauthorized resellers.
LIMITATION OF REMEDIES UNIVERSAL REMOTE CONTROL SHALL NOT BE LIABLE FOR ANY INCIDENTAL OR CONSEQUENTIAL DAMAGES FOR BREACH OF ANY EXPRESS OR IMPLIED WARRANTY OR CONDITION ON THIS PRODUCT. IN NO EVENT SHALL UNIVERSAL REMOTE CONTROL BE LIABLE, WHETHER IN CONTRACT OR IN TORT (INCLUDING NEGLIGENCE) FOR DAMAGES IN EXCESS OF THE PURCHASE PRICE OF THE PRODUCT,
ACCESSORY OR SOFTWARE, OR FOR ANY INDIRECT, INCIDENTAL, SPECIAL OR CONSEQUENTIAL DAMAGES OF ANY KIND, OR LOSS OF REVENUE OR PROFITS, LOSS OF BUSINESS, LOSS OF INFORMATION OR DATA, SOFTWARE OR APPLICATIONS OR OTHER FINANCIAL LOSS ARISING OUT OF OR IN CONNECTION WITH THE ABILITY OR INABILITY TO USE THE PRODUCTS, ACCESSORIES OR SOFTWARE TO THE FULL EXTENT THESE DAMAGES MAY BE DISCLAIMED BY LAW.
EXCEPT TO THE EXTENT PROHIBITED BY APPLICABLE LAW, THERE IS NO OTHER WARRANTY EXPRESSED OR IMPLIED. UNIVERSAL REMOTE CONTROL WILL NOT BE HELD RESPONSIBLE FOR STATEMENTS MADE BY OTHERS CONCERNING THE MERCHANTABILITY OR FITNESS FOR A PARTICULAR PURPOSE ON THIS PRODUCT. Some states or jurisdictions do not allow the exclusion or limitation of incidental or consequential damages, or allow limitations on how long an implied warranty lasts, so the above limitations or exclusions may not apply to you. This Limited Warranty gives you specific legal rights and you may have other rights which vary from state to state or jurisdiction to jurisdiction.
REV020708
Information to the End User
This equipment has been tested and found to comply with the limits for a Class B digital device, pursuant to part 15 of the FCC Rules. These limits are designed to provide reasonable protection against harmful interference in a residential installation. This equipment generates, uses and can radiate radio frequency energy and, if not installed and used in accordance with the instructions, may cause harmful interference to radio communications. However, there is no guarantee that interference will not occur in a particular installation. If this equipment does cause harmful interference to radio or television reception, which can be determined by turning the equipment off and on, the user is encouraged to try to correct the interference by one more of the following measures:
◆ Reorient or relocate the receiving antenna.
◆ Increase the separation between the equipment and receiver.
- Connect the equipment into an outlet on a circuit different from that to which the receiver is connected.
◆ Consult the dealer or an experienced radio/TV technician for help.
Warning!
Changes or modifications not expressly approved by the manufacturer could void the user's authority to operate the equipment.
Note : The manufacturer is not responsible for any Radio or TV interference caused by unauthorized modifications to this equipment. Such modifications could void the user's authority to operate the equipment.
Maintaining Your MX-6000
Be careful not to scratch the touch screen, only use your finger to tap the LCD touch screen or use a plastic pen top or PDA stylus. Never use a real pen, pencil or any other sharp object on the screen. Keep it away from extreme cold or heat. The MX-6000 is not waterproof. Do not use it in any location that is damp or wet. If you spill water on it, take out the battery pack and let the MX-6000 dry for 48 hours before you try powering it up again. If you spill coffee or another beverage on it, clean it with distilled water. Make sure no water gets inside the MX-6000. The touch screen contains a glass element. Don't drop the MX-6000 or impact it against anything.
Use a soft, damp cloth to clean the screen. If the screen still shows finger prints, clean it with watered down window-cleaner. Do not use anything abrasive and don't use too much water, some might leak into the interior.
Precautions & Information: Rechargeable Lithium Ion Batteries
If you will not be using your remote control for an extended period of time, be sure to remove the battery. Do not attempt to disassemble, alter or apply heat to the battery. Use care to avoid dropping the battery or subjecting it to severe impact that could damage the case. The battery should not be immersed in water. Lithium Ion batteries are recyclable. For the address of a recycle drop-off location near you call toll free 1-800-822-8837 or visit http://www.rbrc.com
Specifications
Microprocessor: 533MHz ARM9
RAM: 128Mbyte Mobile DDR
NAND: 64Mbyte
LCD: 4.3 Inch Wide Screen (480 by 272)
LCD Backlighting by LED
Sound: 2 x 1 watt USB: 2.0
Devices - Supports up to 255
Devices with text, less with heavy graphics usage
Pages - Supports up to 255 Pages on each Device with text, less with heavy graphics usage
Learning Capability - Standard frequencies (15kHz to 455kHz)
Macro Capability - Up to 255 steps each, however nesting is allowed
IR Learning: 20-455 kHz
IR Range (Line of Sight via Infrared): 30-50 feet, depending on the environment
RF Frequency: 418MHz
RF Range (radio frequency): 50 to
100 feet, depending upon the environment
WiFi: IEEE 802.11 B (11Mps), G (54Mps)
Battery: Lithium Ion, 4800 mA hours
Battery Capacity: 4 hours continuous use, 9 days standby
Battery Charging Time: 7 Hours
Dimensions: 7.5"Wide x 5.1"Deep x 1.3"Height
Weight (without AC Adapter): 15 oz
On the Use of the RF Device
NOTE: The information in this section applies to models with the wireless LAN module.
USA and Canada Safety Requirements and Notices
IMPORTANT NOTE: To comply with FCC RF exposure compliance requirements, the antenna must not be co-located or operating in conjunction with any other antenna or transmitter.
Radio Frequency Interference Requirements and SAR
The FCC with its action in ET Docket 93-62 has adopted a safety standard for human exposure to Radio Frequency (RF) electromagnetic energy emitted by FCC certified equipment. The wireless LAN module meets the Human Exposure limits found in OET Bulletin 65, 2001, and ANSI/IEEE C95.1, 1992. Proper operation of this radio according to the instructions found in this manual will result in exposure substantially below the FCC's recommended limits. The following safety precautions should be observed:
- Do not touch or move antenna while the unit is transmitting or receiving.
- Do not hold any component containing the radio such that the antenna is very close or touching any exposed parts of the body, especially the face or eyes, while transmitting.
- Do not operate the radio or attempt to transmit data unless the antenna is connected; if not, the radio may be damaged.
Use in specific environments:
- The use of wireless devices in hazardous locations is limited by the constraints posed by the safety directors of such environments.
- The use of wireless devices on airplanes is governed by the Federal Aviation Administration (FAA).
- The use of wireless devices in hospitals is restricted to the limits set forth by each hospital.
Antenna use:
- High-gain, wall-mount, or mast-mount antennas are designed to be professionally installed and should be located at a minimum distance of 30 cm (12 inches) or more from the body of all persons. Please contact your professional installer, VAR, or antenna manufacturer for proper installation requirements.
Explosive Device Proximity Warning
WARNING: Do not operate a portable transmitter (such as a wireless network device) near unshielded blasting caps or in an explosive environment unless the device has been modified to be qualified for such use.
Use on Aircraft Caution
CAUTION: Regulations of the FCC and FAA prohibit airborne operation of radio-frequency wireless devices because their signals could interfere with critical aircraft instruments.


Universal Remote Control®
500 Mamaroneck Avenue, Harrison, NY 10528
Phone: (914) 835-4484 Fax: (914) 835-4532
www.universalremote.com
OCE-0026G Rev 04
- Operating Your System
- Easy Operation
- Automatic Backlighting
- Programming the MX-6000
- Integrated Stylus
- Connecting the Battery Pack
- Using the Charging Base
- Two Way via WiFi
- Optional RF "No Rules" Operation
- Using Two Way Personal Server Features
- Shortcuts:
- Shuffle:
- Jukebox:
- Edit Jukebox:
- Displaying the Settings Screen
- Sleep Settings
- Brightness
- Button Light
- Date and time
- Power Settings
- System
- Network
- Calibration
- Factory Default
- Exit
- USA Limited Warranty Statement
- Information to the End User
- Warning!
- Maintaining Your MX-6000
- Precautions & Information: Rechargeable Lithium Ion Batteries
- Specifications
- On the Use of the RF Device
- USA and Canada Safety Requirements and Notices
- Radio Frequency Interference Requirements and SAR
- Use in specific environments:
- Antenna use:
- Explosive Device Proximity Warning
- Use on Aircraft Caution
Brand : UNIVERSAL REMOTE CONTROL
Model : MX-6000
Category : Remote control