
Punctuate - Audio software EVENTIDE - Free user manual and instructions
Find the device manual for free Punctuate EVENTIDE in PDF.


| Product Type | Audio Software Plug-in |
| Compatible Platforms | Windows, macOS |
| Plug-in Formats | VST2, VST3, Audio Units, AAX (Native) |
| Copy Protection | PACE iLok (hardware dongle or computer-based) |
| License Activations | 2 per license |
| Number of Bands | 1 to 26 (default 26) |
| Filter Bank | Linear phase triangular filters, Mel scale or custom |
| Key Controls | Transient Emphasis, Adaptive Transient, Transient Length, Adaptive Length, per-band sliders |
| Metering | Input/Output bar meters (Peak, RMS, Peak Hold), scrolling transient waveform |
| Preset Management | Preset bar with load, save, compare, info, settings |
| Color Schemes | Multiple options for UI |
| Installation File Size | Approximately 50 MB (estimated) |
| Sample Rate Support | Up to 192 kHz (typical) |
| Bit Depth | 32-bit floating point internal processing |
| Manufacturer | Eventide Inc. (Newfangled Audio) |
Frequently Asked Questions - Punctuate EVENTIDE
User questions about Punctuate EVENTIDE
0 question about this device. Answer the ones you know or ask your own.
Ask a new question about this device
Download the instructions for your Audio software in PDF format for free! Find your manual Punctuate - EVENTIDE and take your electronic device back in hand. On this page are published all the documents necessary for the use of your device. Punctuate by EVENTIDE.
USER MANUAL Punctuate EVENTIDE
natural_image
Illustration of a multi-tiered audio amplifier with speaker, buttons, and speaker holes (no text or symbols)NEWFANGLED AUDIO
Copyright 2018, Newfangled Audio
P/N: 141313, Rev 1
Eventide is a registered trademark of Eventide Inc.
Newfangled Audio and Punctuate are trademarks of Orthogonal Art and Science, LLC.
AAX and Pro Tools are trademarks of Avid Technology. Names and logos are used with permission.
Audio Units is a trademark of Apple, Inc.
VST is a trademark of Steinberg Media Technologies GmbH.
All other trademarks contained herein are the property of their respective owners.
Punctuate proudly uses the PFFFT library, which is available at https:
//bitbucket.org/jpommier/pffft.
Newfangled Audio
www.newfangledaudio.com
Eventide Inc.
One Alsan Way
Little Ferry, NJ 07643
201-641-1200
www.eventide.com
Contents
BackgroundonAuditoryFilterBanks1
2NewfangledAudioPunctuate2
3InstallationandInstantiation4
3.1 Registering Your Plug-in 4
3.2 Activating Your License 5
3.3 Installing Your Plug-in 5
3.4 Moving or Removing an Activation 5
4PresetBar7
4.1 Preset Selector 7
4.2 Preset Load and Save Buttons 7
4.3 Compare 8
4.4 Info 8
4.5 SETTINGS 8
4.6 Color Scheme 8
5ParametersandMetering
5.1 Global Controls 9
5.2 Global Parameters 10
5.2.1 INPUT AND OUTPUT LEVEL AND BAR METERS ..... 10
5.2.2 ACTIVE 11
5.2.3 MIX 11
5.2.4 SCROLLING TRANSIENT METER 11
5.3 TRANSIENT PAGE 11
5.3.1 TRANSIENT EMPHASIS 12
5.3.2 ADAPTIVE TRANSIENT 12
5.3.3 TRANSIENT LENGTH 13
5.3.4 ADAPTIVE LENGTH 13
5.3.5 TRANSIENT EMPHASIS PER BAND 13
5.3.6 TRANSIENT EMPHASIS PER BAND METERS 13
5.3.7 SOLO BUTTONS 13
5.3.8 RESET TRANS 14
5.3.9 DRAW CURVE 14
5.4 FILTER BANK PAGE 14
5.5 FILTER BANK SUB-MODULE PAGE 14
5.5.1 AUDITORY FILTER BANK 15
5.5.2 MEL/CUSTOM 15
5.5.3 SOLO BUTTONS 15
5.5.4 INSERT FILTER 15
5.5.5 REMOVE FILTER 16
5.5.6 FILTER CENTER FREQUENCIES 16
5.5.7 FILTER BANK DISPLAY 16
6Conclusion17
7AboutNewfangledAudio18
Chapter 1
BackgroundonAuditory FilterBanks
In the 1930s a physicist at Bell Labs named Harvey Fletcher was studying the human auditory system. In 1933 he published a paper called "Loudness, Its Definition, Measurement and Calculation" which introduced the concept of critical bands in human hearing. This discovery showed that a human can only detect a the presence of a frequency if it is a certain distance from another frequency playing at the same time. This frequency distance changes depending on the frequencies of the tones that are playing. But generally, this and other research has found that we can divide the human auditory range into 26 critical bands between 0 Hz and 20 kHz, and within each critical band a human can really only make out one sound at a time. Because the critical band corresponds to action of the basilar membrane in the human ear it is referred to as an auditory filter, and the set of all 26 critical bands is referred to as an auditory filter bank.
In the years since, many successful models of the human auditory system have been developed which rely on these critical bands. Many of the most successful of these rely on the Mel Scale, which defines a particular arrangement of auditory frequency bands such that each band sounds equally spaced from all others. The idea is that by breaking up a sound using a mel spaced filter bank, the division of that sound will sound equal to a human listener.
Auditory scientists and engineers now use the mel scale in hearing research and in speech recognition research. You might not know it, but the mel scale is probably being used behind the scenes in various gadgets and equipment you already use. It's often used any time the signal processing could benefit from working in the same way as the human ear. After success using the mel scale auditory filter bank in EQuivocate and Elevate we decided to use it to create a more full featured transient modulator called Punctuate.
Chapter2
NewfangledAudio Punctuate
bar
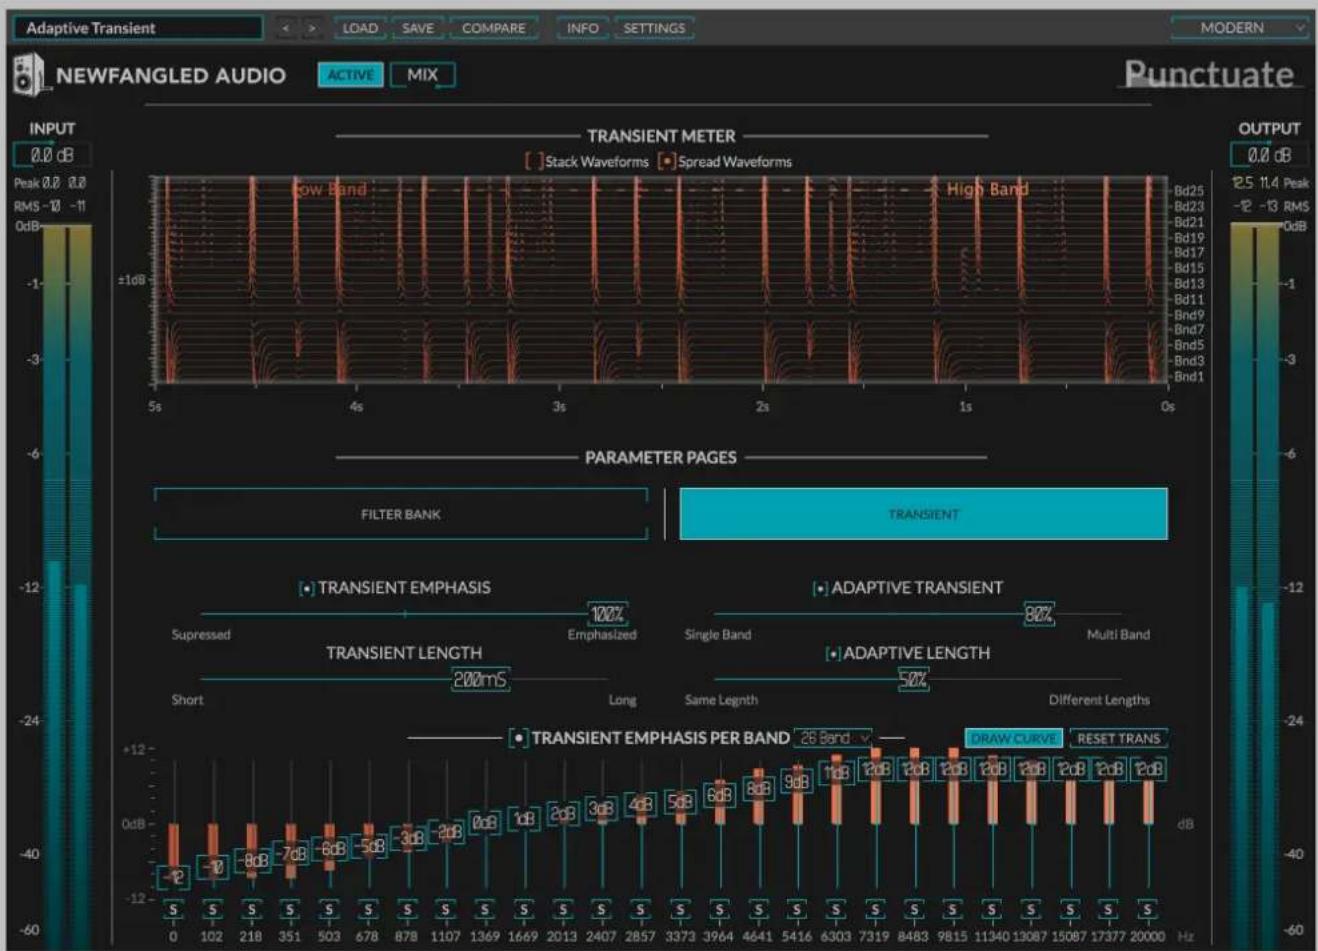
| Band | Value | |------|-------| | Short | -12 | | S | -10 | | S | -8 | | S | -7 | | S | -6 | | S | -5 | | S | -4 | | S | -3 | | S | -2 | | S | -1 | | S | 0 | | S | 1 | | S | 2 | | S | 3 | | S | 4 | | S | 5 | | S | 6 | | S | 7 | | S | 8 | | S | 9 | | S | 10 | | S | 11 | | S | 12 | | S | 13 | | S | 14 | | S | 15 | | S | 16 | | S | 17 | | S | 18 | | S | 19 | | S | 20 | | S | 21 | | S | 22 | | S | 23 | | S | 24 | | S | 25 | | S | 26 | | S | 27 | | S | 28 | | S | 29 | | S | 30 | | S | 31 | | S | 32 | | S | 33 | | S | 34 | | S | 35 | | S | 36 | | S | 37 | | S | 38 | | S | 39 | | S | 40 | | S | 41 | | S | 42 | | S | 43 | | S | 44 | | S | 45 | | S | 46 | | S | 47 | | S | 48 | | S | 49 | | S | 50 | | S | 51 | | S | 52 | | S | 53 | | S | 54 | | S | 55 | | S | 56 | | S | 57 | | S | 58 | | S | 59 | | S | 60 | | S | 61 | | S | 62 | | S | 63 | | S | 64 | | S | 65 | | S | 66 | | S | 67 | | S | 68 | | S | 69 | | S | 70 | | S | 71 | | S | 72 | | S | 73 | | S | 74 | | S | 75 | | S | 76 | | S | 77 | | S | 78 | | S | 79 | | S | 80 | | S | 81 | | S | 82 | | S | 83 | | S | 84 | | S | 85 | | S | 86 | | S | 87 | | S | 88 | | S | 89 | | S | 90 | | S | 91 | | S | 92 | | S | 93 | | S | 94 | | S | 95 | | S | 96 | | S | 97 | | S | 98 | | S | 99 | | S | 100 | | Troughs (approx.) range from -12 to +12 dB; Transient Emphasis per band range from -12 to +12 dB; Transient Emphasis per band range from -12 to +12 dB; Transient Emphasis per band range from -12 to +12 dB; Transient Emphasis per band range from -12 to +12 dB; Transient Emphasis per band range from -12 to +12 dB; Transient Emphasis per band range from -12 to +12 dB; Transient Emphasization (Top) ranges from -12 to +12 dB; Transient Emphasization (Bottom) ranges from -12 to +12 dB; Transient Emphasization (Top) peaks at -10 dB (Peak RMS -10 to -1 dB RMS) and peaks at +10 dB (Peak RMS -1 to +1 dB RMS); Transient Emphasization (Bottom) peaks at -10 dB (Superimposed) and peaks at +10 dB (Superimposed), with Transient Emphasization (Top) peaks at +10 dB (Superimposed) and Transient Emphasization (Bottom) peaks at +10 dB (Superimposed).Punctuate is heavily based on the Transient Emphasis section of the Elevate Mastering Limiter. It is a multi-band transient modulator (sometimes called a transient designer) that uses, by default, the 26 critical bands in the human ear. In addition to using the critical bands it uses intelligent algorithms to set the parameters of the transient modulator for each band. This allows you to control the transient emphasis (or suppression) and timing across all 26 bands with just 4 controls.
Like EQuivocate the filter bank in Punctuate supports between 1 and 26 bands which, by default, are distributed along the Mel Scale between 0 Hz and 20 kHz, however it does allow you to customize the center frequency of each band. The filters themselves are linear phase triangular filters, of the kind often used in human auditory models to represent critical bands. Unlike the filters used in analog graphic EQs, these filters are very well behaved over the mel space. With Transient Emphasis at 0% these filters will pass your audio untouched, and when the transients are modulated, each band will stay completely independent from its neighbor. And unlike some other linear phase filter implementations, these filters have minimal pre-echo or other time domain artifacts. The overall effect is a very pleasant and neutral tone modification, which sounds very natural.
By default, the number of bands is set to 26 and they are spread using the Mel Scale, so that filters should closely represent the critical bands of human hearing. This means each transient modulator is directly tickling a different section of your inner ear. For the purposes of modifying a complex sound, this should be the most direct way available.
This all works together to create an incredibly powerful, but very easy to use transient modulator.
Chapter3
Installation and Instantiation
Like other plug-ins Eventide distributes, Punctuate uses PACE's ilok.com licensing system, with or without and iLok hardware dongle. Each license provides two activations which can reside on either your computer or on an iLok license dongle. Once you've purchased your plug-in, you'll need to register it on Eventide's website, activate your license, and install the plug-in on to your computer
3.1 RegisteringYourPlug-in
When you purchase Punctuate, you'll receive a Serial Number and License Key. The Serial Number will be two letters followed by 6 numbers. If you have an individual Punctuate license, the Serial Number will start with NP (i.e. NP-######). The License Key will be 3 sets of 4 characters, a letter or a number, each; like XXXX-XXXX-XXXX.
Once you've received these codes, you can register your plug-in on the Eventide website. To do so, please log in to http://www.eventideaudio.com, navigate to My Account in the top right corner, and select Register a New Product. Then, fill out the form by selecting Native Plug-in (VST, AU, AAX) in the Product Category field, select Punctuate in the Product list, and enter your Serial Number, License Key, and iLok.com account name. If you don't yet have an ilok.com account, you can create one for free at http://www.ilok.com. Once you've done so, press Register.
Once you've entered this information and pressed the Register button, Eventide will send the applicable plug-in license to your ilok.com account, which you will need to activate to your computer or ilok donggle.
3.2 Activating Your License
To activate and manage your plug-in licenses you'll need to install PACE's iLok License Manager software which you can download from http://www.ileok.com. If you don't have this software installed, please download and install it now.
Once you have installed and launched iLok License Manager you should be able to log in to your account by clicking the large "Sign In" button in the upper left hand corner of the application. Once you have, you should be able to see available licenses by choosing the Available tab at the top of the iLok License Manager application. If you have successfully registered your plugin, your Punctuate Native license will be available in this list. Please activate this license by dragging it to either your computer or iLok dongle listed on the left. When you do so, you will be asked to confirm the activation, and you will be able to see it by clicking on the location you have chosen. At this point your license is activated.
3.3 Installing Your Plug-In
You should have been given a link to the Punctuate plug-in installer when you purchased your plug-in, but if you haven't, you can find downloads for all of Eventide's Native Plug-Ins at http://www.eventideaudio.com/products/plugins. Please download and launch the correct installer for your system.
Once you've launched the plug-in installer, it will take you through several pages of options. We have tried to choose defaults for these options which will best serve the majority of users, but it is worth a minute to make sure you understand these options before clicking through to the next page. A common issue with Windows VST plug-ins is choosing the correct VST directory, which can be different on each system. Please pay special attention to this setting. Once you have followed through the installer, your plug-ins and presets should be in your chosen locations, and you can hit finish to end the installer application.
At this point, you should be ready to use your Punctuate Plug-In.
3.4 MovingorRemovinganActivation
If at any point, you decide to move your plug-in activation, you can do so in iLok license manager. To move an activation between an iLok dongle and your computer, simply plug in the iLok, locate the license in its current location, and drag it to its new location. To deactivate a license, find it in its location, right click on it, and choose deactivate.
Remember that each Punctuate Plug-In License comes with two activations, which can be used on either a computer or iLok dongle, meaning you can use Punctuate in two locations at the same time.
Chapter4
PresetBar
At the very top of the Punctuate plug-in is a preset bar which allows you to load and save preset, as well as a couple other features. These are the preset bar sections.

4.1 PresetSelector
On the far left is a drop-down menu which allows you to select preset from a tree structure. These presets are stored in your
Next to the preset drop-down menu is a left and right arrow, which allows you to quickly scroll through presets.
4.2 PresetLoadandSaveButtons
To the right of the preset selection arrows is a LOAD and SAVE button. LOAD will allow you to load a .tide preset from anywhere on your computer. Save will allow you to save a new preset to anywhere on your computer, however, we suggest that you place it somewhere in the
4.3 Compare
The COMPARE button will allow you to toggle between the current settings and the last saved or loaded preset. If you have settings that you like, save them as a preset, and as you tweak you can always return to them using the COMPARE button.
4.4Info
The INFO button will open this manual for you to read about the plugin.
4.5Update
If there is a software update available an UPDATE button will appear in the preset bar. Clicking it will bring you to a web page where you can download the new installers.
4.6 SETTINGS
The SETTINGS button pops down a settings page which currently only contains an OPENGL button, but may contain more settings in the future. The OPENGL button allows you to toggle between two different rendering engines. Most people will want to use OPENGL set to on, which will select a rendering engine that uses your computer's onboard GPU to do all graphics rendering for Punctuate. However, some computers do not have a separate GPU processor, or have a GPU that doesn't use the specific OpenGL features used by Punctuate. In these cases, having OPENGL set to "on" may cause graphics errors or an extreme load on your computers CPU. To turn OpenGL rendering off, set the OPENGL button to "off", close the plug-in window, then open it again. Closing and opening the plug-in windows is necessary because the rendering engine can only be changed when the plug-in window is closed.
4.7ColorScheme
On the far right is a drop-down labeled COLOR SCHEME. This will allow you to choose one of several different color schemes for your viewing pleasure.
Chapter5
ParametersandMetering
All of Punctuate's controls fit on a single page, in this section we will describe each control and call out some features and tips.
5.1 GlobalControls
Punctuate has several control types, including vertical and horizontal sliders, rotary knobs, drop-down menus, and toggle and radio buttons, all of which have tool-tips which will give you more information about their function if you hover your mouse above them.
In general, all sliders and knobs can be double clicked to type in a specific value, option-clicked to return them to their default value, or command-clicked or control-clicked to enter a vernier mode for fine tuning. In addition, some controls support special shift-click functionality, such as using shift-swipe to draw and EQ curve, or shift clicking the gain sliders to set output level compensation. Where available, these shift-click functions are mentioned in the tool-tips for the individual controls.
Where appropriate, many controls have a related on/off button which will deactivate this control, or even the entire section. Turning sections off when you're not using them may reduce the amount of processing power used by Punctuate.
5.2GlobalParameters
5.2.1 INPUTANDOUTPUTLEVELANDBARMETERS
bar
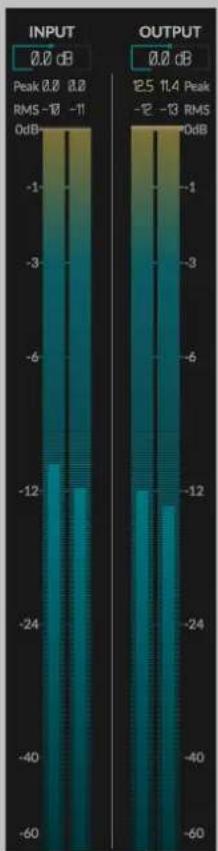
| INPUT | OUTPUT | |-------|--------| | Peak 0.0 dB | 12.5 dB | | Peak 0.2 dB | 11.4 dB | | RMS -10 dB | -12 dB | | RMS -11 dB | -13 dB | | RMS 0dB | 0 dB |The left and right hand sides of the plug-in have matching vertical bar meters which display the INPUT (on the left) and OUTPUT (on the right) levels in levels in Peak (horizontal ticks), RMS (solid bar and numerical display), and Peak Hold (numerical display) formats. These meters are always present in the display and clicking the Peak Hold section, or bypassing the plug-in will clear the held peak value.
Above the INPUT meter is a knob for the MASTER INPUT LEVEL, and above the OUTPUT meter is an AUTO button which will allow you to automatically compensate for the level change introduced by the EQ, or not. Alternatively, by clicking the down arrow next to this button, you can select a knob to manually set the MASTER OUTPUT LEVEL. The MASTER INPUT LEVEL is just before the INPUT meter and the MASTER OUTPUT LEVEL is just before the OUTPUT meter. The Punctuate EQ is linear and floating point, so it will not saturate your audio at any step in its process, but the INPUT and OUTPUT level can be used to set optimize the meters and make up
for any throughput gain change.
5.2.2ACTIVE
The ACTIVE button is located near the top left of the plug-in UI near the NEWFANGLED AUDIO label in the header. It activates or bypasses all the processing in the plug-in.
5.2.3MIX
The MIX knob is located next to the ACTIVE button. When the plugin is ACTIVE the MIX knob blends the output signal between the wet (transient modulated) sound and the dry input sound.
line
| Time (s) | Stack Waveforms (±1dB) | Spread Waveforms (±1dB) | |----------|--------------------------|---------------------------| | 0 | ~0 | ~0 | | 1 | ~0 | ~0 | | 2 | ~0 | ~0 | | 3 | ~0 | ~0 | | 4 | ~0 | ~0 | | 5 | ~0 | ~0 | | 6 | ~0 | ~0 | | 7 | ~0 | ~0 | | 8 | ~0 | ~0 | | 9 | ~0 | ~0 | | 10 | ~0 | ~0 | | 11 | ~0 | ~0 | | 12 | ~0 | ~0 | | 13 | ~0 | ~0 | | 14 | ~0 | ~0 | | 15 | ~0 | ~0 | | 16 | ~0 | ~0 | | 17 | ~0 | ~0 | | 18 | ~0 | ~0 | | 19 | ~0 | ~0 | | 20 | ~0 | ~0 | | 21 | ~0 | ~0 | | 22 | ~0 | ~0 | | 23 | ~0 | ~0 | | 24 | ~0 | ~0 | | 25 | ~0 | ~0 | | 26 | ~0 | ~0 | | 27 | ~0 | ~0 | | 28 | ~0 | ~0 | | 29 | ~0 | ~0 | | 30 | ~0 | ~0 | | 31 | ~0 | ~0 | | 32 | ~0 | ~0 | | 33 | ~0 | ~0 | | 34 | ~0 | ~0 | | 35 | ~0 | ~0 | | 36 | ~0 | ~0 | | 37 | ~0 | ~0 | | 38 | ~0 | ~0 | | 39 | ~0 | ~0 | | 40 | ~0 | ~0 | | 41 | ~0 | ~0 | | 42 | ~0 | ~0 | | 43 | ~0 | ~0 | | 44 | ~0 | ~0 | | 45 | ~0 | ~0 | | 46 | ~0 | ~0 | | 47 | ~0 | ~0 | | 48 | ~0 | ~0 | | 49 | ~0 | ~0 | | 50 | ~0 | ~0 | | 51 | ~0 | ~0 | | 52 | ~0 | ~0 | | 53 | ~0 | ~0 | | 54 | ~0 | ~0 | | 55 | ~0 | ~0 | | 56 | ~0 | ~0 | | 57 | ~0 | ~0 | | 58 | ~0 | ~0 | | 59 | ~0 | ~0 | | 60 | ~0 | ~0 | | 61 | ~0 | ~0 | | 62 | ~0 | ~0 | | 63 | ~0 | ~0 | | 64 | ~0 | ~0 | | 65 | ~0 | ~0 | | 66 | ~0 | ~0 | | 67 | ~0 | ~0 | | 68 | ~0 | ~0 | | 69 | ~0 | ~0 | | 70 | ~0 | ~0 | | 71 | ~0 | ~0 | | 72 | ~0 | ~0 | | 73 | ~0 | ~0 | | 74 | ~0 | ~0 | | 75 | ~0 | ~0 | | 76 | ~0 | ~0 | | 77 | ~0 | ~0 | | 78 | ~0 | ~0 | | 79 | ~0 | ~0 | | 80 | ~0 | ~0 | | 81 | ~0 | ~0 | | 82 | ~0 | ~0 | | 83 | ~0 | ~0 | | 84 | ~0 | ~0 | | 85 | ~0 | ~0 | | 86 | ~0 | ~0 | | 87 | ~0 | ~0 | | 88 | ~0 | ~0 | | 89 | ~0 | ~0 | | 90 | ~0 | ~0 | | 91 | ~0 | ~0 | | 92 | ~0 | ~0 | | 93 | ~0 | ~0 | | 94 | ~0 | ~0 | | 95 | ~0 | ~0 | | 96 | ~0 | ~0 | | 97 | ~0 | ~0 | | 98 | ~0 | ~0 | | 99 | ~0 | ~0 | | 1 | -1.5 | -1.5 | | 2 | -1.5 | -1.5 | | 3 | -1.5 | -1.5 | | 4 | -1.5 | -1.5 | | 5 | -1.5 | -1.5 | | 6 | -1.5 | -1.5 | | 7 | -1.5 | -1.5 | | 8 | -1.5 | -1.5 | | 9 | -1.5 | -1.5 | | 1 | -1.5 | -1.5 | | 2 | -1.5 | -1.5 | | 3 | -1.5 | -1.5 | | 4 | -1.5 | -1.5 | | 5 | -1.5 | -1.5 | | 6 | -1.5 | -1.5 | | ... | ... | ... | | ... | ... | ... | | ... | ... | ... | | ... | ... | ... | | ... | ... | ... | | ... | ... | ... | | ... | ... | ... | | ... | ... | ... | | ... | ... | ... | | ... | ... | ... | | ... | ... | ...5.2.4 SCROLLING TRANSIENTMETER
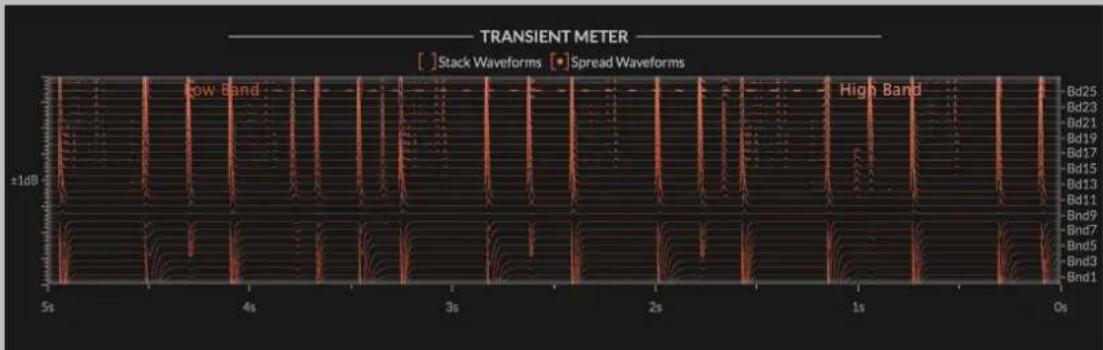
In the top center of the screen is a scrolling transient meter. This will show you the transient modification applied to each band in either a stacked or spread configuration. When the waveforms are stacked you will see each transient modulations waveform stacked on top of each other on the same axis. When the waveforms are spread you will see the individual waveforms spread out so you can see each a bit more clearly.
5.3 TRANSIENTPAGE
The rest of the controls are split between a TRANSIENT page for controlling the TRANSIENT EMPHASIS or SUPPRESSION algorithms and a FILTER
BANK page for fine tuning the filter bank settings. First the controls on the TRANSIENT PAGE:
bar
PARAMETER PAGES | Frequency (Hz) | Transient Emphasis (%) | Adaptive Transient (%) | Transient Emphasis Per Band (dB) | |---|---|---|---| | 0 | -12 | | S | | 102 | -10 | | S | | 218 | -9 | | S | | 351 | -7 | | S | | 503 | -8 | | S | | 678 | -5 | | S | | 878 | -3 | | S | | 1107 | -2 | | S | | 1369 | 0 | | S | | 1669 | 1 | | S | | 2013 | 2 | | S | | 2407 | 3 | | S | | 2857 | 4 | | S | | 3373 | 5 | | S | | 3964 | 6 | | S | | 4641 | 8 | | S | | 5416 | 8 | | S | | 6303 | 10 | | S | | 7319 | 12 | | S | | 8483 | 12 | | S | | 9815 | 12 | | S | | 11340 | 12 | | S | | 13087 | 12 | | S | | 15087 | 12 | | S | | 17377 | 12 | | S | | 20000 | 12 | | S | | Transient Length (ms) | Single Band (%) | Multi Band (%) | Same Length (dB) | |---|---|---|---| | Short: 200ms: Suppressed; Long: 5dB: -3dB; Top: 100%; Bottom: -12 dB: -12 dB; Top: 80%; Bottom: -70 dB: -70 dB; Top: 5dB: -5dB; Bottom: -3dB: -3dB; Top: -2dB: -2dB; Bottom: -2dB: -2dB; Top: -1dB: -1dB; Bottom: -1dB: -1dB; Top: -1dB: -1dB; Bottom: -1dB: -1dB; Top: -1dB: -1dB; Bottom: -1dB: -1dB; Top: -1dB: -1dB; Bottom: -1dB: -1dB; Top: -1dB: -1dB; Bottom: -1dB: -1dB; Top: -1dB: -1dB; Bottom: -1dB: -2dB: -2dB: -2dB: -2dB: -2dB: -2dB: -2dB: -2dB: -2dB: -2dB: -2dB: -2dB: -2dB: -2dB: -2dB: -2dB: -2dB: -2dB: -2dB: -2dB: -2dB: -2dB: -2dB: -2dB: -2dB: -5dB: 0 dB (S), Top: 5 dB (S), Bottom: 5 dB (S), Top: 5 dB (S), Bottom: 5 dB (S), Top: 5 dB (S), Bottom: 5 dB (S), Top: 5 dB (S), Bottom: 5 dB (S), Top: 5 dB (S), Bottom: 5 dB (S), Top: 5 dB (S), Bottom: 5 dB (S), Top: 5 dB (S), Bottom: 5 dB (S).5.3.1 TRANSIENTEMPHASIS
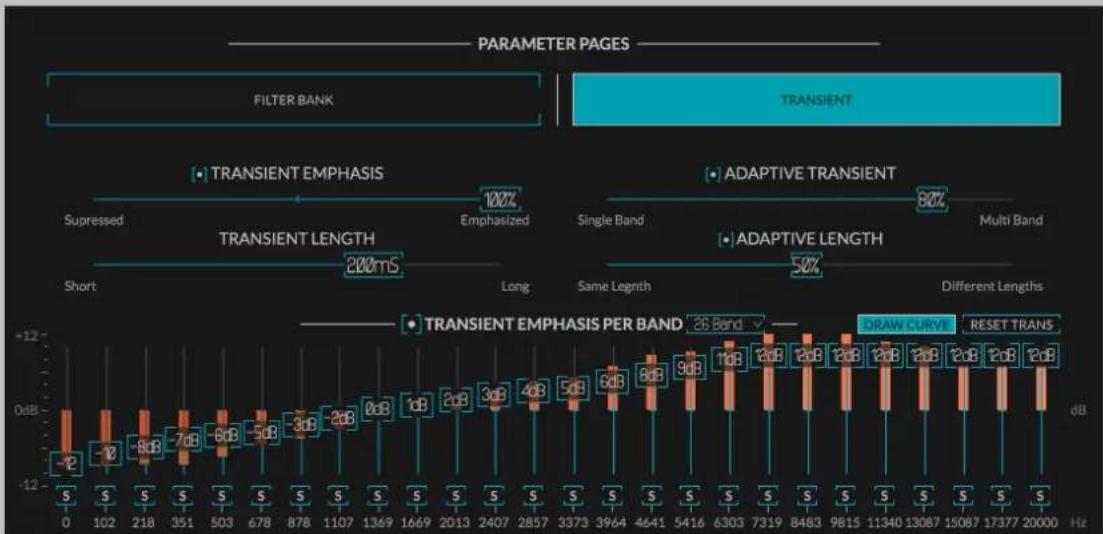
This is the plug-ins main TRANSIENT EMPHASIS control. This control works in tandem with the individual band controls to set the TRANSIENT EMPHASIS or TRANSIENT SUPPRESSION in each band. By default, when the TRANSIENT EMPHASIS control is above 0% Punctuate is emphasizing transients, when it's below 0% it's suppressing transients. However, in the TRANSIENT EMPHASIS PER BAND section you can change each band from emphasizing (+dB) to suppressing (-dB) allowing you to invert this action for specific bands, or all bands if you choose. This action may seem a little confusing at first but is very powerful because it allows you to emphasize transients in one section of the frequency spectrum while suppressing them in another. This can be useful for getting the high hats out of the snare mic, or boosting the kick while cutting the snare in the room mic, for just two examples.
5.3.2 ADAPTIVETRANSIENT
The ADAPTIVE TRANSIENT slider will set how much Punctuate is allowed to adapt each bands modulation to the transients it sees in that band, or how much it must consider the other bands when setting it's transient level. When the ADAPTIVE TRANSIENT slider is pulled to 0% the intelligent algorithm is turned off, forcing all bands to respond at the same level to incoming transients. When the ADAPTIVE TRANSIENT slider is turned to 100% each band totally ignores the other bands and responds only to transient in its own frequency range. At settings between these two
extremes the bands work together to identify transients in sections of the signal and boost and cut these in the most natural way.
5.3.3 TRANSIENTLENGTH
The TRANSIENT LENGTH slider allows you to set the length of what Punctuate considers to be a transient. When this is set to be very short only the very beginning of each attack is modulated, but when it's set longer more of the attack sound is captured in the modulation. When it's set to be very long it can take a while to recover and might be less sensitive to many quick transients.
5.3.4 ADAPTIVELENGTH
The ADAPTIVE LENGTH control allows each of Punctuate's bands to adapt it's own length parameter to the signal it sees. This means that, in general, lower bands will have longer lengths and react more slowly while higher bands have shorter lengths and react more quickly. This is a powerful control and it's setting can greatly effect the sound of Punctuate.
5.3.5 TRANSIENTEMPHASISPERBAND
Below the four main sliders are individual TRANSIENT EMPHASIS PER BAND sliders. Each of these sets the total amount of transient emphasis being applied to that band, when the TRANSIENT EMPHASIS slider is at 100%. By default these are all set to +12 dB and the amount of global transient emphasis is applied using the TRANSIENT EMPHASIS slider, but my modifying these band sliders you can create complex modulations which effect different parts of the spectrum differently, or even suppress some bands while emphasizing others.
5.3.6 TRANSIENTEMPHASISPERBANDMETERS
Behind the TRANSIENT EMPHASIS PER BAND sliders are meters showing the transient emphasis being applied in each band. Similar to the sliders themselves these range from -12 dB to +12 dB.
5.3.7 SOLOBUTTONS
Below each TRANSIENT EMPHASIS PER BAND slider is a solo button which allows you to solo that specific band and each what's happening there, only.
5.3.8RESETTRANS
Hitting the RESET TRANS button will reset all transient per band sliders to 0.0 dB.
5.3.9 DRAWCURVE
The DRAW CURVE button is on by default, which allows you to click and swipe your mouse across the GAIN SLIDER FIELD to draw an EQ curve. If you toggle the DRAW CURVE button off you will be able to manipulate only one band at a time, but will be able to fine tune it using a command click.
5.4 FILTERBANKPAGE
5.5 FILTERBANKSUB-MODULEPAGE
line
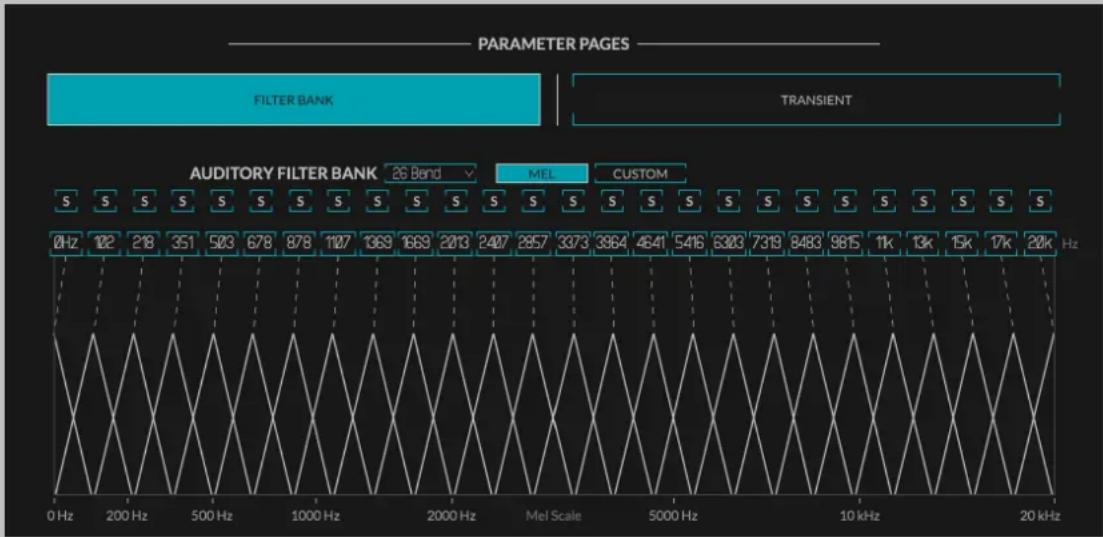
PARAMETER PAGES | Frequency (Hz) | Filter Bank (S) | Filter Bank (S) | Transient (S) | |---|---|---|---| | 0 Hz | 102 | 218 | 351 | | 200 Hz | 503 | 678 | 878 | | 500 Hz | 107 | 1969 | 1669 | | 1000 Hz | 2013 | 2407 | 2957 | | 2000 Hz | 3373 | 3964 | 4641 | | 5000 Hz | 5416 | 6303 | 7319 | | 10 kHz | 6815 | 8483 | 9815 | | 13 kHz | 1k | 13k | 15k | | 17 kHz | 17k | 20k | 20k | The chart displays a triangular waveform pattern for the system. The left panel shows the filtering components (Filter Bank and Transient), while the right panel shows the corresponding output values for each mode. The parameter pages are labeled above the chart.The Elevate plug-in uses a triangular filter bank to split the input signal into a number of frequency bands that resemble the critical bands in the human ear. The FILTER BANK parameter page allows you to control the filters that split the input signal into these frequency bands. This filter bank outputs a number of audio streams which the adaptive algorithm uses to set the gain reduction across bands. In general, the higher the number of bands, the more fine grained control the adaptive algorithms will have, and the more gain you can add before hearing artifacts. However, a larger numbers of bands does increase the algorithms processing
requirements significantly, and increasing the number of bands may not always produce a noticeable increase in quality.
The number of bands selected in the auditory FILTER BANK will change the number and frequency of bands in the graphic EQ and TRANSIENT emphasis pages. Selecting the 1 BAND option will also deactivate the ADAPTIVE parameters, as these work across the bands. By selecting 1 BAND you are turning the limiter section into a standard look-ahead limiter, with transient emphasis.
5.5.1 AUDITORYFILTERBANK
This drop-down allows you to select the number of bands you are splitting the signal into. Setting the number of bands using this drop-down will automatically space them on the mel scale between the minimum value and the maximum value.
5.5.2MEL/CUSTOM
This set of interactive radio buttons allow you to distribute the filter center frequencies using the MEL scale or a CUSTOM scale of your choosing. The MEL scale is an auditory scale based on the perceptual distance between pitches, selecting MEL will equally distribute the chosen number of filters between the current minimum frequency and current maximum on the MEL scale. CUSTOM is selected by either choosing the radio button, or by moving any of the filter center frequencies away from their MEL based values. By customizing the filter bank to your program material you can use the EQ and TRANSIENT pages to hone in on particular frequency ranges that are important in your program material. For instance you might choose one filter to focus on the resonant frequency of a kick drum, and another for the bass guitar and use the EQ and TRANSIENT pages to increase punch in just the bass drum without effecting the relative loudness of the bass guitar.
5.5.3 SOLOBUTTONS
There is a set of toggle buttons which allow you to solo the output of one band, or for a number of bands by shift-clicking or ctrl-clicking. These are the same solo buttons that appear on the EQ and TRANSIENT pages.
5.5.4 INSERTFILTER
The (+) button beneath the solo for the selected band will insert a new filter with a center frequency between the band chosen and the one
to it's right. This can be especially helpful if you find you need more resolution in an area when fine tuning the filter center frequencies. If you are already using the maximum number of filters, the INSERT FILTER buttons will be greyed out.
5.5.5REMOVEFILTER
The (-) button beneath the solo for the selected band will remove the current band without effecting the center frequencies of the surrounding bands. This can be helpful if you find one or more bands to be redundant while fine tuning center frequencies.
5.5.6 FILTERCENTERFREQUENCIES
There are also a set of text box sliders that allow you to set the CENTER FREQUENCY of each band. By default these are set to match the critical bands of the human ear, however these bands can be fine tuned to more closely match important frequency ranges in your program material as well. Doing so will allow you to use the band specific gain and transient sliders in the other sub-modules to fine tune your result.
5.5.7 FILTERBANKDISPLAY
The FILTER BANK DISPLAY shows you the relative distance and shape of each filter using the MEL scale. This will help you visualize how the filters are arranged across the auditory spectrum. The triangular shape of these filters help adjacent band have some amount of similarity, leading to a smoother overall sound.
Chapter6
Conclusion
We hope you enjoy Newfangled Audio's Punctuate Intelligent Transient Modulator plug-in. If you have any questions, comments, or concerns please write us at support@eventide.com
Chapter7
AboutNewfangledAudio
The Oxford English Dictionary defines Newfangled as "objectionably new".
Music technology can sometimes be a backward looking pursuit. This is understandable, the purpose of music technology should be to help musicians make great music. There have been many great pieces of gear in the past and we should seek to keep these pieces and make them available to people who want to use them, and the time and dedication required to master a musical instrument means that changes in their design are often evolutionary rather than revolutionary.
However, the great pieces of gear from yesteryear are more often than not those that contained new ideas in their time. The reverence we have for these pieces can sometimes turn into fetishism, and mindless re-creation of classic gear can fail to inspire musicians and artists to take new risks. It's important to make sure artists and engineers have access to good tools that inspire them and don't stand in their way, but these tools should never be used as a security blanket to stand in the way of an artist or engineers ears and taste.
Newfangled Audio seeks to only make gear that incorporates new ideas. We want to make gear that is great, but only using ideas that others are not. We realize that deviation from the norm might sometimes be objectionable. The Oxford English Dictionary defines Newfangled as "objectionably new".
- Contents
- BackgroundonAuditoryFilterBanks1
- 2NewfangledAudioPunctuate2
- 3InstallationandInstantiation4
- 4PresetBar7
- 5ParametersandMetering
- Chapter 1
- BackgroundonAuditory FilterBanks
- Chapter2
- NewfangledAudio Punctuate
- Chapter3
- Installation and Instantiation
- RegisteringYourPlug-in
- Activating Your License
- Installing Your Plug-In
- MovingorRemovinganActivation
- Chapter4
- PresetBar
- PresetSelector
- PresetLoadandSaveButtons
- Compare
- 4.4Info
- 4.5Update
- SETTINGS
- 4.7ColorScheme
- Chapter5
- ParametersandMetering
- GlobalControls
- 5.2GlobalParameters
- INPUTANDOUTPUTLEVELANDBARMETERS
- 5.2.2ACTIVE
- 5.2.3MIX
- SCROLLING TRANSIENTMETER
- TRANSIENTPAGE
- TRANSIENTEMPHASIS
- ADAPTIVETRANSIENT
- TRANSIENTLENGTH
- ADAPTIVELENGTH
- TRANSIENTEMPHASISPERBAND
- TRANSIENTEMPHASISPERBANDMETERS
- SOLOBUTTONS
- 5.3.8RESETTRANS
- DRAWCURVE
- FILTERBANKPAGE
- FILTERBANKSUB-MODULEPAGE
- AUDITORYFILTERBANK
- 5.5.2MEL/CUSTOM
- SOLOBUTTONS
- INSERTFILTER
- 5.5.5REMOVEFILTER
- FILTERCENTERFREQUENCIES
- FILTERBANKDISPLAY
- Chapter6
- Conclusion
- Chapter7
- AboutNewfangledAudio
Brand : EVENTIDE
Model : Punctuate
Category : Audio software