
Aloha 1021-SSB - Shower system Pulse ShowerSpas - Free user manual and instructions
Find the device manual for free Aloha 1021-SSB Pulse ShowerSpas in PDF.


| Product Type | Shower System |
| Brand | Pulse ShowerSpas |
| Model | Aloha 1021-SSB |
| Number of Functions | 3 (Showerhead, Handshower, Body Jets) |
| Diverter Valve | Controls shower head, handshower, and body jet functions |
| Handshower | Detachable with multiple spray patterns |
| Showerhead | Adjustable with Spray Straight™ technology |
| Spray Straight™ Technology | Soft tips to easily remove mineral deposits |
| Installation Type | Retrofit or new construction; drill or drill-less mounting options |
| Minimum Distance from Water Outlet | 27 inches or more |
| Required Tools | Pencil, Allen wrenches (4mm & 5mm), safety glasses, tape measure, level, channel locks, drill, masonry bit |
| Included Components | Shower system unit, shower arm, rubber washers, brass nuts, 90° fittings, compression nuts, mounting plate, nipples, handshower, handshower hose, plumber's tape, flow restrictor, wall anchors, screws, glue |
| Flow Restrictor | Removable for cleaning (located in inlet fitting) |
| Care Instructions | Wipe with soft cotton cloth after each use; use auto spray wax for hard water stains; clean with mild liquid soap and non-abrasive sponge |
| Safety Warnings | Turn cold water on first to prevent scalding; do not use any part as a support device |
| Warranty | Limited Lifetime Warranty for original homeowner; 5 years for other purchasers |
| Warranty Coverage | Defects in material and workmanship; includes repair or replacement |
| Prohibited Cleaners | No chemicals or abrasives |
| Customer Support | www.PulseShowerSpas.com |
Frequently Asked Questions - Aloha 1021-SSB Pulse ShowerSpas
User questions about Aloha 1021-SSB Pulse ShowerSpas
0 question about this device. Answer the ones you know or ask your own.
Ask a new question about this device
Download the instructions for your Shower system in PDF format for free! Find your manual Aloha 1021-SSB - Pulse ShowerSpas and take your electronic device back in hand. On this page are published all the documents necessary for the use of your device. Aloha 1021-SSB by Pulse ShowerSpas.
USER MANUAL Aloha 1021-SSB Pulse ShowerSpas
Please Read The Following Instructions COMPLETELY Before Beginning!
Our goal is to ensure your installation goes smoothly and safely. Please read these instructions carefully and follow recommendations for plumbing and mounting. After reading instructions, if you determine you do not have the necessary skills and/or tools, we recommend that a licensed plumbing contractor complete the installation.
If you encounter any problems during installation PLEASE VISIT CUSTOMER SUPPORT AT WWW.PULSESHOWERSPAS.COM Before returning your Shower System to the store
You Will Need The Following Tools
Soft pencil or felt pen to mark tile
4mm & 5mm allen wrench
Safety glasses
Tape measure
Level
Channel locks or adjustable wrench
Drill (preferably cordless)
Masonry drill bit


Shower System Parts Legend
-
Shower System......1
-
Shower Arm....1
- Rubber Washer 6mm ...... 1
- Showerhead 1
- Top Cover....1
- Brass Nut 2
- Rubber Washer 2mm ...... 3
- 90° Fitting.....2
-
Compression Nut 2
-
Rubber Washer....1
- Retaining Washer....1
- Mounting Plate....1
- 1-1/2" Brass NPT Nipple ..... 1
13A. 3/4" Brass NPT Nipple.....2
- Two Faced Tape....2
- Wall Anchor....6
- Screw (5x35mm) 6
-
Hand Shower Mount...... 1
-
Nut 4mm....2
- Non Slip Washer....2
- 1-3/8" Machine Screw ..... 2
- Hand Shower....1
- Hand Shower Hose......1
- Plumber's Tape....1
- Flow Restrictor......1
- Glue....1

Installation Instruction
BEFORE YOU BEGIN
Measure the following to ensure your Shower System will fit properly.
New Construction
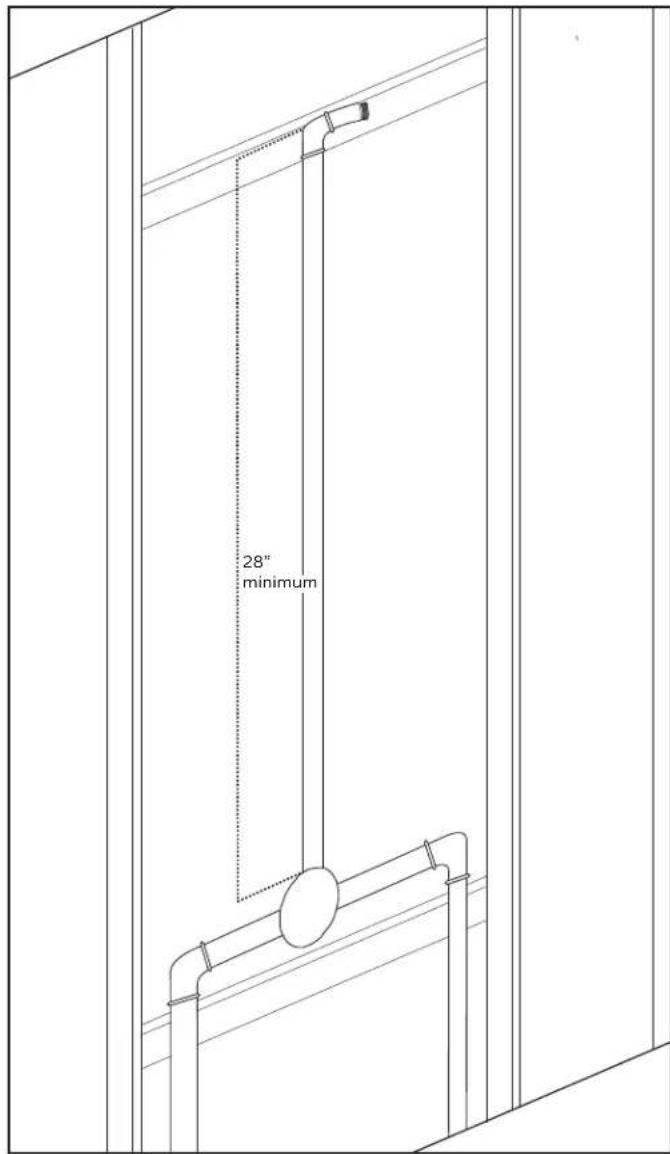
Make sure distance from water outlet and mixing valve trim (NOT INCLUDED) is a minimum 27" or more.
Retrofit
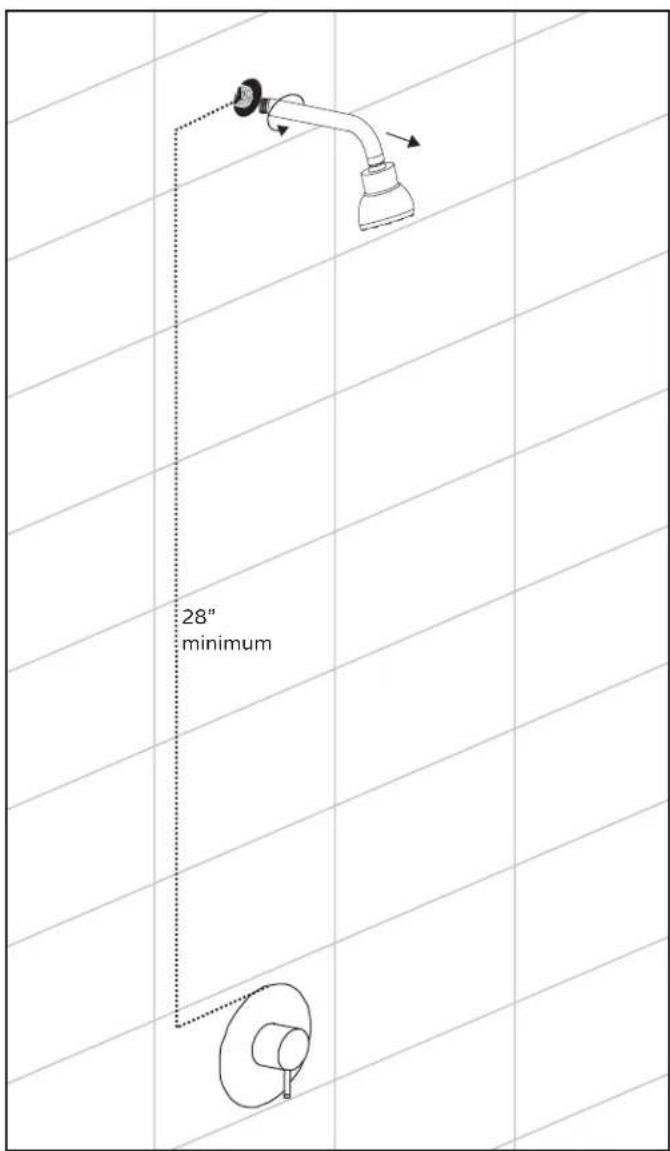
Remove existing shower arm and shower head.
Make sure distance from water outlet and mixing valve trim (NOT INCLUDED) is a minimum 27" or more.
Installation Instructions
1
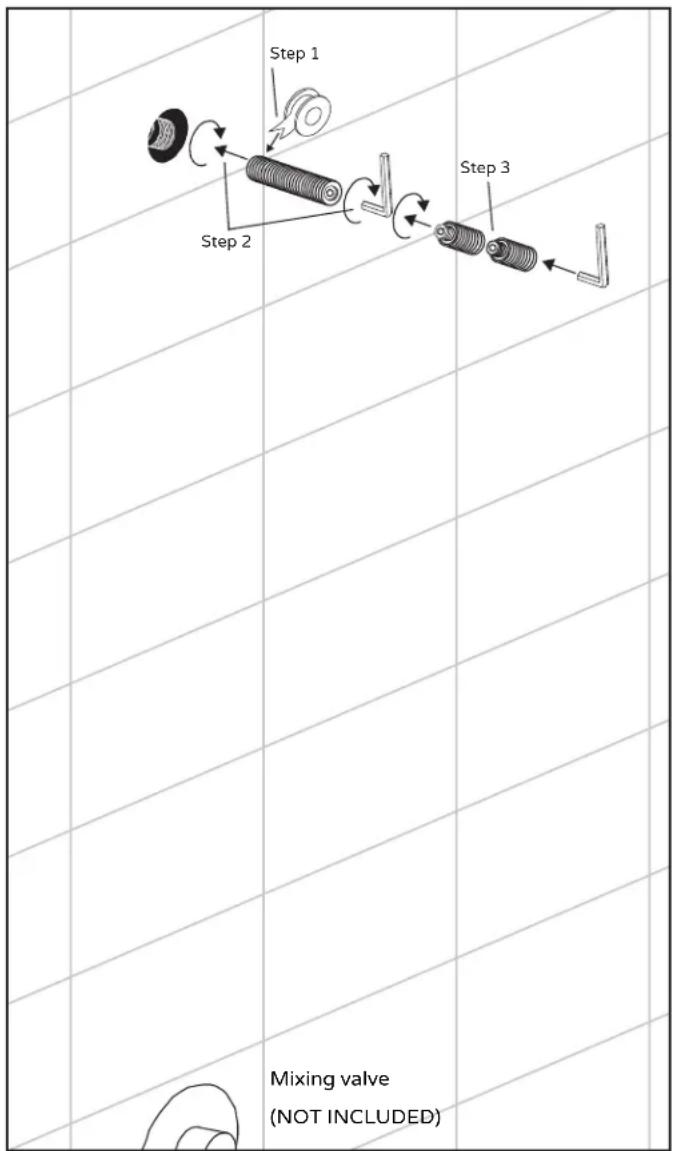
[Step 1] Apply a generous amount of PTFE (plumber's) tape (24) to end of end of nipple (13).
[Step 2]Screw nipple (13) into fitting which old shower arm was screwed into. Use allen wrench provided to secure. DO NOT OVERTIGHTEN.
[Step 3] If needed, screw nipple extension (13A) into pipe. Make sure 1/2" protrudes from finished wall surface.
2
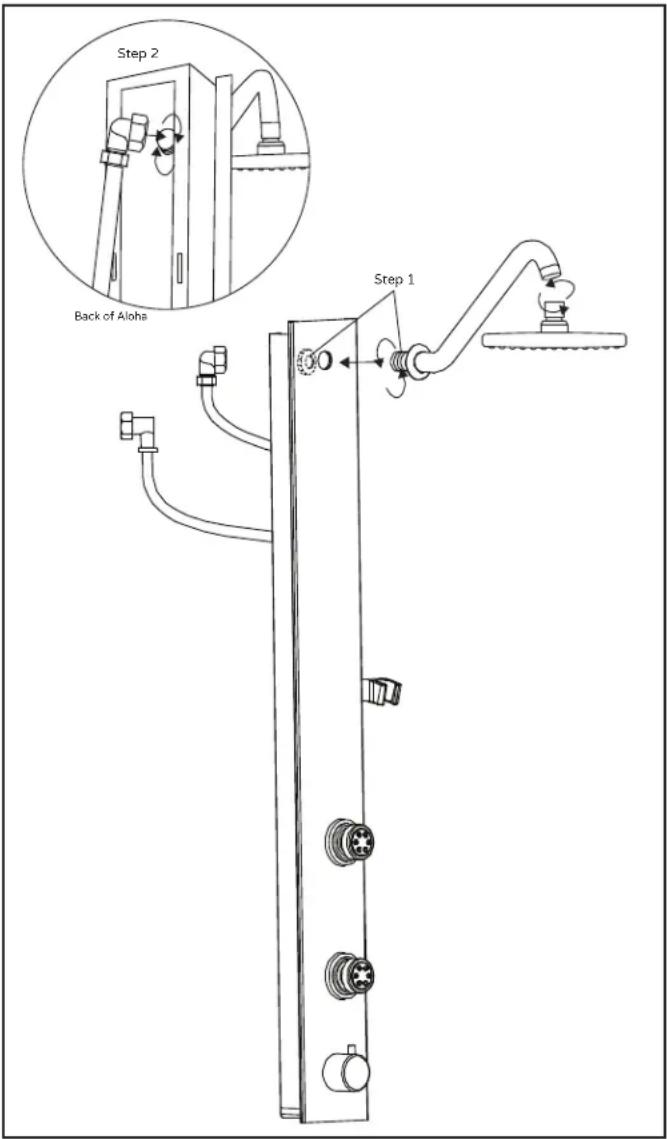
[Step 1] Secure shower arm (2) onto unit by tightening brass nut (6) on the back of unit.
[Step 2] Connect shower head supply line (8) to shower arm (2).
Installation Instructions

Drill-less Option
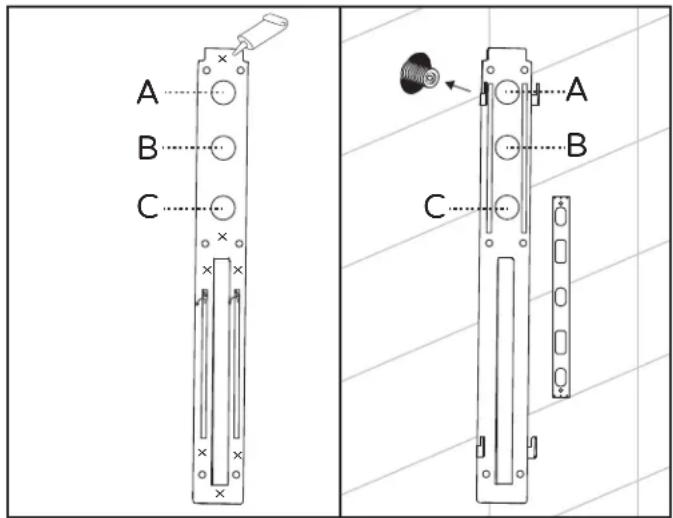
[Step 1] Remove face of tape (14) from mounting plate (12), apply glue (25) as shown and slide plate over nipple (13) through predetermined hole (A,B,C).
[Step 2] Press mounting plate onto finished wall. Level plate before adhering to wall. Let glue cure for 48 hours for complete result.

Drill Option
OR

Place mounting plate (12) onto nipple (13), depending on your desired height. Use plate as a guide, mark and drill the holes deep. Insert anchors (15) into holes and secure mounting plate (12) with screws (16). Level plate before drilling. NOTE: anchors provided are for solid surface walls; If you have fiberglass walls with no backing, toggle anchors must be used (not included).


Connect main supply line (9) to brass nipple (13).

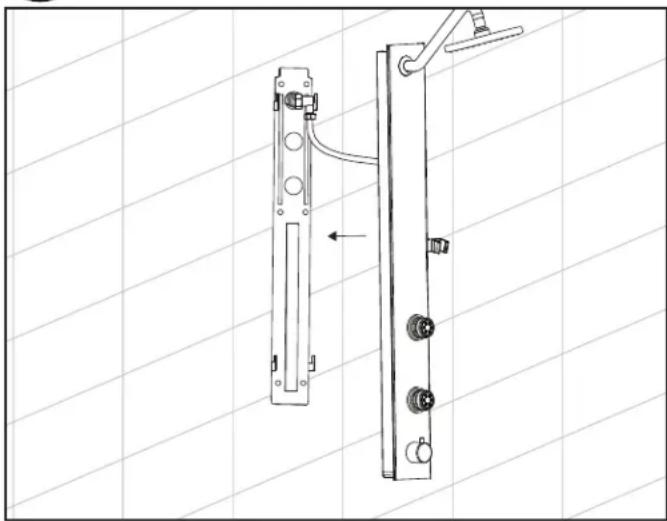
Mount shower system (1) onto mounting plate (12).
Installation Instructions
7
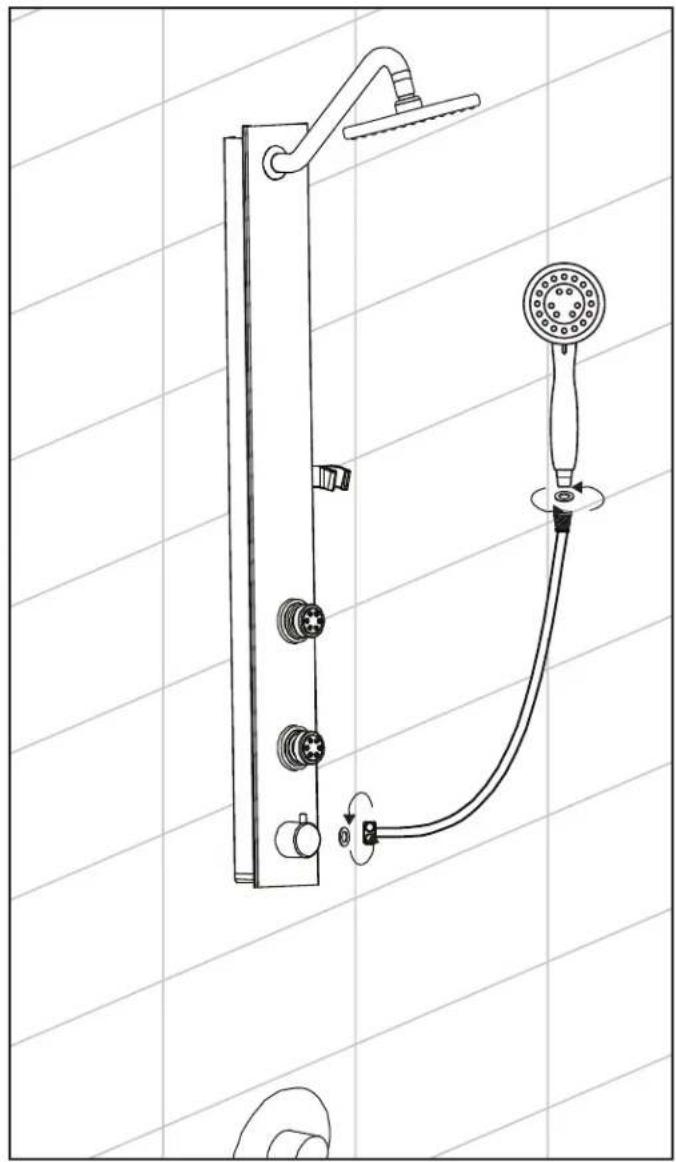
Insert washer (7) into the hex end of the handshower hose (22). Attach hose to handshower (21) outlet located on the bottom of the diverter.
Insert washer (7) into the tapered end of the hand shower hose (22) and attach the handshower (21).
Place the tapered end of the hose into the hand shower holder (17).
⑨

Product Fully Assembled
Usage
Diverter valve controls the shower head, handshower, and body jet functions.
Turn face of handshower to select different spray patterns.
Always turn cold water on first to help prevent any accidental burning or scalding; especially for children and elderly.
This shower system is equipped with Spray Straight™ technology in the tips of the showerhead and handshower. If the stream becomes obstructed from mineral deposits, simply rub the soft tips with your finger to loosen the deposits.
DO NOT use any part of the Shower System as a support device.
Care and Maintenance
To keep your Shower System, looking new, wipe down after each use with a soft cotton cloth.
Protect your Shower System from hard water stains and mineral deposits by periodically using an auto spray wax.
Clean using mild liquid soap and a non-abrasive sponge or cloth. Rinse with clean water.
If the flow rate of your Shower System is less than desired or reduces over time, flow restrictors located in the inlet fitting can be removed for cleaning. If further assistance is required please visit customer support at www.PulseShowerSpas.com
Do Not Use Any Kind Of
Chemicals Or Abrasives!
MANUFACTURER'S LIFETIME LIMITED WARRANTY
- Defects Covered; Warranty Period: Pulse Shower Spas, Inc. (“Pulse”) warrants to the original consumer purchaser who purchases this shower spa (the “Product”) for use in his or her own home, that the Product will be free from defects in material and manufacturing workmanship for as long as the original consumer purchaser owns that same home. For all other purchasers (including, but not limited to purchasers for industrial, commercial and business use), the above warranty will apply for a period of 5 years from the original date of purchase.
- Remedy: If the Product does not conform to the above warranty, Pulse, at its option, will repair or replace the Product, free of charge, or refund your purchase price. For warranty claims, please visit www.pulseshowerspas.com/index.php/warranty. Pulse may require that you return the Product to Pulse, shipping prepaid, in which case Pulse will provide you with a return materials authorization number (RMA). Pulse may also require that you provide evidence of the date you purchased the Product. Pulse will ship a new or repaired Product to you, at the expense of Pulse, or refund your purchase price. Service labor performed by you or others in connection with the removal or replacement of the Product will not be reimbursed by Pulse.
- Exclusions: Pulse shall not be responsible for failure of the Product, and the above warranties will not apply, if the Product fails as a result of improper installation, improper use, modifications or repairs by anyone other than Pulse, or accident or abuse (including damage during shipment).
-
Warranty on Repairs and Replacements: For consumer purchasers who purchased the Product for home use, repaired or replacement Products will continue to be covered under this warranty for as long as he or she owns that same home. For other purchasers, repaired or replacement Products will be covered for the balance of the original warranty period.
-
No Other Warranties; Limitation of Liability: OTHER THAN THE LIFETIME LIMITED WARRANTY STATED ABOVE, PULSE DISCLAIMS ALL OTHER WARRANTIES, EXPRESS OR IMPLIED, INCLUDING BUT NOT LIMITED TO WARRANTIES OF MERCHANTABILITY AND FITNESS FOR A PARTICULAR PURPOSE, TO THE EXTENT PERMITTED BY APPLICABLE LAW. THE REMEDIES STATED ABOVE ARE YOUR SOLE REMEDIES IN CONNECTION WITH THIS WARRANTY. IN NO EVENT WILL PULSE BE LIABLE TO YOU FOR ANY DAMAGES, WHETHER DIRECT, INDIRECT, INCIDENTAL, SPECIAL OR CONSEQUENTIAL, INCLUDING BUT NOT LIMITED TO LOST PROFITS OR BUSINESS INTERRUPTION, ARISING OUT OF OR RELATING TO THE PRODUCT OR ITS USE, WHETHER UNDER A CONTRACT, WARRANTY, TORT, OR ANY OTHER CAUSE OF ACTION, EVEN IF PULSE HAS BEEN ADVISED OF THE POSSIBILITY OF SUCH DAMAGES. NOTWITHSTANDING THE TERM OF ANY LIMITED OR IMPLIED WARRANTY, OR IN THE EVENT THAT ANY LIMITED WARRANTY FAILS OF ITS ESSENTIAL PURPOSE, IN NO EVENT WILL PULSE'S ENTIRE LIABILITY EXCEED THE PURCHASE PRICE OF THE PRODUCT. SOME STATES AND PROVINCES DO NOT ALLOW THE EXCLUSION OR LIMITATION OF INCIDENTAL OR CONSEQUENTIAL DAMAGES SO THE ABOVE LIMITATIONS OR EXCLUSIONS MAY NOT APPLY TO YOU. THIS LIMITED WARRANTY GIVES YOU SPECIFIC LEGAL RIGHTS, AND YOU MAY ALSO HAVE OTHER RIGHTS WHICH VARY FROM STATE TO STATE AND PROVINCE TO PROVINCE.

- PLEASE READ THE FOLLOWING INSTRUCTIONS COMPLETELY BEFORE BEGINNING
- IF YOU ENCOUNTER ANY PROBLEMS DURING INSTALLATION PLEASE VISIT CUSTOMER SUPPORT AT WWW.PULSESHOWERSPAS.COM BEFORE RETURNING YOUR SHOWER SYSTEM TO THE STORE
- YOU WILL NEED THE FOLLOWING TOOLS
- SHOWER SYSTEM PARTS LEGEND
- INSTALLATION INSTRUCTION
- BEFORE YOU BEGIN
- INSTALLATION INSTRUCTIONS
- USAGE
- CARE AND MAINTENANCE
- MANUFACTURER'S LIFETIME LIMITED WARRANTY
Brand : Pulse ShowerSpas
Model : Aloha 1021-SSB
Category : Shower system