ABM-270 - Bread maker Aroma - Free user manual and instructions
Find the device manual for free ABM-270 Aroma in PDF.


| Product Type | Bread Maker |
| Brand | Aroma |
| Model | ABM-270 |
| Power Supply | 120V AC, 60Hz |
| Functions | 17 functions: White, Sweet, Sourdough, French, Whole Wheat, Quick, Sugar-Free, Multigrain, Soft, Cake, Raw Dough, Leaven Dough, Jam, Bake, Yogurt, Gluten-Free, Ferment |
| Loaf Sizes | 1 lb, 1.5 lb, 2 lb |
| Crust Colors | Light, Medium, Dark |
| Delay Timer | Up to 15 hours |
| Display Type | Digital LED display |
| Baking Pan Material | Nonstick coating |
| Body Material | Stainless Steel |
| Accessories Included | Measuring cup, measuring spoon, paddle hook, fruit & nut dispenser |
| Safety Features | Grounding plug, short cord, anti-skid base, cool-touch handles |
| Cleaning & Maintenance | Hand wash recommended; accessories top-rack dishwasher safe |
| Warranty | 2-year limited warranty |
Frequently Asked Questions - ABM-270 Aroma
User questions about ABM-270 Aroma
0 question about this device. Answer the ones you know or ask your own.
Ask a new question about this device
Download the instructions for your Bread maker in PDF format for free! Find your manual ABM-270 - Aroma and take your electronic device back in hand. On this page are published all the documents necessary for the use of your device. ABM-270 by Aroma.
USER MANUAL ABM-270 Aroma
natural_image
Exterior view of a modern stainless steel-colored milk-based computer (no visible text or symbols)instruction manual
ABM-270
Digital Bread Maker

Mullicookers/Rice Cookers
Pot style
Rice Cookers
Water Keties
Indoor Grills
Woks
AROMA®
To Enhance and Enrich Lives.
Here at Aroma we strive to make a difference—to design and distribute products that enhance and enrich people's lives.
Aroma offers an array of exceptional products to make cooking simple and satisfying. Discover other countertop appliances and cookware from our current product lineup to complement your kitchen.
Stay connected for more recipe ideas and monthly giveaways!
AROMA TEST KITCHEN

www.AromaTestKitchen.com


/AromaHousewares

IMPORTANT SAFEGUARDS
Basic safety precautions should always be followed when using electrical appliances, including the following:
- Important: Read all instructions carefully before first use.
- Do not touch hot surfaces. Use the handles or knobs.
- Use only on a level, dry and heat-resistant surface.
- Thoroughly clean all surfaces in contact with food before use. To protect against electrical shock, do not immerse cord, plug or the appliance in water or any other liquid. See instructions for cleaning.
- Close supervision is necessary when the appliance is used by or near children.
- Unplug from outlet when not in use and before cleaning. Allow unit to cool before putting on or taking off parts and before cleaning the appliance.
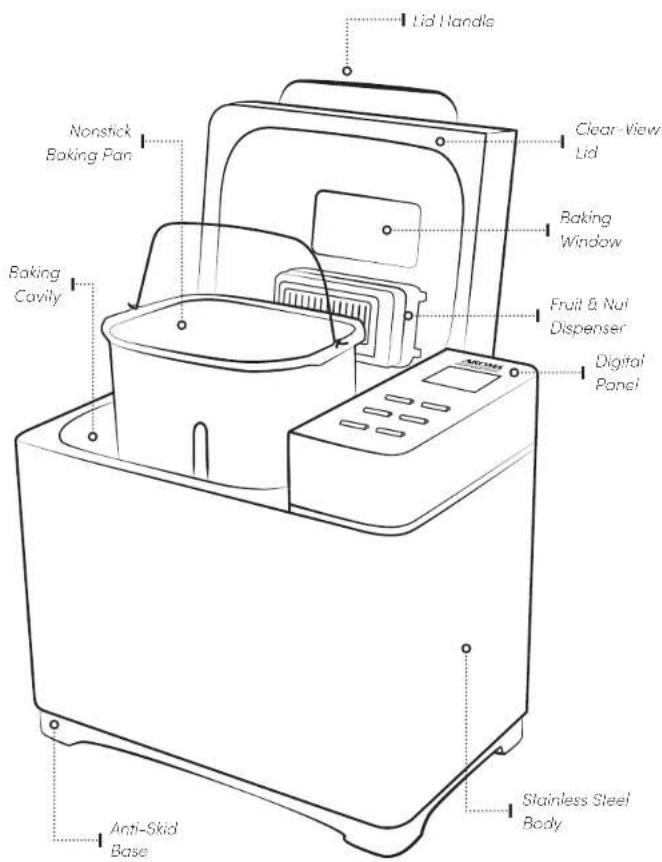
- Always make sure the outside of the Baking Pan is dry prior to use. If the Baking Pan is placed in the Baking Cavity when wet, it may damage or cause the product to malfunction.
- Do not operate any appliance with a damaged cord or plug or after the appliance malfunctions or has been damaged in any manner. Contact Aroma® customer service for examination, repair or adjustment.
- Always unplug from the plug gripping area. Never pull on the cord.
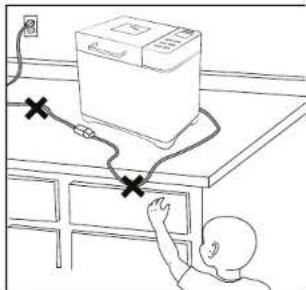
- Do not let cord touch hot surfaces or hang over the edge of a counter or table.
-
Use only with a 120V AC power outlet.
-
The bread maker should be operated on a separate electrical circuit from other operating appliances. If the electrical circuit is overloaded with other appliances, the bread maker may not operate properly.
- The use of accessory attachments not recommended by Aroma® Housewares may result in fire, electrical shock or injury.
- Do not use the appliance for anything other than its intended use.
- Do not use outdoors.
- Do not place on or near a hot gas or electric burner or in a heated oven.
- Do not allow the unit to come into contact with curtains, wallpaper, kitchen towels, or any other flammable materials while in use.
- While in use, ensure that there is sufficient space around the top and sides of the unit for correct air circulation.
- Do not touch any moving or spinning parts of the machine when baking.
- To avoid damaging the appliance, never operate the unit without the Baking Pan placed in the Cavity.
- The appliance is not intended to be operated through use of an external timer or remote-control system.
- To reduce the risk of electrical shock, cook only in the removable baking pan provided.
- Use extreme caution when opening the lid during or after baking. Hot steam will escape and may cause scalding.
Published By:
Aroma Housewares Co. | 6469 Flanders Drive, San Diego, CA 92121, U.S.A.
1-800-276-6286 | www.AromaCo.com
©2020 Aroma Housewares Company | All rights reserved.
SAVE THESE INSTRUCTIONS

IMPORTANT SAFEGUARDS
Parts Identification
Short Cord Instructions
- A short power-supply cord is provided to reduce the risks resulting from becoming entangled in or tripping over a longer cord.
- Longer extension cords are available and may be used if care is exercised in their use.
- If a longer extension cord is used:
a.) The marked electrical rating of the extension cord should be at least as great as the electrical rating of the appliance.
b.) The longer cord should be arranged so that it will not drape over the counter top or tabletop where it can be pulled by children or tripped over unintentionally.
c.) The extension cord should be a grounding-type 3-wire cord.
natural_image
Line drawing of a person using a computer to switch a button on a cabinet (no text or symbols present)DO NOT
DRAPE CORD!
KEEP AWAY
FROM CHILDREN!
Grounding Instructions
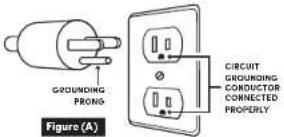
This appliance must be grounded while in use to protect the operator from electrical shock. The appliance is equipped with a 3-conductor cord and a 3-prong grounding-type plug to fit the proper grounding-type receptacle. The appliance has a plug that looks like figure (A).
THIS APPLIANCE IS FOR HOUSEHOLD USE ONLY.
Control Panel Identification
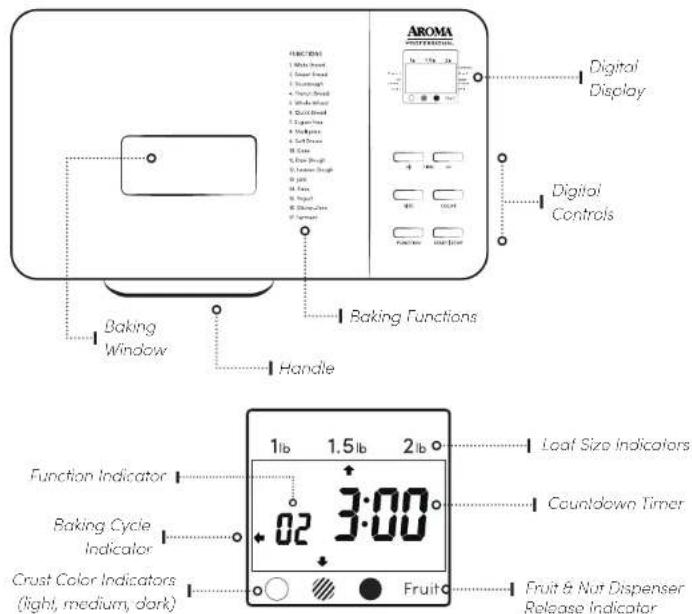
Controls/Functions
Time (+) or (-)
Adds or reduces overall time by 1, 5, or 10 minutes with each button press.
Size
Selects desired loaf size: 1 pound, 1.5 pounds or 2 pounds.
Color
Selects desired loaf color/doneness: light, medium or dark.
Function
Selects desired baking function. Each button press cycles down the provided function list.
Start / Stop
Once baking selections have been made, press once to begin cooking. If pressed during the cooking cycle, the bread maker will pause for 3 minutes or until pressed again. To cancel the baking process, hold button down until the unit beeps.
Baking Functions
1. White Bread
For white and mixed breads consisting mainly of basic bread flour.
2. Sweet Bread
Perfect for breads high in sugar, fat, and protein with a thin crust. For best results, use the "light" crust color option.
3. Sourdough
Best for natural sourdough that requires extra long rising time in order to achieve its characteristic sour flavor.
4. French Bread
Longer kneading, rising, and baking times. Produces a fluffy bread with a crispy crust.
5. Whole Wheat
For recipes using whole wheat flour or whole wheat flour blended with regular.
6. Quick Bread
Great for a fast, basic loaf. However, loaf size will be smaller and slightly more dense than normal.
7. Sugar-Free
Designed for bread recipes that require zero added sugar.
8. Multigrain
Best for dense breads made with heavier flours (like wheat or rye) that require longer kneading and rising times.
9. Soft Bread
For baking fluffy, light textured bread with a thin crust.
10. Cake
For recipes that use baking soda or powder instead of yeast. Perfect for traditional cake mix, corn bread, and other light, fluffy breads.
11. Raw Dough
Simply mixes and kneads any dough without rising. Great for preparing dough for rolls, pizza, or specialty breads that require shaping by hand before rising and/or baking.
12. Leaven Dough
Mixes, kneads, and allows dough to rise. Dough can be removed at the end of the cycle, shaped, then baked. Great for creating your own custom recipes.
13. Jam
The Stirring Paddle mixes fruit puree, perfect for making fresh fruit/vegetable spreads.
14. Bake
Bake-only function. Perfect for darkening already prepared loaves, melting or browning bread toppings, or using after the Leaven Dough function.
15. Yogurt
Simple low-temperature heating with customizable time.
16. Gluten-Free
Designed for breads using various flours without wheat gluten.
17. Ferment
A rise-only function for premixed dough and other fermentable foods.
Accessories Identification
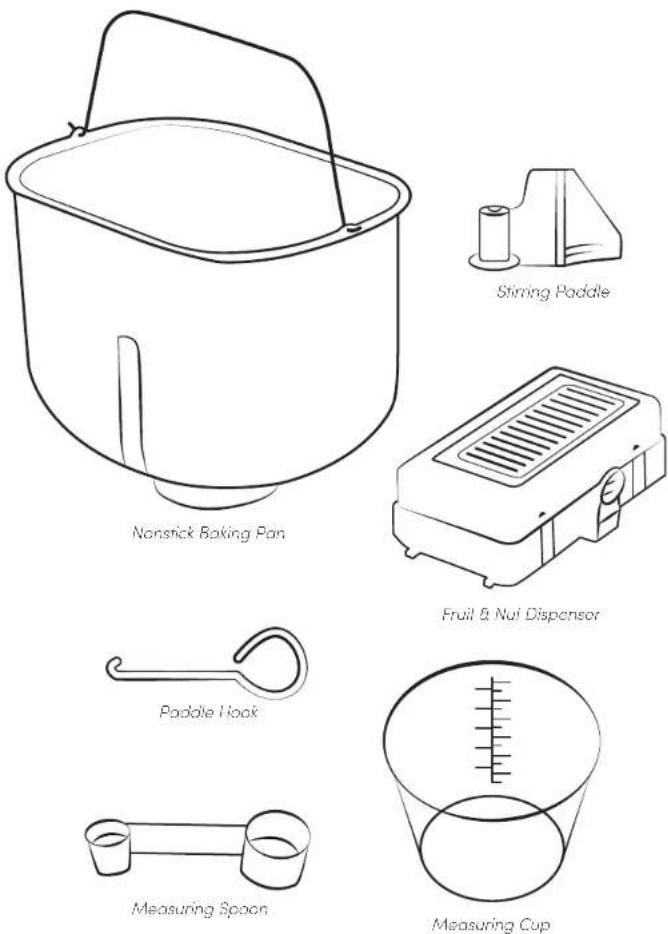
Guidelines for Use
Nonstick Baking Pan
To place inside the Baking Cavity, hold by the handle and slightly rotate the Baking Pan counterclockwise until it settles into place. Rotate the handle clockwise until snug. To remove, hold the handle and turn counterclockwise to release, then pull straight up.
Stirring Paddle
Before inserting into the Baking Pan, ensure that there is no leftover bread residue inside the paddle hole, or on the drive shaft at the bottom of the Baking Pan. To insert, align the "D" shaped paddle hole with the corresponding drive shaft at the bottom of the Baking Pan and push down firmly. To remove from bread after baking, see instructions for using the Paddle Hook accessory.
Paddle Hook
The Stirring Paddle will often become stuck inside the bread at the end of the baking process. To make removal easier, insert the Paddle Hook into the small opening on the underside of the Stirring Paddle. Pull gently to release the Stirring Paddle.
Fruit & Nut Dispenser
This accessory will automatically add optional toppings into the dough during the "Knead" cycle. To use, open the plastic lid on the bottom of the dispenser and place desired toppings inside. Close the lid, then insert the bottom of the dispenser into the slots on the underside of the bread maker lid, pressing in the black tab to latch it in place. Gently tug on the dispenser to ensure that it is secure.
Measuring Cup
When filled to the top of the cup (not the top line), the provided measuring cup is equal to 240ml, or 1 standard US cup. When measuring liquids, make sure the cup is on a level surface before filling. When filling with dry ingredients, gently shake the cup from side to side until the ingredients are level with the top of the cup. Be sure to not shake the cup excessively to avoid compacting the ingredients and overuse of the ingredients.
Measuring Spoon
The large end of this accessory is equal to one tablespoon, and the small end is equal to one teaspoon. When measuring liquids, make sure the spoon is level before filling. When filling with dry ingredients, gently shake the spoon from side to side until the ingredients are level with the top of the spoon.
BEFORE FIRST USE
Due to the manufacturing process, slight smoke and odor may be emitted during the first use, which is normal. We recommend following steps 7-11 below prior to first use in order to eliminate the smoke and odor.
- Read all instructions and important safeguards.
- Remove all packaging materials and check that all items have been received in good condition.
- Tear up all plastic bags and dispose of them properly as they can pose a risk to children.
- Remove the Baking Pan from the Baking Cavity and clean with warm, soapy water. Rinse and dry thoroughly.
- Wash the Stirring Paddle, Fruit & Nut Dispenser, and all other accessories in warm, soapy water. Rinse and dry thoroughly.
- Wipe the exterior of the Stainless Steel Body clean with a damp cloth, then wipe dry.
- Place the clean, empty Baking Pan and Stirring Paddle securely into the bread maker.
- Using the Function button, set the bread maker to "Bake", and set for 10 minutes using the Time buttons.
- Press Start/Stop and allow the bread maker to cook.
- When finished, allow the bread maker to cool, then re-wash the Baking Pan and Stirring Paddle to remove any residue.
- Dry and reassemble all parts. The bread maker is now ready for use.
QUICK START
Can't wait to start baking? Make sure to read "Important Safeguards" on page 3, then follow the instructions below to make one 1.5lb loaf of white bread.
- Follow the instructions in "Before First Use" (above) to clean and prepare your bread maker and accessories.
- Remove the Baking Pan from the Baking Cavity and secure the Stirring Paddle in place. See "Helpful Hints" in the side panel for correct Baking Pan removal.
- Plug the power cord into an available 120V AC wall outlet.
- Refer to the ingredient list on page 18 for a 1.5lb loaf using the White Bread function.
10.
Note:
If washing in the dishwasher, a slight discoloration to the Baking Pan and accessories may occur. This is cosmetic only and will not affect performance. Any other servicing should be performed by Aroma® Housewares.
Helpful Hints:
To pace the Baking Pan inside the Baking Cavity, hold by the handle and slightly rotate the Baking Pan counterclockwise until it settles into place. Rotate the handle clockwise until snug. To remove, hold the handle and turn counterclockwise to release, then pull up. For more information on proper use of the accessories, see 'Guidelines for Use' on page 9
QUICK START(CONT.)
- Add all ingredients to the Baking Pan. Be sure to add them in the exact order listed (it is important to add the yeast last so that it does not get wet).
- Place the Baking Pan into the Baking Cavity and close the lid. See "Helpful Hints" on the side panel for correct Baking Pan placement.
- Press the Start/Stop button to begin baking (the bread maker should already be programmed to its default settings: "1.5lb" loaf size, "Medium" crust color and Function 1).
- The bread maker will beep to indicate that the cooking process has begun, and the baking timer will count down from the preset time.
- When finished, the bread maker will beep and automatically switch to warming mode.
- When you are ready to serve, turn off the warming mode by pressing the Start/Stop button until the bread maker beeps.
- Using an oven mitt or gloves, carefully remove the Baking Pan from the Baking Cavity and turn it upside down over a plate. The bread should easily slide out.
- Using your hands or the Paddle Hook, remove the Stirring Paddle from the underside of the bread loaf before slicing.
- When finished using your bread maker, unplug the power cord to turn off, wipe clean with a damp cloth, then wipe dry.
QUICK TIPS
- When measuring dry ingredients, gently shake the cup from side to side until the ingredients are level with the top of the cup. Be sure to not shake the cup excessively to avoid compacting the ingredients and overuse of the ingredients.
- Always add wet ingredients into the Baking Pan first, followed by the dry ingredients. Yeast should always be added last.
- For best results, always use bread flour when baking bread.
- Check your bread maker after 5 minutes of mixing. Dough should not be too dry or too runny, but well combined into a solid mass. If dough is too dry, add more liquid (one teaspoon at a time). If too runny, add more flour (one teaspoon at a time).

Caution:
To avoid spilling ingredients onto the bread maker's heating element, always remove the Baking Pan from the Baking Cavity before filling. Make sure the Baking Pan is securely locked in place before pressing the Start/Stop button.
Note:
For more detailed baking instructions, see 'Operation Guide' on page 12.
After bread is done baking, the bread maker will automatically switch to warming mode. It will keep your bread warm for up to 1 hour. You can end the warming mode early by holding down StartStop
OPERATION GUIDE
- Read all instructions and important safeguards.
- Follow the instructions in "Before First Use" on page 10 to clean and prepare your bread maker and accessories.
- Remove the Baking Pan from the Baking Cavity and secure the Stirring Paddle in place.
- To remove the Baking Pan, hold the handle and turn counterclockwise to release, then pull up.
- For correct stirring paddle placement, see the guidelines on page 9.
- Add all ingredients to the Baking Pan.
• To ensure proper baking and rising, ingredients should always be added in the following order:
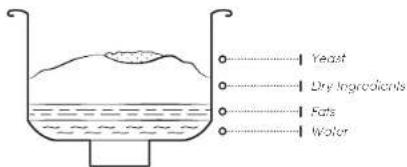
- When measuring dry ingredients, such as salt, sugar, or flour, be sure not to over-pack the measuring cup. Instead, gently shake the cup from side to side until the ingredients are level with the top of the cup. Over-packing will affect the ingredient balance and dry out the dough.
-
For more information on ingredients, see "Ingredient Guide" on page 15.
-
Place the Baking Pan inside the Baking Cavity, ensuring that it is securely in place.
To place the Baking Pan inside the Baking Cavity, hold by the handle and slightly rotate the Baking Pan counterclockwise until it settles into place. Rotate the handle clockwise until snug.
- Load the Fruit & Nut Dispenser (optional)
The Fruit & Nut Dispenser will automatically dispense fruit, nuts, and other small toppings into the dough during the "Knead" phase. These toppings can be added to any bread function. We recommend adding around 14 cup of toppings for a 1lb loaf, 12 cup for 1.5lbs, and 12 cup for a 2lb loaf.
To use, open the plastic lid on the bottom of the dispenser and place desired toppings inside. Close the lid, then insert the bottom of

Caution:
To avoid spilling ingredients onto the bread maker's heating element, always remove the Baking Pan from the Baking Cavity before filling.
Do not use perishable ingredients when setting a delay start for your bread, as the ingredients may spot. Instead, use powdered alternatives.
Note:
Always add the yeast last when adding ingredients to the Baking Pan. Yeast that comes into contact with the wet ingredients will no ferment properly.
For best results, consider the size of the ingredients that you are placing inside the Fruit & Nut Dispenser. If too small, ingredients will fall out of the vents on the dispenser. Ensure that sticky ingredients, such as dried fruit, are well separated before placing into the dispenser.
Refer to 'Recipe Charts' on pages 18-26 for specific function notes and ingredients.
OPERATION (CONT.)
the dispenser into the slots on the underside of the bread maker lid, pressing in the black tab to latch it in place. Gently tug on the dispenser to ensure that it is secure.
The Fruit & Nut Dispenser is only compatible with functions 1-9, 12 and 16. It will not release for functions 10, 11, 13-15 or 17.
- Lower the lid and plug the power cord into an available 120V AC wall outlet.
The alert will sound and the default menu settings will be shown on the Digital Display. - First, use the Function button to select your desired bake function. Then, select the loaf size, crust color, and time (optional) using the Size, Color, and Time buttons.
- Bake Function For a detailed description of available baking functions and uses, see pages 6-7.
Loaf Size
You may set the loaf size to 1lb, 1.5lbs, or 2lbs. Selecting the 2lb loaf size will product the most uniform, traditional loaf. The loaf size option is only adjustable for functions 1-9 and 16.
Crust Color
You may set the baking color to light, medium or dark. See Note.
The crust color option is only adjustable for functions 1-10, 14 and 16.
Time
After selecting your desired bake function, the Digital Display will automatically set to the standard bake time for that function. You can delay the start time if desired by increasing the total bake time using the Time buttons. For example, if you would like the bread maker to begin in 3 hours, add 3 additional hours to the displayed bake time.
You can only delay the start time for functions 1-9, 11, 12 and 16. The delay timer can be set for up to 15 hours.
For function 13, there is no delay start, and the bake time is not adjustable. Once you press Start/Stop, the cooking cycle will begin.
For functions 14-15 and 17, there is no delay start. Select your total bake time, and press Start/Stop to confirm. The digital display will stop flashing, indicating that the bake time is set.
Helpful Hints:
Check your bread maker after 5 minutes of mixing. Dough should not be too dry or too runny, but well combined into a solid mass. If dough is too dry, add more liquid (one teaspoon at a time). If too runny, add more flour (one teaspoon at a time).
Note:
Breads high in sugar ano/or egg will naturally have a darker crust color. For breads high in these ingredients, we recommend using the 'light' baking color. Be sure to also check your bread during the baking phase to ensure that it is not getting burnt on top.
When using the Time buttons, lime will increase/decrease by 1 min, 5 min, or 10 min with each press. To rapidly adjust the time, press and hold down the button.
OPERATION (CONT.)
- Press the Start/Stop button to begin the baking process. The unit will beep and the Digital Display will begin to count down.
Note that for functions 14-15 and 17, you will have to press Start/Stop once to secure the bake time setting, and once more to start baking.
If you are using a delay time and wish to cancel and start the baking process immediately, press the Start/Stop button again. The bread maker will begin to function.
To pause the bread maker, press Start/Stop at any point during the cooking cycle. Press again to restart. To stop the bread maker and cancel the function, press and hold Start/Stop until the unit beeps.
Baking Phases
Functions 1-13 and 16 progress through multiple phases: Knead, Rise, Rest, and Bake. See "Recipe Charts" on page 18 for the exact durations of each baking cycle per function.
Adding Fruit
During the "Knead" phase, the unit will beep intermittently when it is time for toppings to be added. At this time, the Fruit & Nut Dispenser will automatically open, and "Fruit" will be indicated on the Digital Display. You can also open the lid to manually add fruit and nuts.
Removing the Stirring Paddle
After the last "Rise" cycle, it is safe to remove the Stirring Paddle if you do not want to remove it from the baked loaf later. Simply press Start/Stop to pause the unit, open the lid and remove the paddle. Press Start/Stop again to resume.
10. Once baking is complete, the unit will beep and automatically switch to the warming mode.
The bread maker will keep bread warm for up to one hour, after which it will beep to indicate that the time has ended. If you wish to cancel the warming mode early, simply press and hold the Start/Stop button until the unit beeps after the bread has finished baking.
11. Using oven mitts or hot pads, carefully remove the Baking Pan from the Baking Cavity. Tilt the Baking Pan on its side and gently slide the baked bread out, tapping gently or shaking the pan if necessary.
Note:
Pausing the bread maker during operation is sometimes necessary if you want to remove the Stirring Paddle or manually add in toppings. However, interrupting the operation or lifting the lid excessively can affect the dough's ability to bake or rise correctly.
OPERATION (CONT.)
Before slicing, remove the Stirring Paddle from the bottom of the loaf using your fingers or the Paddle Hook, if you did not remove it earlier.
- When you are finished using your bread maker, unplug the power cord to turn off, wipe clean with a damp cloth, then wipe dry. See "To Clean" on page 28 for instructions on cleaning your bread maker's accessories.
INGREDIENT GUIDE
Flours
Bread Flour
High-gluten wheat flour that produces a light, springy loaf. Bread flour is excellent at holding its shape and rises well with yeast, which makes it the best choice for bread and pizza dough.
All-Purpose Flour
Basic wheat flour with moderate gluten levels. While it can be used for breadmaking, it does not rise as well as bread flour. All-purpose flour is best suited for low-rising baked goods like cake, muffins, and cookies.
Whole Wheat Flour
Wheat flour made using the entire wheat kernel. Very high in fiber, this flour can be used in a variety of baked goods, but will yield smaller and more dense results with a nuttier taste. Whole wheat flour can also be mixed with bread flour or all-purpose to dilute it's characteristics.
· Rye Flour
A low-gluten flour milled from rye grains/berries. Recommended for rye, pumpernickel, and even sourdough breads. Due to low-gluten levels, it is recommended to mix rye flour with bread flour to assist in proper rising.
· Gluten-Free Flour
Made from a variety of gluten-free grains and nuts like rice, millet, oats, almonds, and even coconut. Gluten-free breads tend to be more dense and smaller than traditional wheat breads. If possible, we recommend choosing a gluten free flour specifically formulated for bread making.

Caution:
The Baking Pan will be hot after removing from the Baking Cavity. Before attempting to remove the broad, we recommend setting the Baking Pan aside and letting it cool briefly.
To avoid spills, burning, and/or damage to your broad maker, never overfill the Baking Pan. Follow the recipe measurements provided in 'Recipe Charts' on pages 18-26.
Note:
Using flours that differ from the provided recipes in this manual may affect baking outcomes. Adding extra water or flour may be needed if dough is too runny or crumbly.
Be sure to precisely measure your ingredients, as this will greatly affect the outcome of your bread.
INGREDIENT GUIDE (CONT.)
Fats
·Unsalted Butter
Adds flavor, moisture and texture to breads. Unsalted butter is highly recommended, as using salted butter can make the dough too salty and prevent proper rising. For best results, bring butter to room temperature and cut into small slices before adding to the Baking Pan.
- Oil
Vegetable oils, like canola or corn, can be used in place of butter for breadmaking. Consider the flavor of the oil before using, as it will affect the taste of the bread. Flavored oils (walnut, garlic, etc) can also be added for a unique taste.
Shortening
Made from hydrogenated vegetable oils, shortening can be used in place of butter or oil with similar results. However, the flavor will not be as rich as breads baked with butter.
Sugars
- Sugars provide food for the yeast, allowing the dough to rise properly. While white sugar is recommended, other sugars like brown sugar, honey, molasses, and syrup may be used for unique flavors. For best results when using liquid sugars, reduce the amount of water/milk in the recipe to avoid runny dough.
Egg
Eggs assist with rising, and add flavor and texture to the bread. Ensure that eggs are fresh and at room temperature before adding to the Baking Pan. Powdered egg alternatives and liquid substitutes may also be used.
Milk/Water
Milk, water, and other liquids add moisture and affect the bread's texture. Bread made with milk will have extra sweetness, and have a tendency to brown more on the top. For this reason, we recommend using the "light" crust color setting when using milk. Powdered milk also works well, and is recommended for any recipe using a delay start time. For proper rising, ensure that all liquids used are at room temperature before adding to the Baking Pan.
Note:
Using too much fat in your recipe can slow down yeast fermentation and keep dough from rising properly.
Do not use perishable ingredients when setting a delay start for your bread, as the ingredients may spoil. Instead, use powdered alternatives.
Be sure to precisely measure your ingredients, as this will greatly affect the outcome of your bread.
INGREDIENT GUIDE (CONT.)
Salt
- Salt is a must-have for bread making. It adds flavor to the bread, helps bring out the flavor of other ingredients used, and promotes proper rising. Any type of salt can be used, as long as it is accurately measured. The wrong amount of salt can greatly affect your results.
Yeast
- Yeast allows the dough to rise, and gives bread its characteristic spongy, airy texture. Growing yeast is a delicate process, and all ingredients must be room temperature before adding to the Baking Pan to ensure that your dough rises properly. Yeast must always be added last, on top of the other dry ingredients.
Active Dry Yeast
Active Dry Yeast can be added directly to the Baking Pan with no pre-soaking required. This type of yeast generally takes longer to rise than Instant Yeast. Therefore, for Quick Bread, we recommend using Instant Yeast. For best results, store Active Dry Yeast in the refrigerator after use.
· Instant Yeast
Also referred to as "Bread Machine Yeast", Instant Yeast is shelf-stable, quick to rise, and can also be added directly to the Baking Pan with no pre-soaking required. Instant Yeast works well with any bread function.
Add-ins
- Use the included Fruit & Nut Dispenser and toppings will automatically be added during the bread maker's "Knead" phase. You can also manually add toppings at any point during the "Knead" or after the "Ferment" phases. Refrain from opening the lid too much, as it may affect the dough's ability to rise properly.
Nuts & Seeds
Any nuts or seeds will work well with the Fruit & Nut Dispenser. Note that extra small ingredients like sunflower seeds may fall through the slots in the dispenser. It may be better to add small ingredients manually.
Fruit
Any dried fruit will work well for use with the Fruit & Nut Dispenser. Chop if needed, and make sure to separate any sticky pieces so they will properly dispense into the bread.

Caution:
To avoid spills, burning, and/or damage to your bread maker, never overfill the Baking Pan. Follow the recipe measurements provided in 'Recipe Charts' on pages 18-26.
Note:
Toppings added after the 'Ferment' phases will not be mixed into the dough, but will rest on top of the loaf as it bakes.
INGREDIENT GUIDE (CONT.)
Seasonings
Use sugar, cinnamon, rosemary, flaked salt, garlic, and more as additions to your dough, or toppings for your bread. Manually add desired seasonings to your dough before starting, during the Stir phase, or while baking.
Other
Cheeses, like feta, parmesan and cheddar make great add-ins to your dough, as do meats and vegetables like bacon and jalapeños. Make sure all add-ins are well separated for proper distribution.
RECIPE CHARTS
The following charts provide baking cycle timelines for a 1.5lb loaf with "Medium" crust color and ingredient guidelines for each function on your bread maker. Use these charts along with "Operation Guide" on pages 12-15 for best results.
NOTE: Factors such as outside temperature, altitude and ingredients used may affect how bread bakes. Bread may require more or less time than the programmed functions provide. For best results, check on your bread using the Baking Window as it cooks. Use the Bake function if additional bake time is needed.
- White Bread
| 7 min 1-min | 25 min 58 min | 25 sec 50 min 50 min | |
| Rest | Rise 1 | ||
| Rise 2 BakeKnead 1 Knead 1Knead 2 | |||
| 03:11 | |||
| Ingredients | 1 lb | 1.5 lb | 2 lb |
| Water | 34 cup | 1 cup | 112 cup |
| Oil/Butter | 112 tbsp | 2 tbsp | 2 tbsp |
| Salt | 12 tsp | 34 tsp | 1 tsp |
| Sugar | 1 tbsp | 112 tbsp | 3 tbsp |
| Milk Powder | 1 tbsp | 1 tbsp | 2 tbsp |
| Bread Flour | 214 cup | 314 cup | 4 cup |
| Yeast | 1 tsp | 1 tsp | 1 tsp |
RECIPE CHARTS (CONT.)
- Sweet Bread
| 6 min—1 min—24 min-50-min — 25 sec 45 min 53 min — | ||||||
| Rest | Rise 1 | Rise 2 BakeKnead | 1 Knead 1Knead 2 | |||
| 02:59 | ||||||
| Ingredients | 1 lb | 1.5 lb | 2 lb |
| Water | 35 cup | 1 cup | 112 cup |
| Oil/Butter | 1 tbsp | 1 tbsp | 2 tbsp |
| Salt | 12 tsp | 1 tsp | 112 tsp |
| Sugar | 14 cup 14 cup | 12 cup | |
| Milk Powder | 1 tbsp | 112 tbsp | 2 tbsp |
| Bread Flour | 212 cup | 312 cup | 4 cup |
| Yeast | 1 tsp | 1 tsp | 1 tsp |
- Sourdough
| —10 min —10min —22 min —91 min —60 min —35 sec —150 min 60 min — | |||||||
| Knead 1 | Rest | Risead 2 | Ferment | Knead 1 | Rise 2 | Bake | |
| 06:44 | |||||||
| Ingredients | 1 lb | 1.5 lb | 2 lb |
| Water | 34 cup | 1 cup | 114 cup |
| Oil/Butter | 1 tbsp | 1 tbsp | 2 tbsp |
| Salt | 12 tsp | 12 tsp | 1 tsp |
| Sugar | 1 tbsp 2 tbsp | 3 tbsp | |
| Milk Powder | 1 tbsp 2 tbsp | 3 tbsp | |
| Bread Flour | 2 cup | 3 cup | 4 cup |
| Yeast | 12 tsp | 12 tsp | 12 tsp |
RECIPE CHARTS (CONT.)
4. French Bread
| Rest | Rise 1 | Rise 2 | BakeKnead 1 | Knead 1 | Knead 2 | |||
| 03:19 | ||||||||
| Ingredients | 1 lb 1.5 lb | 2 lb | |
| Water | 1 cup+ 1 tbsp | 114 cup+ 1 tbsp | 112 cup |
| Salt | 34 tsp 114 | tsp 112 tsp | |
| Bread Flour | 1 cup+ 6 tbsp | 312 cup 4 cup | |
| Yeast | 1 tsp 1 tsp | 1 tsp | |
5. Whole Wheat
| —5 min 3-min —25 min 50 min —25 sec 50 min 65 min — | ||||||
| Rest | Rise 1 | Rise 2 | BakeKnead 1 Knead 1Knead 2 | |||
| 03:18 | ||||||
| Ingredients | 1 lb 1.5 lb | 2 lb | |
| Water | 1 cup | 1 cup & 1 tbsp | 114 cup |
| Oil/Butter | 112 tbsp | 2 tbsp | 212 tbsp |
| Salt | 314 tsp | 1 tsp | 114 tsp |
| Sugar | 1 tbsp 112 | bsp 2 tbsp | |
| Bread Flour | 314 cup | 1 cup | 114 cup |
| Whole Wheat Flour | 112 cup | 2 cup | 212 cup |
| Yeast | 1 tsp 1 tsp 1 tsp | ||
RECIPE CHARTS (CONT.)
6. Quick Bread
| —3 min—17 min 28 min 50 min | |||
| Knead 1 | Knead 2 | Rise 2 | Bake |
| 01:38 | |||
| Ingredients | 1 lb | 1.5 lb | 2 lb |
| Water | 35 cup | 1 cup | 112 cup |
| Oil/Butter | 2 tbsp | 2 tbsp | 3 tbsp |
| Egg | 1 | 1 | 1 |
| Salt | 12 tsp | 12 tsp | 1 tsp |
| Sugar | 14 cup | 12 cup | 34 cup |
| Milk Powder | 1 tbsp | 2 tbsp | 2 tbsp |
| Bread Flour | 2 cup + 3 tbsp | 214 cup | 312 cup |
| Yeast | 3 tsp | 3 tsp | 3 tsp |
7. Sugar-Free
| Rest | Rise 1 | Rise 2 BakeKnead | 1 Knead 1Knead 2 | |||
| 03:11 | ||||||
| Ingredients | 1 lb 1.5 lb | 2 lb | |
| Water | 12 cup 114 | cup 112 cup | |
| Oil/Butter | 112 tbsp | 2 tbsp 2 tbsp | |
| Salt | 12 tsp | 34 tsp | 1 tsp |
| Milk Powder | 1 tbsp 1 tbsp | 2 tbsp | |
| Bread Flour | 214 cup | 314 cup 4 cup | |
| Yeast | 1 tsp 1 tsp | 1 tsp | |
RECIPE CHARTS (CONT.)
8. Multigrain
| 5 min—2 min—22 min—49 min—25 sec—54 min—55 min— | ||||||
| Knead 1 | Rest | Knead 2 | Rise 1 | Knead 1 | Rise 2 | Bake |
| 03:07— | ||||||
| Ingredients | 1 lb 1.5 lb | 2 lb | |
| Water | 12 cup 14 cup 1 cup | ||
| Oil/Butter | 2 tbsp 2 tbsp 3 tbsp | ||
| Egg | 1 l l | ||
| Salt | 12 tsp 14 tsp 1 tsp | ||
| Sugar | 1 tbsp 2 tbsp 3 tbsp | ||
| Milk Powder | 2 tbsp 3 tbsp 4 tbsp | ||
| Bread Flour | 112 cup | 112 cup | 212 cup |
| Whole Wheat Flour | 12 cup 12 cup 12 cup | ||
| Oatmeal | 12 cup 12 cup 12 cup | ||
| Yeast | 1 tsp 114 tsp 112 tsp | ||
9. Soft Bread
| 3 min—1 min—24 min—49 min—25 sec—54 min—55 min— | ||||||
| Knead 1 | Rest | Knead 2 | Rise 1 | Knead 1 | Rise 2 | Bake |
| 03:06— | ||||||
| Ingredients | 1 lb 1.5 lb | 2 lb | |
| Milk | 12 cup 32 cup 1 cup | ||
| Oil/Butter | 2 tbsp 2 tbsp 3 tbsp | ||
| Egg | 1 l l | ||
| Salt | 12 tsp 34 tsp 1 tsp | ||
| Sugar | 2 tbsp 3 tbsp 4 tbsp | ||
| Milk Powder | 2 tbsp 3 tbsp 5 tbsp | ||
| Bread Flour | 2 cup 212 cup 3 cup | ||
| Yeast | 1 tsp | 1 tsp | 1 tsp |
RECIPE CHARTS (CONT.)
10. Cake
| —5 min—18 min—70 min— | ||
| Knead 1 | Knead 2 | Bake |
| 01:33— | ||
| Ingredients | 2 lb |
| Milk | 3 cup |
| Oil/Butter | 112 cup |
| Egg | 3 |
| Sugar | 1 cup |
| Cake Flour | 2 cup |
| Baking Powder | 312 tsp |
NOTES
- Follow all steps in "Operation Guide" on pages 12-15. - For best results, add ingredients to the Baking Pan in the order they are listed. - This function also works well with boxed mix. Use a maximum of one 15.25oz package. Simply follow the ingredient instructions on the package and add to the Baking Pan (no pre-mixing required).
11. Raw Dough
| —3 min —20 min — | |
| Knead 1 | Knead 2 |
| 00:23 — | |
| Ingredients | 2 lb |
| Water | 114 cup |
| Oil/Butter | 2 tbsp |
| Salt | 114 tsp |
| Sugar | 1 cup |
| Bread Flour | 4 cup |
| Egg | 2 |
NOTES
- Follow steps 1-9 in "Operation Guide" on pages 12-15. Select Raw Dough using the Function button. - Use the Time buttons to set the delay timer, if using. There is no need to select the crust color or loaf size.
- This recipe will yield 2lbs of plain multipurpose dough. To create bread dough with yeast, use ingredients for 'Leaven Dough' on page 24. - This function is perfect for using with Ferment and/or Bake to create a custom recipe.
RECIPE CHARTS (CONT.)
12. Leaven Dough
| Ferment | Knead 1 | Rise 2Knead 1 Knead 2 | ||
| 01:24 | ||||
| Ingredients | |
| Water | 1 cup |
| Oil/Butter | 2 tbsp |
| Salt | 112 tsp |
| Sugar | 1 tbsp |
| Bread Flour | 3 cup |
| Yeast | 112 tsp |
NOTES
- Follow steps 1-9 in "Operation Guide" on pages 12-15. Select Leaven Dough using the Function button.
- There is no need to select the crust color or loaf size. Use the Time buttons to adjust the delay timer if using.
· Once finished, gently reshape dough, or add toppings if desired.
- This function is perfect for using with Bake to create a custom recipe.
13. Jam
| 5 min | 10 min | 50 min |
| BakeKnead 2 Rise 2 | ||
| 01:05:00 | ||
| Ingredients | |
| Fruit (fresh or frozen) | 3 cup |
| Lemon Juice | 1 tbsp |
| Sugar | 112 cup |
NOTES
- Thoroughly wash, peel, and remove the cores from your fruit. Slice fruit into 1-inch chunks. Using a blender or food processor, pureé chopped fruit into a paste-like consistency and pour into the Baking Pan. Make sure the Stirring Paddle is in place.
- Select Jam using the Function button. There is no delay start or adjustable bake time for this function.
· Once finished, carefully remove the Baking Pan and pour the jam into a clean container to cool. Use caution when handling or pouring, as jam will be extremely hot.
· Refer to "Operation Guide" on pages 12-15 as needed.
RECIPE CHARTS (CONT.)
14. Bake
| Bake |
| 00:10-1:10 |
NOTES
- Place raw or leavened dough evenly into the Baking Pan. Shape if desired.
- Select Bake using the Function button.
- Select the desired crust color using the Color button.
- Use the Time buttons to select the total bake time (there is no delay start).
- Bake is designed for manual use; there is no crust color or loaf size option.
Instead, simply add or decrease total bake time to achieve your desired level of doneness.
- Refer to "Operation Guide" on pages 12-15 if needed.
15. Yogurt
| Ferment (97°F) |
| 05:00-13:00 |
| Ingredients | |
| Milk | 1 12 cup |
| Yogurt | 14 cup |
| Sugar | 2 tbsp |
NOTES
- Place all yogurt ingredients inside the Baking Pan. The Stirring Paddle does not need to be inserted.
- Select Yogurt using the Function button.
- Use the Time buttons to select the total ferment time between 5 and 13 hours (there is no delay start or crust color option available).
- This recipe can be doubled or tripled for large batches of yogurt. To avoid overflow, do not exceed a triple batch.
- Refer to "Operation Guide" on pages 12-15 if needed.
RECIPE CHARTS (CONT.)
16. Gluten-Free
| 7 min—3 min—20 min—10 min—30 min—25 sec—60 min—45 min— | |||||||
| Knead 1 | Rest | Knead 2 | Rise 1 | Ferment | Knead 1 | Rise 2 | Bake |
| 02:55 | |||||||
| Ingredients | 1 lb 1.5 lb | 2 lb | |
| Water | 12 cup 34 cup | 1 cup + 1 tbsp | |
| Oil/Butter | 2 tbsp | 212 tbsp | 3 tbsp |
| Salt | 12 tsp 1 tsp | 2 tsp | |
| Sugar | 212 tbsp | 3 tbsp | 312 tbsp |
| Gluten Free Flour | 1 cup 112 cup | 2 cup | |
| Corn Flour | 1 cup 112 cup | 2 cup | |
| Yeast | 1 tsp 112 tsp 112 tsp | ||
17. Ferment
| Ferment (86°F) |
| 00:10-04:00 |
NOTES
- Place raw dough or food to be fermented into the Baking Pan, then select Ferment using the Function button.
- Use the Time buttons to select the total ferment time between 10 minutes and 4 hours (there is no delay start option available).
- If fermenting dough, follow with the Bake function to finish.
RECIPES
Sweet Raisin Loaf
| Ingredients | 1 lb 1.5 lb | 2 lb | |
| Milk | 12 cup 12 cup 12 cup | ||
| Oil/Butter | 2 tbsp 14 cup 12 cup | ||
| Egg | 1 | 2 | 2 |
| Salt | 14 tsp 14 tsp | 1 tsp | |
| Sugar | 2 tbsp + 1 tsp | 3 tbsp | 4 tbsp |
| Bread Flour | 214 cup | 3 cup 314 cup | |
| Yeast | 1 tsp 1 tsp 1 tsp | ||
| Raisins | 14 cup 12 cup 12 cup | ||
NOTES
- Place raisins inside the Fruit & Nut Dispenser. Add remaining ingredients to the Baking Pan in the order listed.
· Follow all the instructions in "Operation Guide" on pages 12-15.
- Select Sweet Bread using the Function button.
- Select the "Light" crust color and your desired loaf size using the Color and Size buttons.
· The Fruit & Nut Dispenser will automatically dispense raisins during the "Knead" phase.
Soft Cranberry Walnut Loaf
| Ingredients | 1 lb 1.5 lb | 2 lb | |
| Water | 12 cup 14 cup | 1 cup + 1 tbsp | |
| Oil/Butter | 14 tbsp 1 tbsp 1 tbsp | ||
| Salt | 14 tsp 1 tsp 1 tsp | ||
| Sugar | 1 tbsp + 2 tsp | 2 tbsp 3 tbsp | |
| Milk Powder | 2 tsp 1 tbsp 1 tbsp | ||
| Bread Flour | 114 cup 2 cup 212 cup | ||
| Yeast | 1 tsp 1 tsp 1 tsp | ||
| Cranberries | 3 tbsp 14 cup 12 cup | ||
| Walnuts | 1 tbsp 2 tbsp 3 tbsp | ||
NOTES
- Place cranberries and walnuts inside the Fruit & Nut Dispenser. Add remaining ingredients to the Baking Pan in the order listed.
· Follow all the instructions in "Operation Guide" on pages 12-15.
- Select Soft Bread using the Function button. Select the crust color and your desired loaf size using the Color and Size buttons.
· The Fruit & Nut Dispenser will automatically dispense cranberries and walnuts during the 'Knead' phase.
TO CLEAN
It is recommended to clean the bread maker after each use. See "Before First Use" on page 10 for important initial cleaning guidelines.
- Unplug the power cord. Allow the bread maker and all accessories to completely cool before disassembling and cleaning.
- Remove the Baking Pan and Stirring Paddle from the Baking Cavity and clean with warm, soapy water. Rinse and dry thoroughly. Soak the Stirring Paddle in warm water for 10 to 15 minutes if you cannot remove it from the Baking Pan.
- Check if any ingredients spilled inside the Baking Cavity. Gently clean with a soft, damp cloth if needed, then wipe dry.
- Wash the Fruit & Nut Dispenser, and all other accessories in warm, soapy water. Rinse and dry thoroughly.
- Wipe the exterior of the Stainless Steel Body clean with a damp cloth, then wipe dry.
- Place the clean, empty Baking Pan and Stirring Paddle securely into the bread maker.
- Dry and reassemble all parts.
- To store your bread maker, make sure the lid is closed, and place all accessories inside the Baking Pan. Do not place heavy objects on top of the bread maker.
TROUBLESHOOTING
Bread maker fails to work/mix flour
- Check if the power cord is plugged into a 120V AC wall outlet.
- If ":" is flashing on the Digital Panel with a countdown timer, there is a delay timer in place. Press Start/Stop to cancel the delay timer and start the bread maker.
- Make sure the Baking Pan and Stirring Paddle are properly installed in the machine.
- Your bread maker components may be damaged. Contact customer service.
Abnormal Sound
- There may be debris or ingredients trapped inside the Baking Cavity. Unplug the power cord, wait for the bread maker to cool, and remove the debris with a damp cloth.
- The Baking Pan may be loose. Read "Operation Guide" on page 12 for proper Baking Pan placement.

Caution:
Do not immerse the Stainless Steel Body in water or place in a dishwasher.
To avoid damaging the machine, do not use benzene, scrubbing brushes, or chemical cleaners on the broad maker or accessories. Instead, use only a mild, non-abrasive cleaner.
Take care to prevent water or cleaning fluids from seeping under the Digital Controls or Digital Display. Never apply cleaner directly to the surface of the bread maker. Always apply to a cloth or sponge first.
Do not use abrasive cleansers, metal scouring pads or metal utensils on the nonstick surface of the Baking Pan, as they may damage the finish.
Note:
All accessories are top-rack dishwasher safe. However, hand washing is recommended to extend the life of the materials and nonstick coatings.
Some discoloration of the Baking Pan may appear over time. This is a natural effect caused by moisture and steam and will not affect the bread in any way.
Any other servicing should be performed by Aroma® Housewares.
TROUBLESHOOTING
Smoke or burning odor from the back of the machine • The power cord may be damaged. Keep the power cord away from hot objects.
- Due to the manufacturing process, slight smoke and odor may be emitted during the first use. This is normal. Read "Before First" Use on page 10 for cleaning instructions. - Ingredients may have spilled onto the heating element inside of the Baking Cavity. Unplug the power cord, wait for the bread maker to cool, and clean with a damp cloth. Dry thoroughly and restart.
The Digital Display won't light up
- Check if the power cord is plugged in to a 120V AC wall outlet.
• The Digital Display shows 0:00 and ":" is flashing - The baking cycle has simply ended, and the bread maker is on warming mode. Press the Start|Stop button to turn off the warming mode if desired.
The Digital Display reads "LLL"
- The internal temperature of the bread maker is too low. The bread maker must be operated between 14^ - 104^ .
The Digital Display reads "HHH"
- The internal temperature of the bread maker is too high. Allow the unit to cool down in between cycles. Unplug the unit, open the lid, and carefully remove the Baking Pan. Allow to cool 15-30 minutes before resuming.
The Digital Display reads "EE0" or "EE1"
- The temperature sensor circuit is broken. Please contact customer service.
Bread is partially uncooked
- There may have been too much water in the dough, or the water temperature may have been too high. Refer to the provided recipe charts and "Operation Guide" on pages 12-15.
The sides of the bread are collapsed and the bottom of the bread is damp
- There are several possible solutions. The bread may have been left in the Baking Pan too long after baking. Remove the bread from the pan sooner, and allow it to cool.
- Try using more flour (1 tsp at a time), or less yeast (1/4 tsp at a time), or less water or liquid (1 tsp at a time).
- This could also be the result of forgetting to add salt to the recipe.
The bread has a heavy, thick texture
- Try using less flour (1 tsp at a time), or more yeast (1/4 tsp at a time). This could also be the result of using old flour or the wrong type of flour for the recipe.
The bread is not completely baked in the center
- Try using more flour (1 tsp more at a time), or less water or liquid (1 tsp less at a time). Do not lift the lid too often during baking.
TROUBLESHOOTING (CONT.)
There are large holes inside the bread
- This is usually the result of not adding salt to the recipe.
The bread rose too much
- Try using less yeast (1/4 tsp less at a time). This could also be the result of not adding salt to the recipe or not placing the Stirring Paddle into the Baking Pan.
The bread did not rise enough
- There are several possible solutions. Try using less flour (1 tsp less at a time), more yeast ( 14 tsp more at a time, or less water (1 tsp less at a time).
- You may have forgotten to add salt.
- Check that the yeast is not expired, and is fresh and properly stored (sealed, in a cool, dark place).
- Liquid ingredients may have either been too hot (this will kill the yeast), or too cold (yeast will not activate). Liquids should be between 75^ - 90^ for best results.
• The ingredients were in the Baking Pan in the improper order. If the ingredients are placed improperly, this can cause the yeast to get wet and not activate. See "Operation Guide" on pages 12-15 for proper ingredient placement.
The bread has a floured top
- This is usually a result of using too much flour or not enough water. Try using less flour (1 tsp less at a time), or try using more yeast (¼ tsp less at a time).
The bread is too brown
- This is usually the result of adding too much sugar to the recipe. Try using less sugar (1 tbsp at a time). You can also try selecting a lighter crust color selection.
The bread is not brown enough
- This is usually the result of repeatedly lifting the lid of the bread machine or leaving the lid open while the bread is baking. Be sure the lid is shut while the bread maker is in operation.
The Stirring Paddle comes out with the bread
- This can happen, as the Stirring Paddle is detachable. Use a non-metal utensil or the Paddle Hook to remove it from the baked loaf before slicing. Use caution, as the paddle will be hot. Alternatively, you can remove the Stirring Paddle after the final "Ferment" phase.
The bread is pale on top and collapsed
• Usually this is because the ingredients are not in balance or low protein flour is used. Check the method of weighing/measuring the ingredients. Too much yeast, water or other liquid ingredients, or insufficient flour, may cause the bread to be pale on top and collapse while baking.
TROUBLESHOOTING (CONT.)
Bread/jam/yogurt is overflowing in the Baking Pan
- Results may vary when using other recipes, as the recipes in this booklet are sized so that the dough is kneaded properly and the finished bread does not exceed the Baking Pan capacity. Use only recipes with similar quantities of ingredients. As a general guide, a minimum of 2 cups and maximum of 4.5 cups of total dry ingredients is recommended on the bread settings. On the jam setting, as a general guide, a maximum of 3 cups of fruit should be used.
Can I use egg powder or dry milk?
- Yes, egg powders, dried buttermilk or dry milk can be used. These products allow you to use the Delay Start feature—however, always be sure to add the water to the Baking Pan first, then add the dried substitution after the flour to keep them separate. Similarly, fresh milk and eggs can be substituted for dry milk and egg powders, but the baked bread will have a heavier texture. If you still choose to use fresh milk, decrease the same measurement of other liquid in the recipe to avoid runny dough. Do not use the Delay Start feature with perishable ingredients.
Can other sweetening agents be used in place of sugar?
- Yes. Honey, golden syrup or brown sugar can be used. When substituting honey or similar sweet liquids for sugar, ensure to decrease the same measurement of liquid to equal the liquid sugar substitute. We do not recommend powdered or liquid artificial sweeteners.
Can butter or margarine be used in place of oil?
- Yes, but the bread texture may appear more creamy and yellow.
Can salt be omitted?
- Salt plays a very important part in bread making. Omitting it will decrease water retention in the dough, as well as affect mixing, the strength of the gluten development and the fermentation of the yeast. In the finished bread, salt improves the loaf shape, crumb structure and crust color, as well as extending shelf life and enhancing flavor.
What if the power goes out during the baking process?
- If the power goes out for 15 minutes or less while the bread maker is working, the bread maker's power-off memory will resume the baking process once power returns.
- If the power outage lasts longer than 15 minutes, the bread maker will not be able to resume the baking process. If this happens, hold down the Start/Stop button for 3 seconds when the power returns. If the display does not return to the time setting before the outage, unplug the bread maker then plug it back in. If the machine still does not start, hold down the Start/Stop button a second time for 3 seconds. Continue to unplug/replug and hold down Start/Stop until the display returns to the cycle time before the power outage. Then, press Start/Stop once to resume.
NOTES
NOTES
NOTES
LIMITED WARRANTY
Aroma Housewares Company warrants its products against defects in material and workmanship for two years from provable date of purchase in the United States. Within this warranty period, Aroma Housewares Company will repair or replace, at its discretion, defective parts at no charge, provided the product is returned, freight prepaid with proof of purchase and U.S. \$25.00 for shipping and handling charges payable to Aroma Housewares Company. Before returning an item, please call the toll free number below for a return authorization number. Allow 2-4 weeks for return shipping.
This warranty does not apply if the warranty period expired; the products has been modified by any unauthorized service center or personnel; the defect was subject to abuse, improper use not conforming to product manual instructions, or environment conditions more severe than those specified in the manual and specification, neglect of the owner or improper installation; the defect was subject to Force Majeure such as flood, lightning, earthquake, other natural calamities, war, vandalism, theft, brownouts or sags (damage due to low voltage disturbances).
This warranty gives you specific legal rights, which may vary from state to state, and does not cover areas outside the United States.
SERVICE & SUPPORT
In the event of a warranty claim, or if service is required for this product, please contact Aroma® customer service toll-free at:
1-800-276-6286
M-F, 8:30am-4:30pm, Pacific Time
Or we can be reached online at:
CustomerService@AromaCo.com
For your records, we recommend stapling your sales receipt to this page along with a written record of the following:
- Date of Purchase:
- Place of Purchase:
Aroma Housewares Company 6469 Flanders Drive, San Diego, CA 92121, U.S.A. 1-800-276-6286 | www.AromaCo.com M-F, 8:30am - 4:30pm, Pacific Time
Note:
Proof of purchase is required for all warranty claims.
natural_image
Exterior view of a stainless steel loaf with control panel (no visible text or symbols)To Enhance and Enrich Lives.
- instruction manual
- AROMA®
- Stay connected for more recipe ideas and monthly giveaways!
- IMPORTANT SAFEGUARDS
- SAVE THESE INSTRUCTIONS
- Parts Identification
- Short Cord Instructions
- Grounding Instructions
- THIS APPLIANCE IS FOR HOUSEHOLD USE ONLY.
- Control Panel Identification
- Controls/Functions
- Time (+) or (-)
- Size
- Color
- Function
- Start / Stop
- Baking Functions
- White Bread
- Sweet Bread
- Sourdough
- French Bread
- Whole Wheat
- Quick Bread
- Sugar-Free
- Multigrain
- Soft Bread
- Cake
- Raw Dough
- Leaven Dough
- Jam
- Bake
- Yogurt
- Gluten-Free
- Ferment
- Accessories Identification
- Guidelines for Use
- Nonstick Baking Pan
- Stirring Paddle
- Paddle Hook
- Fruit & Nut Dispenser
- Measuring Cup
- Measuring Spoon
- BEFORE FIRST USE
- QUICK START
- Note:
- Helpful Hints:
- QUICK START(CONT.)
- QUICK TIPS
- Caution:
- OPERATION GUIDE
- OPERATION (CONT.)
- Loaf Size
- Crust Color
- Time
- INGREDIENT GUIDE
- Flours
- Bread Flour
- All-Purpose Flour
- Whole Wheat Flour
- · Rye Flour
- · Gluten-Free Flour
- INGREDIENT GUIDE (CONT.)
- Fats
- ·Unsalted Butter
- - Oil
- Shortening
- Sugars
- Egg
- Milk/Water
- Salt
- Yeast
- Active Dry Yeast
- · Instant Yeast
- Add-ins
- Nuts & Seeds
- Fruit
- Seasonings
- Other
- RECIPE CHARTS
- RECIPE CHARTS (CONT.)
- NOTES
- RECIPES
- Sweet Raisin Loaf
- Soft Cranberry Walnut Loaf
- TO CLEAN
- TROUBLESHOOTING
- Bread maker fails to work/mix flour
- Abnormal Sound
- The Digital Display won't light up
- The Digital Display reads "LLL"
- The Digital Display reads "HHH"
- The Digital Display reads "EE0" or "EE1"
- Bread is partially uncooked
- The sides of the bread are collapsed and the bottom of the bread is damp
- The bread has a heavy, thick texture
- The bread is not completely baked in the center
- TROUBLESHOOTING (CONT.)
- There are large holes inside the bread
- The bread rose too much
- The bread did not rise enough
- The bread has a floured top
- The bread is too brown
- The bread is not brown enough
- The Stirring Paddle comes out with the bread
- The bread is pale on top and collapsed
- Bread/jam/yogurt is overflowing in the Baking Pan
- Can I use egg powder or dry milk?
- Can other sweetening agents be used in place of sugar?
- Can butter or margarine be used in place of oil?
- Can salt be omitted?
- What if the power goes out during the baking process?
- LIMITED WARRANTY
- SERVICE & SUPPORT
- 1-800-276-6286
- CustomerService@AromaCo.com
Brand : Aroma
Model : ABM-270
Category : Bread maker