
Rockin' Roller Mini 2 - Portable speaker MONSTER - Free user manual and instructions
Find the device manual for free Rockin' Roller Mini 2 MONSTER in PDF.


| Product Type | Portable Bluetooth Speaker with Guitar/Mic Input |
| Brand | Monster |
| Model | Rockin' Roller Mini 2 (RRMINI 2) |
| Dimensions (W x H x D) | 14.02" x 16.54" x 7.09" (356 x 420 x 180 mm) |
| Weight | 12.8 lbs (5.8 kg) |
| Speaker Output Power | 25W |
| Speaker Drivers | 6.5" Woofer + 1.5" Tweeter |
| Frequency Response | Not specified (estimated 80 Hz - 20 kHz) |
| Bluetooth Version | 2.1 + EDR |
| Bluetooth Range | 10 m (33 ft) |
| Bluetooth Profiles | A2DP, AVRCP |
| Audio Inputs | Bluetooth, AUX 3.5mm, FM Radio |
| Microphone/Guitar Input | Yes (1/4" jack, with volume control) |
| FM Radio | Yes, with 4 presets |
| USB Charging Port | 5V/2A (for charging external devices) |
| Power Supply | AC 120V/60Hz or 220V/50Hz (depending on region); DC 15V |
| Battery Type | Rechargeable (specific type not stated, estimated lead-acid or Li-ion) |
| Battery Charging Time | Approximately 6 hours for first charge (power off) |
| Auto Standby | Yes, after 15 minutes of inactivity |
| Maximum SPL | 99 dB |
| Total Harmonic Distortion | < 10% |
| Signal-to-Noise Ratio | > 75 dB |
| Cabinet Material | Plastic with ruggedized housing |
| Warranty | 90 days labor, 1 year parts |
Frequently Asked Questions - Rockin' Roller Mini 2 MONSTER
User questions about Rockin' Roller Mini 2 MONSTER
0 question about this device. Answer the ones you know or ask your own.
Ask a new question about this device
Download the instructions for your Portable speaker in PDF format for free! Find your manual Rockin' Roller Mini 2 - MONSTER and take your electronic device back in hand. On this page are published all the documents necessary for the use of your device. Rockin' Roller Mini 2 by MONSTER.
USER MANUAL Rockin' Roller Mini 2 MONSTER
TABLE OF CONTENTS
IMPORTANT SAFETY INSTRUCTIONS 3
UNPACKING 4
GETTING STARTED 5
CHARGING BATTERY 5
BLUETOOTH CONNECTION (Bluetooth Devices) 5
CONNECTION USING AUX INPUT 6
FM / USB CHARGING 6
AUTO STANDBY / WAKE UP 6
GUITAR / MIC INPUT 7
TROUBLESHOOTING 7
SPECIFICATIONS 8
LIMITED WARRANTY 9
IMPORTANT SAFETY INSTRUCTIONS
TO PREVENT FIRE OR SHOCK HAZARD, DO NOT USE THIS PLUG WITH AN EXTENSION CORD, RECEPTACLE OR OTHER OUTLET UNLESS THE BLADE SCAN BE FULLY INSERTED TO PREVENT BLADE EXPOSURE. TO PREVENT FIRE OR SHOCK HAZARD, DO NOT EXPOSE THIS APPLIANCE TO RAIN OR MOIST.

The lightning flash with arrow- head symbol, within an equilateral triangle is intended to alert the user to the presence of uninsulated 'dangerous voltage' within the product's enclosure that may be of sufficient magnitude to constitute a risk of electric shock to persons.
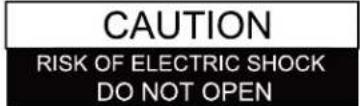
WARNING: TO REDUCE THE RISK OF ELECTRIC SHOCK DO NOT REMOVE COVER (OR BACK), NO USER SERVICEABLE PARTS INSIDE REFER SERVICING TO QUALIFIED SERVICE PERSONNEL.

The exclamation point within an equilateral triangle is intended to alert the user to the presence of important operating and maintenance (servicing) instructions in the literature accompanying the appliance.
- READ INSTRUCTIONS - All the safety and operating instructions should be read before the product is operated.
- RETAIN INSTRUCTIONS - The safety and operating instructions should be retained for future reference.
- HEED WARNINGS - All warnings on the product and in the operating instructions should be adhered to.
- FOLLOW INSTRUCTIONS - All operating and use instructions should be followed.
- CLEANING - Unplug this product from the wall outlet before cleaning. Do not use liquid cleaners or aerosol cleaners. Clean only with a dry cloth.
- ATTACHMENTS - Do not use attachments not recommended by the product manufacturer as they may cause hazards.
- ACCESSORIES - Do not place this product on an unstable cart, stand, tripod, bracket, or table. The product may fall, causing serious injury to a child or adult, and serious damage to the product. Use only with a cart, stand, tripod, bracket, or table recommended by the manufacturer, or sold with the product. Any mounting of the product should
follow the manufacturer instructions, and should use a mounting accessory recommended by the manufacturer. A product and cart combination should be moved care-quick stops, excessive force and uneven surfaces may cause the product and cart combination to overturn.

- VENTILATION- Slots and openings in the cabinet are provided for ventilation and to ensure reliable operation of the product and to protect it from overheating, and these openings must not be blocked or covered. The openings should never be blocked by placing the product on a bed, sofa, rug
or other similar surface. This product should not be placed in a built-in installation, such as a bookcase or rack, unless proper ventilation is provided or the manufacturer*instructions have been adhered to.
- POWER SOURCES - This product should be operated only from the type of power source indicated on the marking label. If you are not sure of the type of power supply to your home, consult your product dealer or local power company. For products intended to operate from battery power, or other sources, refer to the operating instructions.
- GROUNDING OR POLARIZATION - This product may be equipped with a polarized alternating-current line plug(a plug having one blade wider than the other). This plug will fit into the power outlet only one way. This is a safety feature: If you are unable to insert the plug fully into the outlet, try reversing the plug. If the plug should still fail to fit, contact your electrician to replace your obsolete outlet. Do not defeat the safety purpose of the polarized plug.
- POWER-CORD PROTECTION - Power-supply cords should be routed so that they are not likely to be walked on or pinched by items placed upon or against them, paying particular attention to cords at plugs, convenience receptacles, and the point of exit from the product.
- NON-USE PERIODS - The power cord of the product should be unplugged from the outlet when left unused for long periods of time.
- Do not use this apparatus near water.
14 Do not install near any heat sources such as radiators, heat registers, stoves or other apparatus (including amplifiers) that produce heat. - Refer all servicing to qualified service personnel. Servicing is required when the apparatus has been damaged in any way, such as power - supply cord or plug is damaged, liquid has been spilled or objects have fallen into the apparatus, the apparatus has been exposed to rain or moisture, does not operate normally, or has been dropped.
- Mains plug is used as disconnect device and it should remain readily operable during intended use. In order to disconnect the apparatus from the mains completely, the mains plug should be disconnected from the mains socket outlet completely.
- Battery shall not be exposed to excessive heat such as sunshine, fire or the like.
WARNING
To reduce the risk of fire or electric shock, do not expose this apparatus to rain or moisture.
CAUTION
Use of controls or adjustments or performance of procedures other than those specified may result in hazardous radiation exposure.
CAUTION: These servicing instructions are for use by qualified service personnel only. To reduce the risk of electric shock do not perform any servicing other than that contained in the operating instructions unless you are qualified to do so.
CAUTION
Danger of explosion if battery is incorrectly replaced. Replace only with the same or equivalent type.
FCC Warning Statement
Changes or modifications not expressly approved by the party responsible for compliance could void the user's authority to operate the equipment.
This equipment has been tested and found to comply with the limits for a Class B digital device, pursuant to Part 15 of the FCC Rules.
These limits are designed to provide reasonable protection against harmful interference in a residential installation. This equipment generates, uses, and can radiate radio frequency energy and, if not installed and used in accordance with the instructions, may cause harmful interference to radio communications.
However, there is no guarantee that interference will not occur in a particular installation. If this equipment does cause harmful interference to radio or television reception, which can be determined by turning the equipment off and on, the user is encouraged to try to correct the interference by one or more of the following measures:
- Reorient or relocate the receiving antenna.
- Increase the separation between the equipment and receiver.
- Connect the equipment into an outlet on a circuit different form that to which the receiver is connected.
- Consult the dealer or an experienced radio/TV technician for help.
FCC Radiation Exposure Statement:
This equipment complies with FCC radiation exposure limits set forth for an uncontrolled environment. In order to avoid the possibility of exceeding the FCC radio frequency exposure limits, Human proximity to the antenna shall not be less than 20cm (8 inches) during normal operation.
UNPACKING
Check that you have all of the following items.
If any item is missing, please contact the customer service hotline for assistance.
The hotline number is printed on the cover page of this user manual.
- Monster Rockin' Roller Mini 2 Unit
- AUX In Cable
- AC Power Cable
- Microphone
- User Manual (with Warranty Statement)
- Quick Start Guide
PART DESCRIPTIONS


1.....Handle
2.....Ruggedized Housing
3.....Power On/Power Off Key
4.....Power Input
5.....Guitar/Mic Input
6.....DC In
7.....Guitar/Mic Volume
8.....LED Interface
9.....USB Input
10.... AUX Input
11....Source Select
12....Bluetooth Pairing Key
13.... Battery Level Indication
14.... Main Volume Knob
15....Guitar/Mic Select
16.... Radio Preset
GETTING STARTED
Power Connection
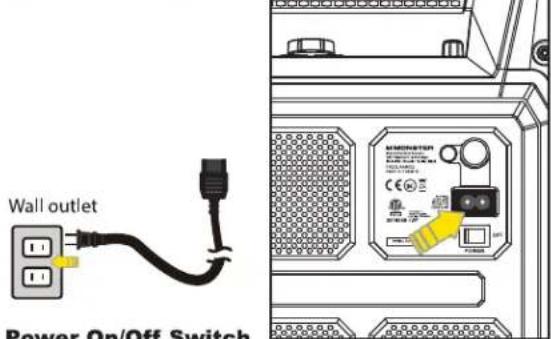
Power On/Off Switch
- Power on the mechanical Power Switch.
- The Power Red LED will turn On.
-
The unit will enter into Bluetooth mode, Bluetooth LED will flash blue.
-
Connect the supplied AC cable to The speaker.
- Plug the AC cord into wall outlet.
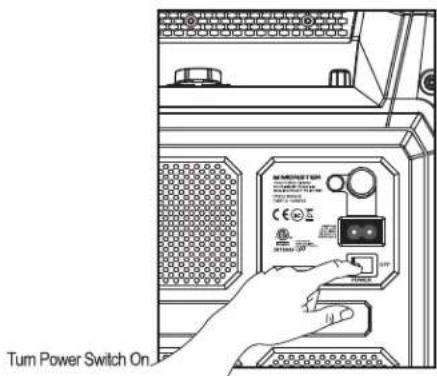
Charging Battery
- By connecting AC power, battery will start charging.
- To check the battery levels, press the battery icon located on the top panel.
- The percentage of battery life will be displayed on the screen.
- Charge battery about 6 hours in power off mode before you start using the unit for the first time.

BLUETOOTH CONNECTION (Bluetooth Device)
Manual Bluetooth pairing
- Place Speaker and your Bluetooth device so they are no more than 3 feet apart.
- Change the input to BT (Bluetooth) by pressing the "Source" button.
- Press and hold ⚙ Button on Speaker for 2 seconds and enter. Bluetooth pairing mode BT Blue LED will flash .
- Make sure Bluetooth function of your Bluetooth device is ON.
- Set your Bluetooth device to search for Bluetooth devices. You will recognize the unit by its Bluetooth name RRMINI2.
- Once selected, your Bluetooth device will indicate as "Connected", and you will hear confirmation sound from speaker.
- Bluetooth LED turns solid upon completion of pairing.

natural_image
Line drawing of a device with a hand pressing a button, showing a smartphone above it (no text or symbols present)
Pairing Using NFC
- Turn on NFC function on your Bluetooth enabled device.
- Place your Bluetooth device on the silkscreen "NFC" on the top surface of the Monster Rockin' Roller Mini 2.
- Confirm Bluetooth connection on your Bluetooth device.
Note: Blue LED indicator will be solid. - Once paired you can play audio from your Bluetooth device and audio can be heard from the unit.
CONNECTION USING AUX INPUT
- Plug in the 3.5mm Stereo Audio wire into the Aux-In input,
- Switch the input to "Aux" mode by pressing the "Source" button.
- You can connect any audio device that has 3.5mm audio output jack, and can playback any audio from this connected device.
- All playback functions (Play, Pause, Next, Previous, Volume Up & Volume Down) can be controlled from the connected Audio device.

natural_image
Line drawing of a device control panel with an attached smartphone (no text or symbols)FM / USB Charging
Listening to FM radio
- Press the "Source" button to select FM source, the radio station frequency will be displayed on the screen.
- Press and hold (◀ or ▶) to search a station with strongest reception automatically.
Store your favorite radio stations manually (upto 4)
- Tune to the desired radio station.
- Press and hold a number key (1-4) to enter programming mode; the corresponding number blinks on the screen; and the station to save on the selected preset.
- Repeat above step 1-2 to store additional stations.

Select a favorite radio station
- Press the "Source" button to select FM source.
- Press the number 1-4 keys to select one of your favorite radio stations to listen.
USB Charging (5V/2A)
- With the built in USB power bank located on the main control panel, connect your USB cable to the USB power port. You can connect an iPhone, iPad, or most Android devices. (USB cable not included)

AUTO STANDBY/ WAKE UP
Auto Standby:
The Power Red LED Signal will turn on and other LED Signals will turn off once the main unit is in Standby mode.
- Bluetooth: When there is no BT Connection, or there is a BT Connection failure, or if the BT has been disconnected for 15 Minutes, the set will go to standby mode and the BT LED Signal will turn off.
- AUX: The main unit will enter standby mode when the main unit is in AUX mode and no AUX cable has been detected.
- Standby: When the unit is on, press and hold the volume knob for 3 seconds and the speaker will enter the Standby mode.
"Wake up" from standby mode:
If the main unit is in Standby mode, press and hold the volume knob for 2 second. The main unit will turn on and return to the latest source mode. The Power Red LED Signal will turn off and the LED Screen will display the latest source once the main unit is in work mode.
Guitar/Mic. Input
The new Mini Rockin' Roller Mini 2 comes with a Mic/Guitar input. This new feature allows you to simply connect the provided microphone or your guitar and start playing or singing along!
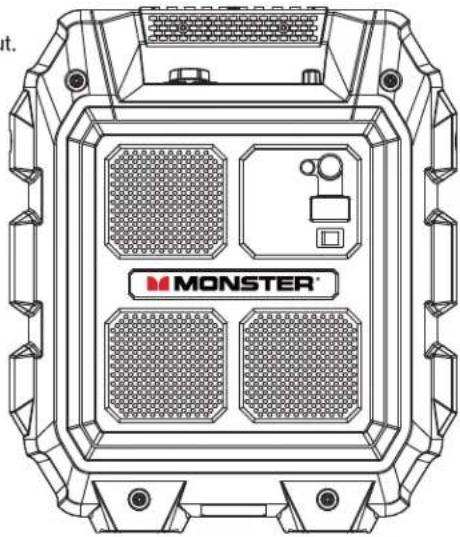
- Plug the Mic/Guitar into the "Mic/Guitar" labeled input located on the back of the unit.
- To switch between Mic or Guitar audio settings press the "Mic/Guitar" button.

natural_image
Technical line drawing of a device front panel with hexagonal grid and labeled 'MONSTER' logo (no readable text or symbols beyond branding)TROUBLESHOOTING
General
No power
- Check that the AC power cord is securely inserted in the unit and the electrical outlet.
- Check the Power On/Off switch is turn to On position.
- If battery is flat. Plug in the AC power cord to charge and operate.
Keys no response
- Turn the Power On/Off switch to Off, and then On again to reset the unit.
- Unplug the AC power cord and plug it back again.
No sound heard
- Make sure the guitar is connected, and Guitar Mode is selected (press Guitar/Mic button) and Guitar/Mic Volume is turned to a reasonable level.
- Make sure the mic is connected, and Mic Mode is selected (press Guitar/Mic button) and Guitar/Mic Volume is turned to a reasonable level;
- Make sure the Aux connected device volume is turned to a reasonable level.
- Make sure the Bluetooth connected device output the audio thru BT out.
- Make sure the Bluetooth connected device volume is turned to a reasonable level.
Bluetooth Operations
Audio quality is poor
- Bluetooth reception is poor. Move the Bluetooth device closer to the speaker.
Cannot pair to Bluetooth device
- Make sure both Bluetooth device and speaker is not connected to any other Bluetooth device.
- Make sure the Bluetooth function is on your Mini Rockin' Roller.
- Make sure the Blue LED on the Speaker is flashing fast (Pairing mode).
- Turn Power switch to Off, and then On again. Repeat the steps mentioned in "Bluetooth Set-Up".
SPECIFICATIONS
General
Input Source: Bluetooth/FM/Aux/Microphone/Guitar
Bluetooth Range: Bluetooth 10M (33ft)
AUX IN 3.5 mm
Control Buttons ...... Power, Source, Bluetooth pairing, Volume knob, Previous/Next, 4 pcs FM preset key Battery Level indicated LED on/off key
LED Indicator....Power/Standby (Red LED x1); Bluetooth (Blue LED x1); Battery level indicating LED (Red x1,)
Power Input AC IN 120V/60Hz/AC
IN 220V/50Hz
DC in 15V
Auto Standby.... When the unit is not being used for over 15 minutes it will automatically enter Standby mode
Auto Power Off Yes
Speaker output Wattage 25W
Speaker driver size 6.5" (Woofer) X1 + 1.5" (Tweeter) X1
Speaker grill finishing .... Metal speaker grill
Full range ...... Yes
Max SPL 99dB
THD + Noise < 10%
S/N > 75dB
Cabinet Material Plastic
Dimension (W x H X D) 14.02" x 16.54" x 7.09"
Weight (Kg) 12.8 lbs
Operating Temperature
Operating Temperature Range .. 32F to 104F
Operating Humidity Range ..... 40\~90% RH
Storage Temperature Range..... --13F to 158F
Key
Power on/off key....Power on: Switch "Power" key to "ON" ....Power off: Switch "Power" key to "OFF"
Source key .... 1. Press Source key to change source between "BT", "Aux in", or "FM"
Volume knob 1. Rotate VOLUME knob to increase/decrease volume;
- Press and hold the volume knob key for 3s and enter Standby status
Bluetooth Pairing.... 1. Press and hold the Pairing key for 2s to enter Pairing mode
- Press and hold the Pairing key for 8S to clear any previous Bluetooth pairing
Previous/Next Key.... Auto search radio stations when in FM mode press and hold "Previous/Next" Key in FM source
Preset 1,2,3,4 .... Short press – play preset station Long press – store current station to preset
Battery Level indicated
Battery Icon .... Press to display battery level;
Bluetooth
Bluetooth version 2.1 + EDR
Bluetooth Profile A2DP, AVRCP
Bluetooth Frequency Brand..... 2.4GHz \~ 2.48 GHz
Bluetooth Range.... 10 m (33ft.)
Connections
3.5mm Aux in Yes
USB Port ...... USB x1 (5V 2A )
iPhone/iPad/Android Compatible
AC in.....Yes
Limited Warranty
Model: RRMINI 2
This Monster-branded product, marketed as new, in the original carton to the original purchaser ("Product"), is warranted by Russell Distribution Company, LLC against manufacturing defects in materials and workmanship for a limited warranty period of Ninety (90) Days for Labor and One (1) year for Parts. This Limited Warranty is conditioned upon proper use of Product by you, the Purchaser.
This Limited Warranty does not apply to store display products and product sold as a "marked down" special, in "as is" condition, "close outs", "liquidation and clearance sales", "open box", products missing accessories, or no fault found.
Proof of purchase in the form of a Bill of Sale, Receipt or Receipted Invoice is evidence the Product is within the limited warranty period. The Bill of Sale, Receipt or Receipted Invoice must be presented as a pre-condition to obtaining the limited warranty service.
This limited warranty begins on the original date of purchase and is valid only on Products purchased through authorized dealers and used in the United States, and Puerto Rico, by the original Purchaser. To receive warranty service, the Purchaser must first contact us for problem determination and service procedures. The original dated bill of sale, receipt or receipted invoice must be presented upon request as proof of purchase.
We will repair your product or if repairs cannot be made, we will replace it at no charge with the same or similar product. If the Product is defective as specified in this limited warranty during the limited warranty period, we may use new or remanufactured parts to repair the Product. All replaced parts and products become our property and must be returned to us. Replacement parts and products assume the remaining original limited warranty, or ninety (90) days, whichever is longer.
Product freight must be prepaid by you, the original Purchaser and shipped in either its original packaging or packaging affording an equal degree of protection. We will not be responsible for or obligated to replace damaged Products.
If the Product is received damaged, it is your responsibility as the consumer to file a claim against the carrier. We will only store the damaged Product for 30 days and reserve the right, in our sole discretion, to dispose of the damaged Product or ship it back to you at your expense after 30 days.
This limited warranty covers manufacturing defects in materials and workmanship encountered in normal, and except to the extent otherwise expressly provided for in this statement, noncommercial use of this Product, and shall not apply to the following, including, but not limited to: Damage which occurs in shipment; delivery and installation; applications and uses for which this Product was not intended; altered Product or serial numbers; cosmetic damage or exterior finish; accidents, abuse, neglect, fire, water, lightning or other acts of nature; use of products, equipment, systems, utilities, services, hardware, supplies, accessories, applications, installations, repairs, external wiring or connectors not supplied or authorized by us or the manufacturer, which damage this Product or result in service problems; incorrect electrical line voltage, fluctuations and surges; customer adjustments and failure to follow operating instructions, cleaning, maintenance and environmental instructions that are covered and prescribed in the instruction book; reception problems and distortion related to noise, echo, interference or other signal transmission and delivery problems; burned-in images. Uninterrupted or error-free operation of the Product is not warranted.
THERE ARE NO EXPRESS OR IMPLIED WARRANTIES OTHER THAN THOSE LISTED AND DESCRIBED ABOVE, AND NO WARRANTIES WHETHER EXPRESS OR IMPLIED, INCLUDING, BUT NOT LIMITED TO, ANY IMPLIED WARRANTIES OF MERCHANTABILITY OR FITNESS FOR A PARTICULAR PURPOSE, SHALL APPLY AFTER THE EXPRESS WARRANTY PERIODS STATED ABOVE, AND NO OTHER EXPRESS WARRANTY OR GUARANTY GIVEN BY ANY PERSON, FIRM OR CORPORATION WITH RESPECT TO THIS PRODUCT SHALL BE BINDING ON US. REPAIR OR REPLACEMENT AS PROVIDED UNDER THIS LIMITED WARRANTY IS YOUR EXCLUSIVE REMEDY ASTHE CONSUMER. WE SHALL NOT BE LIABLE FOR ANY INCIDENTAL, OR CONSEQUENTIAL DAMAGES FOR BREACH OF ANY EXPRESS OR IMPLIED WARRANTY ON THIS PRODUCT; EXCEPT TO THE EXTENT PROHIBITED BY APPLICABLE LAW, ANY IMPLIED WARRANTY OF MERCHANTABILITY OR FITNESS FOR A PARTICULAR PURPOSE ON THIS PRODUCT IS LIMITED FOR THE DURATION OF THIS LIMITED WARRANTY. THIS LIMITED WARRANTY SHALL NOT EXTEND TO ANYONE OTHER THAN THE ORIGINAL PURCHASER OF THIS PRODUCT, IS NONTRANSFERABLE AND STATES YOUR EXCLUSIVE REMEDY.
Some states do not allow limitations on how long an implied warranty lasts, or the exclusion or limitation of incidental or consequential damages, so the above limitations or exclusions may not apply to you. This limited warranty gives you specific legal rights, and you may also have other rights which vary from state to state. Any provision contained herein which is found contrary to state or local laws shall be deemed null and void and the remaining provisions shall continue in full force and effect.
To obtain warranty service:
Telephone: 800-976-0677
Ver. 130828-1
MONSTER®
Monster and the M Monster logo are registered trademarks of Monster, Inc. and its subsidiaries in the U.S. and other countries, used under license. Pure Monster Sound is a trademark of Monster, Inc. and its subsidiaries in the U.S. and other countries, used with permission.
The Bluetooth ^® word mark and logos are registered trademarks owned by Bluetooth SIG, Inc. Other trademarks and trade names are those of their respective owners.
MONSTER®
STOP
FOR QUESTIONS OR TECHNICAL SUPPORT Please call:
1-800-976-0677
Please do not return this product to the store.
TABLA DE CONTENIDOS
natural_image
Technical line drawing of a mechanical component with symmetrical cross-shaped features (no text or symbols)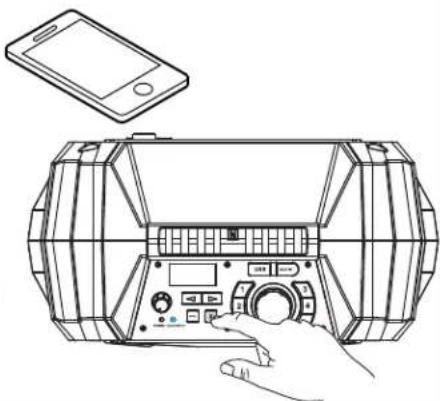
natural_image
Line drawing of a device interior with a hand operating the control panel (no text or symbols)natural_image
Line drawing of a home control panel with a smartphone on the floor (no text or symbols)FM / USB
Escucha la radio FM


natural_image
Technical line drawing of a device front panel with four mesh panels and a central display (no text or symbols)Bluetooth 10M (33 pies)
3,5 mm
The following table is a duplicate of the previous table to be corrected as follows:
[1] a1 = a2 + a3 = a4 (舍去三角形)

- TABLE OF CONTENTS
- IMPORTANT SAFETY INSTRUCTIONS
- WARNING
- CAUTION
- FCC Warning Statement
- UNPACKING
- GETTING STARTED
- Power On/Off Switch
- Charging Battery
- BLUETOOTH CONNECTION (Bluetooth Device)
- Manual Bluetooth pairing
- Pairing Using NFC
- CONNECTION USING AUX INPUT
- FM / USB Charging
- Listening to FM radio
- Store your favorite radio stations manually (upto 4)
- Select a favorite radio station
- USB Charging (5V/2A)
- AUTO STANDBY/ WAKE UP
- Auto Standby:
- "Wake up" from standby mode:
- Guitar/Mic. Input
- TROUBLESHOOTING
- General
- No power
- Keys no response
- No sound heard
- Bluetooth Operations
- Audio quality is poor
- Cannot pair to Bluetooth device
- SPECIFICATIONS
- Operating Temperature
- Key
- Bluetooth
- Connections
- Limited Warranty
- Model: RRMINI 2
- MONSTER®
- TABLA DE CONTENIDOS
- FM / USB
- Escucha la radio FM
Brand : MONSTER
Model : Rockin' Roller Mini 2
Category : Portable speaker