
WC-2039 - Sanitary appliance Salton - Free user manual and instructions
Find the device manual for free WC-2039 Salton in PDF.


| Product Type | Dual Zone Wine Cellar |
| Brand | Salton |
| Model | WC-2039 |
| Bottle Capacity | 44 bottles |
| Temperature Range | 4°C - 16°C (39°F - 61°F) per zone |
| Number of Zones | 2 (Upper and Lower) |
| Control Type | Digital touch panel with lock and standby |
| Interior Light | Yes, 2 LED lights (one per zone) |
| Defrost | Automatic |
| Installation | Freestanding or built-in |
| Power Supply | 115V ~ 60Hz, 10A |
| Weight | Approx. 35 kg (77 lbs) |
| Dimensions (H x W x D) | Approx. 33.5 x 23.5 x 25.5 in (85 x 60 x 65 cm) |
| Shelving | 5 wire racks (2 per zone + 1 double-level bottom rack) |
| Cooling System | Compressor with automatic defrost |
| Child Lock | Yes (control panel lock) |
| Standby Mode | Yes |
| Safety Features | Grounded plug, child entrapment warning |
| Care and Cleaning | Unplug and clean with baking soda solution; vacuum front vent |
| Warranty | 1 year limited |
| Customer Service | SWG Canada, service@salton.com |
Frequently Asked Questions - WC-2039 Salton
User questions about WC-2039 Salton
0 question about this device. Answer the ones you know or ask your own.
Ask a new question about this device
Download the instructions for your Sanitary appliance in PDF format for free! Find your manual WC-2039 - Salton and take your electronic device back in hand. On this page are published all the documents necessary for the use of your device. WC-2039 by Salton.
USER MANUAL WC-2039 Salton
Dual Zone Wine Cellar

natural_image
Exterior view of a modern stainless steel double-decker refrigerator with open doors and black grilles (no visible text or symbols)Instruction Booklet
Model: WC-2039
IMPORTANT SAFEGUARDS
Before the appliance is used, it must be properly positioned and installed as per the instruction in the "Installation" section. To reduce the risk of fire, electric shock or injury, follow basic precautions including the following:
- Read all instructions before using the appliance.
- Plug into a grounded 3-prong outlet, DO NOT remove grounding prong, DO NOT use an adapter, and DO NOT use an extension cord.
- DO NOT place any other household appliances on top of the unit.
- It is recommended that a separate circuit, serving only your appliance be provided. Use receptacles that cannot be turned off by a switch or pull chain.
- Never clean appliance parts with flammable fluids. DO NOT store or use gasoline or other flammable vapors and liquids in the vicinity of this or any other appliance. The fumes can create a fire hazard or explosion.
- Failure to unplug the appliance during cleaning or light bulb replacement could result in electrical shock or personal injury.
- DO NOT connect or disconnect the plug when your hands are wet.
- DO NOT operate any appliance with a damaged cord or plug or after the appliance malfunctions, or has been damaged in any manner. DO NOT repair or replace any part of the refrigerator. Return appliance to SWG Canada for examination, repair or adjustment. See "Warranty".
- To ensure proper ventilation for your appliance, the front of the unit must be completely unobstructed. Choose a well-ventilated area with temperatures above 55irc F ( 13irc C) and below 90irc F ( 32irc C).
- DO NOT use outdoors.
- The appliance should not be located next to ovens, grills or other sources of high heat.
- If you will not be using the refrigerator for an extended period, unplug it and open the door. Wipe any condensation off after the inside reaches room temperature.
- It is important for the appliance to be leveled to work properly.
- Never allow children to operate, play with or crawl inside the unit.
- DO NOT use this appliance for other than its intended use.
- CAUTION: Risk of child entrapment
Before disposing take off the doors. Leave the shelves so children may not easily climb inside. Never allow children to operate, play with or crawl inside the Wine Cellar.
SAVE THESE INSTRUCTIONS
HOUSEHOLD USE ONLY
GROUNDED PLUG
To reduce the risk of electric shock this appliance has a grounded plug. (2 blades and 1 pin) If the plug does not fit fully into the electrical outlet contact a qualified electrician. DO NOT modify the plug in any way or use an adaptor.
This appliance is not designed to be used with an inverter.
The cord should be secured behind the appliance and not left exposed or dangling to prevent accidental injury.
DO NOT use an extension cord with this appliance. If the power cord is too short, have a qualified electrician or service technician install an outlet near the appliance. Use of an extension cord can negatively affect the performance of the unit.
BEFORE FIRST USE
- Remove all interior and exterior packaging, including labels. If there is any glue residue rub a small amount of liquid dish soapy with your fingers then wipe with warm water. Dry.
NOTE: DO NOT use any sharp instruments, rubbing alcohol, flammable fluids or abrasive cleaners to remove tape or glue.
- Clean the Wine Cellar, following the instructions in the 'Care and Cleaning' section.
INSTALLATION
-
The unit is designed for built-in or free standing installation.
-
DO NOT place next to any appliance that emits large amount of heat, such as a dishwasher, microwave, oven, toaster, etc. or in direct sunlight. Direct sunlight may affect the acrylic coating and heat sources may increase electrical consumption.
-
This unit is not designed for use in a garage or any other outside installation. Extreme cold ambient temperatures, below 68irc F ( 20irc C) may also cause the appliance not to perform properly.
-
DO NOT install in a humid location.
- Place the Wine Cellar on a flat level surface that is strong enough to support it when fully loaded.
- To help with door closure, position legs with a 1/8" (3 mm) tilt to the back. Adjust the leveling legs by turning clockwise to raise and counterclockwise to lower.
- After plugging the appliance into a wall outlet, turn the unit on and allow the unit to cool down for 3 – 4 hours before filling.
Built-in Installation
-
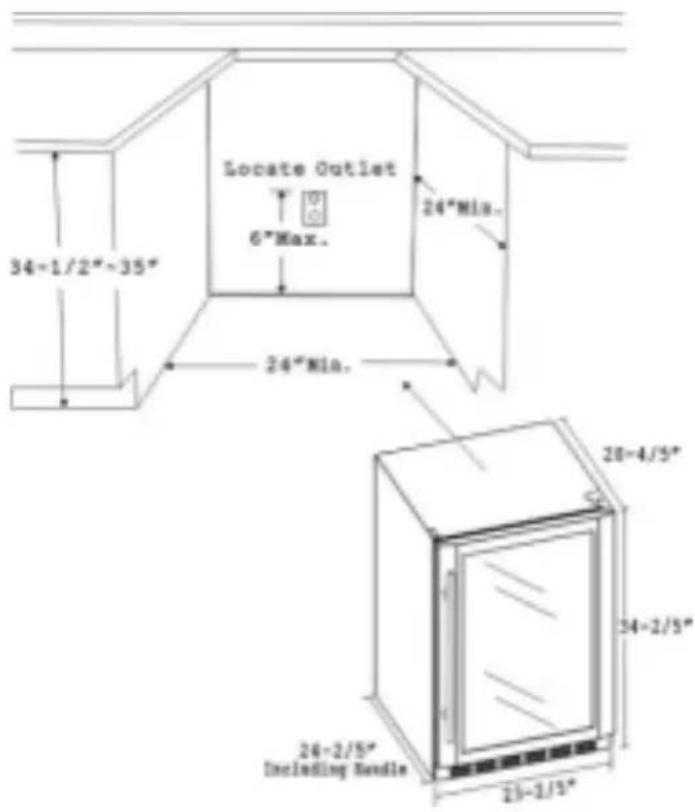
Follow the dimensions in the diagram to allow for door swing and access to the pull-out shelves when installing as a built-in appliance.
-
If installing between frameless cabinets a 1/2" (13 mm) wide filler strip or side panel may be needed on the hinged side. The filler strip will act as a spacer between the appliance and the adjacent cabinet door swing. The width of the opening must include the filter panels. NOTE: The door should protrude at least 1" (25 mm) beyond the surrounding cabinets.
DESCRIPTION OF PARTS
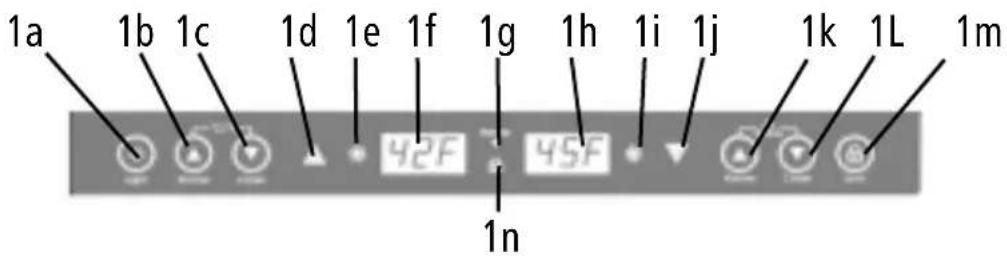
1. Control Panel
a) Interior Light On/Off Keypad
b) Raise Temperature ▲ - Upper Zone
c) Lower Temperature ▼ - Upper Zone
d) Upper Zone Indicator
e) Refrigeration Cycle Indicator - Upper Zone
f) Temperature Display – Upper Zone
g) Standby (both zones)
h) Temperature Display – Lower Zone
i) Refrigeration Cycle Indicator for Lower Zone
j) Lower Zone Indicator
k) Raise Temperature ▲ – Lower Zone
I) Lower Temperature ▼ – Lower Zone
m) Control Panel Lock (for both zones)
n) Lock Indicator – Both Zones
2. Interior light
Each zone has its own interior light, which can be switched on or off by pressing the 'Light' On/Off Keypad
3. Upper Zone Wine Racks
There are two wine shelves of full depth in the Upper Zone. Each shelf can hold up to 8 bottles with the bottle necks alternating front to back.
NOTE: The second supporting guide in the Upper Zone is not designed for the Wine Racks.

4. Lower Zone Wine Racks
There are 2 Wine Racks of full depth. Each Rack can hold up to 8 bottles with the bottle necks alternating front to back. The 2 level bottom Wine Rack holds up to 6 bottles on each level with bottle necks facing the front.
5. Front Vent
HOW TO USE
Installing the Wine Racks
- Any of the Wine Racks can be removed to accommodate larger bottles.
- To remove a Wine Rack, remove all of the bottles. Lift the Wine Rack upward and then gently pull out.
To replace a Wine Rack, slide the Wine Rack back onto the Wine Rack Supporting Guides and push back until the wine rack tabs slide into place on the Wine Rack Guides. NOTE: Ensure that the tabs are firmly in place before placing any bottles on the Wine Rack.
Locking and Unlocking the Control Panel
You can manually lock the control panel by pressing the Control Panel Lock keypad.
NOTE: If a Keypad is not pressed within 1 minute then the Control Panel will lock automatically. To unlock press the Control Panel Lock keypad for approximately 3 seconds until the Lock Indicator Light goes out.
Setting the Temperature
NOTE: The Temperature display can be changed between Celsius and Fahrenheit by pressing and holding the left side Raise and Lower Temperatures Buttons simultaneously for approximately 3 seconds.
- The temperatures in the Upper Zone and Lower Zone can be independently controlled and displayed. The temperature range in each zone is between 4irc - 16ircC ( 39irc - 61ircF ).
- The Temperature Display indicates the current internal temperature of each zone. When setting the temperature the Temperature Display will flash to indicating that the temperature setting is in progress.
- To set the temperature in the Upper Zone, press the controls on the left side. To set the temperature in the Lower zone, press the controls on the right side.
- When pressing the Raise or Lower Temperature Keypads the setting will increase or decrease in increments of 1irc . NOTE: The Temperature display will flash until no Keypad is pressed for approximately 3 seconds. Your last setting is recorded and confirmed by the display indicating the current temperature of that zone.
Standby setting
To activate Standby:
Press and hold the right side Raise and Lower Temperatures Buttons simultaneously for approximately 3 seconds. The 'Standby' indicator light will illuminate indicating the unit is now in Standby mode.
NOTE: In Standby mode the wine cellar is no longer cooling but is still with power.
To deactivate Standby:
Press and hold the right side Raise and Lower Temperature Buttons simultaneously for approximately 3 seconds. The 'Standby' light will go off and the unit will now start working normally again.
CARE AND CLEANING
Automatic Defrost
There is no need for manual defrosting of this appliance. The ice build-up on the inner back wall during compressor operation will be automatically defrosted in the compressor off cycle. When defrosting is in process, the Refrigerator Cycle Indicator for both zones will go off and both circulation fans will run. The water will drain out into the drain pan located above the compressor where it will evaporate.
Cleaning
Always unplug the unit from the wall outlet before cleaning. CAUTION: Failure to unplug the appliance could result in electrical shock or personal injury.
- Remove all contents
- Wash the Wine Racks in mild soap and water. Rinse and dry.
- Wash the inside cavity and door gasket with a warm water and baking soda solution. Mix approximately 2 tbsp. (30 ml) of baking soda with 1 quart (litre) of water. Dry.
- The outside of the Wine Cellar can be wiped with a damp cloth. Dry.
NOTE: Use caution when wiping over the Control Panel area so that water does not enter the controls. - Dust or anything blocking the front vent may affect the cooling efficiency of the appliance. Vacuum the vent if necessary.
NOTE: DO NOT use any abrasive cleaning products on the inside or outside of the Wine Cellar.
Power Failure
Most power failures are corrected within a few hours and should not affect the temperature of your appliance if you minimize the number of times the door is opened.
NOTE: If the unit is unplugged, has lost power, or is turned off; you must wait 3 to 5 minutes before restarting the unit. If you attempt to restart before this time delay, damage may occur and or the appliance may not start.
Vacations
- Short vacations: Leave the appliance operating during vacations of less than three weeks.
- Long vacations: If the appliance will not be used for several months, remove all items and unplug the power cord. Clean and dry the interior thoroughly. To prevent odor and mold growth, leave the door open slightly, blocking it open if necessary.
Moving your Wine Cellar
- Remove all contents.
- Securely tape down all loose items inside your appliance.
- Turn the leveling screw up to the base to avoid damage.
- Tape the doors shut.
- Be sure the appliance stays secure in the upright position during transportation.
- Protect the outside of appliance with a blanket, or similar item.
TROUBLESHOOTING
| PROBLEM POSSIBLE CAUSE | |
| Appliance does not operate. • Not plugged in.• The circuit breaker tripped or a fuse has blown. | |
| Inside temperature is not cold enough. | • Check the temperature control setting.• The door is opened too often.• The door is not closed completely.• The door gasket does not seal properly.• The appliance has recently been disconnected for a period of time. 4 hours are required for the appliance to cool down completely. |
| Inside temperature is too cold. • Check temperature control setting.• The room temperature is too cold. | |
| Vibrations. • Check to assure that the appliance is level.(See “Installation” section)• The appliance is touching the wall. | |
| Moisture forms on the inside appliance walls. | • Door is slightly open.• Door is kept open too long or is opened too often.• The door is not sealed properly. |
| Moisture on exterior of appliance. • Door is slightly open causing cold air from inside to meet warm moist air from outside. | |
| The door will not close properly. • The appliance is not level.(See “Installation” section)• The gasket is dirty.• The shelves are out of position. | |
| Abnormal display on the control panel. | • ‘E1’ on display for upper zone – temperature sensor error for upper zone.• ‘E2’ – temperature sensor error for lower zone.• ‘E3’ – Electric Fan error for upper zone.• ‘E4’ – Electric Fan error for lower zone.If any of the above errors occur contact Customer Service – See “Warranty”. |
Because of potential safety hazards under certain conditions, it is strongly recommended that you do not use an extension cord with this appliance. However, if you must use an extension cord it is absolutely necessary that it be a CSA-Listed, 3-wire grounding type appliance extension cord having a grounding type plug and outlet and that the electrical rating of the cord be 115 volts and at least 10 amperes.
LIMITED WARRANTY
SWG Canada warrants that this appliance shall be free from defects in material and workmanship for a period of one year from the date of purchase. During this 'in-warranty' period, defective products will be repaired or replaced at the discretion of the retailer and/or SWG Canada. This warranty covers normal domestic usage and does not cover damage which occurs in shipment or failure which results from alteration, accident, misuse, abuse, glass breakage, neglect, commercial use or improper maintenance.
A defective product should be returned to the original place of purchase within the retailer's stipulated return/exchange period*. If you are unable to have a defective product replaced under warranty by the retailer, please check our website at "www.salton.com" for the service centre nearest you. You may also contact us for assistance by mail, e-mail, fax or telephone as listed below.
To ensure prompt 'in-warranty' service securely package and return the product to us prepaid. Be sure to include the original proof of purchase and a description of the defect along with your address and postal code.
For repairs not covered by the warranty, please contact us for assistance.
salton®
SWG CANADA
Division of Salton Appliances (1985) Corp.
Customer Service Department
81A Brunswick
Dollard-des-Ormeaux
Quebec, Canada H9B 2J5
Website: www.salton.com
E-mail: service@salton.com
Fax: 514-685-8300
Tel: 514-685-3660
- Dual Zone Wine Cellar
- IMPORTANT SAFEGUARDS
- SAVE THESE INSTRUCTIONS
- HOUSEHOLD USE ONLY
- GROUNDED PLUG
- BEFORE FIRST USE
- INSTALLATION
- Built-in Installation
- DESCRIPTION OF PARTS
- Control Panel
- Interior light
- Upper Zone Wine Racks
- Lower Zone Wine Racks
- Front Vent
- HOW TO USE
- Installing the Wine Racks
- Locking and Unlocking the Control Panel
- Setting the Temperature
- Standby setting
- CARE AND CLEANING
- Automatic Defrost
- Cleaning
- Power Failure
- Vacations
- Moving your Wine Cellar
- TROUBLESHOOTING
- LIMITED WARRANTY
- salton®
- SWG CANADA
Brand : Salton
Model : WC-2039
Category : Sanitary appliance