
STR-H183W1 - Freezer Stirling - Free user manual and instructions
Find the device manual for free STR-H183W1 Stirling in PDF.


| Product Type | Upright Freezer |
| Brand | Stirling |
| Model | STR-H183W1 |
| Total Capacity | 168 L |
| Dimensions (H x W x D) | 1430 x 550 x 570 mm |
| Net Weight | 43 kg |
| Rated Voltage | 220–240 V~ |
| Rated Frequency | 50 Hz |
| Rated Current | 0.7 A |
| Climate Class | T (16 °C – 43 °C) |
| Refrigerant | R600a (isobutane), 60 g |
| Insulation Blowing Agent | Cyclopentane |
| Temperature Control | Manual dial (MIN, NORMAL, MAX) |
| Number of Drawers | 4 transparent drawers + 1 tray |
| Door Reversible | Yes (instructions in manual) |
| Defrosting | Manual (recommended when frost >3–4 mm) |
| Energy Saving Features | Keep away from heat sources, limit door openings |
| Noise Level | Normal operating sounds: compressor, refrigerant, thermostat click |
| Warranty | 3 years in-home (parts & labour), 5 years compressor |
| Safety Features | Child entrapment prevention (door removal if discarding), flammable refrigerant warning |
| Spare Parts Available | Adjustable feet, drawer, tray (contact after-sales support) |
| Electrical Connection | Dedicated earthed outlet, 220–240 V, plug must be accessible |
| Installation Requirements | Level floor, 12 cm rear clearance, 5 cm sides, avoid direct sunlight/heat |
| Compliance | AS/NZS 60335.1 and AS/NZS 60335.2.24, RCM marked |
Frequently Asked Questions - STR-H183W1 Stirling
User questions about STR-H183W1 Stirling
0 question about this device. Answer the ones you know or ask your own.
Ask a new question about this device
Download the instructions for your Freezer in PDF format for free! Find your manual STR-H183W1 - Stirling and take your electronic device back in hand. On this page are published all the documents necessary for the use of your device. STR-H183W1 by Stirling.
USER MANUAL STR-H183W1 Stirling
168 L Upright Freezer
Model Number: STR-H183W1
INSTRUCTION MANUAL
Welcome
Congratulations on choosing to buy a STIRLING ® product.
All products brought to you by STIRLING ® are manufactured to the highest standards of performance and safety and, as part of our philosophy of customer service and satisfaction, are backed by our comprehensive 3 Year In Home Warranty. We hope you will enjoy using your purchase for many years to come.
Contents
02 Welcome
04 Warranty Details
05 General Safety Instructions
08 Product Overview
09 Getting Started
11 Instructions
14 FAQs and Troubleshooting Guide
16 Other Useful Information
23 Repair and Refurbished Goods or Parts Notice


STIRLING
168 L Upright Freezer
Warranty Details
REGISTER YOUR PURCHASE AT www.aldi.com.au/en/about-aldi/product-registration/ TO KEEP UP-TO-DATE WITH IMPORTANT PRODUCT INFORMATION
The product is guaranteed to be free from defects in workmanship and parts for a period of 36 months from the date of purchase. Defects that occur within this warranty period, under normal use and care, will be repaired, replaced or refunded at our discretion. The benefits conferred by this warranty are in addition to all rights and remedies in respect of the product that the consumer has under the Competition and Consumer Act 2010 and similar state and territory laws.
Our goods come with guarantees that cannot be excluded under the Australian Consumer Law. You are entitled to a replacement or refund for a major failure and to compensation for any other reasonably foreseeable loss or damage. You are also entitled to have the goods repaired or replaced if the goods fail to be of acceptable quality and the failure does not amount to a major failure.


General Safety Instructions
READ CAREFULLY AND KEEP FOR FUTURE REFERENCE
Read this manual thoroughly before first use, even if you are familiar with this type of product. The safety precautions enclosed herein reduce the risk of fire, electric shock and injury when correctly adhered to. Keep the manual in a safe place for future reference, along with the completed warranty card, purchase receipt and carton. If applicable, pass these instructions on to the next owner of the appliance.


WARNING: Risk of fire
Pay particular attention to messages that follow this safety alert symbol or the words DANGER, WARNING or CAUTION. These words are used to alert you to a potential hazard that can seriously injure you and others. The instructions will tell you how to reduce the chance of injury and let you know what can happen if the instructions are not followed.
This symbol alerts you to take care as the appliance contains flammable materials: isobutane as refrigerant and cyclopentane as insulation blowing gas. While isobutane (R600a) is a gas with a high level of environmental compatibility, it is nevertheless flammable. Do not expose the appliance to high heat, sparks and open flames. During transport and installation, ensure that none of the components of the refrigerant circuit become damaged.
Refrigerant matters
WARNING: Do not damage the refrigerant circuit! Never use an appliance with a damaged refrigerant circuit! If the refrigerant circuit becomes damaged, avoid proximity to open fires and all types of heat and ignition sources. Thoroughly ventilate the room in which the appliance is located.
The room for installing the appliance must be at least 1 m3 per 8 g of refrigerant. The amount and type of refrigerant in the appliance can be found in the Technical Specifications on page 20 and on the appliance rating plate.
It is hazardous for anyone other than an authorised service person to service this appliance. In Queensland, the authorised service person MUST hold a Gas Work Authorisation for hydrocarbon refrigerants to carry out servicing or repairs which involve the removal of covers.
Responsible disposal
At the end of its working life, do not throw this appliance out with your household waste. Electrical and electronic products contain substances that can have a detrimental effect on the environment and human health if disposed of inappropriately. Observe any local regulations regarding the disposal of electrical consumer goods and dispose of it appropriately for recycling and recovery of the refrigerant and blowing agent. Contact your municipal authorities for advice on recycling facilities in your area.
WARNING! This refrigeration appliance contains flammable refrigerants and insulation blowing gases, which must be removed before disposal. Contact your municipal authorities for any codes or regulations concerning the disposal of such materials.
DANGER! Risk of child entrapment: When discarding this or another freezer, make sure to take off the door and leave the drawers in place so that children cannot easily climb in and get trapped inside.
General Safety Instructions (Cont.)
To reduce the risk of fire, electric shock or injury, always follow basic safety precautions and accident prevention measures when using this appliance, including the following:
Electrical safety
- Voltage: Plug the appliance in a 220–240 V, 50 Hz, properly earthed power outlet, which must be in good working order. Make sure your outlet voltage and circuit frequency correspond to the voltage stated on the appliance rating label.
- Power connection: Do not use an adaptor; do not use an extension cord. Plug the power plug directly into a power point that cannot easily be turned off accidentally, and that is easily accessible so you can switch it off when required.
- Power cord: Do not kink or damage the power supply cord.
WARNING: When positioning the appliance, ensure the supply cord is not trapped or damaged.
WARNING: Do not locate multiple portable socket-outlets or portable power supplies at the rear of the appliance.
- Damaged cord: Do not use a cord that shows cracks or abrasion damage along its length or at either end. Any damage to the cord may cause a short circuit, fire and/or electric shock. If the power cord is damaged, it must be replaced by the manufacturer or its service agent. Contact the after sales support line for advice.
- Disconnection: Never unplug the unit by pulling the cord. Always grip the plug firmly and pull straight out from the power point.
- Electrical work: If the installation of this appliance requires any electrical work, make sure it is carried out by a qualified electrician.
Usage conditions and restrictions
- Indoor domestic use only: This appliance is intended for indoor domestic use only. It is not suitable for industrial or commercial use.
- Intended purpose: Do not use this appliance for anything other than its intended purpose, and only use it as described in this manual. Do not attempt to alter or modify this appliance in any way.
- Usage restrictions: This appliance is not intended for use by persons (including children) with reduced physical, sensory or mental capabilities, or lack of experience and knowledge, unless they have been given supervision or instruction concerning the use of the appliance by a person responsible for their safety.
- Children: Supervise children to ensure they do not play with the appliance. Close supervision is necessary when any appliance is used by or near children. Never allow children to operate, play with or crawl inside the appliance.
- WARNING! Do not use any electrical appliances (such as ice cream makers) inside the food storage compartments of the appliance, unless they are approved for this purpose by the manufacturer.
General Safety Instructions (Cont.)
Cleaning and maintenance
- Disconnect: Unplug the appliance before cleaning or servicing. Failure to do so can result in electric shock, injury or death. Do not connect or disconnect the plug when your hands are wet.
- Flames: Do not let open flames or ignition sources enter the appliance.
- Flammable/explosive substances: Never clean this appliance with flammable fluids. Do not store or use volatile, flammable or explosive substances such as aerosol cans with flammable propellants in or close to this or any other appliance. The fumes can create a fire hazard or explosion.
- Solvents: Do not use solvent based cleaning agents or abrasives on the interior as these may damage or discolour the surfaces of the appliances.
- WARNING! Do not use mechanical devices or other means to accelerate the defrosting process, other than those recommended by the manufacturer. Never use a sharp or metal instrument to remove frost or clean the appliance. Use a plastic scraper, if necessary.
- Service: Do not attempt to repair, modify or replace any part of the appliance unless specifically recommended in this manual. Refer all other servicing to a qualified technician, or contact the after sales support centre for advice.
Installation (see page 10 for comprehensive installation instructions)
- Heavy: This appliance is heavy, take care when moving it. To avoid back or other injury, consider a two person lift or mechanical aid when installing it. Failure to do so can result in back or other injury.
- WARNING: Ventilation: To ensure proper ventilation, keep any ventilation openings, in the appliance enclosure or in the built-in structure, clear of obstructions. Ensure adequate air circulation around the appliance to prevent overheating.
- Level: Install the appliance level in order to ensure proper operation.
- Location: Install the appliance in an area that meets the following requirements:
— Ambient temperature: The ambient temperatures must correspond to the climate class (T) indicated on the rating plate of the appliance: 16 °C – 43 °C.
— Floor surface: The floor must be sturdy, level and strong enough to support the unit when it is fully loaded.
— Areas to avoid: Avoid areas where the appliance would be exposed to direct sunlight, sources of heat (stove, heater, radiator, etc.), extreme cold ambient temperatures or excessive moisture and high humidity (such as outdoors or exposed to wind, rain water spray or drips). Installing it in the coolest area of the room will save energy consumption and running costs.
Product Overview
Scope of delivery

Parts list
1 Temperature control
2 Freezer tray
3 Freezer drawers (4)
4 Levelling feet
5 Door
Documentation (not shown)
Instruction manual
Quick start guide
Warranty certificate
NOTE: Due to continued product improvement, images and illustrations in this manual may vary slightly from the product purchased. All images in this manual are for reference purposes only. Parts are not necessarily pictured to scale.
Getting Started
Unpacking
- Packaging materials: This product has been packaged to protect it against transportation damage. Remove all packaging materials from around and inside the appliance and keep the original packaging carton and materials in a safe place. It will help prevent any damage if the product needs to be transported in the future, and you can use it to store the appliance when it is not in use. In the event that the packaging materials are to be disposed of, please recycle them where possible.
Plastic wrapping can be a suffocation hazard for babies and young children, so ensure all packaging materials are out of their reach and disposed of safely.
- Parts: Check to ensure you have all the parts pictured opposite.
- Damage: When unpacking, check the appliance carefully for damage. If it is damaged, do not install the appliance. Contact our after sales support centre for advice on examination or return of the damaged appliance.
- Power cord: Unwind the power cord to its full length and inspect it for damage. Do not use the appliance if the appliance or its cord have been damaged or are not working properly. In case of damage, contact our after sales support centre for advice on examination, repair or return of the damaged product.
- Read the manual: Before installing your new freezer, read all safety instructions, especially the sections on installation and electrical safety on pages 6–7. Then follow the installation instructions on the next page.
- Clean: Make sure the freezer is disconnected from the power supply before cleaning the interior surfaces and all internal accessories with lukewarm water with a little baking soda added (about 2 tablespoons of baking soda to 1 litre of water) and a soft cloth. This will remove any dust from transit and storage and help remove the typical smell of a brand new product. Then dry thoroughly.
IMPORTANT: Do not use harsh or abrasive detergents or powders as these will damage the finish.
- Door opening: Your freezer has the capability of the door opening from the right or left side. If your set-up requires reversal of the door swing, follow the instructions on pages 18-19.
Getting Started (Cont.)
Installation
Space requirements
- Door opening: Place the unit so there is enough space for the door to open (Fig. 1).
- Clearances: Ensure that air can circulate freely around the back of the cabinet, which is necessary to cool the compressor and condenser. Allow at least 12 cm clear space at the back and 5 cm at the sides of the unit.
- Overhanging wall units: To ensure best performance, if the appliance is positioned below an overhanging wall unit, the minimum distance between the top of the cabinet and the wall unit must be at least 10 cm. Ideally, however, the appliance should not be positioned below overhanging wall units.

Levelling
The appliance must be installed level in order to work properly. If the unit is not level, the doors and magnetic seal alignments will not be covered properly.
- To level the unit, adjust one or both levelling feet at the base of the cabinet (Fig. 2).
Electrical connection
- WARNING! It must be possible to unplug the freezer from the mains power supply; the plug must therefore be easily accessible after installation.
- Before plugging in your new freezer, let it stand upright for at least 4 hours. This will allow the refrigerant gases to settle into the compressor and reduce the possibility of a malfunction in the cooling system.
- The appliance must be earthed. The plug of the power supply cord is equipped with a contact for this purpose. Do not under any circumstances cut or remove the third (earth) prong from the power cord. If the plug does not fit your outlet, consult a licensed electrician for advice to have the outlet changed.
- Plug the unit into a dedicated, properly installed and earthed wall outlet. Ensure that your outlet voltage and circuit frequency correspond to the voltage stated on the appliance rating label.
- Secure the freezer's supply cord behind the unit. Do not leave it exposed or dangling to prevent injury and accidental disconnection from the power supply.
- Adjust the temperature control as described on page 11.
- When first starting up, and after a period out of use, allow the unit to cool down on the MAX setting for at least 2 hours before placing food in the freezer.

Instructions
Temperature setting
The temperature control is located at the top, front of the cabinet, behind the door (Fig. 3). The MIN mark indicates the warmest setting, NORMAL is suitable for normal use, and MAX is the coldest setting.
- The first time you turn the unit on, please set the control to the MAX position. Then, after about 24 hours, adjust the temperature control to the setting that suits your needs.
- To turn the freezer off, turn the temperature control to MIN, which will stop cooling. Then unplug the unit from the power supply.

NOTE: The unit may not work at the set temperature on particularly hot days, or if the door is opened too frequently. To ensure efficient operation, do not open the door unnecessarily or for prolonged periods of time.
The freezer compartment
The freezer compartment is suitable for freezing domestic quantities of fresh food and long-term storage (up to three months) of frozen food. It is designed to operate in ambient (surrounding air) temperatures between 16 °C and 43 °C. For convenient access and organised storage, the freezer compartment is equipped with four transparent, easy to pull out drawers, and a tray in the top part for easy removal of food packages.
Freezing fresh food
- Only freeze fresh food that is suitable for freezing.
- Do not store food uncovered in the freezer. Always use good quality, freezer-proof packaging to maintain food quality. Remove air from packages of solid food and seal bags tightly before freezing.
- Ensure that food placed in the freezer is dated and labelled. This will help you keep track of storage times.
- Keeping portions small will ensure they are frozen (and subsequently defrosted) rapidly.
- Make sure that fresh, unfrozen food packages do not touch food that is already frozen, thus avoiding a temperature rise in the frozen food.
- When freezing food, do not push food together too much, leave some space for air to circulate around each item. Do not place packages directly against the back wall.
- When adding large amounts of fresh food to the freezer, keep in mind that it will take approximately 24 hours for fresh food to freeze to solid frozen state. For best results, do not add other fresh food to the freezer drawer during this time.
- Do not place hot foods or liquids which may evaporate in the freezer compartment.
Instructions (Cont.)
Storing frozen food
- When buying frozen food, only buy quantities that you can store straight away; use an insulated container for your shopping and when you get home, place the food in the freezer immediately.
- When storing pre-packed, commercially frozen food, follow the food manufacturer's instructions for storing the food in a home freezer. Do not exceed any storage times listed on the packaging.
- Once you have opened a packet of frozen food, rewrap it airtight to prevent surface evaporation which causes drying or freezer burn.
- Do not place carbonated liquids such as bottles of fizzy drink in the freezer as the container could explode under pressure and damage the freezer.
- Do not refreeze food once it has been defrosted.
- Frozen food which has thawed accidentally should either be used immediately or thrown away. Alternatively, if the food is uncooked and has not been completely defrosted, it may be cooked and then refrozen.
- CAUTION! Do not remove items from the freezer if your hands are damp or wet as this could cause skin abrasions.
Saving energy
- Locate the freezer in the coolest area of the room, away from heat-producing appliances and out of direct sunlight.
- Let hot foods cool to room temperature before placing them in the freezer. Overloading the freezer forces the compressor to run longer.
- Be sure to wrap foods properly, and wipe containers dry before placing them in the freezer. This cuts down on frost build-up inside the unit.
- Do not line the freezer storage drawers with aluminium foil, wax paper or paper towelling. Liners interfere with cold air circulation, making the freezer less efficient.
- Do not pack food packages close together as this prevents air circulating.
- Organise and label food to reduce door openings and extended searches. Remove as many items as needed at one time and close the door as soon as possible.
- Do not open the freezer door unnecessarily or for too long, especially during a power failure.
- Do not run the appliance permanently on the MAX temperature setting. The MAX setting is recommended on very hot days, or when you have added a large quantity of fresh food.
Instructions (Cont.)
Power failure
- Most power failures are corrected within a few hours and should not affect the temperature inside your freezer, if you minimise the number of times the door is opened. However, if the power is going to be off for a longer period of time, you need to take proper steps to protect your food.
- Do not refreeze frozen food without checking its condition first.
- If in doubt, discard the food. Do not refreeze food that has thawed completely.
Going away?
- Short vacation: Leave the freezer operating during vacations of less than a month.
- Long vacation: If you are not going to use the freezer for longer periods, remove all food and unplug the power cord. Clean and dry the interior thoroughly. To prevent odour and mould growth, leave the door open slightly, blocking it open, if necessary. (Restrict children's access to the room with the open freezer to avoid creating a child entrapment risk.)
Moving the freezer
- Remove all food from inside the freezer, securely tape down the drawers and tape the door shut. Turn the levelling feet up to the base to avoid damage.
- Protect the outside of the unit with a blanket or similar soft material and make sure the freezer stays secure in the upright position during transportation.
FAQs and Troubleshooting Guide
If you experience a problem with your freezer, check in the following table for solutions to help you solve the problem. If after these checks you still have a problem with your freezer, call the after sales support line for advice.
CAUTION: Before troubleshooting, disconnect the power supply. Any troubleshooting that is not mentioned in this manual may only be carried out by a qualified electrician or similarly qualified person.
| Problem Possible cause and solution | |
| Appliance does not work. | Check and ensure that the mains plug is securely plugged into the power point and power to the socket is switched on. |
| Check the fuse and replace, if it has blown or is defective, or reset a tripped circuit breaker. | |
| Ensure that there is power at the socket (plug another appliance into the outlet to check that it is working). | |
| Food freezes too much. | If the appliance runs at the MAX setting, reset the temperature control to a warmer setting temporarily. |
| Food is not frozen enough. | Reset the temperature to a colder setting. |
| Make sure the door is only opened for as long as is necessary. Do not keep it open for an extended period. | |
| If you have added a large quantity of warm food in the appliance within the last 24 hours, turn the temperature control to a colder setting temporarily. | |
| Make sure the appliance is not located near a heat source. | |
| Heavy build-up of frost on the door seal. | This is a sign that the door seal is not air-tight. Carefully warm the leaking sections of the door seal with a hair dryer (on a cool setting). At the same time shape the warmed door seal by hand in such a way that it sits correctly. |
| The door will not open. | If the door has just been opened, leave it for a few minutes to allow the air pressure to equalise before trying again. |
| The door will not close. | Ensure the freezer is properly levelled and the door gasket is clean. |
| Unusual noises. | Check and ensure that the appliance is level. If necessary, adjust the levelling feet. |
| If the appliance is touching the wall or other objects, move it slightly. | |
| Some sounds are normal during use and no cause for concern. These include whirring or pulsating noises from the compressor, faint gurgling or bubbling sounds from the refrigerant circulation and clicking noises from the temperature control cutting in and out. | |
FAQs and Troubleshooting Guide (Cont.)
| Problem Solution | |
| The external freezer surface is warm. | The exterior freezer walls can be warmer than room temperature. This is normal while the compressor works to transfer heat from inside the freezer cabinet. |
| The compressor runs continuously, or turns on and off very frequently. | Select a lower temperature setting. |
| Check that the door is closed completely and that the door gasket is clean and seals properly. | |
| Large quantities of food have recently been placed in the cabinet and/or the door is frequently opened. | |
| Check that ventilation openings are not obstructed. | |
| If the freezer was recently disconnected for some time, it will need some time before it will have cooled down to the set temperature. | |
| If the room temperature is hotter than usual, the compressor has to work harder to maintain the correct temperature. | |
| Excessive frost and ice has built up. | Ensure the door is not left open. |
| Check that nothing is preventing the door from closing. | |
| Check that the door gasket is intact and clean. | |
| Ensure the freezer is defrosted periodically. | |
| Vibrations Ensure the floor is even and the freezer is not touching a wall. | |
Other Useful Information
WARNING!
Before defrosting or cleaning the appliance, make sure it is switched off and disconnected from the power supply. Failure to do so can result in electric shock or injury.
Defrosting the freezer
- For efficient operation and minimum energy consumption, defrost the freezer compartment when the frost on the freezer walls is building up; do not let frost build up to more than 3–4 mm thickness.
- Turn the temperature control to the MIN position, unplug the freezer and remove the food, and storage tray and drawers. (Keep any frozen food temporarily in a fridge or cooler bag to keep defrosting to a minimum.)
- Keep the door open and place a tray and old towel underneath the appliance to collect the defrost water.
- After the frost or ice in the freezer has melted, discard the defrost water and clean and/or dry all interior freezer surfaces thoroughly. (See below for how to clean the interior surfaces.) Then turn the freezer temperature control to the desired setting to restart the freezer.
WARNING!
- Never use sharp or metallic tools to scrape off frost from the evaporator as you could damage it. To scrape ice off surfaces, use a plastic scraper.
- Do not use boiling water to accelerate defrosting because it may damage the plastic parts.
Cleaning the freezer
For hygienic reasons the appliance interior, including the interior accessories, should be cleaned regularly. We recommend cleaning the freezer after defrosting it, while all frozen food and drawers are already removed from the compartment.
- Make sure the freezer is unplugged from the power supply, the temperature control is set to MIN and all food and storage drawers are removed.
- Wash the inside surfaces and the interior accessories with a damp, warm cloth moistened in a water and baking soda solution. The solution should be about 2 tablespoons of baking soda to 1 litre of water. Rinse and wipe dry with a soft cloth.
- Clean the outside of the unit with a damp, well wrung out cloth, making sure the area of the controls remains dry. Keep the door gasket (seal) clean.
- Accumulation of dust at the condenser increases energy consumption. For this reason carefully clean the condenser at the back of the appliance once a year with a soft brush or a vacuum cleaner brush attachment.
• After everything is dry, place appliance back into service.
Other Useful Information (Cont.)
WARNING!
- Never clean the unit with an abrasive, acid, oil or solvent based cleaning agent, or with abrasive pads or scourers. Never use flammable fluids or sprays for cleaning as the fumes from these substances can create a fire hazard or explosion.
- Never clean the appliance with a steam cleaner. Moisture could accumulate in the electrical components, danger of electric shock! Hot vapours can lead to the damage of plastic parts.
- The appliance must be completely dry before it is placed back into service.
IMPORTANT!
- Ethereal oils and organic solvents can attack plastic parts, e.g. lemon juice or the juice form orange peel, butyric acid, or cleansers that contain acetic acid. Do not allow such substances to come into contact with the appliance parts.
Service and repair
Do not attempt to alter or modify this appliance in any way.
Do not attempt to repair or replace any part of the appliance unless it is specifically recommended in this manual. All other servicing should be referred to a qualified technician. Contact our after sales support line for advice.
Spare parts
Our after sales support centre stocks the following spare parts for the STIRLING 168 L Upright Freezer. To purchase a part, call the centre on 1300 112 534 or email us at parts@tempo.org
- Adjustable feet
- Drawer
- Tray
Other Useful Information (Cont.)
Reversing the door swing
This freezer can be opened from either side to suit your individual installation requirements. If you want to open the door from the other side, follow the instructions below and on the following pages to reverse the door swing.
Tools required: Phillips head screwdriver, flat-bladed screwdriver, hexagonal spanner Help required: We recommend you ask another person to help you during assembly.
- WARNING! Ensure the freezer is empty and disconnected from the power supply.
- Keep all parts you remove for re-installation of the door on the other side.
-
Tilt the appliance slightly towards the back and prop it up securely on something solid so that it will not slip during the door reversing process. Do not lay the unit flat as this may damage the coolant system.
-
Remove top right hinge cover (Fig. 4).
- Undo the screws. Then remove the hinge bracket (Fig. 5).
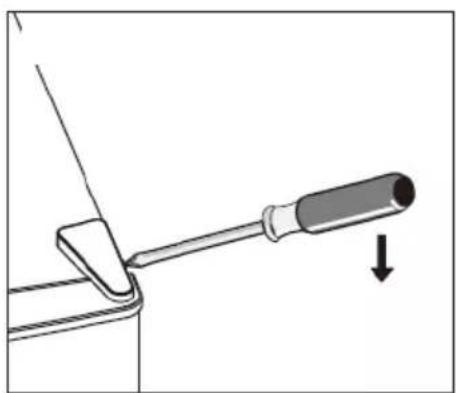

- Remove the top left screw cover (Fig. 6).
- Move the core cover from the left side to the right side (Fig. 7). And then lift the upper door and place it on a padded surface to prevent it from scratching.


Other Useful Information (Cont.)
- Unscrew and remove the bottom hinge pin, turn the bracket over and replace it (Fig. 8).

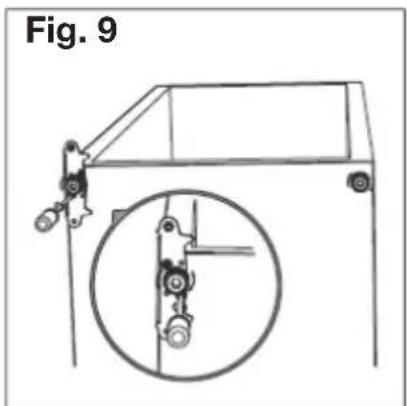
- Refit the bracket fitting the bottom hinge pin. Replace both adjustable feet (Fig. 9).
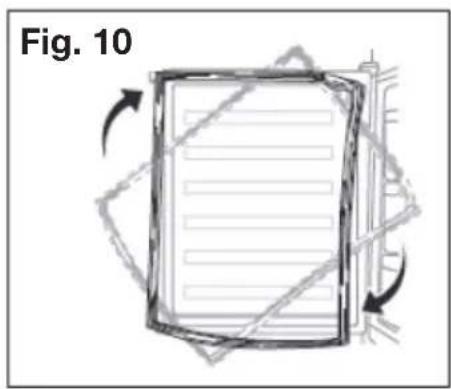
- Detach the door gaskets and then attach them after rotating (Fig. 10).
- Reattach the freezer door. Ensure the door is aligned horizontally and vertically so that the seals are closed on all sides before finally tightening the top hinge (Fig. 11). Insert the hinge bracket and screw it to the top of the unit. Use a spanner to tighten it, if necessary.
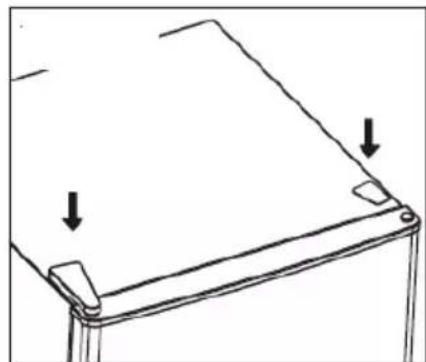
- Put the hinge cover and the screw cover back (Fig. 12).
- With the door closed, check that the door is aligned horizontally and vertically and that the seal is closed on all sides before finally tightening the bottom hinge. Re-adjust the levelling feet as needed.

Other Useful Information (Cont.)
Technical specifications
| Model STR-H183W1 | |
| Rated voltage 220–240 V~ | |
| Rated frequency 50 Hz | |
| Rated current 0.7 A | |
| Climate class T | |
| Capacity 168 L | |
| Refrigerant R600a, 60g | |
| Insulation blowing agent Cyclopentane | |
| Dimensions (approx.) 1430 (H) x | 550 (W) x 570 (D) mm |
| Net weight (approx.) 43 kg |
Compliance
This product has been fully tested and meets all requirements as set out by standards AS/NZS 60335.1 and AS/NZS 60335.2.24.
T
This marking indicates that the appliance is suitable for use in tropical climates under ambient temperatures of 18\ °C to 43\ °C .

The RCM Mark (Regulatory Compliance Mark) indicates that the product complies with the relevant guidelines of the ACMA as well as corresponding government requirements for the safety of electrical devices.
This page has been left blank intentionally.
This page has been left blank intentionally.


STIRLING
168 L Upright Freezer
Repair and Refurbished Goods or Parts Notice
Unfortunately, from time to time, faulty products are manufactured which need to be returned to the supplier for repair.
Please be aware that if your product is capable of retaining user-generated data (such as files stored on a computer hard drive, telephone numbers stored on a mobile telephone, songs stored on a portable media player, games saved on a games console or files stored on a USB memory stick) during the process of repair, some or all of your stored data may be lost. We recommend you save this data elsewhere prior to sending the product for repair.
You should also be aware that rather than repairing goods, we may replace them with refurbished goods of the same type or use refurbished parts in the repair process.
Please be assured though, refurbished parts or replacements are only used where they meet ALDI's stringent quality specifications.
If at any time you feel your repair is being handled unsatisfactorily, you may escalate your complaint. Please telephone us on 1300 112 534 or write to us at:
Tempo (Aust) Pty Ltd (ABN 70 106 100 252)
PO BOX 132, Shop 11/2–18 Forest Way, Frenchs Forest NSW 1640, Australia
Email: info@tempo.org
Tempo Help Desk: 1300 112 534 (Aust)
(Operating Hours: Mon-Sat 09:00 am to 06:00 pm AEST)


Please read the manual
It will help you get the best out of your product.
Still have questions?
Call after sales support
1300 112 534
Or visit www.tempo.org
Warranty returns
Should you for any reason need to return this product for a warranty claim, make sure to include all accessories with the product.
Product does not work?
If you encounter problems with this product, or if it fails to perform to your expectations, make sure to contact our After Sales Support Centre on 1300 112 534.
For an electronic copy of this manual, go to www.stirlingappliances.com.au and download a copy, or contact our after sales support centre.
Instruction Manual Revision Index
Version No Issue Date Description
V1.0 20 May 2021 Original release
V1.1 14 July 2021 Minor Updates on pg1
- Welcome
- Contents
- Stirling
- Warranty details
- General safety instructions
- Read carefully and keep for future reference
- Refrigerant matters
- Responsible disposal
- General safety instructions (cont.)
- Electrical safety
- Usage conditions and restrictions
- Cleaning and maintenance
- Product overview
- Parts list
- Getting started
- Unpacking
- Getting started (cont.)
- Installation
- Space requirements
- Levelling
- Electrical connection
- Instructions
- Temperature setting
- The freezer compartment
- Freezing fresh food
- Instructions (cont.)
- Storing frozen food
- Saving energy
- Power failure
- Going away
- Moving the freezer
- Faqs and troubleshooting guide
- Faqs and troubleshooting guide (cont.)
- Other useful information
- Warning
- Defrosting the freezer
- Cleaning the freezer
- Other useful information (cont.)
- Important
- Service and repair
- Spare parts
- Reversing the door swing
- Compliance
- Repair and refurbished goods or parts notice
- Please read the manual
- Still have questions
- Warranty returns
- Product does not work
- Instruction manual revision index
Brand : Stirling
Model : STR-H183W1
Category : Freezer