
HW-T12312 - Lighting HONEYWELL - Free user manual and instructions
Find the device manual for free HW-T12312 HONEYWELL in PDF.


| Product Type | Artificial Christmas Tree (Pre-lit) |
| Model Number | HW-T12312 |
| Brand | Honeywell |
| Height | 7.5 ft (228.6 cm) |
| Shape | Slim (Churchill Pine) |
| Light Source | LED (3.0V, 0.06W per lamp) |
| Number of Lighting Modes | 4 (Warm White Steady On, Multicolor Steady On, Color Changing, Off) |
| Power Supply | 120V, 60Hz |
| Power Cord | Polarized plug with foot pedal switch and control box |
| Fuse Ratings | 5A 125V (foot pedal), 3A 125V (section cords) |
| Max Connected Load | 216 Watts (1.8 Amps) total |
| Number of Sections | 3 (Top, Middle, Bottom) |
| Tree Stand | Metal base with screw |
| Assembly | Easy, no tools required; sections stack and connect |
| Intended Use | Indoor seasonal use |
| Safety Features | Overload protection (fuse), polarized plug, automatic shut-off when unplugged |
| Replacement Parts Included | 2 fuses, 8 LED lamps |
| Cleaning | Wipe with dry cloth; do not use water or solvents |
| Storage | Disassemble and store in original box in cool, dry place below 100°F (38°C) |
| Country of Origin | Cambodia |
| Customer Service | 866-205-9854 |
Frequently Asked Questions - HW-T12312 HONEYWELL
User questions about HW-T12312 HONEYWELL
0 question about this device. Answer the ones you know or ask your own.
Ask a new question about this device
Download the instructions for your Lighting in PDF format for free! Find your manual HW-T12312 - HONEYWELL and take your electronic device back in hand. On this page are published all the documents necessary for the use of your device. HW-T12312 by HONEYWELL.
USER MANUAL HW-T12312 HONEYWELL
Read and save these instruction before use
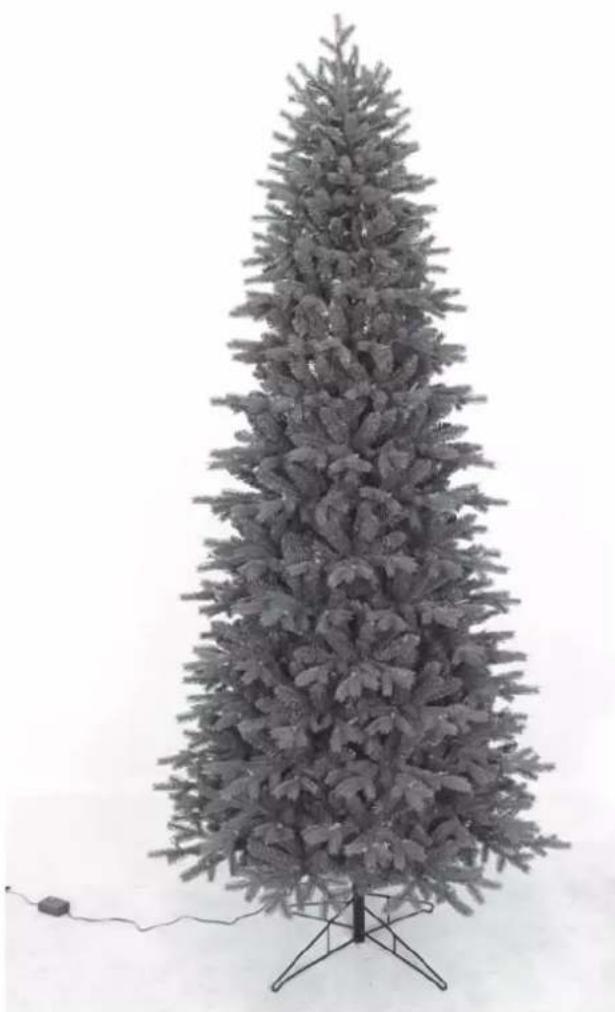
natural_image
Large conical Christmas tree with dense canopy and metal stand, no visible text or symbolsHW_T12312
CAUTION! ALWAYS UNPLUG YOUR TREE FROM ITS POWER
SOURCE BEFORE ASSEMBLING OR DISASSEMBLING.
THANK YOU
Thank you for purchasing the 7.5ft Honeywell Churchill Pine Slim Color Changing LED tree. This tree assembles in minutes and is decorated with LED light sets. This tree has 4 lighting options, Warm White Color Steady On, Multicolor Steady On, Color Changing and off. These functions can be changed by using the control box. For your convenience, it is equipped with a foot pedal switch for easy illumination.
IMPORTANT SAFETY INSTRUCTIONS
When using electrical products, basic precautions should always be followed including the following:
READ AND FOLLOW ALL SAFETY INSTRUCTIONS.
- Do not use this product outdoors.
- This seasonal use product is not intended for permanent installation or use.
- Do not mount or place near gas or electric heaters, fireplace, candles or other similar sources of heat.
- Do not secure the wiring of the product with staples or nails, or place on sharp hooks or nails.
- Do not let lamps rest on the supply cord or on any wire.
- Unplug the product when leaving the house, when retiring for the night, or if left unattended.
- This is an electric product—not a toy! To avoid risk of fire, burns, personal injury should not be played with or placed where small children and ele can reach it.
- Do not use this product for other than its intended use.
- Do not hang ornaments or other objects from cord, wire, or light string. Hang ornaments only on the tree itself.
- Do not close doors or windows on the product or extension cords as this may damage the wire insulation.
- Do not cover the product with cloth, paper or any material not part of the product when in use.
- This product employs overload protection (fuse). A blown fuse indicates an overload or short-circuit situation. If the fuse blows, unplug the product from the outlet. Also unplug any additional strings or products that may be attached to the product. Replace the fuse as per the user servicing instructions (follow product marking for proper fuse rating) and check the product. If the replacement fuse blows, a short-circuit may be present and the product should be discarded.
- This product is equipped with push-in type lamps. Do not twist lamps.
- This product has a polarized plug (one blade is wider than the other) as a feature to reduce the risk of electric shock. This plug will fit in a polarized outlet only one way. If the plug does not fit fully in the outlet, reverse the plug. If it still does not fit, contact a qualified electrician. Do not use with an extension cord unless plug can be fully inserted. Do not alter or replace the plug.
- Read and follow all instructions that are on the product or provided with the product.
SAVE THESE INSTRUCTIONS.
PACKAGE CONTENT
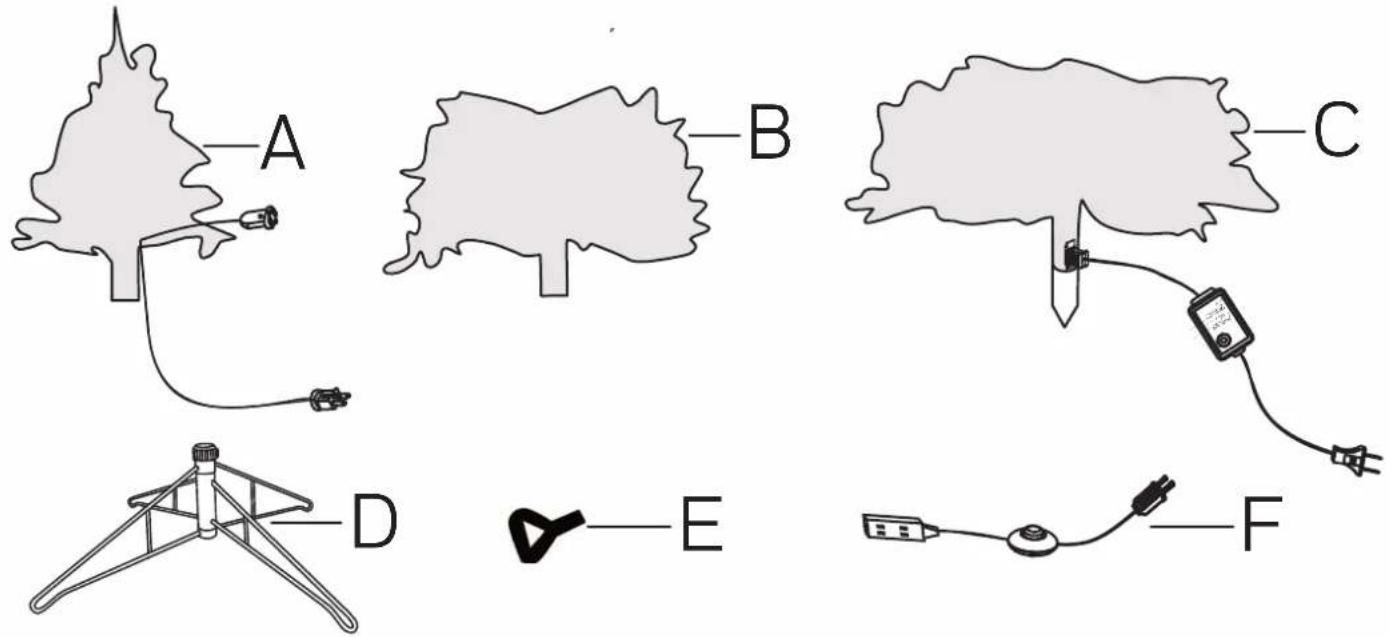
Installation kit:
A. Top Section (1 set)
B. Middle Section (1 set)
C.Bottom Section (1 set)
D. Tree Base (1 set)
E.Screw (piece)1
F. Power cord with foot pedal switch (piece)1
OTHER COMPONENTS
chemical
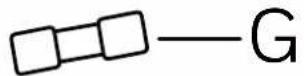
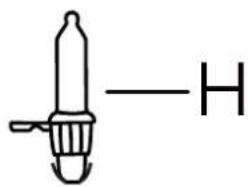
Simple chemical structure diagram showing a cylindrical object with a side arm and a horizontal line labeled 'H'G.Fuse (2 pieces)
H.Replacement lamp (8 pieces)
INSTALLATION
Note: Before you start to assemble your tree, please choose a location near an electrical wall outlet. Place the tree stand on a level surface.
Please remove protective covers from the base of the pole from each section.
- Unfold the tree base to a 90 degree angle.
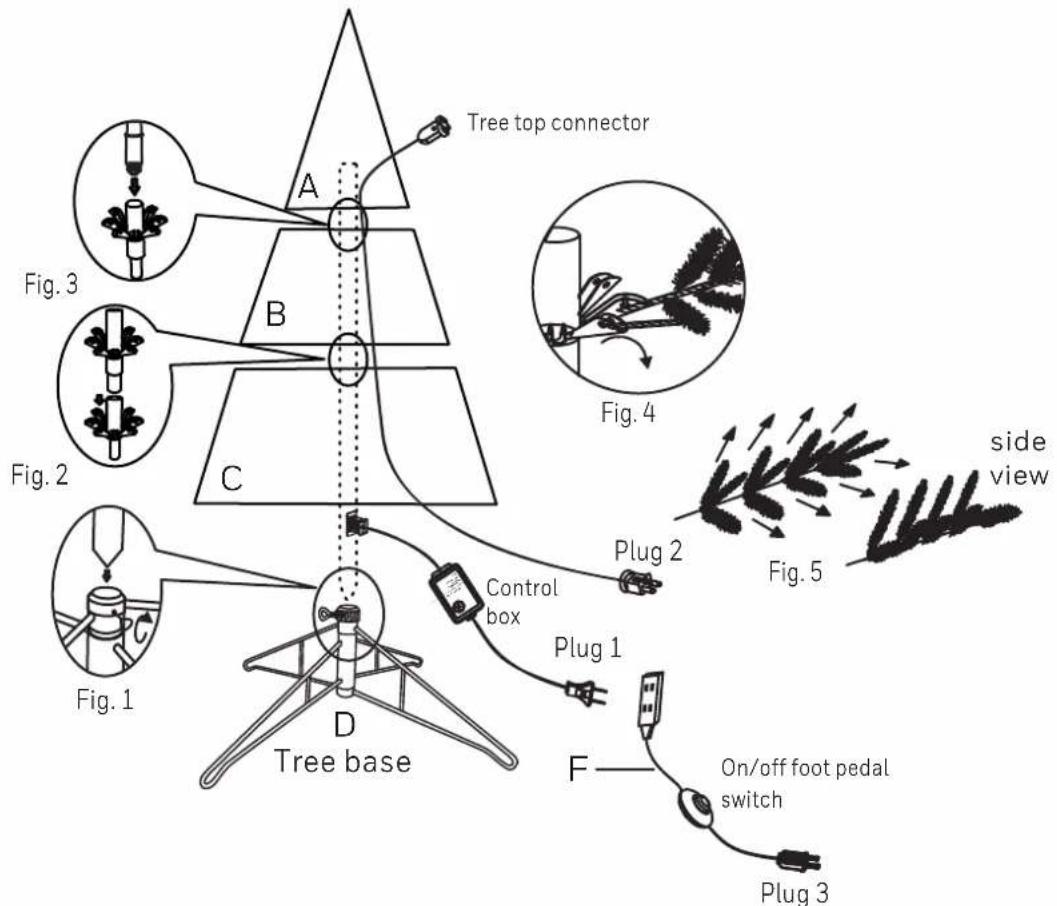
- Carefully insert bottom section (C) of tree into tree base and tighten the screw (see Fig. 1).
- Insert the middle section (B) of the tree into the bottom section (C) (see Fig. 2).
-
Insert the top section (A) into the middle section (B) (see Fig. 3).
Note: There is a tree top connector on the top section (A). -
Allow the branches to fall into place or gently pull branches up and out. When adjusting branches be sure that all wires are free of branch hinges (see Fig. 4).
-
Shape the branches. Starting with tips closest to the pole, shape one tip to the right, one to the left and one along the centre of the main stem. Repeat pattern for each branch (see Fig. 5).
-
Plug the well-connected power supply cord plug 1 from the bottom section (C) into electrical outlet. The plug 2 is for tree top lights. Plug the power supply cord plug 2 into electrical outlet.
-
Another way to light up the tree. Please note this tree comes with a power cord with on/off foot pedal switch (F) for easy illumination. Plug the plug 1 and plug 2 into the power cord with on/off foot pedal switch (F). Plug the plug 3 into the electrical outlet.
.9 Please note this tree comes with a control box for easy illumination and changing This tree is Color Changing, the 4 lighting options available are: 1) Warmfunction White Color Steady On, 2) Multicolor Steady On, 3) Color Changing and 4) Off.
EN | 4
TROUBLESHOOOTHING
If any lights do not work on your pre-lit tree, please check the following before calling customer service:
- If entire tree or a section of the tree does not light:
a) Make sure the end connector of the power cord is well connected to the bottom section (C).
b) Check that each section of the tree is well connected.
c) Check that there is power at the electrical outlet.
d) Check fuses in tree's plugs and replace if necessary (see Replace the fuse below).
- If a strand of lights still does not work:
a) Check that all lamps are tightly fitted inside the lampholders and that no lamps are broken or missing. Replace any broken or missing lamps with replacement lamps provided (see Replace the lamp below). If all lamps are firmly in the lampholders, slightly twist the lamps from side to side to ensure proper connection.
b) If the lights still do not work, carefully remove each lamp one by one out of the problem light string. Pull the lamp AND plastic base straight out of lampholder. Do not twist lamps while removing from lampholders. Check the two wires at the bottom of the lampholder. Each wire should be aligned properly on the lampholder to ensure a proper connection in the lampholder. If one wire is missing or too short, please replacement lamp (provided).replace lamp with a
- If you are still experiencing problems with the tree, please contact us at 866-205-9854.
Loose branches
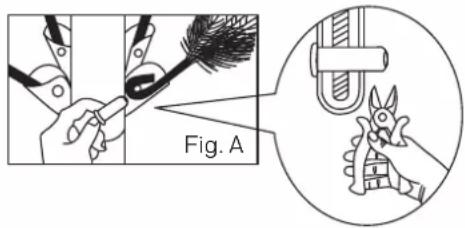
If a branch of the tree falls off, follow the steps below to reinstall it with a spare bolt.
- Place the branch into the slot of the bracket.
- Insert a spare bolt through the hole and use diagonal pliers (not included) to crimp the bolt. (See Fig. A)
CAUTION! ALWAYS UNPLUG YOUR TREE FROM ITS POWER
SOURCE BEFORE ATTEMPTING EITHER FUSE OR LAMP REPLACEMENT.
USER SERVICING INSTRUCTIONS
Replace the fuse:
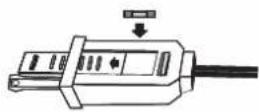
A) Replace the fuse of power cord with foot pedal switch (1 replaceable 5 A, 125 V fuse is located in the plug):
Note: This plug will fit in a polarized outlet only one way. If the plug does not fit fully in the outlet, reverse the plug.
- Grasp plug and remove from the receptacle or other outlet device. Do not unplug by pulling on cord.
- Open fuse cover. Slide open fuse access cover on top of attachment plug towards blades.
USER SERVICING INSTRUCTIONS (CONTINUED)
-
Remove fuse carefully.
-
Risk of fire. Replace fuse only with 5 Amp, 125 Volt fuse (provided with product).
-
Close fuse cover. Slide closed the fuse access cover on top of attachment plug.
-
Risk of fire. Do not replace attachment plug. Contains a safety device (fuse) that should not be removed. Discard product if the attachment plug is damaged.
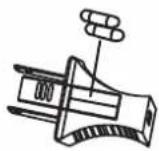
B) Replace the fuse of the power cord from the bottom section (C) and plug 2:
- Grasp plug and remove from the receptacle or other outlet device. Do not unplug by pulling on cord.
-
Open fuse cover. Slide open fuse access cover on top of attachment plug towards blades.
-
Remove fuse carefully.
-
Risk of fire. Replace fuse only with 3 Amp, 125 Volt fuse (provided with product).
-
Close fuse cover. Slide closed the fuse access cover on top of attachment plug.
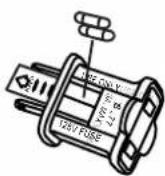
- Risk of fire. Do not replace attachment plug. Contains a safety device (fuse) that should not be removed. Discard product if the attachment plug is damaged.
Replace the lamp:
- Grasp plug and remove from the receptacle or other outlet device. Do not unplug by pulling on cord.
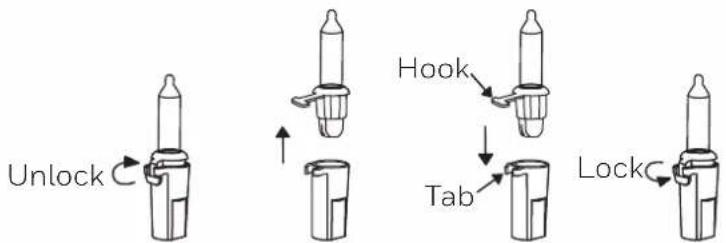
- Unlock the burned out LED lamp by lifting the hook.
- Pull lamp and plastic base straight out of lampholder.
- Replace lamp with only 3.0 Volt, 0.06 Watt, LED type lamp (provided with product). Always match the hook to the tab.
- Lock the hook of lamp base by pushing lock down into the tab.
CAUTION:
-
To reduce the risk of overheating, replace burned-out lamps promptly. Use The LED lamp has polarity. Do not3.0 Volt, 0.0 deliberately change the direction of the LED lamp in the lamp holder.
-
Risk of fire. This product does not contain lamp shunts, which allow the product to operate if one lamp burns out. Replace lamps only with the spare lamps provided with this product.
USE CONTINUED)R SERVICING INSTRUCTIONS (
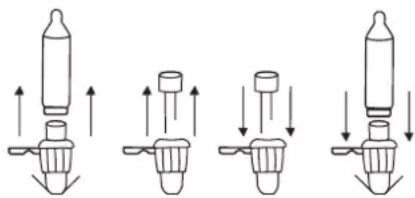
If the new lamp base does not fit in lampholder, follow the steps below before step 4:
a) Pull the reflector out.
b) Remove the base of burned out lamp by straightening lamp leads and gently pull lamp out.
c) Thread leads of new lamp through holes in old base with one lead in each hole.
d) After lamp is fully inserted into base, bend each lead up, like other lamps in the light set so that the leads will touch the contacts inside the lampholder (always match the long lead of new lamp to the hook of lamp base).
e) Insert the reflector into the base.
natural_image
Four identical line drawings of a mechanical component with arrows indicating direction (no text or symbols)CAUTION
a) To reduce the risk of electric shock, use only with the power-supply cord provided or with a cord set intended for indoor use.
b) Do not use a cracked, frayed, or damaged cord. Inspect the cord periodically.
c) Do not abuse cord - Do not carry product by the cord or yank or pull it to disconnect from the outlet.
d) Disconnect the product from the outlet when not in use.
e) Do not overload. Connect other lighting strings or tree toppers end-to-end up to a maximum of 216 watts (1.8 Amps) total. Do not interconnect low-voltage products.
USE AND CARE INSTRUCTIONS
a) Before using or reusing, inspect product carefully. Discard any products that have cut, damaged, or frayed wire insulation or cords, cracks in the lampholders or enclosures, loose connections, or exposed copper wire.
b) When storing the product, carefully remove the product from wherever it is placed to avoid any undue strain or stress on the product conductors, connections, and wires.
c) When not in use, store neatly in a cool, dry location protected from sunlight.
FCC STATEMENT
This device complies with Part 15 of the FCC Rules. Operation is subject to the following two conditions: (1) This device may not cause harmful interference, and (2) this device must accept any interference received, including interference that may cause undesired operation.
Warning: Please note that changes or modifications of this product is not expressly approved by the party responsible for compliance could void the user's authority to operate the equipment.
FCC STATEMENT CONTINUED)(
NOTE: This equipment has been tested and found to comply with the limits for a Class B digital device, pursuant to Part 15 of the FCC Rules. These limits are designed to provide reasonable protection against harmful interference in a residential installation. This equipment generates, uses and can radiate radio frequency energy and, if not installed and used in accordance with the instructions, may cause harmful interference to radio communications.
However, there is no guarantee that interference will not occur in a particular installation. If this equipment does cause harmful interference to radio or television reception, which can be determined by turning the equipment off and on, the user is encouraged to try to correct the interference by one or more of the following measures:
● Reorient or relocate the receiving antenna.
- Increase the separation between the equipment and receiver.
- Connect the equipment into an outlet on a circuit different from that to which the receiver is connected.
- Consult the dealer or an experienced radio/TV technician for help.
MODEL NO. HW_T12312
STORAGE: Disassembled tree can be stored in its original box. Store tree in a cool, dry place where the temperature does not exceed 100^ F ( 38^ C).
ONE PLUG® U.S. Patents: US8,454,186, US8,454,187, US8,936,379, US9,044,056, US 9,140,438, US 9,179,793, US9,222,656, US 9,243,788, US 10,194,764, US 10,433,604, US 10,578,289, US 10,721,981, US 11,006,687, US 11,013,355, US 11,419,374. Other Patents Pending.
See for a complete list of patents. https://www.williscorporation.com/about.html#p6
TXUSA Corporation
1919 Akron Peninsula Road, Akron, Ohio 44313
866-205-9854
Dongguan Newone Trading Co., Ltd.
1001 Room, No.273, Jinxiu Road,
Changan Town, Dongguan City,
Guangdong Prov., China
866-205-9854
customersupport_hw@willis.com.tw
Made in Cambodia
The Honeywell Trademark is used
under license from Honeywell
International Inc.
Honeywell International Inc. makes
no representations or warranties
with respect to this product.
This product is manufactured by
Dongguan Newone Trading Co., Ltd.
Honeywell
- THANK YOU
- IMPORTANT SAFETY INSTRUCTIONS
- READ AND FOLLOW ALL SAFETY INSTRUCTIONS.
- SAVE THESE INSTRUCTIONS.
- PACKAGE CONTENT
- Installation kit:
- OTHER COMPONENTS
- INSTALLATION
- TROUBLESHOOOTHING
- Loose branches
- CAUTION! ALWAYS UNPLUG YOUR TREE FROM ITS POWER
- USER SERVICING INSTRUCTIONS
- Replace the fuse:
- USER SERVICING INSTRUCTIONS (CONTINUED)
- Replace the lamp:
- CAUTION:
- USE CONTINUED)R SERVICING INSTRUCTIONS (
- CAUTION
- USE AND CARE INSTRUCTIONS
- FCC STATEMENT
- FCC STATEMENT CONTINUED)(
Brand : HONEYWELL
Model : HW-T12312
Category : Lighting