
Aspen 140 - Car radio BLAUPUNKT - Free user manual and instructions
Find the device manual for free Aspen 140 BLAUPUNKT in PDF.


| Product Type | Car Stereo / Autoradio |
| Brand | Blaupunkt |
| Model | Aspen 140 |
| Power Supply | DC 12V, Negative Ground |
| Chassis Dimensions (W x D x H) | 178 x 97 x 50 mm |
| Maximum Output Power | 4 x 40 Watts |
| Current Drain (Max) | 10 A |
| FM Frequency Range | 87.5 - 108 MHz |
| AM Frequency Range | 520 - 1710 KHz |
| FM Sensitivity (S/N=30dB) | 4 µV |
| AM Sensitivity (S/N=20dB) | 36 dBµV |
| FM Stereo Separation | > 25 dB |
| Tone Controls | Bass ±10 dB at 100 Hz, Treble ±10 dB at 10 kHz |
| Audio Inputs | AUX IN (3.5mm), USB (Music & Charging) |
| Bluetooth | Hands-free calling, A2DP audio streaming |
| Preset EQ Modes | POP, ROCK, CLASS, JAZZ, FLAT, OFF |
| Front Panel | Detachable, with LCD display |
| Clock | Manual setting, display via DISP button |
| Reset | Restores factory settings |
| Installation | Professional installation recommended; use only in 12V negative ground vehicles |
Frequently Asked Questions - Aspen 140 BLAUPUNKT
User questions about Aspen 140 BLAUPUNKT
0 question about this device. Answer the ones you know or ask your own.
Ask a new question about this device
Download the instructions for your Car radio in PDF format for free! Find your manual Aspen 140 - BLAUPUNKT and take your electronic device back in hand. On this page are published all the documents necessary for the use of your device. Aspen 140 by BLAUPUNKT.
USER MANUAL Aspen 140 BLAUPUNKT
Operating instructions
OPERATION
ATTENTIONS OF INSTALLATION
- This player should be installed by professional technician.
- please read the instruction and operation of equipment carefully before installing.
- Make sure to connect other wires before power connection.
- To avoid short circuit. Please make sure all the exposed wire are insulating.
- please fix all the wires after installation.
- please make connection to the player accordingly to this instruction manual. Wrong connection may cause damage.
- This player only fit for 12V DC device and please make sure your car belongs to this kind of cathode grounding electrical system.
- Please connect the wires rightly. Wrong connection will cause malfunction or damage the electrical system.
INSTALL THE UNIT
Insert Mounting sleeve 1 into car.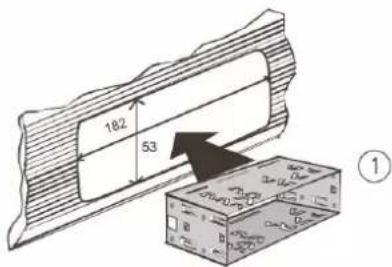 1 1 | Bend these clawsoutwif ne 2 2 |
Insert Outer trim Frame 2 to the unit 2 2 | 4 Insert the unit into themounting sleeve. |
REMOVE THE UNIT
- Detach the front panel.
- Take out the outer trim frame.

- Insert the keys supplied on the both sides of the unit until they click. Pulling the keys and makes them to remove the unit from the dashboard.
![graph LR A["Open Box"] --> B["Internal Block"] B --> C["Closed Box"]](/content/2026/05/956438/images/178b40583a4ffce0a51f02f431ee453d0d9dbd6311ef6eee93dd1bddb2888910.jpg)
WIRING CONNECTION
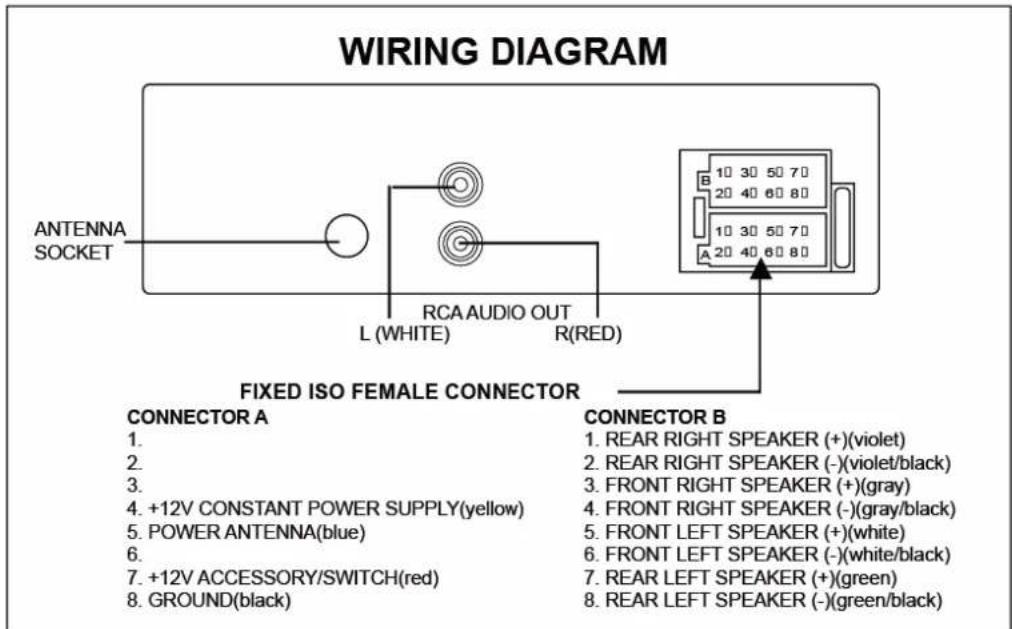
OPERATION
- This player can only be used by the 12V DC.
- Do not connect the battery terminal until the player is fully well installation.
- Please make sure to connect the yellow wire to the positive of the battery(+).
- When change the fuse. Please make sure the specifications are same.
- Using good quality speaker with 4-8 ohm can result in the best effect of the equipment.
LOCATION OF KEYS
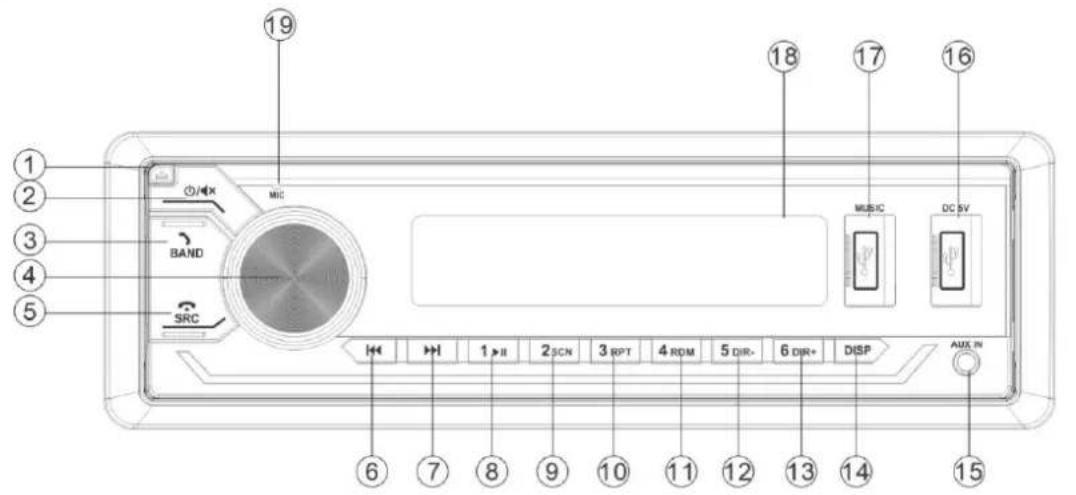
- ▲(panel release) button.
- ⏻/◄×(POWER/MUTE) button.
- BAND button.
- VOL-/+ (Volume up/down) button.
- /SRC(Source) button.
- ◀◀(SEEK DOWN) button.
- ▶▶I(SEEK UP) button.
- 1 ▶Iibutton.
- 2 SCN button.
- 3RPT button.
-
4RDM button.
-
5 DIR-button
- 6DIR+ button
- DISP (Display)button.
- Aux in Jack.
- USB (DC5V) Port for charging
- USB (MUSIC) Port for play music.
- LCD display.
- MIC.
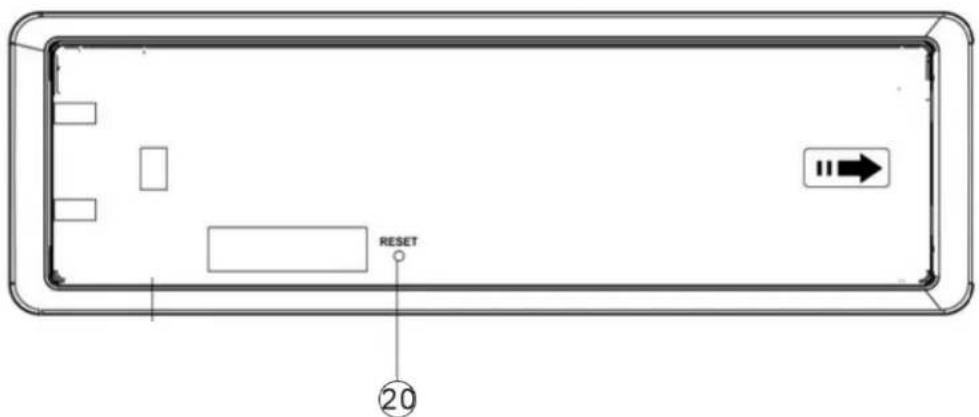
- RESET button
OPERATION
BASIC OPERATION
Turn on/off the unit and mute function
Press ⏻/◀× button to turn on the unit. When system is on. Shortly press this button for mute on/off. Press and hold this button to turn off the unit.
Audio and setting menu adjustment
BAS(Bass)->TRE(Treble)->BAL(Balance)->FAD(Fader)->LOUD->EQ->
STEREO/MONO->DX/LOC
In each item. Rotating the VOL knob to set them.
LOUD: In small volume set it on to reinforce the bass output. The sound will be better.
EQ: In EQ item, Rotate VOL knob to set the preset EQ as below:
POP->ROCK->CLASS->JAZZ->FLAT->EQ OFF
STEREO/MONO:
STEREO: Receive FM stereo signal.
MONO: Change FM stereo to monochrome. It can reduce the noise when the signal is weak.
DX/LOC (Distance/Local):
LOC: Receive the strong signal station only.
DX: Receive strong and weak signal station.
Show Clock
Shortly press DISP button to show the clock for several seconds.
Manual Clock setting
Press and hold DISP button for 2 seconds. The "HH" will be flashing. Rotating the VOL knob to adjust the hour. After that press SEL button the "MM" will be flashing. Rotate VOL knob to adjust the minute. Then press DISP button to confirm and exit.
Reset the unit
Press RESET key to restore all the data to factory settings.(Note: all memories will be lost.)
Play music via the aux in 3.5mm jack
Press SRC button to switch to AUX IN mode when inserted an audio source to the 3.5mm jack of the unit.
RADIO OPERATION
Receive a radio station
Press SRC button to select radio mode. Then press BAND button to select a band. Shortly press ▶/◀◀ button to seek the desired radio station. Press and hold ▶/◀◀ button for manual tuning the frequency.
OPERATION
Auto Store station
Press and hold BAND button for 2 seconds to auto store stations to numeric buttons 1-6 of band 1\~3.
Manually store station & recall preset station
Tuning to a station with ◀◀ or ▶▶ button. Press and hold one of the 1-6 preset button for 2 seconds. The current station is stored into the number button. Shortly press the preset button (1\~6) to directly listen to the station that saved in the corresponding preset button.
USB operation
When an USB driver inserted to the unit, the unit will play the MP3/WMA file automatically. If an USB drive is already inserted in the unit. Keep pressing SRC button shortly until the USB mode display appears.
Select file
Press ▶▶/◀◀ button to skip to next/previous file. Hold ▶▶/◀◀ button to fast forward or fast reverse.
Play/Pause
Press k▶ on to pause/play the song.
SCN function:
Press SCN button to play the first 10 seconds each file. Press SCN button again to cancel this function.
RPT function:
Press RPT button to select RPT ONE/RPTDIR/RPT ALL mode.
RPT ALL (default): Repeat all files.
RPT ONE: Repeat playing the current playing song.
RPT DIR : Repeat all files of this folder.
Random function:
Press RDM button, all files will be played randomly. Press it again to cancel this function.
Select a Directory
Press DIR+/DIR- button to select directory upward or downward.
+10/-10 file function (for MP3/WMA)
Press and hold DIR+/DIR- button for 2 seconds to skip +10/-10 file to play.
Song search:
Press and hold BAND button to select song search, begin to show "NUM0000", You can select the song by directly enter numeric buttons: 0\~9 (SRC=7, ◀◀=8, ▶▶=9, DISP=0). You also can rotate the VOL knob to select the numeric. Then press VOL to play.
CAUTION:
1) When connecting an MP3 player which has normal battery (non rechargeable battery), you should remove the battery from the MP3 player then connect it to the USB
OPERATION
interface. Otherwise, it may cause battery burst.
2) When there are important files in the USB device, do not connect it to the main unit to play. Because any wrong operation may cause files loss. And our company assumes no responsibility for this.
BLUETOOTH OPERATION
PAIRING
On mobile phone, select the Bluetooth item searching the Bluetooth device. "Aspen 140" should appear in the list, select "Aspen 140" and then input password "0000" If it needs a password. When successful paired, the BT mark will be displayed on LCD.
Answering / rejecting an incoming call
Press ↗ key to answer the coming call. Press 🔔 key to reject or hang up the call.
Call-out function
Please use your mobile phone to call-out.
Transfer the call between mobile phone and unit
During the talking mode, you can press ↗ button to transfer the phone call between the mobile phone and the unit.
Bluetooth audio (A2DP function)
Press ▶II key to pause/play the song. Press ▶▶/◀◀ button to select next/previous song.
GENERAL
| Power Supply Requirements | : DC 12V Volts, Negative Ground |
| Chassis Dimensions | : 178 (W) x 97 (D) x 50 (H) |
| Tone Controls | |
| - Bass (at 100 Hz) | : ±10 dB |
| - Treble (at 10 kHz) | : ±10 dB |
| Maximum Output Power | : 4x40 watts |
| Current Drain | : 10 Ampere (max.) |
| RADIO | FM | AM (MW) |
| Frequency Coverage: | 87.5 to 108 MHz. | 520 to 1710 KHz |
| Sensitivity: | 4mV(S/N=30dB) | 36dBuV(S/N=20dB) |
| Stereo Separation | >25dB | / |
TROUBLE SHOOTING
Before going through the checklist, check wiring connection. If any of the problems persist after checklist has been made, consult your nearest service dealer.
| Symptom | Cause | Solution |
| No power. | The car ignition switch is not on. | If the power supply is connected to the car accessory circuits, but the engine is not moving, switch the ignition key to “ACC”. |
| The fuse is blown. | Replace the fuse. | |
| No sound. | Volume is in minimum | Adjust volume to a desired level. |
| Wiring is not properly connected. | Check wiring connection. | |
| The operation keys do not work. | The built-in microcomputer is not operating properly due to noise. | Press the reset button. |
| The radio does not Work. The radio station automatic selection does not work. | The antenna cable is not connected. | Insert the antenna cable firmly. |
| The signals are too weak. | Select a station manually. |
FOR MORE LANGUAGES, PLEASE SCAN QR CODE BELOW:
PARA MÁS IDIOMAS, FAVOR ESCANEAR EL CÓDIGO QR ABAJO:
POUR PLUS DE LANGUES, VEUILLEZ SCANNER LE CODE QR CI-DESSOUS :

BP Americas Corp.
Doral, Florida 33178 USA
www.bpcarusa.com
BP Americas Paraguay S.A.
Asunción, Paraguay
info@bpamericas.com



- OPERATION
- ATTENTIONS OF INSTALLATION
- INSTALL THE UNIT
- REMOVE THE UNIT
- WIRING CONNECTION
- BASIC OPERATION
- STEREO/MONO
- SHOW CLOCK
- MANUAL CLOCK SETTING
- RESET THE UNIT
- RADIO OPERATION
- RECEIVE A RADIO STATION
- AUTO STORE STATION
- MANUALLY STORE STATION & RECALL PRESET STATION
- USB OPERATION
- SELECT FILE
- PLAY/PAUSE
- SCN FUNCTION
- RPT FUNCTION
- RANDOM FUNCTION
- SELECT A DIRECTORY
- 10/-10 FILE FUNCTION (FOR MP3/WMA)
- SONG SEARCH
- CAUTION
- BLUETOOTH OPERATION
- PAIRING
- CALL-OUT FUNCTION
- TROUBLE SHOOTING
Brand : BLAUPUNKT
Model : Aspen 140
Category : Car radio