DTE314 - Television Emerson - Free user manual and instructions
Find the device manual for free DTE314 Emerson in PDF.


| Product Type | 13-inch Color Television with Remote Control |
| Model Number | DTE314 |
| Screen Size | 13 inches (measured diagonally) |
| Power Supply | AC 120V, 60Hz |
| Antenna Input | VHF/UHF 75 ohm coaxial (rear panel) |
| Audio/Video Inputs | Composite (RCA) on front and rear panels |
| Earphone Jack | 3.5mm stereo (front panel) |
| Channel Coverage | VHF 2-13, UHF 14-69, CATV up to 125 channels |
| Closed Caption | C1, C2, T1, T2 modes |
| Parental Control | V-Chip with US Movie (G to X) and TV (TV-Y to TV-MA) ratings |
| Sleep Timer | Up to 120 minutes, adjustable in 5-minute increments |
| Picture Modes | Personal, Soft, Standard, Vivid |
| Menu Languages | English, Spanish, French |
| Remote Control | Included, uses 2x AAA batteries (not included) |
| Safety Features | Polarized AC plug, auto power off, grounding recommendations |
| Warranty | 1 year parts and labor, 2 years on picture tube |
Frequently Asked Questions - DTE314 Emerson
User questions about DTE314 Emerson
0 question about this device. Answer the ones you know or ask your own.
Ask a new question about this device
Download the instructions for your Television in PDF format for free! Find your manual DTE314 - Emerson and take your electronic device back in hand. On this page are published all the documents necessary for the use of your device. DTE314 by Emerson.
USER MANUAL DTE314 Emerson
13" Television With Remote Control
OWNER'S MANUAL
DTE314
Copyright 2005 Viacom International Inc. All Rights Reserved. Nickelodeon, Nick Jr., Dora The Explorer, Nicktronics and all related titles, logos and characters are trademarks of Viacom International Inc. Created by Stephen Hillenburg.

natural_image
Color palette bar with grayscale shades and a crosshair for selection (no text or symbols)CONTENTS
Contents ....1
Power Source....2
Important Safety Instructions.... 3
Location of Controls 8
- Front....8
- Rear 9
Remote Control....9
- Battery Installation....10
- Effective Distance of the Remote Control Transmitter....10
Cable (CATV)/Satellite Connections ....11
Outdoor Antenna Connections 12
External Audio/Video Connections....13
VCR Connections....14
Setting the Language....15
Setting the AIR/CATV Menu Option....15
Setting the Channels into Memory ....16
Adding and Deleting Channels ....17
TV Operation 18
- Mute....19
- Sleep....19
• AV IN Button ....19
- Display Button.... 19
Closed Captions ....20
On-Screen Control Adjustments (Picture)....21
- Personal Preference....21
- Blue Background.... 21
Setting Parental Control 22
• Movie Rating Set Up....23
• TV Parental Rating Set Up....24
- Changing the Password for Parental Control ....25
Troubleshooting Guide....26
Reception Disturbances 27
Limited Warranty 28
Thank you for purchasing the DORA the Explorer 13" Color TV and Remote Control from Emerson Radio Corp. Please read this manual before operating this unit to become familiar with its features and obtain the performance that will bring you continued enjoyment for many years. In the event you require technical assistance, please call the Emerson Service Department at: 1-800-695-0098.
For future reference, record the serial number in the space provided.
POWER SOURCE
Insert the AC plug (with the 2 blades) into a conveniently located AC outlet having 120V, 60Hz.
NOTE: The AC plug supplied with the unit is polarized to help minimize the possibility of electric shock. If the AC plug does not fit into a nonpolarized AC outlet, do not file or cut the wide blade. It is the user's responsibility to have an electrician replace the obsolete outlet.

IMPORTANT SAFETY INSTRUCTIONS
WARNING
• TO PREVENT FIRE OR SHOCK HAZARD. DO NOT EXPOSE THIS APPLIANCE TO RAIN OR MOISTURE.
THIS APPLIANCE SHALL NOT BE EXPOSED TO DRIPPING OR SPLASHING WATER AND THAT NO OBJECT FILLED WITH LIQUIDS SUCH AS VASES SHALL BE PLACED ON APPRATUS.

The lightning flash with arrowhead symbol, within an equilateral triangle, is intended to alert the user to the presence of uninsulated "dangerous voltage" within the product's enclosure that may be of sufficient magnitude to constitute a risk of electric shock to persons.
CAUTION
RISK OF ELECTRIC SHOCK DO NOT OPEN
Warning: To reduce the risk of electric shock, do not remove cover (or back) no user-serviceable parts inside. Refer servicing to qualified service personnel.

The exclamation point within an equilateral triangle is intended to alert the user to presence of important operating and maintenance (servicing) instructions in the literature accompanying the appliance.
- Read these instructions.
- Keep these instructions.
- Heed all warnings.
- Follow instructions.
- Do not use this apparatus near water.
- Clean only with dry cloth.
- Do not block any ventilation openings. Install in accordance with manufacturer's instructions.
- Do not install near any heat source such as radiators, heat registers, stoves, or other apparatus (including amplifiers) that produce heat.
- Do not defeat the safety purpose of the polarized or grounding-type plug. A polarized plug has two blades with one wider than the other. A grounding type plug has two blades and a third grounding prong. The wide blade or the third prong are provided for your safety. If the provided plug does not fit into your outlet, consult an electrician for replacement of the obolete outlet.
- Protect the power cord from being walked on or pinched particularly at plugs, convenience receptacles, and the point where they exit from the apparatus.
- Only use attachments/accessories specified by the manufacturer.
- Use only with a cart, stand, tripod, bracket, or table specified by the manufacturer, or sold with the apparatus. When a cart is used, use caution when moving the cart/apparatus combination to avoid injury from tip-over.

-
Unplug this apparatus during lightning storms or when unused for long periods of time.
-
Refer all servicing to qualified service personnel. Servicing is required when the apparatus has been damaged in any way, such as if the power-supply cord or plug is damaged, liquid has been spilled or objects have fallen into the apparatus, the apparatus has been exposed to rain or moisture, does not operate normally, or has been dropped.
IMPORTANT SAFETY INSTRUCTIONS
15. Retain Instructions
The safety and operating instructions should be retained for future reference.
16. Water and Moisture
Do not use this product near water-for example, near a bath tub, wash bowl, kitchen sink, or laundry tub, in a wet basement, or near a swimming pool and the like.
17. Power Sources
The product should be operated only from the type of power source indicated on the marking label. If you are not sure of the type of power supply to your home, consult your product dealer or local power company. For products intended to operate from battery power, or other sources, refer to the operating instructions.
18. Grounding or Polarization
This product may be equipped with a polarized alternating-current line plug (a plug having one blade wider than the other). This plug will fit into the power outlet only one way. This is a safety feature. If you are unable to insert the plug fully into the outlet, try reversing the plug. If the plug should still fail to fit, contact your electrician to replace your obsolete outlet. Do not defeat the safety purpose of the polarized plug. Alternative Warnings -This product is equipped with a three-wire grounding-type plug, a plug having a third (grounding) pin. This plug will only fit into a grounding-type power outlet. This is a safety feature. If you are unable to insert the plug into the outlet, contact your electrician to replace your obsolete outlet. Do not defeat the safety purpose of the grounding-type plug.
19. Outdoor Antenna Grounding
If an outside antenna or cable system is connected to the product, be sure the antenna or cable system is grounded so as to provide some protection against voltage surges and built-up static charges. Article 810 of the National Electrical Code, ANSI/NFPA 70, provides information with regard to proper grounding of the mast and supporting structure, grounding of the lead-in wire to antenna discharge unit, size of grounding conductors, location of antennadischarge unit, connection to grounding electrodes, and requirements for the grounding electrode. See fig. A on page 6.
20. Lightning
For added protection for this product during a lightning storm, or when it is left unattended and unused for long periods of time, unplug it from the wall outlet and disconnect the antenna or cable system. This will prevent damage to the product due to lightning and powerline surges.
21. Power Lines
An outside antenna system should be located in the vicinity of overhead power lines or other electric light or power circuits, or where it can fall into such power lines or circuits. When installing an outside antenna system, extreme care should be taken to keep from touching such power lines or circuits as contact with them might be fatal.
22. Overloading
Do not overload wall outlets, extension cords, or integral convenience receptacles as this can result in a risk of fire or electric shock.

natural_image
Color palette bar with grayscale shades and a crosshair for selection (no text or symbols)IMPORTANT SAFETY INSTRUCTIONS
23. Object and Liquid Entry
Never insert objects of any kind into this product through openings as they may touch dangerous voltage points or short-out parts that could result in a fire or electric shock. Never spill liquid of any kind on the product.
Do not attempt to service the product yourself as opening or removing covers may expose you
24. Damage Requiring Service
Unplug this product from the wall outlet and refer servicing to qualified service personnel under the following conditions:
a. When the power-supply cord or the plug is damaged,
b. If liquid has been spilled, or objects have fallen into the product,
c. If the product has been exposed to rain or water,
d. If the product does not operate normally by following the operating instructions. Adjust only those controls that are covered by the operating instructions as an improper adjustment of other controls may result in damage and will often require extensive work by a qualified technician to restore the product to its normal operation,
e. If the product has been dropped, or damaged in any way,
f. When the product exhibits a distinct change in performance, this indicates a need for service.
25. Replacement Parts
When replacement parts are required, be sure the service technician has used replacement parts specified by the manufacturer or have the same characteristics as the original part. Unauthorized substitutions may result in fire, electric shock, or other hazards.
26. Safety Check
Upon completion of any service or repairs to this product, ask the service technician to perform safety checks to determine that the product is in proper operating condition.
27. Wall or Ceiling Mounting
The product should be mounted to a wall or ceiling only as recommended by the manufacturer.
28. Heat
The product should be situated away from heat sources such as radiators, heat registers, stoves, or other products (including amplifiers) that produce heat.
29. Nonuse Period
If the unit is to be left unused for a long period of time, unplug the power cord.
30. Note To CATV System Installer
This reminder is provided to call the CATV system installer's attention to Article 820-40 of the NEC that provides guidelines for proper grounding and, in particular, specifies that the cable ground shall be connected to the grounding system of the building, as close to the point of cable entry as practical.

natural_image
Color palette bar with grayscale gradient and a crosshair symbol (no text or labels)IMPORTANT SAFETY INSTRUCTIONS
FIGURE A
EXAMPLE OF ANTENNA
GROUNDING ACCORDING TO
NATIONAL ELECTRICAL CODE
INSTRUCTIONS

a. Use No.10 AWG (5.3mm2) copper, No.8 AWG (8.4mm2) aluminum, No.17 AWG (1.0mm2) copper-clad steel or bronze wire, or larger, as a ground wire.
b. Secure antenna lead-in and ground wires to house with stand-off insulators spaced from 4 - 6 feet (1.22-1.83m) apart.
c. Mount antenna discharge unit as close as possible to where lead-in enters house.
d. Use jumper wire not smaller than No.6 AWG (13.3mm2) copper, or the equivalent, when a separate antenna grounding electrode is used.

natural_image
Color palette bar with grayscale shades and a crosshair for selection (no text or symbols)IMPORTANT SAFETY INSTRUCTIONS
ON PLACEMENT
* Do not use the unit in places which are extremely hot, cold, dusty or humid.
* Place the unit on a flat and even surface.
* Do not restrict the air-flow of the unit by placing it in a location with poor ventilation, by covering it with a cloth or by placing it on a carpet.
ON CONDENSATION
* When left in a heated room where it is warm and damp, water droplets or condensation may form inside the unit.
* When there is condensation inside the unit, the unit may not function normally.
* Let it stand for 1 to 2 hours before turning the power on, or gradually heat the room up and dry the unit before use.
CAUTION:
Remove AC plug from wall outlet and batteries from battery compartment of the remote control when the unit will not be used for a prolonged period.
HIGH VOLTAGE:
Live parts are accessible when the rear cover is removed.
Please read IMPORTANT SAFETY INSTRUCTIONS
NOTES:
• Periodically inspect for damage, if damaged properly repair the TV before use.
• Adult supervision recommended.
FRONT

1 POWER Button-Use this button to turn your TV on or off.
2 Remote Control Sensor-This receiver receives a signal from your remote control. Do not block it.
3 MENU Button-Use this button to turn the TV's menu system on and off.
4 CHANNEL UP↑)/DOWN (↓) Buttons-Use these buttons to change channels on your TV, or to select items in the menu system.
5 VOLUME UP (→)/DOWN (←) Buttons-Use these buttons to change your TV's volume, to activate selections in the menu system, or to change audio and video settings.
6 VIDEO IN Jack-Use this jack to receive a video signal from another A/V component.
7 AUDIO IN Jack-Use this jack to receive an audio signal from another A/V component.
8 EARPHONE Jack-Connect an optional Earphone/Headphone (not included) to this jack for private listening.
9 Speaker
LOCATION OF CONTROLS (CONTINUED)
REAR

1 VHF/UHF IN Jack-Connect a VHF/UHF antenna, CATV, VCR, satellite, etc. cable to this jack. AV button must be set to TV/CATV.
2 VIDEO IN Jack-Use this jack to receive a video signal from another A/V component.
3 AUDIO IN Jack-Use this jack to receive an audio signal from another A/V component.
REMOTE CONTROL

- SLEEP Button
- PP (Personal Preference) Button
- CHANNEL UP ( ↑)/DOWN ( ↓) Buttons
- VOLUME DOWN ( ←) Button
- DISPLAY Button
- Direct Channel Selection Buttons (0-9)
- AV IN Button
- POWER Button
- VOLUME UP ( → ) Button
- MENU Button
- MUTE Button
-
-
- Button (For Channels 10-125)
-
REMOTE CONTROL (CONTINUED)
BATTERY INSTALLATION
1

natural_image
Pure mechanical assembly diagram showing a sliding mechanism with no text or symbolsLoosen the screw to open the battery compartment cover.
natural_image
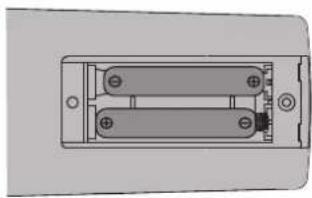
Diagram of a dual-chamber battery pack with two terminals and mounting holes (no text or symbols)Install two (2) "AAA" batteries, paying attention to the polarity diagram in the battery compartment.

natural_image
Pure mechanical assembly diagram showing a clamping mechanism with no text or symbolsScrew the battery compartment cover on the battery compartment.
BATTERY PRECAUTIONS
Follow these precautions when using batteries in this device:
- Use only the size and type of batteries specified.
- Be sure to follow the correct polarity when installing the batteries as indicated in the battery compartment. Reversed batteries may cause damage to the device.
- Do not mix different types of batteries together (e.g. Alkaline and Carbon-zinc) or old batteries with fresh ones.
- If the device is not to be used for a long period of time, remove the batteries to prevent damage or injury from possible battery leakage.
- Do not try to recharge batteries not intended to be recharged; they can overheat and rupture. (Follow battery manufacturer's directions.)
EFFECTIVE DISTANCE OF THE REMOTE CONTROL TRANSMITTER

NOTES:
- When there is an obstacle between the TV and the transmitter, the transmitter may not operate.
- When direct sunlight, incandescent lamp, fluorescent lamp or any other strong light shines on the REMOTE SENSOR of the TV, the remote operation may be unstable.
CABLE (CATV)/SATELLITE CONNECTIONS
This TV has an extended tuning range and can tune most cable channels without using a Cable TV converter box. Some Cable TV companies offer “premium pay channels” in which the signal is scrambled. Descrambling these signals for normal viewing requires the use of a descrambler device which is generally provided by the cable company.
FOR SUBSCRIBERS TO BASIC CABLE TV SERVICE
For basic cable TV service not requiring a converter/descrambler box, connect the CATV 75 ohm coaxial cable to the VHF/UHF jack on the rear of the TV.

natural_image
Diagram showing a connector with threaded body and cable, no text or symbols presentFOR SUBSCRIBERS TO SCRAMBLED CABLE TV SERVICE OR SATELLITE
If you subscribe to a satellite service or a cable TV service which requires the use of a converter/descrambler box, connect the incoming 75 ohm coaxial cable to the converter/descrambler or satellite box. Using another 75 ohm cable, connect the output of the converter/descrambler or satellite box to the antenna jack on the TV. Follow the connections shown below. Set the TV/VCR to the output channel of the converter/descrambler or satellite box (usually 3 or 4) and use the converter/descrambler or satellite box to select channels.

FOR SUBSCRIBERS TO UNSCRAMBLED BASIC CABLE TV SERVICE WITH SCRAMBLED PREMIUM CHANNELS
If you subscribe to a satellite service or a cable TV service in which basic channels are unscrambled and premium channels require the use of a converter/descrambler box, you may wish to use a signal splitter and an A/B switch box (available from the cable company or an electronic supply store). Follow the connections shown below. With the switch in the "B" position, you can directly tune any nonscrambled channels on your TV. With the switch in the "A" position, tune your TV to the output of the converter/descrambler box (usually channel 3 or 4) and use the converter/descrambler box to tune scrambled channels.

flowchart
graph LR
    A["INCOMING 75 OHM CATV CABLE"] --> B["SPLITTER"]
    B --> C["CONVERTER/DESCRAMBLER"]
    C --> D["A/B SWITCH"]
    D --> E["75 OHM CABLE"]
FAQS:
I connected my cable, why can't I get channels above 69?
Make sure AIR/CATV option is set to CATV, see page 15. Also, make sure your cable company broadcasts channels in the range you are searching.
Are the cables included?
No, the cables are sold separately; visit your local electronics store.
INDOOR ANTENNA CONNECTION
Connecting the Rod Antenna (not included)
Insert the Rod Antenna on top of the rear cabinet and connect other end to the antenna jack as shown below.

natural_image
Technical line drawing of a vehicle front panel with sensors and a power outlet (no text or symbols)ROD ANTENNA IS NOT SUPPLIED.
OUTDOOR ANTENNA CONNECTIONS
OUTDOOR VHF/UHF ANTENNA CONNECTION (ANTENNA NOT SUPPLIED)
Follow the instructions for the type of antenna system you intend to use. If using Cable or Satellite, see page 11.
Combination VHF/UHF
Antenna (Single 75 ohm cable or 300 ohm twin-lead wire)

Connect the 75 ohm cable from combination VHF/UHF antenna to the antenna jack.
OR
If your combination antenna has a 300 ohm twin-lead wire, use a 300-75 ohm matching transformer (NOT SUPPLIED).
Combination VHF/UHF Antenna (Separate VHF and UHF 300 ohm twin-leads)
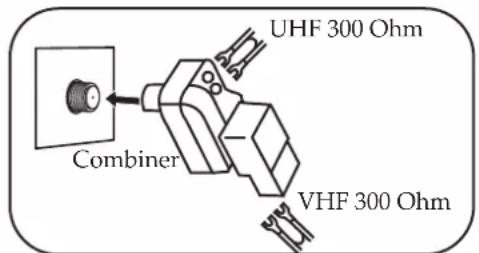
Connect the UHF twin-lead wire to a combiner (NOT SUPPLIED). Connect the VHF twin-lead to a 300-75 ohm matching transformer (NOT SUPPLIED). Attach the transformer to the combiner. Attach the combiner to the antenna jack.
Separate VHF/UHF Antennas

Connect the 75 ohm cable from the VHF antenna and the UHF antenna twin-lead wire to a combiner (NOT SUPPLIED). Attach the combiner to the antenna jack.
NOTE: If your VHF antenna has a twin-lead wire use a 300-75 ohm matching transformer, then connect the transformer to the combiner.
EXTERNAL AUDIO/VIDEO CONNECTIONS
When you watch a program recorded on another source (VCR, video camera, DVD, etc.), you can use the Audio/Video input jacks on the front of the TV.
Connect the Audio/Video output jacks of the external unit to the Audio Input jack and the Video Input jack of the TV.
To access the unit connected to these jacks, press the AV IN button so AV appears on the screen. To resume normal TV viewing, simply press the AV IN button again.

AUDIO/VIDEO Cord (Not Supplied)
FAQ:
How do I watch the external unit connected to the Audio/Video Input jacks?
Press the AV IN button so AV appears on the screen, then start the external source.
VCR CONNECTIONS
Follow the instructions below to connect a VCR to your television using a 75 ohm coaxial cable (CABLES NOT INCLUDED).
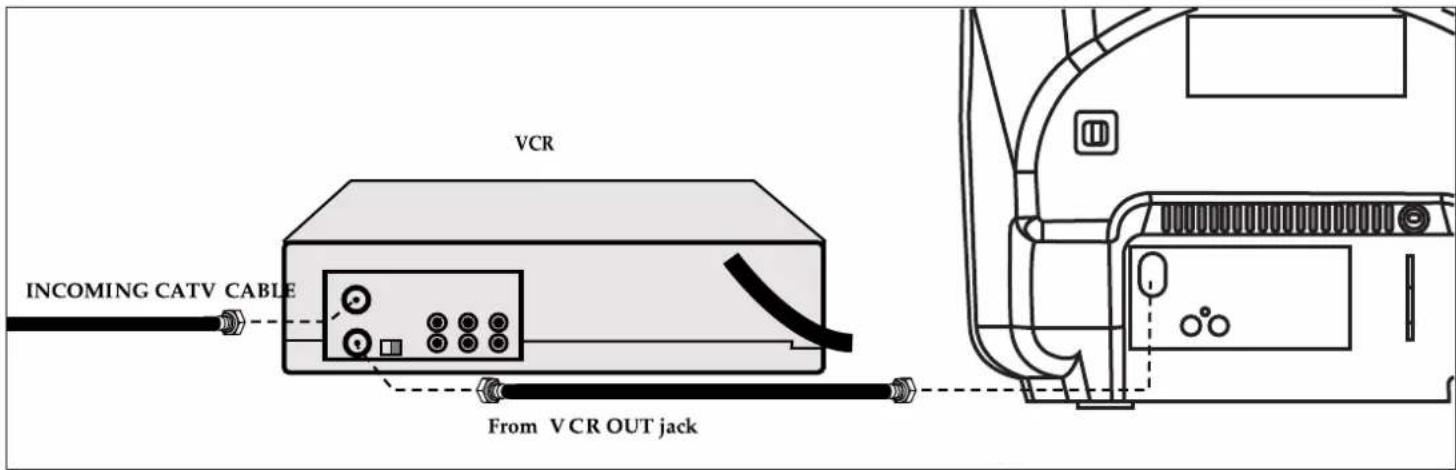
- Connect the cable, satellite or incoming antenna to the VHF/UHF IN jack on the rear of the VCR.
- Connect a 75 ohm coaxial cable from the VCR's 75 ohm OUT jack to the ANT jack on the rear of the TV.
- Press the AV IN button until regular TV or CATV appears on the TV screen and press PLAY on the VCR to watch a tape.
Follow the instructions below to connect a VCR to your television using Audio/Video cables (CABLES NOT INCLUDED).

- Connect the cable, satellite or incoming antenna to the VHF/UHF IN jack on the rear of the VCR.
- Connect the audio cable from the VCR's Audio OUT jack to the TV's Audio IN jack. Connect the video cable from the VCR's Video OUT jack to the TV's Video IN jack.
- Press the AV IN button until AV appears on the TV screen and press PLAY on the VCR to watch a tape.
NOTE:
Above are basic connection instructions; for detailed connection instructions for external units, refer to the external unit's owner's manual.
SETTING THE LANGUAGE
This TV can show the On-Screen display in English, Spanish or French.
1
PRESET
LANGUAGE ENGLISH
CHANNEL 2
SKIP OFF
RECEPTION AIR
MEMORIZE CHANNEL
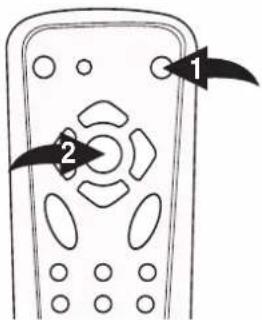
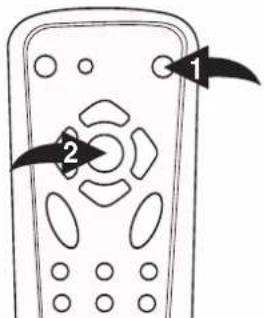
Press the Power button ① to turn on the TV. Press the MENU button ② twice, screen will appear.
3

PRESET
▶LANGUAGE ENGLISH
CHANNEL 2
SKIP OFF
RECEPTION AIR
MEMORIZE CHANNELS
Press the VOLUME UP (→) ①/DOWN (←) ② buttons to select the desired language (English, French or Spanish).
2

PRESET
▶LANGUAGE ENGLISH
CHANNEL 2
SKIP OFF
RECEPTION AIR
MEMORIZE CHANNEL
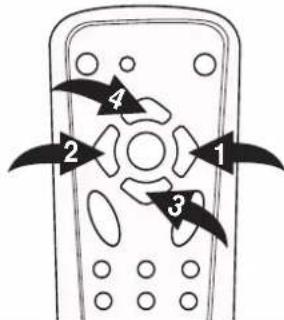
Press the CHANNEL UP (↑) ④ /DOWN (↓) ③ buttons to select LANGUAGE.
4

natural_image
Line drawing of a remote control with a black arrow pointing to the button (no text or symbols)Press the MENU button twice or wait 20 seconds to exit the menu.
FAQ:
Will selecting a language change the audio, or only the on-screen menus?
Selecting a language will only change the on-screen menus.
SETTING THE AIR/CATV MENU OPTION
1

PRESET
LANGUAGE ENGLISH CHANNEL 2 SKIP OFF RECEPTION AIR MEMORIZE CHANNEL
Press the Menu buttons twice, Access the Menu screen as described in step 1 above. Press the CHANNEL UP (↑) ⚠ /DOWN (↓) ⚡ buttons to select RECEPTION.
2
OPTIONS
AIR: If using a VHF/UHF antenna.
CATV: If using Cable TV.
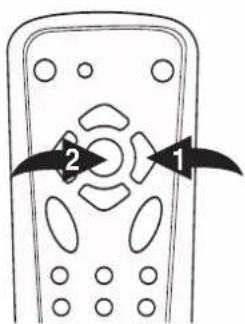
Press the VOLUME UP (→) button ① to set AIR or CATV. Press the MENU button ② twice to exit the menu.
TV / CATV MODE SELECTION
When shipped from the factory, the TV / CATV menu option is set to the "CATV" ( Cable Television) mode. If not using CATV, set this menu option to the "Air" position.
SETTING THE CHANNELS INTO MEMORY
This TV is equipped with a channel memory feature which allows channels to skip up or down to the next channels set into memory, skipping over unwanted channels. Before selecting channels, they must be programmed into the TV's memory. In addition to normal VHF/UHF channels, this TV can receive up to 113 Cable TV channels.
1

PRESET
LANGUAGE ENGLISH
CHANNEL 2
SKIP OFF
RECEPTION AIR
MEMORIZE CHANNELS
Press the Power button ① to turn on the TV. Set the AIR/CATV menu option to AIR or CATV (see page 15). The antenna, cable, etc. must be connected before memorizing channels. Press the MENU button ② twice. the PRESET MENU screen will appear.
2

PRESET
LANGUAGE ENGLISH
CHANNEL 2
SKIP OFF
RECEPTION AIR ▶MEMORIZE CHANNELS
Press the CHANNEL UP (↑) ④/DOWN (↓) ③ buttons to select MEMORIZE CHANNELS.
3

natural_image
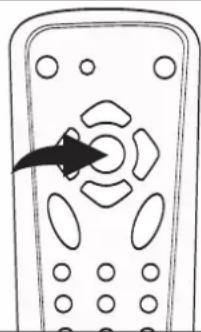
Line drawing of a remote control with an arrow pointing to the left side (no text or symbols)Press the VOLUME UP (→) button to confirm. The TV will automatically cycle through all the channels and store active channels into memory.
4
natural_image
Line drawing of a remote control with an arrow pointing to the button (no text or symbols)Press the MENU button twice or wait 20 seconds to exit the menu.
FAQs:
How many channels will I actually receive?
The actual number of channels that can be received depends on how many channels your cable company, or local area, provides. Contact your company to determine the number of channels in your area.
Do channels need to be set into memory before using the CHANNEL UP (↑)/DOWN (↓) buttons?
Yes, the channels must be programmed into memory.
Can I stop memorizing the channels?
Yes, simply press the MENU button.
ADDING AND DELETING CHANNELS
After setting channels into memory, you can add or delete channels as follows:
1

PRESET
LANGUAGE ENGLISH
CHANNEL
SKIP OFF
RECEPTION AIR
MEMORIZE CHANNELS
Press the Power button ① to turn on the TV. Press the MENU button ② twice; the PRESET MENU screen will appear.
2

PRESET
LANGUAGE ENGLISH
▶CHANNEL 2
SKIP OFF
RECEPTION AIR
MEMORIZE CHANNELS
Press the CHANNEL UP (↑) ①/DOWN (↓) ② buttons to select CHANNEL. Press the VOLUME UP (→)③/DOWN (←) ④ buttons to select a channel.
4

PRESET
LANGUAGE ENGLISH
CHANNEL 2
SKIP OFF
RECEPTION AIR
MEMORIZE CHANNELS
When a channel is selected, press the VOLUME UP (→) ①/DOWN (←) ② buttons to skip (ON will appear) or not to skip (OFF will appear). Repeat steps 3 to 5 to add or delete more channels. Press the MENU button ③ to exit.
3
PRESET
LANGUAGE ENGLISH
CHANNEL 2
→SKIP OFF
RECEPTION AIR
MEMORIZE CHANNELS
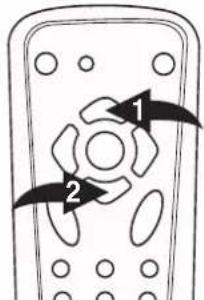
Press the CHANNEL UP (↑) ①/DOWN (↓) ② buttons to select SKIP.
OFF will appear if the channel is not skipped.
ON will appear if the channel is being skipped.
5
natural_image
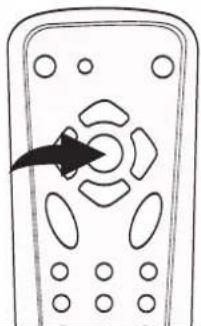
Line drawing of a remote control with an arrow pointing to the center (no text or symbols)Press the MENU button twice or wait 20 seconds to exit the menu.
TV OPERATION
1
natural_image
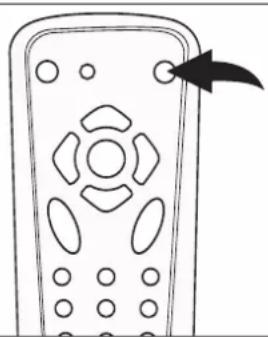
Line drawing of a remote control with an arrow pointing to the button (no text or symbols)Press the Power button to turn on the TV.
2
PRESET
LANGUAGE ENGLISH
CHANNEL 2 SKIP OFF
*RECEPTION AIR MEMORIZE CHANNELS
OPTIONS
AIR: If using a VHF/UHF antenna.
CATV: If using Cable TV.
3

Adjust the volume level by pressing the VOLUME UP (→)①/DOWN (←) ② buttons.
NOTES:
- When AIR/CATV option is set to AIR, only channels up to 69 can be selected. When set to CATV, channels up to 125 can be selected.
- If an invalid channel is selected, the display will revert to the original channel.
4
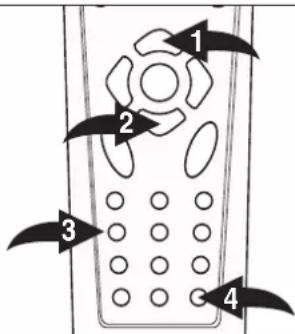
For proper operation, before selecting channels, they must be set into the TV's program memory, see page 17. Press and release the CHANNEL UP (↑) ⏻/DOWN (↓) Ⓞ buttons. The TV automatically stops at the next channel set into memory. This will not operate if channels are not set into memory.
Direct Program Selection buttons (0-9)
Use these buttons to select a channel. The channel number will appear at the top right corner of the screen.
- For Channels 1 through 9, press 1-9 ③ as desired.
- For Channels 10 through 99, press the -- button ④ once, then the two digits in order.
- For Channels 100 through 125, press the -- button ④ twice, then the three digits in order.
FAQs:
AIR/CATV option must be set to CATV when using cable, see page 15.
Why are some channels scrambled?
You must subscribe to these channels through your cable company.
TV OPERATION (CONTINUED)
MUTE SLEEP

Press the MUTE button ① to turn off the sound. The TV's sound will be silenced and MUTE will appear briefly on the screen. The sound can be turned back on by pressing this button again or one of the VOLUME UP (→)②/DOWN (←) ③ buttons or the MUTE button ① again.
AV IN BUTTON

This TV has an audio/video input as well as a standard coaxial input for audio/video signals, as described on pages 8 through 11. To watch standard TV or CABLE, press the AV IN button until the signal appears in the display. To watch the source connected to the Audio/Video jacks, press so AV appears in the display.
natural_image
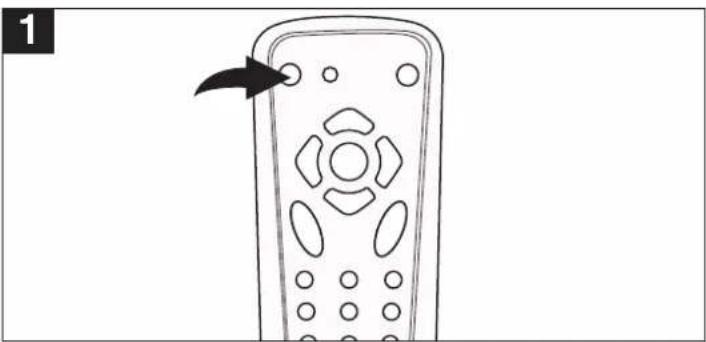
Line drawing of a remote control with an arrow pointing to the button (no text or symbols)To set the TV to turn off after a preset amount of time, press the SLEEP button on the remote, "SLEEP OFF" will appear on the screen. Each additional press will increase the Sleep time by 5 minutes up to 120 minutes. To confirm remaining sleep time, press the SLEEP button; the remaining time will briefly appear on the screen. To cancel the sleep time, press the SLEEP button repeatedly until "SLEEP OFF" appears on the screen.
DISPLAY BUTTON
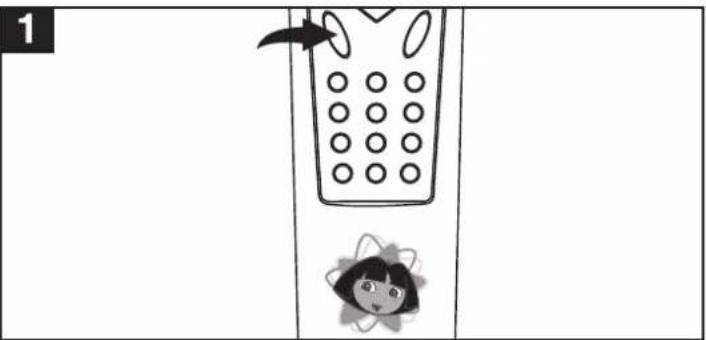
Press the DISPLAY button once to display the channel number and sleep timer. Press again and the text will disappear.
CLOSED CAPTIONS
WHAT IS CLOSED CAPTIONING?
This television has the capability to decode and display Closed Captioned television programs. Closed Captioning will display text on the screen for hearing impaired viewers or it will translate and display text in another language.
CLOSED CAPTIONING WITH A VCR
Closed Captioned programs can be recorded and played back on a VCR with the Closed Captioned text intact. The Closed Captioned text will disappear during Cue (Fast Forward Search), Review (Rewind Search) and Pause modes or if the VCR tracking is not adjusted properly.
TO VIEW CLOSED CAPTIONS
Enter the SPECIAL menu and select the Closed Caption icon.
CAPTIONS (C1,C2,CMUTE): This Closed Caption Mode will display text on the screen in English or other languages. Generally, Closed Captions in English are transmitted on Captions 1 and Closed Captions in other languages are transmitted on Caption 2.
TEXT (T1, T2): The Text Closed Caption Mode will usually fill the screen with a programming schedule or other information.
After selecting a Closed Caption Mode, it will stay in effect until it is changed, even if the channel is changed. If the Captions signal is lost due to a commercial or a break in the signal, the Captions will reappear when the signal is received again. If the channels are changed, the Captions will be delayed approximately 10 seconds.
The Captions will appear in places on the screen where they will least interfere with the picture, usually on the bottom of the screen. News programs will usually show three-line Closed Captions which scroll onto the screen. Most other shows provide two or three-lined Captions placed near the character who is speaking so the viewer can follow the dialogue.
Words in italics or underlined describe titles, words in foreign languages or words requiring emphasis. Words that are sung usually appear enclosed by musical notes.
For television programs broadcasting with Closed Captions, look in your TV guide for the Closed Captions symbol (CC).
NOTES:
- When selecting Closed Captions, the captioning will be delayed approximately 10 seconds.
- Misspellings or unusual characters may occasionally appear during Closed Captioning. This is normal with Closed Captioning, especially with live programs. This is because captions are also entered live. These transmissions do not allow time for editing.
- When Captions are being displayed, on-screen displays, such as volume and mute may not be seen or may interfere with Closed Captions.
- Some cable systems and copy protection systems may interfere with the Closed Caption signal.
- If using an indoor antenna or if TV reception is very poor, the Closed Caption Decoder may not appear or may appear with strange characters or misspelled words. In this case, adjust the antenna for better reception or use an outdoor antenna.
CLOSED CAPTIONS
1

Press the Menu buttons third, Access the SETUP Menu and Press the CHANNEL UP (↑) ③/DOWN (↓) ④ buttons select CLOSED CAPTION. Press the VOLUME UP (→) ①/DOWN (←) ② buttons to select the desired closed caption option (see above). Closed Captioning will display text on the screen for the hearing impaired.
FAQs:
When I press the DISPLAY or MUTE button, the captions do not appear, is this normal?
Yes, this is normal for this unit. Once the display information disappears, the captions will continue.
I entered the Captions mode, but no captions are appearing, why?
If no caption signal is received, no captions will appear, but the television will remain in the Caption mode.
Why is there a big black box on the screen?
Because you are in a Captions mode. Turn the captions off, or select a different Captions mode.
ON-SCREEN CONTROL ADJUSTMENTS (PICTURE)
1
PICTURE
CONTRAST 50
BRIGHT 50
COLOR 50
SHARPNESS 50
TINT 50

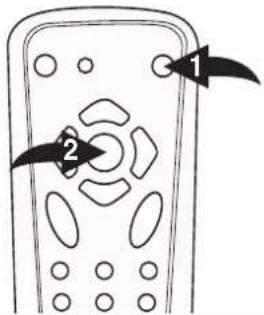
Press the Power button ① to turn on the TV. Press the MENU button ②; the PICTURE MENU screen will appear.
2

Press the CHANNEL UP (↑) ①/DOWN (↓) ② buttons to select the desired picture setting (CONTRAST, BRIGHTNESS, COLOR, SHARPNESS or TINT).
3

Press the VOLUME UP ( ) ①/DOWN ( ) ②buttons to adjust the desired picture setting. Press the MENU button ③ third or wait 20 seconds to exit the menu.
PERSONAL PREFERENCE (PP) BLUE BACKGROUND
1

natural_image
Line drawing of a remote control with an arrow pointing to the button (no text or symbols)There are four preset picture modes to choose from (PERSONAL, SOFT, STANDARD or VIVID). The SOFT, STANDARD and VIVID options are preset. The PERSONAL setting is preset by the user as described above.
Press the PP button to select between the three modes.
1
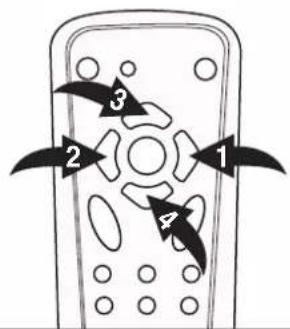
If the BLUE BACKGROUND option is set to ON, when a station is selected with no broadcast signal, a blue screen will appear. Press the Menu buttons third Access the Setup Menu and Press the CHANNEL UP (↑) ③/DOWN (↓) ④ buttons to select BLUE BACK. Press the VOLUME UP (→) ①/DOWN (←) ② buttons to turn this option on or off.
SETTING PARENTAL CONTROL
PARENTAL CONTROL SET-UP:
You can set the CHANNEL BLOCK to block out any channels that you do not want to be viewed as follows:
1

SETUP
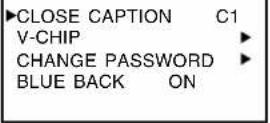
Press the Power button ① to turn on the TV. Press the MENU button ② third; the SETUP MENU screen will appear.
2
[Non-Text]

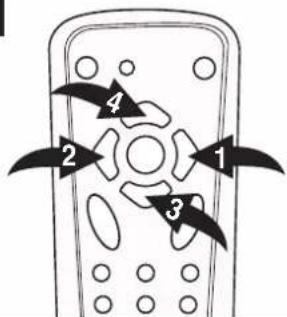
Press the CHANNEL UP (↑) ④/DOWN (↓) ③ buttons to select V-CHIP.
3
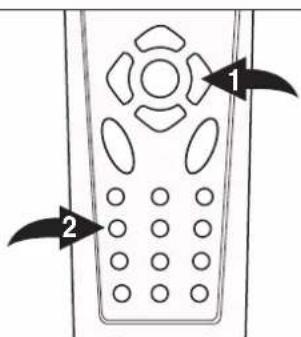
Press the VOLUME UP (→) button ① to confirm. Using the Direct Channel Selection buttons (0-9) ②, enter the password ("1111" is the preset password if you have not changed it). This password can be changed to consist of different numbers after the original password is entered (see page 25).
4
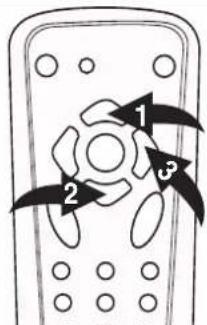
Press the CHANNEL UP (↑) ①/DOWN (↓) ② buttons to scroll to select PARENTAL LOCK, and then press the VOLUME UP (→) ③ to turn it on or off. See the next two pages to set Movie or TV blocking options.
5
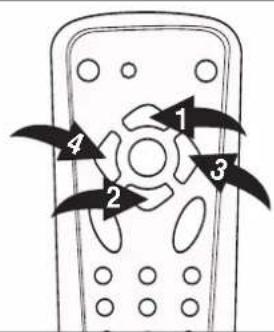
You can unblock or block all TV shows regardless the ratings as follows:
Use the CHANNEL UP (↑) ①/DOWN (↓) ② buttons to select NO RATING, then select UNBLOCK or BLOCK using the VOLUME UP (→) ③/DOWN (←) ④ buttons.
5

You can unblock or block the unit connected to the A/V jacks as follows:
Use the CHANNEL UP (↑) ①/DOWN (↓) ② buttons to select EXT SOURCE, then select UNBLOCK or BLOCK using the VOLUME UP (→) ③/DOWN (←) ④ buttons.
SETTING PARENTAL CONTROL (CONTINUED)
Movie Rating enables parents to prevent their children from watching inappropriate material on TV. Movie Rating reads the ratings for programming (except for news, sports, unedited movies on premium cable and emergency system signals), then denies access to programming if the program's rating meets the limitations previously set. In this case, the program will be blocked.
MOVIE RATING SET UP
1
PARENTAL CONTROL
PARENTAL LOCK OFF
TV GUIDELINES
MOVIE RATING
NO RATING
EXTSOURCE
UNBLOCK
UNBLOCK
Enter the PARENTAL CONTROL menu as described on page 22.
2

Press the CHANNEL UP (↑) Ⓞ/DOWN (↓) Ⓢ buttons to select MOVIE RATING, and then the VOLUME UP (→) button Ⓔ to select it.
3

NONE: Movie rating is not set.
G: All ages.
PG: Parental Guidance.
PG-13: Parental Guidance, less than 13 years old.
R: Under 17 years old, Parental Guidance
suggested.
NC17: 17 years old and above.
X: Adult only.
NR: Not Rated.
Press the CHANNEL UP (↑) ①/DOWN (↓) ② buttons to select a rating to turn On or Off. When a desired rating appears, press the VOLUME UP (→) button ③ to block that rating and the ones above it.
SETTING PARENTAL CONTROL (CONTINUED)
TV Parental Guidelines have one or more letters added to the basic rating to let parents know when a show contains higher levels of violence, sex, adult material or suggestive dialogue.
TV PARENTAL RATING SET UP
1
PARENTAL CONTROL
PARENTAL LOCK OFF
TV GUIDELINES
MOVIE RATING
NO RATING
EXTSOURCE
UNBLOCK
UNBLOCK
Enter the PARENTAL CONTROL menu as described on page 22.
2

Press the CHANNEL UP (↑) Ⓞ/DOWN (↓) Ⓥ buttons to select TV GUIDELINES, and then the VOLUME UP (→) button Ⓤ to select it.
3
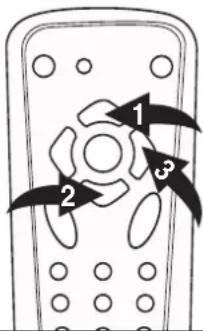
F: Fantasy Violence
V: Violence
S: Sexual Situations
L: Adult Language
D: Suggestive
Dialogue
Press the CHANNEL UP (↑) ①/DOWN (↓) ② buttons to select a rating. When a desired rating appears, press the VOLUME UP (→) button ③ to turn selected rating On or Off. Then press the CHANNEL DOWN (↓) button ② to scroll down and then press the VOLUME UP (→) button ③ to turn the individual settings On or Off (these represent the descriptions as shown above. All programs with a higher rating than the one selected will also be blocked).
SETTING PARENTAL CONTROL (CONTINUED)
1
SETUP
CLOSE CAPTION C1
V-CHIP ▶
CHANGE PASSWORD ▶
BLUE BACK ON
Press the Power button ① to turn on the TV. Press the MENU button ② third; the SETUP MENU screen will appear.
2
SETUP
CLOSE CAPTION C1
V-CHIP ▶
▶CHANGE PASSWORD ▶
BLUE BACK ON
Press the CHANNEL UP (↑) ④/DOWN (↓) ③ buttons to select CHANGE PASSWORD.
3
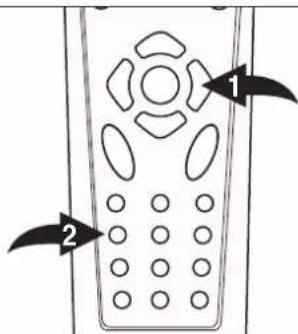
Press the VOLUME UP (→) button ① to confirm. Using the Direct Channel Selection buttons (0-9) ②, enter the password ("1111" is the preset password if you have not changed it).
4

natural_image
Line drawing of a remote control with buttons and a black arrow pointing to the button (no text or symbols)Using the Direct Channel Selection buttons (0-9), enter the desired new password, then the confirm screen will appear. Enter the password again to confirm.
IMPORTANT:
Make sure to write done the new password and retain it for future use.
TROUBLESHOOTING GUIDE
Check the following before requesting service:
| SYMPTOM POSSIBLE | CAUSE POSSIBLE SOLUTION | |
| POWER | ||
| No power. The AC power | cord is not Connect the AC power cord to connected. the AC outlet. | |
| TV BROADCAST RECEPTION | ||
| Poor or no picture. Picture | TV station experiencing problems. Try another channel. | |
| re control is not adjusted. Check picture control adjustments. | ||
| Possible local interference. Check for source of reception disturbance. | ||
| Antenna/CATV connector is not connected. Check CATV connection or VHF/UHF antenna. | ||
| Picture wobbles or drifts | TV station experiencing problems. Try another channel. | |
| Cable TV channel is scrambled. A Cable box needs to be used (if desired). | ||
| Possible local interference. Check for source of reception disturbance. | ||
| No CATV reception. | CATV not connected. | Check all CATV connections. |
| AIR/CATV option set to AIR. | Set AIR/CATV option to CATV. | |
| Cable TV service interrupted. | Contact your Cable TV company. | |
| No reception above ch13. | AIR/CATV option set to AIR. | Set AIR/CATV option to CATV. |
| Poor or no sound. | TV station experiencing problems. Try another channel. | |
| MUTE button is pressed. | Press MUTE button again. | |
| Possible local interference. Check for source of reception disturbance. | ||
| Antenna/CATV connector is not connected. | Check CATV connection or VHF/UHF antenna. | |
| Volume is set to minimum. | Increase volume. | |
| TV shuts off. | TV station stopped broadcasting. | Tune to a new channel. |
| Sleep Timer is set. | Set Sleep Timer to Off. | |
| Home breaker has blown. | Check breaker. | |
| Closed Captioning not working. | TV signal is weak. | Check CATV or VHF/UHF antenna connection. |
| TV station experiencing problems or program tuned is not closed captioned. | Try another channel. | |
| Closed Captioning not turned on. | Turn Closed Captioning on. | |
| REMOTE CONTROL | ||
| Remote control does not operate. | Distance is too far or too much light in the room. | Operate within 20 feet or reduce the light in the room. |
| There is an obstacle in the path of the beam or remote is not aimed at the sensor. at the | Clear the path of the beam and/or aim the remote sensor. | |
| The batteries are weak or installed incorrectly. | Replace the batteries or install correctly. | |
| PARENTAL CONTROL (PC) | ||
| PC protection not working properly. | Parental Control setting is turned off. | Turn Parental Control setting on. |
| News or sports event being broadcast. | Parental Control does not work with news or sporting events. | |
| Ratings not set. | Set ratings as desired. | |
RECEPTION DISTURBANCES
Most types of television interference can be remedied by adjusting the height and position of the VHF/UHF antenna. Outdoor antennas are recommended for best results if not using cable or a satellite. The most common types of television interference are shown below. If one of these symptoms appear when the TV is connected to a Cable TV system, the disturbance may be caused by the local cable company broadcast.
IGNITION:
Black spots or horizontal streaks may appear, picture may flutter or drift. Usually caused by interference from automobile ignition systems, neon lamps, electric drills and other electric appliances.
GHOSTS:
Ghosts are caused by the television signal following two paths. One is the direct path and the other is reflected from tall buildings, hills or other objects. Changing the direction or position of the antenna may improve the reception.
SNOW:
If your receiver is located in the fringe area of a television station where the signal is weak, your picture may be marred by the appearance of small dots. When the signal is extremely weak, it may be necessary to install an external antenna to improve the picture.
RADIO FREQUENCY INTERFERENCE:
This interference produces moving ripples or diagonal streaks, and in some cases, causes loss of contrast in the picture.
PICTURE SIZE VARIATION:
A slight picture size variation is quite normal when you adjust the CONTRAST or BRIGHTNESS setting.

DORA THE EXPLORER-MODEL DTE 314 LIMITED WARRANTY
Emerson Radio Corp. warrants manufacturing defects in original material, including original parts and workmanship, under normal use and conditions, for a period of one (1) year (Two years on picture tube) from the date of original purchase in the U.S. With your dated proof of purchase, we will provide repair service at no charge for labor and parts at an authorized Depot Repair Facility, or replace the product in our discretion. For repair or replacement, pack your unit in a padded box, enclose your check or money order payable to Emerson Radio Corp. in the amount of \$9.00 (not required by California residents) to cover shipping and handling costs, and enclose a copy of your proof of purchase.
Send your unit to the address blow.
This warranty does not cover damage from negligence, misuse, abuse, accident, failure to follow operating instructions, commercial use, rental, repairs by an unauthorized facility, or products purchased, used, serviced or damaged outside of the United States.
THIS WARRANTY GIVES YOU SPECIFIC LEGAL RIGHTS, AND YOU MAY ALSO HAVE OTHER RIGHTS WHICH VARY FROM STATE TO STATE.
The serial number can be found on the back cabinet. We suggest that you record the serial number of your unit in the space below for future reference.
Model Number:
Serial Number:

Emerson®
SERVICE
TO FIND THE LOCATION AND PHONE NUMBER OF YOUR NEAREST SERVICE CENTER PERMITTED TO PERFORM WARRANTY...
CALL TOLL FREE: 1-800-695-0098
FOR ADDITIONAL SET-UP OR OPERATIONG ASSISTANCE
PLEASE CALL:
1-800-898-9020
FOR CUSTOMER SERVICE, PLEASE SEND TO:
Emerson Radio Corp.
Consumer Affairs Dept.
5101 Statesman Drive,
Irving, TX 75063.
Emerson®
EMERSON®
PART NO. 21-2080
608-02
Printed in China


- 13" Television With Remote Control
- DTE314
- CONTENTS
- POWER SOURCE
- IMPORTANT SAFETY INSTRUCTIONS
- WARNING
- CAUTION
- Retain Instructions
- Water and Moisture
- Power Sources
- Grounding or Polarization
- Outdoor Antenna Grounding
- Lightning
- Power Lines
- Overloading
- Object and Liquid Entry
- Damage Requiring Service
- Replacement Parts
- Safety Check
- Wall or Ceiling Mounting
- Heat
- Nonuse Period
- Note To CATV System Installer
- FIGURE A
- ON PLACEMENT
- ON CONDENSATION
- CAUTION:
- HIGH VOLTAGE:
- NOTES:
- FRONT
- LOCATION OF CONTROLS (CONTINUED)
- REAR
- REMOTE CONTROL
- REMOTE CONTROL (CONTINUED)
- BATTERY INSTALLATION
- BATTERY PRECAUTIONS
- EFFECTIVE DISTANCE OF THE REMOTE CONTROL TRANSMITTER
- CABLE (CATV)/SATELLITE CONNECTIONS
- FOR SUBSCRIBERS TO BASIC CABLE TV SERVICE
- FOR SUBSCRIBERS TO SCRAMBLED CABLE TV SERVICE OR SATELLITE
- FOR SUBSCRIBERS TO UNSCRAMBLED BASIC CABLE TV SERVICE WITH SCRAMBLED PREMIUM CHANNELS
- FAQS:
- INDOOR ANTENNA CONNECTION
- Connecting the Rod Antenna (not included)
- OUTDOOR ANTENNA CONNECTIONS
- OUTDOOR VHF/UHF ANTENNA CONNECTION (ANTENNA NOT SUPPLIED)
- OR
- EXTERNAL AUDIO/VIDEO CONNECTIONS
- FAQ:
- VCR CONNECTIONS
- NOTE:
- SETTING THE LANGUAGE
- SETTING THE AIR/CATV MENU OPTION
- SETTING THE CHANNELS INTO MEMORY
- ADDING AND DELETING CHANNELS
- 1
- 2
- 4
- 3
- 5
- TV OPERATION
- PRESET
- OPTIONS
- Direct Program Selection buttons (0-9)
- TV OPERATION (CONTINUED)
- MUTE SLEEP
- AV IN BUTTON
- DISPLAY BUTTON
- CLOSED CAPTIONS
- WHAT IS CLOSED CAPTIONING?
- CLOSED CAPTIONING WITH A VCR
- TO VIEW CLOSED CAPTIONS
- ON-SCREEN CONTROL ADJUSTMENTS (PICTURE)
- PERSONAL PREFERENCE (PP) BLUE BACKGROUND
- SETTING PARENTAL CONTROL
- PARENTAL CONTROL SET-UP:
- SETTING PARENTAL CONTROL (CONTINUED)
- MOVIE RATING SET UP
- TV PARENTAL RATING SET UP
- PARENTAL CONTROL
- IMPORTANT:
- TROUBLESHOOTING GUIDE
- RECEPTION DISTURBANCES
- IGNITION:
- GHOSTS:
- SNOW:
- RADIO FREQUENCY INTERFERENCE:
- PICTURE SIZE VARIATION:
- DORA THE EXPLORER-MODEL DTE 314 LIMITED WARRANTY
- Emerson®
Brand : Emerson
Model : DTE314
Category : Television