
Smart Lighting Transformer - Lighting Transformer RING - Free user manual and instructions
Find the device manual for free Smart Lighting Transformer RING in PDF.


| Product Type | Low Voltage Landscape Lighting Transformer |
| Brand | Ring |
| Model | Smart Lighting Transformer |
| Input Voltage | 120 V AC (typical US household) |
| Output Voltage | Selectable 12V or 15V |
| Maximum Wattage Load | 200 W |
| Compatible Light Types | LED and halogen landscape lights (12V or 15V) |
| Smart Connectivity | Ring app via Ring Bridge (sold separately) |
| Outdoor Rating | For outdoor use with covered weatherproof GFCI receptacle |
| GFCI Protection | Required on branch circuit (Class A GFCI) |
| Mounting | Wall mount with included screws and template; top screws at least 18" above ground |
| Accepted Cable Gauge | 12-16 AWG low voltage cable (CSA or UL approved) |
| Reset Button | Yes, accessible inside door |
| Color | Black |
| Material | Plastic with metal components |
| Warranty | See ring.com/warranty for details |
| Installation Requirement | Must be installed greater than 1 ft above ground; professional installation recommended |
| Included Accessories | Mounting template, screws |
| Low Voltage Cable | Not included; must be purchased separately |
| Distance from Pool/Spa | At least 10 ft (3 m) |
Frequently Asked Questions - Smart Lighting Transformer RING
User questions about Smart Lighting Transformer RING
0 question about this device. Answer the ones you know or ask your own.
Ask a new question about this device
Download the instructions for your Lighting Transformer in PDF format for free! Find your manual Smart Lighting Transformer - RING and take your electronic device back in hand. On this page are published all the documents necessary for the use of your device. Smart Lighting Transformer by RING.
USER MANUAL Smart Lighting Transformer RING
natural_image
Close-up of a black ring device with a blue circular indicator light (no text or symbols visible)Transformer
Smart Lighting
For your safety...

WARNING - Risk of electric shock. Do not mount power supply or luminaires within 10 feet (3.0 meters) of a pool, spa, or fountain.
CAUTION: For use only on a branch circuit protected by a Class A type Ground Fault Circuit Interrupter (GFCI).
When used outdoors, install only to a covered Class A GFCI protected receptacle that is weatherproof with the power unit connected to the receptacle. If one is not provided, contact a qualified electrician for proper installation. Ensure that the power unit and cord do not interfere with completely closing the receptacle cover.
Transformer must be installed greater than 1 foot above ground level.
Maximum wattage load is 200 watts. Verify that the combined total wattage of all fixtures is below 200W.
For use with landscape lighting systems only.
Use with 12V or 15V landscape lights, including LED and halogen lights.
Use ONLY with common gauge sizes of CSA or UL approved low voltage cable (12-16 AWG).
DO NOT use with an extension cord.
DO NOT connect two or more power supplies in parallel.
This manual is for informational purposes only. Working with electricity can be dangerous unless proper safety precautions are taken. If you are not comfortable or are inexperienced with the processes and tools described in this manual, we recommend that you hire a licensed electrician.
1. Set up your Transformer.
Download the Ring app.
The app walks you through setting up and managing your Ring Transformer.
Download it on your iOS or Android device.
ring
Set up your Ring Bridge.
The Bridge connects your Ring Transformer to the Ring app and other compatible Ring devices.
To set up your Bridge, follow the instructions in the Ring app or Bridge user manual.

natural_image
White wireless router device with ports and indicator lights (no visible text or symbols)Choose a location.
You'll have to plug in your Transformer, so the best place for it is near an outlet (make sure it's a covered, weatherproof Class A GFCI protected outlet).
Once you've decided on a spot, use the included mounting template to mark the screw holes.
To avoid damage to your Transformer, make sure the top screws are at least 18" above the ground.
Insert the top screws.
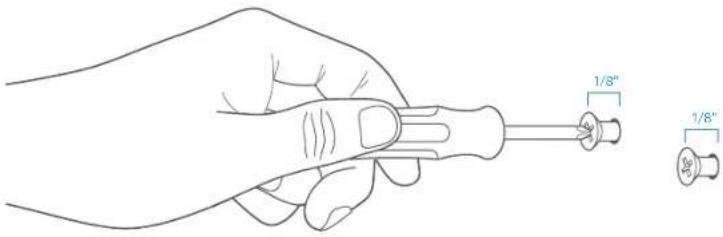
Drive the top screws first, leaving 1/8" of space between the mounting surface and screw heads.
If mounting on a masonry surface or drywall, use a 1/4" drill bit to drill pilot holes at each mark and insert the anchors.
Mount your Transformer.
Align the Transformer with the top screws. Slide it down over the screws to lock it into place.
Then drive the bottom screw to secure your Transformer to the mounting surface.
2. Install lights and wiring.
Choose a cable.
If you already have low voltage lighting installed, skip ahead to page 12.
The Transformer doesn't come with low voltage cable, so you'll have to buy some online or at a home improvement store.
The chart on the next page might help...
| Wire Length *0-50 Feet 51-100 Feet 101-150 Feet | |||
| Total Light Wattage | 0-50 Watts | 16 AWG 16 AWG 14 AWG | |
| 51-100 Watts | 16 AWG 14 AWG 12 AWG | ||
| 100-200 Watts | 14 AWG 12 AWG 12 AWG with | 15V Tap ** | |
* Make sure your cable is long enough to reach all light fixtures. Consult cable manufacturer if additional wire length or connectors are needed.
** Only use 15V Tap when the wire length is over 100 feet and total wattage is over 100 Watts. 12V Tap is recommended for all other cases.
*** Use ONLY with common gauge sizes of CSA or UL approved low voltage cable (12-16 AWG).
Calculate the total fixture wattage.
Ensure the total fixture wattage does not exceed the maximum wattage load of the Transformer.
To get the total wattage, add up the wattage of each fixture (example: 10 fixtures at 5W each is 50W total wattage).
Place light fixtures.
Decide where you would like to place your lights (not included), and arrange them in the desired locations.
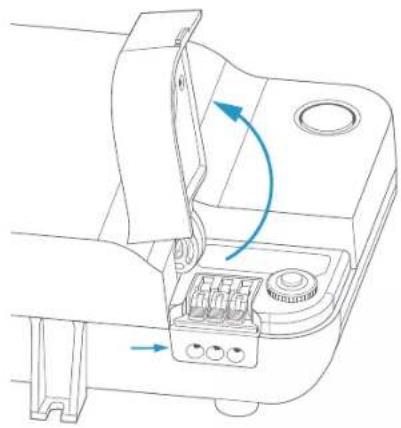
Open the Transformer door.
Lift and hold the door open to access the terminals.
The rubber grommet underneath the door can be removed to identify the terminals.
Don't lose it! Be sure to put it back before the next step...
natural_image
Technical line drawing of a mechanical device with a blue arrow indicating rotation or movement (no text or symbols present)Connect cable to Transformer.
Split and strip the cable.
Flip open the terminals, and feed one of the wires through the rubber grommet into the Common terminal (left), and the other into either the 12V (center) or 15V terminal (right) based on the total wattage of your system.
Then close the terminals and the access door.

natural_image
Technical line drawing showing two views of a device's internal components with wires (no text or symbols)Run cable to fixtures.
Starting at the Transformer, run the cable to each light fixture, leaving about 12" of cable after the last fixture.
Leave a little extra cable at each fixture in case you have to adjust their location.
Connect the light fixtures to the cable.
Secure the light fixtures to the cable according to the fixture manufacturer's instructions.
3. Complete installation.
Plug in your Transformer.
Your Transformer must be connected to a covered, weatherproof GFCI protected receptacle. If you don't have a covered, weatherproof GFCI protected receptacle, you'll need to hire a licensed electrician to install one.

natural_image
Line drawing of a hand inserting a device into a notebook-like frame (no text or symbols)Connect your lighting to Ring.
Once plugged in, the light around the button on the front of your Transformer will flash blue. That means it's ready to pair with the Ring app!
If the light around the button is white after you plug it in, press and release it. The light will then flash blue.


To test your lights, press the round button once. The circle will turn white and your light fixtures will illuminate.
Complete Setup in the Ring app.
In the app, tap Set Up a Device.
When prompted, select Smart Lighting and follow the in-app instructions.
When the light on your Transformer turns solid blue, setup is complete.
Conceal the cable.
Now that setup is complete, you can hide the low voltage cable (if updating an existing system, you've probably already done that - ignore this part).
To bury the cable, dig a narrow, shallow trench (up to 6" deep) along the wiring route. Lay the cable inside the trench and cover it over with the displaced ground.
Or, if your cable runs through an area with soil (like a flower bed) you can cover it with a layer of mulch.
What about that Reset button?
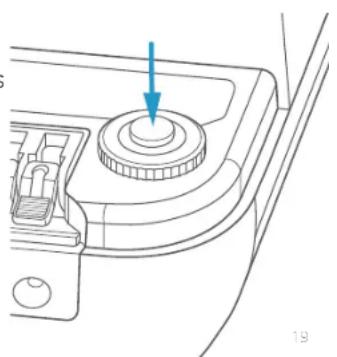
You probably won't need it, but if your Transformer is plugged in and the light around the button on the front is not illuminated, you may need to press it.
Open the Transformer door and check to see if the Reset button popped up. If so, press it to reset your Transformer.
If it pops up again, double-check the total wattage of your fixtures. Make sure it's below 200W totoal wattage (refer to page 11).
natural_image
Technical line drawing of a mechanical component with a blue arrow pointing to a circular feature (no text or symbols)For additional help, visit: ring.com/help
Or give us a call...
US 1 800 656 1918
Canada 1 855 300 7289
Worldwide +1 310 929 7085
For a list of all our customer support numbers, visit: ring.com/callus
To review your warranty coverage, please visit www.ring.com/warranty.
Patents: www.ring.com/patents
© 2019 Ring LLC or its affiliates.
Ring, Alexa, Always Home, and all related logos are trademarks of Amazon.com, Inc. or its affiliates.
Last updated: 03/08/19
- Transformer
- Smart Lighting
- For your safety...
- Set up your Transformer.
- Download the Ring app.
- Set up your Ring Bridge.
- Choose a location.
- Insert the top screws.
- Mount your Transformer.
- Install lights and wiring.
- Choose a cable.
- Calculate the total fixture wattage.
- Place light fixtures.
- Open the Transformer door.
- Connect cable to Transformer.
- Run cable to fixtures.
- Connect the light fixtures to the cable.
- Complete installation.
- Plug in your Transformer.
- Connect your lighting to Ring.
- Complete Setup in the Ring app.
- Conceal the cable.
- What about that Reset button?
Brand : RING
Model : Smart Lighting Transformer
Category : Lighting Transformer