
D-5G-30D3 - TV antenna Mikrotik - Free user manual and instructions
Find the device manual for free D-5G-30D3 Mikrotik in PDF.


| Product Type | Parabolic Dish Antenna |
| Model | D-5G-30D3 |
| Frequency Band | 5 GHz (5.15 - 5.85 GHz typical) |
| Gain | 30 dBi |
| Polarization | Dual Linear (Vertical and Horizontal) |
| Impedance | 50 Ω |
| Connector Type | N-Type (via RF cables) |
| Mounting | Pole mount, up to 70 mm (2.75 in) diameter |
| Compatible Devices | MikroTik RB900 series outdoor devices (sold separately) |
| Included Accessories | Parabolic dish, back plate, feed bracket, antenna feed, pole clamp, RF cables (2 pcs), self-bonding tape (2 pcs), bolts, nuts, washers |
| Required Tools | 10 mm wrench, 13 mm wrench, PH2 screwdriver |
| Torque Specifications | M6 nut: 5 Nm, M4 bolt: 2 Nm, M3 bolt: 1.5 Nm, RF connector: 0.5 Nm, M8 nut: 20 Nm |
| Weight | Approximately 5 kg (estimate) |
| Wind Load | Not specified; ensure secure mounting |
| Operating Temperature | -40°C to 70°C (typical for outdoor antennas) |
| Warranty | 12 months from shipping date |
Frequently Asked Questions - D-5G-30D3 Mikrotik
User questions about D-5G-30D3 Mikrotik
0 question about this device. Answer the ones you know or ask your own.
Ask a new question about this device
Download the instructions for your TV antenna in PDF format for free! Find your manual D-5G-30D3 - Mikrotik and take your electronic device back in hand. On this page are published all the documents necessary for the use of your device. D-5G-30D3 by Mikrotik.
USER MANUAL D-5G-30D3 Mikrotik
Quick setup guide and warranty information
Package contents
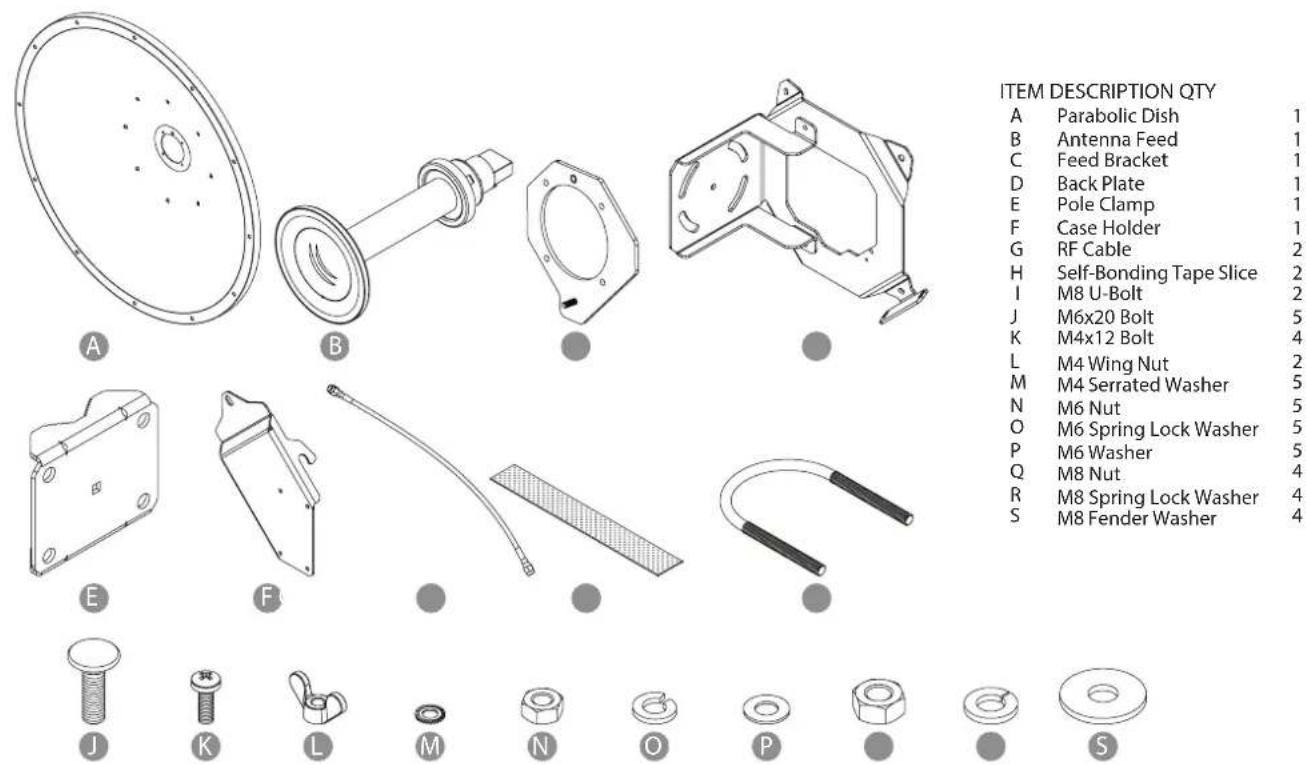
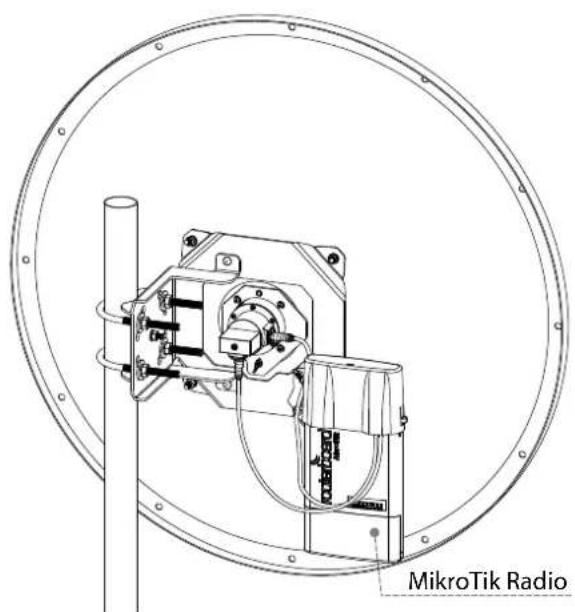
MikroTik Antenna assembly preview
natural_image
Technical line drawing of a MikroTik Radio antenna mounted on a circular base, showing internal components and wiring (no text or symbols)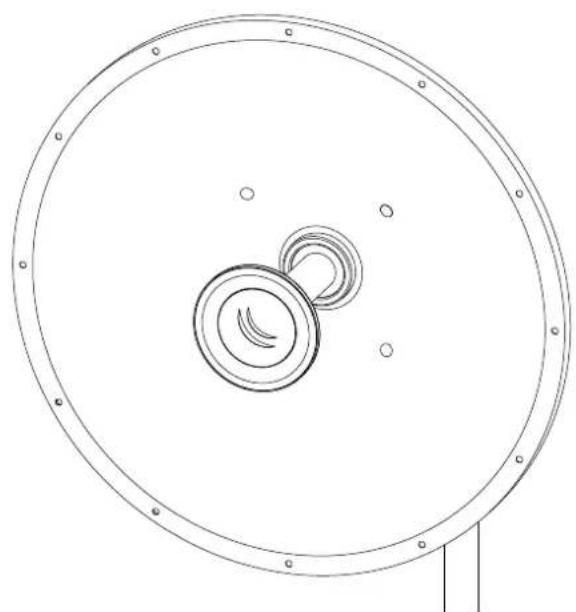
natural_image
Technical line drawing of a circular mechanical component with concentric rings and mounting holes (no text or symbols)MikroTik Antenna assembly preview back* MikroTik Antenna assembly preview front
*The preview is valid if a MikroTik RB900 series outdoor device (sold separately) is installed.
Installation Guide
0. Items Required
• 10mm Wrench • 13mm Wrench • PH2 Screw Driver •
- This guide is written to be used with a MikroTik RB900 series outdoor device (sold separately)
1. Install Back Plate to Parabolic Dish
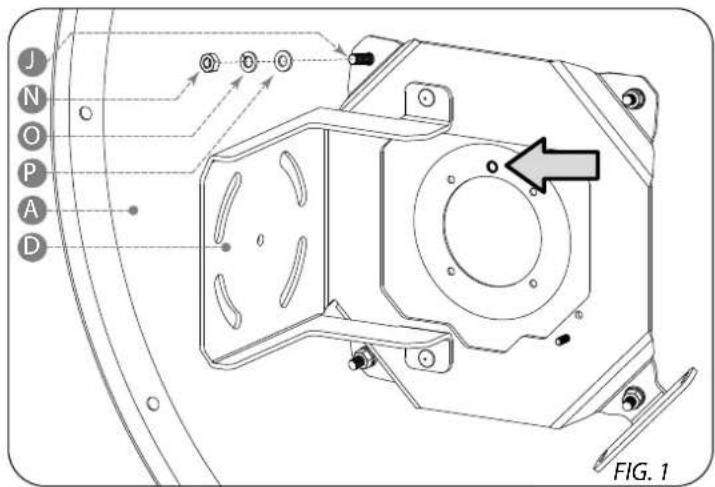
Install Back Plate [D] to Parabolic Dish [A] using:
[J] M6x20 Bolt x 4 pcs;
[P] M6 Washer x 4 pcs;
[O] M6 Spring Lock Washer x 4 pcs;
[N] M6 Nut x 4 pcs.
Important:
- Back Plate [D] must be aligned respectively to a bore in the Parabolic Dish [A] - see Fig. 1;
- M6 Nut [N] tightening torque must be approximately 5 Nm.
2. Install Antenna Feed
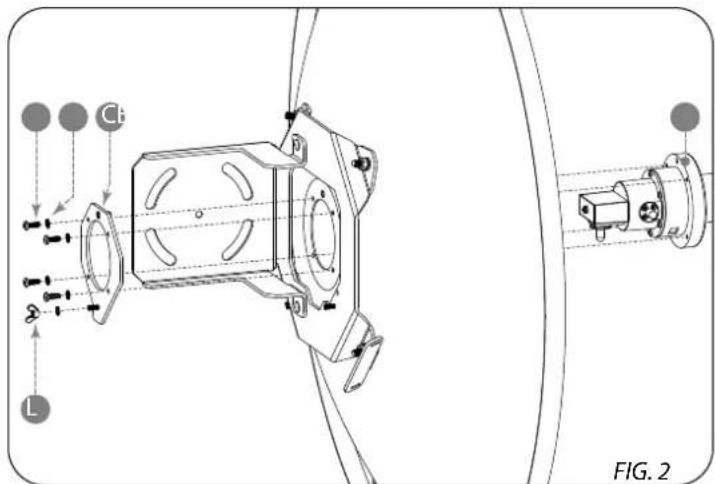
Install Antenna Feed [B] to Parabolic Dish [A] using:
[C] Feed Bracket x 1 pc;
[K] M4x12 Bolt x 4 pcs;
[M] M4 Serrated Washer x 4 pcs.
Install grounding fasteners:
[L] M6 Wing Nut x 1 pc;
[M] M4 Serrated Washer x 1 pc.
Important:
- Antenna Feed [B] and Feed Bracket [C] must be aligned respectively
to the alignment bore in the Parabolic Dish [A] - see Fig. 2; - M4x12 Bolt [N] tightening torque must be approximately 2 Nm.
3. Install Pole Clamp
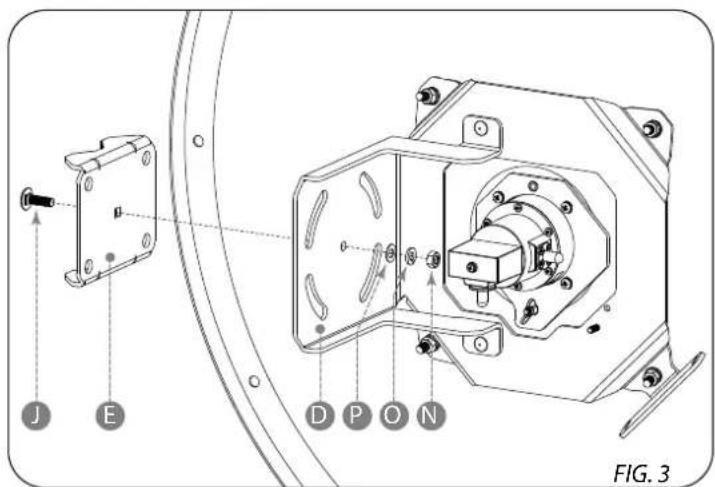
Install Pole Clamp [E] to Back Plate [D] - see Fig. 3, using:
[J] M6x20 Bolt x 1 pc;
[P] M6 Washer x 1 pc;
[O] M6 Spring Lock Washer x 1 pc;
[N] M6 Nut x 1 pc.
Important:
- Do not tighten M6 Nut [N] firmly until step 7.
4. Attach MikroTik Radio to Back Plate
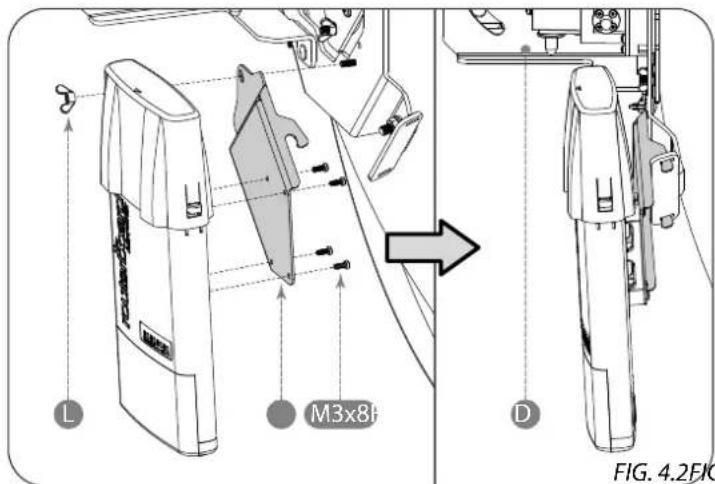
Attach a MikroTik RB900 series outdoor device to Case Holder [F] using: [-] M3x8 Bolt x 4 pcs (Comes with MikroTik Radio) - see Fig. 4.1.
Attach Case Holder [F] to Back Plate [D] by fitting Case Holder's hinges into the Back Plate's flange - see Fig. 4.2. Secure Case Holder using: [L] M4 Wing Nut x 1 pc.
Important:
- M3x8 Bolt [-] tightening torque must be approximately 1.5 Nm.
5. Install RF Cables
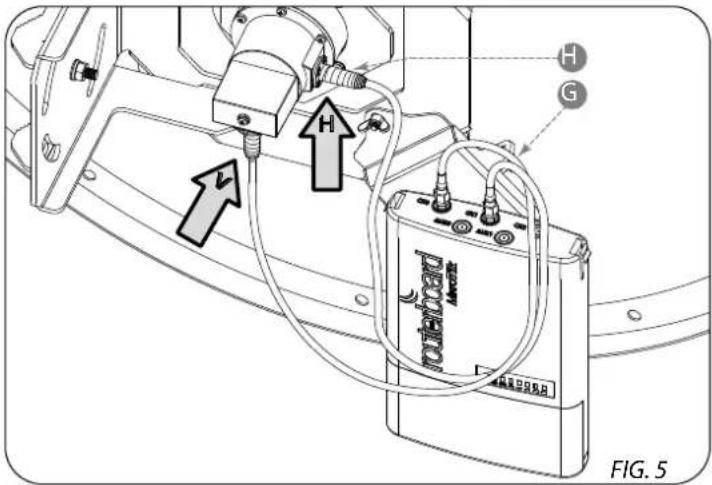
Remove the cover from MikroTik Radio and install the RF Cables [G]. Connect vertical polarization (arrow V) to CH0, horizontal polarization (arrow H) to CH1 - see Fig. 5.
Insulate the RF Cable [G] ends which are connected to Antenna Feed [B] by using: [H] Self-Bonding Tape Slice x 2pcs.
- Remove the plastic liner from both sides;
- Stretch the tape to 2/3 of its width;
- Apply half-lapped layers clockwise.
The RF Cable [G] ends which are connected to MikroTik Radio are insulated by the cover.
Fit back the MikroTik Radio cover.
Important:
- RF Cables [G] connector tightening torque must be approximately 0.5 Nm.
6. Attach Antenna to Pole
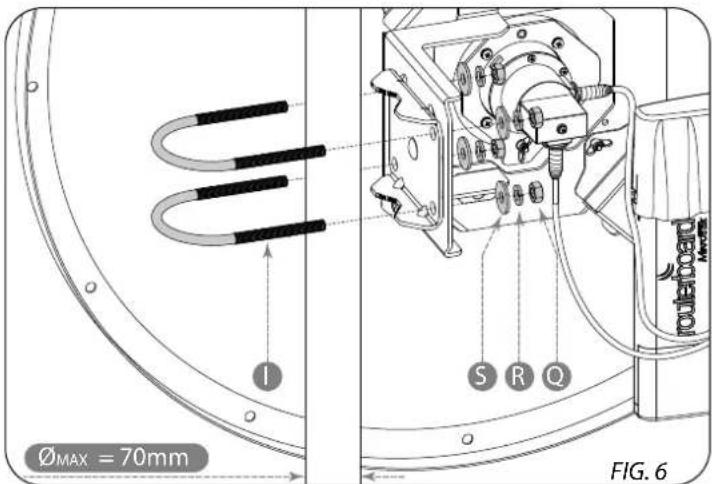
MikroTik Antenna D-5G-30D3 is design to fit the pole diameter up to 70mm(2.75").
Attach MikroTik Antenna to pole as shown in Fig. 6 using:
[1] M8 U-Bolt x 2 pcs;
[S] M8 Fender Washer x 4 pcs;
[R] M8 Spring Lock Washer x 4 pcs;
[Q] M8 Nut x 4 pcs.
Important:
- Do not tighten M8 Nuts [Q] firmly until step 7.
7. Adjust Azimuth and Elevation
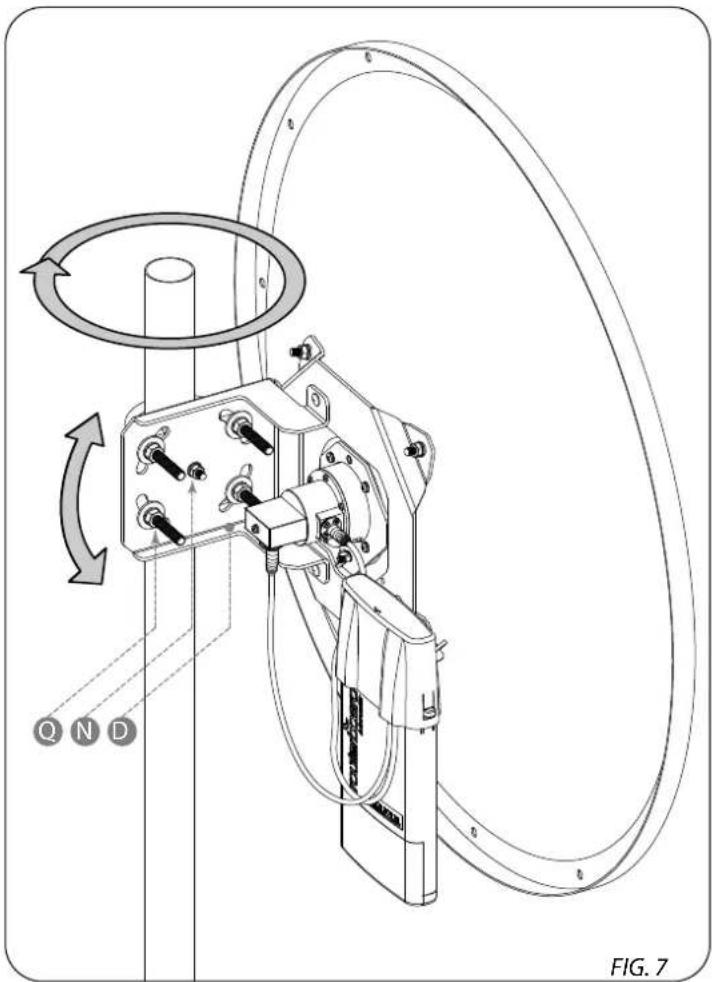
The Azimuth and Elevation can be adjusted if M8 Nuts [Q] are slightly loosen. In order to set the azimuth rotate the antenna around the pole - see Fig. 7. The elevation can be set by turning Back Plate [D].
After setting the azimuth and elevation, tighten firmly the corresponding fasteners - see Fig. 6.
Important:
• M6 Nut [N] tightening torque must be approximately 5 Nm.
- M8 Nuts [Q] tightening torque must be approximately 20 Nm.
natural_image
Technical line drawing of a mechanical device with rotating components and labeled parts (no readable text or symbols)Copyright and Warranty information
Copyright MikroTikls SIA. This document contains information protected by copyright law. No part of it may be reproduced or transmitted in any form without prior written permission from the copyright holder. RouterBOARD, RouterOS, RouterBOOT and MikroTik are trademarks of MikroTikls SIA. All trademarks and registered trademarks appearing in this document are the property of their respective holders.
Hardware. MikroTik warrants all RouterBOARD series equipment for the term of twelve (12) months from the shipping date to be free of defects in materials and workmanship under normal use and service, except in case of damage caused by mechanical, electrical or other accidental or intended damages caused by improper use or due to wind, rain, fire or other acts of nature.
To return failed units to MikroTik, you must perform the following RMA (Return Merchandise Authorization) procedure. Follow the instructions below to save time, efforts, avoid costs, and improve the speed of the RMA process.
-
If you have purchased your product from a MikroTik Reseller, please contact the Reseller company regarding all warranty and repair issues, the following instructions apply ONLY if you purchased your equipment directly from MikroTik in Latvia.
-
MikroTik does not offer repairs for products that are not covered by warranty. Exceptions can be made for: CCR1016-12G, CCR1016-12G-BU, CCR1036-12G-4S, RB1100, RB1100AH, RB1100AHx2, RB1200, RB600, RB600A and RB800 as a paid service (fees apply).
-
Out-of-warranty devices and devices not covered by warranty sent to Mikrotik will be returned to the sender at sender's cost. If the customer has not organized return of such rejected devices within 12 months from the day of arrival, MikroTik has the right to discard them.
RMA Instructions are located on our webpage here: http://rma.mikrotik.com
This document is provided "as is" without a warranty of any kind, expressed or implied, including, but not limited to, the implied warranty of merchantability and fitness for a particular purpose. The manufacturer has made every effort to ensure the accuracy of the contents of this document, however, it is possible that it may contain technical inaccuracies, typographical or other errors. No liability is assumed for any inaccuracy found in this publication, nor for direct or indirect, incidental, consequential or other damages that may result from such an inaccuracy, including, but not limited to, loss of data or profits. Please report any inaccuracies found to support@mikrotik.com
Brand : Mikrotik
Model : D-5G-30D3
Category : TV antenna