
FIVE.O - Audio System L.R.Baggs - Free user manual and instructions
Find the device manual for free FIVE.O L.R.Baggs in PDF.


| Product Type | Undersaddle pickup with endpin preamp |
| Model | FIVE.O |
| Brand | L.R. Baggs |
| Compatible Instrument | Ukulele with standard saddle slot |
| Power Supply | Two CR2032 3V lithium coin cell batteries |
| Controls | Volume wheel (mounts near soundhole) |
| Output | Endpin jack with strap ring |
| Installation Type | Professional installation recommended for warranty |
| Saddle Compensation Required | Remove approximately 0.030" from saddle height |
| Package Contents | Pickup, endpin preamp, green monofilament line, two CR2032 batteries, three self-stick wire clips, manual |
| Key Features | Undersaddle element, endpin preamp, volume control, easy battery access |
| Weight | Approximately 30 g (pickup and preamp) |
| Dimensions (Pickup) | Fits saddle slot width of 3/32" or larger; length standard for ukulele |
| Materials | Pickup: piezoelectric element with braided wire; preamp: plastic housing |
| Warranty | Coverage with professional installation; register online at lrbaggs.com |
| Maintenance | Clean mounting surfaces before attaching volume wheel and battery pad |
| Repairability | Battery replaceable; pickup not user-serviceable |
Frequently Asked Questions - FIVE.O L.R.Baggs
User questions about FIVE.O L.R.Baggs
0 question about this device. Answer the ones you know or ask your own.
Ask a new question about this device
Download the instructions for your Audio System in PDF format for free! Find your manual FIVE.O - L.R.Baggs and take your electronic device back in hand. On this page are published all the documents necessary for the use of your device. FIVE.O by L.R.Baggs.
USER MANUAL FIVE.O L.R.Baggs
Drill a clean 1/2" hole in the tail-block for the strapjack. Remove wood shavings and dust from inside the uke.
Installing the strapjack
Remove the strap ring, retaining nut, and one washer from the end of the jack. There should still be one star locking washer, one flat washer, and a nut remaining on the jack. Bring the jack down through the soundhole into the body and insert it into the pre-drilled hole in the tail block. Using the internal nut (be sure to include the flat and star washers), set the proper depth that will allow the entire smaller threaded section to protrude from the instrument (see figure 1).

With the jack in place, lay the remaining washer over the threads and attach the external retaining nut until it's tight. Finish by attaching the strap ring (it should cover the retaining nut and washer).
STEP 2. PICKUP INSTALLATION
Drilling the hole
Drill a hole at the far edge of either end of the saddle slot. The diameter should be the same size as the saddle slot and no less than 3/32". To avoid kinking and damaging the pickup, slightly round the top edge of the hole with an exacto blade or small file.
saddle slot and no less than 3/32". To avoid kinking and damaging the pickup, slightly round the top edge of the hole with an exacto blade or small file.
To make installing the pickup easier, we have included a green monofilament line for pulling the pickup through the hole. There is a loop tied on one end to keep the line from falling into the instrument. Slip the side without the loop down through the hole in the saddle slot and feed it up through the soundhole. Thread the line through the hole in the guide at the end of the pickup and tie a knot to secure it (see figure 2).
To make installing the pickup easier, we have included a green monofilament line for pulling the pickup through the hole. There is a loop tied on one end to keep the line from falling into the instrument. Slip the side without the loop down through the hole in the saddle slot and feed it up through the soundhole. Thread the line through the hole in the guide at the end of the pickup and tie a knot to secure it (see figure 2).

After the wire and line are connected, pull up on the line above the bridge and guide the pickup into the saddle slot. Using sharp cutters, remove the guide from the pickup just beyond the tapered section, leaving a small portion of the soldered braid intact (approximately 1/16" long) (see figure 3 on the next page). Finally, lay the pickup down in the saddle slot.
Preparing the saddle
You will need to compensate for the thickness of the pickup by removing approximately .030" from the overall height of the saddle. NOTE: The fit of the saddle is the single most important factor for the installation. The bottom of the saddle should be perfectly flat. The ideal saddle fit is loose enough to remove with your fingertips, but will not fall out by itself.
You will need to compensate for the thickness of the pickup by removing approximately .030" from the overall height of the saddle. NOTE: The fit of the saddle is the single most important factor for the installation. The bottom of the saddle should be perfectly flat. The ideal saddle fit is loose enough to remove with your fingertips, but will not fall out by itself.
Carefully trim here with sharp cutter.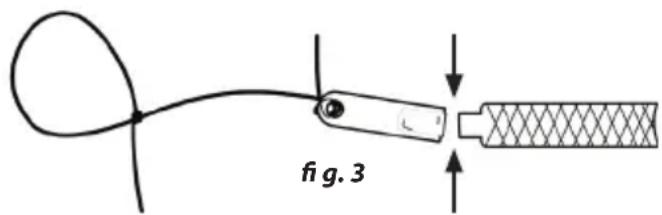
Battery placement
Place the battery in an easily accessible spot with the velcro pad included. Be sure to clean the area thoroughly before installing.
Volume wheel placement
Find a suitable location near the top inner edge of the soundhole for the volume pot. Clean the area, peel off the backing from the adhesive and put the pot into place.
Secure all wires with the wire clips provided and re-string the uke. You are done.
PACKAGE CONTENTS
One (1) Undersaddle pickup and endpin preamp with attached volume control and battery connector
One (1) Green monofilament line for pickup installation
Two (2) CR2032 3V lithium coin cell battery
Three (3) Self-stick wire clips
One (1) Manual
OVERVIEW AND CAUTIONS
This product must be installed by a professional luthier to qualify for warranty coverage. Technical assistance will not be provided for home or hobbyist installations.
REGISTER THIS PRODUCT
online at www.lrbaggs.com
C.R. Bagge


- INSTALLING THE STRAPJACK
- STEP 2. PICKUP INSTALLATION
- DRILLING THE HOLE
- TO MAKE INSTALLING THE PICKUP EASIER, WE HAVE INCLUDED A GREEN MONOFILAMENT LINE FOR PULLING THE PICKUP THROUGH THE HOLE. THERE IS A LOOP TIED ON ONE END TO KEEP THE LINE FROM FALLING INTO THE INSTRUMENT. SLIP THE SIDE WITHOUT THE LOOP DOWN THROUGH THE HOLE IN THE SADDLE SLOT AND FEED IT UP THROUGH THE SOUNDHOLE. THREAD THE LINE THROUGH THE HOLE IN THE GUIDE AT THE END OF THE PICKUP AND TIE A KNOT TO SECURE IT (SEE FIGURE 2)
- PREPARING THE SADDLE
- YOU WILL NEED TO COMPENSATE FOR THE THICKNESS OF THE PICKUP BY REMOVING APPROXIMATELY .030" FROM THE OVERALL HEIGHT OF THE SADDLE. NOTE: THE FIT OF THE SADDLE IS THE SINGLE MOST IMPORTANT FACTOR FOR THE INSTALLATION. THE BOTTOM OF THE SADDLE SHOULD BE PERFECTLY FLAT. THE IDEAL SADDLE FIT IS LOOSE ENOUGH TO REMOVE WITH YOUR FINGERTIPS, BUT WILL NOT FALL OUT BY ITSELF
- BATTERY PLACEMENT
- VOLUME WHEEL PLACEMENT
- PACKAGE CONTENTS
- OVERVIEW AND CAUTIONS
Brand : L.R.Baggs
Model : FIVE.O
Category : Audio System