RF-QX4 - Earphones Rocketfish - Free user manual and instructions
Find the device manual for free RF-QX4 Rocketfish in PDF.


| Product Type | Wireless Bluetooth Headset |
| Brand | Rocketfish |
| Model | RF-QX4 (RF-QX4-T, RF-QX4-E, RF-QX4-J) |
| Bluetooth Version | v2.1+EDR |
| Profiles | Handsfree Profile (HFP) v1.5, Headset Profile (HSP) v1.1 |
| Operating Range | Up to 33 feet (10 meters) |
| Talk Time | Up to 7 hours |
| Standby Time | Up to 250 hours |
| Charging Time | Approximately 2 hours |
| Battery Type | Rechargeable lithium-ion |
| Power Supply | USB charging cable and A/C wall charger |
| Dimensions (Approx.) | 2.0 x 0.8 x 0.6 inches (5.1 x 2.0 x 1.5 cm) |
| Weight (Approx.) | 0.7 oz (20 g) |
| Package Contents | Headset, ear loop, earbuds (small, medium, large), USB cable, AC charger, Quick Setup Guide |
| Key Functions | Voice dial, redial, answer/end call, reject call, mute/unmute, volume control, call transfer |
| Indicator Light | Shows pairing, connection, battery, and call status |
| Pairing Capacity | Up to 8 devices, connected to 1 at a time |
| Safety Features | Volume warning, battery safety, Do not expose to water or heat sources |
| Maintenance | Clean with dry cloth; avoid harsh chemicals, moisture, and extreme temperatures |
| Warranty | One-year limited warranty |
| Compliance | FCC Part 15, IC RSS-210 |
Frequently Asked Questions - RF-QX4 Rocketfish
User questions about RF-QX4 Rocketfish
0 question about this device. Answer the ones you know or ask your own.
Ask a new question about this device
Download the instructions for your Earphones in PDF format for free! Find your manual RF-QX4 - Rocketfish and take your electronic device back in hand. On this page are published all the documents necessary for the use of your device. RF-QX4 by Rocketfish.
USER MANUAL RF-QX4 Rocketfish
Wireless Bluetooth Headset
RF-QX4/RF-QX4-T/
RF-QX4-E/RF-QX4-J
rocketfish mobile
Wireless Bluetooth Headset
Contents
Important safety instructions....3
Introduction......4
Features......4
Package contents......4
Components ....5
Using your headset....6
Headset functions....6
Charging the battery ....7
Turning the headset on or off....7
Pairing the headset with a compatible phone......7
Disconnecting the headset from the phone......8
Reconnecting the headset to the phone ....8
Making a call....8
Answering or ending a call....9
Rejecting a call 9
Redialing the last number dialed....9
Muting a call....9
Using voice dialing 9
Adjusting the headset volume....10
Switching between the headset and phone......10
Erasing all pairing information....10
Turning the indicator on or off....10
Checking the battery status 11
Resetting the headset (hardware reset)....11
Maintaining....11
Troubleshooting....12
Specifications 12
Legal notices....12
One-year limited warranty 13
Important safety instructions
1 Read these instructions.
2 Keep these instructions.
3 Heed all warnings.
4 Follow all instructions.
5 Do not expose the headset to water.
6 Clean only with a dry cloth.
7 Do not plug in the wall charger near any heat sources such as radiators, heat registers, stoves, or other chargers that produce heat.
8 Do not defeat the safety purpose of the polarized or grounding-type plug. A polarized plug has two blades with one wider than the other. A grounding type plug has two blades and a third grounding prong. The wide blade or the third prong are provided for your safety. If the provided plug does not fit into your outlet, consult an electrician for replacement of the obsolete outlet.
9 Protect the power cord from being walked on or pinched particularly at plugs, convenience receptacles, and the point where they exit from the charger.
10 Only use attachments/accessories specified by the manufacturer.
11 Unplug this charger during lightning storms or when unused for long periods of time.
12 Refer all servicing to qualified service personnel. Servicing is required when the apparatus has been damaged in any way, such as power-supply cord or plug is damaged, liquid has been spilled or objects have fallen into the apparatus, the apparatus has been exposed to rain or moisture, does not operate normally, or has been dropped.
13 To reduce the risk of fire or electric shock, do not expose the charger to rain, moisture, dripping, or splashing.
14 An apparatus with a three-prong, grounding-type plug is a Class I apparatus, which needs to be grounded to prevent possible electric shock. Make sure that you connect this Class I device to a grounding-type, three-prong outlet.
15 In order to charge your headset correctly, the wall outlet must be in correct working condition.
16 Batteries should not be exposed to excessive heat.
Caution: Danger of explosion if battery is incorrectly replaced. Replace only with the same or equivalent type.
Warning: If the volume is set too high, excessive sound pressure from earphones and headphones can cause hearing loss.
Introduction
Congratulations on your purchase of the RF-QX4 wireless headset. This headset represents the state of the art in wireless headset design and is designed for reliable and trouble-free performance.
Note: Your RF-QX4 model number may end in a letter depending on what region you are in. We use RF-QX4 in this User Guide to refer to all of the following models:
• RF-QX4—United States
• RF-QX4-T—Canada
• RF-QX4-E—Europe
• RF-QX4-J—Japan
Features
Package contents
• R F - Q X 4 h e a d s e t
- Ear loop
• Earbuds (small, medium, and large)
- USB charging cable and A/C wall charger
- Quick Setup Guide
Note: The ear loop and medium earbud come preattached.
Components
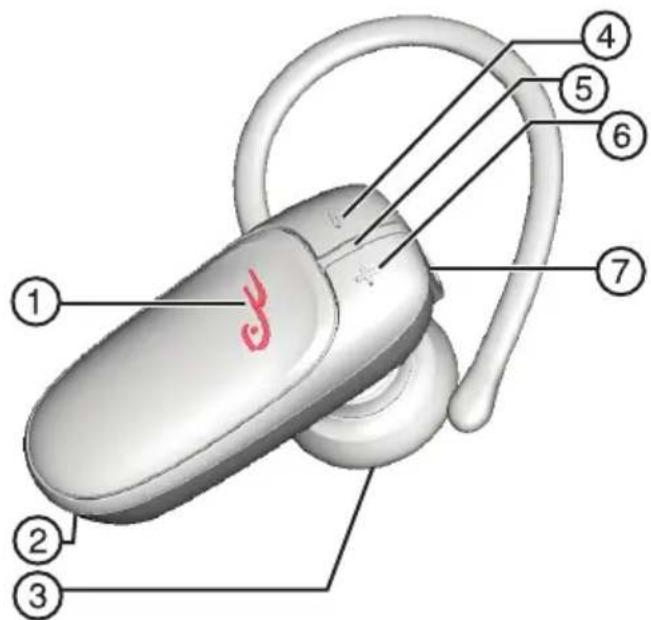
| # Component Description | ||
| 1 | Power/Send/End button • Switches the headset on and off. Answers incoming calls. Ends active calls. Rejects incoming calls. | |
| 2 | Microphone Transmits your voice. | |
| 3 | Earpiece Transmits the caller's voice. | |
| 4 | - (volume down button) Press to decrease the headset volume. | |
| 5 | Indicator light | Power on—Lights solid green for one second and the headset beeps once. Pairing mode—Rapidly flashes green-red.The flashing continues for approximately three minutes or until the headset is connected to a compatible phone. If the headset is not connected to a phone during this time, the headset enters connectable status. Connectable—Flashes green once every 2.5 seconds. Connection active—Flashes green every 5 seconds. Incoming call—Flashes green two times every 1 second. Active call—Flashes green every 5 seconds. Power off—Lights solid red for 1 second and the headset beeps once. Low battery—Alternately flashes red and green, and the headset beeps every 300 seconds. |
| # | Component | Description |
| 6 | + (volume up button) Press to increase the headset volume. | |
| 7 | Charger connector Connect the USB charging cable to the AC adapter and a power outlet to charge the battery.ORConnect the USB charging cable to this jack and to a USB port on a computer. | |
Using your headset
Headset functions
| Headset function Button presses | |
| Voice dial Press the Power/Send/End button. | |
| Redial | Double-press the Power/Send/End button. |
| Answer a call Press the Power/Send/End button. | |
| End (cancel) a call | Press and hold the Power/Send/End button for two seconds. |
| Reject a call Double-press the Power/Send/End button. | |
| Transfer a call between connected devices | Double-press the Power/Send/End button while in a call to transfer the call to the handset. |
| Mute or unmute | Press the + (volume up) and - (volume down) buttons at the same time. |
| Adjust the headset volume | Press the + (volume up) or - (volume down) button. |
| Erase all pairing information When the headset is turned off, press and hold the Power/Send/End and - (volume down) buttons. | |
| Turn the indicator on When the headset is connected to a phone, press and hold the Power/Send/End and + (volume up) buttons for three seconds. | |
| Turn the indicator off When the headset is connected to a phone, press and hold the Power/Send/End and - (volume down) buttons for three seconds. | |
| Check the battery status | Press and hold the Power/Send/End for two seconds. |
Charging the battery
Before using the headset, you must charge the battery for approximately two hours. When the battery is fully charged, it provides up to 7 hours of talk time or up to 250 hours of standby time.
To charge the battery:
- Connect the AC wall charger to the headset and to a power outlet. While the battery is charging, the indicator lights red. When the battery is fully charged, the indicator lights green.
Turning the headset on or off
To turn the headset on or off:
1 To turn on the headset, press and hold the Power/Send/End button for about two seconds. The headset beeps and the indicator blinks green. (The first time you turn on the headset, you have to press and hold the power button for five seconds.)
2 To turn off the headset, press and hold the power button for about four seconds. The headset beeps and the indicator briefly lights red.
Pairing the headset with a compatible phone
Pairing is the process of linking the headset with a Bluetooth-enabled mobile phone. After you pair the headset with a phone, you can only use the headset with the paired phone. If you want to use the headset with a different phone, you must repeat the pairing process with the new phone. The headset can be paired with up to eight compatible phones, but it can be connected to only one phone at a time.
To pair the headset with a compatible phone:
1 Make sure that a compatible phone is turned on and within 33 feet (10 meters) of the headset.
2 Turn on the headset and make sure that the battery is fully charged.
3 Press and hold the Power/Send/End button for about four seconds. The indicator rapidly flashes green.
4 Release the button. The headset is now in pairing mode.
5 Activate the Bluetooth connection from the phone. See the documentation that came with the phone for instructions.
6 Set the phone to start searching for Bluetooth devices.
7 Select RF-QX4 from the list of found devices displayed on the phone.
8 If necessary, enter the PIN code 0000 to pair and connect the headset with your phone. With some phones, you need to make a connection separately after pairing.
Disconnecting the headset from the phone
To disconnect the headset from the phone:
- Turn off the headset.
Or,
- Disconnect the headset in the phone's menu.
Or,
- Move the headset more than 33 feet (10 meters) away from the phone.
Note: You do not need to delete the pairing with the headset to disconnect the headset. When you reconnect the headset to a phone it has been paired with, you do not have to enter the code 0000 again.
Reconnecting the headset to the phone
Note: The headset connects to the last connected phone by default. If the last phone is out of the Bluetooth operating range or you are not using the last phone, the headset searches and connects to the other paired phones.
To reconnect the headset to the last phone used:
- If the headset is turned off, turn it on. It automatically connects to the phone.
Note: If the headset is out of Bluetooth operating range (33 feet/10 meters), the headset sounds a warning tone. If you move the headset back into operating range within two minutes, it automatically reconnects with the phone.
If the headset is out of Bluetooth operating range for more than two minutes, go back into range then press and hold the Power/Send/End button until a beep sounds to indicate the connection is reactivated.
Making a call
To make a call:
- Use the phone in the normal way. See the phone's documentation for instructions.
Answering or ending a call
When you receive a call, you hear a ringing tone through the headset.
To answer or end a call:
- Press the Power/Send/End button to answer a call.
- Press and hold the Power/Send/End button for two seconds to end a call.
Note: Some phones have an Auto Answer function. If the phone has this function, you can use it with the headset.
Rejecting a call
To reject a call:
- Double-press the Power/Send/End button.
Redialing the last number dialed
To redial the last number dialed:
- While no call is in progress, double-press the Power/Send/End button.
Muting a call
To mute a call:
- Briefly press the volume up and volume down buttons at the same time. Press the volume up and volume down buttons again to unmute the call.
Using voice dialing
If the paired phone has a voice dialing feature, you can use it with the headset.
To use voice dialing:
- When no call is in progress, press the Power/Send/End button. A tone indicates that you can start saying the voice tag. The phone plays the voice tag and dials the related phone number.
Adjusting the headset volume
To adjust the headset volume:
- Press the + (volume up) or - (volume down) button.
Switching between the headset and phone
To switch between the headset and phone:
- While a call is in progress, double-press the Power/Send/End button or use the switching function on the phone.
Erasing all pairing information
To erase all pairing information:
1 Turn off the headset.
2 At the same time, press and hold the Power/Send/End and – (volume down) buttons until the indicator flashes red and green alternately. After erasing all pairing information, the headset enters pairing mode automatically.
Turning the indicator on or off
You can turn the indicator on or off when the headset is connected to a phone.
To turn the indicator on or off:
- At the same time, press the Power/Send/End button and the + (volume up) button for about three seconds to turn on the indicator.
- At the same time, press the Power/Send/End button and the – (volume down) button for about three seconds to turn off the indicator.
Checking the battery status
When the headset is paired and connected to a phone, press and hold the Power/Send/End button for about two seconds.
- If the indicator flashes green once, the battery level is over half of the battery capacity.
- If the indicator flashes orange once, the battery level is less than half, but has more than one hour of talk time.
- If the indicator flashes red once, the battery level is less than one hour of talk time.
Resetting the headset (hardware reset)
To reset the headset (hardware reset):
- Press and hold the Power/Send/End button and connect the charger at the same time. The headset is turned off and reset.
Note: You should only use the reset function when the headset operates unusually. When you reset the headset, pairing information is not erased.
Maintaining
- Do not store the headset in cold areas. When the headset returns to normal temperature, moisture can form inside the headset and damage electronic circuit boards.
- Do not drop, knock, or shake the headset. Rough handling can break internal circuit boards and fine mechanics.
- Do not use harsh chemicals, cleaning solvents, or strong detergents to clean the headset.
- Do not paint the headset. Paint can clog the moving parts and prevent correct operation.
Troubleshooting
If you cannot connect to a compatible phone, make sure that:
• The battery is charged
• The headset is turned on
• The phone has been paired with the headset
Specifications
The headset supports the following specifications:
- Bluetooth Core Specification v2.1+EDR
- Handsfree Profile (HFP) v1.5
- Headset Profile (HSP) v1.1
Legal notices
FCC Part 15
This device complies with Part 15 of the FCC Rules. Operation of this product is subject to the following two conditions: (1) this device may not cause harmful interference, and (2) this device must accept any interference received, including interference that may cause undesired operation.
This equipment has been tested and found to comply within the limits for a class B digital device, pursuant to Part 15 of the FCC Rules. These limits are designed to provide reasonable protection against harmful interference in a residential installation. This equipment generates, uses, and can radiate radio frequency energy and, if not installed and used in accordance with the instructions, may cause harmful interference to radio communications. However, there is no guarantee that interference will not occur in a particular installation. If this equipment does cause harmful interference to radio or television reception, which can be determined by turning the equipment off and on, the user is encouraged to try to correct the interference by one or more of the following measures:
- Reorient or relocate the receiving antenna.
- Increase the separation between the equipment and receiver.
- Connect the equipment into an outlet on a circuit different from that to which the receiver is connected.
- Consult the dealer or an experienced technician for help.
FCC warning
Changes or modifications not expressly approved by the party responsible for compliance with the FCC Rules could void the user's authority to operate this equipment.
Canada RSS210 statement
This equipment complies with RSS210 of the IC Rules. Operation is subject to the following two conditions:
(1) This device may not cause harmful interference, and
(2) This device must accept any interference received, including interference that may cause undesired operation.
One-year limited warranty
Rocketfish Products ("Rocketfish") warrants to you, the original purchaser of this new RF-QX4 ("Product"), that the Product shall be free of defects in the original manufacture of the material or workmanship for one (1) year from the purchase of the Product ("Warranty Period"). This Product must be purchased from an authorized dealer of Rocketfish brand products and packaged with this warranty statement. This warranty does not cover refurbished Product. If you notify Rocketfish during the Warranty Period of a defect covered by this warranty that requires service, terms of this warranty apply.
How long does the coverage last?
The Warranty Period lasts for one year (365 days), beginning on the date you purchased the Product. The purchase date is printed on the receipt you received with the product.
What does this warranty cover?
During the Warranty Period, if the original manufacture of the material or workmanship of the Product is determined to be defective by an authorized Rocketfish repair center or store personnel, Rocketfish will (at its sole option): (1) repair the Product with new or rebuilt parts; or (2) replace the Product at no charge with new or rebuilt comparable products or parts. Products and parts replaced under this warranty become the property of Rocketfish and are not returned to you. If service of Products and parts are required after the Warranty Period expires, you must pay all labor and parts charges. This warranty lasts as long as you own your Rocketfish Product during the Warranty Period. Warranty coverage terminates if you sell or otherwise transfer the Product.
How to obtain warranty service?
If you purchased the Product at a retail store location, take your original receipt and the Product to the store you purchased it from. Make sure that you place the Product in its original packaging or packaging that provides the same amount of protection as the original packaging. If you purchased the Product from an online web site, mail your original receipt and the Product to the address listed on the web site. Make sure that you put the Product in its original packaging or packaging that provides the same amount of protection as the original packaging.
Where is the warranty valid?
This warranty is valid only to the original purchaser of the Product in the United States, Canada, and Mexico.
What does the warranty not cover?
This warranty does not cover:
- Customer instruction
- Installation
- Setup adjustments
• Cosmetic damage
• Damage due to acts of God, such as lightning strikes
- Accident
- Misuse
- A b u s e
- Negligence
• C o m m e r c i a l u s e - Modification of any part of the Product, including the antenna
This warranty also does not cover:
- Damage due to incorrect operation or maintenance
- Connection to an incorrect voltage supply
- Attempted repair by anyone other than a facility authorized by Rocketfish to service the Product
- Products sold as is or with all faults
- Consumables, such as fuses or batteries
- Products where the factory applied serial number has been altered or removed
REPAIR REPLACEMENT AS PROVIDED UNDER THIS WARRANTY IS YOUR EXCLUSIVE REMEDY. ROCKETFISH SHALL NOT BE LIABLE FOR ANY INCIDENTAL OR CONSEQUENTIAL DAMAGES FOR THE BREACH OF ANY EXPRESS OR IMPLIED WARRANTY ON THIS PRODUCT, INCLUDING, BUT NOT LIMITED TO, LOST DATA, LOSS OF USE OF YOUR PRODUCT, LOST BUSINESS OR LOST PROFITS. ROCKETFISH PRODUCTS MAKES NO OTHER EXPRESS WARRANTIES WITH RESPECT TO THE PRODUCT, ALL EXPRESS AND IMPLIED WARRANTIES FOR THE PRODUCT, INCLUDING, BUT NOT LIMITED TO, ANY IMPLIED WARRANTIES OF AND CONDITIONS OF MERCHANTABILITY AND FITNESS FOR A PARTICULAR PURPOSE, ARE LIMITED IN DURATION TO THE WARRANTY PERIOD SET FORTH ABOVE AND NO WARRANTIES, WHETHER EXPRESS OR IMPLIED, WILL APPLY AFTER THE WARRANTY PERIOD. SOME STATES, PROVINCES AND JURISDICTIONS DO NOT ALLOW LIMITATIONS ON HOW LONG AN IMPLIED WARRANTY LASTS, SO THE ABOVE LIMITATION MAY NOT APPLY TO YOU. THIS WARRANTY GIVES YOU SPECIFIC LEGAL RIGHTS, AND YOU MAY ALSO HAVE OTHER RIGHTS, WHICH VARY FROM STATE TO STATE OR PROVINCE TO PROVINCE.
Contact Rocketfish:
For customer service please call 1-800-620-2790
www.rocketfishproducts.com
Distributed by Best Buy Purchasing, LLC
7601 Penn Avenue South, Richfield, Minnesota, U.S.A. 55423-3645
© 2011 BBY Solutions, Inc.
All rights reserved. ROCKETFISH is a trademark of BBY Solutions, Inc. Registered in some countries. All other products and brand names are trademarks of their respective owners.

www.rocketfishproducts.com (800) 620-2790
Distributed by Best Buy Purchasing, LLC
7601 Penn Avenue South, Richfield, MN 55423-3645 USA
© 2011 BBY Solutions, Inc.
All rights reserved. ROCKETFISH is a trademark of BBY Solutions, Inc.
All other products and brand names are trademarks of their respective owners.
- Wireless Bluetooth Headset
- rocketfish mobile
- Contents
- Important safety instructions
- Introduction
- Features
- Package contents
- Components
- Using your headset
- Headset functions
- Charging the battery
- To charge the battery:
- Turning the headset on or off
- To turn the headset on or off:
- Pairing the headset with a compatible phone
- To pair the headset with a compatible phone:
- Disconnecting the headset from the phone
- To disconnect the headset from the phone:
- Reconnecting the headset to the phone
- To reconnect the headset to the last phone used:
- Making a call
- To make a call:
- Answering or ending a call
- To answer or end a call:
- Rejecting a call
- To reject a call:
- Redialing the last number dialed
- To redial the last number dialed:
- Muting a call
- To mute a call:
- Using voice dialing
- To use voice dialing:
- Adjusting the headset volume
- To adjust the headset volume:
- Switching between the headset and phone
- To switch between the headset and phone:
- Erasing all pairing information
- To erase all pairing information:
- Turning the indicator on or off
- To turn the indicator on or off:
- Checking the battery status
- Resetting the headset (hardware reset)
- To reset the headset (hardware reset):
- Maintaining
- Troubleshooting
- Specifications
- Legal notices
- FCC Part 15
- FCC warning
- Canada RSS210 statement
- One-year limited warranty
- How long does the coverage last?
- What does this warranty cover?
- How to obtain warranty service?
- Where is the warranty valid?
- What does the warranty not cover?
Brand : Rocketfish
Model : RF-QX4
Category : Earphones