
Multi View 28490 - Security Camera Summer Infant - Free user manual and instructions
Find the device manual for free Multi View 28490 Summer Infant in PDF.


| Product Type | Extra Video Camera for Multi View Monitor |
| Brand | Summer Infant |
| Model | Multi View 28490 |
| Number of Cameras Supported | Up to 4 cameras |
| Viewing Modes | Single camera, Split-screen (2-4 cameras), Auto-scan (8 sec per camera) |
| Mounting Options | Table top or wall mount |
| Included Accessories | 6 Security Clips, AC Adapter |
| Power Supply | AC adapter (included) |
| Dimensions (approx.) | 3.5 x 3.5 x 4.5 inches |
| Weight (approx.) | 0.5 lbs |
| Video Type | Digital color video |
| Night Vision | Yes (infrared LEDs, monochrome in low light) |
| Wireless Technology | 2.4 GHz FHSS (frequency hopping) |
| Range (typical) | Up to 200 meters (open space) |
| Safety Features | Strangulation prevention: cord kept >3 ft from crib; security clips |
| Maintenance | Wipe with dry, soft cloth; avoid water and heat sources |
| Spare Parts / Repairability | Contact Summer Infant for replacement parts; no user-serviceable parts inside |
| Certifications | FCC, CE (Europe) |
| Manufacturing Date | 2012 |
| Origin | Made in China |
Frequently Asked Questions - Multi View 28490 Summer Infant
User questions about Multi View 28490 Summer Infant
0 question about this device. Answer the ones you know or ask your own.
Ask a new question about this device
Download the instructions for your Security Camera in PDF format for free! Find your manual Multi View 28490 - Summer Infant and take your electronic device back in hand. On this page are published all the documents necessary for the use of your device. Multi View 28490 by Summer Infant.
USER MANUAL Multi View 28490 Summer Infant
natural_image
White summer phone with a small screen and antenna, no visible text or symbols on the device body.MULTIVIEW™ EXTRA VIDEO CAMERA
WARNING:
THIS PRODUCT CANNOT REPLACE RESPONSIBLE ADULT SUPERVISION.
- STRANGULATION HAZARD - Children have STRANGLED in cords. Keep this cord out of reach of children (more than 3 feet (0.9 m) away from the crib). Use enclosed Security Clips to help secure cord away from baby's reach. Never use extension cords with AC Adapters. Only use the AC Adapters provided.
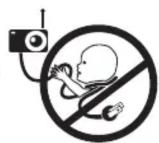
- When an AC Adapter is plugged into an electrical outlet, do not touch the exposed end.
- Test monitor before first use, periodically, and when changing location of the Camera.
- Do not use monitor near water (such as bathtub, sink, etc.).
- Keep monitor away from heat sources (such as stoves, radiators, etc.).
- Make sure there is proper ventilation around all monitor components. Do not place on sofas, cushions, beds, etc. which may block ventilation.
- Nursery monitors use public airwaves to transmit signals. This monitor may pick up signals from other monitors or similar devices and signals broadcast by this monitor may be picked up by other receivers.
• This product is not a toy. Do not allow children to play with it. - This product contains small parts. Adult assembly required. Exercise care when unpacking and assembling the product.
Add, View Camera and Delete Cameras
Up to 4 cameras can be used with the Multi View Digital Color Video Monitor (#28490)
Add Camera:
- Move the monitor to the same area as the camera and with both powered on, press the MENU/SELECT button once.
- Press the Up and Down arrows to highlight the “+■” icon.
- Press MENU/SELECT to enter "ADD CAM" menu.
- The next available channel will automatically be selected. Press MENU/SELECT to begin syncing.
- Within 20-seconds, press the CODE button on back of camera and live video will appear.
If this is unsuccessful, you should repeat steps above making sure the monitor and camera are close enough to each other for syncing.
Split-Screen and Auto-Scan Viewing:
Note: these options are only available when more than one camera is in use.
The monitor is designed with innovative technology that allows parents to view up to 4 cameras at one time on a split-screen or parents can use the auto-scan feature and scan between cameras, with a duration of about 8-seconds between cameras.
- To scan all cameras in use, press MENU/SELECT to enter the camera menu.
- Use the Up and Down arrows to highlight the "■-■" icon and press MENU/SELECT to begin scanning.
- To change from scanning mode, press the split-screen button "☐☐" to view multiple cameras at one time on one screen.
- To change from split-screen mode, us the Up and Down arrows to highlight the camera you want to view and press MENU/SELECT to begin viewing that camera.
- To resume scanning, repeat step 2 or to resume viewing in split-screen mode, repeat step 3.
Delete Camera:
- Press the MENU/SELECT button to enter the camera menu.
- Use the Up and Down arrows to navigate to “-” icon.
- Press MENU/SELECT to enter "DEL CAM" menu.
- Using the Up and Down arrows, select the camera to delete and press MENU/SELECT.
CAMERA SET UP & USE:
Table Top or Wall Mounting:
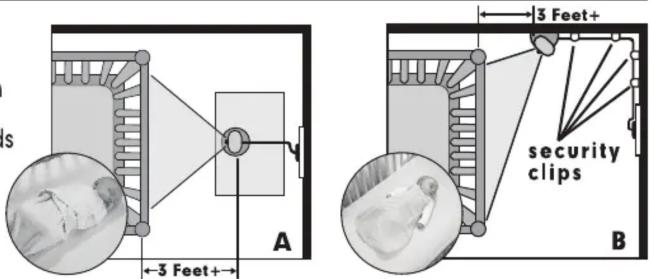
Determine a location for the CAMERA that will provide the best view of your baby in his crib. Place the CAMERA on a flat surface, such as a dresser, bureau, or shelf (Figure A). Or mount the CAMERA on a wall (Figure B). NEVER place camera or cords within 3 feet of the crib. Secure the cord to the wall using the 6 Security Clips included to keep cord away from baby's reach. Be sure to test reception and CAMERA positioning before mounting to a wall (see "Testing Your Initial Set Up" section).

© 2012 Summer Infant, Inc. Colors and styles may vary. Please retain information for future reference.
MADE IN CHINA. 1/13
Summer Infant, Inc.
1275 Park East Drive
Woonsocket, RI 02895 USA
1-800-268-6237
Summer Infant Europe, Ltd.
First Floor North Wing, Focus 31
Cleveland Road, Hemel Hempstead
Hertfordshire, HP2 7BW UK
+44 (0) 144 250 5000

Brand : Summer Infant
Model : Multi View 28490
Category : Security Camera