Compass - Microphone Blue - Free user manual and instructions
Find the device manual for free Compass Blue in PDF.


| Product Type | Desktop Boom Arm |
| Brand | Blue |
| Model | Compass |
| Max Weight Capacity | 2.4 lbs (including microphone and shock mount) |
| Horizontal Reach | 32 inches |
| Mounting Type | C-clamp for desktop (fixed mounting with optional desk-insert bushing) |
| Threading | Standard 3/8\" with 3/8\" to 5/8\" adapter included |
| Cable Management | Hidden-channel cable management with snap closures |
| Boom Arm Type | Tube-style |
| Adjustability | Adjustable friction hinges at base, mid-point, and microphone mount; internal spring tension adjustment |
| Warranty | 2 years limited |
| Included Accessories | C-clamp, 3/8\" to 5/8\" adapter |
| Compatibility | Broadcast microphones like Blue Yeti, Yeti Pro, Blackout Spark SL |
| Power Source | None (passive) |
| Application | Game streaming, podcasting, voice-over |
Frequently Asked Questions - Compass Blue
User questions about Compass Blue
0 question about this device. Answer the ones you know or ask your own.
Ask a new question about this device
Download the instructions for your Microphone in PDF format for free! Find your manual Compass - Blue and take your electronic device back in hand. On this page are published all the documents necessary for the use of your device. Compass by Blue.
USER MANUAL Compass Blue
natural_image
Line drawing of a blue industrial pipe fitting with two circular components and a handle (no text or symbols)
BLUEDESIGNS.COM
©7017 Blue Microphones. All rights reserved. Blue Logo General registered trademarks of Blue Microphones, LLC
Compass is a premium tube style desktop boom arm with internal springs and built-in cable management, making it ideal for broadcast applications including game streaming, podcasting, voice-over and more. With smooth, quiet operation and a sophisticated on-camera lack, Compass is the perfect boom arm for broadcast mics weighing up to 24 pounds, including Yoli, Yoli Pro and Blackout Spark SL.
DESKTOP MOUNTING INSTRUCTIONS
Mount Compass to your desktop via the included C-clamp:
1
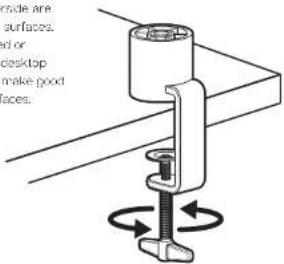
Unscrow the C-clamp and slide is over the side of your desktop, making sure that both the top of the C-clamp and the underside are resting on flat surfaces. Overy rounded or overhanging desktop edges do not make good mounting surfaces.
2
Screw the lower part of the C-clamp until it is light and secure.
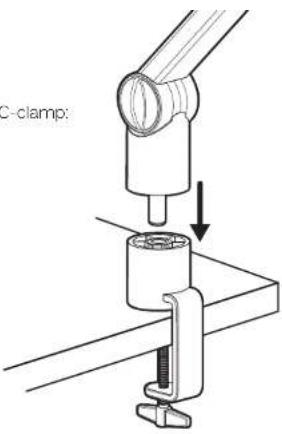
3 Lower Compass into the C-clamp until it is secure and rotates smoothly in both directions.
Fixed mounting with the desk-insert bushing
(sold separately, see bluedesigns.com)
If you would like to permanently mount Compass to your desktop, please use the following procedure:
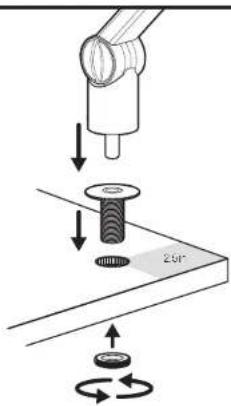
- Using an electric drill and a 1-inch hole saw bit drill a hole into the desktop at 100 feet 2 inches from the edges of the desk.
- Unscrew the nut from the desk-insert bushing and insert the bushing into the hole.
- Screw the nut onto the bushing from the underside of the desktop until it is light and secure.
- Lower Compass into the desk-insert bushing unit it is secure and rotates smoothly in both directions.
CONNECTING A MICROPHONE
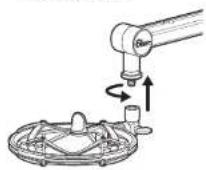
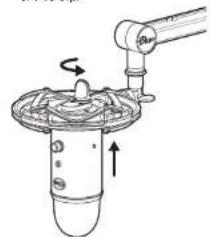
Microphones can be connected to Compass via a shock mount, microphone clip or internal threads (if available on the mic). Compass supports shock mounts and mic clips with 3/8" threading, or 5/8" via the included adaptor. Microphones can be connected facing up, or suspended upside down from Compass. To connect your microphone:
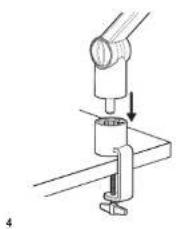
1 Insert Compass into the desktop C-Clamp from step 3 above.
natural_image
Mechanical assembly diagram showing a tool pressing into a cylindrical component (no text or symbols)2 Screw your microphone's shockmount or mic clip onto Compass so that it is trim and secure.
3 Connect the microphone to the shockmount or mic clip.
natural_image
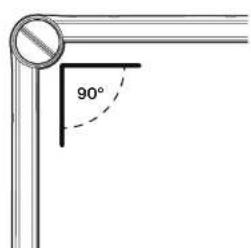
Diagram of a mechanical device with rotating components and directional arrows (no text or symbols)4 Adjust Compass so that it makes a 90-degree angle at the middle pivot point. Confirm that the microphone balances in the 90-degree position and you can smoothly move it into the desired position as necessary. If you have the boom arm fully extended, you may need to lighter the thumbscrow at the base of the boom arm near the C-Clamp.
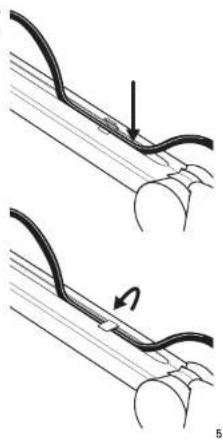
5 Connect your microphone cable to the mic, open the snass along the top side at the boom arm tubes and tuck the microphone cable into the hidden channel
6 Close the snaps over the cable inside the hidden cable channel.
natural_image
Diagram showing two mechanical or electrical component configurations with arrows indicating motion (no text or symbols)FINE-TUNING COMPASS
Compass comes pre-adjusted for use with most broadcast microphones like Yeti and Yeti Pro; however, there may be situations where you wish to fine-tune the microphone hold
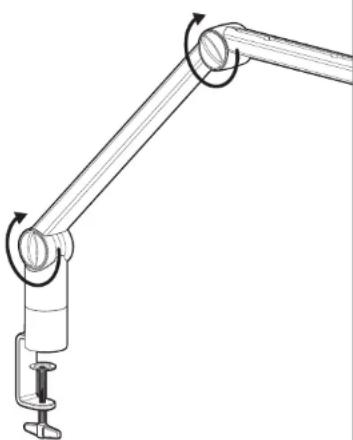
- Compass features adjustable friction hinges at each of the pivot points: base, mid-point, and near the microphone mount. For a more firm hold, rotate the thumbscrews at the friction hinges clockwise.
- For additional adjustment, you can fine-tune the internal spring tension. Inside the basic of Compass, you will find the spring tension screw. Rotate the screw clockwise to increase the tension of the internal springs—which may be necessary for heavier microphones—or counter-clockwise to loosen—which may be necessary for lightweight microphones
natural_image
Mechanical arm diagram showing rotational motion with arrows indicating direction (no text or symbols)TECHNICAL SPECIFICATIONS:
- Boom Type: Tube-style
• Max Weight Hold: 2.4lbs (including mic and shock mount) - Threading: Standard 3/8" threading, with 3/8" to 5/8" adapter affixed
- Cable Management: Hidden-channel cable management
• Max Horizontal Reach: 32 ^1
INCLUDED ACCESSORIES:
- Compass desktop boom arm
• C clamp for desktop mount - 3/8" to 5/8" adapter
WARRANTY
Blue Microphones warrants its hardware product against defects in materials and workmanship for a period of TWO (2) YEARS from the date of original retail purchase, provided the purchase was made from an authorized Blue Microphones dealer. This warranty is void if the equipment is altered, misused, misandled, disassembled, maadjusted, suffers excessive wear, or is serviced by any parties not authorized by Blue Microphones. The warranty does not include transportation costs incurred because of the need for service unless arranged for in advance. Blue Microphones reserves the right to make changes in design and improve upon its products without obligation to install these improvements in any of its products previously manufactured. For warranty service or for a copy of Blue's Warranty Policy including a complete list of exclusions and limitations, contact Blue at 816 875 3200. In keeping with our policy of continued product improvement, Baltic Latvian Universal Electronics (BLUE) reserves the right to alter specifications without prior notice.

Designed in USA. Made in China.
Brand : Blue
Model : Compass
Category : Microphone