6060 - Yogurt maker WestBend - Free user manual and instructions
Find the device manual for free 6060 WestBend in PDF.


| Product Type | Yogurt Maker |
| Brand | WestBend |
| Model | 6060 |
| Capacity | 1 Quart (4 cups) |
| Material | Plastic container and lid, metal heating base |
| Power Supply | 120V AC, 60 Hz (estimated 40-60 watts) |
| Signal Light | Yes, indicates when base is heating |
| Cord Storage | Yes, on underside of base |
| Heating Method | Low-temperature constant heating |
| Processing Time | 4 to 10 hours depending on desired tartness |
| Temperature Range | 100-110°F for milk before adding starter |
| Cleaning - Container & Lid | Hand wash or dishwasher top rack only |
| Cleaning - Heating Base | Wipe with damp cloth; do not immerse |
| Safety Features | Short cord, do not immerse base or cord |
| Warranty | 90 days from original purchase |
| Included Accessories | Yogurt container with lid, cover, heating base |
| Recipes Included | Basic yogurt, evaporated milk yogurt, and multiple flavoring/dessert ideas |
Frequently Asked Questions - 6060 WestBend
User questions about 6060 WestBend
0 question about this device. Answer the ones you know or ask your own.
Ask a new question about this device
Download the instructions for your Yogurt maker in PDF format for free! Find your manual 6060 - WestBend and take your electronic device back in hand. On this page are published all the documents necessary for the use of your device. 6060 by WestBend.
USER MANUAL 6060 WestBend
1-QUART FRESH YOGURT MAKER
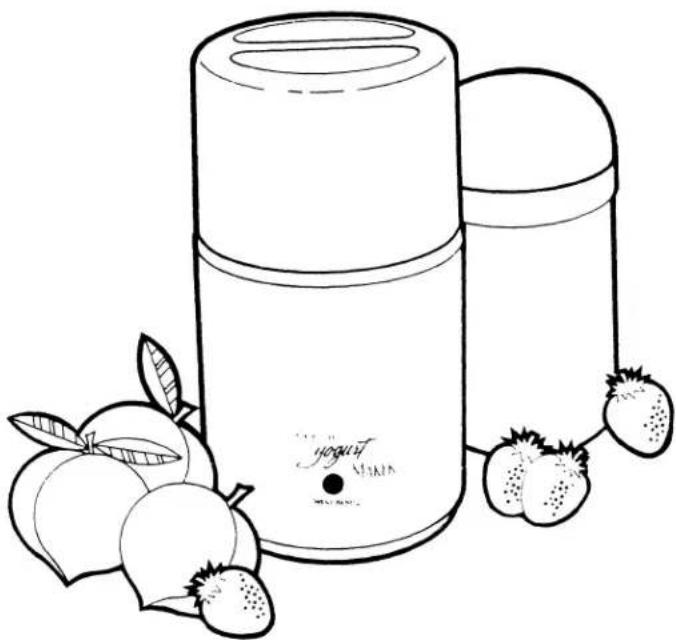
natural_image
Line drawing of a beverage bottle and a strawberry with fruit in the foreground (no text or symbols)Care and Use Instructions
BEFORE USING THE YOGURT MAKER, READ AND FOLLOW THE INSTRUCTIONS IN THIS BOOKLET.
IMPORTANT SAFEGUARDS
When using electrical appliances, basic safety precautions should always be followed including the following:
- Read all instructions before using.
• To protect against risk of electrical shock, do not put Yogurt Maker base, its cord or plug in water or other liquid. - Close supervision is necessary when any appliance is used by or near children.
- Unplug from outlet when not in use, before putting on or taking off parts and before cleaning.
- Do not operate any appliance with a damaged cord or plug or after the appliance malfunctions, or is dropped or damaged in any manner. Return appliance to The West Bend Company for examination, repair or electrical or mechanical adjustment.
- The use of attachments not recommended or sold by the manufacturer may cause fire, electric shock or injury.
- Do not use outdoors.
- Do not let cord touch hot surfaces or hang over the edge of a counter or table.
- Do not place Yogurt Maker on or near a hot electric or gas burner, or in a heated oven.
- Use Yogurt Maker only for the uses described in this booklet.
- Extreme caution must be used when moving an appliance containing hot liquids.
SAVE THESE INSTRUCTIONS
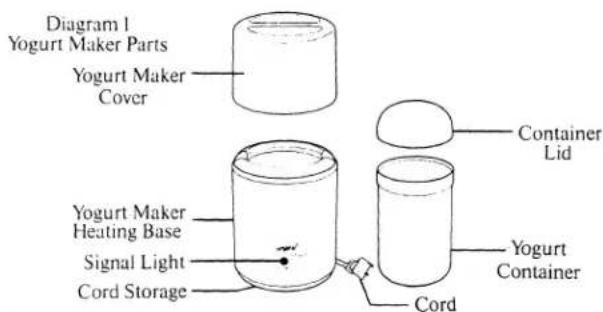
Your Yogurt Maker needs no special care other than cleaning. If servicing becomes necessary, please return your Yogurt Maker to The West Bend Company. See Warranty section in this booklet for service details. Do not attempt to repair it yourself.
CAUTION: Your Yogurt Maker Has A Short Cord As A Safety Precaution To Prevent Injury Or Property Damage Resulting From Pulling, Tripping Or Becoming Entangled With The Cord. Do Not Allow Children To Be Near Or Use This Yogurt Maker Without Close Adult Supervision. If You Must Use A Longer Cord Set Or An Extension Cord When Using The Yogurt Maker, The Cord Must Be Arranged So It Will Not Drape Or Hang Over The Edge Of A Countertop Or Tabletop Where It Can Be Pulled On By Children Or Tripped Over Accidentally. To Prevent Electrical Shock, Injury Or Fire, The Electrical Rating Of The Extension Cord You Use Must Be The Same Or More Than The Wattage Of The Yogurt Maker (Wattage Is Stamped On Underside Of Yogurt Maker).
YOGURT MAKING TIPS
Before making yogurt, review these tips to ensure satisfactory results:
- Be sure yogurt container, its lid and any other utensils used to heat or measure ingredients are clean. Impurities can affect the growth of the yogurt culture.
- Make sure the milk used for preparing yogurt is cooled to between 100 and 110^ before adding yogurt starter. If the milk is too warm, the yogurt culture will be destroyed. If the milk is slightly cooler, additional processing will be required. Use a candy or deep fryer thermometer that registers as low as 100 degrees, or sprinkle a few drops of milk on your wrist. Milk should feel lukewarm, not hot.
- Be sure to mix warm milk and yogurt starter gently, but thoroughly. DO NOT BEAT OR WHIP. If not mixed well, the yogurt may thicken only at the bottom of the container.
- Use 4 cups (1 quart) of milk to prepare 1 quart of plain yogurt. Any type of milk (whole, 2%, 1%, skim) can be used for making yogurt. Add 14 to 12 cup non-fat dry milk to help thicken yogurt. Try both amounts to determine which consistency you like the best. Homemade yogurt is not quite as smooth as commercially made yogurt, which is normal. Evaporated milk can also be used. See recipe on page 6.
-
When buying yogurt to use as the starter, always purchase plain (Not Flavored) yogurt and make sure it contains active yogurt culture and has not passed expiration date. This information will be on the outside of the yogurt container. If the container does not state that yogurt contains active culture, don't purchase it as it will not work in making yogurt. After you have made yogurt, you can use it as the starter. Remove 12 cup, refrigerate and use within 5 days. Do not flavor yogurt that will be used as starter. After using homemade yogurt several times as a starter, the yogurt may not thicken, indicating the culture is too weak. When this happens, purchase fresh, plain yogurt to use as the starter. Dry yogurt cultures are also available. Use according to package directions with 1 quart milk.
-
You can adjust the tartness of homemade yogurt by the amount of processing time. For a mild tasting yogurt, process 4 to 6 hours. For a tarter tasting yogurt, process 8 to 10 hours.
- Do not disturb Yogurt Maker during processing as this may affect the quality of the yogurt obtained. Also, keep it away from any drafts.
- After processing, yogurt should be partially set and jiggle in center of container. If not partially set, process an additional hour or until set. Yogurt will continue to thicken during refrigeration.
- During processing and refrigeration, a small amount of clear liquid may form on the surface of the yogurt. This is normal and called "whey." The whey can be stirred into the yogurt or it can be removed.
- Always keep yogurt refrigerated until used. Yogurt may be refrigerated for up to one week. After this time, it has a tendency to become very tart.
- Add flavoring or fruit to yogurt after processing and refrigeration.
- If yogurt never thickens, there are several reasons: 1.) starter too weak or added when milk too hot, 2.) starter not mixed thoroughly with milk, 3.) utensils used in preparing yogurt not clean, or 4.) starter was stirred too vigorously into the milk.
• Before Using Yogurt Maker For The First Time
Before using your Yogurt Maker for the first time, wash the yogurt container, its lid, and yogurt maker cover in hot soapy water with a dishcloth or sponge, rinse thoroughly and dry. Wipe Yogurt Maker heating base with a damp cloth and dry. Your Yogurt Maker is now ready to use.
CAUTION: To Reduce The Risk Of Electric Shock, Do Not Immerse Yogurt Maker Heating Base, Its Cord Or Plug In Water Or Other Liquid.
• To Make Yogurt
BASIC RECIPE
4 cups (1 quart) milk: whole, 2%, 1% or skim
14 to 12 cup instant non-fat dry milk powder
½ cup plain yogurt
- In 2-quart saucepan, combine milk and dry milk. Heat over medium heat, stirring frequently, to just below boiling point. Remove milk from heat and allow to cool until lukewarm, between 100 and 110°F. To hasten cooling of milk, place pan into refrigerator or sink of cold water, stirring occasionally to cool evenly. This takes about 20 minutes.
Milk can also be heated in microwave. In uncovered yogurt container, heat milk and dry milk at full power (High) for 6 to 8 minutes or to just below boiling. DO NOT ALLOW MILK TO BOIL. Carefully remove container from microwave as milk will be VERY HOT. Allow to cool until lukewarm, between 100 and 110°F. Cool as directed above.
-
Prewarm Yogurt Maker heating base by plugging cord into a 120 volt AC electric outlet ONLY. Signal light will glow when base is plugged in.
-
Add plain yogurt to warm milk, stirring gently to blend. DO NOT BEAT OR WHIP. Pour mixture into yogurt container, secure lid and place covered container into heating base. Cover Yogurt Maker and process, undisturbed and out of drafts, for 4 to 10 hours depending on tartness desired. Set timer or write down time yogurt will be done as a reminder. Yogurt should be partially set after processing and will thicken further after refrigeration. If not partially set, process an extra hour or until set.
-
After processing, unplug cord from outlet. Remove cover and lift covered yogurt container out of heating base. Place in refrigerator. Chill at least 2 hours. Remove 12 cup yogurt for future use as starter before adding desired fruit, flavoring, etc. Keep yogurt refrigerated until used. DO NOT PUT HEATING BASE OF YOGURT MAKER INTO REFRIGERATOR. ONLY THE YOGURT CONTAINER IS REFRIGERATOR-SAFE.
YOGURT MADE WITH EVAPORATED MILK-CUSTARD-LIKE CONSISTENCY
2 cups evaporated milk, whole or skim (not sweetened condensed)
2 cups hot tap water
13 cup instant non-fat dry milk powder
12 cup plain yogurt
- Prewarm Yogurt Maker heating base by plugging cord into a 120 volt AC electric outlet ONLY. Signal light will glow when base is plugged in.
- In yogurt container combine evaporated milk, hot water and dry milk. Stir well to blend. Check temperature, making sure it is between 100 and 110°F before adding starter. Add plain yogurt and stir gently to blend. DO NOT BEAT OR WHIP.
- Secure lid on yogurt container and place covered container into heating base. Cover Yogurt Maker and process, undisturbed and out of drafts, for 4 to 10 hours depending on tartness desired. Set timer or write down time yogurt will be done as reminder. Yogurt should be partially set after processing, and will thicken further after refrigeration. If not partially set, process an extra hour or until set.
- After processing, unplug cord from outlet. Remove cover and lift covered yogurt container out of heating base. Place in refrigerator. Chill at least 2 hours. Add desired flavoring. Keep refrigerated until used.
- Cleaning Yogurt Maker
Wash yogurt container and its lid in hot soapy water with a dishcloth or sponge. Rinse and dry. The yogurt container and its lid may also be washed in automatic dishwasher, TOP RACK ONLY. Wipe Yogurt Maker heating base and cover with damp cloth when needed. Underside of heating base features cord storage for convenience.
CAUTION: To Prevent Risk Of Electric Shock, Do Not Immerse Yogurt Maker Heating Base, Its Cord Or Plug In Water Or Other Liquid.
FLAVORING
The flavorings that you can add to yogurt are limited only by your imagination! When flavoring yogurt, be sure to add the desired flavorings after the yogurt has been processed and refrigerated. Gently fold flavoring into yogurt to maintain its consistency. Excessive stirring can cause the yogurt to become thin. Suggested flavorings include:
| Fresh, frozen or canned fruits | Brown sugar |
| Fruit jam, jelly or marmalade | Instant coffee |
| Flavored syrups | Nuts |
| Flavored extracts | Granola type cereals |
| Flavored gelatin | Dry soup mixtures for dips |
Honey
DRINKS, DIPS & DRESSINGS
BERRY BLEND
1 10-ounce package frozen sliced strawberries or raspberries, partially thawed
2 cups plain yogurt
In blender container, combine berries and yogurt. Blend at high speed 30 seconds. Stir. Blend an additional 30 seconds or until thick and frosty. Pour into glasses. Makes 4 6-ounce servings.
BREAKFAST BRIGHTENER
1 cup plain yogurt
1 banana, sliced
13 cup milk
2 tablespoons honey
2 tablespoons frozen orange juice concentrate
2 ice cubes, crushed
Combine all ingredients in blender container. Blend at high speed for 30 seconds or until smooth. Makes 4 4-ounce servings.
ONION YOGURT DIP
2 cups plain yogurt
1 1-ounce envelope dry onion-mushroom soup mix
Combine yogurt and soup mix in small mixing bowl. Stir gently to mix. Chill, covered, 1 to 2 hours before serving. Serve with chips, crackers or raw vegetables. Makes 2 cups.
YOGURT DIP
1 cup plain yogurt
12 cup small curd creamed cottage cheese
1 green onion, thinly sliced
12 teaspoon salt
18 teaspoon garlic salt dash pepper
Combine all ingredients in blender container and blend at high speed for 30 seconds or until smooth. Serve with raw vegetables. Makes 1 12 cups.
YOGURT SALAD DRESSING
1 cup plain yogurt
1/2 teaspoon dry mustard
½ teaspoon paprika
1/4 teaspoon garlic salt
In small mixing bowl, combine all ingredients. Stir gently until smooth. Makes 1 cup. May be used for tossed salads or as dressing for cole slaw.
BAKED POTATO TOPPING
1/2 cup shredded cheddar cheese
½ cup plain yogurt
1 tablespoon snipped chives or green onion top
Combine all ingredients in mixing bowl; mix well. Serve over baked potatoes. Makes 1 cup.
DESSERTS
LEMON CREAM PIE
14 cup boiling water
1 3-ounce package lemon-flavored gelatin
1 teaspoon grated lemon peel
1 tablespoon lemon juice
2 cups plain yogurt
1 9-inch graham cracker crust
1 4½-ounce container frozen whipped topping, thawed
6 to 8 thin lemon slices, optional
-
In medium-sized mixing bowl combine boiling water and gelatin. Stir to dissolve gelatin. Place bowl containing gelatin in a larger bowl of ice water. Stir gelatin occasionally until slightly thickened. Remove from water.
-
Add lemon peel, lemon juice and yogurt. Beat with wire whisk or rotary beater until smooth. Turn into graham cracker crust. Refrigerate 4 hours or until firm. Garnish with whipped topping and lemon slices. Makes 6 to 8 servings.
PINEAPPLE-ORANGE FLUFF
1 Il-ounce can mandarin orange segments, drained (reserve liquid)
1 8-ounce can crushed pineapple, drained (reserve liquid)
1 3-ounce package orange flavored gelatin
1 cup plain yogurt
-
Combine orange and pineapple juices. Add enough water to make 1¼ cups. Bring liquid to a boil and pour over gelatin. Stir until dissolved. Chill until firm.
-
Beat gelatin with electric mixer at high speed until frothy. Fold in orange segments, pineapple and yogurt. Chill until mixture mounds, about 15 minutes. Spoon mixture into serving dishes and chill 10 to 15 minutes before serving. Makes 6 servings.
YOGURT SPICE CAKE
2¼ cups sifted all-purpose flour
1 teaspoon baking soda
1 teaspoon ground cinnamon
1 teaspoon ground allspice
1/2 teaspoon ground cloves
1/4 teaspoon salt
1/2 cup butter or margarine, softened
1 cup light brown sugar, firmly packed
½ cup honey
2 eggs
1 cup plain yogurt
- Sift together flour, baking soda, cinnamon, allspice, cloves and salt.
- Cream butter, brown sugar and honey with electric mixer at high speed until light and fluffy. Add eggs, one at a time, beating well after each addition.
- Using low speed of mixer, add flour mixture alternately with yogurt, beating well after each addition until smooth. Pour batter into greased 9 x 9 inch cake pan and bake in preheated 350 degree oven for 40 to 45 minutes or until center of cake springs back when lightly pressed with fingertips. Cool cake in pan 5 minutes then remove and cool completely on rack.
FROZEN PEPPERMINT YOGURT
1 envelope unflavored gelatin, about 1 tablespoon
12 cup milk
2 eggs
2 tablespoons sugar
2 tablespoons light corn syrup
2 cups plain yogurt
3/4 cup finely crushed peppermint candies
1 teaspoon lemon juice
1/2 cup whipping cream, whipped
- In 1-quart saucepan, combine gelatin and milk; let stand 3 minutes. Cook over low heat, stirring constantly until gelatin dissolves. Remove from heat and cool slightly.
- In large mixing bowl beat eggs with electric mixer at medium speed until thick and lemon colored. Gradually add sugar and corn syrup. Add gelatin mixture, yogurt, peppermint candy and lemon juice. Beat until smooth. Gently fold in whipped cream.
- Place bowl into freezer and freeze until mixture forms a 12 -inch frozen ring around side of bowl, about 2 hours. Remove from freezer, scrape side of bowl and beat with mixer at medium speed until smooth, about 1 to 2 minutes. Return to freezer and repeat above process when mixture forms a 12 -inch frozen layer. Serve immediately or transfer to freezer storage container and freeze. Makes 1 quart.
SOFT FROZEN RASPBERRY YOGURT
1 envelope unflavored gelatin, about 1 tablespoon ¼ cup cold water
1 10-ounce package frozen raspberries, thawed
3 cups plain yogurt
-
Place water into small heat-proof bowl or custard cup. Sprinkle gelatin over water. Let stand 5 minutes to soften. Meanwhile puree raspberries through sieve. Discard seeds.
-
Place bowl containing gelatin into simmering water. Stir gelatin until completely dissolved. Pour gelatin into a mixing bowl and add yogurt one cup at a time, mixing well after each addition. Stir in pureed raspberries.
-
Place bowl into freezer and freeze 3 hours, stirring well every 30 minutes. With electric mixer, beat yogurt at medium speed until smooth. Freeze an additional 30 minutes before serving. Makes 1 quart.
90 Day

WARRANTY
Your West Bend Warranty covers defects in the materials and workmanship of this electric Yogurt Maker for a 100% or from the date of original purchase. Any defective part of the electric Yogurt Maker will be repaired or replaced without charge.
This warranty gives you specific legal rights, and you may also have other rights which vary from state to state. This warranty does not cover damage caused by misuse, accidents or alterations to the electric Yogurt Maker.
If you think the electric Yogurt Maker is defective or requires service, you may call The West Bend Company (414) 334-6949, or, if you choose, return the electric Yogurt Maker prepaid and insured with a description of the problem to:
The West Bend Company
Attn: Customer Service Department
400 Washington Street
West Bend, WI 53095
Or, you may also consult your telephone book Yellow Pages under “Appliances—Household—Small Service and Repair” for an authorized West Bend Service Center near you.
Please ensure that you enclose the sales slip or proof of date of purchase in order to assure warranty coverage.
This booklet contains important and helpful information on your new product. Please file it for handy reference to instructions for proper use and care, warranty and service information.
For your personal reference, attach dated sales receipt for warranty proof of purchase and record the following information:
Date purchased or received as a gift: ____
Where purchased and price, if known: ____


L-4669102-93
The West Bend Company
Printed in China
- IMPORTANT SAFEGUARDS
- SAVE THESE INSTRUCTIONS
- YOGURT MAKING TIPS
- • Before Using Yogurt Maker For The First Time
- • To Make Yogurt
- BASIC RECIPE
- YOGURT MADE WITH EVAPORATED MILK-CUSTARD-LIKE CONSISTENCY
- - Cleaning Yogurt Maker
- FLAVORING
- DRINKS, DIPS & DRESSINGS
- BERRY BLEND
- BREAKFAST BRIGHTENER
- ONION YOGURT DIP
- YOGURT DIP
- YOGURT SALAD DRESSING
- BAKED POTATO TOPPING
- DESSERTS
- LEMON CREAM PIE
- PINEAPPLE-ORANGE FLUFF
- YOGURT SPICE CAKE
- FROZEN PEPPERMINT YOGURT
- SOFT FROZEN RASPBERRY YOGURT
- Day
- WARRANTY
Brand : WestBend
Model : 6060
Category : Yogurt maker