
Kohna - Tent COLEMAN - Free user manual and instructions
Find the device manual for free Kohna COLEMAN in PDF.


| Product Type | Tent with Screen Room |
| Brand | Coleman |
| Model | Kohna |
| Setup Method | Pole sleeve with shock-corded poles |
| Main Poles | 2 black shock-corded (Part #5010000384) |
| Side Poles | 2 gray thin shock-corded (Part #5010000383) |
| Screen Room Poles | 2 gray shock-corded (Part #5010000382) |
| Rainfly | Included (Part #5010000385) |
| Rainfly Configurations | Adjustable for maximum ventilation or privacy |
| Access Features | Electrical cord access, cooler access |
| Ventilation | Screen room with zippered openings; rainfly can be rolled back |
| Flammability | Meets CPAI-84 requirements |
| Safety Warnings | Keep flame and heat sources away; avoid overhead power lines and trees |
| Storage | Clean and dry thoroughly before storing; remove stakes by pulling on stake, not tent |
| Pole Storage | Do not store poles telescoped together |
| UV Protection | Avoid prolonged exposure to sunlight to prevent damage |
| Condensation | Normal; minimize by ventilating and removing wet items |
| Country of Origin | China |
| Spare Parts Availability | Replacement poles available from Coleman |
Frequently Asked Questions - Kohna COLEMAN
User questions about Kohna COLEMAN
0 question about this device. Answer the ones you know or ask your own.
Ask a new question about this device
Download the instructions for your Tent in PDF format for free! Find your manual Kohna - COLEMAN and take your electronic device back in hand. On this page are published all the documents necessary for the use of your device. Kohna by COLEMAN.
USER MANUAL Kohna COLEMAN
Read all instructions before set up.
- Select a level campsite clear of rocks, branches, and other hard or sharp objects, to install your tent.
WARNING: Keep clear of overhead power lines.
- Do not set up your tent under trees.
- For best results in windy conditions, position end of tent into the wind.
- Enlist the help of at least one other person to assist you when it is time to assemble the tent.
Parts and Components
Description Part Number
Living Quarters, Main Poles, Black (2) 5010000384
Living Quarters, Side Poles, Thin, Gray (2) 5010000383
Screen Room Poles, Gray (2) 5010000382
Rainfly 5010000385
To Set Up Tent's Living Quarters
- Unfold tent and spread out on a clean, level surface with the door facing the desired direction. (Fig. 1)
- Assemble main tent poles by interlocking both longer, black shock-corded, poles.
- Insert black main poles through sleeves, in top of the Living Quarters area of tent, forming an "X" as shown. (Fig. 1)

- Insert one end of each black main pole into pins in front corners of tent. (Fig. 2 & 2A)
- Go to opposite end of each pole and gradually apply pressure to the pole forming an arch. Insert the pin into the pole end at the tent corners. (Fig. 2 & 2A)

- Attach smaller frame clips along edges of tent to black main poles.(Fig. 2B) NOTE: DO NOT attach the larger frame clips located near the top of the tent living quarters. They will be used in later assembly.

To Set Up Tent's Living Quarters (continued)
- Assemble 2 interlocking shock-corded, thin, gray side poles.
- Insert gray side poles through sleeves, in front and back of the living quarters area of tent as shown. (Fig. 3) NOTE: Make sure the side poles are positioned on the outside of the black main poles installed earlier.
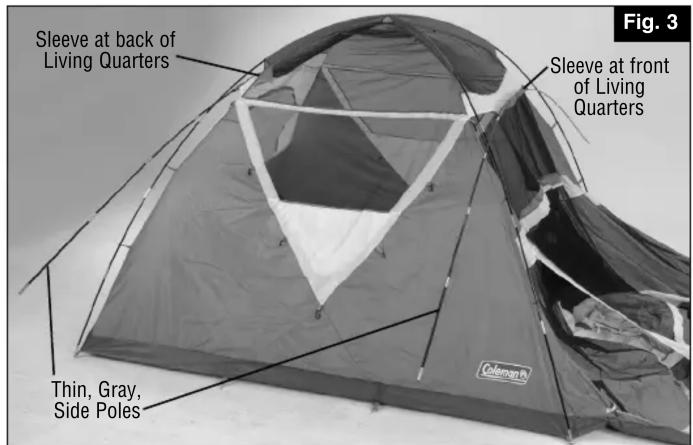
- Insert one end of each gray side pole into pins in side of tent forming an "X". (Fig. 4 & Fig. 4A)
- Go to opposite end of each pole and gradually apply pressure to the pole forming an arch. Insert the pin into the pole end at opposite side of tent forming an "X". (Fig. 4)
- Attach large frame clips along edges of upper four corners tent to connect black main poles and gray side poles where they intersect. (Fig. 4 & 4B)

To Set Up Tent's Screen Room
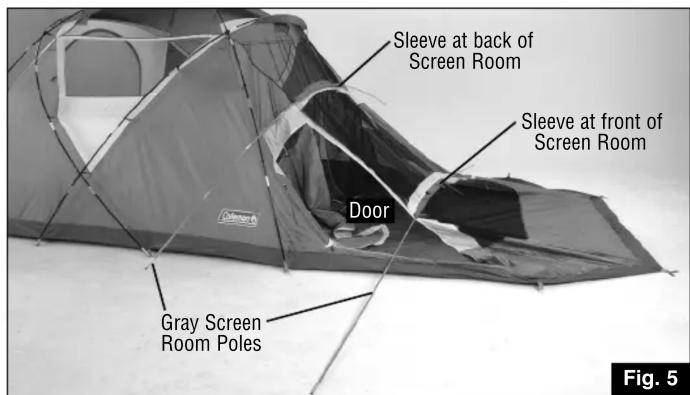
- Assemble screen room poles by interlocking both longer, gray, shock-corded poles.
- Insert gray poles through both sleeves on screen room as shown. (Fig. 5)
(continued on other side)
To Set Up Tent's Screen Room continued
- Insert one end of each gray screen room pole into remaining pins on tent. Gradually apply pressure to other end of pole to form an arch & insert into other front pin. (Fig. 6, 6A, & 6B)
- Attach frame clips along edges of screen room to gray poles. (Fig. 6C)

natural_image
Illustration of a camping tent with labeled parts (6A, 6B) and a person adjusting the blanket (no text or symbols on the tent itself)- Stretch tent until taut, then secure metal loops and web straps with stakes. (Fig. 7)

To Attach Rainfly
- Drape rainfly over living quarters and screen room of tent with as shown. (Fig 8). NOTE: Hook and loop fasteners, located on seams of under side of rainfly, should be centered over black and gray poles.
- Locate all hook & loop fasteners on underside of rainfly and wrap around black and gray poles to secure. (Fig. 8A)
- Stretch elastic straps and hook clip on each to the metal loops around the tent as shown. (Fig. 8 & 8B)

- Tie guylines through loops on web straps on the rainfly. (Fig. 9)
- Stretch guylines until taut, then secure with stakes. (Fig.10)


Electrical Cord Access
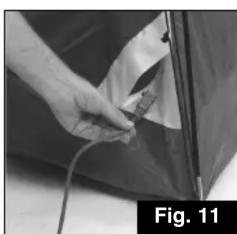
- Unzip access panel in the lower right corner of tent and bring in electrical cord. Use only UL approved cords that are rated for outdoor usage. (Fig. 11)
natural_image
Close-up of a hand holding a small object, possibly a device or tool, with no visible text or symbols.Rainfly Configurations for Screen Room
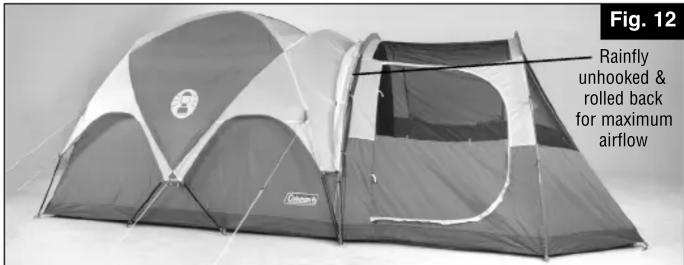
The rainly offers you the ability to choose various configurations to fully utilize your tent's screen room for maximum ventilation or for privacy and protection from the elements.

Cooler Access
The smaller zippered opening at the rear of the tent is designed for added ventilation and easy access to your beverage cooler. (Fig. 14)

natural_image
Diagram of a circular opening with a hand pointing to it, labeled 'Fig. 14' (no text or symbols on the diagram itself)To Store
- All metal poles and stakes must be placed in the storage bag to prevent damage to the fabric items placed in the carry case.
- Make sure tent is clean and dry before placing in carry case.
- Remove rainfly, spread out on floor of tent, then unzip door & vents before taking tent down for storage.
- Neatly fold tent to width of pole storage bag, place on tent, roll tightly, and place in carry case.
- Store in a clean, dry area.
Things You Should Know:
- Under certain conditions (cold weather, high humidity, etc.) condensation will form on the inside of your tent. Condensation is caused by water vapor from your breath, perspiration, or any wet clothing inside the tent. It is NOT LEAKAGE through the tent fabric. It can be minimized by removing wet clothing from your tent and by providing good ventilation through the tent.
- Never store tent, even for a short period of time, without drying it thoroughly and brushing off caked dirt. Do not pack stakes or poles inside your tent. Use a separate storage bag.
- STAKES SHOULD BE REMOVED BY PULLING ON THE STAKE ITSELF. NEVER PULL ON THE TENT TO REMOVE STAKE.
- TENT POLES SHOULD NOT BE LEFT TELESCOPED TOGETHER DURING STORAGE.
- Do not leave your tent set-up for weeks at a time. Be aware that exposure to ultraviolet rays from the sun can seriously damage material and/or cause it to become discolored.
WARNING: Keep all flame and heat sources away from this tent fabric.
This tent meets the flammability requirements of CPAI-84. The fabric may burn if left in continuous contact with any flame source. The application of any foreign substance to the tent fabric may render the flame-resistant properties ineffective.
Coleman
The Coleman Company, Inc. • 3600 N. Hydraulic • Wichita, Kansas 67219
1-800-835-3278 · www.coleman.com
MADE IN CHINA • PRINTED IN CHINA
© 2007 The Coleman Company, Inc.
Coleman® and Coleman® are registered trademarks of The Coleman Company, Inc.


- WARNING: Keep clear of overhead power lines.
- Parts and Components
- Description Part Number
- To Set Up Tent's Living Quarters
- To Set Up Tent's Living Quarters (continued)
- To Set Up Tent's Screen Room
- To Set Up Tent's Screen Room continued
- To Attach Rainfly
- Electrical Cord Access
- Rainfly Configurations for Screen Room
- Cooler Access
- To Store
- Things You Should Know:
- WARNING: Keep all flame and heat sources away from this tent fabric.
- Coleman
Brand : COLEMAN
Model : Kohna
Category : Tent