Axxess AXDSPX-ETH1 - Hi-Fi System Metra - Free user manual and instructions
Find the device manual for free Axxess AXDSPX-ETH1 Metra in PDF.


| Product Type | Digital Signal Processor (DSP) Interface for GM Ethernet Amplifiers |
| Brand / Model | Metra Axxess AXDSPX-ETH1 |
| Input Channels | 6 channels, high/low level selectable (differential-balanced) |
| Output Channels | 10 individually assignable channels |
| Equalizer Type | 31-Band Graphic EQ or 5-Band Parametric EQ, +/-10dB |
| Crossover Filters | Independent high-pass, low-pass, and bandpass per channel; Linkwitz-Riley 24dB/octave slope |
| Delay | Up to 10ms per channel, adjustable in 0.1ms steps |
| Clipping Detection | Built-in clipping detection and limiting circuits |
| Bluetooth Control | Via AX-DSP-XL app (Android & iOS) |
| App Features | Read/write/store configurations, password protect, identify, lock down |
| Frequency Response | 20Hz - 20kHz |
| Total Harmonic Distortion (THD) | <0.03% |
| Signal-to-Noise Ratio | 105dB @ 5V RMS |
| Output Voltage | Up to 5V RMS |
| Input Impedance | 1M Ohm |
| Operating Voltage | 10 - 16VDC |
| Operating Current Draw | ~150mA |
| Standby Current Draw | ~7mA |
| Amplifier Turn-On | 12VDC remote output, signal sense or ignition |
| Vehicle Compatibility | GM 2019-up vehicles with Ethernet amplifiers (e.g., Cadillac, Chevrolet, GMC) |
| Retained Features | Factory chimes, parking sensor chimes, voice prompts (SYNC, OnStar) |
| Update Method | Micro-B USB |
| Included Components | Interface, harness, amplifier bypass harness, bass knob (AXBK-1), LD-ETH-ADAPT harness for Corvette |
| Mounting | Detachable mount or flush mount with washer/locking nut for bass knob |
Frequently Asked Questions - Axxess AXDSPX-ETH1 Metra
User questions about Axxess AXDSPX-ETH1 Metra
0 question about this device. Answer the ones you know or ask your own.
Ask a new question about this device
Download the instructions for your Hi-Fi System in PDF format for free! Find your manual Axxess AXDSPX-ETH1 - Metra and take your electronic device back in hand. On this page are published all the documents necessary for the use of your device. Axxess AXDSPX-ETH1 by Metra.
USER MANUAL Axxess AXDSPX-ETH1 Metra
This is an add-on accessory for the AX-DSP. If you are using the AX-DSP to install an aftermarket subwoofer and would like quick independent control of the subwoofer gain.
Installation is extremely easy.
- Connect the Orange wire on the AX-BASSKÑOB to the Orange wire on the AX-DSP 20-pin harness or the vehicles specific harness that was purchased.
- Connect the Black wire on the AX-BASSKNOB to a chassis ground in the vehicle.
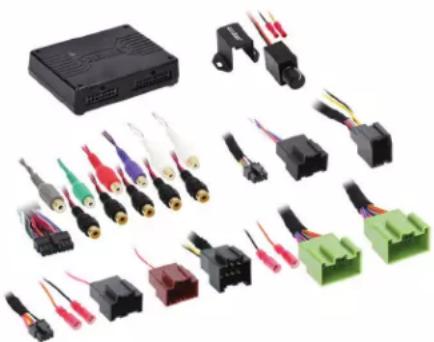
We provide two mounting options for the AX-BASSKNOB, there is a detachable mount so the gain control knob can be mounted under a dash or in a pocket, also provided, a washer and locking nut so the gain control can be flush mounted.
natural_image
Collection of various electronic components and connectors, including a black rectangular device and various colored/red cables (no text or symbols visible)INTERFACE FEATURES
- Designed for GM Ethernet amplifiers
- Ethernet data interface w/AXDSP-X (digital signal processor) built-in
- Includes an amplifier bypass harness
- Retains factory chimes including parking sensor chimes
- Retains vehicle's voice prompts
- Chimes and voice prompts go through the aftermarket amplifier and/or cluster
- Selectable 31 Band graphic EQ or 5 Band Parametric EQ
• 10 individually assignable outputs
GENERAL MOTORS 2019-UP ETHERNET DSPX PACKAGE
Visit AxxessInterfaces.com for more detailed information about the product and up-to-date vehicle specific applications
INTERFACE COMPONENTS
- AXDSPX-ETH1 interface
- AXDSPX-ETH1 harness
- LD-DSP-ETH1
• LD-DSP-ETH2 - AXBK-1
-
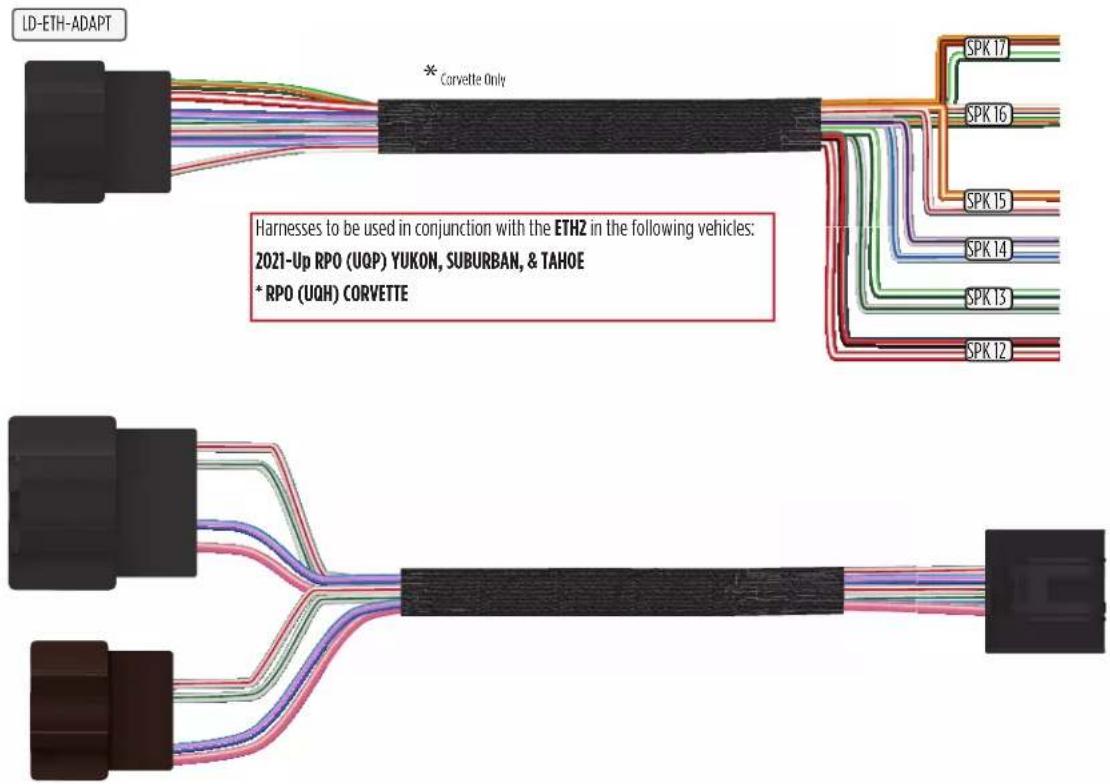
LD-ETH-ADAPT harness
-
AXDSPX-ETH1 interface harness (male connectors: 8-pin, 16-pin)
- Amplifier bypass harness (female connectors: 8-pin black, 20-pin green)
Visit axxessinterfaces.com for current application list.
- Independent equalization on each of the 10 outputs
- Independent high pass, low pass, and bandpass filters
• Each channel can be delayed independently up to 10ms - Clipping detection and limiting circuits
- Settings adjusted via Bluetooth® in a smart device application (tablet or mobile phone), compatible with both Android and Apple devices
- Read, write, and store configurations for future recall
- Password protect feature available in the mobile app
- Micro-B USB updatable
For Dash Disassembly Instructions, refer to metraonline.com. Enter the year, make, and model of the vehicle in the Vehicle Fit Guide for Radio Install kits.
TABLE OF CONTENTS
Connections: Adding A Full-Range Amp & Sub To A Factory System 2-3
Installation 4
Speaker Wiring Charts: Connector Types ....5
Cadillac/XT4 2019-Up 6
Chevrolet/Blazer 2019-Up 7
Chevrolet/Camaro 2019-Up....7
Chevrolet/Cheyenne 2019-2021 8
Chevrolet/Colorado 2019-2021......8
Chevrolet/Corvette 2020-Up....9
Chevrolet/Equinox, Malibu, & Silverado .....10
Chevrolet/Volt 2019....11
GMC/Acadia & Canyon 2019-Up....12
GMC/Sierra 1500/2500/3500 & Terrain .....13
Quick Setup Steps: AX-DSP-XL App....14
Specifications 15
Troubleshooting....16
LED Feedback 16
TOOLS REQUIRED
- Crimping tool and connectors, or solder gun, solder, and heat shrink • Tape • Wire cutter
- Zip ties
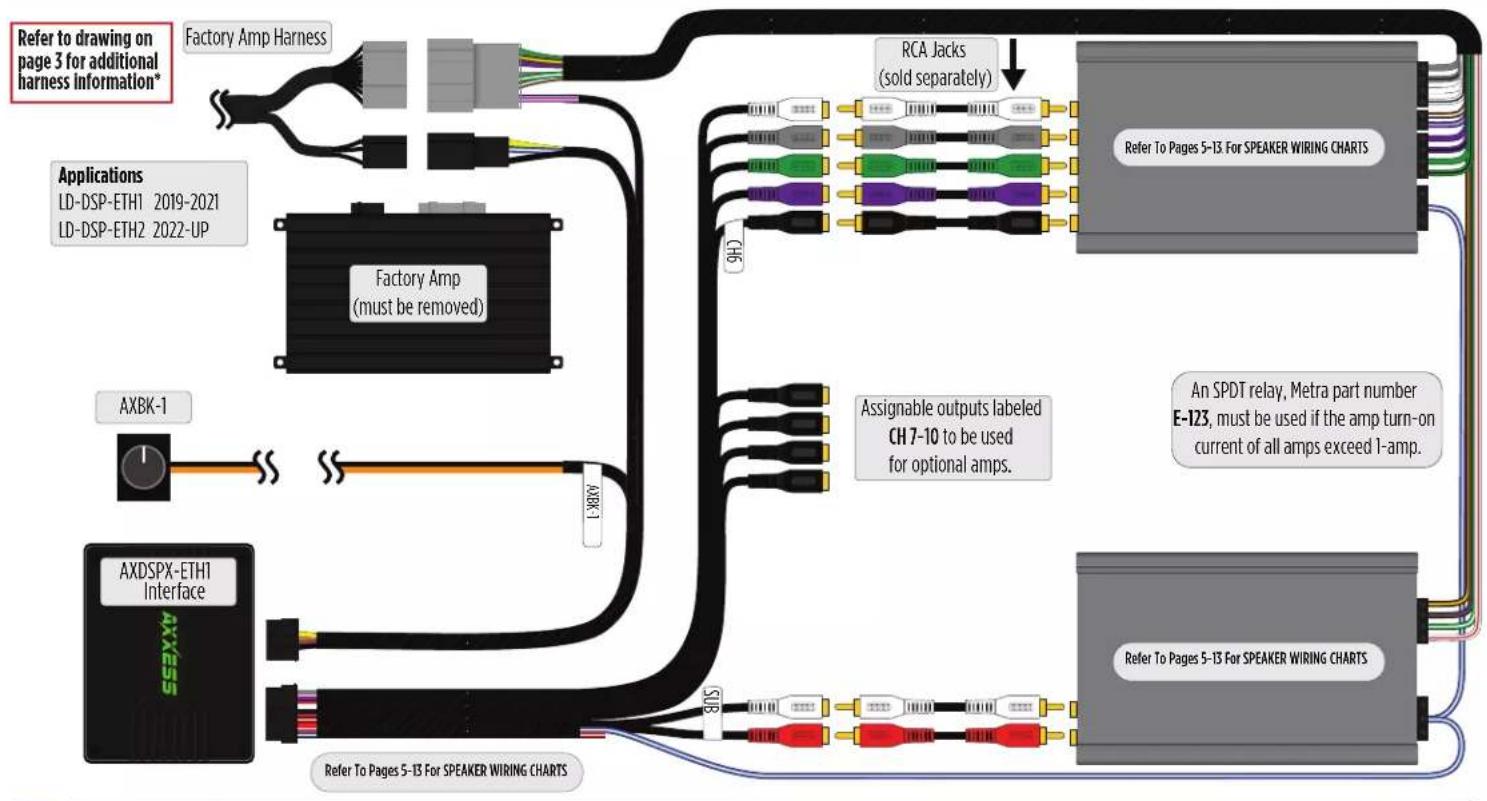
CONNECTIONS: ADDING A FULL-RANGE AMP & SUB TO A FACTORY SYSTEM
flowchart
graph TD
    A["Factory Amp Harness"] --> B["Factory Amp (must be removed)"]
    B --> C["ACX-BK-1"]
    C --> D["AXDSPX-ETH1 Interface"]
    D --> E["Refer To Pages 5-13 For SPEAKER WIRING CHARTS"]
    E --> F["Refer To Pages 5-13 For SPEAKER WIRING CHARTS"]
    F --> G["Refer To Pages 5-13 For SPEAKER WIRING CHARTS"]
    G --> H["Refer To Pages 5-13 For SPEAKER WIRING CHARTS"]
    H --> I["Assignable outputs labeled CH7-10 to be used for optional amps."]
    I --> J["Refer To Pages 5-13 For SPEAKER WIRING CHARTS"]
    J --> K["Refer To Pages 5-13 For SPEAKER WIRING CHARTS"]
    K --> L["Refer To Pages 5-13 For SPEAKER WIRING CHARTS"]
    L --> M["Refer To Pages 5-13 For SPEAKER WIRING CHARTS"]
    M --> N["Refer To Pages 5-13 For SPEAKER WIRING CHARTS"]
    N --> O["Refer To Pages 5-13 For SPEAKER WIRING CHARTS"]
    O --> P["Refer To Pages 5-13 For SPEAKER WIRING CHARTS"]
    P --> Q["Refer To Pages 5-13 For SPEAKER WIRING CHARTS"]
    Q --> R["Refer To Pages 5-13 For SPEAKER WIRING CHARTS"]
    R --> S["Refer To Pages 5-13 For SPEAKER WIRING CHARTS"]
    S --> T["Refer To Pages 5-13 For SPEAKER WIRING CHARTS"]
    T --> U["Refer To Pages 5-13 For SPEAKER WIRING CHARTS"]
    U --> V["Refer To Pages 5-13 For SPEAKER WIRING CHARTS"]
    V --> W["Refer To Pages 5-13 For SPEAKER WIRING CHARTS"]
    W --> X["Refer To Pages 5-13 For SPEAKER WIRING CHARTS"]
    X --> Y["Refer To Pages 5-13 For SPEAKER WIRING CHARTS"]
    Y --> Z["Refer To Pages 5-13 For SPEAKER WIRING CHARTS"]
    Z --> AA["Refer To Pages 5-13 For SPEAKER WIRING CHARTS"]
    AA --> AB["Refer To Pages 5-13 For SPEAKER WIRING CHARTS"]
    AB --> AC["Refer To Pages 5-13 For SPEAKER WIRING CHARTS"]
    AC --> AD["Refer To Pages 5-13 For SPEAKER WIRING CHARTS"]
    AD --> AE["Refer To Pages 5-13 For SPEAKER WIRING CHARTS"]
    AE --> AF["Refer To Pages 5-13 For SPEAKER WIRING CHARTS"]
    AF --> AG["Refer To Pages 5-13 For SPEAKER WIRING CHARTS"]
    AG --> AH["Refer To Pages 5-13 For SPEAKER WIRING CHARTS"]
    AH --> AI["Refer To Pages 5-13 For SPEAKER WIRING CHARTS"]
    AI --> AJ["Refer To Pages 5-13 For SPEAKER WIRING CHARTS"]
    AJ --> AK["Refer To Pages 5-13 For SPEAKER WIRING CHARTS"]
    AK --> AL["Refer To Pages 5-13 For SPEAKER WIRING CHARTS"]
    AL --> AM["Refer To Pages 5-13 For SPEAKER WIRING CHARTS"]
    AM --> AN["Refer To Pages 5-13 For SPEAKER WIRING CHARTS"]
    AN --> AO["Refer To Pages 5-13 For SPEAKER WIRING CHARTS"]
    AO --> AP["Refer To Pages 5-13 For SPEAKER WIRING CHARTS"]
    AP --> AQ["Refer To Pages 5-13 For SPEAKER WIRING CHARTS"]
    AQ --> AR["Refer To Pages 5-13 For SPEAKER WIRING CHARTS"]
    AR --> AS["Refer To Pages 5-13 For SPEAKER WIRING CHARTS"]
    AS --> AT["Refer To Pages 5-13 For SPEAKER WIRING CHARTS"]
    AT --> AU["Refer To Pages 5-13 For SPEAKER WIRING CHARTS"]
    AU --> AV["Refer To Pages 5-13 For SPEAKER WIRING CHARTS"]
    AV --> AW["Refer To Pages 5-13 For SPEAKER WIRING CHARTS"]
    AW --> AX["Refer To Pages 5-13 For SPEAKER WIRING CHARTS"]
    AX --> AY["Refer To Pages 5-13 For SPEAKER WIRING CHARTS"]
CONNECTIONS: LD-ETH-ADAPT
REV. 9/26/23 INSTAXDSPX-ETH1
INSTALLATION
- Locate the factory amp ( ^† ), unplug all connectors, then remove the amp.
- Install the AXDSPX-ETHI harness and make all necessary connections, but leave the amp turn-on wire disconnected.
- Plug the 8-pin and 16-pin connectors from the AXDSPX-ETH1 harness into the AXDSPX-ETH1 interface.
- Download and install the AX-DSP-XL app from the Google Play Store or Apple App Store.
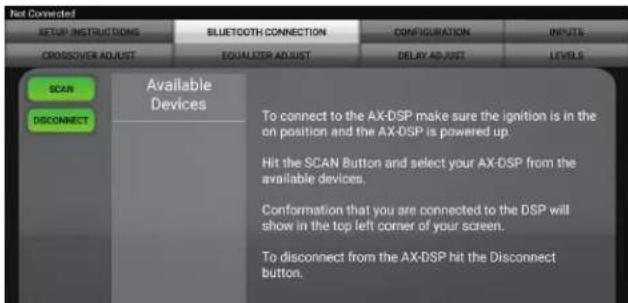
- Open the app and follow the instructions on the Bluetooth Connection tab to pair the mobile device to the AXDSPX-ETH1. (Figure A)
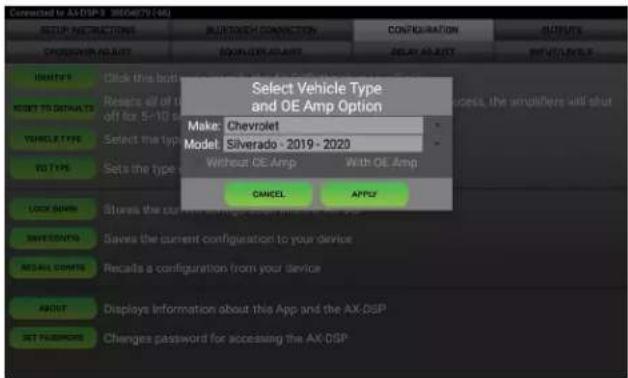
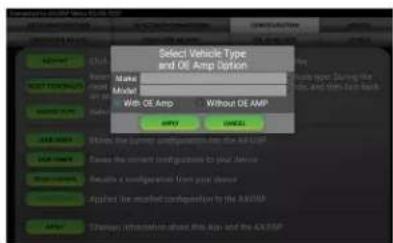
- Scroll to the Configuration tab then select the vehicle type. Press the Lock Down button to save the configuration. (Figure B)
- Connect the amp turn-on wire from the AXDSPX-ETH1 harness.
- Click the Identify button to confirm that the AXDSPX-ETH1 is connected properly. If so, a chime will be heard from the front left speaker or gauge cluster. Test all functions of the installation for proper operation.
- Adjust the DSP settings in the app as desired. Refer to the instructions under the Setup Instructions tab, or online at Axxessinterfaces.com for an explanation of each tab in the app.
(Figure A)
(Figure B)
SPEAKER WIRING CHARTS: CONNECTOR TYPES
SPEAKER WIRING CHARTS
It is recommended to use the factory speaker wires when connecting to your aftermarket equipment.
Due to the variation from the factory speaker wire location and colors, it is critical that these Speaker Wire Charts be used when wiring your aftermarket equipment.
Important: The supplied T-harnesses will not follow the standard speaker wire colors.
We recommend that each speaker wire be double checked using a tone generator and polarity tester.
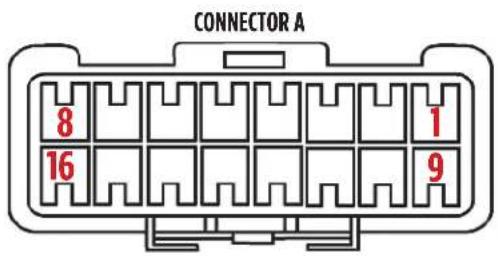
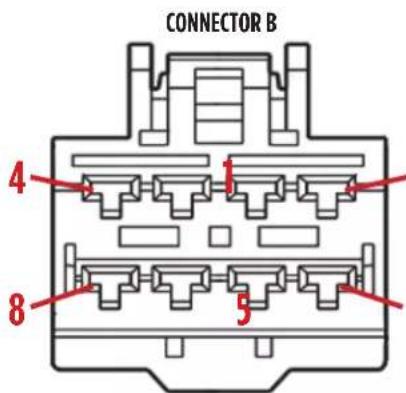
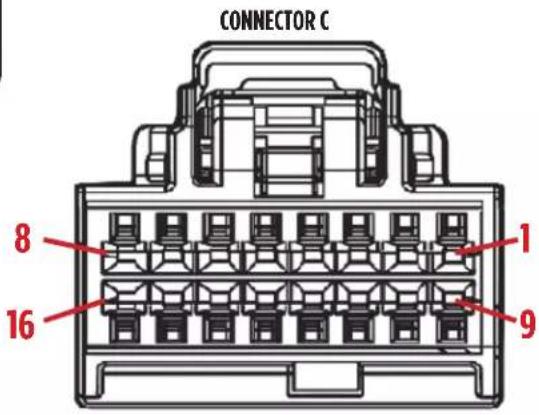
SPEAKER WIRING CHARTS: CADILLAC / XT4 2019-UP W/UQG OR UQS
| CADILLAC/XT4 2019-UP W/UQG | ||||
| CONNECTOR/PIN WIRE COLOR/POLARITY ASSIGNMENT LABEL RPO | ||||
| A-1 Pink (+) | RIGHT REAR | SPK1 UQG | ||
| A-9 Pink/Black (-) | ||||
| A-2 Blue (+) | LEFT REAR | SPK2 UQG | ||
| A-10 Blue/Black (-) | ||||
| A-3 Red/White (+) | RIGHT FRONT MIDRANGE | SPK3 UQG | ||
| A-11 Red/Black (-) | ||||
| A-4 Purple (+) | CENTER | SPK4 UQG | ||
| A-12 Purple/Black (-) | ||||
| A-5 Green (+) | LEFT FRONT MIDRANGE | SPK5 UQG | ||
| A-13 Green/Black (-) | ||||
| A-6 Orange | NA | SPK6 UQG | ||
| A-14 Orange/Black | ||||
| A-7 Orange | NA | SPK7 UQG | ||
| A-15 Orange/Black | ||||
| A-8 | Yellow | NA | SPK8 UQG | |
| A-16 Yellow/Black | ||||
| B-1 | Red (+) | RIGHT FRONT | SPK 09 | UQG |
| B-5 | Black (-) | |||
| B-2 | Gray | NA | SPK 10 | UQG |
| B-6 | Gray/Black | |||
| B-3 White (+) | LEFT FRONT | SPK 11 | UQG | |
| B-7 | White/Black (-) | |||
| B-4 | Yellow 12V | |||
| B-8 | Black | GROUND | ||
| CADILLAC/XT4 2019-UP W/UQS | ||||
| CONNECTOR/PIN WIRE COLOR/POLARITY ASSIGNMENT LABEL RPO | ||||
| A-1 | Pink | NA | SPK1 | UQS |
| A-9 | Pink/Black | |||
| A-2 | Blue | NA | SPK2 UQS | |
| A-10 | Blue/Black | |||
| A-3 | Red/White | NA | SPK3 UQS | |
| A-11 | Red/Black | |||
| A-4 Purple (+) | RIGHT REAR | SPK4 UQS | ||
| A-12 Purple/Black (-) | ||||
| A-5 Green (+) | LEFT REAR | SPK5 UQS | ||
| A-13 Green/Black (-) | ||||
| A-6 | Orange (+) | LEFT REARMIDRANGE | SPK6 | UQS |
| A-14 | Orange/Black (-) | |||
| A-7 | Orange (+) | CENTER | SPK7 | UQS |
| A-15 | Orange/Black (-) | |||
| A-8 | Yellow | NA | SPK8 | UQS |
| A-16 Yellow/Black | ||||
| B-1 | Red (+) | RIGHTFRONT | SPK 09 UQS | |
| B-5 | Black (-) | |||
| B-2 | Gray | NA | SPK 10 | UQS |
| B-6 | Gray/Black | |||
| B-3 White (+) | LEFTFRONT | SPK 11 | UQS | |
| B-7 | White/Black (-) | |||
| B-4 | Yellow 12V | |||
| B-8 | Black | GROUND | ||
SPEAKER WIRING CHARTS: CHEVROLET / BLAZER 2019-UP & CAMARO 2019-UP
| BLAZER 2019-UP W/IOT | ||||
| CONNECTOR/PIN | WIRE COLOR/POLARITY | ASSIGNMENT | LABEL | RPO |
| A-1 Pink | NA | SPK1 | IOT | |
| A-9 Pink/Black | ||||
| A-2 Blue | NA SPK2 | IOT | ||
| A-10 Blue/Black | ||||
| A-3 Red/White (+) | CENTER SPK3 | IOT | ||
| A-11 Red/Black (-) | ||||
| A-4 Purple (+) | RIGHT REAR | SPK4 | IOT | |
| A-12 | Purple/Black (-) | |||
| A-5 Green (+) | LEFT REAR | SPK5 | IOT | |
| A-13 Green/Black (-) | ||||
| A-5 Orange | NA SPK6 | IOT | ||
| A-14 | Orange/Black | |||
| A-7 | Orange | NA SPK7 | IOT | |
| A-15 | Orange/Black | |||
| A-8 | Yellow | NA | SPK8 | IOT |
| A-16 | Yellow/Black | |||
| B-1 | Red (+) | RIGHT SUBWOOFER | SPK9 | IOT |
| B-5 | Black (-) | |||
| B-2 | Gray (+) | RIGHT FRONT | SPK 10 | IOT |
| B-6 | Gray/Black (-) | |||
| B-3 | White (+) | LEFT FRONT | SPK 11 | IOT |
| B-7 | White/Black (-) | |||
| B-4 | Yellow | 12V | ||
| B-8 | Black | GROUND | ||
| CAMARO 2019-UP W/UQA & /UQA + CM8 | ||||
| CONNECTOR/PIN | WIRE COLOR/POLARITY | ASSIGNMENT | LABEL RPO | |
| A-1 Pink | NA | SPK1 | UQA | |
| A-9 Pink/Black | ||||
| A-2 Blue | NA SPK2 | UQA | ||
| A-10 Blue/Black | ||||
| A-3 Red/White (+) | LEFT FRONTTWEET | SPK3 | UQA | |
| A-11 Red/Black (-) | ||||
| A-4 Purple (+) | RIGHTREAR | SPK4 | UQA | |
| A-12 | Purple/Black (-) | |||
| A-5 Green (+) | LEFTREAR | SPK5 | UQA | |
| A-13 Green/Black (-) | ||||
| A-5 Orange | NA | SPK6 | UQA | |
| A-14 | Orange/Black | |||
| A-7 | Orange (+) | CENTER | SPK7 | UQA |
| A-15 | Orange/Black (-) | |||
| A-8 | Yellow (+) | RIGHTSUBWOOFER | SPK8 | UQA |
| A-16 | Yellow/Black (-) | |||
| B-1 | Red (+) | RIGHTFRONT | SPK9 | UQA+CM8 |
| B-5 | Black (-) | |||
| B-2 Gray | NA | SPK10 | UQA+CM8 | |
| B-6 | Gray/Black | |||
| B-3 White (+) | LEFTFRONT | SPK11 | UQA+CM8 | |
| B-7 | White/Black (-) | |||
| B-4 | Yellow | 12V | ||
| B-8 | Black | GROUND | ||
| CAMARO 2019-UP W/UQA - CM8 | ||||
| CONNECTOR/ PIM | WIRE COLOR/ POLARITY | ASSIGNMENT | LABEL | RPO |
| B-1 Red | (+) | RIGHT SUBWOOFER | SPK9 | UQA -CM8 |
| B-5 | Black (-) | |||
| B-2 | Gray (+) | RIGHT FRONT | SPK 10 | UQA -CM8 |
| B-6 Gray/Black (-) | ||||
| B-3 | White (+) | FRONT LEFT | SPK 11 | UQA -CM8 |
| B-7 | White/Black (-) | |||
| B-4 | Yellow | 12V | ||
| B-8 | Black | GROUND | ||
SPEAKER WIRING CHARTS: CHEVROLET / CHEYENNE & COLORADO 2019-2021
| CHEYENNE 2019-2021 W/UQA | ||||
| CONNECTOR/ PIM | WIRE COLOR/ POLARITY | ASSIGNMENT | LABEL RPO | |
| A-1 Pink | NA | SPK1 | UQA | |
| A-9 Pink/Black | ||||
| A-2 Blue (+) | RIGHT FRONT MIDRANGE | SPK2 | UQA | |
| A-10 Blue/Black (-) | ||||
| A-3 Red/White (+) | LEFT FRONT MIDRANGE | SPK3 | UQA | |
| A-11 Red/Black (-) | ||||
| A-4 Purple (+) | RIGHT REAR | SPK4 | UQA | |
| A-12 | Purple/Black (-) | |||
| A-5 Green (+) | LEFT REAR | SPK5 | UQA | |
| A-13 Green/Black (-) | ||||
| A-5 Orange | NA | SPK6 | UQA | |
| A-14 | Orange/Black | |||
| A-7 Orange | NA | SPK7 | UQA | |
| A-15 | Orange/Black | |||
| A-8 Yellow | NA | SPK8 | UQA | |
| A-16 Yellow/Black | ||||
| B-1 Red (+) | SUB WOOFER | SPK9 | ||
| B-5 Black (-) | ||||
| B-2 | Gray | RIGHT FRONT | SPK 10 | |
| B-6 | Gray/Black | |||
| B-3 White (+) | LEFT FRONT | SPK 11 | ||
| B-7 | White/Black (-) | |||
| B-4 Yellow 12V | ||||
| B-8 | Black | GROUND | ||
| COLORADO 2019-2021 | ||||
| CONNECTOR/PIN | WIRE COLOR/POLARITY | ASSIGNMENT | LABEL RPO | |
| A-1 Pink | NA | SPK1 | ||
| A-9 Pink/Black | ||||
| A-2 Blue (-) | RIGHT FRONTTWEET | SPK2 | ||
| A-10 | Blue/Black (+) | |||
| A-3 Red/White (+) | LEFT FRONTTWEET | SPK3 | ||
| A-11 Red/Black (-) | ||||
| A-4 Purple (+) | RIGHTREAR | SPK4 | ||
| A-12 | Purple/Black (-) | |||
| A-5 Green (+) | LEFTREAR | SPK5 | ||
| A-13 Green/Black (-) | ||||
| A-5 Orange | NA | SPK6 | ||
| A-14 | Orange/Black | |||
| A-7 | Orange (+) | CENTER | SPK7 | |
| A-15 | Orange/Black (-) | |||
| A-8 Yellow | NA | SPK8 | ||
| A-16 Yellow/Black | ||||
| B-1 Red (+) | RIGHTFRONT | SPK9 | ||
| B-5 Black (-) | ||||
| B-2 | Gray | NA | SPK10 | |
| B-6 | Gray/Black | |||
| B-3 White (+) | LEFTFRONT | SPK11 | ||
| B-7 | White/Black (-) | |||
| B-4 Yellow 12V | ||||
| B-8 | Black | GROUND | ||
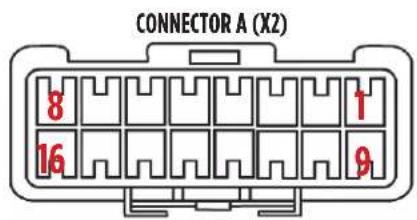
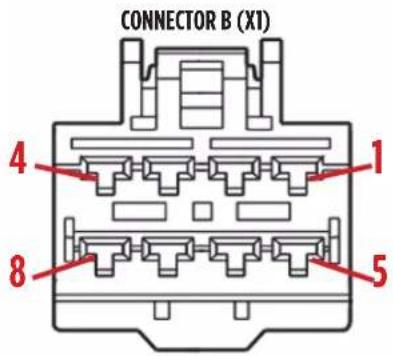
SPEAKER WIRING CHARTS: CHEVROLET / CORVETTE 2020-UP
| CORVETTE 2020-UP | ||||
| CONNECTOR/PIN | WIRE COLOR/POLARITY | ASSIGNMENT | LABEL RPO | |
| A-1 Pink | NA | SPK1 | ||
| A-9 Pink/Black | ||||
| A-2 Blue (-) | RIGHT FRONTTWEET | SPK2 | ||
| A-10 Blue/Black (+) | ||||
| A-3 Red/White (+) | LEFT FRONTTWEET | SPK3 | ||
| A-11 Red/Black (-) | ||||
| A-4 Purple (+) | RIGHTREAR | SPK4 | ||
| A-12 Purple/Black (-) | ||||
| A-5 Green(+) | LEFTREAR | SPK5 | ||
| A-13 Green/Black (-) | ||||
| A-5 Orange | NA | SPK6 | ||
| A-14 | Orange/Black | |||
| A-7 Orange (+) | CENTER | SPK7 | ||
| A-15 | Orange/Black (-) | |||
| A-8 Yellow | NA | SPK8 | ||
| A-16 Yellow/Black | ||||
| B-1 Red (+) | RIGHTFRONT | SPK9 | ||
| B-5 | Black (-) | |||
| B-2 | Gray | NA | SPK10 | |
| B-6 Gray/Black | ||||
| B-3 | White (+) | LEFTFRONT | SPK11 | |
| B-7 White/Black (-) | ||||
| B-4 Yellow | 12V | |||
| B-8 | Black | GROUND | ||
| CORVETTE 2020-UP cont. | ||||
| CONNECTOR /PIN | WIRE COLOR/ POLARITY | ASSIGNMENT | LABEL | RPO |
| C-1 | Red/White (+) | LEFT REAR MIDRANGE | SPK 12 | UQH |
| C-9 | White/Blue (-) | |||
| C-2 | Red/Black(-) | RIGHT REAR MIDRANGE | SPK 13 | UQH |
| C-10 | White/Purple (+) | |||
| C-3 | NA | NA | SPK 14 | NA |
| C-11 | NA | |||
| C-4 | NA | NA | SPK 15 | NA |
| C-12 | NA | |||
| C-5 | Green/White (-) | RIGHT FRONT TWEET | SPK 16 | UQH |
| Green/Black (+) | ||||
| C-5 | Orange (+) | LEFT FRONT TWEET | SPK 17 | UQH |
| C-14 | Orange/Black (-) | |||
| C-7 | Orange | NA | SPK 18 | NA |
| C-15 | Orange/Black | |||
| C-8 | Yellow | NA | SPK 19 | NA |
| C-16 | Yellow/Black | |||
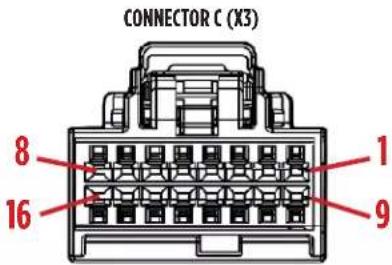
SPEAKER WIRING CHARTS: CHEVROLET / EQUINOX, MALIBU, & SILVERADO
| CHEVROLET EQUINOX 2019-UP W/UQA | ||||
| CONNECTOR/PIN | WIRE COLOR/POLARITY | ASSIGNMENT | LABEL RPO | |
| A-1 Plnk | NA | SPK1 | ||
| A-9 Plnk/Black | ||||
| A-2 Blue (-) | RIGHT FRONTTWEET | SPK2 | UQA | |
| A-10 Blue/Black (+) | ||||
| A-3 Red/White (+) | LEFT FRONTTWEET | SPK3 | UQA | |
| A-11 Red/Black (-) | ||||
| A-4 Purple (+) | RIGHTREAR | SPK4 | UQA | |
| A-12 | Purple/Black (-) | |||
| A-5 Green (+) | LEFTREAR | SPK5 | UQA | |
| A-13 Green/Black (-) | ||||
| A-5 Orange | NA SPK6 | |||
| A-14 | Orange/Black | |||
| A-7 Orange (+) | CENTER | SPK7 | UQA | |
| A-15 | Orange/Black (-) | |||
| A-8 | Yellow | NA | SPK8 | |
| A-16 | Yellow/Black | |||
| B-1 | Red (+) | RIGHTFRONT | SPK9 | UQA |
| B-5 | Black (-) | |||
| B-2 | Gray | NA | SPK10 | |
| B-6 Gray/Black | ||||
| B-3 White (+) | LEFTFRONT | SPK11 | UQA | |
| B-7 | White/Black (-) | |||
| B-4 | Yellow | 12V | ||
| B-8 | Black | GROUND | ||
| CHEVROLET MALIBU 2019-UP W/UQA | ||||
| CONNECTOR/PIN | WIRE COLOR/POLARITY | ASSIGNMENT | LABEL | RPO |
| A-1 | Pink | NA | SPK1 | UQA |
| A-9 Pink/Black | ||||
| A-2 Blue | NA | SPK2 | UQA | |
| A-10 Blue/Black | ||||
| A-3 Red/White (+) | CENTER | SPK3 | UQA | |
| A-11 | Red/Black (-) | |||
| A-4 Purple (+) | RIGHT REAR | SPK4 | UQA | |
| A-12 | Purple/Black (-) | |||
| A-5 | Green (+) | LEFT REAR | SPK5 | UQA |
| A-13 | Green/Black (-) | |||
| A-5 | Orange | NA | SPK6 | UQA |
| A-14 | Orange/Black | |||
| A-7 | Orange | NA | SPK7 | UQA |
| A-15 | Orange/Black | |||
| A-8 | Yellow | SUBWOOFER | SPK8 | UQA |
| A-16 | Yellow/Black | |||
| B-1 | Red (+) | SUBWOOFER | SPK9 | UQA |
| B-5 | Black (-) | |||
| B-2 Gray (+) | RIGHT FRONT | SPK 10 | UQA | |
| B-6 | Gray/Black (-) | |||
| B-3 | White (+) | LEFT FRONT | SPK 11 | UQA |
| B-7 White/Black (-) | ||||
| B-4 | Yellow | 12V | ||
| B-8 | Black | GROUND | ||
| CHEVROLET SILVERADO 1500/2500/3500 2019-2021 | ||||
| CONNECTOR/PIN | WIRE COLOR/POLARITY | ASSIGNMENT | LABEL | RPO |
| A-1 | Pink | NA | SPK1 | UQA |
| A-9 Pink/Black | ||||
| A-2 | Blue (-) | RIGHT FRONTMIDRANGE | SPK2 | UQA |
| A-10 Blue/Black (+) | ||||
| A-3 Red/White (+) | LEFT FRONTMIDRANGE | SPK3 | UQA | |
| A-11 | Red/Black (-) | |||
| A-4 Purple (+) | RIGHT REAR | SPK4 | UQA | |
| A-12 | Purple/Black (-) | |||
| A-5 | Green (+) | LEFT REAR | SPK5 | UQA |
| A-13 | Green/Black (-) | |||
| A-5 | Orange | NA | SPK6 | UQA |
| A-14 | Orange/Black | |||
| A-7 | Orange | NA | SPK7 | UQA |
| A-15 | Orange/Black | |||
| A-8 | Yellow | NA | SPK8 | UQA |
| A-16 | Yellow/Black | |||
| B-1 | Red (+) | SUBWOOFER | SPK9 | UQA |
| B-5 | Black (-) | |||
| B-2 Gray (+) | RIGHTFRONT | SPK10 | UQA | |
| B-6 | Gray/Black (-) | |||
| B-3 | White (+) | LEFTFRONT | SPK11 | UQA |
| B-7 White/Black (-) | ||||
| B-4 | Yellow | 12V | ||
| B-8 | Black | GROUND | ||
SPEAKER WIRING CHARTS: CHEVROLET / VOLT 2019
| CHEVROLET VOLT 2019 | ||||
| CONNECTOR/PIN | WIRE COLOR/POLARITY | ASSIGNMENT | LABEL RPO | |
| A-1 Pink | NA | SPK1 | ||
| A-9 Pink/Black | ||||
| A-2 Blue | NA | SPK2 | ||
| A-10 Blue/Black | ||||
| A-3 Red/White (+) | CENTER | SPK3 | ||
| A-11 Red/Black (-) | ||||
| A-4 Purple (+) | RIGHT REAR | SPK4 | ||
| A-12 Purple/Black (-) | ||||
| A-5 Green (+) | LEFT REAR | SPK5 | ||
| A-13 Green/Black (-) | ||||
| A-5 Orange | NA | SPK6 | ||
| A-14 | Orange/Black | |||
| A-7 Orange | NA | SPK7 | ||
| A-15 | Orange/Black | |||
| A-8 | Yellow | NA | SPK8 | |
| A-16 | Yellow/Black | |||
| B-1 | Red (+) | SUBWOOFER | SPK9 | |
| B-5 | Black (-) | |||
| B-2 Gray | RIGHT FRONT | SPK 10 | ||
| B-6 | Gray/Black | |||
| B-3 White (+) | LEFT FRONT | SPK 11 | ||
| B-7 | White/Black (-) | |||
| B-4 | Yellow 12V | |||
| B-8 | Black | GROUND | ||
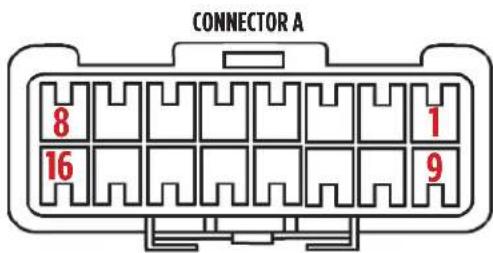
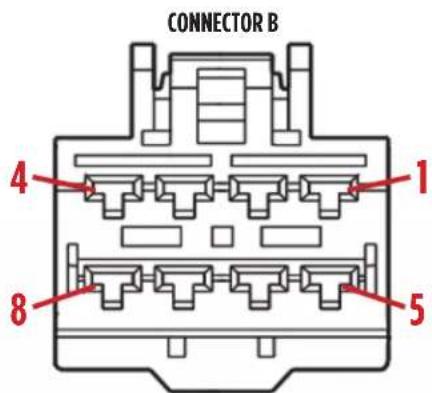
SPEAKER WIRING CHARTS: GMC / ACADIA 2019-UP & CANYON 2019-UP
| GMC ACADIA 2019-UP | ||||
| CONNECTOR/PIN | WIRE COLOR/POLARITY | ASSIGNMENT | LABEL | RPO |
| A-1 | Pink | NA | SPK1 | UQA |
| A-9 | Pink/Black | |||
| A-2 | Blue | NA | SPK2 | UQA |
| A-10 | Blue/Black | |||
| A-3 | Red/White (+) | CENTER | SPK3 | UQA |
| A-11 | Red/Black (-) | |||
| A-4 | Purple (+) | RIGHT REAR | SPK4 | UQA |
| A-12 | Purple/Black (-) | |||
| A-5 Green (+) | LEFT REAR | SPK5 | UQA | |
| A-13 | Green/Black (-) | |||
| A-5 | Orange | NA | SPK6 | UQA |
| A-14 | Orange/Black | |||
| A-7 | Orange | NA | SPK7 | UQA |
| A-15 | Orange/Black | |||
| A-8 | Yellow | NA | SPK8 | UQA |
| A-16 | Yellow/Black | |||
| B-1 | Red (+) | SUBWOOFER | SPK9 | UQA |
| B-5 Black (-) | ||||
| B-2 | Gray (+) | RIGHT FRONT | SPK 10 | UQA |
| B-6 Gray/Black (-) | ||||
| B-3 | White (+) | LEFT FRONT | SPK 11 | UQA |
| B-7 | White/Black (-) | |||
| B-4 | Yellow 12V | |||
| B-8 | Black | GROUND | ||
| CANYON 2019-UP | ||||
| CONNECTOR/PIN | WIRE COLOR/POLARITY | ASSIGNMENT | LABEL RPO | |
| A-1 Pink | NA | SPK1 | ||
| A-9 Pink/Black | ||||
| A-2 Blue (-) | RIGHT FRONTTWEET | SPK2 | ||
| A-10 Blue/Black (+) | ||||
| A-3 Red/White (+) | LEFT FRONTTWEET | SPK3 | ||
| A-11 Red/Black (-) | ||||
| A-4 Purple (+) | RIGHTREAR | SPK4 | ||
| A-12 Purple/Black (-) | ||||
| A-5 Green (+) | LEFTREAR | SPK5 | ||
| A-13 Green/Black (-) | ||||
| A-5 Orange | NA | SPK6 | ||
| A-14 | Orange/Black | |||
| A-7 Orange (+) | CENTER | SPK7 | ||
| A-15 | Orange/Black (-) | |||
| A-8 Yellow | NA | SPK8 | ||
| A-16 | Yellow/Black | |||
| B-1 | Red (+) | RIGHTFRONT | SPK9 | |
| B-5 | Black (-) | |||
| B-2 | Gray | NA | SPK 10 | |
| B-6 Gray/Black | ||||
| B-3 White (+) | LEFTFRONT | SPK 11 | ||
| B-7 | White/Black (-) | |||
| B-4 Yellow 12V | ||||
| B-8 | Black | GROUND | ||
SPEAKER WIRING CHARTS: GMC / SIERRA 1500/2500/3500 2019-2021 & TERRAIN 2019-UP
| SIERRA 1500/2500/3500 2019-2021 | ||||
| CONNECTOR/PIN | WIRE COLOR/POLARITY | ASSIGNMENT | LABEL | RPO |
| A-1 | Pink | NA | SPK1 | UQA |
| A-9 | Pink/Black | |||
| A-2 | Blue (-) | RIGHT FRONT MIDRANGE | SPK2 | UQA |
| A-10 Blue | Blue/Black (+) | |||
| A-3 | Red/White (+) | LEFT FRONT MIDRANGE | SPK3 | UQA |
| A-11 | Red/Black (-) | |||
| A-4 | Purple (+) | RIGHT REAR | SPK4 | UQA |
| A-12 | Purple/Black (-) | |||
| A-5 Green (+) | LEFT REAR | SPK5 | UQA | |
| A-13 Green/Black (-) | ||||
| A-5 | Orange | NA | SPK6 | UQA |
| A-14 | Orange/Black | |||
| A-7 | Orange | NA | SPK7 | UQA |
| A-15 | Orange/Black | |||
| A-8 | Yellow | NA | SPK8 | UQA |
| A-16 | Yellow/Black | |||
| B-1 | Red (+) | SUBWOOFER | SPK9 | UQA |
| B-5 Black (-) | ||||
| B-2 | Gray (+) | RIGHT FRONT | SPK 10 | UQA |
| B-6 Gray/Black (-) | ||||
| B-3 | White (+) | LEFT FRONT | SPK 11 | UQA |
| B-7 | White/Black (-) | |||
| B-4 | Yellow 12V | |||
| B-8 | Black | GROUND | ||
| TERRAIN 2019-UP | ||||
| CONNECTOR/PIN | WIRE COLOR/POLARITY | ASSIGNMENT | LABEL RPO | |
| A-1 Pink | NA | SPK1 | ||
| A-9 Pink/Black | ||||
| A-2 Blue (-) | RIGHT FRONT TWEET | SPK2 UQA | ||
| A-10 Blue/Black (+) | ||||
| A-3 Red/White (+) | LEFT FRONT TWEET | SPK3 UQA | ||
| A-11 Red/Black (-) | ||||
| A-4 Purple (+) | RIGHT REAR | SPK4 UQA | ||
| A-12 Purple/Black (-) | ||||
| A-5 Green (+) | LEFT REAR | SPK5 UQA | ||
| A-13 Green/Black (-) | ||||
| A-5 Orange | NA | SPK6 | ||
| A-14 | Orange/Black | |||
| A-7 Orange (+) | CENTER | SPK7 UQA | ||
| A-15 | Orange/Black (-) | |||
| A-8 Yellow | NA | SPK8 | ||
| A-16 | Yellow/Black | |||
| B-1 | Red (+) | RIGHT FRONT | SPK9 | |
| B-5 | Black (-) | |||
| B-2 | Gray | NA | SPK 10 | |
| B-6 Gray/Black | ||||
| B-3 White (+) | LEFT FRONT | SPK 11 | ||
| B-7 | White/Black (-) | |||
| B-4 Yellow 12V | ||||
| B-8 | Black | GROUND | ||
QUICK SETUP STEPS THROUGH AX-DSP-XL APP
Google Play Store
Apple App Store
iOS 12.1 or higher

- Download and install the AX-DSP-XL app from the Google Play Store or Apple App Store.
- Turn Vehicle Ignition on. Make sure the Remote Turn on lead is disconnected.
- Open the app: Select Bluetooth Connections page.
- Select Scan, all available AXDSP devices within range will be displayed. Select your AXDSP and hit connect. (Figure A)
-
Select the Configuration page.
-
Select Vehicle Type Icon
- Select the Vehicle Make:
- Select the Vehicle's model:
- Select With OE Amp
-
Hit Apply (Figure B)
-
Make sure radio volume is all the way down.
- Connect the amp turn-on wire from the AXDSPX-ETHI harness to the aftermarket amplifiers.
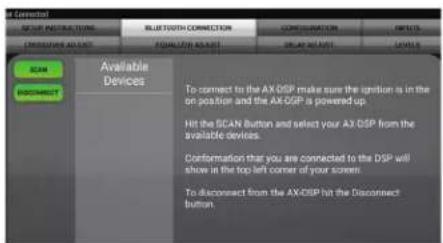
(Figure A) (Figure B)
- From the Configuration page click the Identify button to confirm that the AXDSPX-ETH1 is connected properly. If so, a chime will be heard from the front left speaker.
- Press the Lock Down button to save the configuration. (Do not turn ignition off until this process is completed) (Figure C)
- Select the Bluetooth Configurations page and disconnect the DSPX.
- Turn ignition off, close all door then lock vehicle using the key fob. The vehicle will need to sit uninterrupted for 10 minutes while the vehicle goes to sleep. (Make sure Key fob is 15 feet away from the vehicle)
- Unlock Vehicle, turn ignition on and test radio's functions.
- Adjust the DSP settings in the app as desired. Refer to the instructions under the Setup Instructions tab, or online at Axxessinterfaces.com for an explanation of each tab in the app.
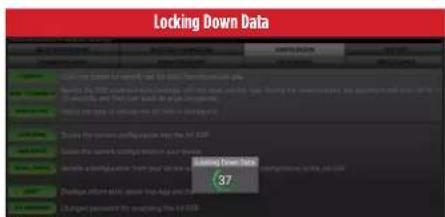
(Figure C)
Last and the most important:
You MUST lock down your configuration and cycle the key!!!
SPECIFICATIONS
Specifications
Input Impedance 1M Ohm
Input Channels 6 High/Low level Selectable
Input Options High Level or Low Level
Input Type Differential-Balanced
Input Voltage
High Level Range 0 - 28v Peak to Peak
Input Voltage
Low Level Range 0 - 4.9v Peak to Peak
Output Channels
Output Voltage Up to 5v RMS
Output Impedance 50 Ohms
Equalizer Type 31 Band Graphic EQ, +/- 10dB
THD <0.03%
Frequency Response 20Hz - 20kHz
Crossover 3-Way LPF, BPF, HPF THP per channel
Crossover Type Linkwitz-Riley 24DB Slope, Fixed
Sampling 48kHz
S/N Ratio 105dB @ 5V RMS
General
Operating Voltage 10 - 16VDC
Standby Current Draw -7mA
Operation Current Draw \~150mA
Adjustments/Controls Application via Bluetooth®
Remote Output 12VDC, Signal Sense or with Ignition

AXDSPX-ETH1 INSTALLATION INSTRUCTIONS
TROUBLESHOOTING
- If the Red light in the AXDSPX-ETH1 interface is blinking 2 or 3 times every 5 seconds, it is not communicating with the vehicle properly. Remove the key from the ignition, unplug the connectors from the interface, then inspect all connections made. If everything is proper, connect the harnesses back into the interface, cycle the key to ignition, then re-inspect. The Red light should blink once every 5 seconds.
LED FEEDBACK
| BLINK RATE CONDITION/STATUS | |
| 1 Blink Every 5 Seconds | ALL GOOD |
| 2 Blinks Every 5 Seconds | MISSING ETHERNET FRAMES |
| 3 Blinks Every 5 Seconds | MISSING CAN FRAMES |
ATTENTION: With the key out of the ignition, disconnect the negative battery terminal before installing this product. Ensure that all installation connections, especially the air bag indicator lights, are plugged in before reconnecting the battery or cycling the ignition to test this product. NOTE: Refer also to the instructions included with the aftermarket accessory before installing this device.
Having difficulties? We're here to help.
Contact our Tech Support line at:
386-257-1187
Or via email at:
techsupport@metra-autosound.com
Tech Support Hours (Eastern Standard Time)
Monday - Friday: 9:00 AM - 7:00 PM
Saturday: 10:00 AM - 5:00 PM
Sunday: 10:00 AM - 4:00 PM

KNOWLEDGE IS POWER
Enhance your installation and fabrication skills by enrolling in the most recognized and respected mobile electronics school in our industry. Log onto www.installerinstitute.edu or call 386-672-5771 for more information and take steps toward a better tomorrow.

Metra recommends MECP certified technicians
natural_image
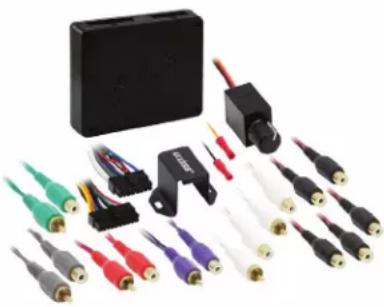
Collection of various audio signal transducers and connectors with no visible text or symbolsAxxess 10-Channel Digital Signal Processor
INTERFACE FEATURES
• 31 Band graphic EQ
• 6 Inputs, 10 individually assignable outputs
• Independent equalization on each of the 10 outputs
- Independent high pass, low pass, and bandpass filters
• Each channel can be delayed independently up to 10ms
- Easy behind the radio installation in most applications
- Can be used with OE and aftermarket radios
• Chime control for GM/Chrysler vehicles
- Clipping detection and limiting circuits
- Bass knob included
- Retains OE voice prompts (SYNC® and OnStar®)
- Retains factory chimes including parking sensor and cross path detection alerts
- Settings adjusted via Bluetooth® in a smart device application (tablet or mobile phone), compatible with both Android and Apple devices
- Read, write, and store configurations for future recall
- Password protect feature available in the mobile app
- Micro-B USB updatable
TABLE OF CONTENTS
Preface 2
Installation Options 3
Installation 3
Connections....4-7
AX-DSP-X app 8-17
Pinout 18
Specifications 19
INTERFACE COMPONENTS
- AX-DSP-X interface
- AX-DSP-X harness (16-pin & 20-pin)
TOOLS & INSTALLATION ACCESSORIES REQUIRED
- Crimping tool and connectors, or solder gun, solder, and heat shrink • Tape • Wire cutter
- Zip ties • Multimeter
Google Play Store
Apple App Store
iOS 12.1 or higher
PREFACE
The AX-DSP-X can be used with an aftermarket system, OEM system, and also an OEM system that is amplified with either an analog or digitally controlled (fixed signal) OEM amplifier. The AX-DSP-X can also grow as your stereo system grows. Start off by adding a subwoofer to an OEM system, then add on from there. Simply reference the Installation Options page to change the AX-DSP-X to the new system. All 10 channels of the AX-DSP-X can be assigned however needed for the installation at hand. If 10 channels of a subwoofer signal is needed, the AX-DSP-X can do it.
In the following section, Installation Options, choose the installation type, then either click on the hyperlink, or reference the page number.
It is highly suggested to use an AX-DSP-X pre-wired harness (sold separately) unless you are installing it with an aftermarket radio. As such, the instructions are written in that manner. Certain connections to the vehicle are unique per vehicle and will require the pre-wired harness to reference to.
The AX-DSP-X provides a 12v 1-amp output to turn on an aftermarket amplifier. If installing multiple amplifiers, an SPDT automotive relay will be required if the current exceeds that amount. Use Metra part number E-123 (sold separately) for best results.
If installing the AX-DSP-X behind the radio to install a sub amp, the OEM amp can be retained for mids/highs. If installing the AX-DSP-X at the OEM amp location, the OEM amp must be fully removed.
In most cases the CAN Bus wires need to be connected in order for the AX-DSP-X to communicate with the vehicle to turn on and provide an amp turn-on output.
INSTALLATION OPTIONS INSTALLATION
Aftermarket radio system:
The AX-DSP-X can be used with an aftermarket radio to improve the overall listening experience for car audio enthusiasts. Installers will connect the RCA inputs from the AX-DSP-X to the outputs from the aftermarket radio; Front, Rear, Sub (sub is optional). When using an aftermarket radio with the AX-DSP-X, General must be chosen for the vehicle type. (refer to page 4)
Adding a subwoofer to an OEM System:
This feature offers the Installer the ability to add an aftermarket subwoofer to an OEM system, whether the OEM system is non-amplified, or amplified with an analog or digitally controlled (fixed signal) amplifier. If the vehicle is equipped with noise canceling mics, they must be disabled for this type of system. (refer to page 5)
OEM System without an amplifier:
This option allows the Installer to wire the AX-DSP-X directly to the speaker outputs from the OEM radio for an audio signal (high-level). (refer to page 6)
OEM System with an "analog" amplifier:
This option allows the Installer to tap directly to the output of the OEM radio and feed an audio signal into the AX-DSP-X. This type of installation requires the removal of the factory amplifier, and will provide a full range signal to the input side of the AX-DSP-X. (refer to page 7)
OEM System with a "digitally controlled" amplifier:
Digitally controlled systems function differently than analog systems. They have a fixed level audio signal that is controlled through the vehicle's CAN bus. In most cases the programming content (audio) provided is just two channels, which can be either front or rear. The other channels are for content like Phone/Bluetooth, SMS reader, SYNC, or OnStar. The AX-DSP-X can retain these OEM features, and also provide a clean audio signal. This type of installation requires the removal of the factory amplifier, and will provide a full range signal to the input side of the AX-DSP-X. (refer to page 7)
Factory Radio Systems
- Remove the factory radio*, then unplug all connectors.
- Install the vehicle specific T-harness (sold separately) and make all necessary connections, but leave the amp turn-on wire disconnected.
- Plug the 20-pin AX-DSP-X harness into the AX-DSP-X.
- Plug the 16-pin AX-DSP-X harness into the AX-DSP-X.
- Plug all connectors back into the OEM radio.
- Download and install the AX-DSP-X app from the Google Play Store or Apple App Store.
- Using the app, select the vehicle.
- Connect the amp turn-on wire from the AX-DSP-X.
- Test all functions of the installation, then reassemble the dash to complete the installation.
* Refer to Metra online for dash disassembly. If Metra makes a dash kit for the vehicle, disassembly will be within the instructions.
Aftermarket Radio Systems
- Complete all necessary connections to the radio and vehicle, but leave the amp turn-on wire disconnected.
- Plug the 20-pin AX-DSP-X harness into the AX-DSP-X.
- Plug the 16-pin AX-DSP-X harness into the AX-DSP-X.
- Download and install the AX-DSP-X app from the Google Play Store or Apple App Store.
- Using the app, select the vehicle.
- Connect the amp turn-on wire from the AX-DSP-X.
- Test all functions of the installation, then reassemble the dash to complete the installation.
flowchart
graph TD
    A["Aftermarket Radio"] --> B["Front/Ros/Sub"]
    B --> C["Optional"]
    B --> D["Input 5"]
    B --> E["Input 6"]
    B --> F["Orange - Control Wire"]
    B --> G["Black - Chassis Ground Yellow - Battery Power Red - Accessory Power"]
    G --> H["Ax-DSP-X (included)"]
    H --> I["Blue/White - Amp Turn-On Wire"]
    I --> J["Assignable Outputs Labeled CH 6-10"]
    J --> K["RCA Jacks (sold separately)"]
    K --> L["An SPDT relay, Metra part number E-123, must be used if more than one amplifier will be installed"]
ADDING A SUBWOOFER TO AN OEM SYSTEM
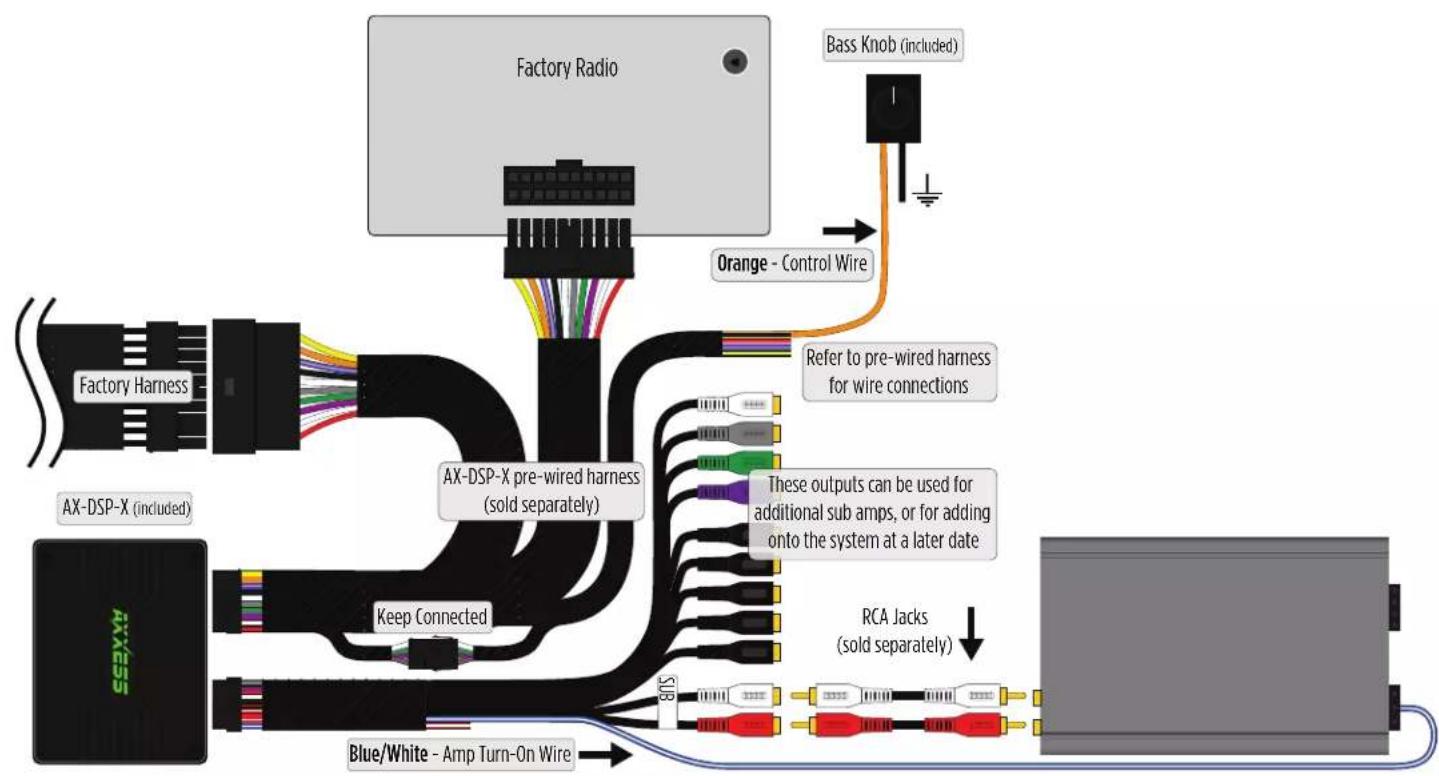
flowchart
graph TD
    A["Factory Radio"] --> B["Orange - Control Wire"]
    B --> C["Bass Knob (included)"]
    D["AX-DSP-X (included)"] --> E["AX-DSP-X pre-wired harness (sold separately)"]
    F["AX/AS5"] --> G["Keep Connected"]
    H["Blue/White - Amp Turn-On Wire"] --> I["Blue/White"]
    E --> J["Refer to pre-wired harness for wire connections"]
    G --> K["RCA jacks (sold separately)"]
    style A fill:#f9f,stroke:#333
    style D fill:#ccf,stroke:#333
    style F fill:#cfc,stroke:#333
    style H fill:#fcc,stroke:#333
REV. 7/24/2019 INSTAX-DSP-X
OEM SYSTEM WITHOUT AMP
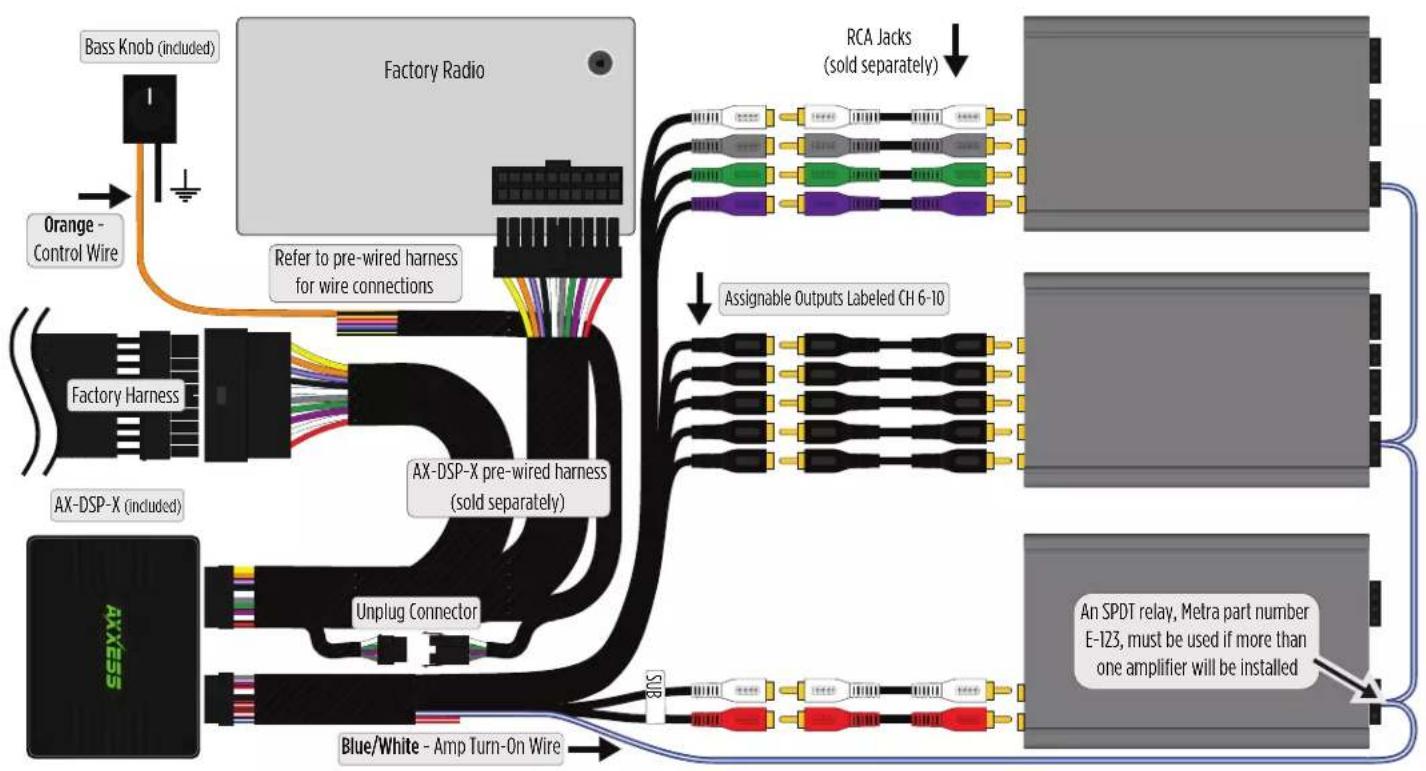
flowchart
graph TD
    A["Bass Knob (included)"] --> B["Factory Radio"]
    C["Orange - Control Wire"] --> B
    B --> D["Refer to pre-wired harness for wire connections"]
    E["AX-DSP-X (included)"] --> F["AX-DSP-X pre-wired harness (sold separately)"]
    G["AX-GSS"] --> H["Unplug Connector"]
    I["Blue/White - Amp Turn-On Wire"] --> H
    H --> J["Assignable Outputs Labeled CH 6-10"]
    K["RCA Jacks (sold separately)"] --> J
    J --> L["An SPDT relay, Metra part number E-123, must be used if more than one amplifier will be installed"]
OEM SYSTEM WITH AMP BYPASS HARNESS
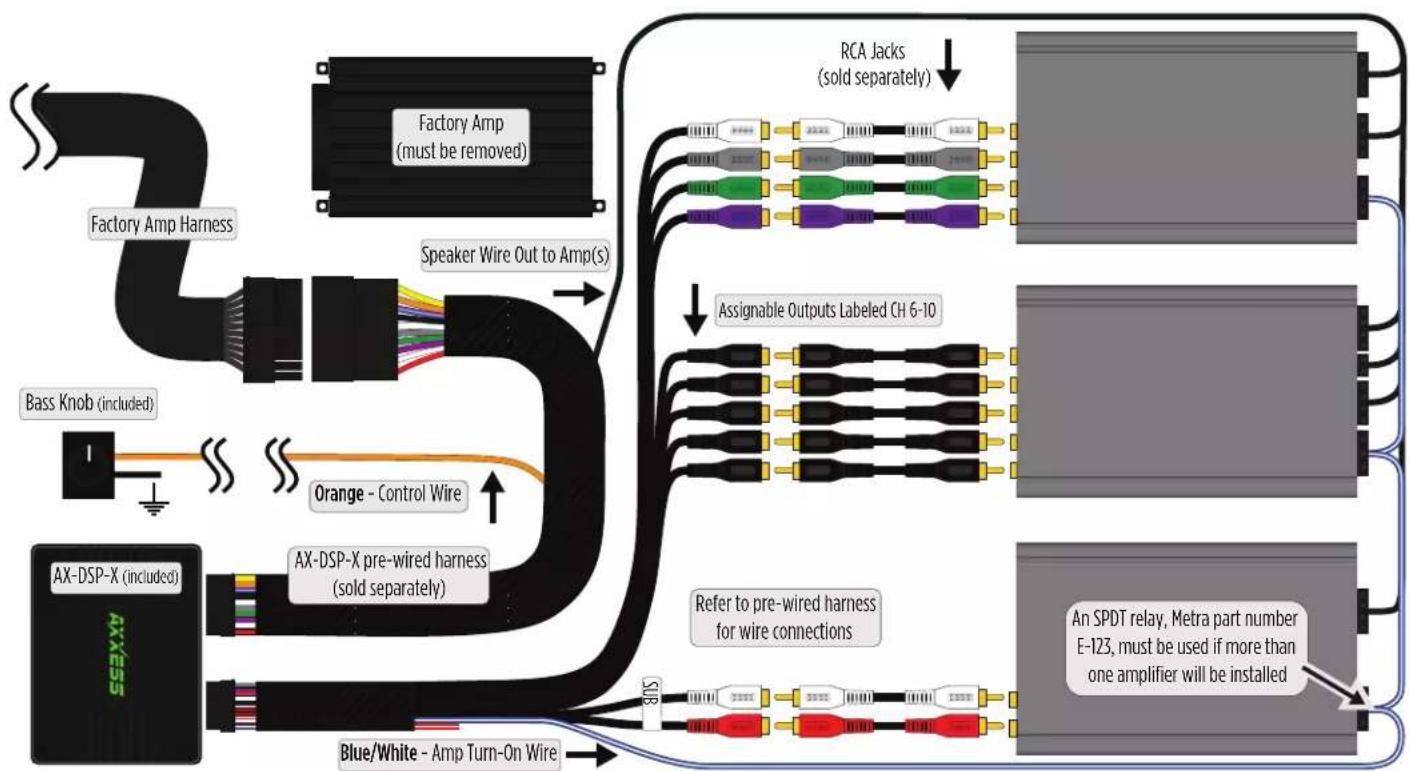
flowchart
graph TD
    A["Factory Amp (must be removed)"] --> B["Speaker Wire Out to Amp(s)"]
    C["Bass Knob (included)"] --> D["Orange - Control Wire"]
    E["AX-DSP-X (included)"] --> F["AX-DSP-X pre-wired harness (sold separately)"]
    G["Blue/White - Amp Turn-On Wire"] --> H["Refer to pre-wired harness for wire connections"]
    I["RCA Jacks (sold separately)"] --> J["Assignable Outputs Labeled CH 6-10"]
    K["An SPDT relay, Metra part number E-123, must be used if more than one amplifier will be installed"] --> L["Output"]
    style A fill:#f9f,stroke:#333
    style C fill:#ccf,stroke:#333
    style E fill:#cfc,stroke:#333
    style G fill:#fcc,stroke:#333
    style K fill:#cff,stroke:#333
    style L fill:#ffc,stroke:#333
REV. 7/24/2019 INSTAX-DSP-X
AX-DSP-X APP
Setup Instructions
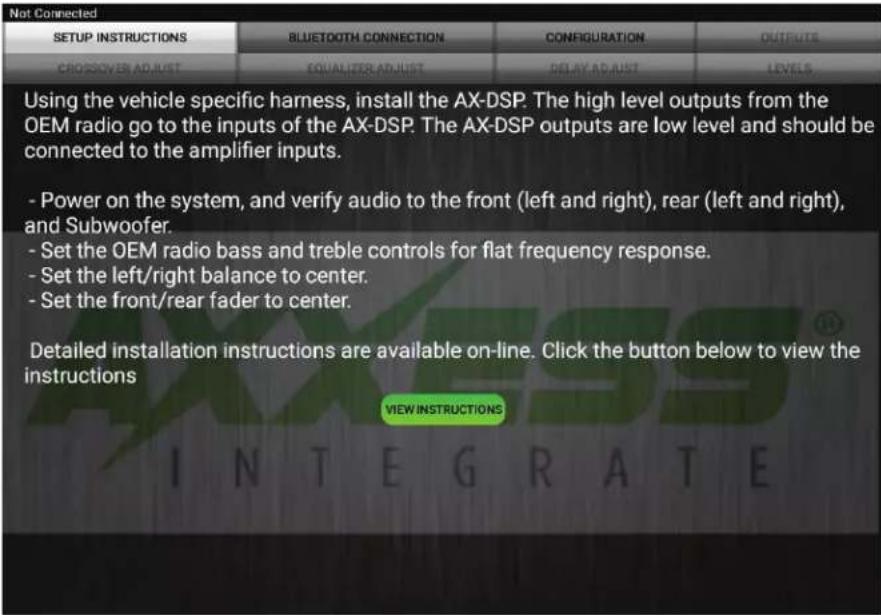
- General information tab for installing the AX-DSP-X.
Continued on the next page
AX-DSP-X APP (CONT.)
Bluetooth Connection
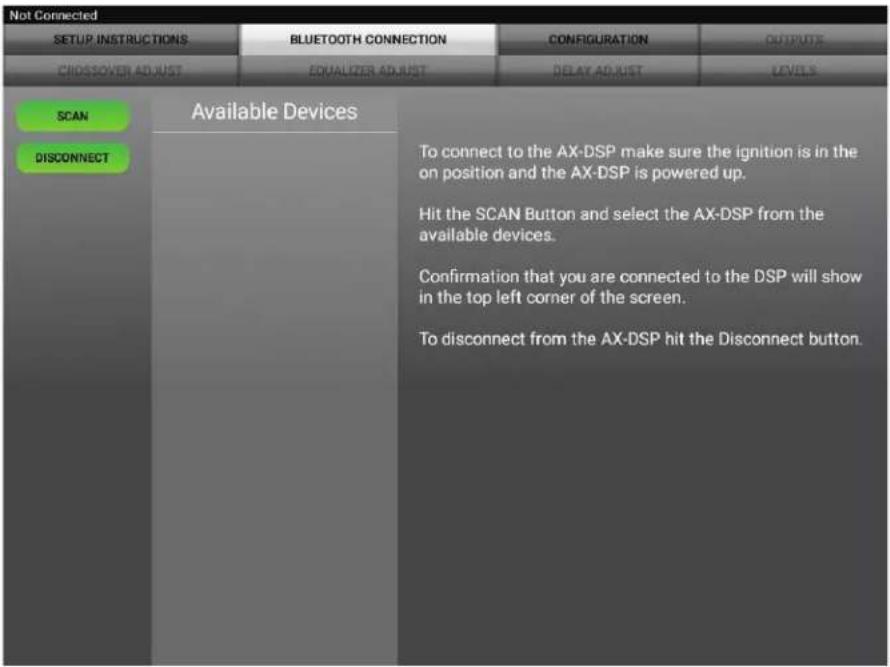
- Scan - Press this button to start the Bluetooth pairing process, then select the AX-DSP-X from the mobile device. The AX-DSP-X must be powered during this process. Confirmation that you are connected will show in the top left corner of the app.
- Disconnect - Disconnects the AX-DSP-X from the app.
Continued on the next page
AX-DSP-X APP (CONT.)
Configuration
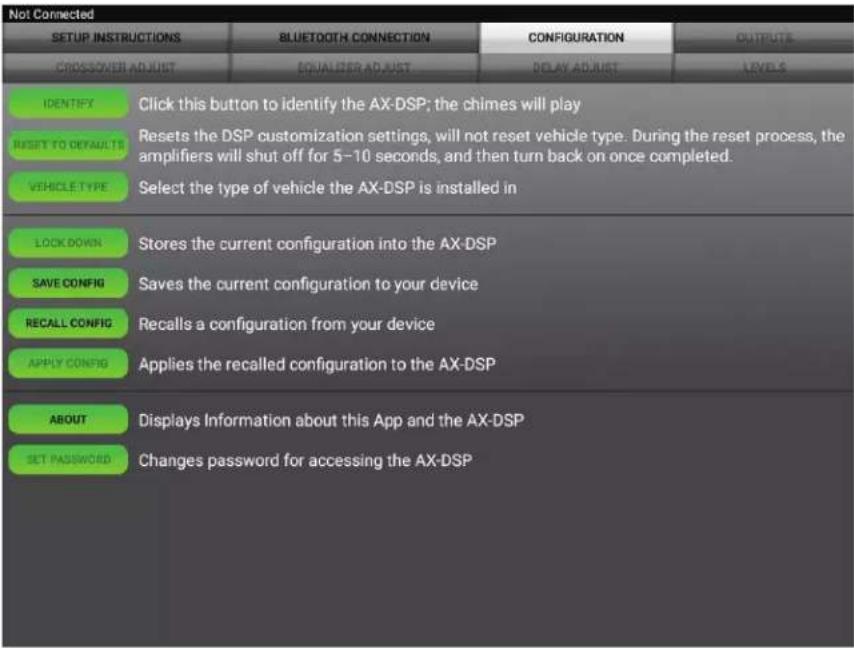
- Identify - Click this button to confirm that the AX-DSP-X is connected properly. If so, a chime will be heard from the front left speaker.
- Reset to Defaults - Resets the AX-DSP-X to factory settings. During the reset process the amplifiers will shut off for 5-10 seconds.
- Vehicle Type - Select the vehicle type from the drop down box, select either Without OE Amplifier or With OE Amplifier, then click the apply button.
- Lock Down - Click this button to save the selected settings.
Attention! This button must be selected before closing the app or cycling the key otherwise all settings will be lost.
- Save Configuration - Saves the current configuration to the mobile device.
- Recall Configuration - Recalls a configuration from the mobile device.
Continued on the next page
AX-DSP-X APP (CONT.)
Configuration (Cont.)
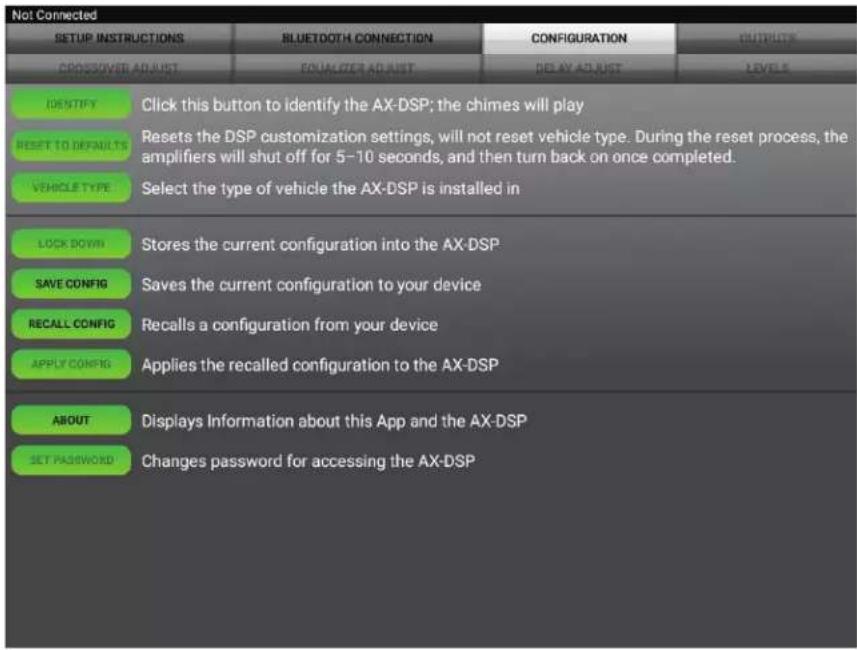
- Apply Configuration - Allows a recalled configuration to the AX-DSP-X. The AX-DSP-X will need to be locked down to save the recalled configuration. This process will shut the amplifier off between 5-10 seconds while the configuration is uploaded to the AX-DSP-X.
- About - Displays information about the app, vehicle, AX-DSP-X, and mobile device.
- Set Password - Assign a 4-digit password to lock the AX-DSP-X. If no password is desired, use "0000". This will clear out any currently set password. It is not necessary to lock down the AX-DSP-X when setting a password.
Note: A 4-digit only password must be chosen otherwise the interface will show "password not valid for this device".
Continued on the next page
AX-DSP-X APP (CONT.)
Outputs
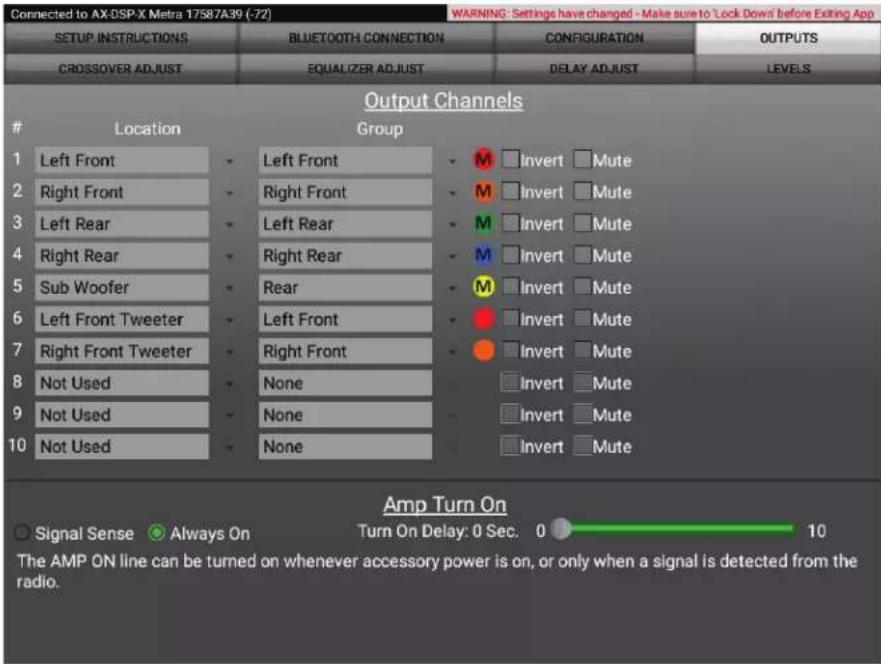
Output Channels
- Location - Location of speaker.
- Group - Used to join channels together. Example, left front woofer/midrange and left front tweeter will be considered simply left front to the AX-DSP-X. The letter M denotes the speaker assigned as the master speaker.
- Invert - Will invert the phase of the speaker.
- Mute - Will mute desired channel(s) for tuning individual channels.
Amp Turn On
- Signal Sense - Will turn the amplifier on when an audio signal is detected, and keep on for 10 seconds past the last signal. This ensures the amplifier doesn't shut off between tracks.
- Always On - Will keep the amplifiers on as long as they is cycled on.
- Turn on Delay - Can be used to delay amp turn-on to avoid turn-on pops.
Continued on the next page
AX-DSP-X APP (CONT.)
Crossover Adjust
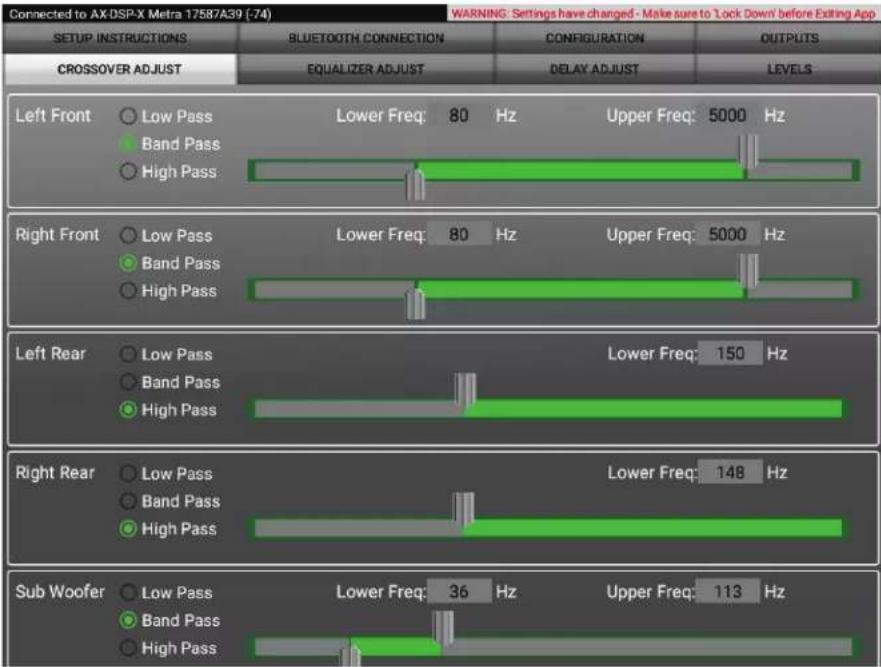
- If installing a subwoofer, the front and rear outputs will default to a 100Hz high pass filter to keep the low frequency signals out of the full range speakers. If a subwoofer is not being installed, change the front and rear crossover points down to 20Hz for a full range signal, or to the lowest frequency the speakers will play to.
- Selecting High Pass and Low Pass will provide one crossover frequency adjustment. Selecting Band Pass will provide two crossover frequency adjustments, one for low pass, and one for high pass.
Continued on the next page
AX-DSP-X APP (CONT.)
Equalizer Adjust
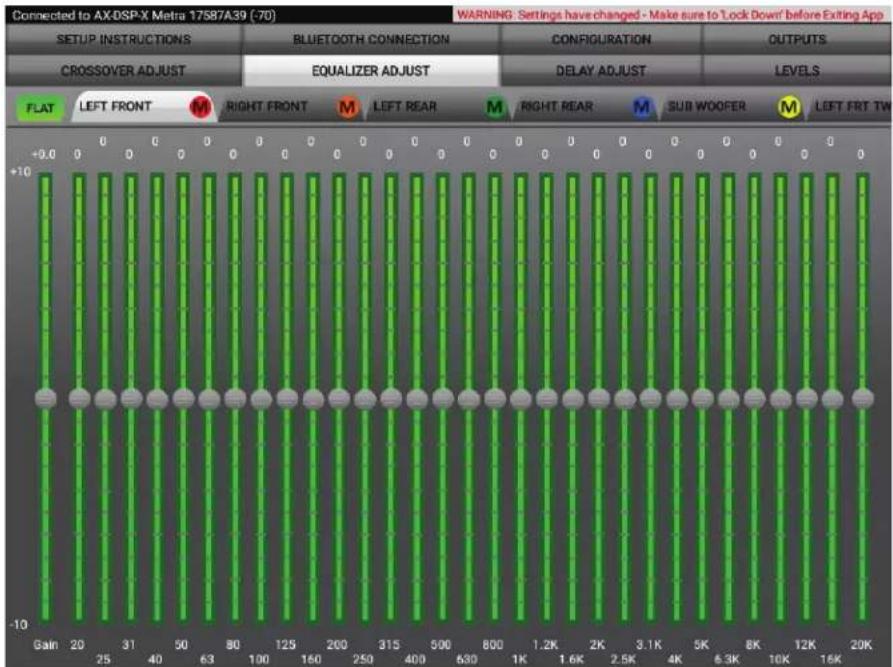
- All channels can be adjusted independently within this tab with 31 bands of available equalization. It is best to tune this by using an RTA (Real Time Analyzer).
• The Gain slider on the far left is for the channel selected.
Continued on the next page
AX-DSP-X APP (CONT.)
Delay Adjust
| Connected to AX-DSP-X Metra 17587A39 (-65) | WARNING. Settings have changed - Make sure to Lock Down before Exiting App | ||
| SETUP INSTRUCTIONS | BLUETOOTH CONNECTION | CONFIGURATION | OUTPUTS |
| CROSSOVER ADJUST | EQUALIZER ADJUST | DELAY ADJUST | LEVELS |
| Distance from each speaker to 'Head' position (in inches) | |||
| Left Front | 37 | ||
| Right Front | 54 | ||
| Left Rear | 27 | ||
| Right Rear | 46 | ||
| Sub Woofer | 57 | ||
| Left Front Tweeter | 26 | ||
| Right Front Tweeter | 45 | ||
- Allows a delay of each channel, up to 10 milliseconds. First measure the distance (in inches) from each speaker to the listening position, then enter those values. If a delay is desired, add to the desired channel(s), up to 99 inches.
Continued on the next page
AX-DSP-X APP (CONT.)
Levels
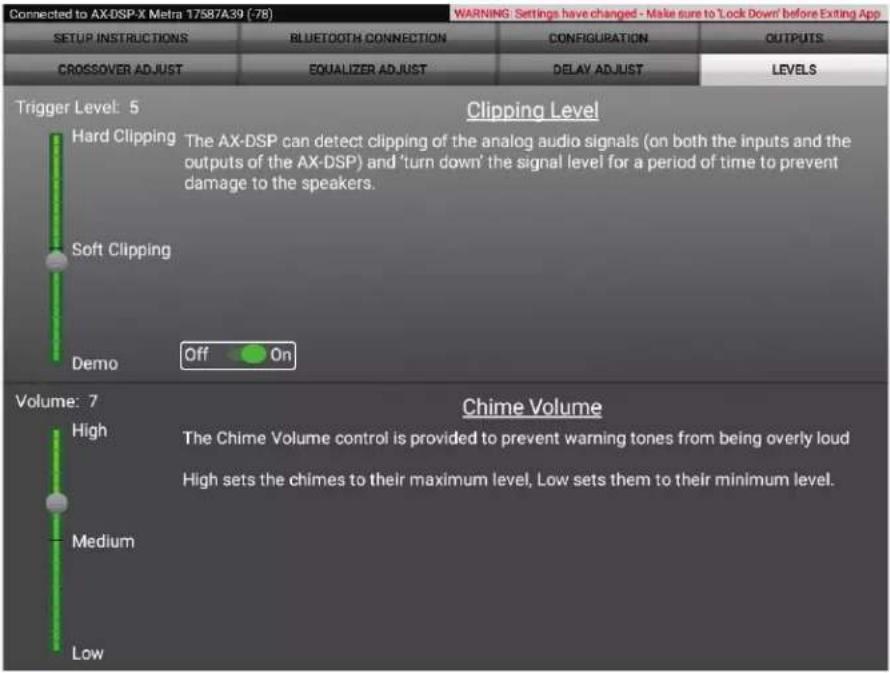
- Clipping Level - Use this feature to protect sensitive speakers like tweeters from being driven past their capabilities. If the output signal of the AX-DSP-X clips the audio will be reduced by 20dB. Turning down the stereo will allow the audio to come back at a normal level. The sensitivity of this feature can be adjusted to the listening preference of the user.
- Chime Volume – Allows the chime volume to be adjusted up or down.
Note: In newer Ford vehicles chimes will be heard through the gauge cluster if the OEM amplifier is removed
Continued on the next page
AX-DSP-X APP (CONT.)
Locking Down Data
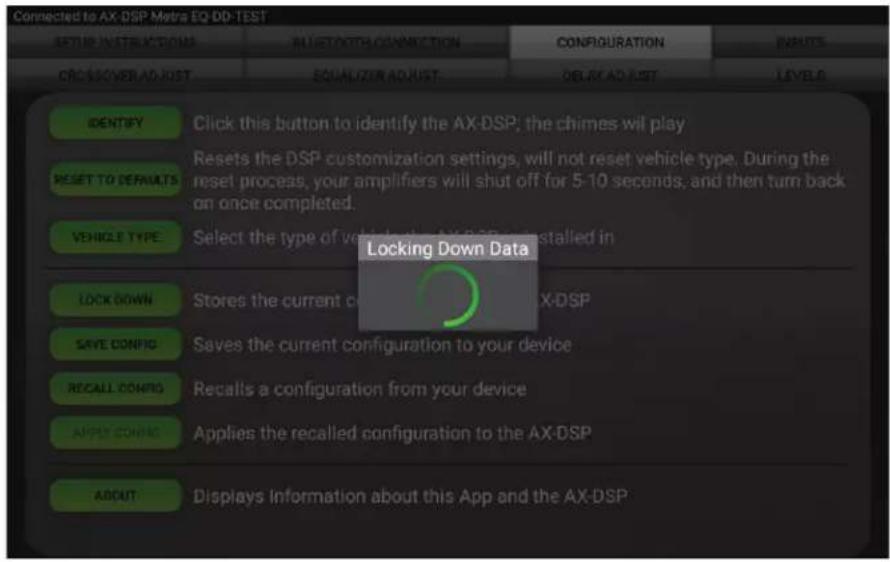
Last and the most important. You must lock down your configuration!!!
PINOUT
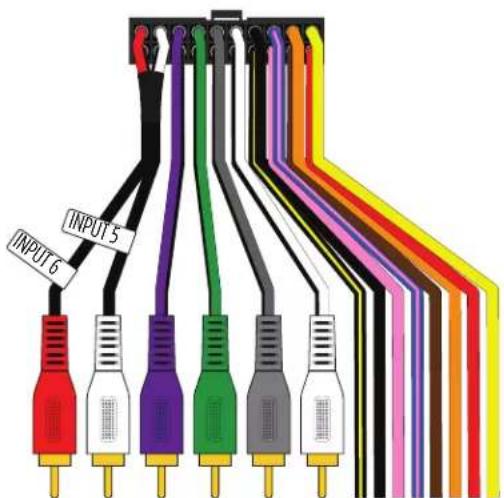
Input 6 - Subwoofer Right Input Black - Chassis Ground
Input 5 - Subwoofer Left Input Pink - CAN-HI
Purple RCA Jack - Rear Right Input * Blue/Pink - CAN-LO
Green RCA Jack - Rear Left Input * Brown - Future Use
Gray RCA Jack - Front Right Input * Orange - Control Wire for Bass Knob
White RCA Jack - Front Left Input * Red - Accessory Power
Black/Yellow - Future Use Yellow - Battery Power
* Cut off RCA jack for speaker level input
Output ConnectorInput Connector
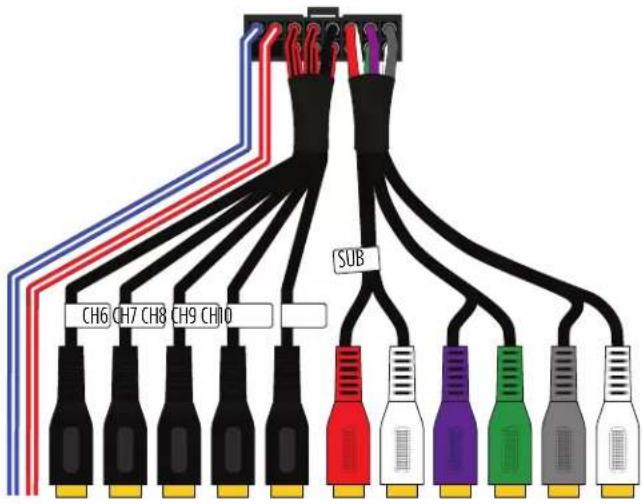
Blue/White - Amp Turn-On Purple RCA Jack - User Assignable Output
Red/White - Future Use Green RCA Jack - User Assignable Output
Channel 6-10 - User Assignable Outputs
Sub RCA Jacks - Use Assignable Outputs
Gray RCA Jack - User Assignable Output
White RCA Jack - User Assignable Output
SPECIFICATIONS
Specifications
Input Impedance 1M Ohm
Input Channels 6 High/Low level Selectable
Input Options High Level or Low Level
Input Type Differential-Balanced
Input Voltage
High Level Range 0 - 28V Peak to Peak
Input Voltage
Low Level Range 0\~4.9V Peak to Peak
Ouput Channels 10
Output Voltage Up to 5v RMS
Output Impedance 50 Ohms
Equalizer Type 31 Band Graphic EQ, +/- 10dB
THD <0.03%
Frequency Response 20Hz - 20kHz
Crossover 3-Way LPF, BPF, HPF THP per channel
Crossover Type Linkwitz-Riley 24DB Slope, Fixed
Sampling 48kHz
S/N Ratio 105dB @ 5V RMS
General
Operating Voltage 10 - 16VDC
Standby Current Draw -7mA
Operation Current Draw \~150mA
Adjustments/Controls Application via Bluetooth
Remote Output or with Ignition 12VDC, Signal Sense
Having difficulties? We're here to help.

ur Tech Support line at:
1-800-253-TECH
Or via email at:
techsupport@metra-autosound.com
Tech Support Hours (Eastern Standard Time)
Monday - Friday: 9:00 AM - 7:00 PM
Saturday: 10:00 AM - 7:00 PM
Sunday: 10:00 AM - 4:00 PM

KNOWLEDGE IS POWER
Enhance your installation and fabrication skills by enrolling in the most recognized and respected
enabling in the most recognized and resp mobile electronics school in our industry.
Log onto www.installerinstitute.com or call
800-354-6782 for more information and take steps toward a better tomorrow.

Metra recommends MECP certified technicians
- Installation is extremely easy.
- INTERFACE FEATURES
- GENERAL MOTORS 2019-UP ETHERNET DSPX PACKAGE
- INTERFACE COMPONENTS
- TABLE OF CONTENTS
- TOOLS REQUIRED
- INSTALLATION
- SPEAKER WIRING CHARTS: CONNECTOR TYPES
- SPEAKER WIRING CHARTS
- SPEAKER WIRING CHARTS: CADILLAC / XT4 2019-UP W/UQG OR UQS
- SPEAKER WIRING CHARTS: CHEVROLET / BLAZER 2019-UP & CAMARO 2019-UP
- SPEAKER WIRING CHARTS: CHEVROLET / CHEYENNE & COLORADO 2019-2021
- SPEAKER WIRING CHARTS: CHEVROLET / CORVETTE 2020-UP
- SPEAKER WIRING CHARTS: CHEVROLET / EQUINOX, MALIBU, & SILVERADO
- SPEAKER WIRING CHARTS: CHEVROLET / VOLT 2019
- SPEAKER WIRING CHARTS: GMC / ACADIA 2019-UP & CANYON 2019-UP
- SPEAKER WIRING CHARTS: GMC / SIERRA 1500/2500/3500 2019-2021 & TERRAIN 2019-UP
- QUICK SETUP STEPS THROUGH AX-DSP-XL APP
- Google Play Store
- SPECIFICATIONS
- General
- AXDSPX-ETH1 INSTALLATION INSTRUCTIONS
- TROUBLESHOOTING
- Tech Support Hours (Eastern Standard Time)
- Metra recommends MECP certified technicians
- Axxess 10-Channel Digital Signal Processor
- TOOLS & INSTALLATION ACCESSORIES REQUIRED
- PREFACE
- INSTALLATION OPTIONS INSTALLATION
- Aftermarket radio system:
- Adding a subwoofer to an OEM System:
- OEM System without an amplifier:
- OEM System with an "analog" amplifier:
- OEM System with a "digitally controlled" amplifier:
- Factory Radio Systems
- Aftermarket Radio Systems
- AX-DSP-X APP
- Setup Instructions
- AX-DSP-X APP (CONT.)
- Bluetooth Connection
- Configuration
- Configuration (Cont.)
- Outputs
- Location
- Output Channels
- Amp Turn On
- Levels
- Locking Down Data
- PINOUT
Brand : Metra
Model : Axxess AXDSPX-ETH1
Category : Hi-Fi System