LACS3000 - Access Control System ACTi - Free user manual and instructions
Find the device manual for free LACS3000 ACTi in PDF.


| Product Type | Access Control System |
| Brand | ACTi |
| Model | LACS3000 |
| Dimensions (Controller Unit) | Approximately 200 x 140 x 45 mm |
| Weight (Controller Unit) | Approximately 0.8 kg |
| Power Supply | 12V DC / 1A (power adapter included) |
| Supported Card Types | MIFARE, HID iCLASS, Desfire (depending on reader) |
| Maximum Users | Up to 50,000 users (configurable) |
| Communication Interface | Ethernet (10/100 Mbps), RS485 |
| Main Functions | Access control, user management, time schedules, door locking, event logging |
| User Induction | Keypad or card reader for authentication |
| Operating Temperature | 0°C to 50°C (32°F to 122°F) |
| Humidity Range | 10% to 90% (non-condensing) |
| Enclosure Material | Metal casing (steel) |
| Mounting Type | Wall mount (bracket included) |
| Maintenance | Periodic cleaning with dry cloth; avoid moisture and dust |
| Security Features | Encrypted communication (TLS), tamper detection, anti-passback |
| Spare Parts | Power adapter, mounting bracket, screws available from ACTi support |
| Repairability | Modular design; internal components replaceable by qualified personnel |
| General Information | Designed for small to medium businesses; integrates with ACTi NVR and software |
Frequently Asked Questions - LACS3000 ACTi
User questions about LACS3000 ACTi
0 question about this device. Answer the ones you know or ask your own.
Ask a new question about this device
Download the instructions for your Access Control System in PDF format for free! Find your manual LACS3000 - ACTi and take your electronic device back in hand. On this page are published all the documents necessary for the use of your device. LACS3000 by ACTi.
USER MANUAL LACS3000 ACTi
Access Control Standard Server
User's Manual
Version V1.1.13
TABLE OF CONTENTS
A. LOGIN/ LOGOUT....4
B. COMPANY....5
C. DEVICE MANAGEMENT....11
D. MEMBER INFORMATION ....18
E. BATCH IMPORT....21
F. TIME ZONE 25
G. ACCESS MANAGEMENT ....26
H. TAILGATING 35
I. MANUAL EXPORT REPORT....36
J. SCHEDULE REPORT ....38
K. MAIL SERVER SETTING....43
L. PERMISSION....44
M. REAL-TIME ACCESS LOG 46
N. RECORDS SEARCH....49
O. NOTIFICATION ....50
P. E-MAP 53
Q. ATTENDENCE....54
R. SYSTEM INFORMATION ....60
Preface
Trademark
All product names mentioned in this documentation are registered trademarks of their respective companies.
Liability
Every reasonable care has been taken during the writing of this manual. Please inform your local office if you find any inaccuracies or omissions. We cannot be held responsible for any typographical or technical errors and reserve the right to make changes to the product and manuals without prior notice.
System Requirements
When using the Access Control Standard Server (ACSS) on other computers, take note of the following minimum system requirements:
• CPU Recommendation: Intel Core i5-6500TE, 8GB RAM
• Operating System: 32/64 bit Windows 7 Embedded, Windows 8, Windows 10
• Network: Ethernet 1000 Base-T recommended
• Storage: SSD 128 GB
A. Login/ Logout
System Login
Open the page and enter the account and password. hp:// {Server IP} /ACSS/Login/Login.aspx
If you long in to another computer with the same domain as the ACSS server, you can directly access the server by entering the IP address on the browser.
*Default Account and password: admin / 123456

Username

Password
Sign in
System Logout
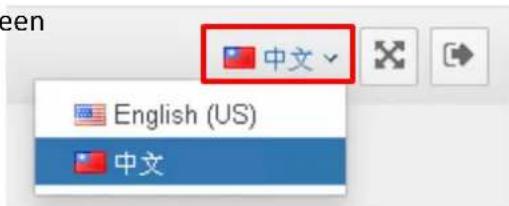
Click the buon on the top right corner

English (US)


Select Language
Click the language buon to switch between English and Chinese.
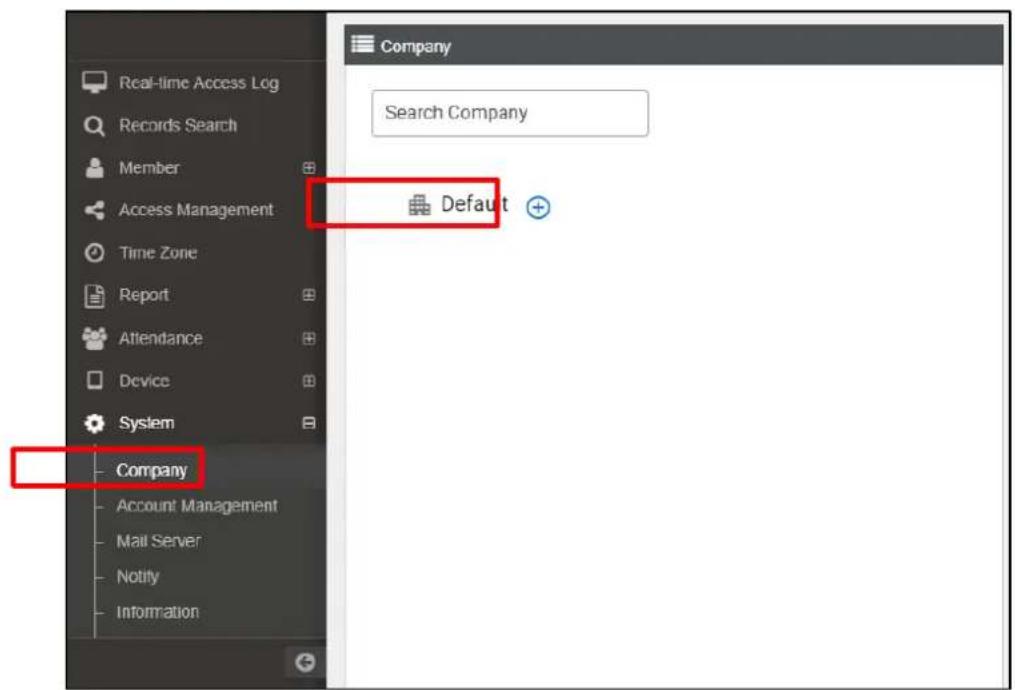
- Click System > Company to enter the company setting page.
ACSS has a preset company name, "Default", set as the head office (being the root directory). It is recommended to modify the company name first.
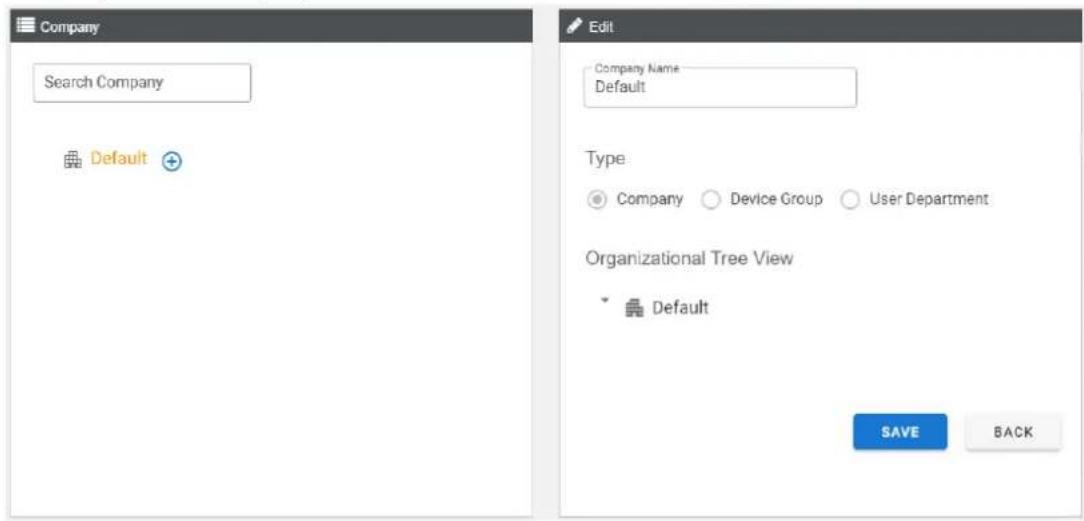
- Click on the company name to enter the editor.
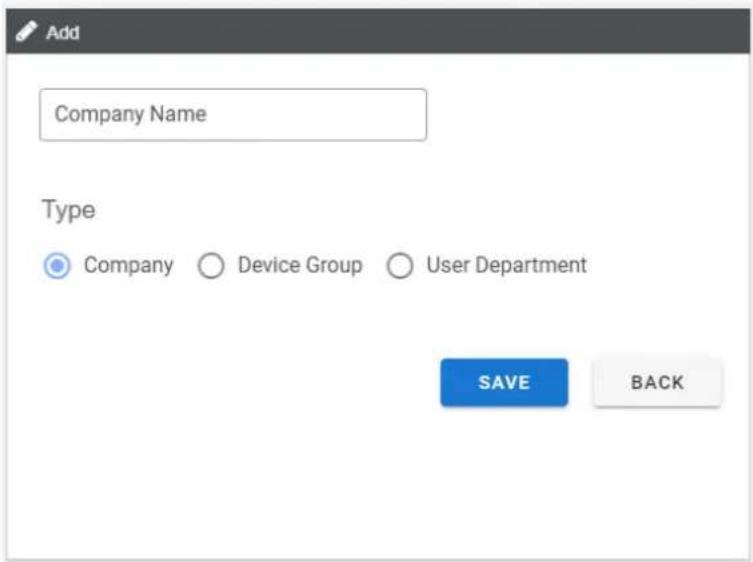
- Complete the company information, then click Save.
Create Groups
Click + to add a new group.
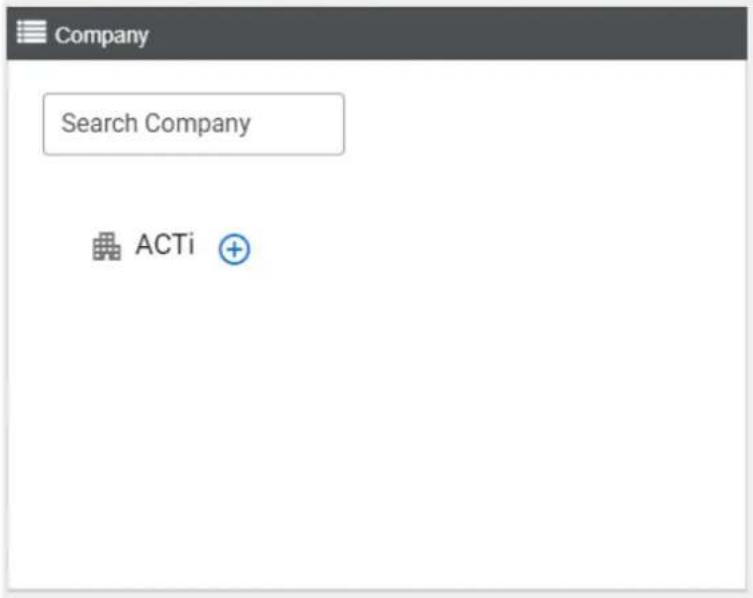
There are three group types:
- Company : To distinguish different organizations, such as branches or offices in different locations. If there is no need to further divide the authority, then there is no need to create a company group, just use the head office, as previously set.
• Device Group: This is the group of access control equipment.
• User Department: This is the group of personnel or members.
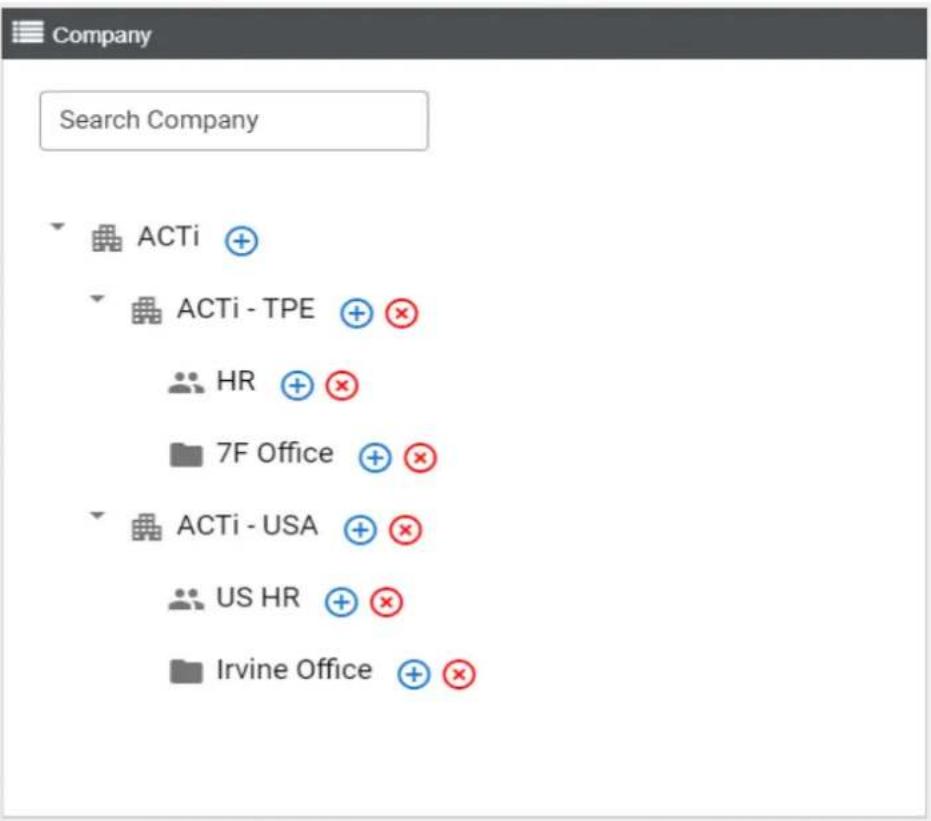
If new groups are created, the corresponding tree will be shown on the left panel.

• Indicates Company Group
• Indicates Device Group
• Indicates User Department


Click the corresponding ⭕ on each group to add subgroups.
The closer the group is to the left side of the tree, the wider is its scope of permission.
Delete User Department Groups
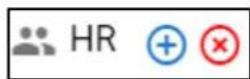
- To delete a group, click the corresponding Ⓧ button.
To ensure that previously linked data in the group can be properly archived, the data in the group that you want to delete will be transferred to other groups before deletion.
- Click Next.
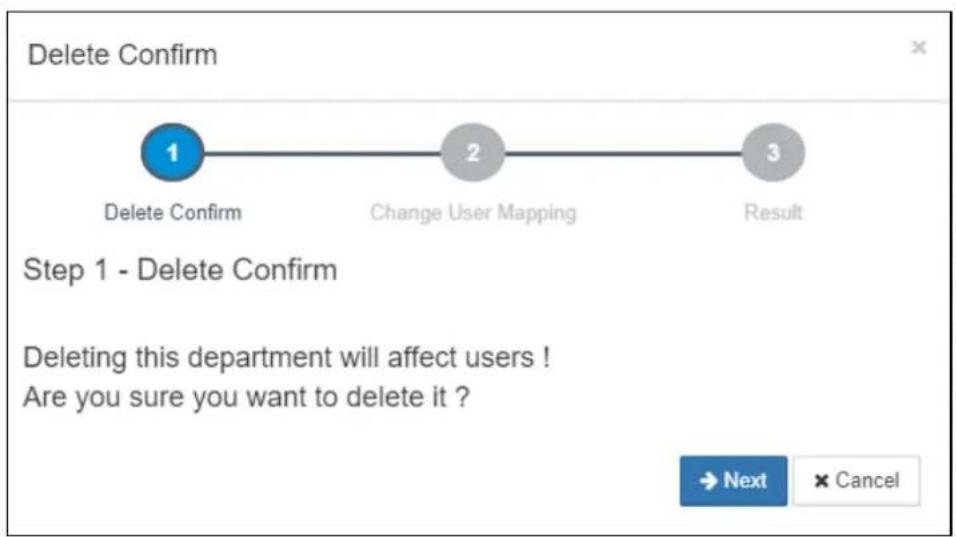
flowchart
graph LR
    A["1 Delete Confirm"] --> B["2 Change User Mapping"]
    B --> C["3 Result"]
- Select the target group to transfer the data, then click Submit.
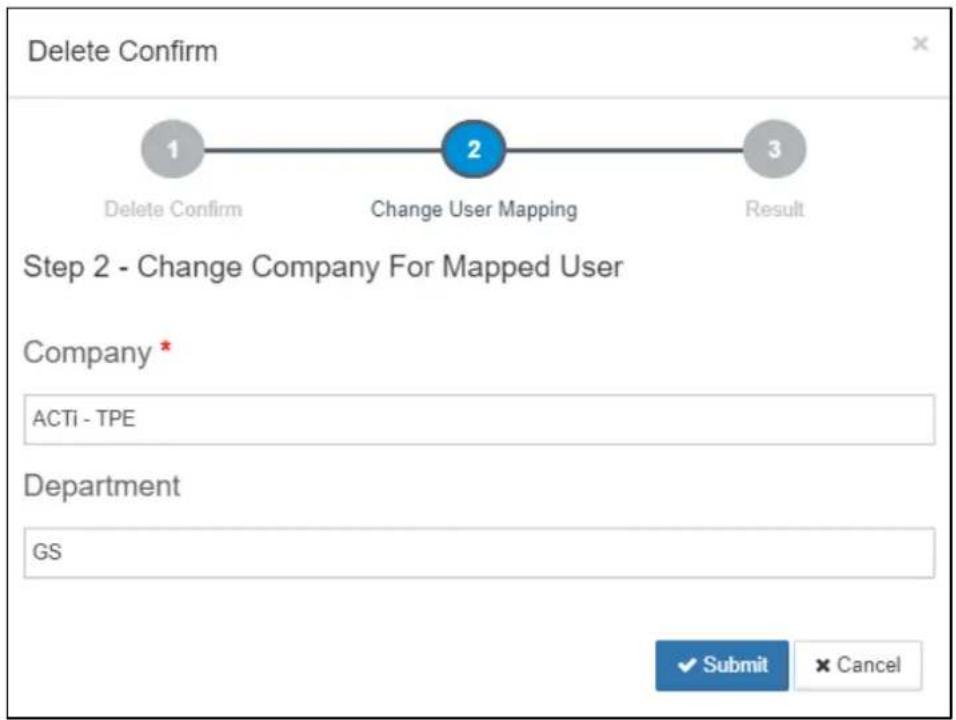
flowchart
graph LR
    A["1 Delete Confirm"] --> B["2 Change User Mapping"]
    B --> C["3 Result"]
After the data transfer is complete, a confirmation message will appear.
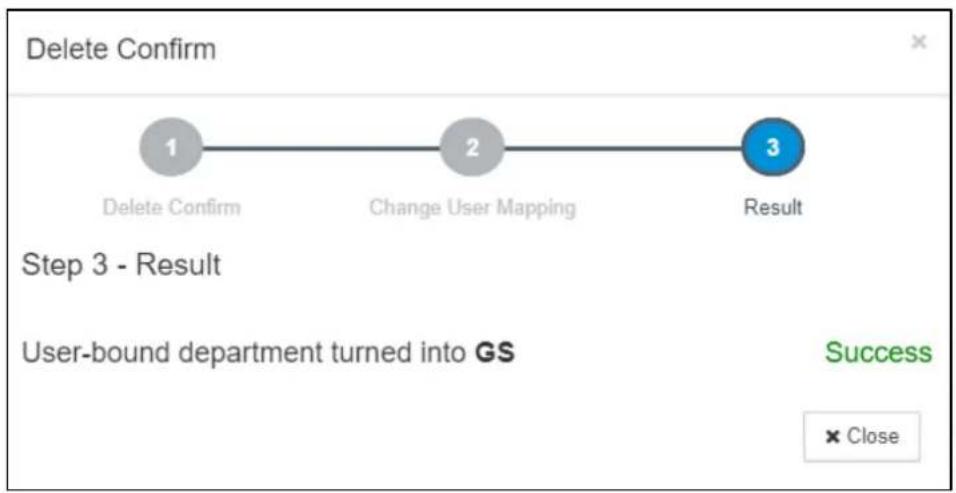
flowchart
graph LR
    A["1 Delete Confirm"] --> B["2 Change User Mapping"]
    B --> C["3 Result"]
Delete Device Groups
- To delete a group, click the corresponding Ⓧ button.
To ensure that previously linked data in the group can be properly archived, the data in the group that you want to delete will be transferred to other groups before deletion.
- Click Next.
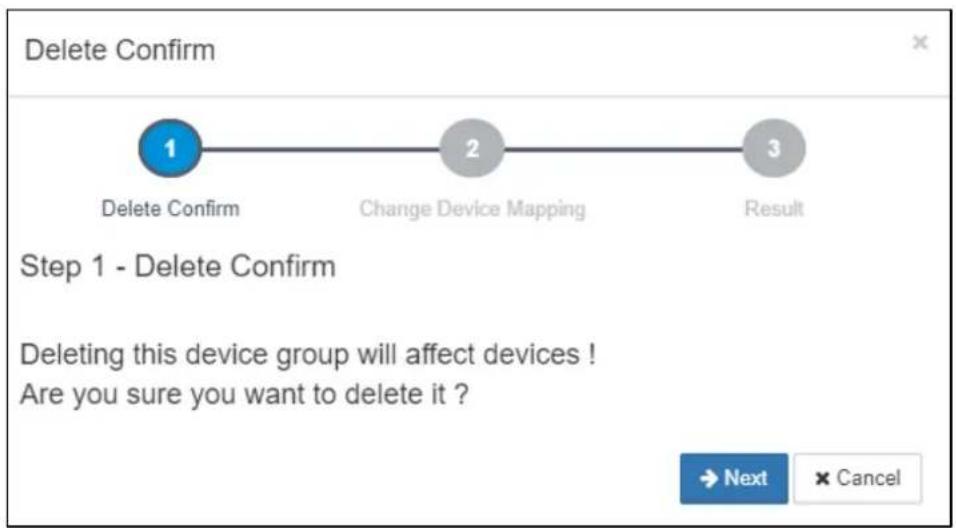
flowchart
graph LR
    A["1 Delete Confirm"] --> B["2 Change Device Mapping"]
    B --> C["3 Result"]
- Select the target group to transfer the data, then click Submit.
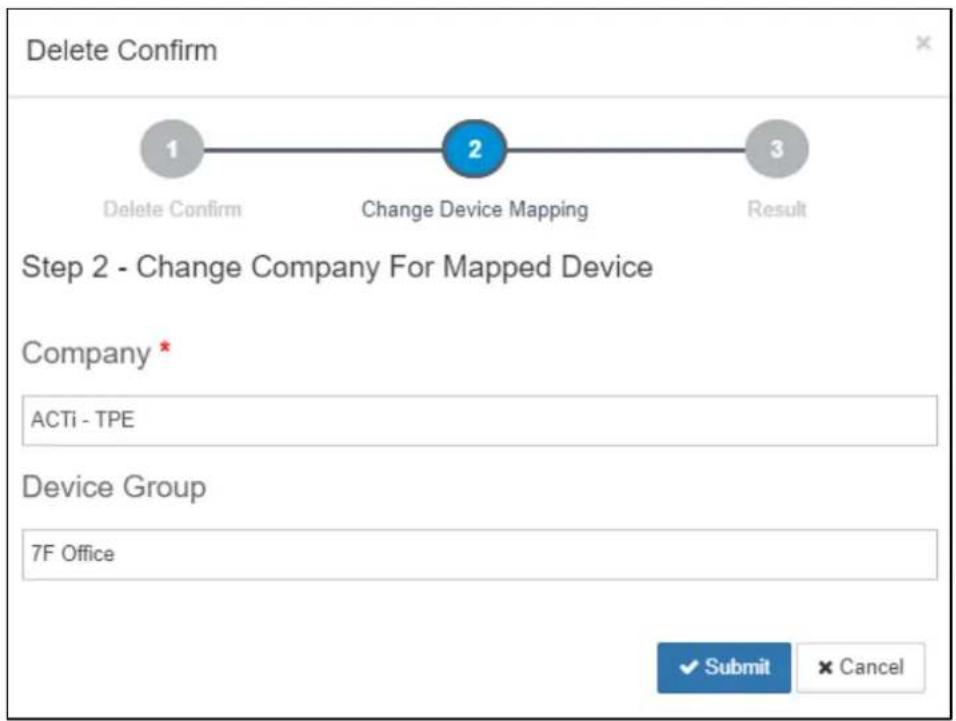
flowchart
graph LR
    A["1 Delete Confirm"] --> B["2 Change Device Mapping"]
    B --> C["3 Result"]
After the data transfer is complete, a confirmation message will appear.
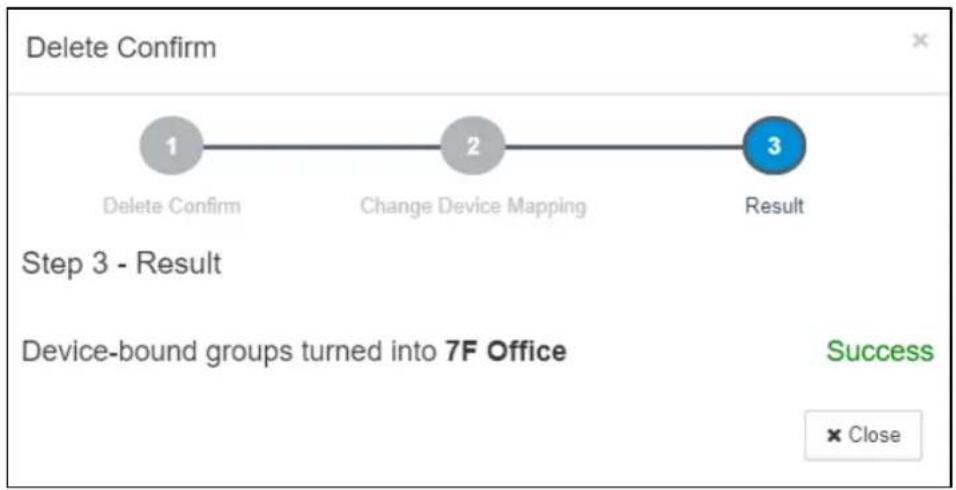
flowchart
graph LR
    A["1 Delete Confirm"] --> B["2 Change Device Mapping"]
    B --> C["3 Result"]
C. Device Management
Manually Add New Device
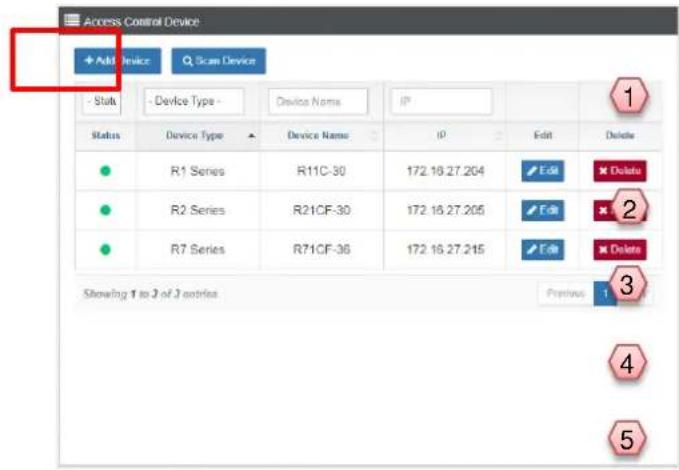
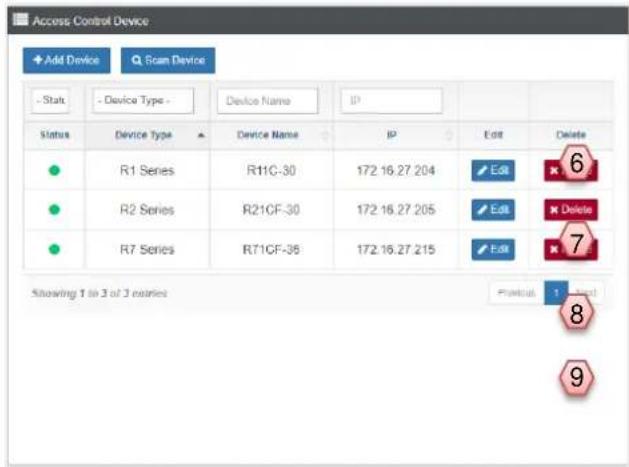
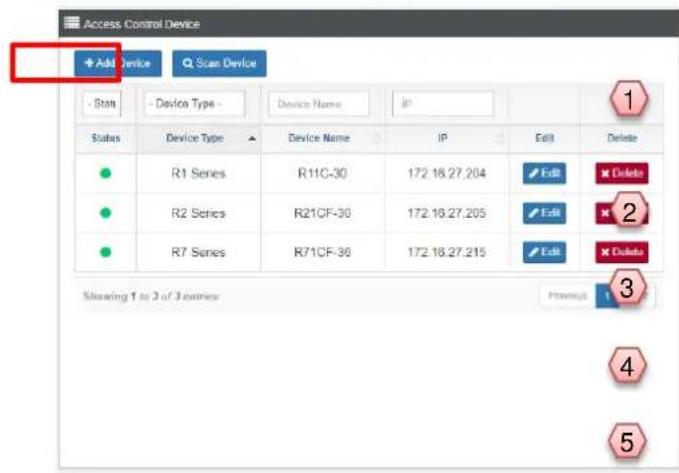
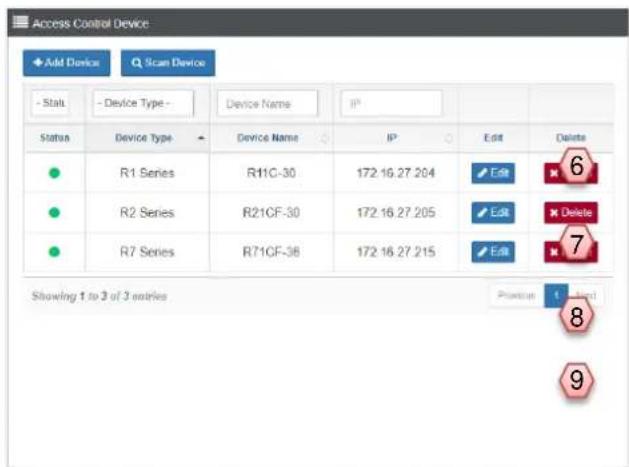
Click Device > Access Control Device to enter the device management page.
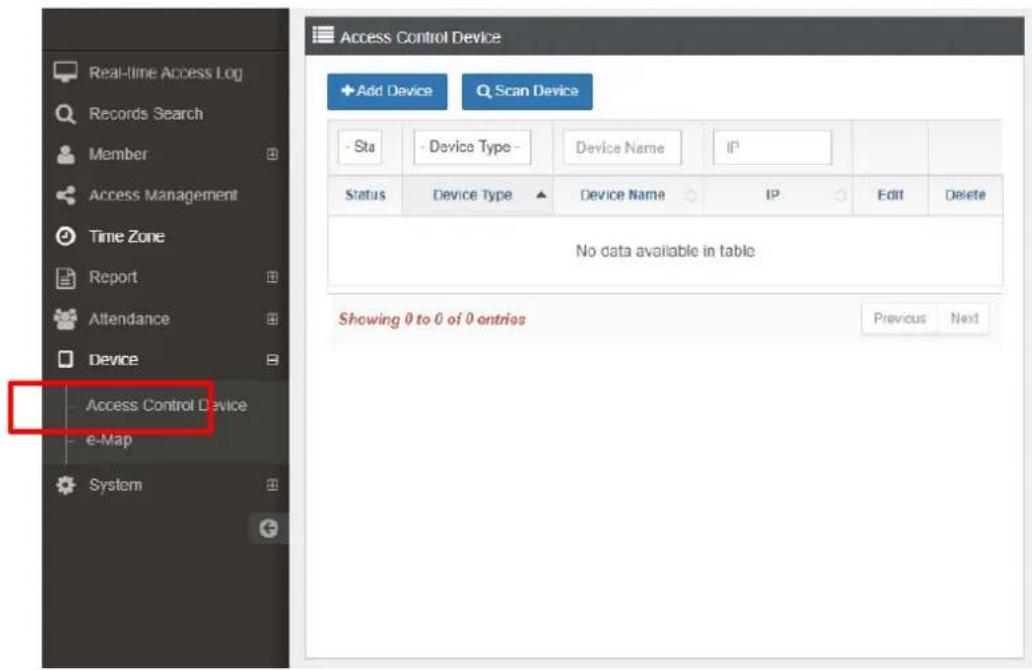
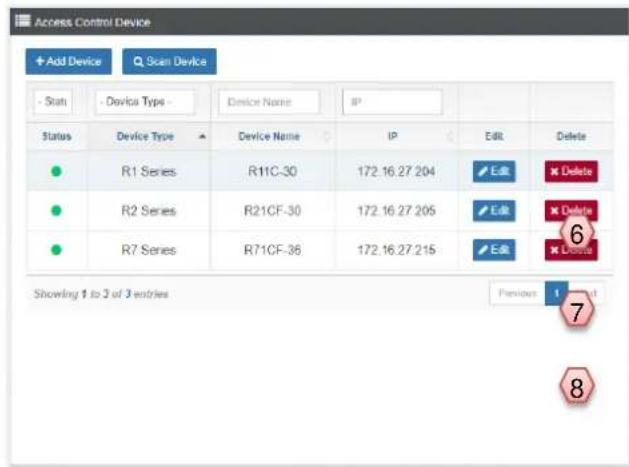
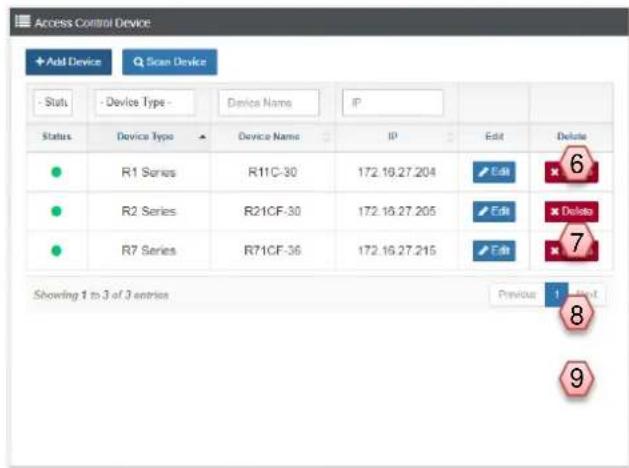
Click Add Device to add a device. The added devices will be listed. Click on the device to edit the device information or delete it. The Status column shows the device status:
- Green: Indicates the device is connected properly.
• Red: Indicates abnormal connection.
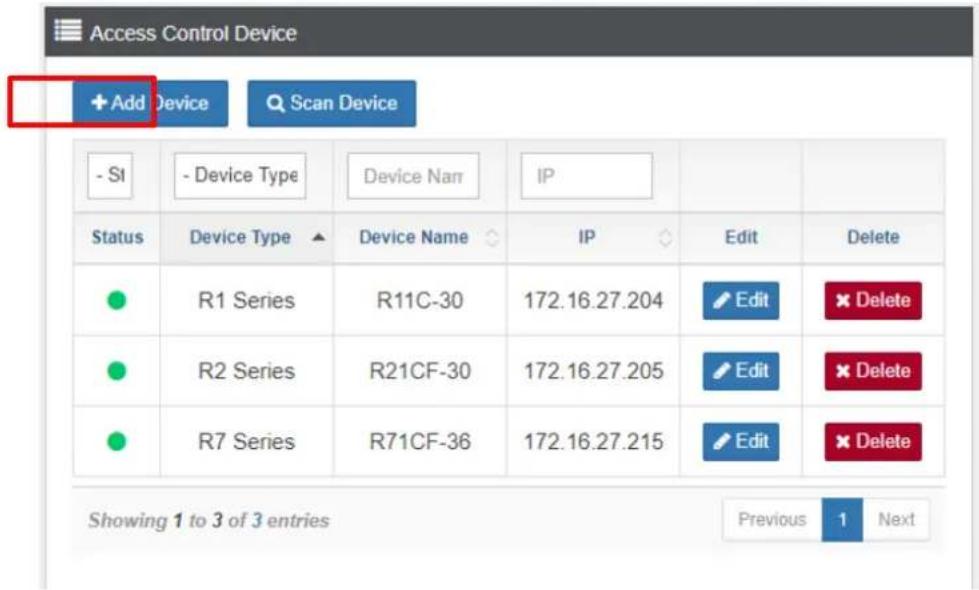
Click Add Device to manually add a device. Select the type of device to be added. At the time of writing this manual, the following device types are supported:
• R1 Series: R1xCx-3x
• R2 Series: R21CF-3x
• R7 Series: R7xCx-3x
• Q960A
These types have slightly different configurations; please refer to the instructions below.
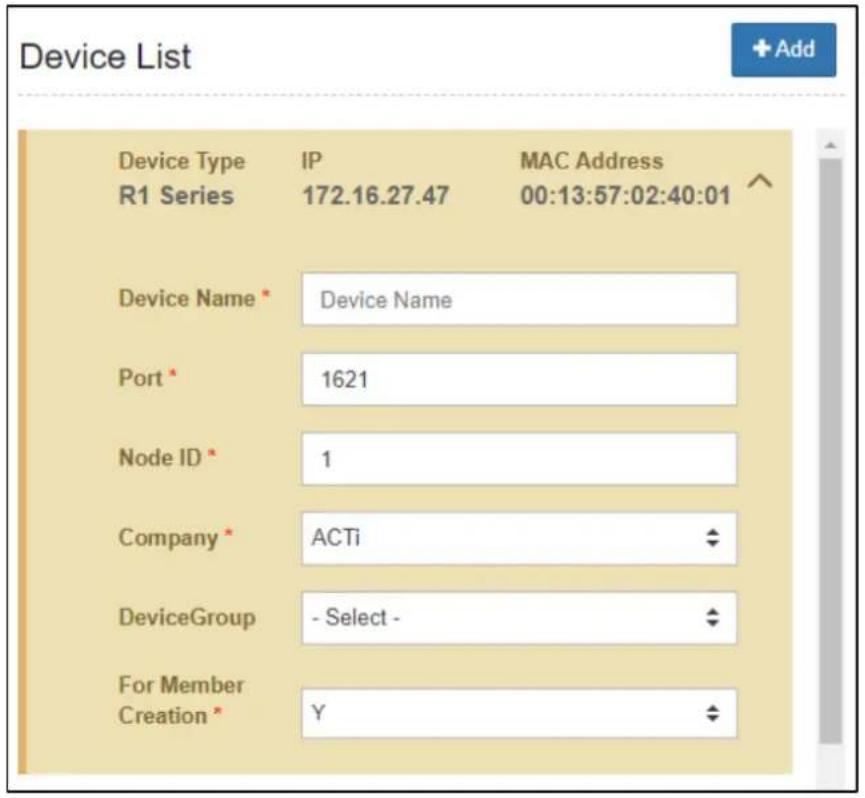
R1 Series
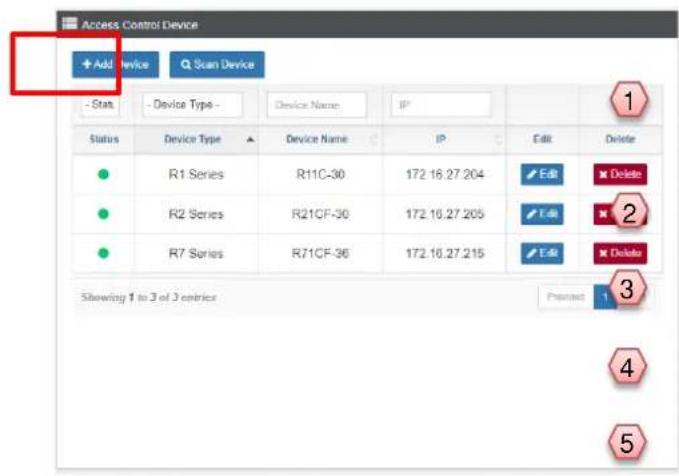
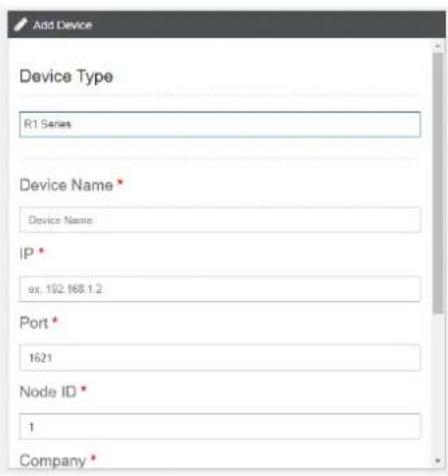
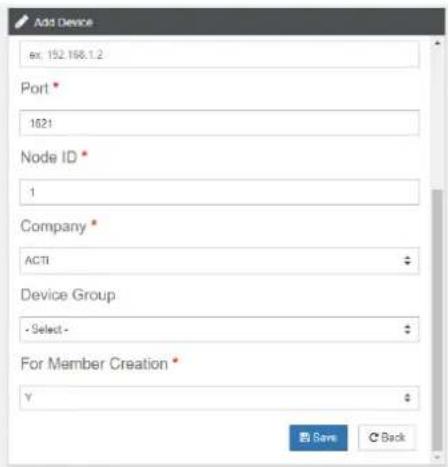
Parameters:
- Drop-down menu to select the device type.
- The device name which you can dene by yourself
- Device IP address
- Device port (default is 1621)
- Staon number (default is 1)
- Company group
-
Device group
-
Whether the device will be used to conjure member card access
R2 Series
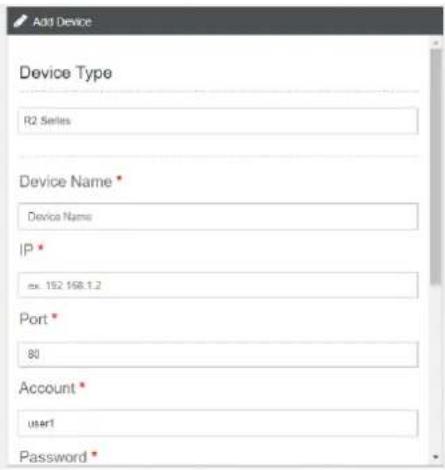
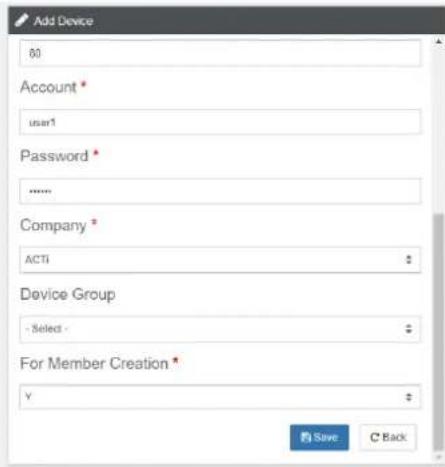
Parameters:
- Drop-down menu to select the device type.
- The device name which you can dene by yourself
- Device IP address
- Device port (default is 80)
- Account to be used to connect (default is user1)
- Password (default is 123456)
- Company group
-
Device group
-
Whether the device will be used to congregate member card access
R7 Series
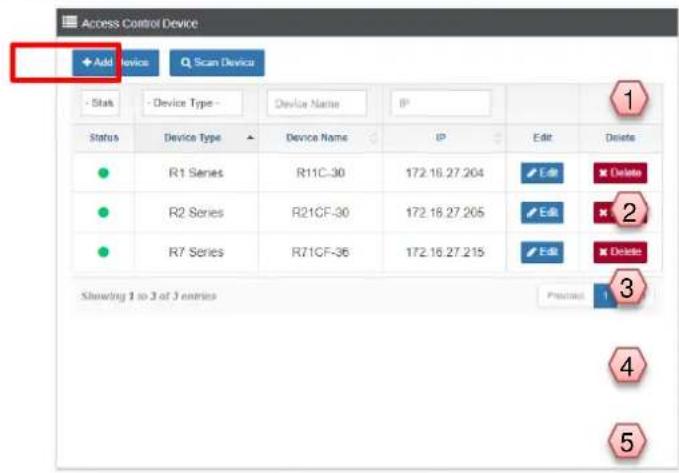
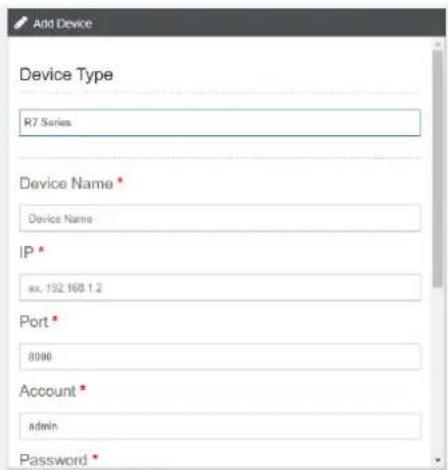
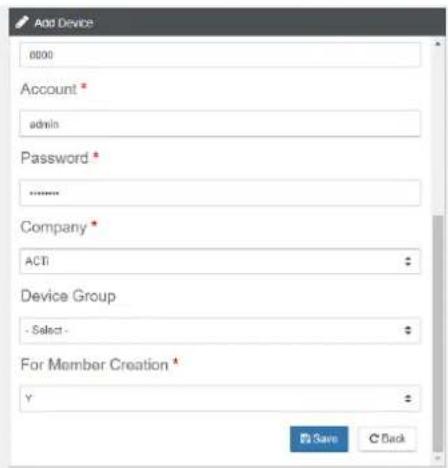
Parameters:
- Drop-down menu to select the device type
- The device name which you can dene by yourself
- Device IP address
- Device port (default is 8000)
- Account to be used to connect (default is admin)
- Password (default is Aa123456)
- Company group
- Device group
- Whether the device will be used to conjure member card access
Q960A
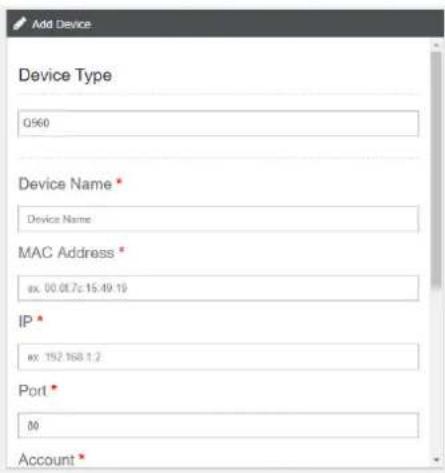
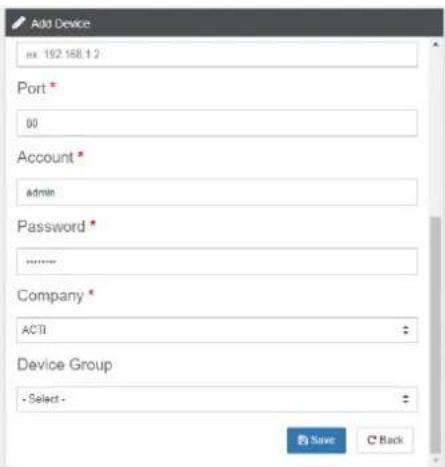
Parameters:
- Drop-down menu to select the device type
- The device name which you can dene by yourself
- MAC address
- Device IP address
- Device port (default is 80)
- Account to be used to connect (default is admin)
- Password (default is Aa123456)
- Company group
- Device group
Scan to Add Devices
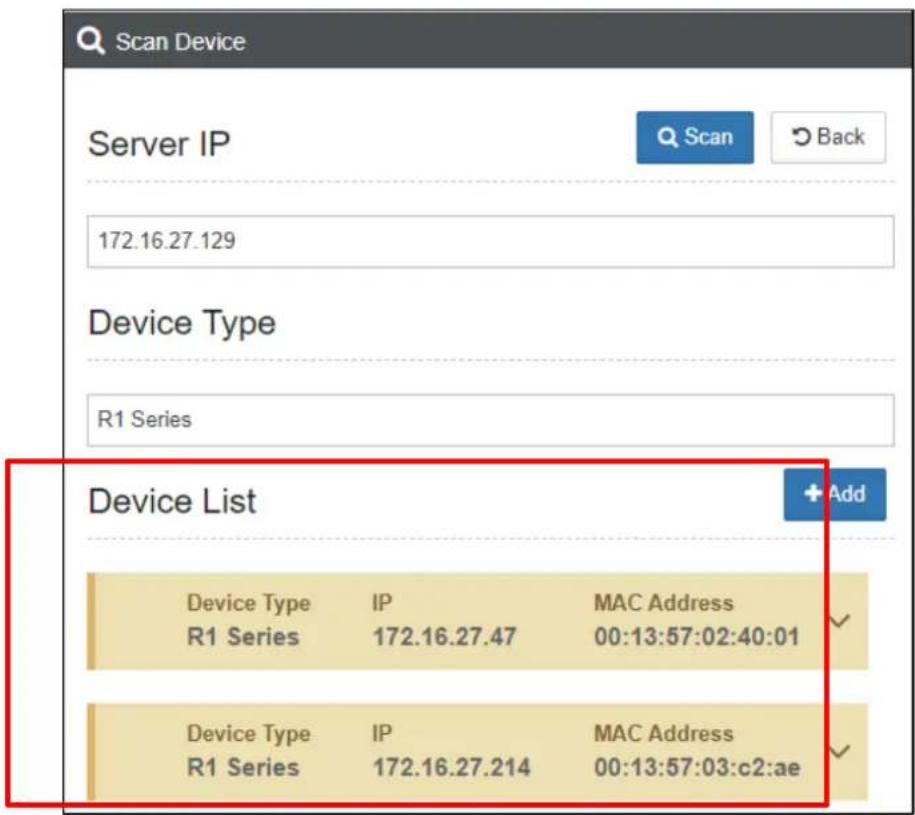
You can also select Scan Device to search for unregistered devices in the same network domain.
Select the type of device to scan, or directly click Scan.
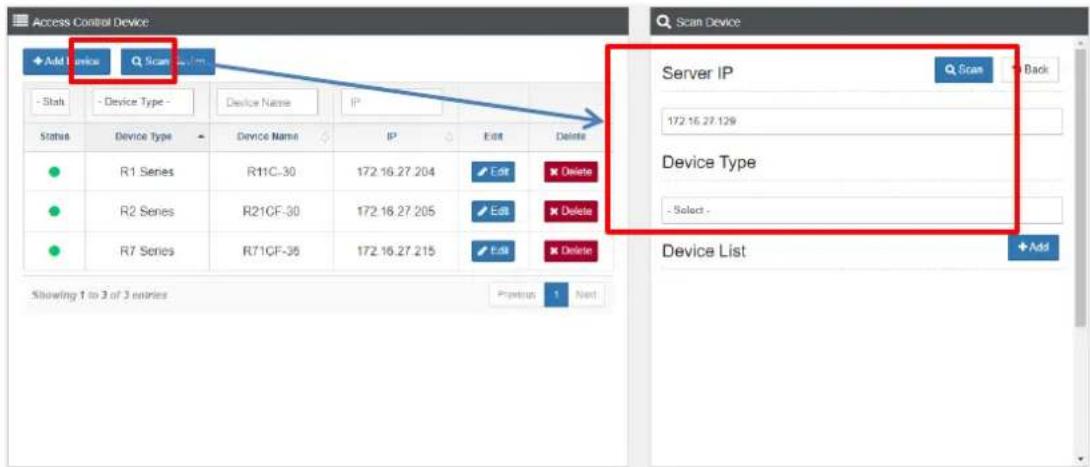
All devices which have not yet been added will be listed. Click on the device, and then Add.
If you want to modify or view the information of a single device, click the drop-down icon on the right and modify the device information.
D. Member Information
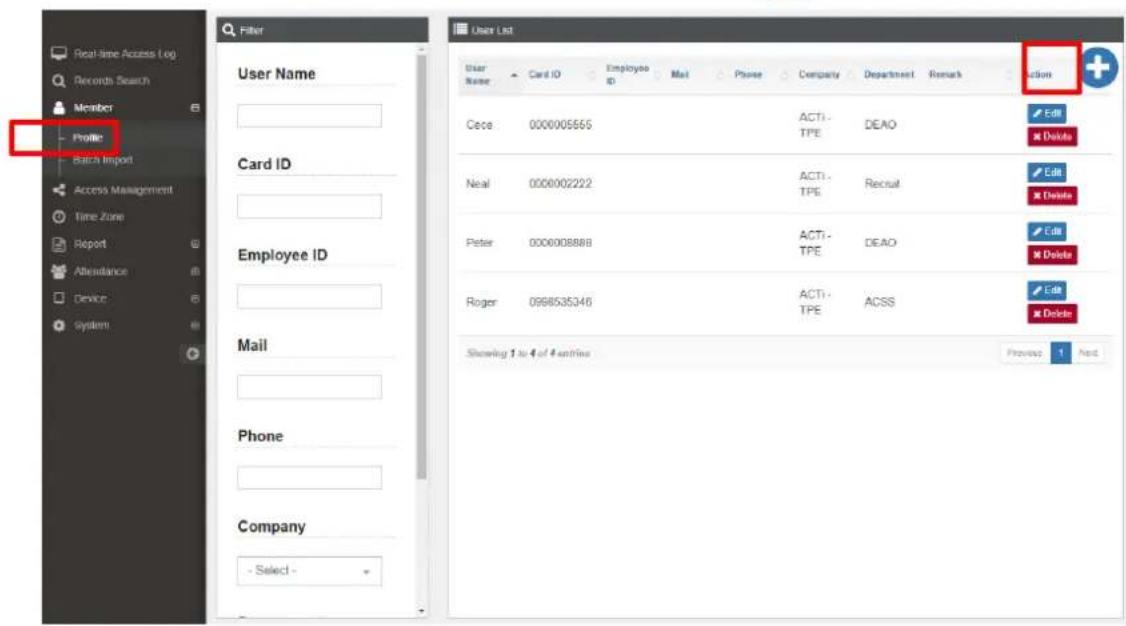
Click Member > Profile to enter the member information management page. You can add / edit / delete a member, or search according to user name, card number, company, group, etc. This also supports fuzzy search. To add a new member, click and follow the succeeding instructions.
On the Add member page, enter the member information. Take note that the fields with asterisk (*) are required.
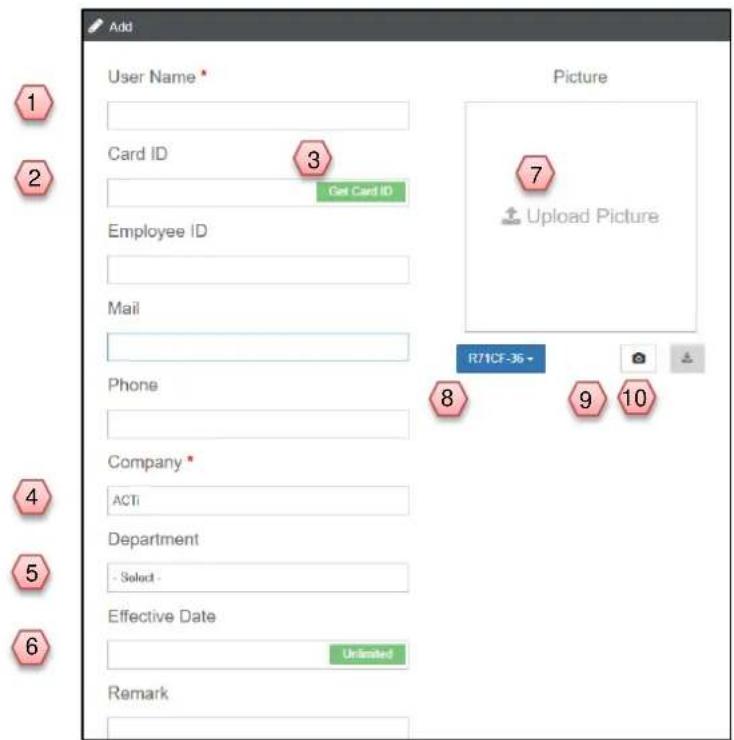
- User Name: Fill in the required fields according to sequence, where "User Name" is a required
field.
- If you know the card number to be assigned to the person (format is 8H10D), type it here directly. If you are solely using the face recognition function, use a unique set of numbers, such as a phone number, as the Card ID.
- If you do not know the card number, you can click "Get Card Number" to search it through the system. The unregistered card number will be displayed on the right. When the card is swiped, the list on the right will update in real-time; click the corresponding card number to directly fill it into the field. After the operation is completed, press Save to complete the addition.
| Card ID1523628850 | DeviceDoor I | Time2020/06/05 08:21:45 |
| Card ID1223318504 | DeviceDoor A | Time2020/06/05 08:21:36 |
| Card ID0900353182 | DeviceDoor D | Time2020/06/05 07:43:32 |
- Select "Company" (default is the Head Office group).
- If there is a Maintenance Personnel group, you can assign this group in the Department field.
- On Effective Date, set the validity period of the person's access authority, or click "Unlimited" for unlimited access.
- Click "Upload Picture" to upload a face model photo (limited to JPG files, maximum of 200KB in size).
- R7 devices can combine the face and card functions, select the model to use the device to capture the member's photo directly.
- Click the camera icon, a human-pattern will appear on the device screen, as shown below. Align the face on the pattern to take the face model photo.
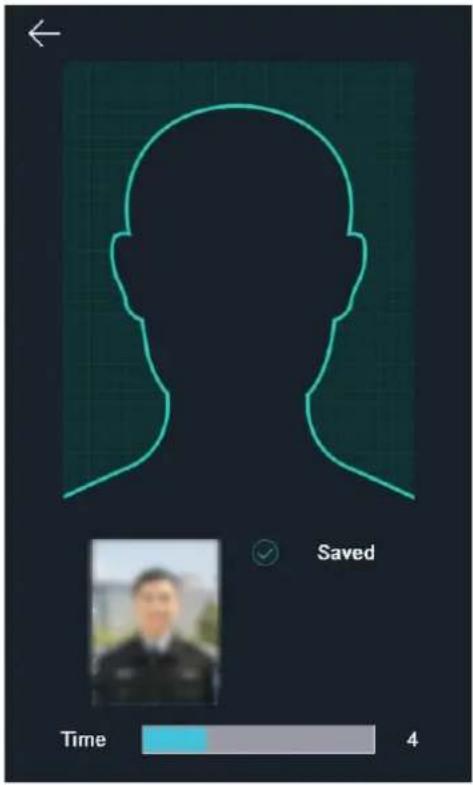
- Click this button to download the photo taken by the device to the computer.
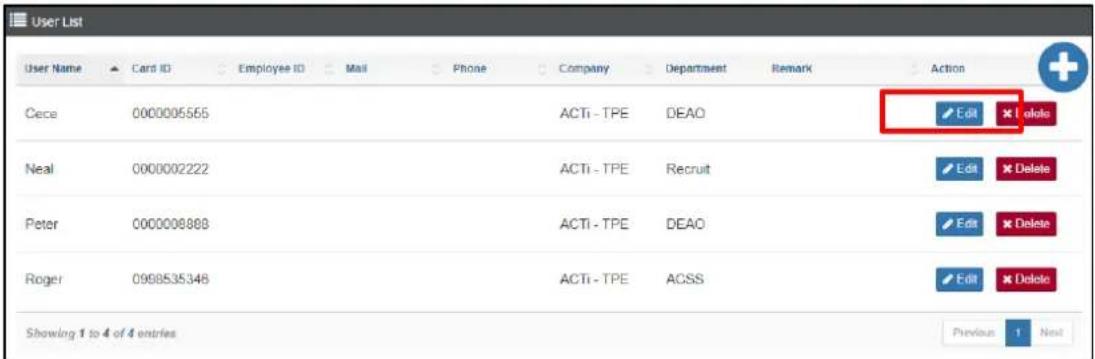
To modify a member's data, click the corresponding Edit or Delete button. Note that when a member is deleted, all synced data will simultaneously be deleted.
E. Batch Import
Batch import is used to import members' data by batches for easier operation and management. You can download a template, upload the members' data into it and then import the data. The operation is as follows:
1. Click Batch Import.
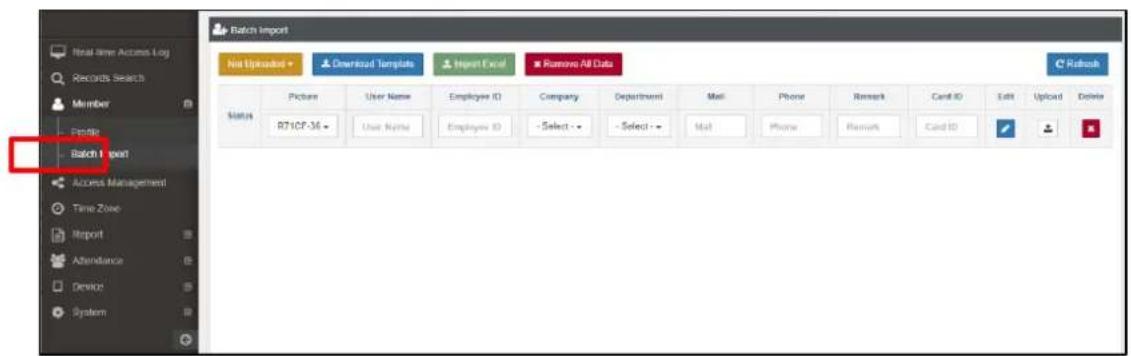
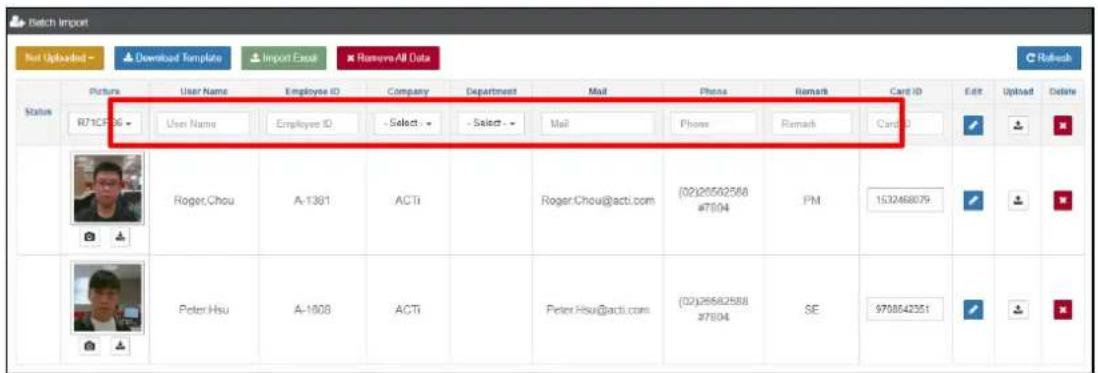
2. By using filter, you can readily see the "Not Uploaded" and "Uploaded" members.

ACTi Access Control Standard Server User's Manual
- After downloading the template, fill it up with members' information, this will save time in encoding the information one by one. Then, click "Import Excel" to import the file. The template fields are as follows:
When you use the Excel template, you can also upload a member's photo (<200KB, JPG), by associating the image file with the User Name or Employee ID as its filename.
Example: Roger Chou.jpg or A-1381.jpg.
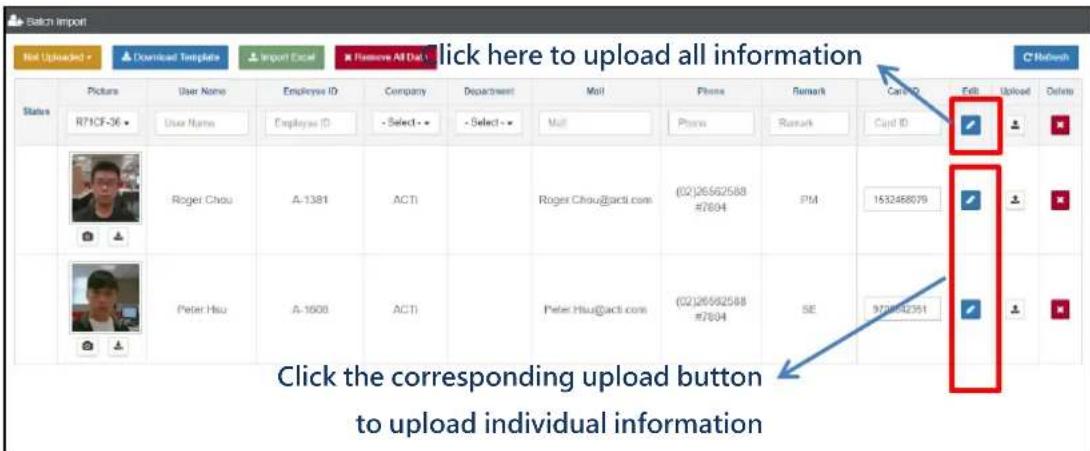
4. Click the Edit button

and modify the information, then click

to complete the
operation.
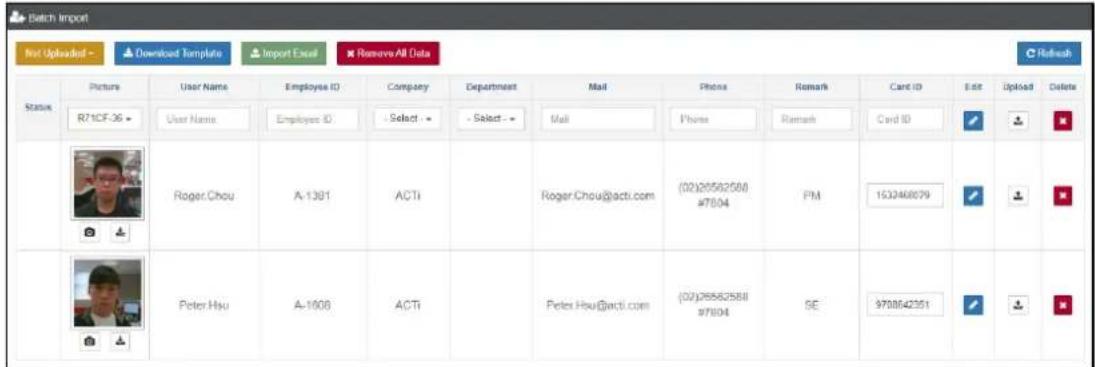
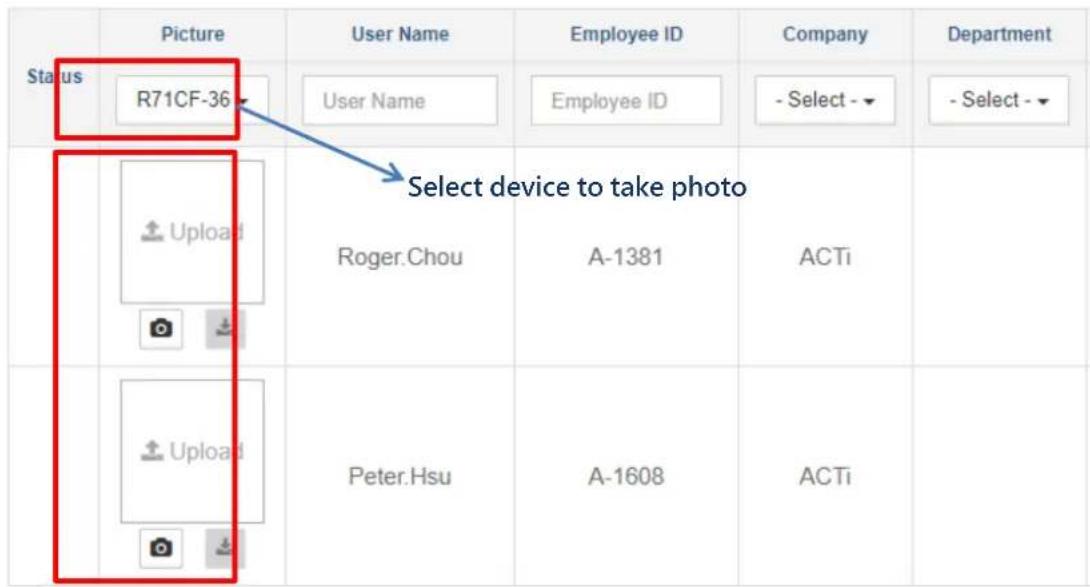
- On the UI, click the photo box to upload the photo. If you are using R7 series devices, you can click the camera button to use the device itself to take a photo. If there are multiple devices, you can select the device on the Picture selection box.
You can manually type the card number of a member on the Card ID field. Or, click on the Card ID field, then place the card towards the card reader device, once read, the card number will automatically be filled in. Confirm that the data is correct, then click "Upload" to upload the data to the ACSS system.
| Status | Picture | User Name | Employee ID | Company | Department | Phone | Remark | Card ID | Edit | Upload | Delete | |
| R71CF-36 - | User Name | Employee ID | Select - - | Select - - | Phone | Remark | Carri ID | |||||
| Roger Chou | A-1381 | ACTi | Roger Chou@acti.com | (02)26562588 #7804 | PM | |||||||
| Peter Hsu | A-1608 | ACTi | Peter Hsu@acti.com | (02)26562588 #7804 | SE |
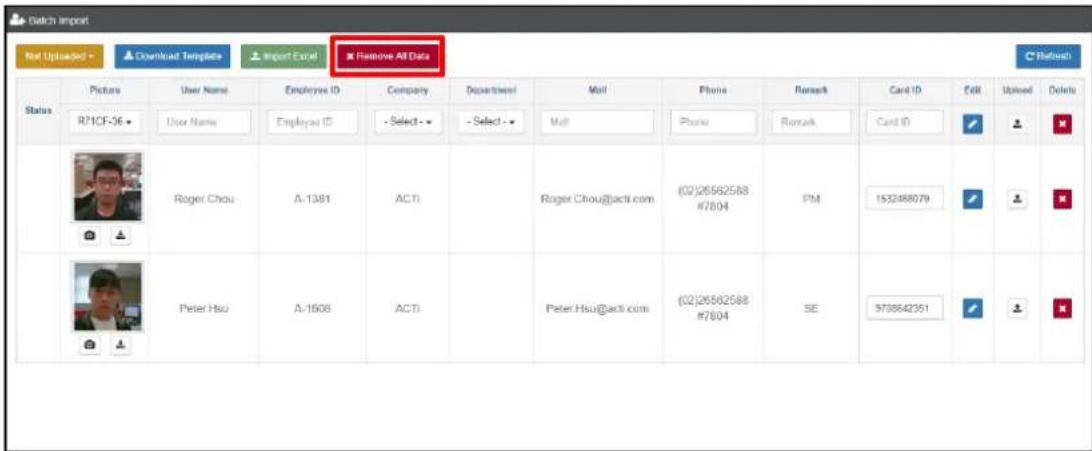
All data, including member's informaon, uploaded through the backend can be deleted. However this acon is not recommended when not necessary.
F. Time Zone
Some companies may not employ a xed working hour schedule, the Time Zone page can be used to congregate shiing dierent schedules of employees.
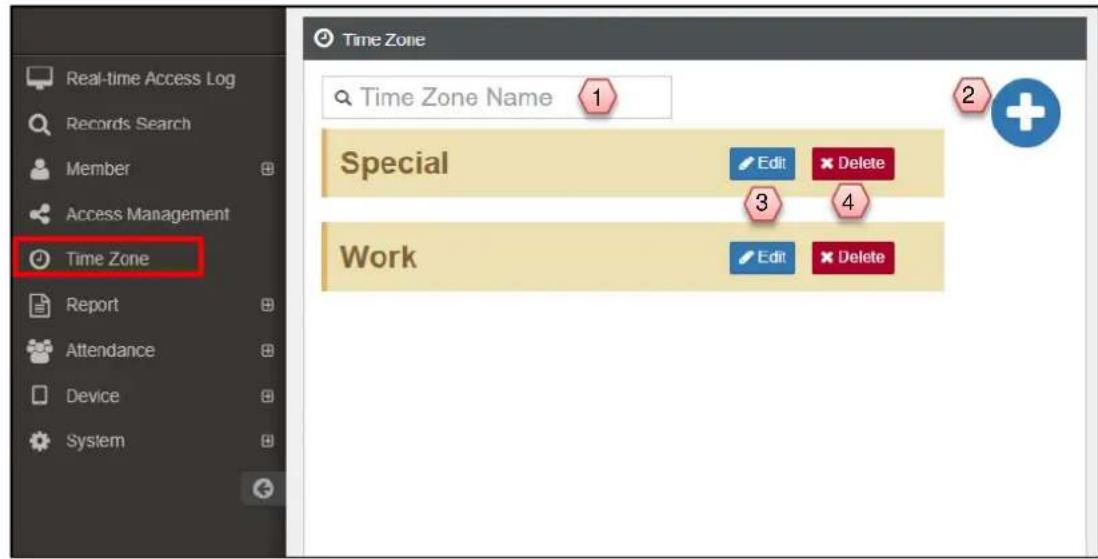
- Search by Time Zone Name
- Add new me zone
- Edit the me zone
- Delete the me zone
Below is the edit page
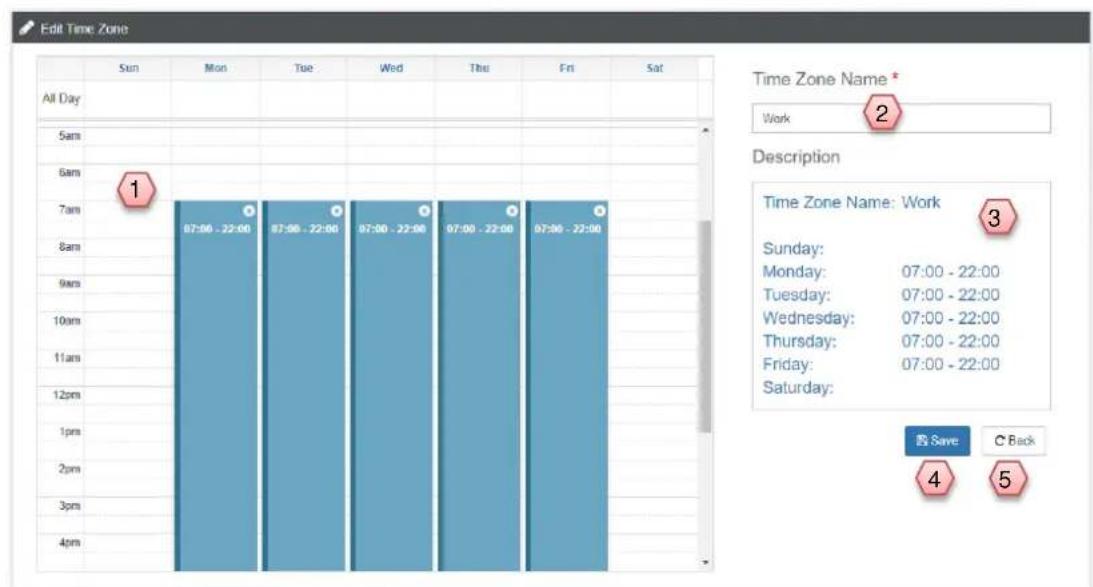
bar
| Time Zone | Date | Hours | | :--- | :--- | :--- | | All Day | Mon | 07:00 - 22:00 | | All Day | Tue | 07:00 - 22:00 | | All Day | Wed | 07:00 - 22:00 | | All Day | Thu | 07:00 - 22:00 | | All Day | Fri | 07:00 - 22:00 | | All Day | Sat | 07:00 - 22:00 | | Description | Time Zone Name | Hours | | :--- | :--- | :--- | | Sunday | Work | 1 | | Sunday | Work | 3 | | Sunday | Work | 5 | | Sunday | Work | 4 | C Back- Select the me range. You can click and drag on the me frame directly to select the me range.
- Dene the name for this me zone
-
Present the result that is from your selecon
-
Save
- Back to the previous page
G. Access Management
Click Access Management to below page
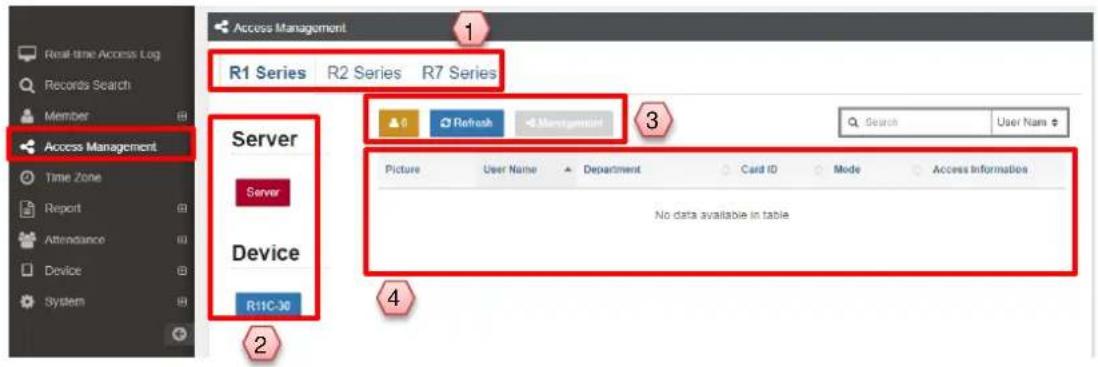
- Device series. Please select according to the access control device you purchased
- Select the device for operaon (Server/ Access Control devices)
- Funcon operaon(Refresh/ Enrollment / Upload/ Management)
- List of the registered members from the selected device(s)
Enrollment and synchronized
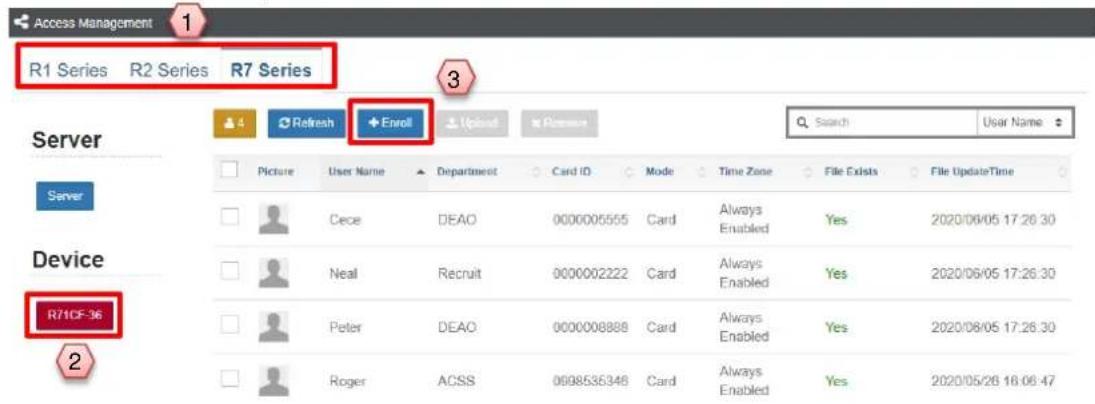
- Select the device series.
-
Select the device to be enrolled from the device list.
-
Click on Enroll
+Enroll
The screen will switch to registraon mode. The following is the teaching process.
Below are the instrucons.
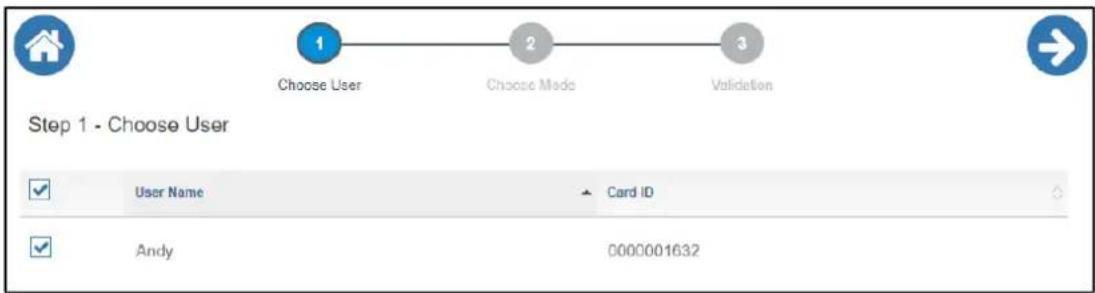
Step 1
flowchart
graph LR
    A["1 Choose User"] --> B["2 Choose Mode"] --> C["3 Validation"]
Select the person to register, the list will show the previously bound card ID in the Member Informaon and users who haven't enrolled before. Mulple selecons are acceptable.
Step 2
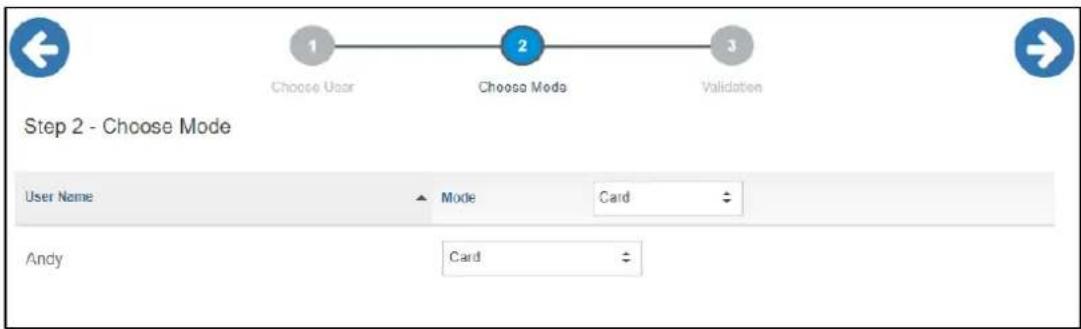
Select the access mode. You can change the mode for each member, or change the mode of all the members at one-me.
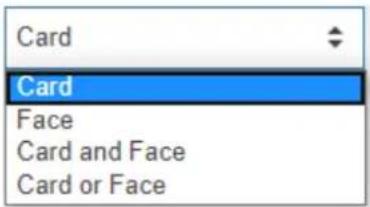
Facial recognition card machine can support dierent access mode.
Step 3
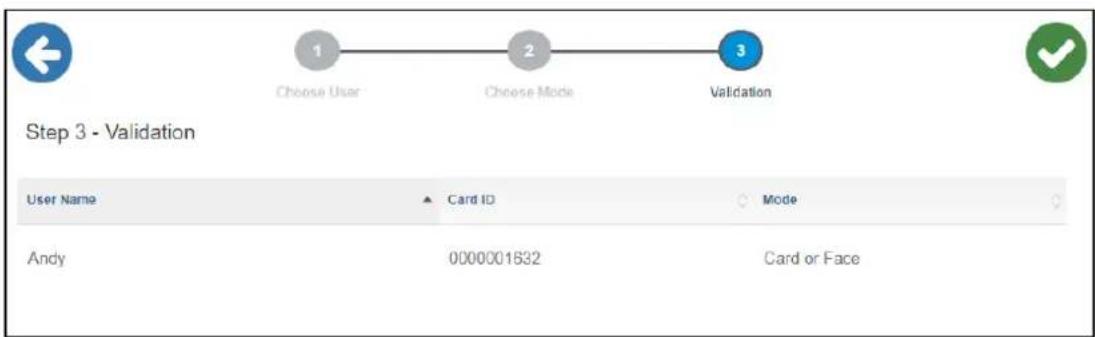

Validate if the access mode is correct, then click the green check to conrm.
Aer the model is completed, ACSS will automatically back up the data to the server to facilitate the synchronizaon of the data to other card machines.
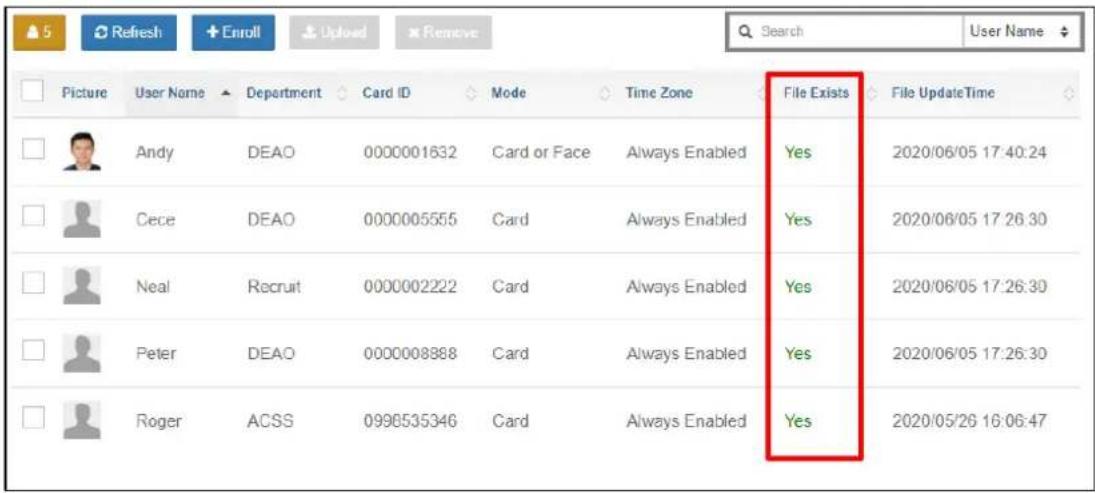
*File Exists : Whether the le has been backed up to the server
Step 4 (For R2 series)
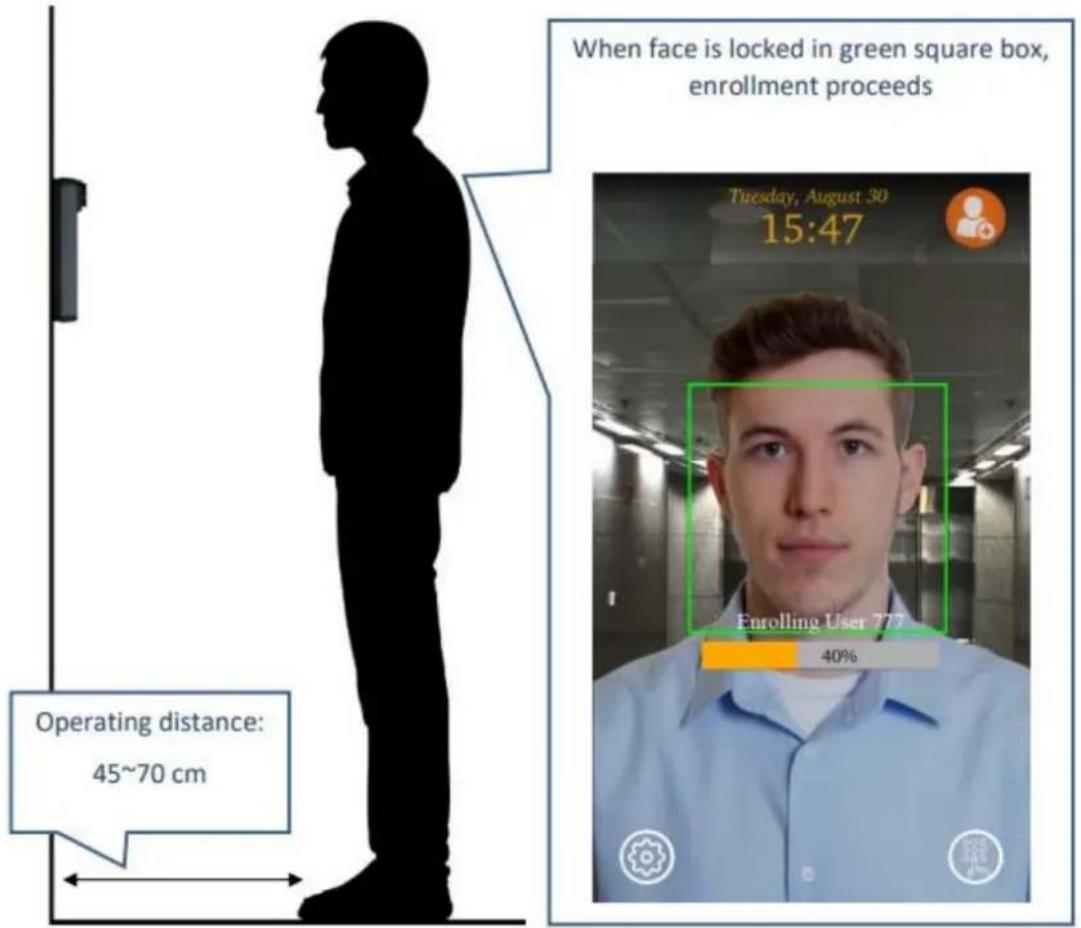
If you use R2 series and select access mode including facial recognition .Aer the modeling device completes the data modeling acon, you need to perform face enrollment in front of the card machine.
Using the modeled card, swipe the card in front of the card machine to perform enroll.
If you use Face recognition mode, click the icon in the lower right corner of the card machine screen to enter the Card ID.
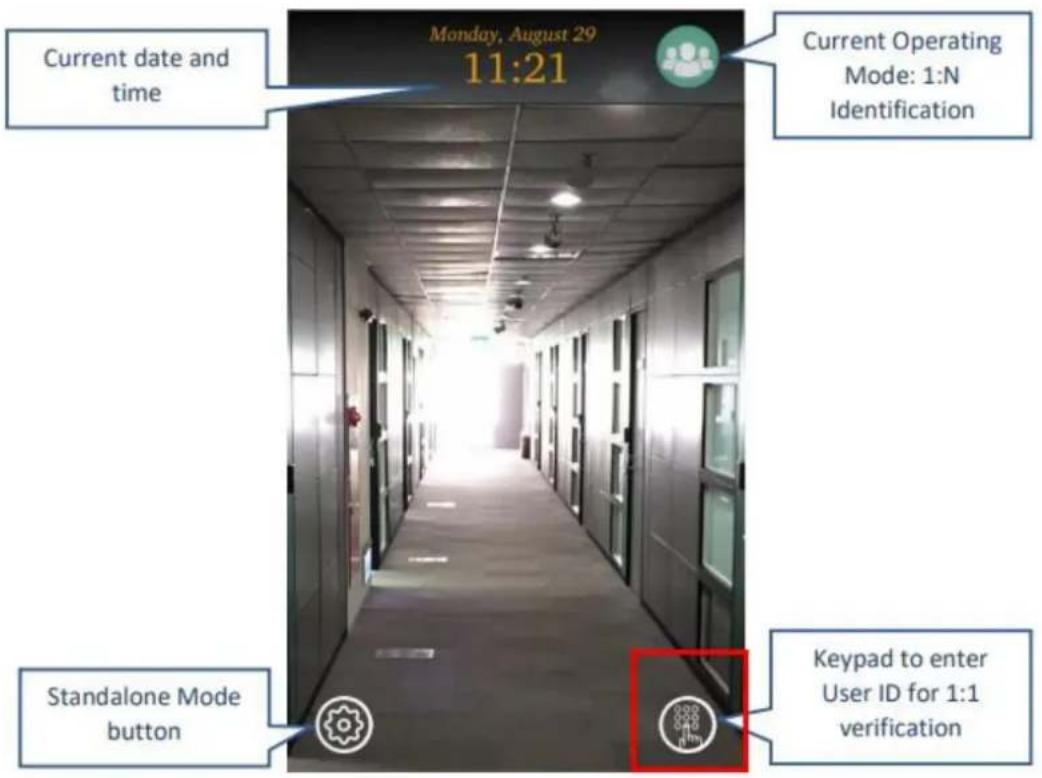
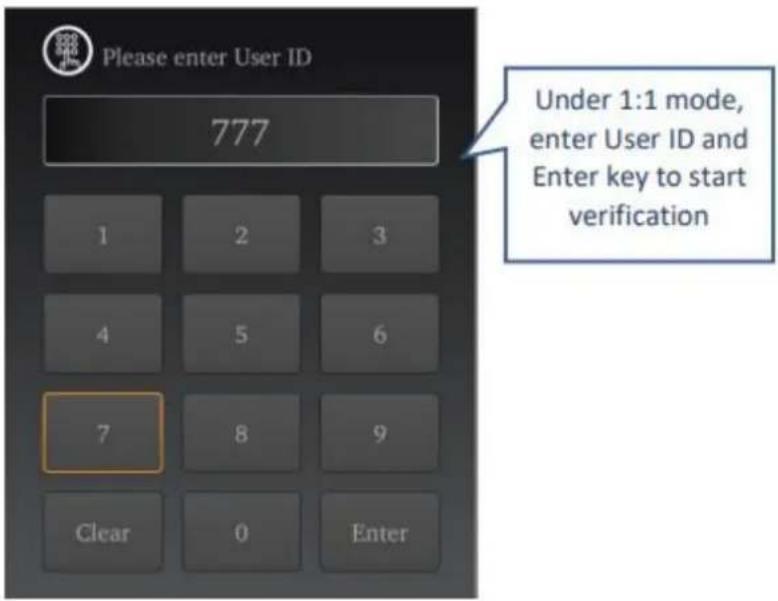
(Please refer to the instrucons and distance below)
Modify the Access Permission (Server is dened as the role of the card machine manager, and Server can set the access permissions)
A. Quickly edit the access permissions of individual member To modify the access permission, click Server buon then click View.
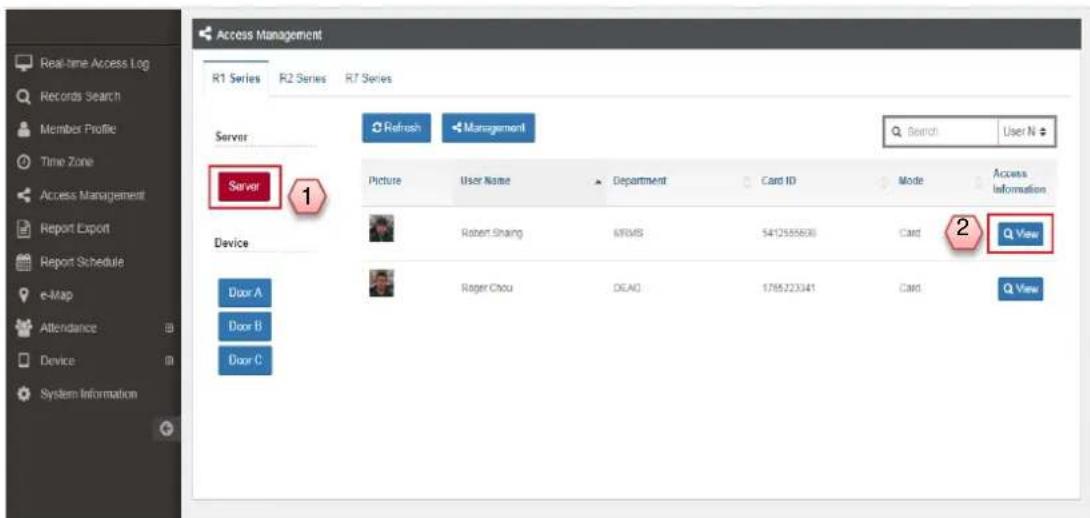
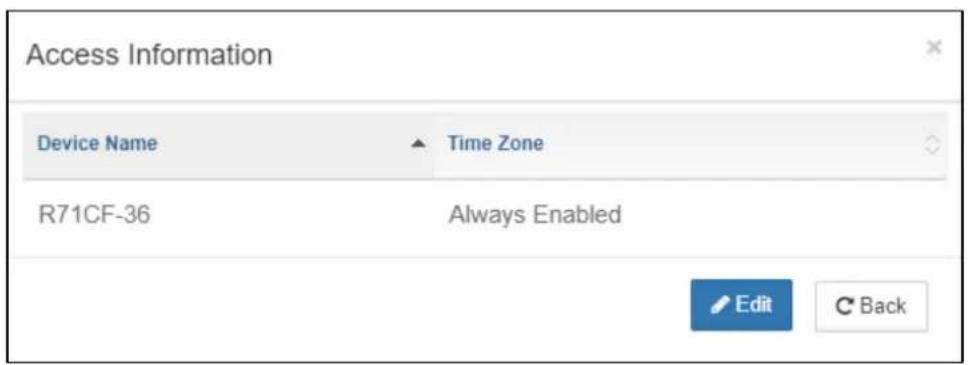
The Access Informaon window appears. The list of permissible access control devices and me period will be displayed. To modify the permission sengs, click Edit.
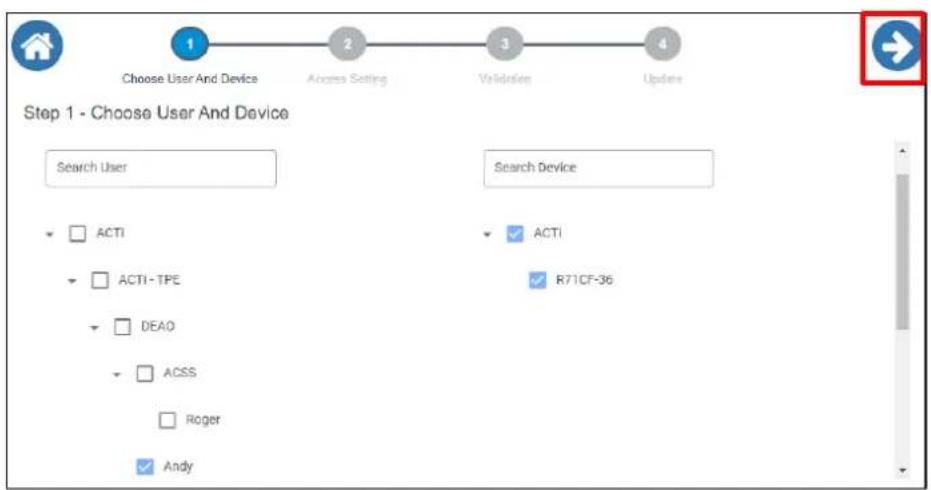
- The le tree diagram shows the members and their department informaon. The right tree diagram shows the oors and access control devices. The checked box indicates the permission given to the selected member. You can set up individually for dierent oors. To modify, check or uncheck the boxes to grant or remove access permission.
Click the Next arrow to connue.
flowchart
graph LR
    A["1 Choose User And Device"] --> B["2 Access Setting"]
    B --> C["3 Validation"]
    C --> D["4 Updates"]
    E["Search User"] --> F["ACTI"]
    F --> G["ACTI-TPE"]
    G --> H["DEAO"]
    H --> I["ACSS"]
    I --> J["Roger"]
    J --> K["Andy"]
II. An overview will be displayed for you to conrm the selected users, me zone, devices and whether they can pass or not. Modify, as needed, on this page.
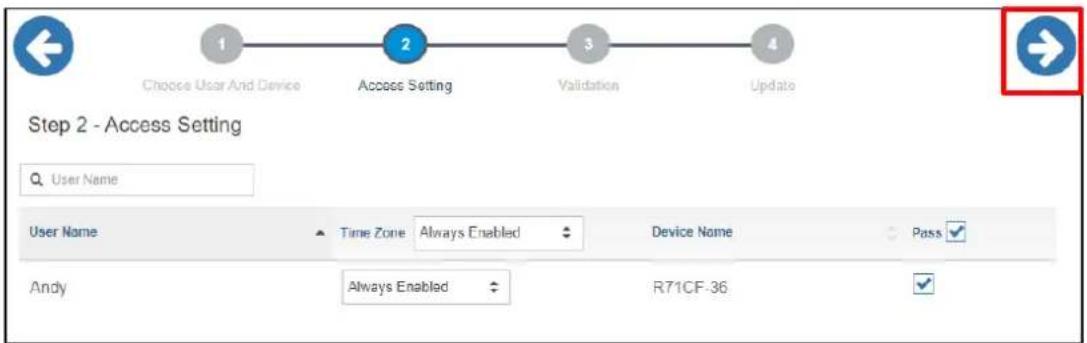
Click the Next arrow to connue.
III. Conrm the selected users and access mode .Click the Green Check icon

to
save. The status will display "Success" aer the server and the access control devices are synchronized.
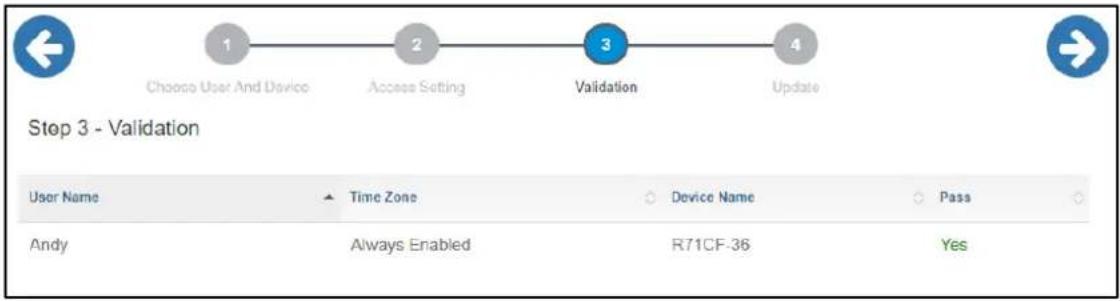
flowchart
graph LR
    A["1 Choose User And Device"] --> B["2 Access Setting"]
    B --> C["3 Validation"]
    C --> D["4 Update"]
IV. Click the Green Check icon to start synchronized .The status will display "Success" aer the server and the access control devices are synchronized.
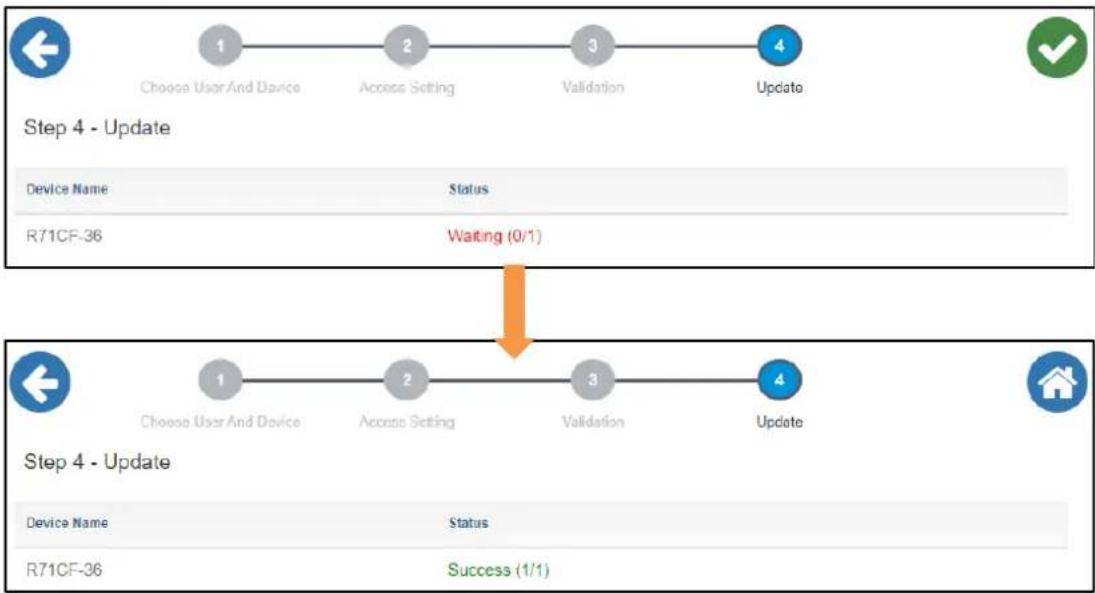
flowchart
graph TD
    A["1 Choose UserAnd Device"] --> B["2 Access Setting"]
    B --> C["3 Validation"]
    C --> D["4 Update"]
    E["Device Name R71CF-36"] --> F["Status Waiting (0/1)"]
    F --> G["Step 4 - Update"]
    H["1 Choose UserAnd Device"] --> I["2 Access Setting"]
    I --> J["3 Validation"]
    J --> K["4 Update"]
    L["Device Name R71CF-36"] --> M["Status Success (1/1)"]
B. Unied edit access control permissions for all member.
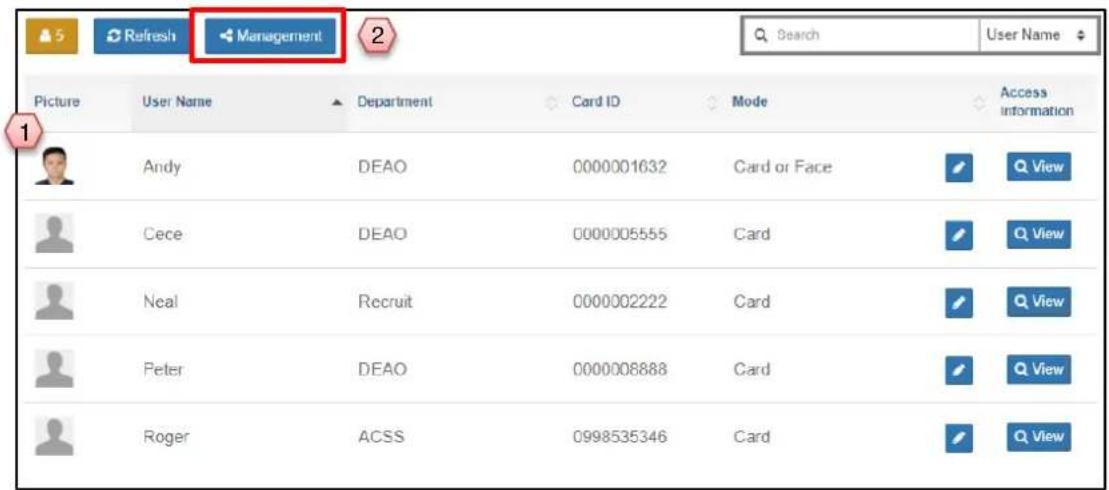
- Click Server on the page of a specific device series.
- Click Management.
Enter the permission edit page, and all member and device will be automatically selected.
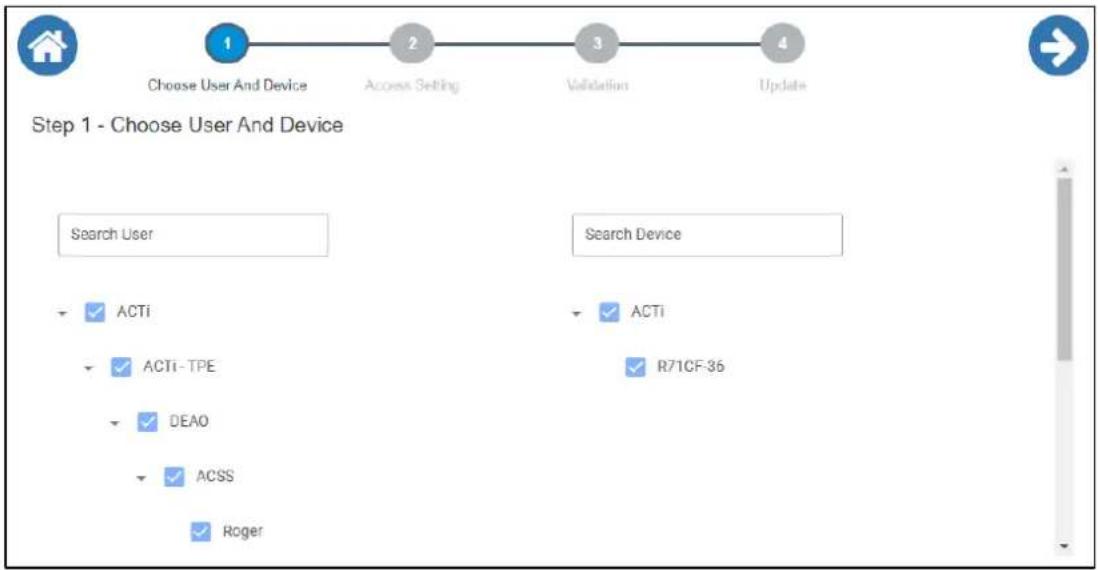
flowchart
graph LR
    A["1 Choose User And Device"] --> B["2 Access Setting"]
    B --> C["3 Validation"]
    C --> D["4 Update"]
The subsequent steps are the same as the individual eding operaons.
H. Tailgating
If you are using Q960 or other people counting device, you can integrate and use the Tailgating function on your access control device. The basic algorithm or logic of Tailgating is defined as the number of registered users of a particular swiped card should match the number of persons passing by. If this condition is not met, then a Tailgating event is triggered. So when an I/O device, such as a warning light, is connected to the access control device and a tailgating event occur, the alarm light will be triggered.
Scenario Examples:
- No swiped card recorded, a person passes by, tailgating is triggered
- One card/face is swiped in, one person passes by, no tailgating occur
- Once card/face is swiped in, two or more persons pass by, tailgating is triggered
- One card/face is swiped repeatedly, two or more persons pass by, tailgating is triggered
Configure Tailgating
Click Device > Tailgating.
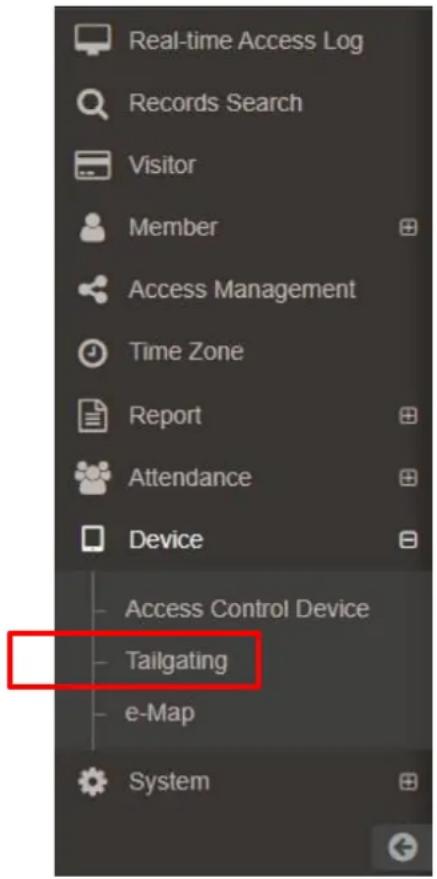
The page will display the people counting camera that can be connected to the access control device.
Click Edit to configure the tailgating settings.

Follow the sequence below to configure.

- Select the People Counting Device to connect to.
- Select the Direction (enter / leave) of trigger.
- Set the time delay.
* This setting refers to the time between the card is swiped and the person is able to pass through the door. After this time delay, any other person passing using the same card credentials will be considered as tailgating. It is recommended to carefully calculate the time for the card holder to walk through the door after swiping the card to avoid misjudgment. For example, about 5\~10 seconds.
- Click Save when done.
I. Manual Export Report
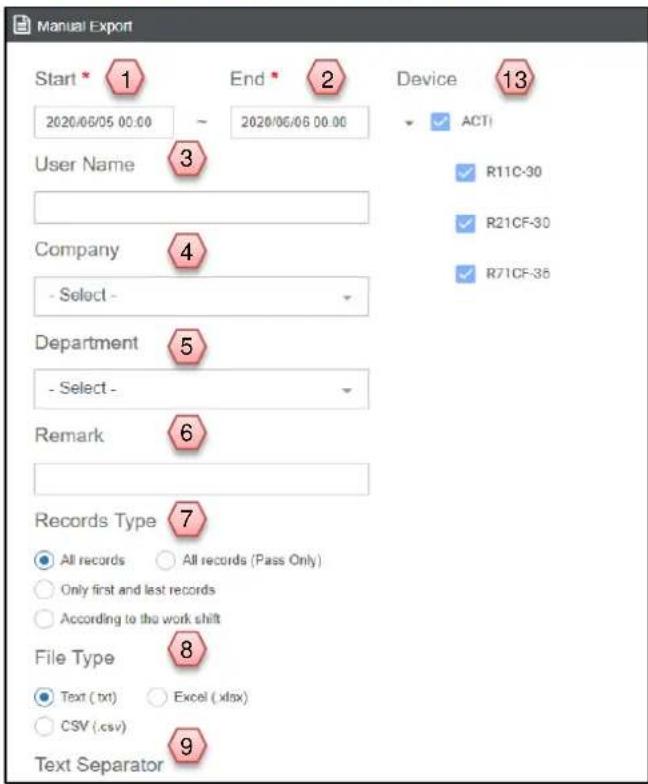
![Space Tab Comma ( ) Semicolon ( ) Customize Columns * 10 Using Columns: 1. User Name 2. Employee ID 3. Card ID 4. Time 5. Result Other Columns: Device Mail Phone Company Department Remark Customize1 Customize2 Customize3 Show Column Name 11 Yes No Time Format * (Default is [yyyy/MM/dd HH:mm:ss]) yyyy/MM/dd HH:mm:ss. 12 yyyy/MM/dd HH:mm:ss. Export](/content/2026/05/955251/images/737980fd092ce50d2c09114e7e4bae83761178db266279ab48eb9ce66c58e161.jpg)
Fill out the required informaon:
- Start me for exporng data (MUST)
- End Time for exporng data (MUST)
- Search by user
- Search by company
- Search by department
- Search by note
- Select the record type (All Record is divided into "including pass failure" and "pass successfully" records)
- Select the exported format
- Delimiter (only available under txt le)
- Export columns(can adjust the columns and order by dragging)
- Show or Hide Column Name
- Dene the YYYY/MM/DD
- Select the device
J. Schedule Report
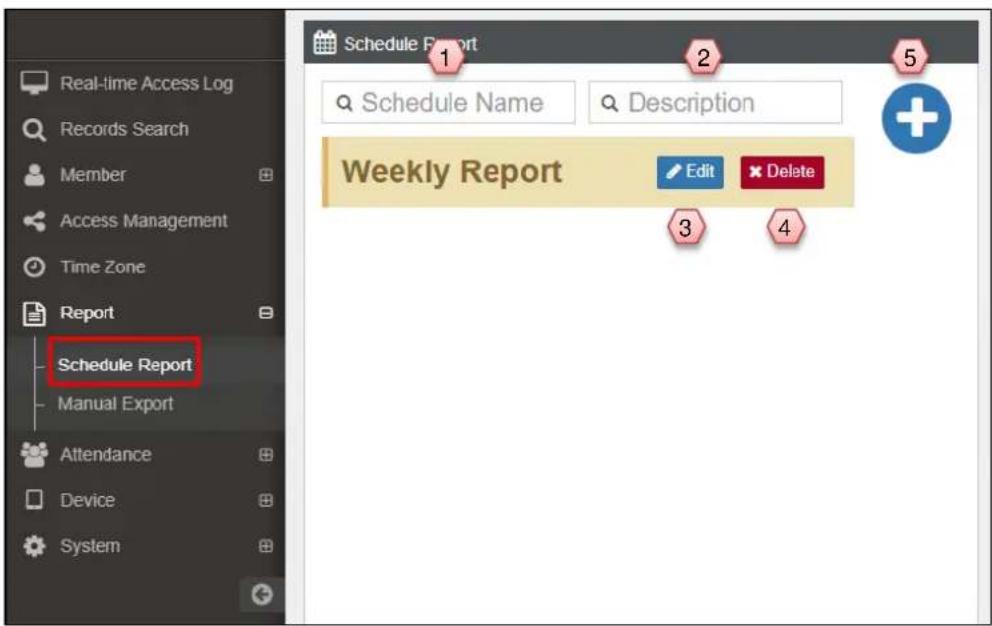
In addition to manually exporng a single report, the system also supports seng up a scheduled me to export report.
Click Report > Schedule Report to enter the page.
For the created report export schedule, you can query by the schedule name.
- Search by schedule name
- Search by the descripon wrien in schedule
- Edit a new schedule
- Delete the schedule
- Add the schedule
A. Informaon Page
Click + in the upper right corner, enter the seng page.
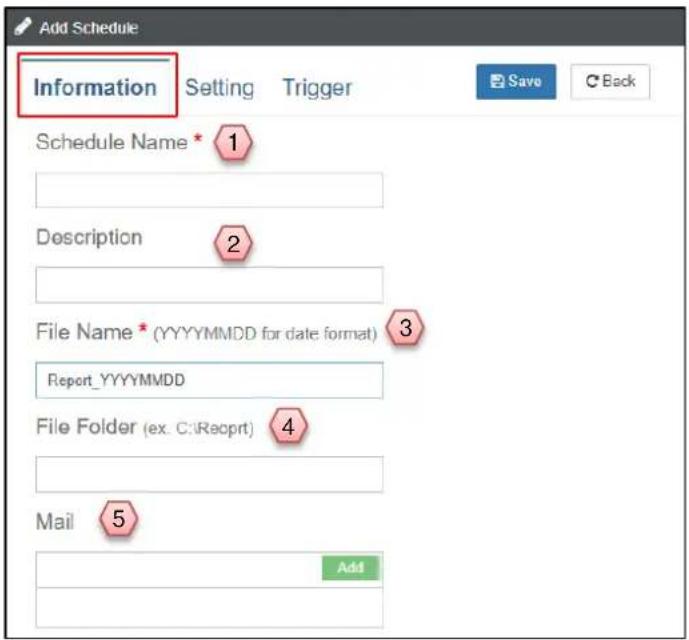
Fill out each column
- Schedule name
- Descripon of schedule
- File name
-
File path
-
Email address. Aer II in, press Add or Enter to save
*Note: Need to congregate Mail Serve Seng before using E-mail report funcon
B. Seng Page
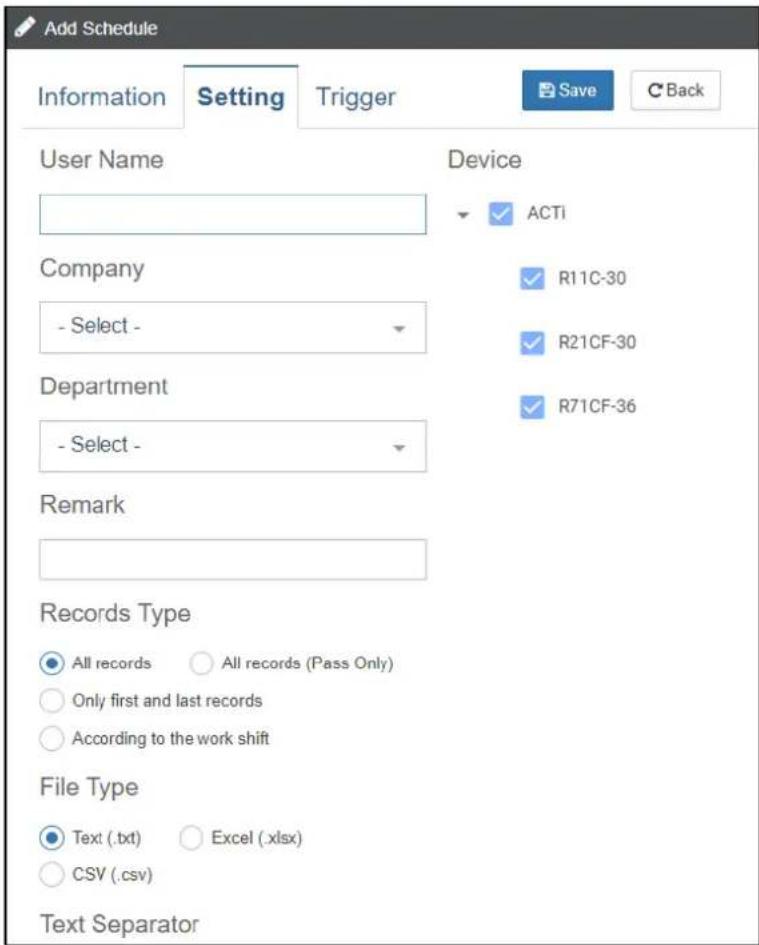
The columns on this page are the same as the settings for Report Export. Please set the report content to be automatically exported.
C. Trigger Page
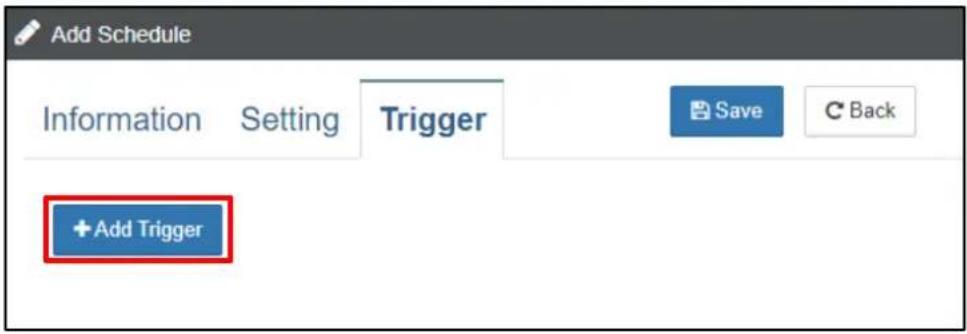
Set the trigger for the schedule on this page. Click Add Trigger to enter the seng page to create a new schedule.
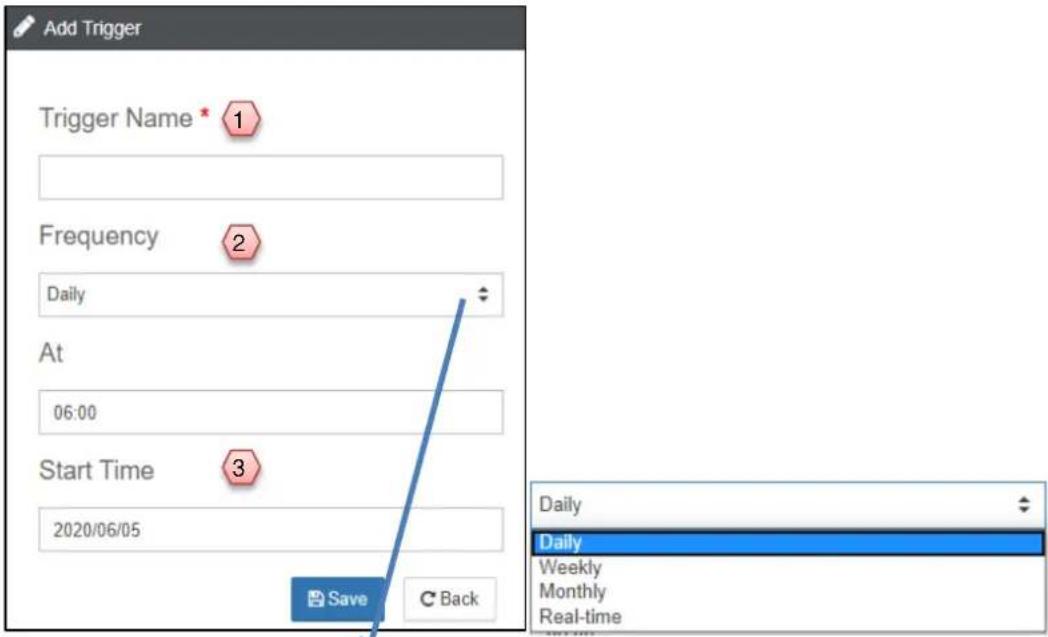
- Dene the trigger name
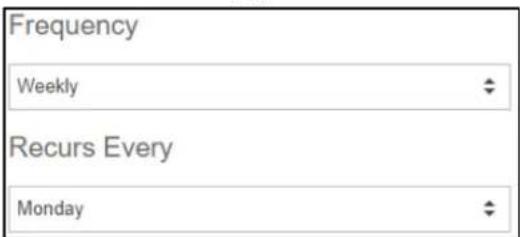
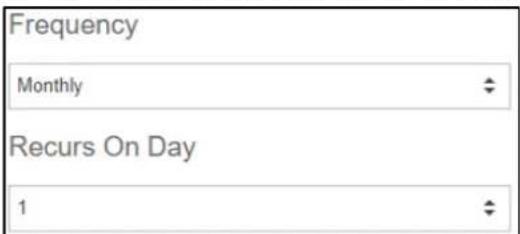
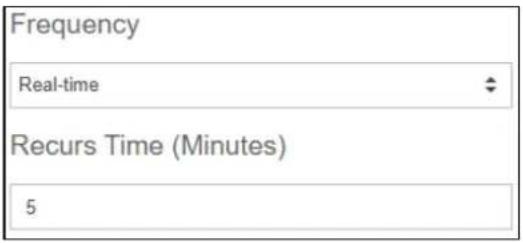
- Select the Frequency, you can choose Daily, Weekly, Monthly or Real-me.
a. Choose Weekly, you can choose one of Monday to Sunday as a recurs day
b. Choose Monthly, you can choose which day is a recurs day
c. Choose Real-me, the recur me can be set in minutes, the most frequent can be set to once every one minute
3. Dene the starng me of the trigger
Aer seng, click Save, you can see the added schedule and execuon informaon
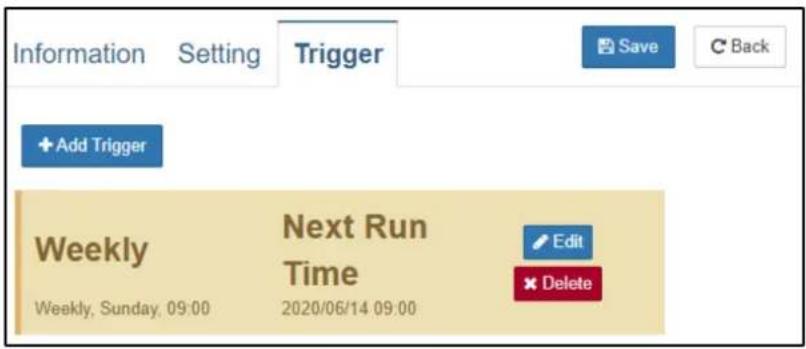
Click Save in the upper right corner to complete the automac export report seng.
K. Mail Server Setting
Click System > Mail Server from the le menu, then enter the page.
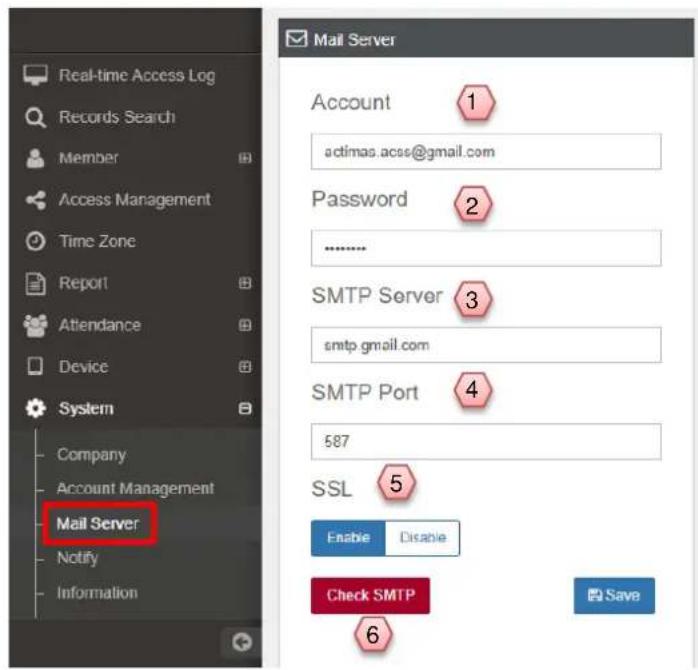
Fill in the required informaon as shown below. The nocaon leer will sent through the server aer the seng is completed
- Account : E-mail sent by agent
- Password: The E-mail password
- SMTP server address
- SMTP connected port
-
Enable/ Disable SSL
-
Click Check SMTP to test whether the mail server is work
Click Save to complete the seng.
L. Permission
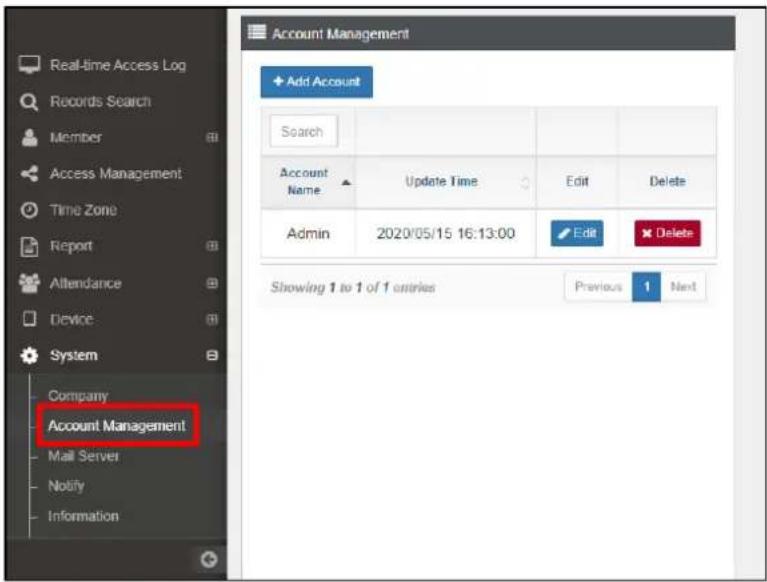
(A) Click System > Account Management in the menu, then enter the page to add/manage system user permissions.
There will be a group of Admin (system administrator authority) initially, please be careful not to delete it.
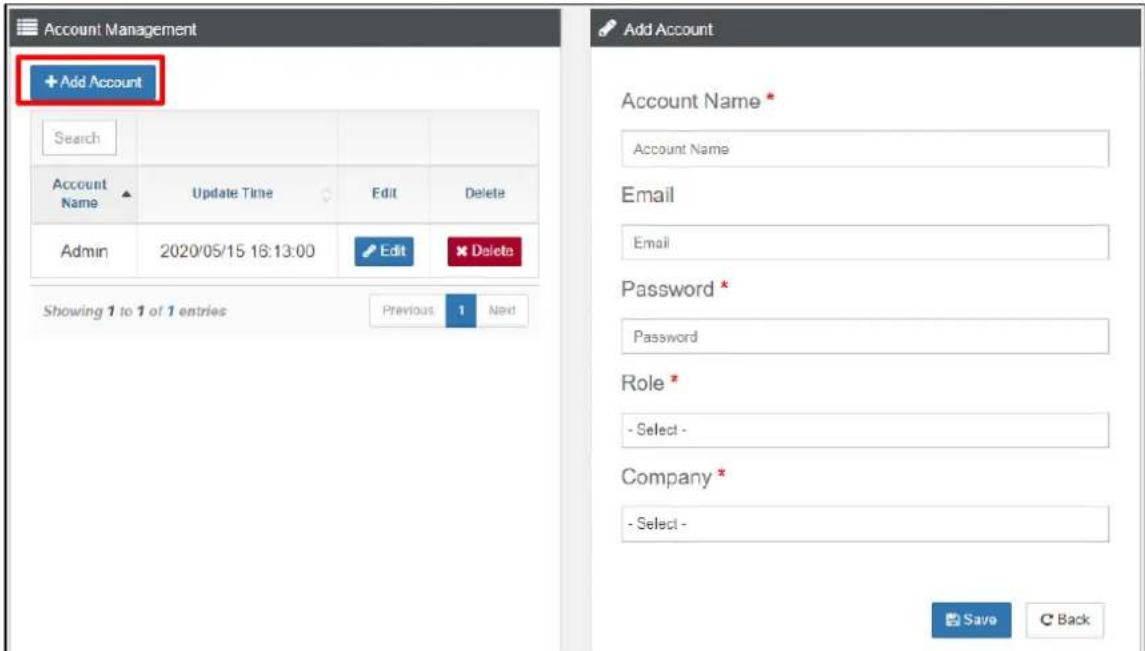
(B) Click Add Account to add users. On the right panel, you can maintain relevant informaon. The permission role is Admin / Manager / User, switch the selecon in the Role eld.
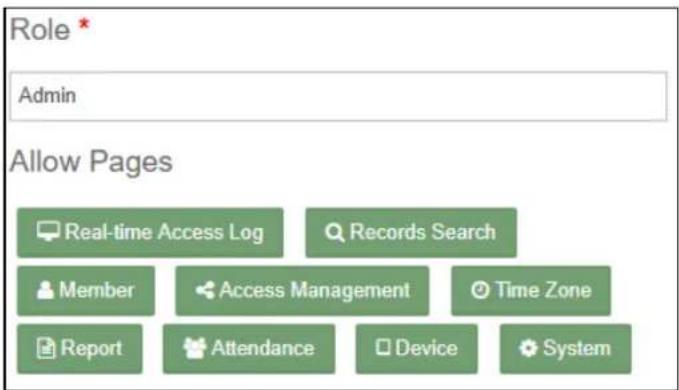
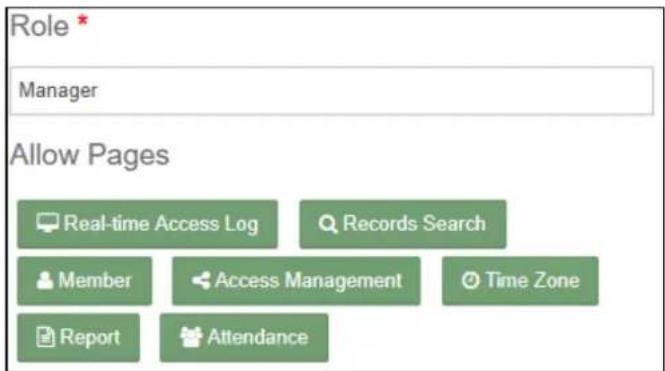
(C) Depending on dierent authority, Allow Pages will mark the pages that can be used in the authority, as shown below:
- Admin
- Manger
- User
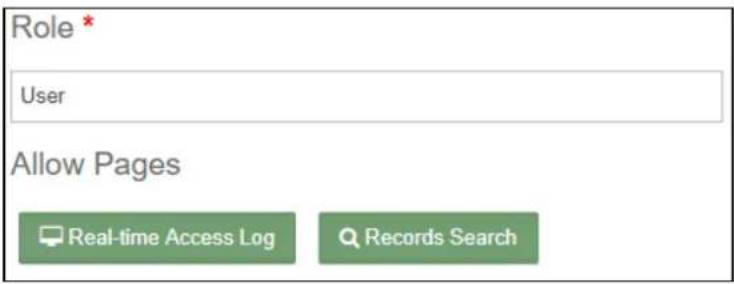
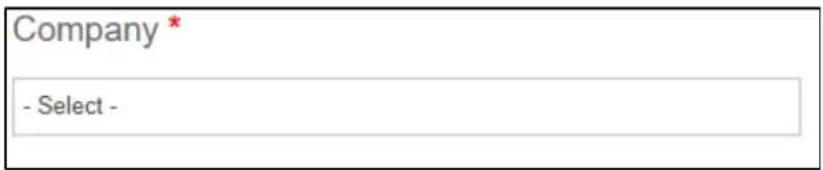
(D) According to the organizaon scope that the user can manage, select the corresponding organizaon in Company.
M. Real-time Access Log
On the main page, the le column is a funcon opons menu, select according to the required funcon.
The following describes the Real-me Access Log funcon.
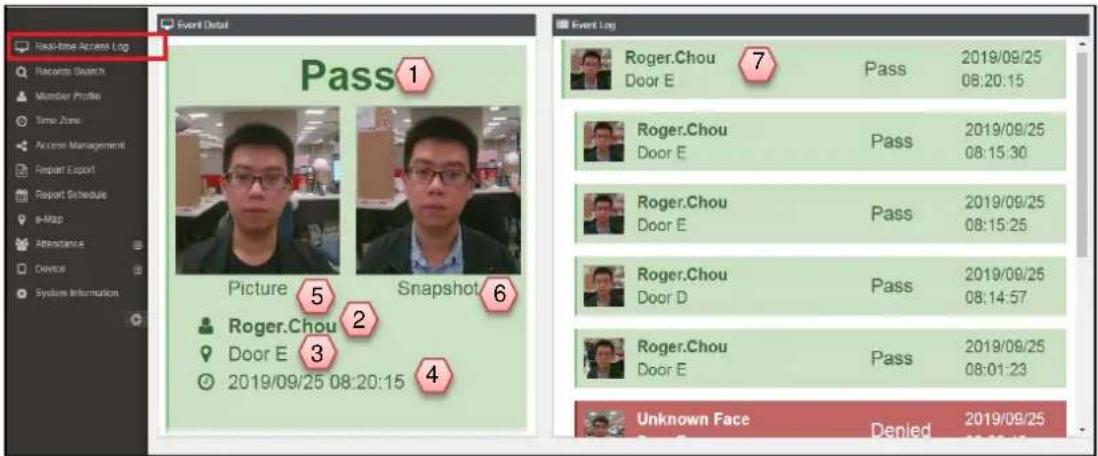
I. Click Real-me Access Log to enter the page
- The validated result, result category lists on F-1
- The idened person
- The idencaon locaon which includes door number/ oor
- Idencaon me
- Original photo from enrollment
- Captured photo
- Idencaon history
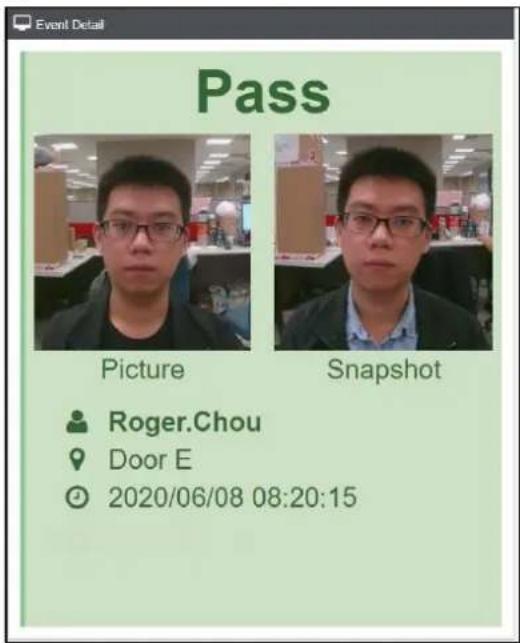
F-1 Validated result
I. Pass
II. Deny (wrong person)
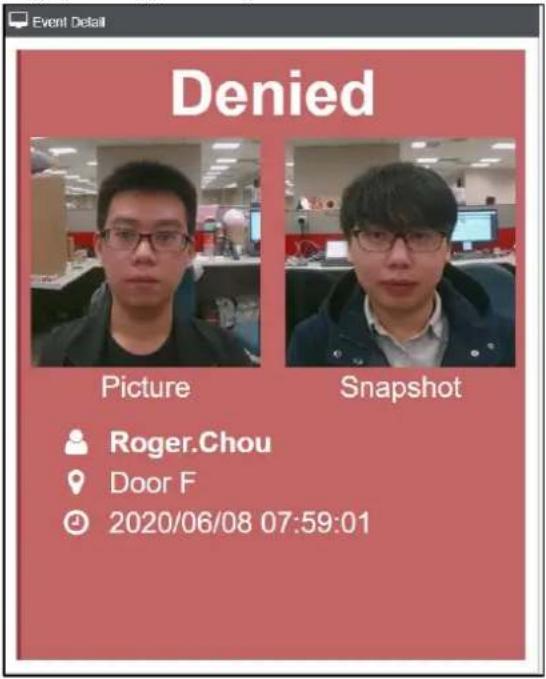
III. Deny (non-registered)
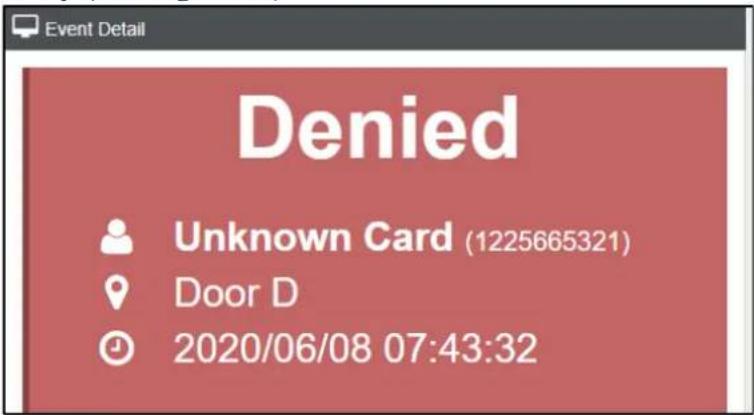
IV. Deny (No face enrollment)
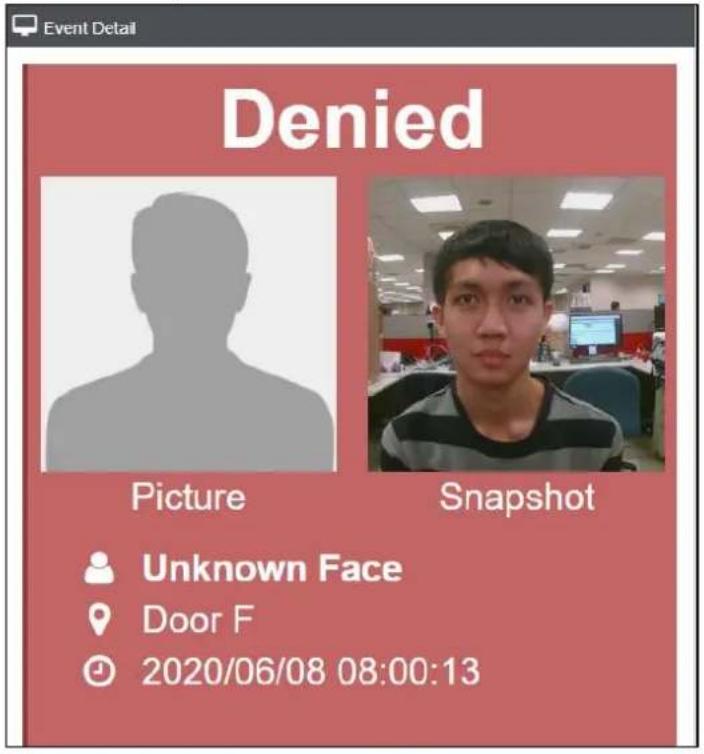
V. Tailgang
If Tailgang occurs, a window will pop-up on the screen to display the device and me
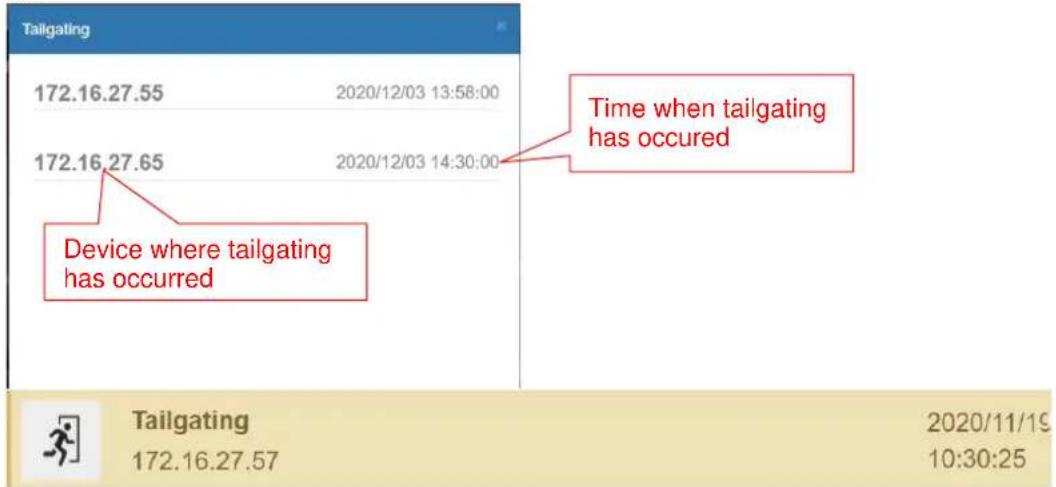
Tailgating
172.16.27.57
2020/11/19 10:30:25
N. Records Search
The related idencaon history can be searched on this page.
Click Records Search. You can iter the data for beer search results.
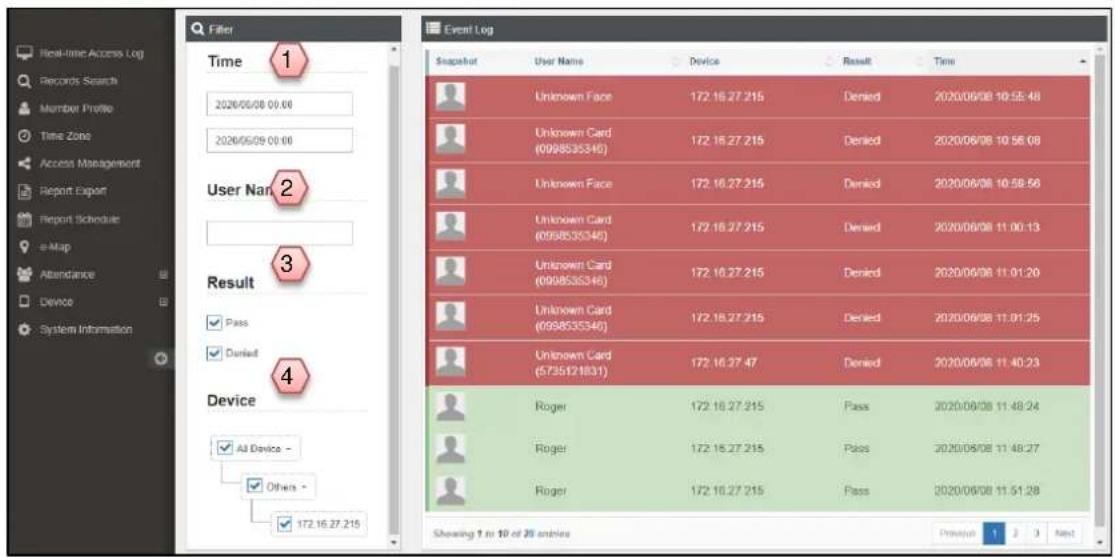
- Select the me interval.
- Type to iter the search by user name (support fuzzy query).
- Select to iter the search by idencaon result, choose Pass, Forbid and Tailing, as needed.
- Select to iter the search by device.
O. Notification
ACSS can send out different types of notifications when events occur. These notifications may be a Web API, email notification, or I/O trigger notifications.
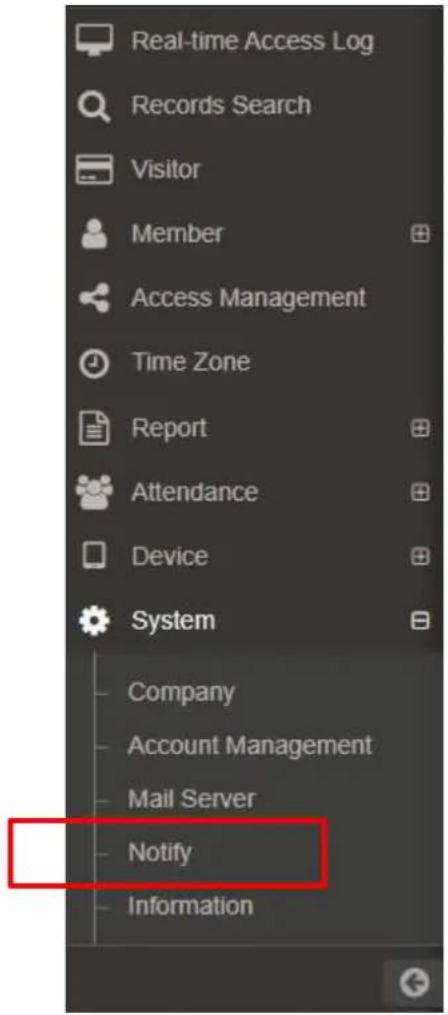
Click System > Notify.
Click “+” to create a new notification.

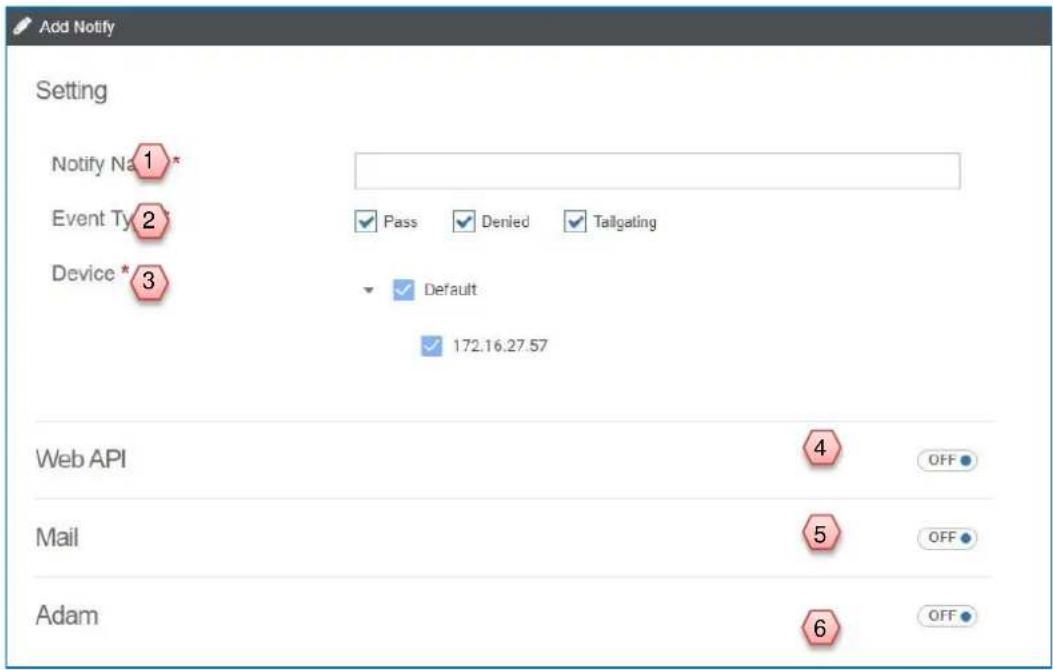
- On Notify Name, type the notification name.
- Select the Event Type that will trigger the event.
- Select the relevant device.
- Click to turn ON and configure Web API notification.
- Click to turn ON and configure Email notification.
- Click to turn ON and configure ADAM I/O device notification.
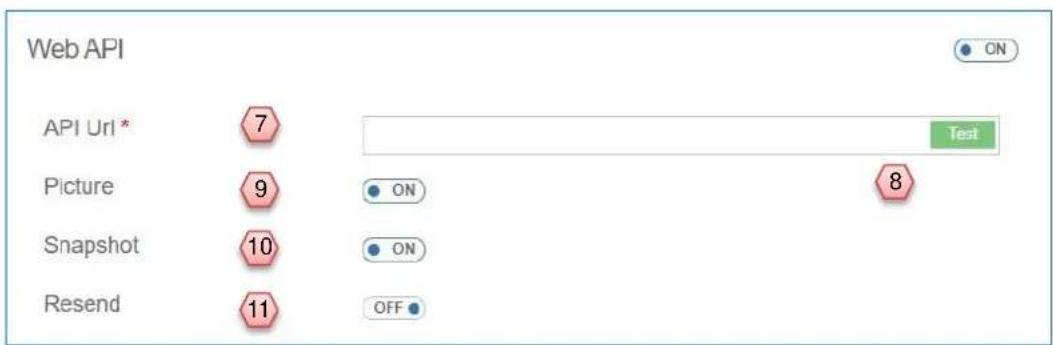
- Type in the API URL.
- Click Test to test the connection.
- Turn ON to include Picture in the notification.
- Turn ON to include event Snapshot in the notification.
- Turn ON or OFF to enable automatic resending of notification.
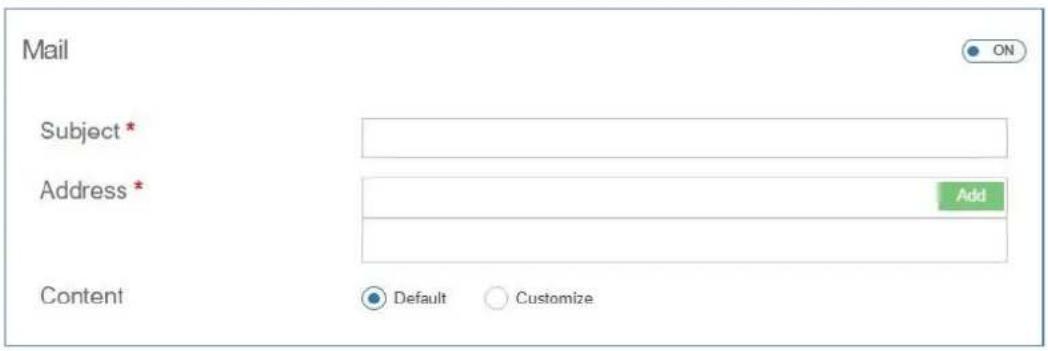
- Type the Email Subject.
- On Address, type the recipient email address. Then, click Add to add to the mailing list.
- Select to send Default or Customize email content.
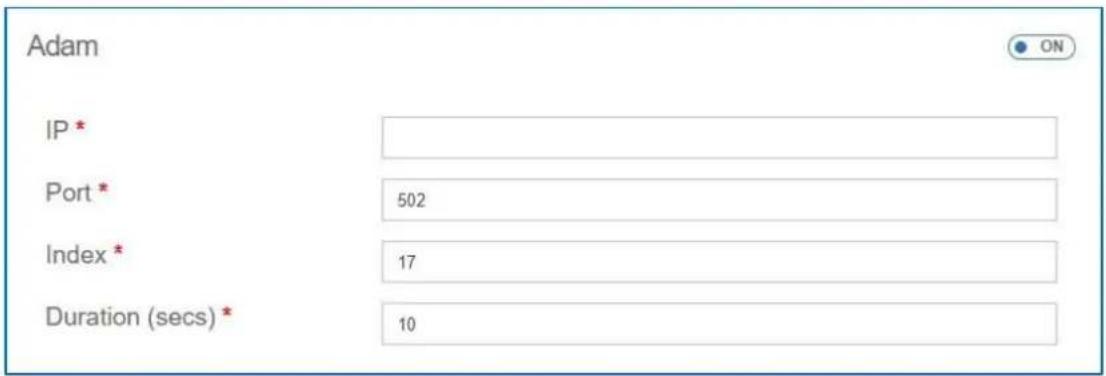
- Type the I/O device IP address.
- Type the port number. Default port is set to 502.
- Type the Index. For the optional PIOB device DO connection, the default index is set to 17.
- Set the Duration of the alarm.
- Click Save to save and apply all settings.
On the Notification page, you can also edit or delete an existing Notification Profile.

P. e-Map
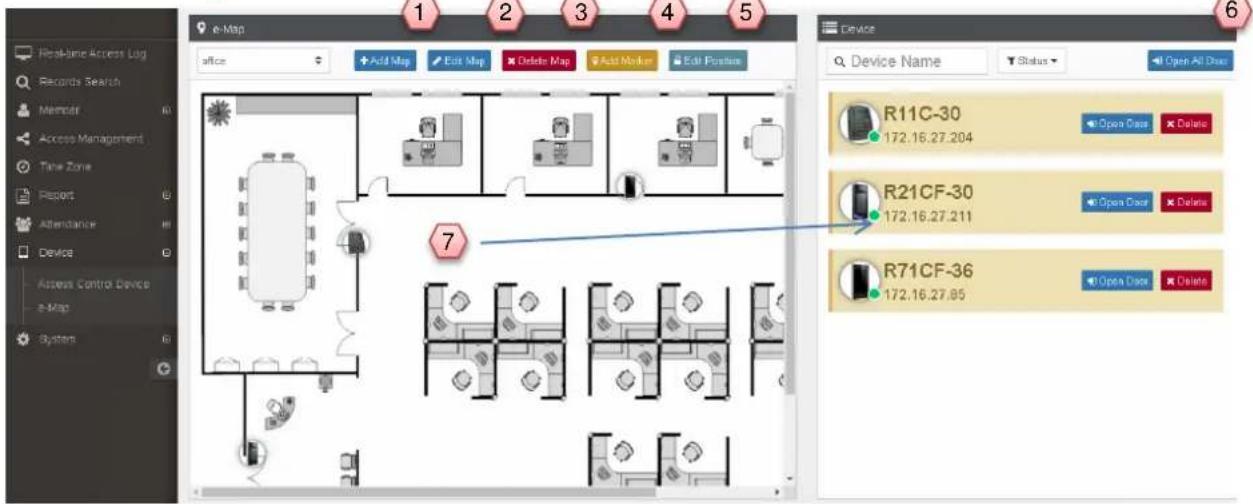
- If there are mulple maps, click to switch
- Upload a new e-Map
- Click Edit Map to change
- Delete e-Map
- The device posion can be marked on the e-Map, drag the mark and move to the specied posion.
- Lock the mark to prevent accidental movement of the actual posion
- Open the door by single or mulple devices through remote operaon. In special cases, all the access control devices can be opened with one buon. For example, when a terrorist ack occurs, the authority owner can open all the access control devices with one buon to reduce the escape obstacle.
- Click the device, the mark of the corresponding device will light up.
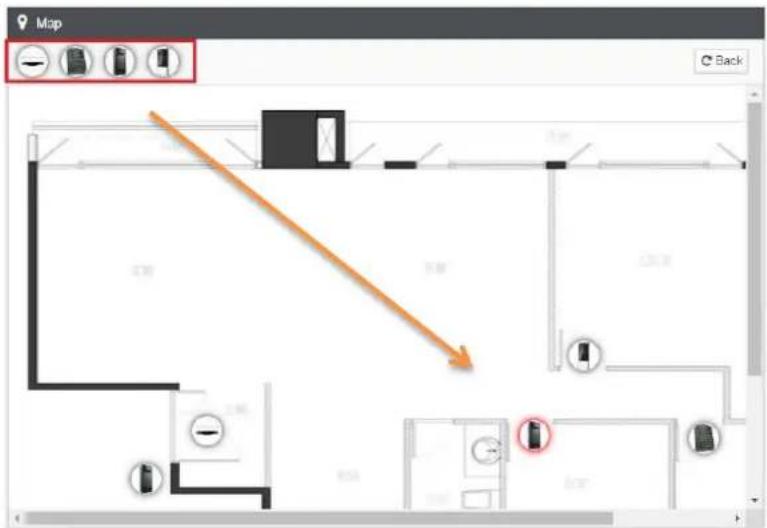
The corresponding card machine device can be dragged to the relave posion.
Q. Attendance
A. Overview
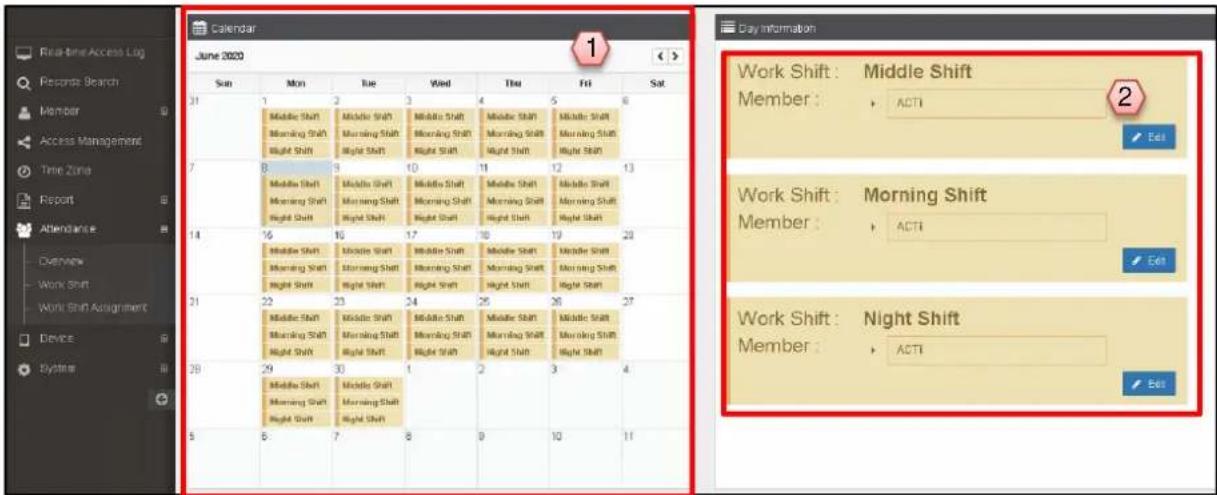
- The shi status can be clearly recorded and displayed with the aendance through the calendar format.
- Work shi can be classied into dierent classes according to requirements (ex: Morning shi, Middle shi, Night shi)
| Sun | Mon | Tue | Wed | Thu | Fri | Sat |
| 31 | 1 | 2 | 3 | 4 | 5 | 6 |
| Middle Shaft | Middle Shaft | Middle Shaft | Middle Shaft | Middle Shaft | ||
| Morning Shaft | Morning Shaft | Morning Shaft | Morning Shaft | Morning Shaft | ||
| Night Shaft | Night Shaft | Night Shaft | Night Shaft | Night Shaft | ||
| 7 | 8 | 9 | 10 | 11 | 12 | 13 |
| Middle Shaft | Middle Shaft | Middle Shaft | Middle Shaft | Middle Shaft | ||
| Morning Shaft | Morning Shaft | Morning Shaft | Morning Shaft | Morning Shaft | ||
| Night Shaft | Night Shaft | Night Shaft | Night Shaft | Night Shaft | ||
| 14 | 15 | 16 | 17 | 18 | 19 | 20 |
| Middle Shaft | Middle Shaft | Middle Shaft | Middle Shaft | Middle Shaft | ||
| Morning Shaft | Morning Shaft | Morning Shaft | Morning Shaft | Morning Shaft | ||
| Night Shaft | Night Shaft | Night Shaft | Night Shaft | Night Shaft | ||
| 21 | 22 | 23 | 24 | 25 | 26 | 27 |
| Middle Shaft | Middle Shaft | Middle Shaft | Middle Shaft | Middle Shaft | ||
| Morning Shaft | Morning Shaft | Morning Shaft | Morning Shaft | Morning Shaft | ||
| Night Shaft | Night Shaft | Night Shaft | Night Shaft | Night Shaft | ||
| 28 | 29 | 30 | 1 | 2 | 3 | 4 |
| Middle Shaft | Middle Shaft | |||||
| Morning Shaft | Morning Shaft | |||||
| Night Shaft | Night Shaft | |||||
| 5 | 6 | 7 | 8 | 9 | 10 | 11 |
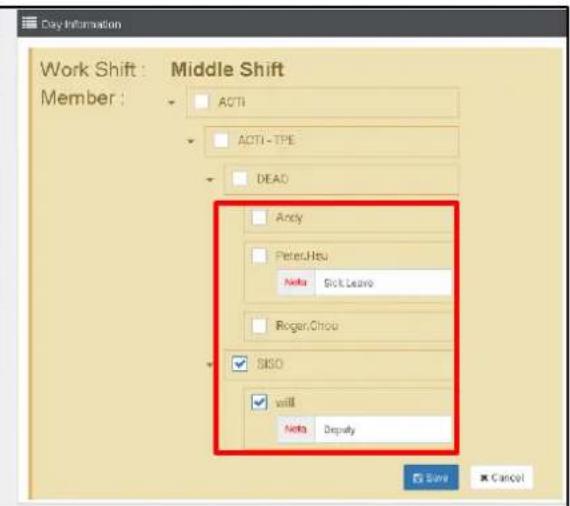
If there is a substitute situaon, you can also choose a single day and mark the leave and the substitute.
B. Work Shi
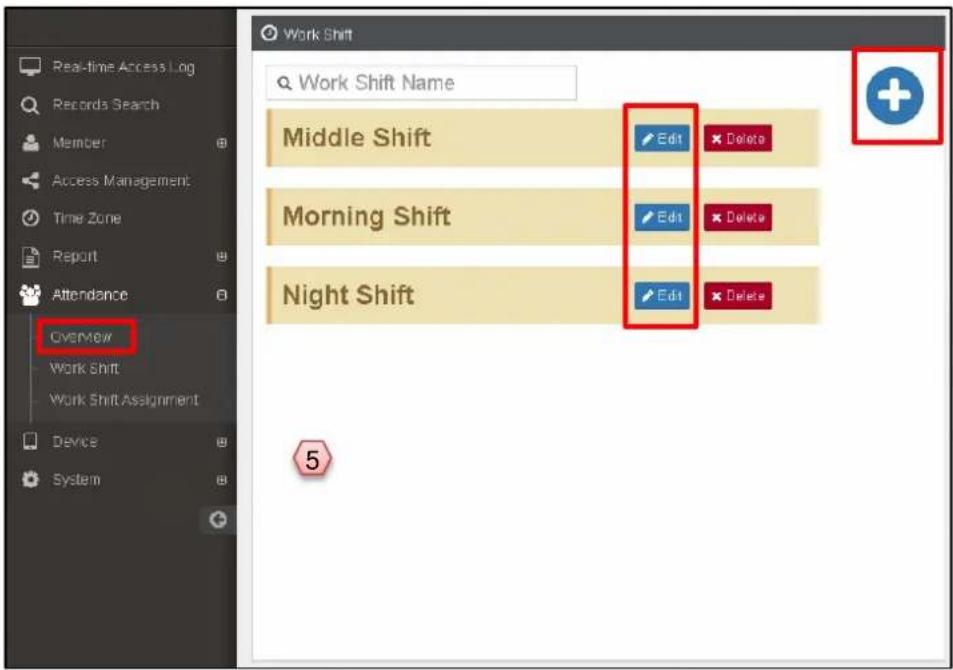
Click on Add or Edit of the work shi, refer to the following steps:
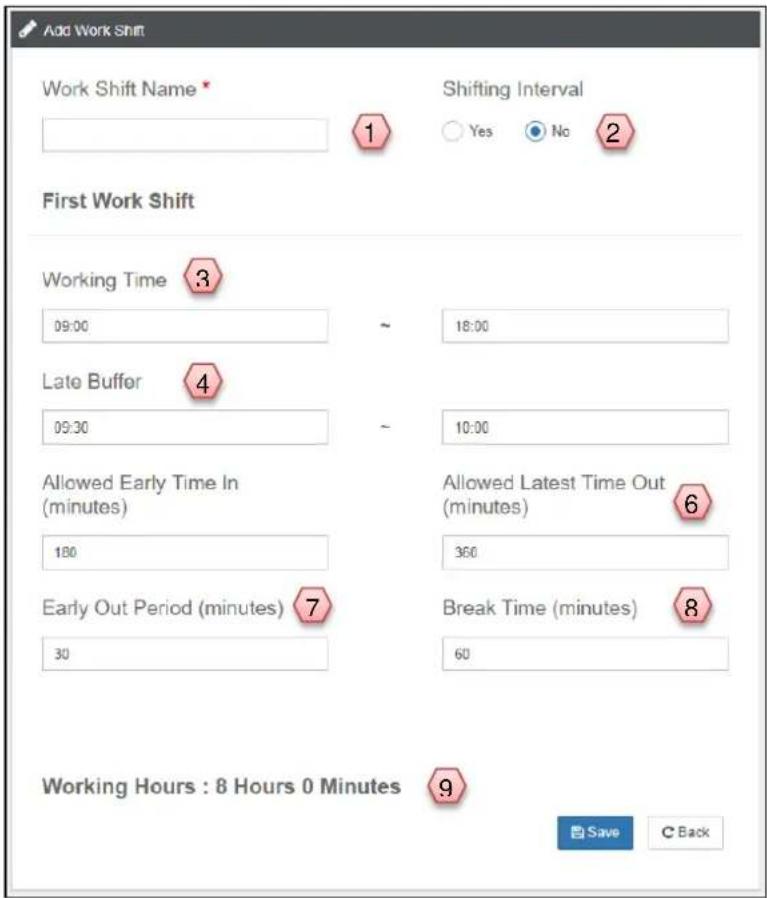
Field descripon
-
Fill in the name of the work shi
-
Choose if it is an interval shi
-
Fill in the working hours
-
Choose the "late buer" interval
-
"Allow early arrival" me (in minutes)
-
"Allow overme" me (in minutes)
-
Early departure me (in minutes)
-
Break me (in minutes)
-
The working hours will be automatically calculated according to the sengs here Click Save to complete seng.
C. Work Shi Assignment
Dene the employee with corresponding work shi. The operaon steps are shown as below:
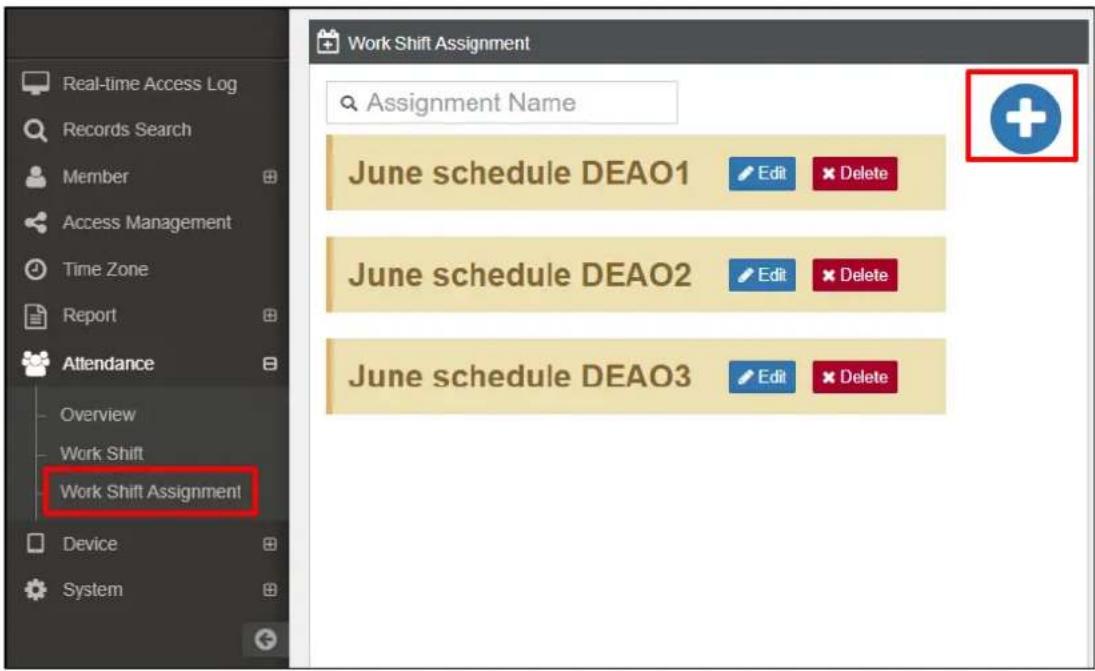
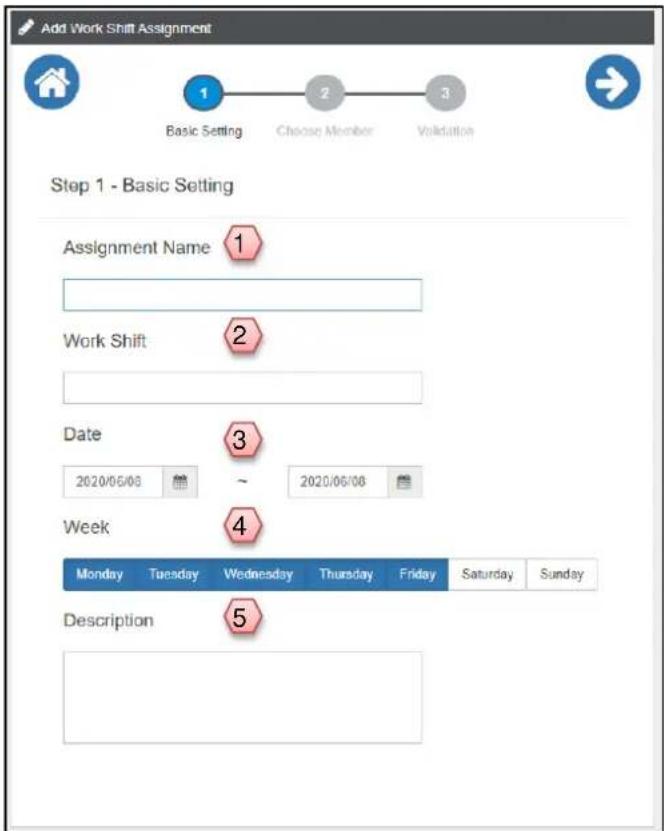
Field descripon
- Assignment name
- Pull down the menu to select the corresponding work shi
- Select date duraon
- Select the weekdays of the week
- Detailed descripon
Click the arrow to proceed to the next step when nished.
Check the group members corresponding to the work shi
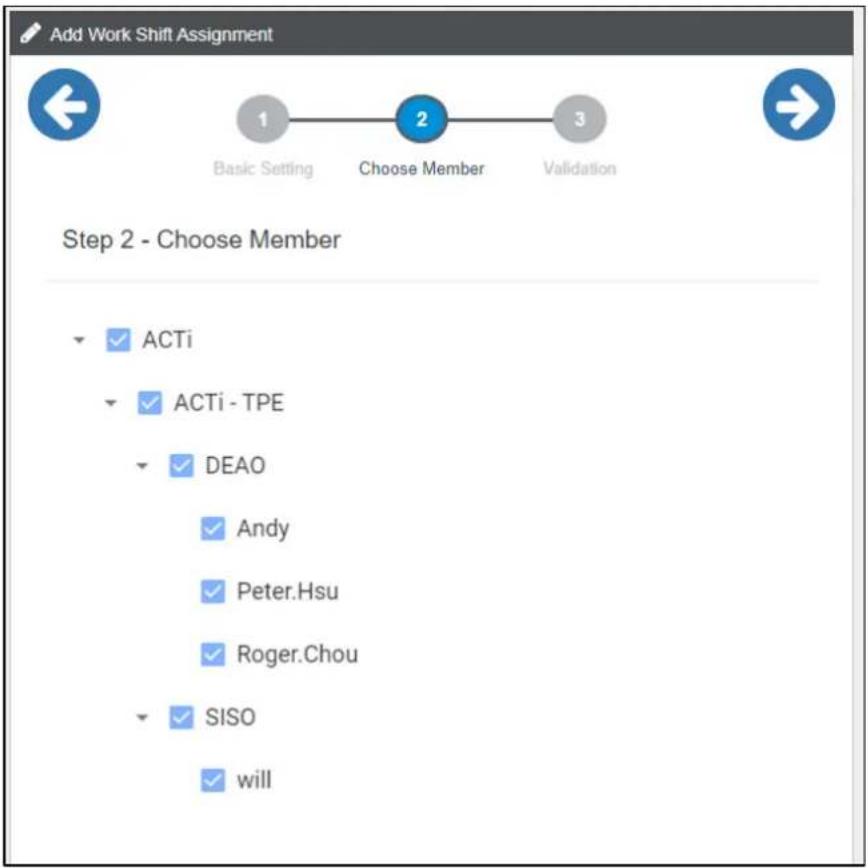
flowchart
graph LR
    A["1: Basic Setting"] --> B["2: Choose Member"]
    B --> C["3: Validation"]
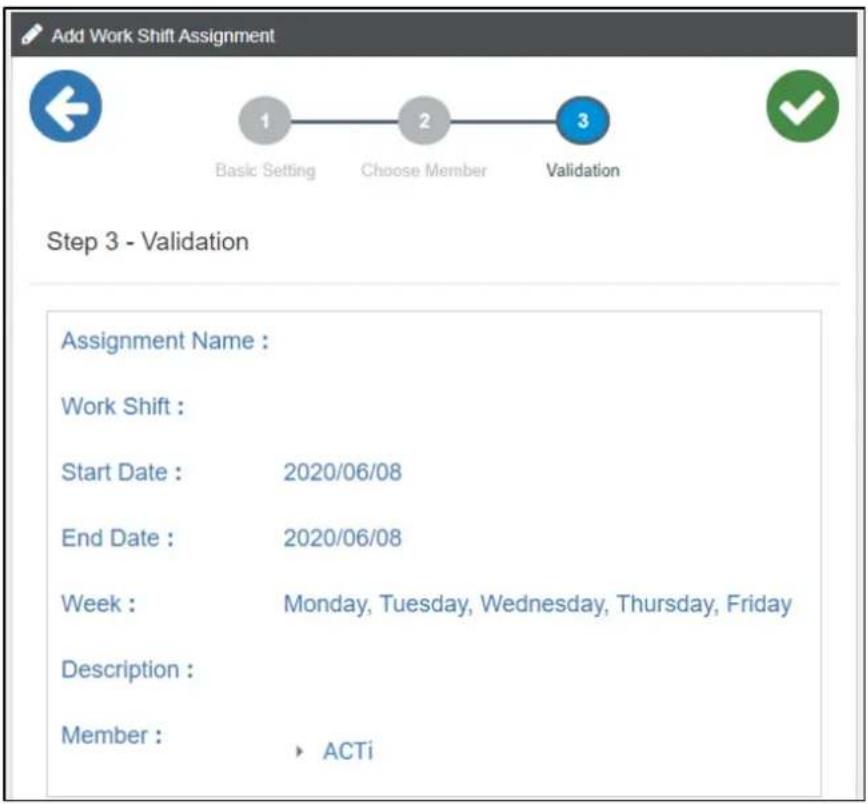
Aer compleng the form, conrm then save.
R. System Information
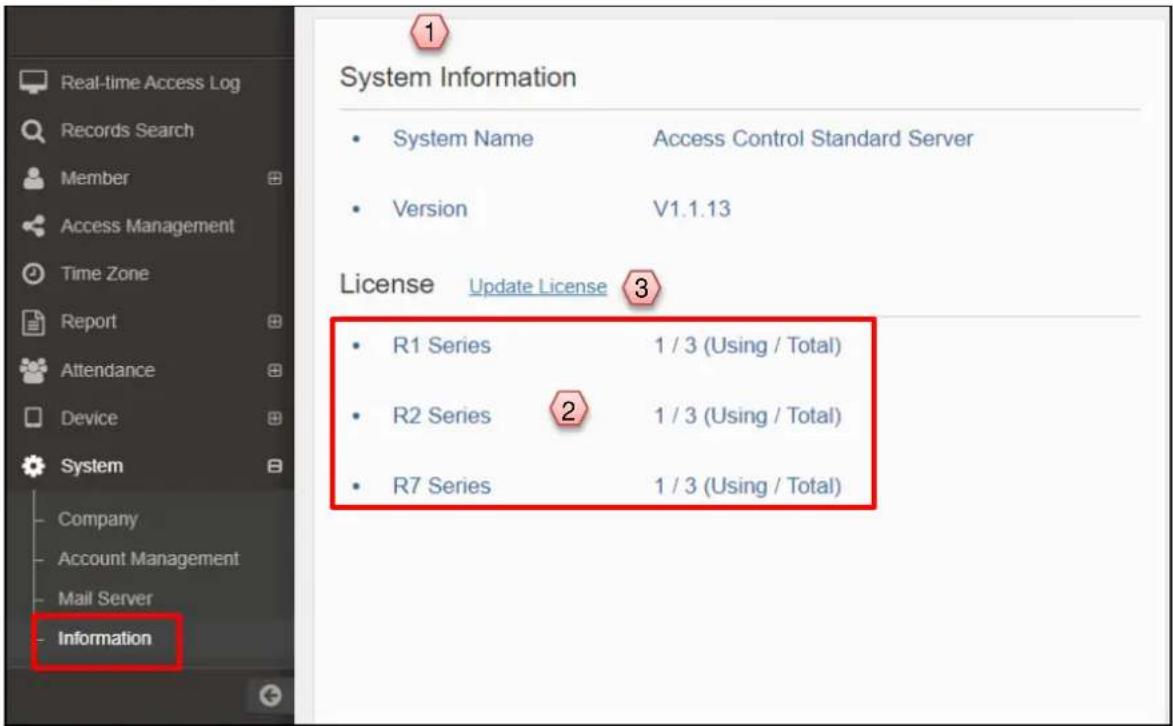
- System informaon includes the system name and current version
- Displays the informaon about the connected devices like the maximum channels and quantity of license
- If you purchase device and need to update the serial number. Click here can go on serial number seng page.
- Access Control Standard Server
- TABLE OF CONTENTS
- Preface
- Trademark
- Liability
- System Requirements
- Login/ Logout
- System Login
- System Logout
- Select Language
- Create Groups
- Delete User Department Groups
- Delete Device Groups
- Device Management
- Manually Add New Device
- Parameters:
- Scan to Add Devices
- Member Information
- Batch Import
- Click Batch Import.
- By using filter, you can readily see the "Not Uploaded" and "Uploaded" members.
- ACTi Access Control Standard Server User's Manual
- Click the Edit button
- Time Zone
- Access Management
- Step 4 (For R2 series)
- Tailgating
- Scenario Examples:
- Configure Tailgating
- Manual Export Report
- Schedule Report
- Informaon Page
- Seng Page
- Trigger Page
- Dene the starng me of the trigger
- Mail Server Setting
- Permission
- Real-time Access Log
- F-1 Validated result
- Deny (wrong person)
- Deny (non-registered)
- Tailgang
- Tailgating
- Records Search
- Notification
- e-Map
- Attendance
- Overview
- Work Shi
- Work Shi Assignment
- Field descripon
- System Information
Brand : ACTi
Model : LACS3000
Category : Access Control System