
TR4000iT - Treadmills LifeSpan - Free user manual and instructions
Find the device manual for free TR4000iT LifeSpan in PDF.


| Product Type | Treadmill |
| Model | TR4000iT |
| Brand | LifeSpan |
| Running Belt Size | 22" x 60" (56 cm x 152 cm) |
| Motor | 3.25 HP Continuous Duty |
| Speed Range | 0.5 - 12 mph (0.8 - 20 kph) |
| Incline Range | -2% to +13% |
| Max User Weight | 350 lb (159 kg) |
| Power Requirements | Standard wall outlet, grounded, do not use GFCI or extension cord |
| Display | Touchscreen with multiple workout data screens |
| Programs | Manual, Preset (Weight Loss, Sport Training, Healthy Living), Custom User, Heart Rate Control (Constant and Interval), Fitness Tests (Rockport and Navy) |
| Heart Rate Monitoring | Contact grip sensors, Bluetooth chest strap and armband compatible |
| Bluetooth | Yes, for speaker and heart rate devices |
| USB Charging | 5V, 0.5A port for mobile devices |
| Cooling Fan | 3-speed fan integrated in console |
| Safety Features | Safety key with clip, Intelli-Guard automatic pause, emergency stop button |
| Folding | Yes, hydraulic shock assist; lockable in folded position |
| Deck Suspension | 8 independent shock absorbers |
| Roller Size | Front: 2.5" (64 mm), Rear: 2" (51 mm) |
| Warranty | Frame: 10 years, Parts: 2 years, Labor: 1 year (North America) |
| Maintenance | Belt lubrication every 50 hours or 3 months; belt alignment and tensioning adjustable; clean with mild detergent |
| Extra Features | Intelli-Step step counting, Quickset speed/incline buttons, decline programs (Hills, Short Interval, Downhill Repeats) |
Frequently Asked Questions - TR4000iT LifeSpan
User questions about TR4000iT LifeSpan
0 question about this device. Answer the ones you know or ask your own.
Ask a new question about this device
Download the instructions for your Treadmills in PDF format for free! Find your manual TR4000iT - LifeSpan and take your electronic device back in hand. On this page are published all the documents necessary for the use of your device. TR4000iT by LifeSpan.
USER MANUAL TR4000iT LifeSpan
Congratulations on Purchasing Your LifeSpan Treadmill!
At LifeSpan we take pride in the quality, safety, and reliability of our products as well as the professionalism of our sales support and customer service teams. Making it our number one priority that you have an exceptional experience using our products.
In support of this quality focus we pre-assemble parts on the manufacturing line whenever possible to reduce the number of steps and complexity of customer assembly, independently certify our products to comply with the latest industry Safety Standards, and use state of the art production processes and quality components.
Then we back LifeSpan products with excellent warranties and a responsive customer service department making it simple and easy to get assistance should the need arise.
This attention to quality, our high standard for customer service and focus on innovation has earned LifeSpan numerous awards and consistent praise from independent review groups, industry authorities and you the consumer.
Thanks for choosing LifeSpan.
Please thoroughly read this manual before you assemble or operate your treadmill. Neither LifeSpan nor its representatives can accept responsibility for any damages or injury incurred as a result of information presented in this manual except under the terms of the product warranty.
Contents
Welcome
Safety First....5
Safety Tips
Safety Key
Grounding
Assembling Your Treadmill....10
Exploded View & Hardware
Assembly Instructions
Console Basics 18
Console Overview
Display and Keyboard
Operations 25
Home Screen and Personal Settings
Bluetooth Speaker, Heart Rate Strap Set-up
QuickSTART and Manual
Preset Programs
Custom User Set-Up Programs
Heart Rate Control Programs
Summary
Screencasting(TR5500iM)
Equipment Settings
Program Profiles
Maintenance and Tips....54
Heart Rate Monitoring
Cleaning / Lubrication
Folding & Unfolding
Moving
Belt Tensioning
Belt Alignment
Troubleshooting
About Your Treadmill....63
Unique Features
Specifications
Warranty / Registration
When using exercise equipment, basic precautions should always be followed, including:
- Never drop or insert any object into any opening. If an object falls into an opening, turn the power off and unplug the power cord from the outlet. Remove the object or call customer service at 801-973-9993x4.
- Never operate this treadmill if it has been damaged or partially submersed in water.
- To reduce the risk of electric shock, unplug the treadmill from the wall outlet when not in use, before performing any maintenance, or before moving the treadmill.
- Do not use outdoors or in areas of high humidity or extreme temperature changes.
- Do not lean against or climb on the treadmill.
- Do not operate where aerosol spray products are being used or where oxygen is being administered.
- Never place the power cord under carpeting or place any object on top of the cord, this may pinch or damage the cord causing fire damage or personal injury.
- Use this exercise product for its intended use as described in this Owner's Manual. Do not use attachments that are not recommended by LifeSpan.
- Do not leave your treadmill running while not in use.
Children and Pets
- Keep children from playing on your treadmill at all times.
- When in use, children and pets should be kept at least 10 feet (3m) away.
- This treadmill can be used by children ages 12 years and above and persons with reduced physical, sensory or lack of experience and knowledge if they have been given supervision or instruction concerning use of the appliance in a safe way and understand the hazards involved.
- Cleaning and user maintenance shall not be made by children without supervision.
Safety First
Safety Tips While in Use
• Always consult a physician before beginning an exercise program.
- If you experience chest pains, nausea, dizziness or shortness of breath, stop exercising immediately and consult your physician before continuing. Do not wear clothing or jewelry that might catch on any part of the treadmill.
- Wear shoes with high traction rubber soles. Do not wear shoes with heals, leather soles, cleats or spikes.
- In case of emergency, grab onto the side handrails and place your feet on the side rails located on each side of the running belt.
- Do not walk or run backwards on the treadmill, always face forward.
- Allow the running belt to fully stop prior to getting off the treadmill.
- Keep the treadmill on a solid surface, with the side rails and front of the treadmill a minimum of 2 feet (0.6m) from any walls or furniture. Make sure that the area behind the treadmill remains completely clear during use. A minimum of 7 feet (2m) of clearance is required for safety reasons.
Safety Clearance

Safety Key
The safety key is required to operate this treadmill. With the safety key installed the treadmill is operational. With the safety key pulled, power is turned off to the motor making the treadmill inoperable.


CAUTION: For your safety always attach safety key clip to an article of clothing prior to use. The safety key clip needs to be securely attached to clothing parallel to or above the height of the safety key.

WARNING: Heart rate monitoring systems may be inaccurate. Over exercising may result in serious injury or death. If you feel faint stop exercising immediately.
NOTE: Read all instructions and save for future reference.
Safety First
Proper Grounding
LifeSpan equipment must be grounded. Improper connection of the equipment's grounding conductor can result in the risk of electric shock. Check with a qualified electrician or service person if you are in doubt as to whether the outlet is properly grounded. Do not modify the plug provided with the product or use a ground plug adapter to adapt to a non-grounded outlet. If the plug will not fit in the outlet, have the proper outlet installed by a qualified electrician.
Power Cord Options
This treadmill should only be used with the proper power cord and power outlet. Several power cord options (shown below) are available from LifeSpan. We do our best do include the correct power cord with the treadmill for your area. In the event that the correct power cord is not included in the packaging please contact your local distributor.

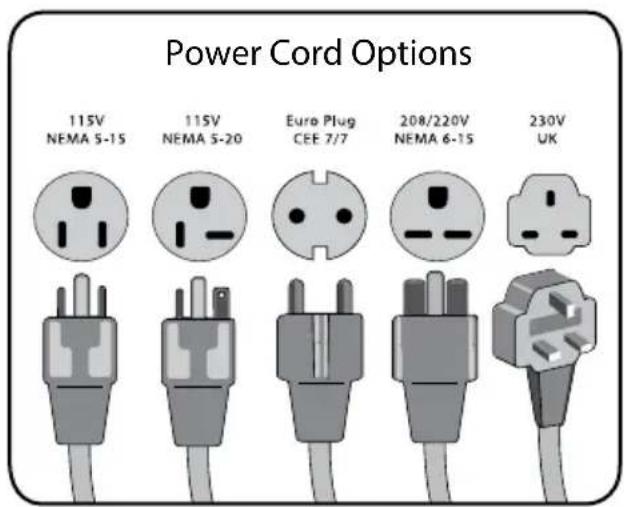

Do not use extension cords between the treadmill and power outlet.

Do not plug into a GFI outlet or circuit as it may trip the breaker.
Assembling Your Treadmill
Exploded View
Prior to starting the assembly process take all of the parts out of the box. Remove plastic bags and lay them out on the floor to become familiar with the components.
Since your treadmill is a heavy piece of equipment it is recommended you use two people during assembly and follow these assembly instructions to reduce any problems that could occur.

Hardware Included
| Item# Part Description | |
| 1 Right Upright Post | |
| 2 Left Upright Post | |
| 3 Right Upright Post Cover | |
| 4 Left Upright Post Cover | |
| 5 Console | |
| 6 Right Cup Holder | |
| 7 Left Cup Holder | |
| 8 Cover for Optional Bluetooth Adapter |
Hardware Bag Contents
| Item # Qty. Hardware Description | |
| N/A 1 6mm Allen Wrench | |
| N/A 1 5mm Allen Wrench with Phillips Screw Driver | |
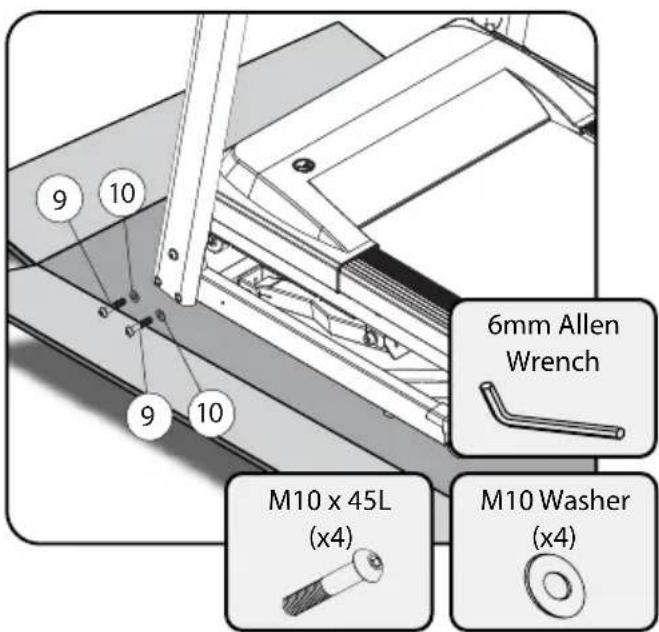
| 9 4 M10 k 45L Bolt - (Upright Attachment) | |
| 10 4 M10 Washer - (Upright Attachment) | |
| 11 2 M8 k 100L Bolt - (Handlebar Hold Down) | |
| 12 2 M8 Washer - (Handlebar Hold Down) |

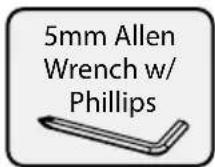

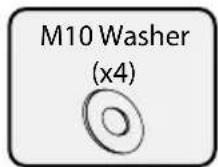

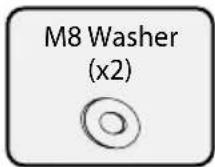
Pre-installed Hardware (not shown)
| Item # Qty. Hardware Description | ||
| 13 2 M4 | k 8L - | (Upright Cover Attachment) |
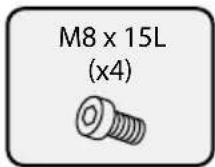
| 14 4 M8 | k 15L Bolt - (Console Attachment) | |
| 15 4 M4 | k 8L Screw - (Cup Holder Attachment) | |


Assembling Your Treadmill
Step 1: Unpacking Treadmill
A. Cut packaging straps and remove.
B. Remove the box top.
C. Remove small parts and packaging material and unwrap parts.
D. Cut the corners of the bottom box and remove all packaging material to begin assembly. The treadmill can be assembled in the box. No need to pick the treadmill up to remove it from box.

natural_image
Technical illustration of a mechanical assembly with layered components (no text or symbols)Step 2: Upright Post Attachment
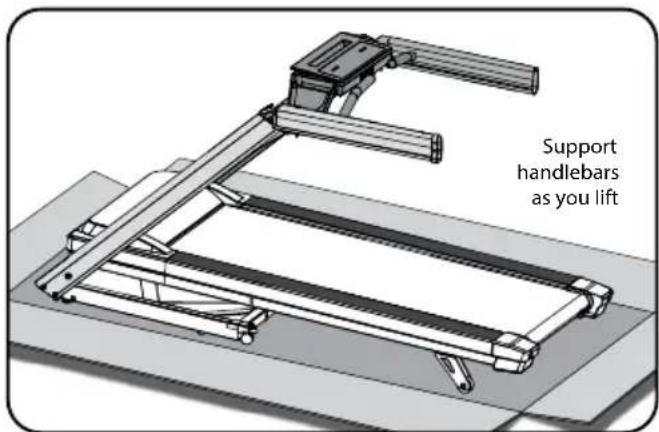
A. Carefully fold the uprights with handlebars up into the upright position.
B. Carefully lay handlebars down as the uprights are brought up into position. This will protect against any accidental damage to wires coming up through the upright into the handlebars.
C. Align the holes in the lower portion of the upright with the threaded holes in the frame.
D. Install the four M10 x 45L bolts (9) and M10 washers (10), two in each upright. The best way to handle this is to loosely install all four bolts and washers and then tighten once all bolts are installed.
Step 3: Upright Post Cover Attachment
A. Remove pre-installed M4x8L screw (13).
B. Install the left upright cover (4) by sliding the front of the cover around the upright and centering or aligning the cover on the upright.
C. Install the M4 x 8L screw (13).
D. Repeat steps A and B for the right upright cover.

Step 4: Handlebar Attachment
A. Place the M8 x 100L bolt (11) and M8 washer (12) through the left handlebar and into the uprights being careful not to damage any wires running through the handlebar. Repeat for the right handlebar.
B. Loosely thread both bolts into the upright prior to tightening.
C. Fully tighten both handlebar attachment bolts.

Assembling Your Treadmill
Step 5: Console Harness Attachment
A. Slide the square mounting tubes (protruding from the front of the console(5)) partially into the console mount as shown in the figure to the left. Do not slide the console all the way in as wire connections need to be made.
B. Securely attach the 12-pin cables together, and the grounding wires together.
C. Carefully tuck the wires into the bottom or top console housing.


Step 6: Securing Console
A. Slide the console fully into the mounting brackets, being careful not to damage any wires. If the console does not want to slide in completely, loosen the four pre-installed M8 x 15L bolts (14) with the provided 6mm Allen wrench to eliminate any friction.
B. Once the console is fully installed, tighten the four M8 x 15L Bolts.
Step 7: Cup Holder Attachment
A. Remove the two pre-installed M4 x 8L screws (15) with the provided Phillip's head screwdriver from the bottom of the right cup holder.

Assembling Your Treadmill
B. Place the right cup holder (6) over the handlebar and into the frame as shown.
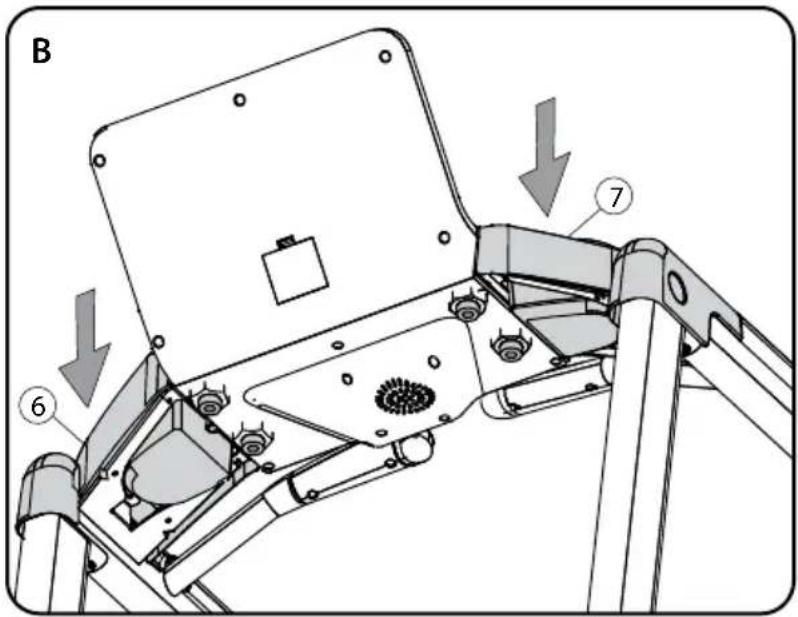
C. Loosely install the two screws removed in step A. Once both screws are installed, securely tighten both screws.
D. Repeat steps A through C for installing the left cup holder (7)

Step 8: Remove Shipping Strap
A. Cut plastic shipping strap holding deck frame to base.

natural_image
Illustration of a mechanical device with a pair of scissors cutting through it (no text or symbols)WARNING: To avoid personal injury, never attempt to pick the treadmill up and carry it from this position once this strap is cut. The treadmill should be folded and rolled to the new location or folded and carried to the new location.
Console Basics

Console Basics
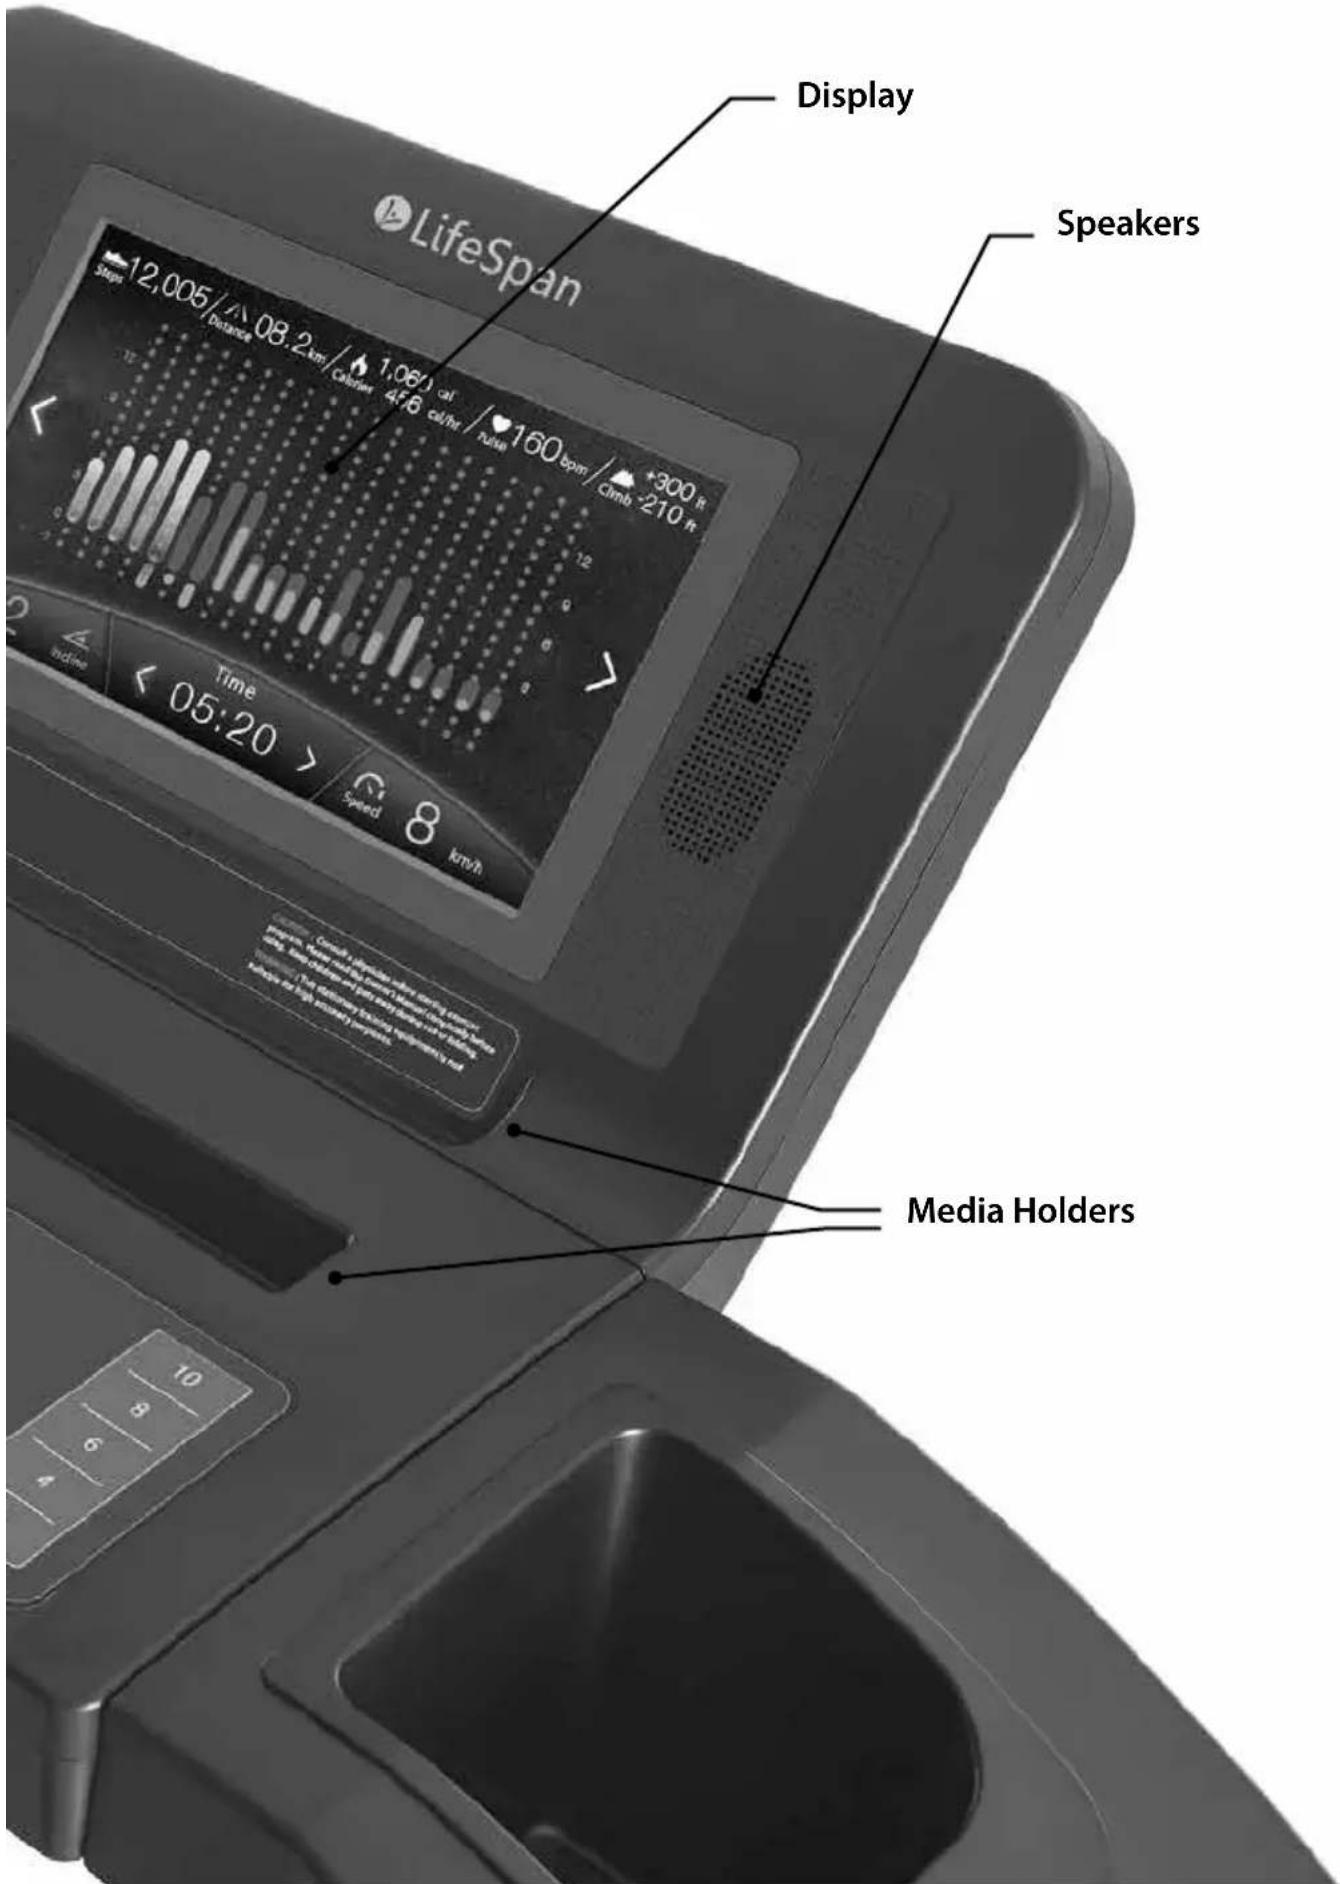
Console Basics
Readout Display
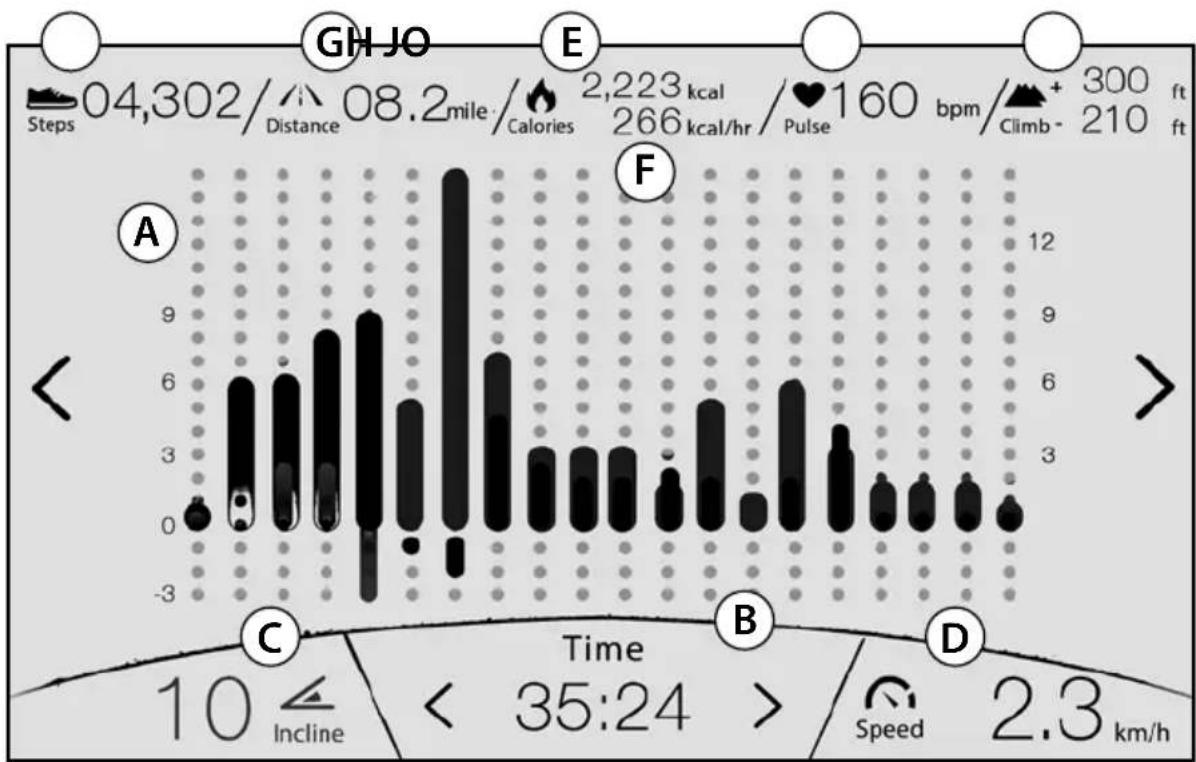
A touchscreen display provides all the information you need to monitor your exercise results and get the most out of your exercise program. Swipe between one of three screens to view your results.
bar
| Time Interval | Value | |---|---| | 04,302/Distance | 08.2 mile / Calories | | 2,223 kcal / Pulse | 266 kcal/hr | | 160 bpm / Climb | 210 ft | | 300 ft | 300 ft | | < 35:24 > | < 35:24 | | < 35:24 > | < 35:24 | | < 35:24 > | < 35:24 | | < 35:24 > | < 35:24 | | < 35:24 > | < 35:24 | | < 35:24 > | < 35:24 | | < 35:24> | < 35:24 | | < 35:24> | < 35:24 | | < 35:24> | < 35:24 | | < 35:24> | < 35:24 | | < 35:24> | < 35:24 | | < 35:24> | < 35:24 | | | < 35:24> | < 35:24 | | < 35:24> | < 35:24 | | < 35:24> | < 35:24 | | < 35:24> | < 35:24 | | < 35:24> | < 35:24 | | < 35:24> (labeled A) | - | | < 35:24> (labeled C) | - | | < 35:24> (labeled B) | - | | < 35:24> (labeled D) | - | | < 35:24> (labeled E) | - | | < 35:24> (labeled F) | - | | < 35:24> (labeled G) | - | | < 35:24> (labeled H) | - | | < 35:24> (labeled I) | - | | < 35:24> (labeled J) | - | | < 35:24> (labeled K) | - | | < 35:24> (labeled L) | - | | < 35:24> (labeled M) | - | | < 35:24> (labeled N) | - | | < 35:24> (labeled O) | - | | < 35:24> (labeled P) | - | | < 35:24> (labeled Q) | - | | < 35:24> (labeled R) | - | | < 35:24> (labeled S) | - | | < 35:24> (labeled T) | - | | < 35:24> (labeled U) | - | | < 35:24> (labeled V) | - | | < 35:24> (labeled W) | - | | < 35:24> (labeled X) | - | | < 35:24> (labeled Y) | - | | < 35:24> (labeled Z) | - | | < 35:24> (labeled AA) | - | | < 35:24> (labeled AB) | - | | < 35:24> (labeled AC) | - | | < 35:24> (labeled AD) | - | | < 35:24> (labeled AE) | - | | < 35:24> (labeled AF) | - | | < 35:24> (labeled AG) | - | | < 35:24> (labeled AH) | - | | < 35:24> (labeled AI) | - | | < 35:24> (labeled AJ) | - | | < 35:24> (labeled AK) | - | | < 35:24> (labeled AL) | - | | < 35:24> (labeled AM) | - | | < 35:24> (labeled AN) | - | | < 35:24> (labeled AO) | - | | < 35:24> (labeled AP) | - | | < 35:24> (labeled AQ) | - | | < 35:24> (labeled AR) | - | | < 35:24> (labeled AS) | - | | < 35:24> (labeled AT) | - | | < 35:24> (labeled AU) | - | | < 35:24> (labeled AV) | - | | < 35:24> (labeled AW) | - | | < 35:24> (labeled AX) | - | | < 35:24> (labeled AY) | - | | < 35:24> (labeled AZ) | - | | < 35:24> (labeled BA) | - | | < 35:24> (labeled CA) | - | | < 35:24> (labeled CB) | - | | < 35:24> (labeled CC) | - | | < 35:24> (labeled DV) | - | | < 35:24> (labeled DV' ) | - | | < 35:24> (labeled DV'') | - | | < 35:24> (labeled DV'') + 'F' (labeled F) | - | | < 35:24> (labeled DV'') + 'F'(Labeled F)' (labeled F)' (A), 'C', 'Incline', 'Speed', 'km/h' (B, C, D, E, F, G, H, I, J, K, L, M, N, O, P, Q, R, S, T, U, V, W, X, Y, Z, W', etc.)Screen Option 1
A. Program Matrix - Divides the workout programs into 20 segments with varying intensity levels. These programs can be viewed in levels of incline, speed or both.
B. Time - The workout time elapsed or the workout time remaining.
C. Incline - TR3000i belt incline range is 0 to +15.
TR4000i, TR5500iM belt incline range is -2 to +13.
D. Speed - The speed you are traveling in miles per hour (this reading can be changed to kilometers by using the Personal Settings Mode).
E. Calories - Estimated calories burned is calculated by using a widely-accepted equation, using body weight and distance covered.
F. Calories/Hour - Number of calories burned per hour.

gauge
| Metric | Value | |--------|-------| | step/minute | 123 | | Calories | < 0,000 kcal | | Speed | 12.3 km/h | | MAX HR | 000 bpm | | kcal/hour | 1,452 kcal | | Incline | 10 | | P | 100% |Screen Option 2
G. Distance - Total distance traveled in miles or kilometers since the beginning of the workout.
H. Steps - Works like a pedometer, counting your steps while you walk.
I. Steps/Minute - Current number of steps being walked per minute
J. Feet/Meters Climb +/- - This is the total feet or meters up or down (based on incline and decline) that you have climbed.

geo
| Location | Value | | :--- | :--- | | LAP04 13:02 | 1300 | | Splits | 100 | | N | > | | C Incline | < 10 | | B Time | < 02:45 | | D Speed | 12.3 km/h |Screen Option 3
K. Pace - The number of minutes it takes to complete a mile or kilometer.
L. Lap - The number of 400 meter laps completed on a track.
M. Lap Time - Current lap time.
N. Splits - These are one lap splits. In this case a split is the time it took to complete a lap.
O. Heart Rate - Your measured heart rate using the hand pulse sensors located on the front handlebars, chest strap, or armband.
P. % Max Heart Rate - This is the percentage of your suggested max HR (220 - age).
Indicator icons:

Lube - Every 50 hours of use a pop-up window with a message to lubricate the treadmill belt will show up. This will happen once at 50 hours with the opportunity to choose "Remind me later" or "Done". If remind me later is chosen, the pop-up will show up again after another hour, with the same options. Once 55 hours is reached a pop-up will show up every time the home screen is displayed, until Done is selected. (Please refer to the Maintenance and tips section for lubrication instructions)

Cooling Fan - Indicates the fan is on - low, medium or high.

CAUTION: The Intelli-Guard feature will automatically be disengaged when the treadmill is operated at speeds under 1.0 mph (1.6 kph). If the speed is within this parameter "Step" will flash. When the "Step" is flashing, the treadmill will not automatically pause. If the speed is above 1.0 mph (1.6 kph) Intelli-Guard™ will not activate until 25 steps are taken and counted.

CAUTION: At 20 seconds the console will beep once per second for 5 seconds and then automatically pause the treadmill. These beeps are a notice that the treadmill belt is about to stop. If for some reason you are still on the treadmill when this occurs move your feet to the side rails and prepare for the belt to stop. The Intelli-Guard feature does not replace the use of your Safety Key or using proper precaution in stopping the treadmill when it is not in use.
Console Basics
Main Keyboard
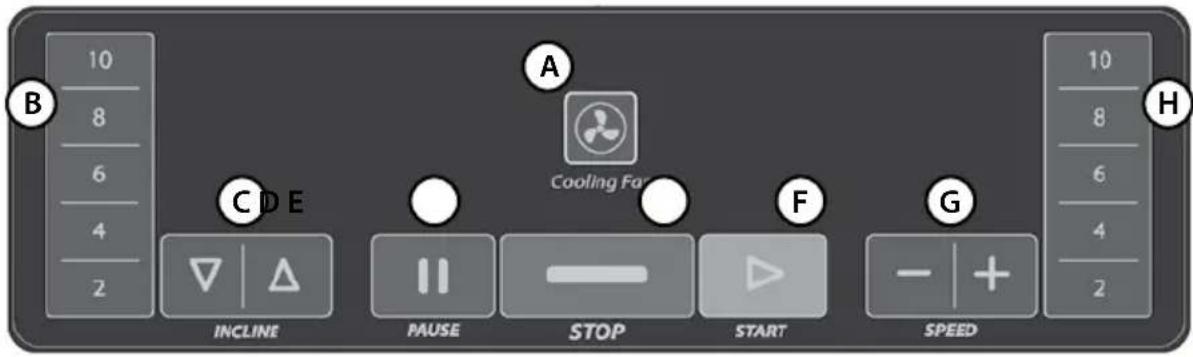
A. Cooling Fan - Operates the 3-speed fan in the front of the console.
B. Quickset ™ Incline - Select an incline level of 2, 4, 6, 8 or 10.
C. Incline - Raise and lower the running belt incline.
D. Pause - Pauses your workout. The pause time can be set up in equipment settings.
E. Stop - The Stop button will end your workout, taking you to a summary screen.
F. Start/QuickSTART - Begin a Manual Program with one touch.
G. Speed - Increase or decrease belt speed. Press once for 0.1 mph/kph.
H. Quickset ^TM Speed - Select a speed of 2, 4, 6, 8, 10 mph (2, 4, 6, 8, 10 kph).
Top Keyboard

A. Power – This button can be used to turn the console "on" from Energy Saving mode and to turn the console "off" when in Standby mode.
B. USB Charging Port - Charges most mobile devices.
NOTE: Make sure the main on/off switch, located at the front of the treadmill base (near the floor) is on.
Home Screen
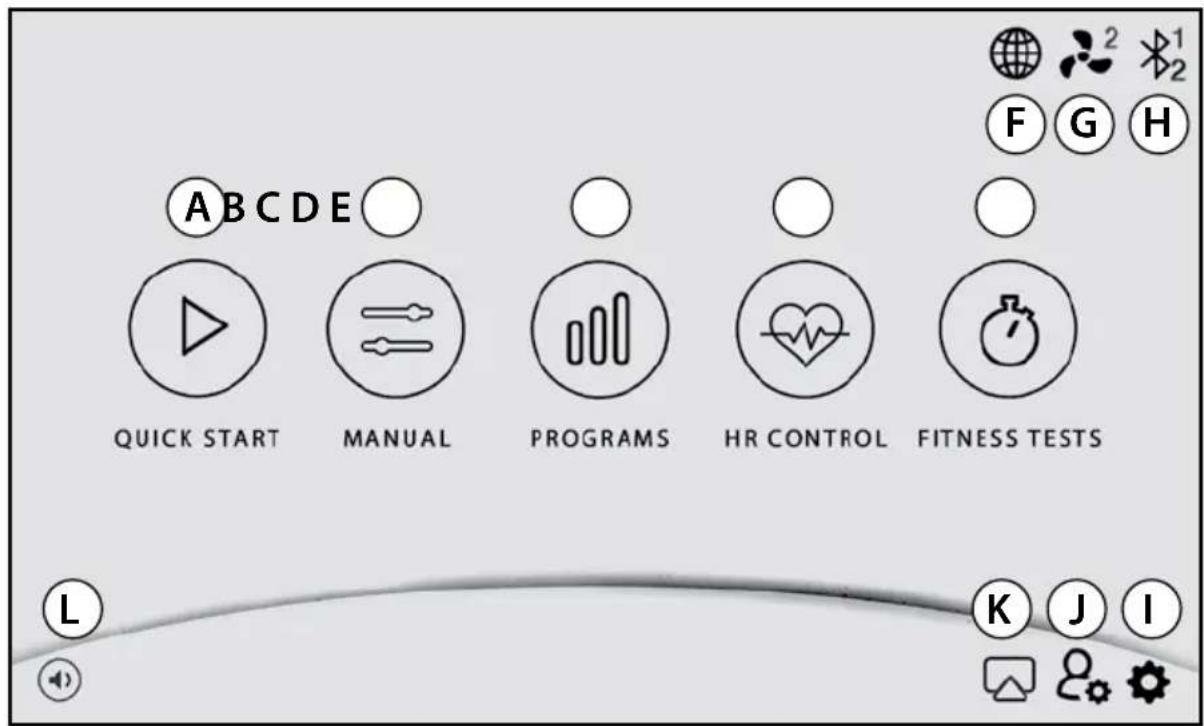
A. QuickSTART - This is a manual program that allows you to start and use whatever incline or speed you want for as long as you want to work out.
B. Manual - This program allows you to set a desired workout time as well as setting age and weight for an accurate calorie count and \% max HR readings.
C. Programs - These are preset programs where the console will control either speed or incline and you will control the other. You can choose whether you want the console to control incline or speed and then update weight, age and override the default program time if desired.
D. HR Control - There are two Heart Rate Control programs to choose from. Constant Heart Rate allows you to select a Constant Heart Rate for the console to adjust Speed or Incline (you get to choose whether the console controls speed or incline) to keep your Heart Rate at that constant number throughout the entire program. Interval Heart Rate Control allows you to select a high heart rate and a low heart rate. Again, you determine whether the console is to control the speed or the incline to get your HR to the desired numbers. The program will get your heart rate to the high number and keep it there for 2 minutes and then to the low number and keep it there for two minutes. The programs adjusts speed or incline to raise and lower your heart rate to the high and low numbers till the program time is finished. It is best to select a workout time of at least 30 minutes for best results.
Operations
E. Fitness Tests* - There are two Fitness tests that can be taken, the Rockport Fitness Test and Navy Fitness Test. The Rockport Fitness test is a test that requires you to walk 1 mile as quickly as you can without running. The Navy Fitness Test requires you to run 1.5 miles as quickly as you can.
F. Language Selection (TR5500iM only) - Tap to select preferred language of English or German.
G. Fan - Tap the fan button on the display when the unit is not running and adjust the fan speed. Fan settings are Off, 1, 2 and 3.
H. Bluetooth Icon - Activates Bluetooth system.
I. Equipment Settings - Adjust readout data in English or Metric units, and control several other settings. See page 41.
J. Personal Settings - Set your weight, age and gender for more accurate calorie count, % max heart rate readings and for Rockport Fitness test results.
K. Screencasting (TR5500iM only) - Cast media from your smart device to your treadmill screen. The instruction screen will guide you through the process.
L. Speaker Volume (TR5500iM only) - Press speaker and volume slider shows up on screen.
*Fitness Tests available with the TR4000i and TR5500iM only.
Personal Settings
The TR3000i, TR4000i and TR5500iM all come with the ability for you to personalize several console settings. To make adjustments to your personal settings, simply touch the Ⓐ。 Icon in the lower right corner of the touch screen.

- Weight - Enter your weight.
- Age - Enter your age. Press Next.
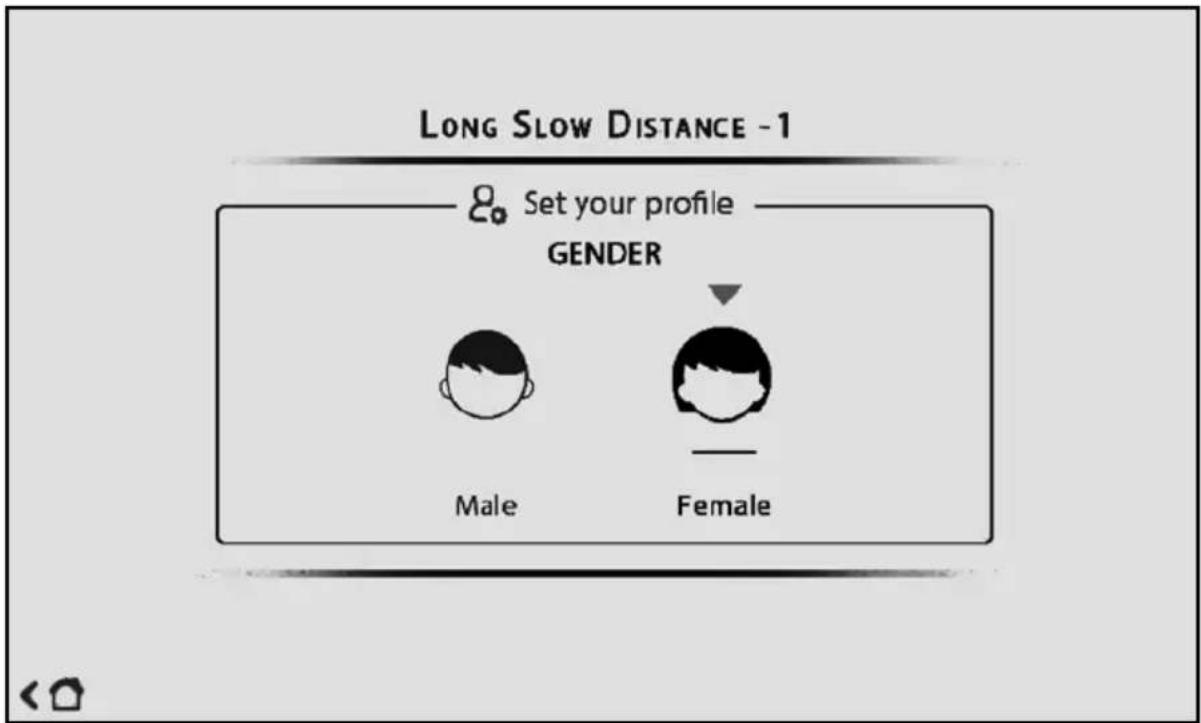
- Gender - Enter your gender.
Press the Home Icon in the lower left to return to the Home Screen.
Operations
Bluetooth Speaker or Heart Rate Strap Setup

Bluetooth Speaker Screen Step 2
To Set up your Bluetooth Speaker:
- Press the Bluetooth button on the home screen.
- Press the Mobile button.
- The console will say Ready to Pair.
- Open Bluetooth settings on your mobile device and search for devices.
- Select LifeSpanAUD_0000 – The last 4 digits are unique numbers – these numbers are just there so you can determine which treadmill you are trying to connect to if you have more than one treadmill in your home.
- Once your mobile device is paired to the console, the console will say Pair completed.
- Turn on your favorite music and start your workout.

To Set up your Bluetooth Heart Rate Chest Strap or Arm Band:

Bluetooth Heart Rate Screen Step 3
If you have purchased a Bluetooth Heart Rate Chest Strap or Arm Band from LifeSpan, the device should automatically connect based on proximity to the console. If for some reason a connection isn't found or for those using a Bluetooth device not purchased from LifeSpan please follow these steps:
- Press the Bluetooth button on the home screen.
- Press the HR Strap button.
- A pop-up screen showing active Bluetooth devices will be displayed.
- Select your Bluetooth device.
- The screen will show Connecting. Once connected the screen will go away.
Operations
Quick Start
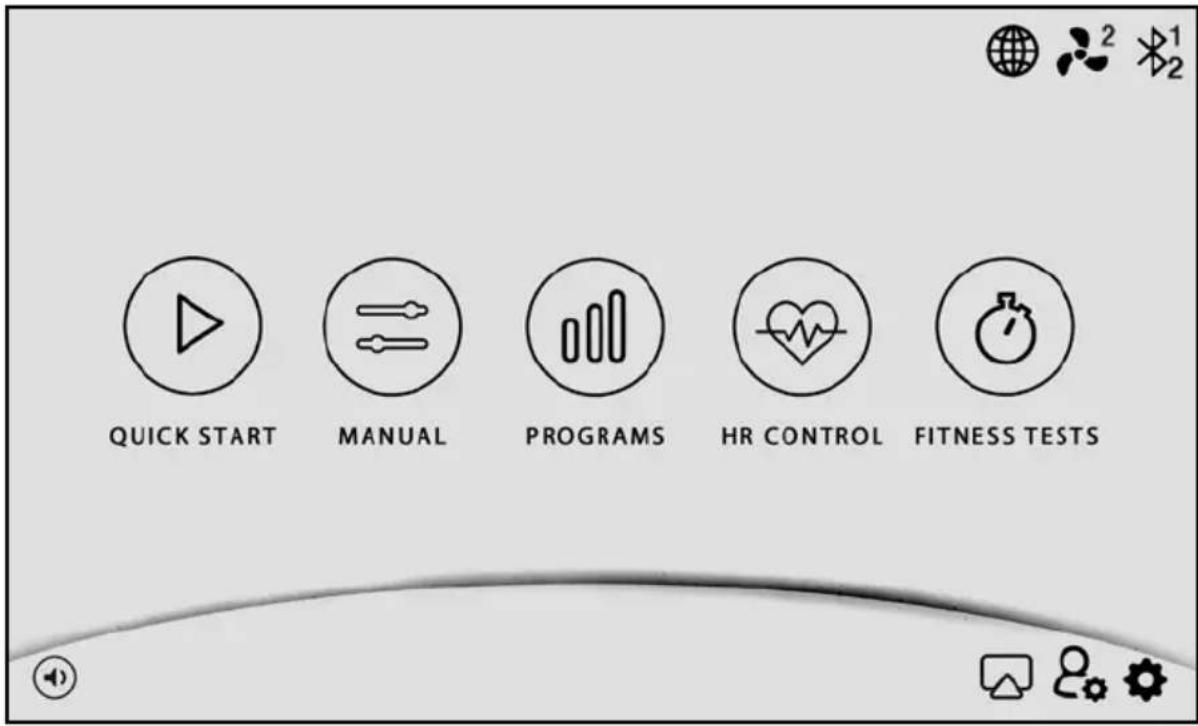
To just start working out without any setup, simply press the QuickSTART button on the home screen and a countdown will begin to start your workout.
When using QuickSTART, the time will count up from 0:00 keeping you fully in control of the speed and incline. When finished press Stop to go to the summary screen.
Operations
Manual Program
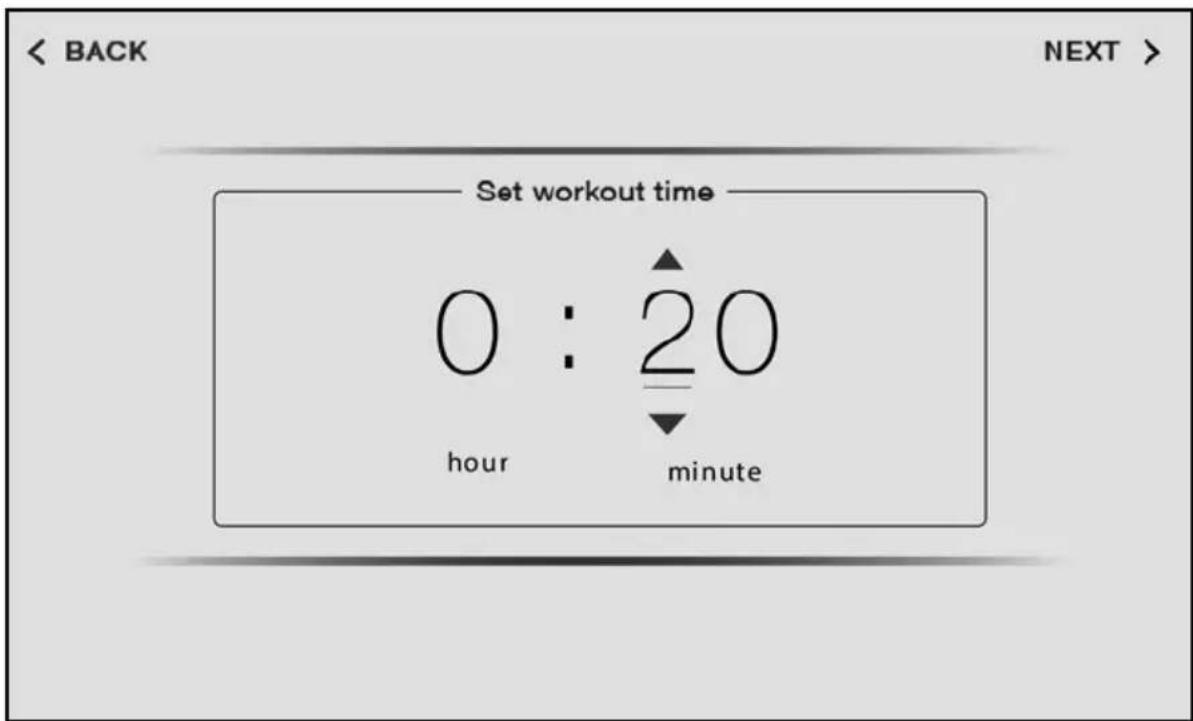
This is very similar to the QuickSTART program, but with this program you can set a workout time and setup personal settings to be sure to get an accurate calorie count. The program will end when your set time has been reached or the Stop button is pressed.
Manual Program Screen Step 2
- Press Manual on the touch screen.
- Set Workout time and press next.
- Set Weight and Age and press next.
- Press Start to begin workout.
- The treadmill will start at 0.5 mph and 0 incline.
- Adjust the speed and incline as needed.
- Once your set time is reached, the manual program will end, and a summary view will pop-up.
- You have the opportunity to go to the home screen.
Operations
Preset Programs
There are several programs available to help add structure and variety to your exercise program. These programs are grouped into 4 basic groups, Weight Loss, Sport Training, Healthy Living and Custom. All but the Custom Programs follow the steps below:

flowchart
graph TD
    A["Steady Pace"] --> B["Long Slow Distance- 2"]
    B --> C["Cardio Run"]
    C --> D["Short Interval- 2"]
    D --> E["Uphill Walk"]
    E --> F["Downhill: Decline"]
    F --> G["Weight Loss"]
    G --> H["Sport Training"]
    H --> I["Healthy Living"]
    I --> J["Custom"]
Programs Screen Step 1
- Select a program group by touching the group on the touch screen. By default Weight Loss is selected.
- Select a program within the selected group by touching the desired program and press next.
- Select Speed or Incline Mode – You can choose to run each program in either Speed or Incline mode. Simply touch speed or incline to select and press next.
- Set Program Level – There are 3 levels of intensity with each preset program (1 being the easiest and 3 being the most difficult). Simply touch the desired intensity level and press next.
- Set Time – Set the program Time of your workout. Use the touch screen to adjust the desired workout time and press next.
- Set Weight and age – Set your Weight for a more accurate calorie calculation. Also, set your age for heart rate calculations and press next.
- Press Start to begin workout.
Custom User Set-up Programs
There are 2 user programs that provide you with the ability to establish customized program profiles specific to your workout requirements. Once these programs are completed they are saved by the console and can be selected like any other preset program. Complete the following steps to set up a user program:

Manual Program Screen Step 3
- Select Programs from the touch screen.
- Select the Custom program group from the bottom of the screen.
- Select User 1 or User 2 and press next.
- Set Time – Set the amount of time that you would like to workout and press next.
- Set Weight and Age – Set your Weight for a more accurate calorie calculation. Also, set your age for heart rate calculations and press next.
Operations

bar
< Back CUSTOM -User2 INCLINE 00 SPEED 00.0 mile/h NEXT >Programs Screen Step 6
-
Set the desired Speed and Incline for each of the 20 segments in the workout. Simply touch the screen in each column or slide your finger up or down in the column to get to the desired Speed or incline. For Speed, there are up and down arrows at the top of the screen when the selected speed is being shown. Use these arrows to fine tune the speed in tenths of a mile/kilometer per hour. Speed is highlighted by default to adjust first. Once speed is selected for each segment, touch the Incline selection and adjust each of the 20 segments for incline. Switch back and forth between speed and incline until the desired speed and incline are selected. Once finished press next.
-
Press Start to begin workout.
HRC - Constant
The Constant Heart Rate program lets you select a single heart rate that you want to maintain throughout your workout and the treadmill will maintain this heart rate for you by either adjusting the speed or incline.

Showing Screen for Step 6
To use this program:
-
Select HR Control from the Home Screen.
-
Select Constant HR and press next.
-
Choose to have the program adjust Speed or Incline and press next. The treadmill will adjust the speed or incline every 10 seconds to keep you at your selected heart rate level. For instance, if you select the incline mode, there will be a 3-minute warm-up and then the incline will start to adjust each 10 seconds to obtain and maintain your target heart rate. You choose the speed that you want the belt to run and the treadmill will control the incline.
-
Set Time – Set the amount of time that you would like to work out and press next.
-
Set Weight and age – Set your Weight for a more accurate calorie calculation. Also, set your age for heart rate calculations and press next.
-
Select your constant Target Heart Rate and press next.
-
Press Start to begin workout.
Operations
HRC - Interval
The Interval Heart Rate program is designed to help you increase anaerobic endurance and improve heart rate recovery. The program lets you select both a High target heart rate and a Low recovery heart rate.
After a 3-minute warm-up, the console will adjust the incline or speed (your choice) every 10 seconds until you reach your High target heart rate. It will keep you there for 2 minutes. Then it will adjust incline or speed every 10 seconds to reduce your heart rate to your Low recovery level, then keep you there for 2 minutes. This repeats until the end of your workout.
It is recommended that you set the workout time to 30 minutes or longer to use this program effectively.

Showing Screen for Step 2
To use this program:
- Select HR Control from the Home Screen.
- Select Interval HR and press next.
- Choose to have the program adjust Speed or Incline and press next. The treadmill will adjust the speed or incline every 10 seconds to keep you at your selected heart rate level. For instance, if you select the incline mode, there will be a 3-minute warm-up and then the incline will start to adjust each 10 seconds to obtain and maintain your target heart rate. You choose the speed

Showing Screen for Step 5
that you want the belt to run and the treadmill will control the incline.
- Set Time – Set the amount of time that you would like to work out and press next.
- Set Weight and Age – Set your Weight for a more accurate calorie calculation. Also, set your age for heart rate calculations and press next.
- Select your Target Low and High Heart Rate and press next.
- Press Start to begin workout.

WARNING: Heart rate monitoring may be inaccurate. Over exercising may result in serious injury or death. If you feel faint stop exercising immediately.
Operations
Summary
When your workout is finished, or stop is pressed, a Summary screen will be displayed.

Summary Screen
A. Pace - The average number of minutes it took to complete a mile or kilometer.
B. Time – The total workout time.
C. Calories – Total Calories burned.
D. Max Speed – The highest speed achieved during the workout.
E. Distance - The total distance traveled in during the workout in Miles or Kilometers.
F. Max Heart Rate - The highest heart rate reading during the workout.
G. Avg. Heart Rate - The average of heart rate readouts throughout the workout.
H. % Max Heart Rate - This is the percentage of your suggested max HR (220 - age).
1. Elevation +/- - The number of feet or meters climbed and descended during the workout.
J. Step Count – The total number of steps taken during the workout.
Operations
K. Sync Data – Allows you to sync your workout data with your LifeSpan app.
- Download the LifeSpan app from the App Store or Google Play.
- Sign in to the app.
- Press the Sync Data button.
- Hold your phone next to the console.
- The workout data will sync to the app and the console will reset to the home screen.
Operations
Screencasting (TR5500iM Only)
Screencasting is the term being used to describe the process of watching videos on your treadmill by casting them from your smart device.
Getting Started
On the home screen press this icon located on the bottom right.
Instruction Screen
This screen is divided into two parts, Setup and Go.

Instruction Screen
Setup
This process uses your phone as a tool to help the treadmill setup its wifi connection.
This setup process needs to be done only once. You can repeat this process in the future if you would like to reselect a different wifi signal for your treadmill.
Step 1: Connect your smart device to the treadmill by opening up your wifi settings. Look for a network that starts with the name EZCast. The full name of the EZCast signal will appear on your treadmill screen. Make this selection on your smart device. If needed, use the password that is displayed on your treadmill screen to finish establishing the link between your smart device and the treadmill. When complete a checkmark will appear on screen.
Step 2: The second part of the setup process starts automatically. The treadmill will look for a wifi signal and connect to it. When done, a checkmark will appear on your screen. To see which signal the treadmill has connected to, open the browser on your smart device and type in the IP address that is displayed on the screen of your treadmill.
This will open up a web page that allows you to see and change the wifi signal your treadmill is using. Tap the row selection for internet and a dropdown menu will show you what other wifi options you have to choose from.
Please note that this second part of the setup process changes the wifi signal your treadmill is using. Repeat the process of using the IP address in the browser of your smart device. You can revisit this process and reselect the treadmill's wifi signal anytime.
After you have completed Setup, open your wifi settings again on your smart device and reselect the original wifi signal you had before.
Using your smart device as a wifi source: If you treadmill is not able to find a wifi signal you can use your smart device as the source. Keep your smart device's wifi network connected to the treadmills EZCast signal. Please be aware that this may use your cellular data if your smart device is not connected to wifi.
Go
Select the screencasting icon on your smart device to start watching videos on your treadmill. Different terms are used by different brands to describe screencasting.
iPhone: Screen Mirroring
Samsung: Smart View
Google/Android: Cast
If you are not familiar with the terminology your smart device uses for screencasting, do a quick search on the internet to find out.
After you have selected the screencasting icon on your device, select the EZCast signal. This will establish a connection from your smart device to the treadmill. The screen of your smart device will now show up on your treadmill's screen.
Operations
Screencast Faster
Now that you have the basics down, let's put it to the test.
With Setup completed, you can skip directly to the Go section. Locate the screencast icon on your smart device, open it, and select the EZCast signal.
The screen of your smart device will show up on the treadmill's screen.

WARNING: It is advised that you setup screencasting before starting any type of workout. Trying to set up screencasting while walking or running may result in injury.
Safe Workouts
Before starting your workout, setup screencasting first.
When you begin your workout you will see a play button on the right side of your treadmill's console screen. Tap this button and your video will show up while still being able to see your workout information overlayed on the top and bottom of the screen.
Tap it again and your workout stats will disappear while the video occupies the full screen of your treadmill. To get your stats back press the button again.
On the left side of your screen is a red button that will restore your full workout screen. If you'd like to see your video again, just press the play button on the right side of the screen.
This provides alternative ways to check on your workout progress when you want, and get back to your video.

WARNING: When your workout is done, wait for the treadmill belt to come to a complete stop before stopping the video on your smart device.
When Your Workout Is Complete
When you are done with your workout wait for the treadmill belt to come to a complete stop before you:
- Stop playing videos on your smart device.
- Stop screencasting from your smart device.
Operations
Hand Pulse Sensors
To use, grasp the sensors with a comfortable grip, with the palms of your hands placed over the sensors. If the sensors are having difficulty picking up your heart rate, use aloe or a moisturizer on your hands or further warm up as you exercise to increase the moisture in your hands. Dry hands do not transfer your pulse as effectively as moist hands.

natural_image
Top-down view of a car's front dashboard showing two connected plug connectors (no text or symbols visible)Chest Strap
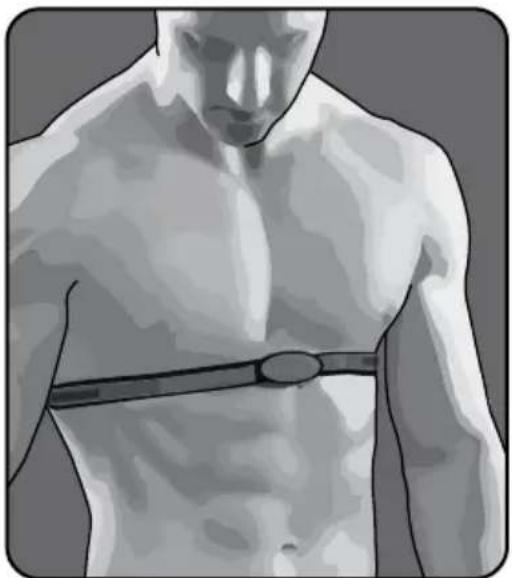
All three of the treadmill models covered in this Owner's Manual have integrated bluetooth heart rate receivers built into the console.
The chest strap should be worn as shown. When using a chest strap you may need to warm-up first to increase the moisture in your skin. If this doesn't work, use aloe or another moisturizer where the sensors on the chest strap are making contact with your skin.
natural_image
Illustration of a human torso with a belt and headband (no text or symbols)
natural_image
Illustration of a life span device with a circular logo and handle (no text or symbols on the device itself)NOTE: The heart rate monitoring system will vary due to your age, method of use, physiology and other factors. LifeSpan cannot guarantee the accuracy of the heart rate readings.
Equipment Settings
The TR3000i, TR4000i and TR5500iM all come with the ability for you to customize several console settings. To make these adjustments simply touch the icon in the lower right corner of the touch screen.
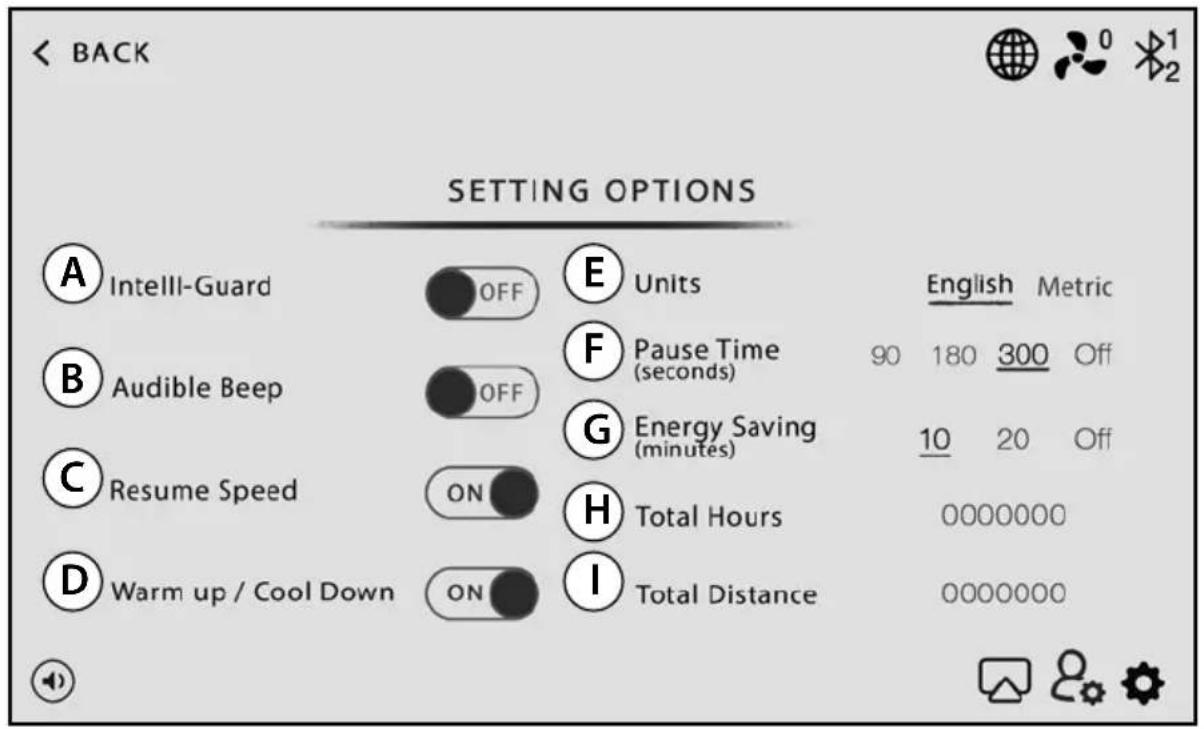
Personal Settings Screen
A. Intelli-Guard™ - This feature is triggered when the treadmill senses you are no longer walking or running. For safety purposes it automatically pauses the belt to avoid accidental falls resulting in possible injury. There are several factors that affect the accuracy of this feature including your walking style, weight and usage characteristics. While we don't recommend it, this feature can be turned off if required.
B. Audible Beep - Turns off the audible alert that beeps for speed and incline changes or when the treadmill is starting or stopping.

WARNING: The audible alert is turned on from the manufacturer to warn you that the treadmill is starting or the speed is changing. Turning this alert off is done at the sole discretion of you.
C.ResumeSpeed: Turning resume speed on allows the treadmill to restart (after a pause) at the same speed it was going prior to pressing pause. When turned off, the speed resumes at the minimum speed, usually around 0.5 mph/0.8 kph.
Operations
D. Warm up/Cool Down: This feature automatically adds a 3 minute warm-up and 3 minute cool down to the Treadmill Preset Programs. It is turned on by default, but if the warm up/cool down feature is not desired, simply turn it off.
E. English or Metric - Used for both Speed and Distance in miles or kilometers shown on the display.
F. Pause Time - The number of seconds the treadmill will Pause before going into Standby Mode or to the home screen. This feature can also be turned off entirely. If turned off, the treadmill will not go into energy saving mode while the treadmill is paused.
G. Energy Savings - Turn Energy Saving On or Off. Energy saving mode will shut down most electronics on the treadmill, which in turn conserves energy.
H. Total Hours - The total number of hours the treadmill has been run.
I. Total Distance - The total number of miles/kilometers the treadmill has run.
Program Profiles
Remember, if you simply get on your treadmill and go at the same pace, for the same amount of time everyday your body will only improve to the level of the workouts you are pushing yourself to do. To help get the most out of your time spent exercising, LifeSpan treadmills include a full range of workout programs. All programs are available in either "Speed" or "Incline" mode with 3 levels of intensity that you select during program set-up. When the "Speed" mode is selected, the belt speed will vary during your workout while the incline level stays constant. In "Incline" mode the speed remains constant while the incline is adjusted by the program. In either mode you have full control of the setting that is not being controlled by the program.
To complement these preset programs you also can use either of the 2 types of heart rate training programs or design your own program.
The treadmills have a three-minute warm-up and cool down to the preset programs. It starts at 3 mph (for warm up) or 2.5 mph (for cool down), but you have full control over the speed. To skip warm-up, press Start. To skip cool down, press Stop. The distance, steps, time, and calories you accumulate in warm-up and cool down are not counted in your workout totals.
Preset Programs
Long Slow Distance
(40 minutes default)

natural_image
Abstract black bar pattern on white background (no text or symbols)Long slow distance is a great workout
for anyone! Beginners can ease into their exercise program and should include a long slow distance workout each week to maximize overall cardiovascular endurance development. Long slow distance workouts are also great for experienced exercisers on days following a harder, higher intensity workout.
Short Interval
(20 minute default)

Short intervals are ideal for beginning
exercisers that want to start gaining the benefits of interval workouts but aren't quite ready for a longer-intensity interval workout. Short intervals are also ideal for experienced exercisers to develop their speed and anaerobic fitness. Remember, it's important to vary exercise intensity and duration to maximize overall fitness development so be sure to include some interval workouts at least once a week.
Operations
Moderate Interval
(30 minute default)

bar
| Category | Value | |---|---| | 1 | 3 | | 2 | 4 | | 3 | 5 | | 4 | 6 | | 5 | 7 | | 6 | 8 | | 7 | 9 | | 8 | 10 | | 9 | 11 | | 10 | 12 | | 11 | 13 | | 12 | 14 | | 13 | 15 | | 14 | 16 | | 15 | 17 | | 16 | 18 | | 17 | 19 | | 18 | 20 | | 19 | 21 | | 20 | 22 | | 21 | 23 | | 22 | 24 | | 23 | 25 | | 24 | 26 | | 25 | 27 | | 26 | 28 | | 27 | 29 | | 28 | 30 | | 29 | 31 | | 30 | 32 | | 31 | 33 | | 32 | 34 | | 33 | 35 | | 34 | 36 | | 35 | 37 | | 36 | 38 | | 37 | 39 | | 38 | 40 | | 39 | 41 | | 40 | 42 | | 41 | 43 | | 42 | 44 | | 43 | 45 | | 44 | 46 | | 45 | 47 | | 46 | 48 | | 47 | 49 | | 48 | 50 | | 49 | 51 | | 50 | 52 | | 51 | 53 | | 52 | 54 | | 53 | 55 | | 54 | 56 | | 55 | 57 | | 56 | 58 | | 57 | 59 | | 58 | 60 | | 59 | 61 | | 60 | 62 | | 61 | 63 | | 62 | 64 | | 63 | 65 | | 64 | 66 | | 65 | 67 | | 66 | 68 | | 67 | 69 | | 68 | 70 | | 69 | 71 | | 70 | 72 | | 71 | 73 | | 72 | 74 | | 73 | 75 | | 74 | 76 | | 75 | 77 | | 76 | 78 | | 77 | 79 | | 78 | 80 | | 79 | 81 | | 80 | 82 | | 81 | 83 | | 82 | 84 | | 83 | 85 | | 84 | 86 | | 85 | 87 | | 86 | 88 | | 87 | 89 | | 88 | 90 | | 89 | 91 | | 90 | 92 | | 91 | 93 | | 92 | 94 | | 93 | 95 | | 94 | 96 | | 95 | 97 | | 96 | 98 | | 97 | 99 | | Note: The actual values in the 'Value' column are not explicitly provided in the code. The 'Number' in the 'Number' column is not explicitly labeled in the code.As you begin to exercise on a regular
basis and feel your fitness improving you will be ready to begin doing “Moderate Intensity Interval” workouts. Remember in this workout you alternate between an easy recovery interval and a higher intensity interval. You should feel comfortable to push yourself as you are never too far away from an easier recovery interval. This workout will improve your overall aerobic endurance while also maximizing anaerobic fitness development.
Long Interval
(40 minute default)

natural_image
Abstract black bar pattern on white background (no text or symbols)Long Interval workouts are great to
maximize calorie burn and improve anaerobic fitness. As in the moderate interval workouts, remember you have a recovery period after each higher intensity interval so you can comfortably push yourself to exercise at a progressively higher level.
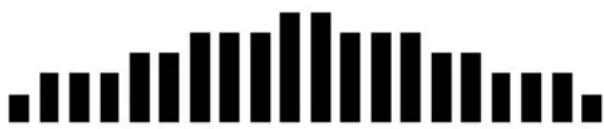
Negative Interval 1
(30 minute default)
bar
| Category | Value | |---|---| | 1 | 2 | | 2 | 4 | | 3 | 4 | | 4 | 4 | | 5 | 6 | | 6 | 7 | | 7 | 8 | | 8 | 9 | | 9 | 10 | | 10 | 10 | | 11 | 8 | | 12 | 7 | | 13 | 6 | | 14 | 5 | | 15 | 5 | | 16 | 4 | | 17 | 3 |The Negative Interval-1 workout
provides the benefits of a steady pace workout but pushes you to slowly obtain a progressively higher steady state exercise intensity and then allows you to slowly decrease the exercise intensity. As your fitness level improves, you can slowly push yourself to a higher peak in overall exercise intensity.
Negative Interval 2
(30 minute default)

bar
| Category | Value | |---|---| | 1 | 2 | | 2 | 3 | | 3 | 4 | | 4 | 5 | | 5 | 6 | | 6 | 7 | | 7 | 8 | | 8 | 9 | | 9 | 10 | | 10 | 11 | | 11 | 12 | | 12 | 13 | | 13 | 14 | | 14 | 15 | | 15 | 16 | | 16 | 17 | | 17 | 18 | | 18 | 19 | | 19 | 20 | | 20 | 21 | | 21 | 22 | | 22 | 23 | | 23 | 24 | | 24 | 25 | | 25 | 26 | | 26 | 27 | | 27 | 28 | | 28 | 29 | | 29 | 30 | | 30 | 31 | | 31 | 32 | | 32 | 33 | | 33 | 34 | | 34 | 35 | | 35 | 36 | | 36 | 37 | | 37 | 38 | | 38 | 39 | | 39 | 40 | | 40 | 41 | | 41 | 42 | | 42 | 43 | | 43 | 44 | | 44 | 45 | | 45 | 46 | | 46 | 47 | | 47 | 48 | | 48 | 49 | | 49 | 50 | | 50 | 51 | | 51 | 52 | | 52 | 53 | | 53 | 54 | | 54 | 55 | | 55 | 56 | | 56 | 57 | | 57 | 58 | | 58 | 59 | | 59 | 60 | | 60 | 61 | | 61 | 62 | | 62 | 63 | | 63 | 64 | | 64 | 65 | | 65 | 66 | | 66 | 67 | | 67 | 68 | | 68 | 69 | | 69 | 70 | | 70 | 71 | | 71 | 72 | | 72 | 73 | | 73 | 74 | | 74 | 75 | | 75 | 76 | | 76 | 77 | | 77 | 78 | | 78 | 79 | | 79 | 80 | | 80 | 81 | | 81 | 82 | | 82 | 83 | | 83 | 84 | | 84 | 85 | | 85 | 86 | | 86 | 87 | | 87 | 88 | | 88 | 89 | | 89 | 90 | | 90 | 91 | | 91 | 92 | | 92 | 93 | | 93 | 94 | | 94 | 95 | | 95 | 96 | | 96 | 97 | | 97 | 98 | | 98 | 99 | | Note: The actual values in the 'Value' column are not provided in the code. The 'Number' is estimated based on the 'Number' value in the 'Number' column. There is only one data point for 'Number' in the 'Number' column. The 'Value' values are estimated based on the 'Value' column.The Negative Interval-2 workout has
been designed to provide your body with a workout that begins with a slight increase in exercise intensity and ends with a progressive decrease in intensity. A workout with an increase and decrease in intensity will most ideally develop your overall aerobic cardiovascular endurance. A workout that decreases in intensity is also ideal for maximizing calorie burn, but most ideally when done for a longer duration, such as 40 or 50 minutes.
Fartlek
(30 minute default)
Varying your exercise intensity with a constantly changing interval workout that starts out at an easy pace and then increases to a moderate or higher intensity pace will add variety into your workouts, make workouts go by faster and provide great fitness benefits. Constantly varying intensities in a workout have been found in brain research to have great benefits on improving overall brain fitness.

bar
| Category | Value | |---|---| | 1 | 2 | | 2 | 4 | | 3 | 6 | | 4 | 8 | | 5 | 6 | | 6 | 9 | | 7 | 7 | | 8 | 7 | | 9 | 4 | | 10 | 5 | | 11 | 2 | | 12 | 9 | | 13 | 5 | | 14 | 3 | | 15 | 5 | | 16 | 7 | | 17 | 9 | | 18 | 7 | | 19 | 4 | | 20 | 3 | | 21 | 2 |Uphill Climb
(30 minute default)
Gradually increase the intensity of your exercise with this fun uphill climb workout. The goal of the uphill climb is to stimulate your body to improve overall cardiovascular fitness while maximizing muscle cell development in working muscles. You will maximize calorie burn during the peak levels while allowing your body to exercise longer and still benefit from the higher intensity as you slow down and return to your starting level.

Pyramid Climb
(30 minute default)
Gradual increases in intensity is ideal to stimulate your body to improve overall cardiovascular fitness, while also maximizing muscle cell development in working muscles. You will maximize overall calorie burn during the peak intensity levels while allowing your body to exercise for a longer duration and still benefit from the higher intensity as you gradually slowdown.

bar
| Category | Value | |---|---| | 1 | 2 | | 2 | 3 | | 3 | 4 | | 4 | 5 | | 5 | 6 | | 6 | 7 | | 7 | 8 | | 8 | 9 | | 9 | 10 | | 10 | 11 | | 11 | 12 | | 12 | 13 | | 13 | 14 | | 14 | 15 | | 15 | 16 | | 16 | 17 | | 17 | 18 | | 18 | 19 | | 19 | 20 | | 20 | 21 | | 21 | 22 | | 22 | 23 | | 23 | 24 | | 24 | 25 | | 25 | 26 | | 26 | 27 | | 27 | 28 | | 28 | 29 | | 29 | 30 | | 30 | 31 | | 31 | 32 | | 32 | 33 | | 33 | 34 | | 34 | 35 | | 35 | 36 | | 36 | 37 | | 37 | 38 | | 38 | 39 | | 39 | 40 | | 40 | 41 | | 41 | 42 | | 42 | 43 | | 43 | 44 | | 44 | 45 | | 45 | 46 | | 46 | 47 | | 47 | 48 | | 48 | 49 | | 49 | 50 | | 50 | 51 | | 51 | 52 | | 52 | 53 | | 53 | 54 | | 54 | 55 | | 55 | 56 | | 56 | 57 | | 57 | 58 | | 58 | 59 | | 59 | 60 | | 60 | 61 | | 61 | 62 | | 62 | 63 | | 63 | 64 | | 64 | 65 | | 65 | 66 | | 66 | 67 | | 67 | 68 | | 68 | 69 | | 69 | 70 | | 70 | 71 | | 71 | 72 | | 72 | 73 | | 73 | 74 | | 74 | 75 | | 75 | 76 | | 76 | 77 | | 77 | 78 | | 78 | 79 | | 79 | 80 | | 80 | 81 | | 81 | 82 | | 82 | 83 | | 83 | 84 | | 84 | 85 | | 85 | 86 | | 86 | 87 | | 87 | 88 | | 88 | 89 | | 89 | 90 | | 90 | 91 | | 91 | 92 | | 92 | 93 | | 93 | 94 | | 94 | 95 | | 95 | 96 | | 96 | 97 | | 97 | 98 | | 98 | 99 | | Note: The actual values in the 'Value' column are not explicitly provided in the code. The 'Number' is calculated based on the 'Value' column. It's based on the 'Number' column as it's the sum of the 'Value' columns. There is only one value represented by the 'Number' column.Plateau Climb
(40 minute default)
A plateau climb workout will provide you with all the benefits of other steady state workouts, but push you to maintain a higher steady state exercise level. As you improve your overall health and fitness you can slowly push to a higher overall intensity for longer periods of time.

bar
| Category | Value | |---|---| | 1 | 3 | | 2 | 4 | | 3 | 6 | | 4 | 8 | | 5 | 10 | | 6 | 10 | | 7 | 10 | | 8 | 10 | | 9 | 10 | | 10 | 10 | | 11 | 10 | | 12 | 10 | | 13 | 8 | | 14 | 6 | | 15 | 4 | | 16 | 3 |Operations
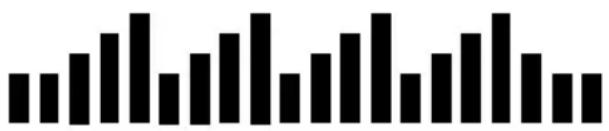
Ladder
(30 minute default)
One of the greatest benefits of exercise are the direct benefits
bar
| Category | Value | |---|---| | 1 | 10 | | 2 | 10 | | 3 | 15 | | 4 | 20 | | 5 | 10 | | 6 | 15 | | 7 | 20 | | 8 | 10 | | 9 | 15 | | 10 | 20 | | 11 | 10 | | 12 | 15 | | 13 | 20 | | 14 | 10 | | 15 | 15 | | 16 | 20 | | 17 | 10 | | 18 | 15 | | 19 | 20 | | 20 | 10 | | 21 | 15 | | 22 | 20 | | 23 | 10 | | 24 | 15 | | 25 | 20 | | 26 | 10 | | 27 | 15 | | 28 | 20 | | 29 | 10 | | 30 | 15 | | 31 | 20 | | 32 | 10 | | 33 | 15 | | 34 | 20 | | 35 | 10 | | 36 | 15 | | 37 | 20 | | 38 | 10 | | 39 | 15 | | 40 | 20 | | 41 | 10 | | 42 | 15 | | 43 | 20 | | 44 | 10 | | 45 | 15 | | 46 | 20 | | 47 | 10 | | 48 | 15 | | 49 | 20 | | 50 | 10 | | 51 | 15 | | 52 | 20 | | 53 | 10 | | 54 | 15 | | 55 | 20 | | 56 | 10 | | 57 | 15 | | 58 | 20 | | 59 | 10 | | 60 | 15 | | 61 | 20 | | 62 | 10 | | 63 | 15 | | 64 | 20 | | 65 | 10 | | 66 | 15 | | 67 | 20 | | 68 | 10 | | 69 | 15 | | 70 | 20 | | 71 | 10 | | 72 | 15 | | 73 | 20 | | 74 | 10 | | 75 | 15 | | 76 | 20 | | 77 | 10 | | 78 | 15 | | 79 | 20 | | 80 | 10 | | 81 | 15 | | 82 | 20 | | 83 | 10 | | 84 | 15 | | 85 | 20 | | 86 | 10 | | 87 | 15 | | 88 | 20 | | 89 | 10 | | 90 | 15 | | 91 | 20 | | 92 | 10 | | 93 | 15 | | 94 | 20 | | 95 | 10 | | 96 | 15 | | 97 | 20 | | 98 | 10 | | 99 | 15 | | Note: The actual values may vary due to the random nature of the data generation. The provided values are just an example.exercise has on the heart and cardiovascular system. The heart health ladder has been specifically designed to provide your heart and cardiovascular system with a series of progressively harder exercise intensity's that will improve your overall aerobic endurance, while also stimulating anaerobic endurance. Remember that it may be challenging for a few minutes, but each progression has been carefully designed to provide recovery intervals so you can push to improve your cardiovascular fitness.
Uphill Interval
(20 minute default)

bar
| Item | Value | |---|---| | 1 | 10 | | 2 | 15 | | 3 | 12 | | 4 | 18 | | 5 | 14 | | 6 | 16 | | 7 | 13 | | 8 | 19 | | 9 | 15 | | 10 | 17 | | 11 | 16 | | 12 | 14 | | 13 | 18 | | 14 | 15 | | 15 | 17 | | 16 | 16 | | 17 | 15 | | 18 | 18 | | 19 | 16 | | 20 | 17 |Uphill Interval workouts are unique
in that they provide your body with the benefits of an interval workout, with the added benefits of gradually increasing the overall intensity. In this workout you should begin at a level that is comfortable and then increase the intensity during each maximum interval, pushing to a slightly higher intensity each time. You will get maximum overall calorie burn during of the higher intensity intervals, while at the same time working on improving your overall anaerobic fitness.
Steady Pace
(40 minute default)

natural_image
Abstract pattern of black vertical bars on white background (no text or symbols)Improve your fitness while also simulating your body to burn more fat with this workout. Steady pace workouts are great for helping you establish an improved overall endurance base. Most “Steady Pace” workouts focus on maintaining one set workload throughout the entire workout. Your goal is to be sure you are exercising within a low moderate intensity to a high moderate intensity during the workout.
Long Slow Distance 2
(40 minute default)

natural_image
Abstract pattern of black vertical bars on white background (no text or symbols)Compared to the long slow distance 1
program, this workout expedites the rate of increasing exertion, allowing for more workout time to be spent at higher levels of intensity.
Cardio Run
(20 minute default)

bar
| Category | Value | |---|---| | 1 | 3 | | 2 | 4 | | 3 | 5 | | 4 | 6 | | 5 | 7 | | 6 | 8 | | 7 | 9 | | 8 | 10 | | 9 | 11 | | 10 | 12 | | 11 | 13 | | 12 | 14 | | 13 | 15 | | 14 | 16 | | 15 | 17 | | 16 | 18 | | 17 | 19 | | 18 | 20 | | 19 | 21 | | 20 | 22 | | 21 | 23 | | 22 | 24 | | 23 | 25 | | 24 | 26 | | 25 | 27 | | 26 | 28 | | 27 | 29 | | 28 | 30 | | 29 | 31 | | 30 | 32 | | 31 | 33 | | 32 | 34 | | 33 | 35 | | 34 | 36 | | 35 | 37 | | 36 | 38 | | 37 | 39 | | 38 | 40 | | 39 | 41 | | 40 | 42 | | 41 | 43 | | 42 | 44 | | 43 | 45 | | 44 | 46 | | 45 | 47 | | 46 | 48 | | 47 | 49 | | 48 | 50 | | 49 | 51 | | 50 | 52 | | 51 | 53 | | 52 | 54 | | 53 | 55 | | 54 | 56 | | 55 | 57 | | 56 | 58 | | 57 | 59 | | 58 | 60 | | 59 | 61 | | 60 | 62 | | 61 | 63 | | 62 | 64 | | 63 | 65 | | 64 | 66 | | 65 | 67 | | 66 | 68 | | 67 | 69 | | 68 | 70 | | 69 | 71 | | 70 | 72 | | 71 | 73 | | 72 | 74 | | 73 | 75 | | 74 | 76 | | 75 | 77 | | 76 | 78 | | 77 | 79 | | 78 | 80 | | 79 | 81 | | 80 | 82 | | 81 | 83 | | 82 | 84 | | 83 | 85 | | 84 | 86 | | 85 | 87 | | 86 | 88 | | 87 | 89 | | 88 | 90 | | 89 | 91 | | 90 | 92 | | 91 | 93 | | 92 | 94 | | 93 | 95 | | 94 | 96 | | 95 | 97 | | 96 | 98 | | 97 | 99 | | Note: The actual values for 'Value' are not provided in the code. The 'Number' is calculated based on the number of categories and the corresponding value. There is only one data series in this case. The values for 'Number' are estimated based on the 'Value' in the code format. (The image contains only the labels and the 'Number' values.)Cardio run is a steady pace workout but at a higher intensity than "Long Slow Distance". Cardio run is a more advanced workout, designed to motivate you to achieve a more challenging steady pace and maintain that pace for the full duration of the workout. Cardio Run is a great workout if you are training for a special event.
Short Interval 2
(20 minute default)

bar
| Category | Value | |---|---| | 1 | 2 | | 2 | 4 | | 3 | 6 | | 4 | 8 | | 5 | 6 | | 6 | 7 | | 7 | 6 | | 8 | 8 | | 9 | 6 | | 10 | 7 | | 11 | 6 | | 12 | 8 | | 13 | 6 | | 14 | 7 | | 15 | 6 | | 16 | 8 | | 17 | 6 | | 18 | 7 | | 19 | 6 | | 20 | 8 |Short interval workouts have been
found in research studies to be ideal for those striving to lose weight and improve cardiovascular fitness. Varying exercise intensity from a moderately slow level to a high intensity for a set period of time and repeating that progression for a complete workout will maximize the number of calories burned. The short interval recovery periods allows the body to more successfully exercise at a higher intensity than might otherwise be comfortable for a complete workout duration.
Uphill Walk
(30 minute default)
The uphill walk gradually increases the intensity of your exercise peaking

bar
| Category | Value | |---|---| | 1 | 1 | | 2 | 1 | | 3 | 2 | | 4 | 2 | | 5 | 2 | | 6 | 3 | | 7 | 3 | | 8 | 4 | | 9 | 4 | | 10 | 5 | | 11 | 6 | | 12 | 7 | | 13 | 8 | | 14 | 9 | | 15 | 9 | | 16 | 7 | | 17 | 5 | | 18 | 4 |at a high intensity. The goal of the uphill workout is to stimulate your body to improve overall cardiovascular fitness, while also maximizing muscle cell development. The uphill walk has been designed to start slow and gradually increase to a peak intensity then with a quick decrease back to a recovery level. You will maximize calorie burn during the peak intensity levels while allowing your body to exercise for longer periods.
Hills: Decline -
TR4000i and TR5500iM Only

natural_image
Abstract black bar pattern on white background (no text or symbols)(30 minute default)
Gentle shifts between uphill and downhill incline settings, suitable for those new to treadmill incline/decline running.
Short Interval: Decline -
TR4000i and TR5500iM Only

natural_image
Abstract black bar pattern on white background (no text or symbols)(30 minute default) The most challenging of the decline workouts. Transitions occur rapidly between varying levels of incline and decline, with short recovery times provided between changes.
Operations
Downhill Repeats: Decline
TR4000i and TR5500iM Only
(30 minute default)

natural_image
Abstract black bar pattern on white background (no text or symbols)Similar to short interval decline, but with consistent incline and decline levels and extended recovery times between changes.
Custom User Programs
There are two user programs that provide you with the ability to build custom program profiles for your specific workout requirements. In custom user programs you set the workout time and then for each of the 20 program segments you set the speed and incline. This program is different than our preset programs in that both speed and incline can be controlled simultaneously. As such, the program matrix display readout will show both incline and speed at the same time. The speed and incline are represented in different colors so they are easy to see.
NOTE: Remember that the console needs to receive your heart rate through the grip pulse or a heart rate chest strap during the course of the workout.
Maintenance and Tips
Heart Rate Monitoring

bar_stacked
| AGE | 194 | 174 | 155 | 133 | 116 | |---|---|---|---|---|---| | 20 | 194 | 174 | 155 | 135 | 116 | | 25 | 190 | 171 | 152 | 133 | 114 | | 30 | 187 | 167 | 149 | 131 | 112 | | 35 | 183 | 165 | 147 | 128 | 110 | | 40 | 180 | 162 | 144 | 126 | 108 | | 45 | 177 | 159 | 141 | 124 | 106 | | 50 | 173 | 156 | 139 | 121 | 104 | | 55 | 170 | 153 | 136 | 119 | 102 | | 60 | 167 | 150 | 133 | 117 | 100 | | 65 | 163 | 147 | 131 | 114 | 98 |Seeing your heart rate while exercising will help you understand the intensity of your exercise and corresponding heart rate training zone, and predict health benefits found through repeated bouts of exercise. Refer to the information below to understand your heart rate training zones:
Zone 5 — Performance Redline Zone: 90% - 100% of your Max HR
The performance zone involves extreme effort, requiring the heart to beat at or near maximum capacity. Training bouts include intense incline or sprinting, benefiting speed, power, and anaerobic performance competency.
Zone 4 — Threshold Zone: 80% - 90% of your Max HR
The threshold zone involves intense jogging or sub-maximal sprinting, typically unsustainable for long periods of time. Benefits include highly-elevated calorie burn, speed and power performance enhancement, improved lactate removal capabilities, and enriched heart health.
Zone 3 — Aerobic Zone: 70% - 80% of your Max HR
The aerobic zone is ideal for cardiovascular training. Workouts in this zone are more intense, involving moderate jogging. Long-term benefits are improved heart health and cardiovascular performance, reductions in blood pressure and cholesterol, and increased calorie burn.
Zone 2 — Temperate Zone: 60% - 70% of your Max HR
The temperate zone consists of moderate-intensity exercise, typically as fast walking to slow jogging. Speaking is more difficult and breathing is elevated. Benefits are similar to those of the healthy heart rate zone, though caloric expenditure is higher.
Zone 1 — Healthy Heart Zone: 50% - 60% of your Max HR
The healthy heart zone involves safe, low-intensity activity, like medium-to-brisk walking. Full conversations can be held, despite a gentle increase in respiration. Benefits include reduced risk of heart and vascular disease, moderated blood pressure and cholesterol, and improved insulin sensitivity.
Cleaning
Daily
It is recommended to wipe the treadmill down after each use to keep the treadmill clean and dry. A mild detergent may be used at times to help remove all dirt and salt from the belt, painted parts and the display.
Monthly
This cleaning would include removing the motor cover and cleaning around the motor and electronics. It is recommended to clean the motor compartment if the treadmill is in an area where there might be plush carpet fibers that could get pulled up into the motor compartment. It is a good idea at this time to check and tighten all assembly hardware, power cord for damage, or anything else that would indicate the need for service.
Safety and Integrity
The safety and integrity designed into the machine can only be maintained when the treadmill is regularly examined for damage and repaired. Worn or damaged components shall be replaced immediately or the treadmill be removed from service until the repair is made. Pay special attention to components most susceptible to wear.

WARNING: Keep treadmill stable on flat ground. Over-exercising or inadequate training may result in physical injury.

WARNING: Unplug the power cord before removing the motor cover.

IMPORTANT: If service is required, turn the power off and remove the power cord to ensure the unit cannot be used. Let all other users know the unit needs service.

CAUTION: Acidic cleaning detergents may damage painted or powder coated surfaces and should not be used. Such cleaners may void the LifeSpan warranty.
Maintenance and Tips
Belt Lubrication
Use only 100% silicone and avoid using aerosol silicone sprays which include additives and petroleum distillates. One ounce of silicone should be used for each application. LifeSpan offers 100% silicone lubricant that can be ordered at www. LifeSpanFitness.com.
The walking belt should be lubricated every 50 hours of use or three months.
To lubricate, unplug your treadmill.
- Start toward the front of the treadmill, slide your hand under the belt and lift it away from the deck.
- Slide tube under the belt as close to the center as possible.
- Apply controlled pressure to the squeeze bottle as you slowly pull back the tube towards the belt edge.
- Repeat on opposite side. (Use 1/2 oz. per side)
- Use treadmill for 3-5 minutes to disperse lube.
NOTE: When lubricating the belt, make sure the treadmill is on a surface that can be easily cleaned. After lubricating clean any excess silicone off the walking surface of the belt and side rails.
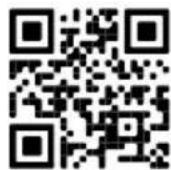
For a full video demonstration on lubricating your treadmill, scan the QR code to watch our YouTube video.

natural_image
Illustration of a hand holding a tool, no text or symbols presentFolding the Treadmill
A. Make sure that the On/Off switch is turned Off and the power cord is removed from the wall.
B. Make sure nothing is on or near your treadmill which might spill, be knocked over or prevent the treadmill from completely folding.
C. Place both hands under the support bar that is located directly under the back of the running belt on your treadmill to make sure that you have a solid lifting point.
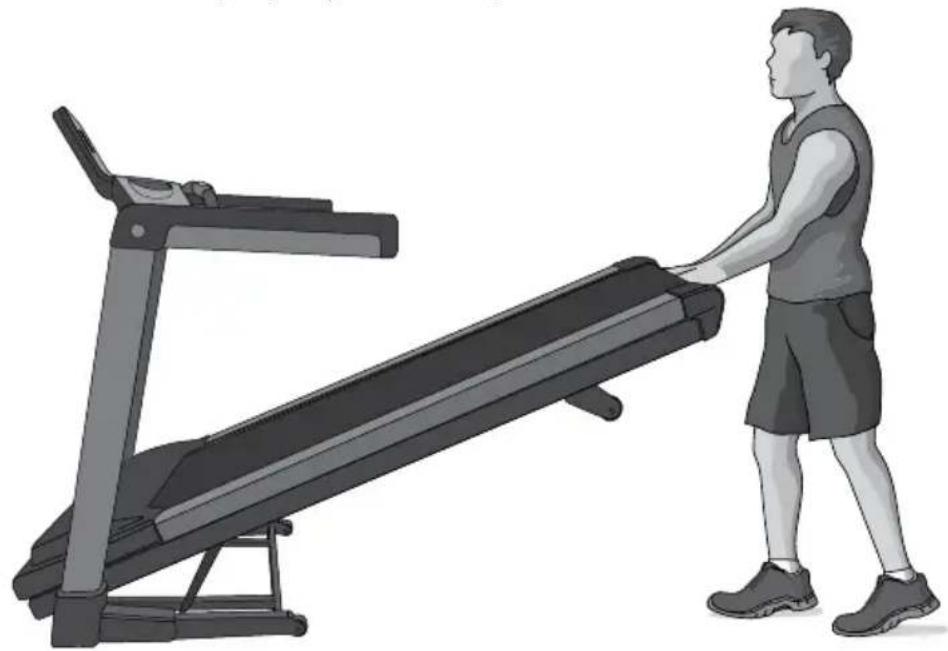
D. Lift the treadmill all the way forward and make sure the hydraulic shock is properly locked in place.
natural_image
Illustration of a person pushing a treadmill on a lift (no text or symbols)E. Ensure that the locking mechanism is secure by gently pulling back on the treadmill and make sure that it doesn't move.
CAUTION:
- Use proper safety precautions and lifting techniques. Bend your knees and elbows, keep your back straight and pull up with both arms.
- Do not fold the treadmill by lifting on the running belt or rear roller.
- Do not lean against the treadmill once it is folded or place items on it that could cause it to become unstable or fall over.
- Do not connect the power cord when the treadmill is folded or try to operate the treadmill in the folded position.
Maintenance and Tips
Unfolding the Treadmill
A. Make sure you have adequate space to lay the treadmill down. There needs to be at least 2 feet of clearance on both sides and in the front of the treadmill. There should be at least 4 feet of clearance on the back side of the treadmill for safety reasons. If you were to fall this would give adequate clearance to get off the treadmill.
B. Inspect so nothing is on or near your treadmill that might spill, be knocked over or prevent the treadmill from completely unfolding.
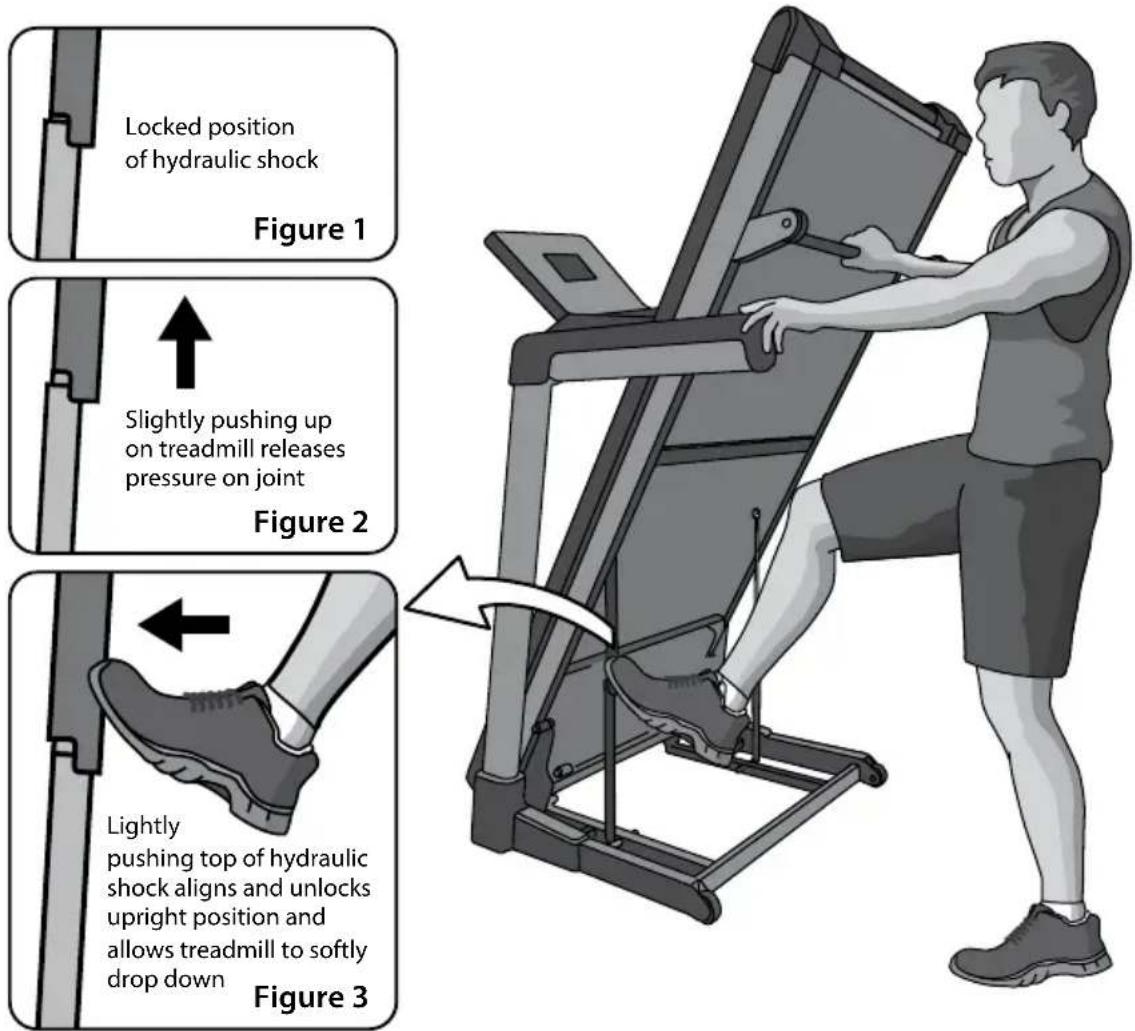
C. Position yourself behind the treadmill. Slightly push the treadmill forward towards the display and with your foot lightly push the top portion of the left hydraulic shock forward till the locking tube frees and the treadmill can be pulled back away from the console. (See FIG. 1, 2 & 3)
D. The hydraulic shock is set up to drop softly without assistance. It is not a bad idea to hold onto the treadmill until it is about 2/3 of the way down. Make sure that you use proper lifting technique, bending your knees and keeping your back straight.
Moving the Treadmill
A. Make sure the ON/OFF switch is turned OFF and the power cord is removed from the wall.
B. Make sure nothing is on or near your treadmill which might spill, be knocked off, or prevent the treadmill from moving.
C. Place both hands under the support bar located under the back of the running belt to make sure you have a solid lifting point.
D. Lift the back of the treadmill and roll to the desired location.

natural_image
Illustration of a person using a treadmill to lift a fitness piece (no text or symbols visible)
CAUTION: When lifting, use proper safety precautions and lifting techniques. Bend your knees and elbows, keep your back straight and pull up evenly with both arms.
Belt Tensioning
If the belt begins to slip and needs to be tensioned, there are tension bolts that are accessible from the back of the treadmill. Before tensioning the belt, start the treadmill and set the speed to 3 mph (5 kph).
A. Using a 6 mm Allen wrench, included in your hardware bag, turn the right and left tension bolts 1/2 turn clockwise. See figures on next page.
B. Test to see if the slipping is eliminated. If the belt slips repeat Step A and test again.
Maintenance and Tips
NOTE: Adjusting one side more than the other will cause the belt to drift to the side of the treadmill and will require belt alignment. Check to be sure the running belt is still aligned. If belt alignment is off as shown below refer to Belt Alignment section.


CAUTION: DO NOT tighten more than 2 full turns on each side.
Over tensioning the belt can cause unnecessary friction and wear and tear on the belt, motor and electronics.
Belt Alignment
A. Press Start, then increase the treadmill speed to 3 mph (5 kph).
B. Stand at the rear of the treadmill to see which way the belt is drifting.
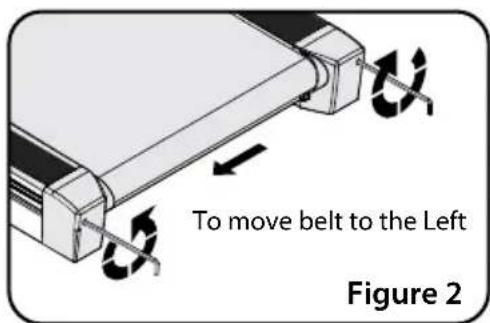
C. If the belt drifts to the left, turn the left adjustment bolt one-quarter turn clockwise and the right adjustment bolt one-quarter turn counterclockwise. (See FIG. 1)
D. If the belt drifts to the right, turn the left adjustment bolt one-quarter turn counter-clockwise and the right adjustment bolt one-quarter turn clockwise. (See FIG. 2)
E. Observe the tracking for two minutes. Repeat steps A-D as needed.

Visit www.LifeSpanFitness.com for a full video demonstration on aligning your treadmill belt.
Troubleshooting
If you have a question that isn't answered in this Owner's Manual, visit our website at www.LifeSpanFitness.com or call us at 801-973-9993 x4.
The treadmill is designed and manufactured to be reliable and easy-to-use. However, if you have a problem, these troubleshooting steps may help you find the cause.
Problem: The console does not turn on or function correctly.
Solution: Check to make sure the treadmill is properly plugged in, turn the power switch down by the power cord off and back on again and make sure the safety key is in place. Check all wire harness connections made during assembly to be sure they are all properly connected. If the problem persists contact LifeSpan Customer Service at www.LifeSpanFitness.com or call 801-973-9993x4.
Problem: The power button on the console does not turn the console on.
Solution: Check the main power switch and power cord located at the front of the treadmill on the right side. Make sure the power cord is plugged in and the power switch is turned on.
Problem: The treadmill does not turn off with the console power button.
Solution: The console has to be in standby mode to be turned off with this button. Press and hold the Stop button till the console resets and then the POWER button will turn the console off.
Problem: The belt does not stay in the center of the treadmill when in use.
Solution: First check to make sure that the treadmill is level, then refer to the instructions in this Owner's Manual on how to align the belt.
Problem: The treadmill belt slips during use.
Solution: The belt may need to be tensioned after a period of use. Refer to the Belt Tensioning Section of this Owner's Manual.
Maintenance and Tips
Problem: Heart rate is erratic or not reading.
Solution: Make sure your hands are moist (aloe vera helps). Make sure all connectors made during assembly, at the back of the console, are properly connected and no wires are damaged. If wearing a chest strap, be sure the batteries are good and that the electrodes are moist and positioned properly on your chest. You may need to pair the bluetooth HR chest strap or arm band with the console.
Problem: Treadmill automatically pauses during workout.
Solution: The treadmill is not detecting your steps because you have stopped walking or because your weight is too low to detect the steps, especially at an incline. One option would be to go to personal settings and turn Intelli-Guard off.
Problem: E1 Error Code after 3 to 8 seconds.
Solution: This is most likely a bad wire connection or a speed sensor issue. Check all wire connections made during assembly and if this does not resolve the issue contact LifeSpan Customer Service at www.LifeSpanFitness.com or call 801-973-9993x4.
Problem: E1 Error Code after several minutes of use.
Solution: This problem usually occurs when there is too much friction building between the running belt and deck. The best thing to do is turn the treadmill off, lubricate the running belt and turn the treadmill back on. Test the unit. If E1 still comes up after testing, contact LifeSpan Customer Service at www.LifeSpanFitness.com or call 801-973-9993 x4.
Problem: E6 Error Code.
Solution: Turn the power off for 30 seconds and back on again. Check to see if the incline is functioning. If still an issue, please check all wire connections made during assembly and cycle the power again. If still not functioning contact LifeSpan Customer Service at www.LifeSpanFitness.com or call 801-973-9993 x4.
Problem: TR5500iM Screencasting Instruction screen not showing.
Solution: Go back to the home screen and wait for twenty seconds, then try again.
Unique Features
As a leader in the fitness industry, LifeSpan has developed a number of unique features in our treadmills making them more engaging, safer and easier to use. Learn more about how to use these features in Saving Your Results and Personal Settings sections of this Owner's Manual.

Intelli-Guard™
Walk confidently knowing your safety is assured with Intelli-Guard™. Step away from your treadmill for more than twenty seconds and your treadmill's belt will automatically glide to a smooth stop.

Intelli-Step™
Never miss a stride with Intelli-Step™. Your steps are automatically calculated with meticulous precision, displaying immediate feedback.

USB Charging Port
Charges most of your mobile devices. 5V, 0.5A Power Output
About Your Treadmill
Specifications
TR3000i
| Cooling Fan 3 Speed | |
| Drive Motor 2.75 HP Continuous Duty | |
| Max User Weight 350 lb (159 kg) | |
| Heart Rate Contact Sensors / Bluetooth Chest Strap & Arm Compatible | |
| Speed Range 0.5 - 12 mph (0.8 - 20 kph) | |
| Running Belt Size 20" x 56" (51 cm x 142 cm) | |
| Incline Levels 0 to +15 | |
TR4000i
| Cooling Fan 3 Speed | |
| Drive Motor 3.25 HP Continuous Duty | |
| Max User Weight 350 lb (159 kg) | |
| Heart Rate Contact Sensors / Bluetooth Chest Strap & Arm Compatible | |
| Speed Range 0.5 - 12 mph (0.8 - 20 kph) | |
| Running Belt Size 22" x 60" (56 cm x 152 cm) | |
| Incline Levels -2 to +13 | |
TR5500iM
| Screencasting Displays media from your smart device | |
| Cooling Fan 3 Speed | |
| Drive Motor 4.0 HP Continuous Duty | |
| Max User Weight 350 lb (159 kg) | |
| Heart Rate Contact Sensors / Bluetooth Chest Strap & Arm Compatible | |
| Speed Range 0.5 - 13.5 mph (0.8 - 22 kph) | |
| Running Belt Size 22" x 60" (56 cm x 152 cm) | |
| Incline Levels -2 to +13 | |
All Models
| Display Readouts Program | Profile, Time, Calories, Step Count, Distance, Heart Rate, Speed, Incline, Lap, Lap Time, % Max HR, Steps/Min, Cal/Hr, Splits, Pace and Elevation Change |
| Programs Speed or Incline | control for Weight Management, Healthy Living, Sports Training and Heart Rate Control as well as 2 customer user programs.TR4000i/TR5500iM - Also included are Hills Decline, Short Interval Decline, Downhill Repeats Decline, Rockport Fitness Test, Navy Fitness Test and 5K/10K Race programs. |
| Deck Suspension 8-Independent Shock Absorbers | |
| Roller Size | 2.5" (64 mm) front / 2" (51 mm) back |
Warranty
Your LifeSpan treadmill comes with the following limited warranty valid in North America. If you are outside of this area contact your local authorized LifeSpan dealer.
| Treadmill Frame | 10 Years |
| Parts | 2 Years |
| Labor | 1 Year |
LifeSpan warrants that the equipment it manufactures is free from defects in materials and workmanship under normal use and services. The periods above are based on the date of purchase. During these periods, LifeSpan will repair or replace any defective part. Free labor is included on all parts that are not normally assembled or replaced by the customer within the labor period.
If within the time frames specified above, any part fails to operate properly, login to our website at www.LifeSpanFitness.com, click on "Customer Service" and complete the form to request assistance or call 801-973-9993 x4 for a Customer Service Agent (please note that certain kinds of service should only be performed by a qualified service technician).
LifeSpan reserves the right to make changes and improvements to our products without incurring any obligations to similarly alter any product purchased. In order to insure our product warranty and to ensure the safe and efficient operation of your LifeSpan product, only authorized parts can be used. The warranty is void if any parts other than those provided by LifeSpan are used.
Exclusions and Limitations:
This warranty does not apply to any defects caused by negligence, misuse, improper assembly, or maintenance, accident, or "act of God."
This warranty does not apply to discoloration of paints or plastics.
LifeSpan shall not be responsible for incidental or consequential damages.
This warranty is non-transferable form the original owner.
LifeSpan Fitness
785 West 1700 South Suite 1
Salt Lake City, UT. 84104
Phone: 801-973-9993
www.LifeSpanFitness.com
Version 3.1NB - Apr 2021
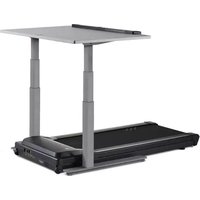
- Congratulations on Purchasing Your LifeSpan Treadmill!
- Contents
- Welcome
- Safety First....5
- Assembling Your Treadmill....10
- Console Basics 18
- Operations 25
- Maintenance and Tips....54
- About Your Treadmill....63
- Children and Pets
- Safety First
- Safety Tips While in Use
- Safety Key
- Proper Grounding
- Power Cord Options
- Assembling Your Treadmill
- Exploded View
- Step 1: Unpacking Treadmill
- Step 2: Upright Post Attachment
- Step 3: Upright Post Cover Attachment
- Step 4: Handlebar Attachment
- Step 5: Console Harness Attachment
- Step 6: Securing Console
- Step 7: Cup Holder Attachment
- Step 8: Remove Shipping Strap
- Console Basics
- Readout Display
- Indicator icons:
- Main Keyboard
- Top Keyboard
- Home Screen
- Operations
- Personal Settings
- Bluetooth Speaker or Heart Rate Strap Setup
- To Set up your Bluetooth Speaker:
- Quick Start
- Manual Program
- Preset Programs
- Custom User Set-up Programs
- HRC - Constant
- To use this program:
- HRC - Interval
- Summary
- Screencasting (TR5500iM Only)
- Getting Started
- Instruction Screen
- Setup
- Go
- Screencast Faster
- Safe Workouts
- When Your Workout Is Complete
- Hand Pulse Sensors
- Chest Strap
- Equipment Settings
- Program Profiles
- Long Slow Distance
- Short Interval
- Moderate Interval
- Long Interval
- Negative Interval 1
- Negative Interval 2
- Fartlek
- Uphill Climb
- Pyramid Climb
- Plateau Climb
- Ladder
- Uphill Interval
- Steady Pace
- Long Slow Distance 2
- Cardio Run
- Short Interval 2
- Uphill Walk
- Hills: Decline -
- Short Interval: Decline -
- Downhill Repeats: Decline
- Custom User Programs
- Maintenance and Tips
- Zone 5 — Performance Redline Zone: 90% - 100% of your Max HR
- Zone 4 — Threshold Zone: 80% - 90% of your Max HR
- Zone 3 — Aerobic Zone: 70% - 80% of your Max HR
- Zone 2 — Temperate Zone: 60% - 70% of your Max HR
- Zone 1 — Healthy Heart Zone: 50% - 60% of your Max HR
- Cleaning
- Daily
- Monthly
- Safety and Integrity
- Belt Lubrication
- Folding the Treadmill
- CAUTION:
- Unfolding the Treadmill
- Moving the Treadmill
- Belt Tensioning
- Belt Alignment
- Troubleshooting
- Problem: The console does not turn on or function correctly.
- Problem: The power button on the console does not turn the console on.
- Problem: The treadmill does not turn off with the console power button.
- Problem: The belt does not stay in the center of the treadmill when in use.
- Problem: The treadmill belt slips during use.
- Problem: Heart rate is erratic or not reading.
- Problem: Treadmill automatically pauses during workout.
- Problem: E1 Error Code after 3 to 8 seconds.
- Problem: E1 Error Code after several minutes of use.
- Problem: E6 Error Code.
- Problem: TR5500iM Screencasting Instruction screen not showing.
- Unique Features
- Intelli-Guard™
- Intelli-Step™
- USB Charging Port
- About Your Treadmill
- Specifications
- Warranty
- Exclusions and Limitations:
- LifeSpan Fitness
Brand : LifeSpan
Model : TR4000iT
Category : Treadmills