
VH82 - Cables for Computers and Peripherals RCA - Free user manual and instructions
Find the device manual for free VH82 RCA in PDF.


| Product Type | RCA Composite Audio/Video Cable |
| Brand | RCA |
| Model | VH82 |
| Connector Type | Male to Male RCA |
| Number of Connectors | 3 (Video + Left/Right Audio) |
| Length | 6 feet (1.8 m) |
| Conductor Material | Oxygen-free Copper |
| Shielding | Double shielding for noise reduction |
| Connector Plating | Gold-plated for corrosion resistance |
| Cable Diameter | 6 mm |
| Color | Black |
| Jacket Material | PVC |
| Weight | 0.2 lbs (90 g) |
| Compatibility | Devices with RCA outputs (DVD players, VCRs, gaming consoles) |
| Application | Audio and video signal transmission |
| Maintenance | Wipe connectors with a dry cloth; avoid moisture |
| Safety | Avoid sharp bends and excessive pulling; do not expose to extreme temperatures |
| RoHS Compliant | Yes |
| Warranty | Limited Lifetime Warranty |
Frequently Asked Questions - VH82 RCA
User questions about VH82 RCA
0 question about this device. Answer the ones you know or ask your own.
Ask a new question about this device
Download the instructions for your Cables for Computers and Peripherals in PDF format for free! Find your manual VH82 - RCA and take your electronic device back in hand. On this page are published all the documents necessary for the use of your device. VH82 by RCA.
USER MANUAL VH82 RCA
Television User's Guide
Changing Entertainment. Again.

natural_image
Black-and-white photo of two dogs, one with black ears and beaded collar, the other with a white collar and beaded collar (no text or symbols)CAUTION
RISK OF ELECTRIC SHOCK DO NOT OPEN

This symbol indicates that this product incorporates double insulation between hazardous mains voltage and user accessible parts. When servicing use only identical replacement parts.
Caution: To reduce the risk of electric shock, do not remove cover (or back). No user serviceable parts inside. Refer servicing to qualified service personnel.

This symbol indicates "dangerous voltage" inside the product that presents a risk of electric shock or personal injury.

This symbol indicates important instructions accompanying the product.
WARNING
To reduce the risk of fire or electric shock, do not expose this product to rain or moisture. This apparatus shall not be exposed to dripping or splashing. No objects filled with liquids, such as vases, shall be placed on the apparatus.
Refer to the identification/rating label located on the back panel of your product for its proper operating voltage.
FCC Regulations state that unauthorized changes or modifications to this equipment may void the user's authority to operate it.
Caution: Using video games or any external accessory with fixed images for extended periods of time can cause them to be permanently imprinted on the picture tube (or projection TV picture tubes). ALSO, some network/program logos, phone numbers, black borders (sides, top and bottom), etc. may cause similar damage. This damage is not covered by your warranty.
Cable TV Installer: This reminder is provided to call your attention to Article 820-40 of the National Electrical Code (Section 54 of the Canadian Electrical Code, Part 1) which provides guidelines for proper grounding and, in particular, specifies that the cable ground shall be connected to the grounding system of the building as close to the point of cable entry as practical.
Product Registration
Please fill out the product registration card (packed separately) and return it immediately. For US customers: Your RCA Consumer Electronics product may also be registered at www.rca.com/productregistration. Registering this product allows us to contact you if needed.
Product Information
Keep your sales receipt to obtain warranty parts and service and for proof of purchase. Attach it here and record the serial and model numbers in case you need them. These numbers are located on the product.
Model No. ____
Serial No. ____
Purchase Date: ____
Dealer/Address/Phone: ____
IMPORTANT SAFETY INSTRUCTIONS
Read before operating equipment
- Read these instructions.
- Keep these instructions.
- Heed all warnings.
- Follow all instructions.
- Do not use this apparatus near water.
-
Clean only with dry cloth.
-
Do not block any ventilation openings. Install in accordance with the manufacturer's instructions.
-
Do not install near any heat sources such as radiators, heat registers, stoves, or other apparatus (including amplifiers) that produce heat.
-
Do not defeat the safety purpose of the polarized or grounding-type plug. A polarized plug has two blades with one wider than the other. A grounding type plug has two blades and a third grounding prong. The wide blade or the third prong is provided for your safety. If the provided plug does not fit into your outlet, consult an electrician for replacement of the obsolete outlet.
-
Protect the power cord from being walked on or pinched particularly at plugs, convenience receptacles, and the point where they exit from the apparatus.
-
Only use attachments/accessories specified by the manufacturer.
-
Use only with the cart, stand, tripod, bracket, or table specified by the manufacturer, or sold with the apparatus. When a cart is used, use caution when moving the cart/ apparatus combination to avoid injury from tip-over.
-
Unplug this apparatus during lightning storms or when unused for long periods of time.
-
Refer all servicing to qualified service personnel. Servicing is required when the apparatus has been damaged in any way, such as power-supply cord or plug is damaged, liquid has been spilled or objects have fallen into the apparatus, the apparatus has been exposed to rain or moisture, does not operate normally, or has been dropped.
-
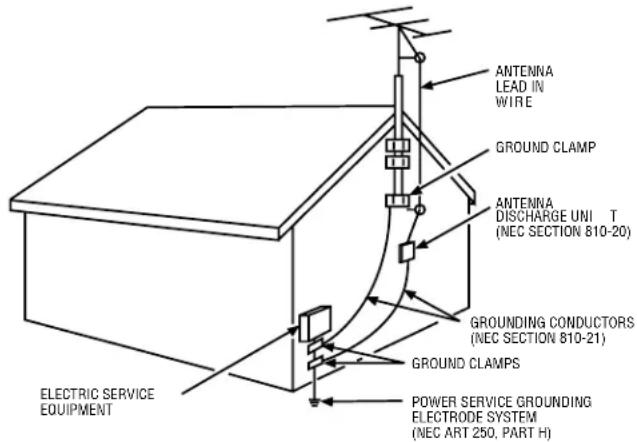
If an outside antenna or cable system is connected to the product, be sure the antenna or cable system is grounded so as to provide some protection against voltage surges and built-up static charges. Section 810 of the National Electrical Code, ANSI/NFPA No. 70-1984 (Section 54 of Canadian Electrical Code, Part 1) provides information with respect to proper grounding of the mast and supporting structure, grounding of the lead-in wire to an antenna-discharge unit, size of grounding conductors, location of antenna-discharge unit, connection to grounding electrodes, and requirements for the grounding electrode. See following example.
Important Information 2
IMPORTANT SAFETY INSTRUCTIONS ....3
Chapter 1: Connections & Setup ....5
Things to Consider Before You Connect 5
Protect Against Power Surges 5
Protect Components from Overheating 5
Position Cables Properly to Avoid Audio Interference 5
Important Stand and Base Safety Information ..... 5
Use Indirect Light 5
Things to Consider Before You Connect 5
Explanation of Jacks and Cables 6
The Front of Your TV 8
Front Input Jacks 8
Front Panel Buttons 8
Plug in the TV 8
Start-up 8
Put Batteries in the Remote 8
Turn on the TV 9
Place All Available Channels Into Memory 9
Set the Time 9
The ClonePRO™ 9
Understanding the Menus 10
Master Menus 10
Basic Menus 10
Using Master and Basic Menus 10
Exiting a Menu 10
Setting Limits in Master Menus 10
Sound Menu 11
Picture Menu 12
Access and Power Options Menu 12
Parental Control 14
Time Menu 15
Setup Menu 16
Chapter 2: Using the Remote Control .....17
Types of Remote Controls 17
Basic Remote Buttons (CRK17TC1 & CRK17TD1) ...... 17
Additional Remote Buttons (CRK17TD1) 18
Using the INPUT Button 19
Using the SYSTEM Button 19
ClonePRO™ Remote Buttons 20
Chapter 3: Using the Menu System ......21
The Basic Menu System 21
Sound Menu 21
Picture Menu 21
Channel Guide Menu 21
Parental Control Menu 22
Time Menu 22
Language & CC Menu 23
The TV can be "Decommercialized" 23
Chapter 4: Using the TV's Features .....24
Channel Banner 24
Parental Controls and V-Chip 24
How V-Chip Works 24
USA V-Chip Rating System 25
Canadian English V-Chip Rating System 25
Canadian French V-Chip Rating System 26
USA V-Chip TV Rating Limit 26
Blocking Specific Content Themes 28
Viewing Specific Content Themes 28
Blocking Canadian V-Chip Ratings 28
V-Chip Movie Rating Limit 29
V-Chip Exempt Program Block 29
KidPass 30
Front Panel Lock 30
Create Password 30
Chapter 5: Other Information ....31
Using the ClonePRO™ 31
Modes of operation 31
DSCI mode 31
IR mode 32
Cloning a TV 33
Troubleshooting 34
Limited Warranty 37
Accessories 39
Things to Consider Before You Connect
Protect Against Power Surges
- Connect all components before you plug any of their power cords into the wall outlet.
- Turn off the TV and/or component before you connect or disconnect any cables.
- Make sure all antennas and cables are properly grounded. Refer to the Important Safeguards sheet packed with your TV.
Protect Components from Overheating
- Don't block ventilation holes on any of the components. Arrange the components so that air can circulate freely.
- Don't stack components.
- If you place components in a stand, make sure you allow adequate ventilation.
- If you connect an audio receiver or amplifier, place it on the top shelf so the heated air from it won't flow around other components.
Position Cables Properly to Avoid Audio Interference
- Insert each cable firmly into the designated jack.
- If you place components above the TV, route all cables down the side of the back of the TV instead of straight down the middle of the TV.
- If your antenna uses 300-ohm twin lead cables, do not coil the cables. Also, keep the twin lead cables away from audio/video cables.
Important Stand and Base Safety Information
Choose the location for your TV carefully. Place the TV on a stand or base that is of adequate size and strength to prevent the TV from being accidentally tipped over, pushed off, or pulled off. This could cause personal injury and/or damage the TV. Refer to the Important Safeguards sheet packed with your TV.
Use Indirect Light
Don't place the TV where sunlight or room lighting will be directed toward the screen. Use soft or indirect lighting.
Things to Consider Before You Connect
You will need a master remote or ClonePRO ^™ to set up the TV. Go to the accessory page at the back of this manual or contact your RCA commercial distributor to purchase these.
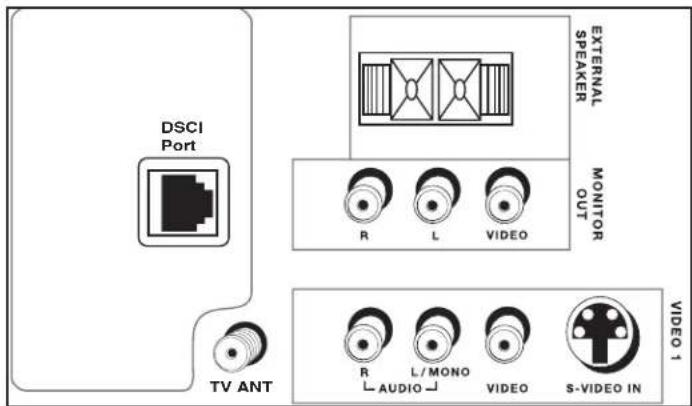
Models J24F635 and J27F635
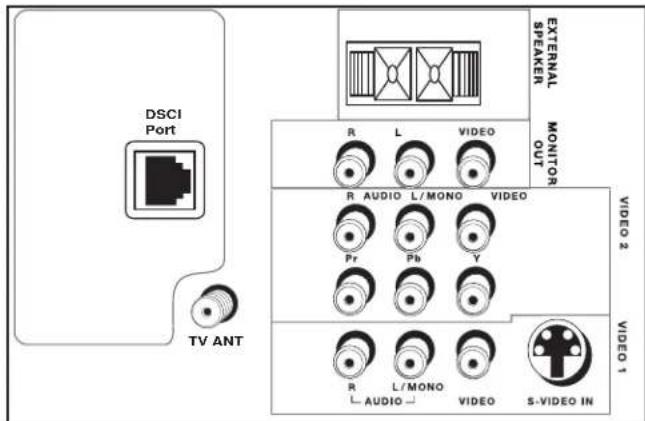
Model J32F635
Explanation of Jacks and Cables
This manual covers TV models that have different back panels. Match the back panel of your TV to one of the back panels shown. This section describes the jacks you can use to make connections. There are several ways to connect components to your TV.
natural_image
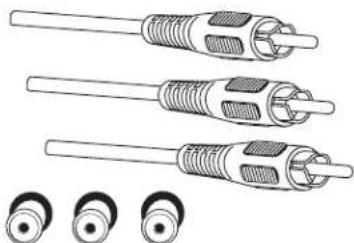
Illustration of three different types of audio/video cables with no text or symbolsAudio/Video Jacks
VIDEO 1
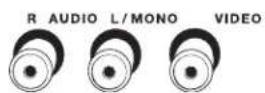
VIDEO, AUDIO R and L/MONO INPUTS Used to connect components such as a VCR, DVD player, camcorder, laserdisc player or video game consoles with audio/video outputs. These jacks are used for most audio/video connections between components.
Note: If your component has only one input for audio (mono), connect it to the left (white L/Mono) audio jack on the TV and don't connect the right audio part of the cable.
- R (RIGHT) AUDIO Provides right audio connection. The right audio connector is usually red.
- L/MONO AUDIO Provides left audio connection. The left audio connector is usually white.
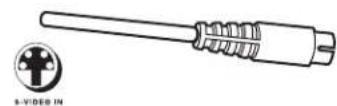
• VIDEO Provides composite video connection. The video connector is usually yellow. - S-VIDEO Provides better picture quality than the video jacks because the color part of the signal is separated from the black and white part of the picture. When using S-VIDEO IN, make sure to connect left and right audio cables to the L/MONO and R AUDIO Input jacks (an S-Video cable is required).
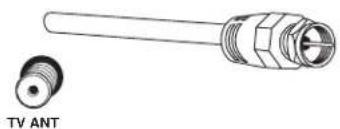
- TV ANT Used to attach either an antenna or cable system to the TV. To connect a VCR, connect a coaxial cable to the TV ANT jack on your TV and to the Output Jack on the VCR (sometimes labeled OUT TO TV).
natural_image
Technical illustration of a TV ANT connector with no text or symbols on the diagram itselfContinues on next page...


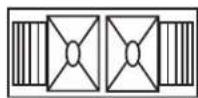
VIDEO 2 (Model J32F635 only)
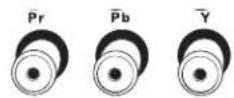
VIDEO, AUDIO R and L/MONO and Y, Pb, Pr INPUTS Let you connect a second component video source, such as a DVD player.
- Y, Pb, Pr Provide optimum picture quality because the video is separated into three signals. Use three video-grade cables for the connection. When using Y, Pb, Pr, make sure to connect left and right audio cables to the VIDEO 2 AUDIO Input jacks.
• R and L/MONO AUDIO and VIDEO Their description is the same as VIDEO 1.
MONITOR OUT
AUDIO/VIDEO OUTPUTS Allow connection of external audio amplifiers, power speakers, audio receivers for improved sound quality or an external video monitor with the use of VIDEO OUT. Please note that these outputs cannot drive standard speakers directly.
DSCI PORT This port is used to transfer information between a TV and other devices, such as a clone box or interactive system. This port is an eight-pin telephone-type port. When the TV receives a message via the DSCI (digital serial communications interface) port, it will act in accordance with the digital instructions received. For more information on its connection and operation, please contact your distributor or the supplier of the interactive system.
EXTERNAL SPEAKERS These jacks are used to connect your TV to a mono speaker. If you want to deliver TV audio into another room, connect the external speaker directly to the TV using class 2 speaker wire.
Note: Speakers should have a minimum of 16 ohms impedance.
natural_image
Front view of a rectangular electronic device with two side panels and a blank screen (no text or symbols)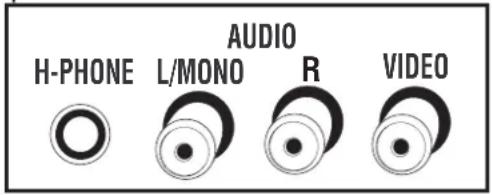
The Front of Your TV
Front Input Jacks
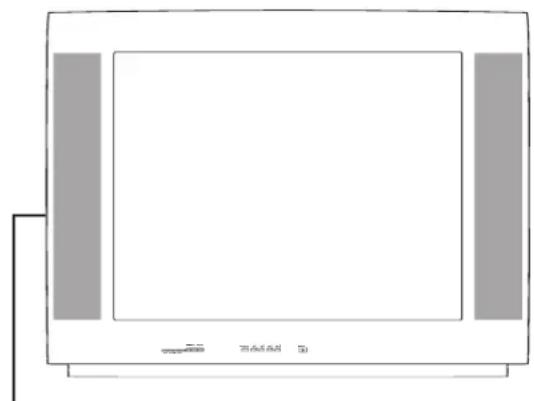
The TV has front input jacks for your convenience: one set of audio/video inputs, an s-video and a headphone jack. These jacks are towards the front of the TV on the side. To access the component you connected to the front of the TV, press the INPUT button on your remote until FRNT appears on the screen. The jacks are ideal for connecting a video game console or a camcorder.
Note: When connecting a component that only has one audio jack, such as some camcorders, use the TV's AUDIO L/MONO jack to hear the audio.
H-PHONE Allows you to connect headphones to listen to the sound coming from the TV.
L/MONO and R AUDIO Receives audio from another component such as a VCR, camcorder, or video game console.
VIDEO Receives video from another component such as a VCR, camcorder, or video game console.
S (S-Video) if equipped Provides better picture quality when receiving s-video from another component. When using S-VIDEO IN, make sure to connect left and right audio cables to the L/MONO and R AUDIO Input jacks (an S-Video cable is required).
Front Panel Buttons
If you cannot locate your remote, you can use the front panel buttons of your TV to operate many of the TV's features.
MENU/OK Brings up the Main menu. In the menu system, it selects highlighted items.
CH v Scans down through the current channel list. In the menu system, acts like the down arrow button on the remote control and adjusts menu controls.
CH ∧ Scans up through the channel list. In the menu system, acts like the up arrow button on the remote control and adjusts menu controls.
VOL < Decreases the volume. In the menu system, acts like the left arrow button on the remote control and adjusts menu controls.
VOL > Increases the volume. In the menu system, acts like the right arrow button on the remote control and adjusts menu controls.
POWER Turns the TV on and off.
Plug in the TV
Plug the end of the power cord into a grounded wall outlet. Insert the plug completely into the outlet.
Start-up
The steps below get your TV connected and ready to watch.
Put Batteries in the Remote
- Slide off the cover of the battery compartment.
- Place the two AAA batteries into the remote, matching the + and - end of each battery in the compartment.
- Replace the cover.
Turn on the TV
Press POWER on the TV or remote.
Place All Available Channels Into Memory
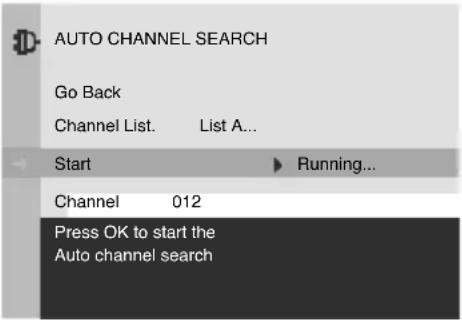
- To go to the Setup menu, with the master remote (CRK17TD1), press MENU then select Setup. In this menu you'll be able to set your Signal Type. Next go to Auto Channel Search, the TV will search for all channels viewable through your antenna or cable TV system.
- Select which channel list you'd like to find channels for (List A is the default).
- Press the down arrow button to select Start. Press the OK button to start searching. The TV searches for active channels and places them in the channel list.
Note: Video Input Channels (VID, SVID, etc.) must be added to the active channel list separately before they can be accessed. Refer to the Setup menu section at the end of this chapter for more information on the Channel menu and List & Labels.
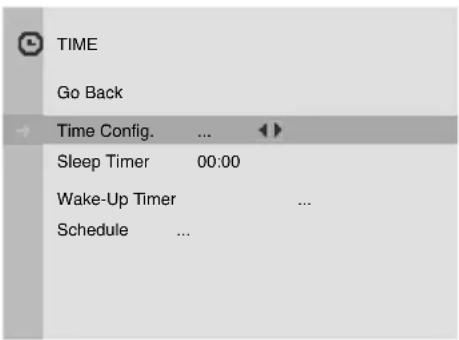
Set the Time
The current time options might not be available to the basic user, depending on how they've been set by the master user. (The Time Configuration menu isn't available in the basic menu).
To set the time, from the Main menu select Time then Time Config. If the current time has not been set, use the arrow and number buttons on the remote control to make changes.
- From the Main menu, highlight Time and press OK.
- Time Config. is highlighted. Press the right arrow to enter the menu.
- Time is highlighted. To set the time press the right and left arrow button to add or subtract minutes. Use the number buttons to set the hour. The OK button changes am and pm.
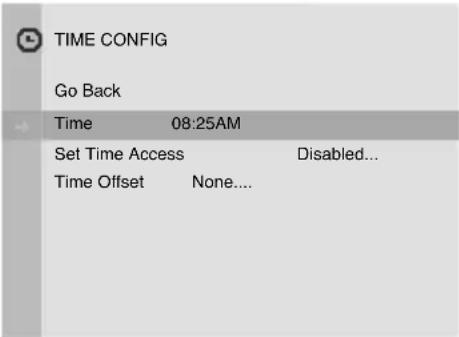
The ClonePRO™
If several TVs need to be programmed with the same menu settings, an optional ClonePRO remote can be used to copy all of the menu settings from one TV into other TVs to reduce installation time. Information can be both downloaded to and uploaded from the ClonePRO using the DSCI port on the TV's back panel or using the IR sensor. A ClonePRO can be obtained from your RCA commercial distributor. Chapter 2 has information about this remote, see page 20. If you want to set other menu options before using the ClonePRO, continue on in this chapter. You can use the ClonePRO at any time.
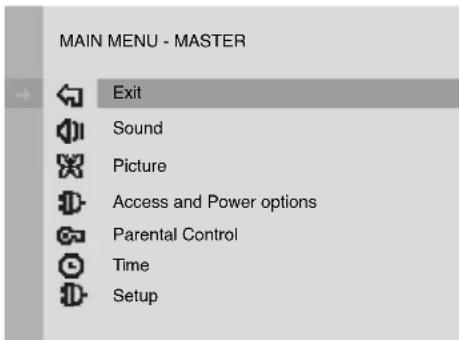
The Master Main menu.
Understanding the Menus
This television displays two levels of menus: master and basic.
Master Menus
The master menus are accessible by pressing MENU on the master remote (CRK17TD1). This menu shows all menu options. The person who chooses the settings available to the basic end user is called the “master user.”
Basic Menus
The basic menus are accessible by pressing MENU on a basic remote (CRK17TC1 or other remote) or the front panel. The choices available on the basic menus and control panels will vary depending on limits set by the master user and the input selected. You can turn off the basic menu completely through the Access & Power Options menu. For more information on the effects of master user choices on the basic menu and basic user functionality, continue on in this chapter.
Note: Options set in the master menu are stored in nonvolatile memory. If any options are changed in the basic menu, and then the TV is turned off, the TV defaults to the master menu settings once it's turned back on.
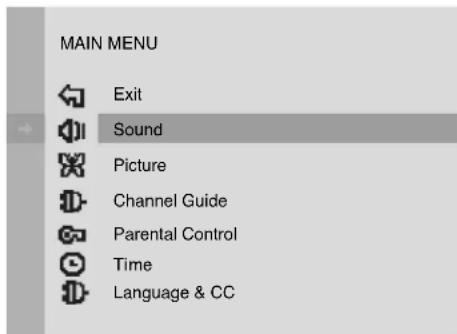
The basic Main menu. The choices available in this menu change according to limits set by the master user.
Using Master and Basic Menus
Menus and choice lists use the "point and select" rule to navigate, but control panels use a variety of methods to adjust features on your TV. The following pages detail how to use these controls to customize the functions of your TV.
Press MENU on the remote (master remote for master menu; basic remote for basic menu) or on the front panel (basic menu) to bring up the Main menu.
To select a menu item:
- Navigate with the arrows and then select OK.
- Navigate with the arrows and then select with the right arrow button (unless it's a choice list).
Exiting a Menu
There are three ways to exit a menu. Note that not all methods work in all menus:
• Highlight Exit and press OK.
- Press MENU on the remote control.
- Press CLEAR, the on-screen displays are cleared from the screen and you return to TV viewing.
Setting Limits in Master Menus
Some screens in the master menus are not available in the basic menus. There also might be some options you want to make unavailable to the basic user. These next few pages describe these types of menu options. To make all options unavailable, set the basic menus in the Access & Power Options menu to Disabled. For information on basic menu options, go to Chapter 3.
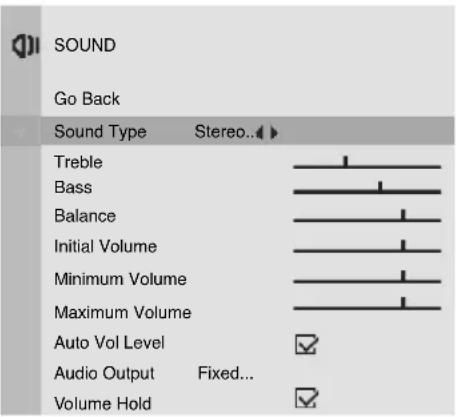
Sound Menu
Scroll to the feature you want to set. Use the right arrow button to change the setting.
Go Back Takes you to the previous menu.
Sound Type You'll have different options depending on which jacks you use and what connections have been made. Choose from Mono, Stereo, Enhanced, SAP, and LEFT. Stereo splits the incoming stereo audio signal into left and right channels. Most TV programs and recorded materials have stereo audio. The word Stereo appears on the TV when you tune to a program that is broadcast in stereo.
Treble Increases or decreases the high frequency audio.
Bass Increases or decreases the low frequency audio.
Balance Fades between the left and right speakers.
Initial Volume Sets the TV's volume to the specified level every time it is turned on.
Note: When the DSCI (Digital Serial Communications Interface) port is used to turn the TV on and off, Initial Volume settings are nonfunctional.
Minimum Volume Re-scales the volume control slider so that the far left position is always the minimum allowable volume (but not necessarily the minimum possible volume).
Maximum Volume Re-scales the volume control slider so that the far right position is always the maximum allowable volume (but not necessarily the maximum possible volume).
Auto Volume Level Reduces volume blasts during commercial breaks. Eliminates the need to constantly adjust volume control. Set it On or Off. The default is Off.
Audio Output Lets you set the audio outputs to fixed or variable control level. Audio level changes with volume control or when it is fixed it doesn't change regardless of volume setting. The default is variable.
Volume Hold Turns the TV's speakers on and sets the audio outputs proportional to the current volume setting. When this feature is turned on, mute and other volume controls are disabled.
| PICTURE | |
| Go Back | |
| Picture Preset | Bright... |
| Auto Color | |
| Color Warmth | Normal... |
| Brighness | |
| Color | |
| Contrast | |
| Sharpness | |
| Tint | |
| Tilt | |
| ACCESS AND POWER OPTIONS | |
| Go Back | |
| Remote Config. TV1.... | |
| Basic Menu Access Enabled... | |
| TV Power On Always... | |
| Energy Saver Disabled... | |
| Front Panel Enabled... | |
| Parental Controls Basic... | |
| Energy Star Enabled... | |
| Legacy Mode |
Note: The Sleep Timer, Schedule and Energy Saver settings are unavailable when On Always has been activated, even if they were set prior to choosing this option.
Picture Menu
The Picture menu items allow you to adjust the appearance of on-screen images for each video input source. Scroll to the feature you want to set. Use the right arrow button to change the setting.
Go Back Takes you to the previous menu.
Picture Preset Choose between Soft, Natural, Bright or Personal. The default setting is Natural.
Auto Color Allows you to set the auto color to On or Off. The default is Off.
Color Warmth Choose between Cool, Normal or Warm. The default setting is Normal.
Brightness Adjusts the brightness of the picture.
Color Adjusts the richness of the picture.
Contrast Adjusts the contrast of the picture.
Sharpness Adjusts the sharpness of the picture. When the component inputs are used, this selection is grayed out (disabled).
Tint Adjusts the balance between the red and green levels of the picture.
Tilt (model J32F635 only) Sets the angle of the TV's picture. The right arrow button rotates the picture clockwise. The left arrow button rotates it counterclockwise. When set by the master user, the setting is used the
Access and Power Options Menu
The Access and Power Options menu allows the master user to specify which features and functions basic users will be able to access. Scroll to the feature you want to set. Use the right arrow button to change the setting.
Go Back Takes you to the previous menu.
Remote Config. (Configuration) This feature allows the master user to determine which TVs the remote operates. Choose from TV1, TV2, TV3, TV1&2, TV1&3, TV2&3, All or Disabled. The default setting is All. If Disabled is chosen, the TV will not respond to the basic remote, except when MENU from the master remote has been pressed.
Note: Although the TV supports TV3, the master remote cannot be programmed for it.
Basic Menu Access This setting allows you to determine whether the TV's basic menus are accessible. Choose Enabled or Disabled. When the basic menu is disabled, users cannot access menus through the basic remote or front panel.
TV Power This setting allows you to determine whether the TV can be turned on or off with the POWER button on the remote or the front panel. Choose between:
On Always The TV is always on and cannot be turned off; the Sleep Timer, Schedule and Energy Saver settings are disabled.
Notes: When On Always is being used, KidPass is unavailable.
When the DSCI (Digital Serial Communications Interface) port is used to turn the TV on and off, the On Always setting is overridden.
Switched The TV can be turned on or off; Sleep Timer, Schedule and Energy Saver can be enabled. This is the default setting.
Energy Saver Setting When enabled, this feature turns the TV off after a specified period of inactivity (no remote or front panel button presses). You can toggle between Disabled, 2-hour, 1-hour, and 30-minute settings. Disabled is the default setting. If TV Power is set to On Always, Energy Saver settings are ignored. A warning message will be displayed prior to the TV shutting off.
Front Panel This setting determines whether the front panel buttons are active (able to be used to control the TV) or not.
Parental Controls This feature determines the amount of access basic users have to Parental Controls. Blocking age-based rating and content themes is described in Chapter 3. Choose between:
Basic&Pwd (Password) Basic users are able to enter the Parental Control menu and change the password. Basic users can watch blocked programming by entering the system password. This is the default setting.
Basic Basic users are able to enter the Parental Control menu but cannot change the password. Basic users can watch blocked programming by entering the system password.
NoBasic Parental Control does not appear on the basic Main menu. Basic users can watch blocked programming by entering the system password.
If Parental Controls is set to NoBasic, Movie Rating Access, TV Rating Access, Unrated Program Block, and Channel Block will not be available to basic users, regardless of what those items have been set to individually in the Parental Controls menu.
Energy Star When enabled, keeps power consumption levels compliant with Energy Star standards. The TV is shipped with Energy Star enabled.
Legacy Mode When turned On, allows the TV to work with earlier DSCI versions. Thus making the set usable with older systems. Off is the default setting.
Note: When Remote Config. and Front Panel are set to Disabled, the MENU button on the master remote turns on the TV.
Note: The master user is always able to enter Parental Controls and change the password.
Parental Control
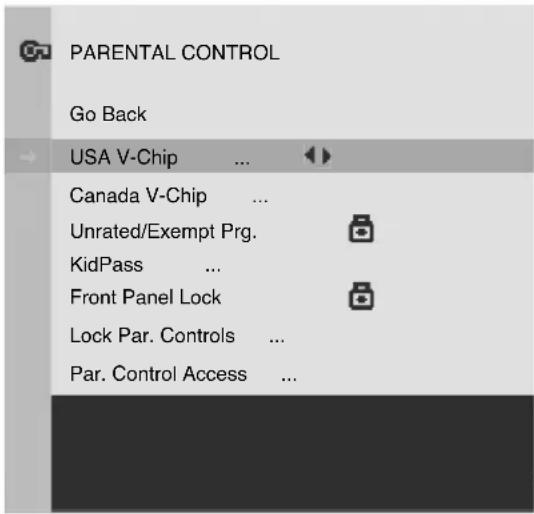
This menu shows all Parental Control menu options. As the master user, you choose which options are available to the basic end user. Scroll to the feature you want to set. Use the right arrow button to change the setting.
Go Back Takes you to the previous menu.
USA V-Chip Displays settings for the US version of V-Chip. If you live within the United States, choose this option.
Canada V-Chip Displays settings for the Canadian version of V-Chip. If you live in Canada, choose this option.
Unrated/Exempt Prg. (Program) This setting allows the master user to determine whether they will allow unrated/exempt programs to be shown. Choose Unlocked for all unrated programs to be shown. Choose Locked and all unrated programs are not available. For more information, go to page 29.
KidPass The KidPass feature allows parents to set a certain amount of time every day of the week that a child can watch TV. For more information on this feature, go to page 30.
Note: When TV Power is set to On Always, KidPass settings are nonfunctional. The time must be set for KidPass to function.
Front Panel Lock This setting allows you to disable (lock) the TV's front panel buttons and may be used as a Parental Control method. When doing so, remove access to any remote capable of operating the TV. The remote still tunes in the channels.
Lock Par. (Parental) Controls Puts into effect settings made in the Parental Control menu. A password is required.
Par. (Parental) Control Access This feature allows you to choose which Parental Control menu item is accessible through the basic menus. If basic users are able to access the Parental Control menu, the master user can still set limited access within the menu through the Par. Control Access menu. The setting toggles between Basic and No Basic. The options within the access menu are: U.S. Movie Rating Access, US TV Rating Access, CA Eng. Rating, CA French Rating, Unrated/Exempt, and KidPass.
| TIME | |
| Go Back | |
| Time Config. | ... |
| Sleep Timer | 00:00 |
| Wake-Up Timer | ... |
| Schedule | ... |
| TIME CONFIG | |
| Go Back | |
| → Time | 08:25AM |
| Set Time Access | Disabled... |
| Time Offset | None.... |
Time Menu
This control panel lets you control several time-related functions. Scroll to the feature you want to set. Use the right arrow button to change the setting.
Go Back Takes you to the previous menu.
Time Config. Takes you to the Time Configuration menu.
Go Back Takes you to the previous menu.
Time Displays the current time if the master user has set the time. If allowed by the master user, the basic user can set the time. Press OK to toggle between am and pm.
Set Time Access The master user selects who is able to set and change the current time:
Basic Basic users are able access the current time information and can make changes.
Disabled If the master user has set the time, the time information is available but cannot be changed.
Automatic Basic users are able to access the current time information but cannot make changes. With this option, if the master user doesn't set the time, the TV software will try to acquire time information from broadcasts that provide it.
Time Offset Sets an offset (from +12 to -12 hours) from Universal Time (UCT). The setting is in increments of 30 minutes. If you enter the time manually, this option appears gray (disabled). Common US offsets from UCT are:
Eastern -5:00
Central -6:00
Mountain -7:00
Pacific -8:00
Alaska -9:00
Hawaii -10:00
Sleep Timer Lets you set the TV to turn off after a given time. Press the right arrow to add 15 minutes to the clock (up to four hours).
Wake-Up Timer Lets the master user set availability to this timer On or Off.
Note: When the ClonePRO remote is used via the TV's DSCI (Digital Serial Communications Interface) port to turn the TV on and off, Sleep Timer and Wake-Up Timer settings are nonfunctional.
Schedule Lets you set the TV to turn on and off at specified times on a specified channel--one time or daily.

SETUP
Go Back
Language
English...
Signal Type
Cable...
Weak Signal Disp.
None...
Auto Ch. Search
List & Labels
Channel Selection
Channel Guide
Auto Tuning
Closed Caption
...
Setup Menu
Use this menu for choosing options to get you started watching TV. Scroll to the feature you want to set. Use the right arrow button to change the setting.
Go Back Takes you to the previous menu.
Language Lets you select your preferred language for the menus.
Signal Type Displays a choice list to choose the signal your TV is receiving. Choose Cable if you are currently using cable or a cable box for TV signals. Choose VHF/UHF if you are currently using an off-air antenna for TV signals.
Weak Signal Disp. (Display) When the signal is weak or there isn't a signal, allows you to select between these options:
Mute & Blank Displays a gray screen with the message "Unusable Signal" with the sound muted until a usable signal is found.
None No message is displayed.
Auto Channel Search Allows the TV to search for available channels to be saved into memory.
List & Labels Lets you edit the channels in the list or choose labels for each channel. To delete a channel from the channel list, highlight Channel and use the left or right arrow to select the channel. Then highlight In list and press the OK button. The box should no longer display a check mark. To add a label to a channel, select the channel in the Channel option. Press the down arrow to highlight Label. Press the right arrow to highlight the first space. Use the up or down arrow to ascend or descend through the characters. Continue to press the right arrow to highlight the space and the up or down arrow to add a character. Press OK when you're done adding a label.
Channel Selection Allows the master user to set the initial channel and to select which of the three channel lists will be active (accessible to the basic user). If no initial channel is selected, the TV tunes to the last channel when turned on. If Hold is selected, the user won't be able to select any channel other than the current channel.
Channel Guide Displays the list of channels and their labels (if labelled) in the active channel list.
Auto Tuning When a universal remote is used, displays a choice list to set up the TV to automatically tune to the correct Video Input Channel. Allows the basic user to press a component button (VCR, DVD etc.) to select a specific channel or input.
Closed Caption Lets you choose the way closed captioning information is shown on the screen. The options are:
Off No captioning information displayed. This is the default option.
On Captioning information shown always, when available.
Muted=On Captioning information is shown when the MUTE button is pressed.
Chapter 2: Using the Remote Control
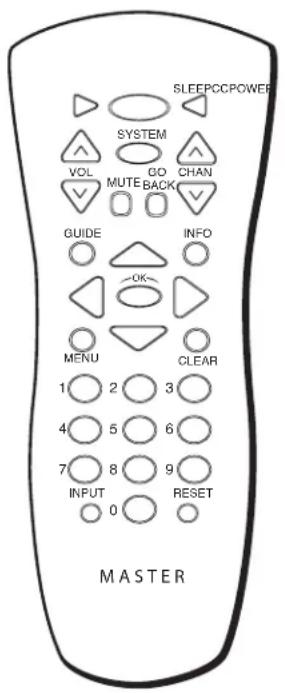
Master Remote CRK17TD1
Types of Remote Controls
All of the remote controls mentioned here, in addition to other remotes and accessories, are available from your RCA distributor. The accessory page at the back of this user's guide lists items. Descriptions of the remote buttons and how they work are on the next pages. Except as otherwise specified, the master remote is the remote described throughout the manual for operating the TV and setting up the TV's features.
Master Remotes
The master remote control (CRK17TD1) accesses all of the TV's menus. It is used to customize the TV's functionality for specific users or specific situations.
Basic Remotes
The basic remote control (CRK17TC1) is used by the viewer for basic operating functions. It is designed so that the viewer cannot alter certain master remote-specified features. The Sleep, Closed Captioning, and Channel Guide features can be accessed directly with remote buttons.
ClonePRO
The ClonePRO has main operating buttons that function the same as the master remote.
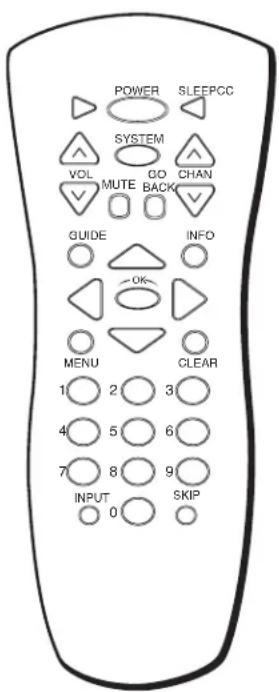
Basic Remote CRK17TC1
Basic Remote Buttons (CRK17TC1 & CRK17TD1)
Arrow Buttons and OK Use the arrow buttons to highlight your choices and navigate the menu system. Use the OK button to select your choice.
CC (Closed Captioning) Displays the Closed-Caption Display. Subsequent presses change the display mode.
CHAN (Channel up or down) Scans up and down through channels in the TV's memory.
CLEAR Clears menus and displays from the screen.
GO BACK Tunes the TV to the last selected channel or video input channel.
GUIDE Displays the Channel Guide (when not in the menu system).
INFO Displays channel information. Press again to clear channel information.
INPUT Switches between TV (channels 01-125) and other available inputs. See description later in this chapter for more details.
MENU Brings basic menus to the screen and moves from menu to menu. Also, clears the current menu from the screen.
MUTE Lowers the volume to its minimum level. Press again to restore volume.
Number Buttons (0-9) Selects an available channel number. Two digits must be pressed for each channel. Press 0 then 6 for channel 6. For three-digit channel numbers, press and hold 1 until "1--" appears on the screen. Then press the other two digits.
POWER Turns the TV on or off.
Continues on next page...
SKIP (Commercial Skip- CRK17TC1) Press once before changing the channels and the TV waits 30 seconds before returning to the original channel. Each subsequent press adds 30 seconds to the skip time. Press CLEAR to cancel.
SLEEP Displays the Sleep Timer control panel, which allows the user to set a time for the TV to turn itself off.
SYSTEM Allows the remote to change between TV1 and TV2 mode. It also allows access to system-defined functionality, when available. See the description later in this chapter for more details.
VOL (Volume up or down) Decrease or increase the TV's volume (unless Volume Hold is on) and displays the Volume Control slider. Go to Chapter 1 for more information on Volume Hold.
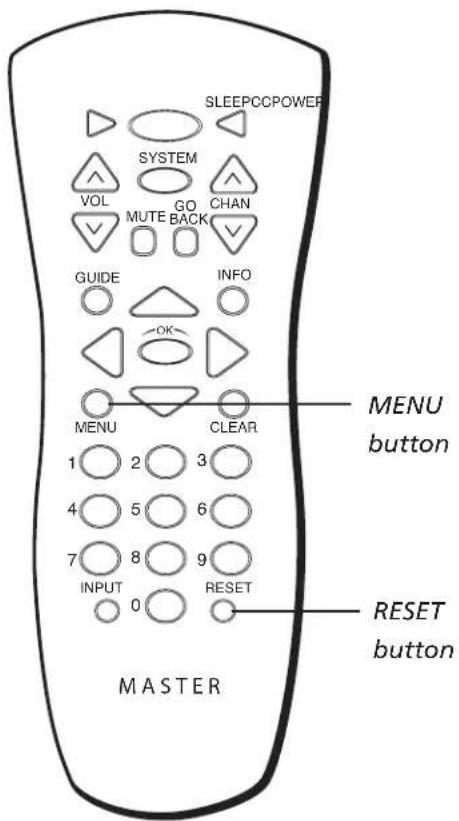
Master Remote CRK17TD1
Additional Remote Buttons (CRK17TD1)
MENU (MASTER) Brings up the master menu screen. This is different from the basic user menu screen.
RESET (MASTER) Returns the picture to the original settings and displays the Picture Presets choice list.
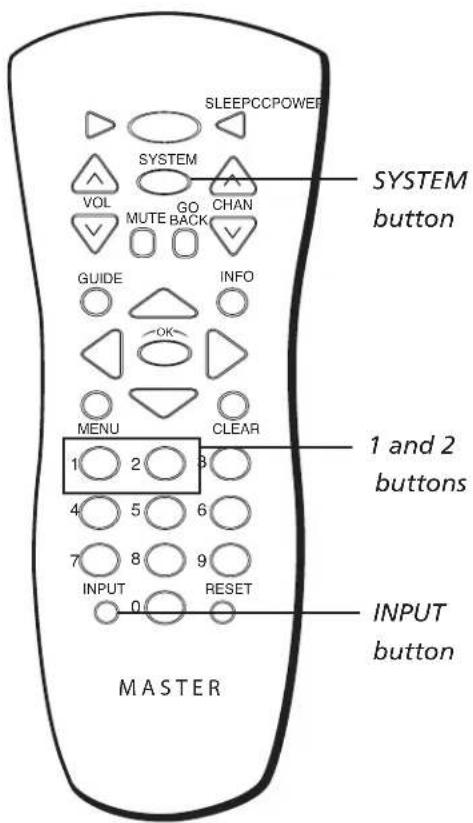
Note: Although the TV supports TV3, the master remote cannot be programmed for it.
Using the INPUT Button
In addition to a cable or antenna signal, you might have VCR, DVD etc. or other signals coming in to your TV (not all inputs are available on all models). Use the INPUT button to select the desired signal source.
- Make sure that the component you want to view is turned on.
- Press INPUT until you have selected the desired input source.
Inputs and On-Screen Displays
The Status Display shows which input signal(s) is selected. The following table shows which display term usually corresponds with which input.
Input Signal TV Display
ANTENNA/CABLE jack (channel digit)
Rear A/V jacks VID1
Front Jacks FRNT
Using the SYSTEM Button
When the television is connected to an interactive system or similar device, the SYSTEM button allows you to access system programming or other special functionality through the DSCI jack.
On a master or basic remote, the SYSTEM button can also allow independent remote control of two TVs. Once you have specified TV1 or TV2 status for the TVs, see the Access and Power Options menu on page 12. Follow these steps to tell the remote which TV you want to operate:
- On the remote control, simultaneously press and hold the SYSTEM button and 1 (for TV1) or 2 (for TV2).
- After several seconds, release the buttons. The specified TV will respond to that remote.
- To control the other TV, simply repeat the process using the other (1 or 2) button.
ClonePRO™ Remote Buttons
The ClonePRO can be used as a master remote. First, press ON to turn the remote on. Some of the buttons only apply when using the ClonePRO to download or upload information to or from a TV. Those buttons are described in Chapter 5.
Note: After 30 seconds of inactivity the remote will turn itself off.
![ready DSCI busy ready IR busy Comm. Legacy Decom. Master+ [Config] Master- [Factory] INFO RESET △ [Status] OK MENU CLEAR LEARN POWER TEACH ON OFF TEACH ClonePRO™ RESET Returns the picture to the original settings and displays the Picture Presets choice list. Arrow buttons (up, down, left, right) Use to move through the on-screen menus. When a menu isn't displayed, the up and down arrows scan the channel list. The left and right arrows decrease or increase the TV's volume, unless Volume Hold is enabled. Chapter 1 has more information on Volume Hold. MENU Displays the master main menu. INFO Displays channel information. OK Press to select a menu item that is highlighted. CLEAR Removes any menu or display from the screen and returns you to TV viewing.](/content/2026/05/955013/images/ae4e1bf674ebb9c24773fa9c1e086ecd6f715ed2cbc44c8db184426f8813da5e.jpg)
Chapter 3: Using the Menu System
MAIN MENU

Exit

Sound

Picture

Channel Guide

Parental Control

Time

Language & CC
The Basic Menu System
The basic menus are accessible through basic remote controls and the front panel. Which menu items are available will depend on the restrictions set by the master user and the active input. For instance, if Basic Menu Access has been set to Disabled in the Access and Power Options menu, the basic menus and many features will not be available. Also, except for some Parental Controls settings, many of the changes made in the basic menu will revert back to their master menu settings the next time the TV is turned on. Many of the basic menu items function exactly the same as their master menu counterparts. (See Chapter 1 for more details on the master menus.)

SOUND
Go Back
Sound Type
Stereo...
Sound Menu
Go Back Takes you to the previous menu.
Sound Type Choose Stereo, Enhanced, SAP or Mono. If you connect to VID1 or the front jacks, choose from Stereo or Left. Stereo splits the incoming stereo audio signal into left and right channels. Most TV programs and recorded materials have stereo audio. Stereo or Mono is displayed in the Channel banner when chosen. SAP (Second Audio Program) plays the program's audio in a second language, if one is available. This selection is displayed in the Channel banner when chosen.

PICTURE
Go Back
Picture Preset
Bright...
Picture Menu
The basic Picture menu items allow you to adjust the appearance of on-screen images.
Go Back Takes you to the previous menu.
Picture Preset Choose between Soft, Natural, Bright or Personal. The default setting is Natural.

CHANNEL GUIDE
CH 001
CH 002
CH 003
CH 004
CH 005
CH 006
CH 007
CH 008
CH 009
CH 010
Select: OK Page +: > Page -: <
Press MENU to exit.
Channel Guide Menu
The basic Channel Guide menu is the same as the master Channel Guide menu. It will only display the channels chosen by the master user.
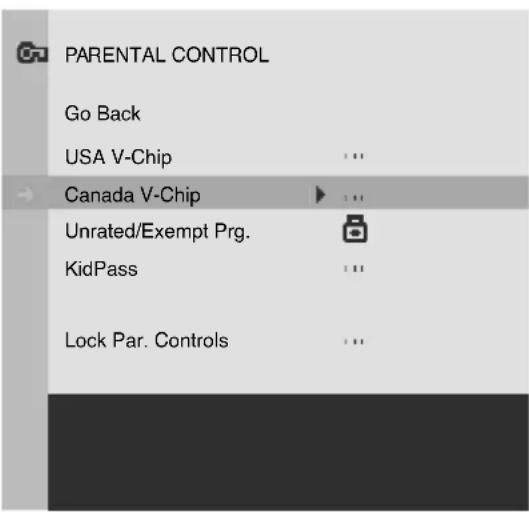
Parental Control Menu
The basic Parental Control menu will depend on the options set by the master user. If the master user chooses Allow Basic on menu items, then all options are available. To set movie and TV ratings, content themes, etc., go to Chapter 4.
Go Back Takes you to the previous menu.
USA V-Chip Displays settings for the US version of V-Chip. If you live within the United States, choose this option.
Canada V-Chip Displays settings for the Canadian version of V-Chip. If you live in Canada, choose this option.
Unrated/Exempt Prg. (Program) This setting allows the master user to determine whether they will allow unrated/exempt programs to be shown. Unlocked- All unrated programs are shown. Locked- All unrated programs are not available. Page 29 has more information.
KidPass The KidPass feature allows parents to set a certain amount of time every day of the week that a child can watch TV.
Note: The time must be set for KidPass to function.
Lock Par. (Parental) Controls Puts into effect settings made in the Parental Control menu. A password is required.
Note: Parental Control Access is the master menu that controls which menus are available to the basic end user. Go to Chapter 1 for more details.
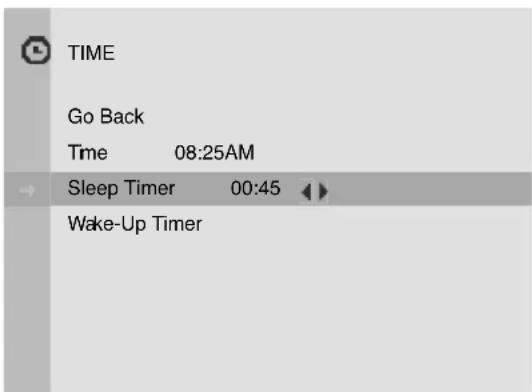
The Sleep Timer and Energy Saver settings are unavailable when On Always has been activated, even if they were set prior to choosing this option.
Note: The Time Configuration menu allows the master user to make changes to the master menu regarding time. Go to Chapter 1 for more details.
Time Menu
The functions of the basic Time menu will depend on the options set by the Master user.
Go Back Takes you to the previous menu.
Time Displays the current time if the master user has set the time.
Sleep Timer Lets you select the amount of time (in 15 minute increments) you want to give the TV before it shuts itself off (up to four hours). A message is displayed as a warning before the TV turns off. Select 00:00 to stop this function. This feature won't work if TV Power in the master menu is set to On Always. The default setting is 00:00.
Wake-Up Timer Displays a menu that lets you enter the time and channel you want your TV to turn to when it turns on.
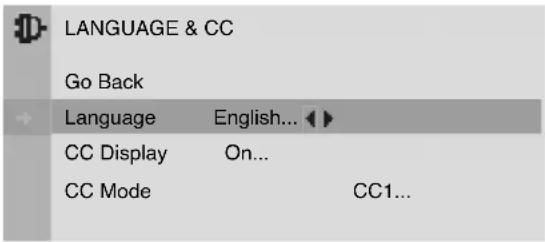
Language & CC Menu
Go Back Takes you to the previous menu.
Language Displays your preferred language for the menus. Select English, Français (French) or Español (Spanish).
CC Display Use the CC button on the remote to choose whether closed captioning information is shown on the screen.
CC Mode When CC Display is turned on, displays the CC mode: CC1, CC2, CC3, CC4, T1, T2, T3 or T4.
The TV can be "Decommercialized"
If you no longer want your TV to function as a commercial one, the steps below describe how to make it a non-commercial TV. Many features and options found in non-commercial TVs are included for your use.
• Make sure the TV is off.
- Press VOL- on the front of the TV and MENU on the remote for a few seconds simultaneously.
- The TV will turn on and activate the decommercialization sequence.
Note: In the case of inadvertent decommercialization, the user can reverse the TV to a commercial set by using the same button combination above. The decommercialized TV will turn on and reset to a commercial set.
When using the ClonePro remote, it has buttons to decommercialize and commercialize the TV. Go to page 31 for more information.
Chapter 4: Using the TV's Features
Channel Banner
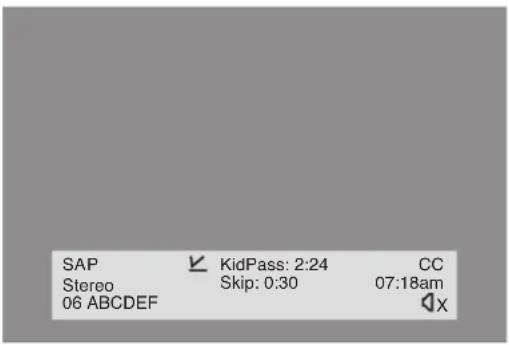
There are several items that might appear on-screen when you press the TV or INFO button on the remote. This display is called the Channel Banner. The following list describes the items on the Channel Banner screen (left to right and top to bottom).
SAP Displayed when the current channel is broadcasting SAP (Second Audio Program) information.
◀ Displayed when V-Chip has been activated.
KidPass: 2:24 Displayed when KidPass is set and the length of time remaining.
CC Displayed when Closed Captioning is available on the current channel.
Stereo or Mono Stereo is displayed when the current channel is broadcasting in stereo. Mono is displayed when the current channel is broadcasting in mono.
Skip: 0:30 Corresponds to the SKIP button. Shows the amount of time left before the TV switches back to the previous channel.
07:18 am Displays the current time.
06 ABCDEF Displays the current channel and label assigned to the channel.
◀× Displayed when you mute the sound.
Parental Controls and V-Chip
The choices in the USA V-CHIP menu involve software inside your TV (referred to as V-Chip) which allows you to block TV programs and movies based on violence, sex, or other content you may believe children should not view.
Once you block programs, you can unblock programs by entering a password.
By default, the software inside your TV is turned "off."
How V-Chip Works
V-Chip reads the program's age-based rating (TV-MA, TV-14, etc.) and content themes [(Violence (V), Adult Language (L), etc.)]. If you have blocked the rating and/or content themes that the program contains, you will receive the message, "This channel has not been approved for viewing". Change channel or press OK to enter password and temporarily deactivate the Parental Control.
Broadcasters are not required to provide content themes, so programs received with no content themes will only be blocked if you block their age-based rating. You can also block out programs that have been given a rating of Not Rated, and programs that are considered unrated. The TV age-based ratings and content themes you can block follow:
USA V-Chip Rating System
TV-MA (Mature Audience Only) Specifically designed to be viewed by adults and may be unsuitable for children under 17. It contains one or more of the following content themes: crude indecent language (L), explicit sexual activity (S), or graphic violence (V).
TV-14 (Parents Strongly Cautioned) Contains some material that many parents would find unsuitable for children under 14. Parents are strongly urged to exercise greater care in monitoring this program and are cautioned against letting children under the age of 14 watch unattended. This program contains one or more of the following content themes: intensely suggestive dialogue (D), strong coarse language (L), intense sexual situations (S), or intense violence (V).
TV-PG (Parental Guidance Suggested) Contains material that parents may find unsuitable for younger children. Many parents may want to watch it with their younger children. The program contains one or more of the following content themes: some suggestive dialogue (D), infrequent coarse language (L), some sexual situations (S), or moderate violence (V).
TV-G (General Audience) Most parents would find this program suitable for all ages. It contains little or no sexual dialogue (D) or situations (S), no strong language (L), and little or no violence (V).
TV-Y7 (Directed to Children 7 years and older) Designed for children ages 7 and above. It may be more appropriate for children who have acquired the developmental skills needed to distinguish between make-believe and reality. Themes and elements in this program may include mild fantasy violence (FV) or comedic violence, or may frighten children under the age of 7.
TV-Y (All Children) Themes and elements in this program are designed for a young audience, including children from ages 2-6. It is not expected to frighten younger children.
Canadian English V-Chip Rating System
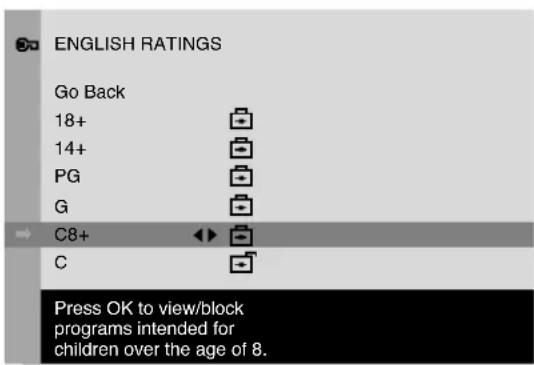
18+ (Adults) Programming intended for adults 18 and older. It may contain elements of violence, language, and sexual content which could make it unsuitable for viewers under 18. Violence Guidelines: May contain violence integral to the development of the plot, character or theme, intended for adult audiences. Other Content Guidelines: May contain graphic language and explicit portrayals of nudity and/or sex.
14+ (Viewers 14 and over) Programming contains themes or content which may not be suitable for viewers under the age of 14. Parents are strongly cautioned to exercise discretion in permitting viewing by pre-teens and early teens. Violence Guidelines: May contain intense scenes of violence. Could deal with mature themes and societal issues in a realistic fashion. Other Content Guidelines: May contain scenes of nudity and/or sexual activity. There could be frequent use of profanity.
PG (Parental Guidance) Programming intended for a general audience but which may not be suitable for younger children (under the age of 8). Parents may consider some content inappropriate for unsupervised viewing by children aged 8-13. Violence Guidelines: Depictions of conflict and/or aggression will be limited and moderate; may include physical, fantasy, or supernatural violence. Other Content Guidelines: May contain infrequent mild profanity, or mildly suggestive language. Could also contain brief scenes of nudity.
G (General Audience) Programming considered acceptable for all ages groups. While not designed specifically for children, it is understood younger viewers may be part of the audience. Violence Guidelines: Will contain very little violence, either physical or verbal or emotional. Will be sensitive to themes which could frighten a younger child, will not depict realistic scenes of violence which minimize or gloss over the effects of violent acts. Other Content Guidelines: There may be some inoffensive slang, no profanity and no nudity.
C8+ (Children 8 and Older) Programming generally considered acceptable for children 8 years and over to watch on their own. Violence Guidelines: Violence will not be portrayed as the preferred, acceptable, or only way to resolve conflict or encourage children to imitate dangerous acts which they may see on television. Any realistic depictions of violence will be infrequent, discreet, of low intensity and will show the consequences of the acts. Other Content Guidelines: There will be no profanity, nudity or sexual content.
Continues on next page...
C (Children) Programming intended for children under age 8. Violence Guidelines: Careful attention is paid to themes which could threaten children's sense of security and well being. There will be no realistic scenes of violence. Depictions of aggressive behavior will be infrequent and limited to portrayals that are clearly imaginary, comedic or unrealistic in nature. Other Content Guidelines: There will be no offensive language, nudity or sexual content.
Canadian French V-Chip Rating System
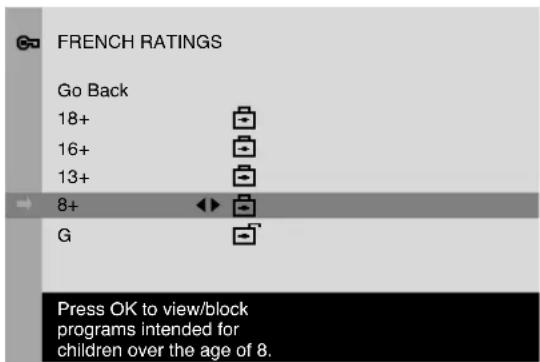
18+ (Adults) Programming is for adults only. This program contains sustained violence or extremely violent scenes.
16+ (Viewers 16 and over) Programming is not suitable for those under age 16. This program contains frequent scenes of violence or intensely violent scenes.
13+ (Viewers 13 and over) Programming may not be suitable for children under the age of 13. This program either contains several violent scenes or one or more scenes that are violent enough to affect them. Viewing in the company of an adult is therefore strongly recommended for children under the age of 13.
8+ (Viewers 8 and over) Not recommended for young children. This program is suitable for most audiences, but it contains mild or occasional violence that could upset young children. Viewing in the company of an adult is therefore recommended for young children (under the age of 8) who do not distinguish between reality and imagination.
G (General Audience) This program is suitable for audiences of all ages. It contains no violence, or any violence that it does contain is either minimal or is presented in a humorous manner, as a caricature, or in an unrealistic way.
USA V-Chip TV Rating Limit
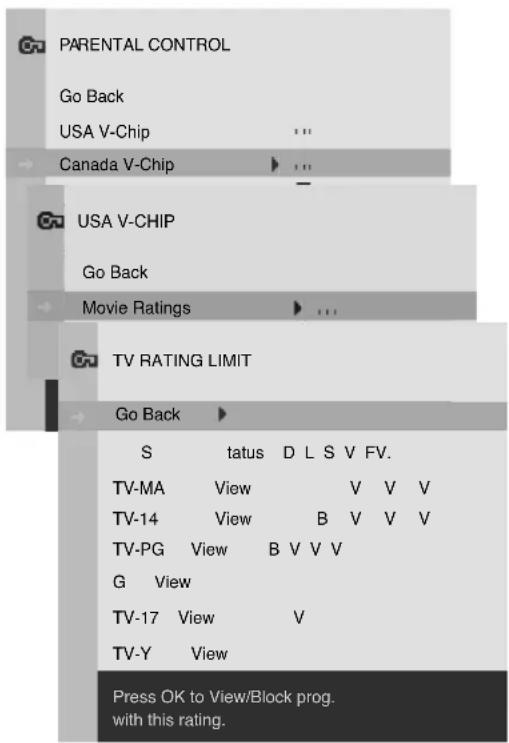
The V-Chip TV Rating Limit lets you decide which TV programs can and cannot be viewed.
To set TV programming limits:
- Choose Parental Control from the Main menu (the PASSWORD screen appears the first time you enter the Parental Control menu). Create your password using the number buttons on the remote.
- Highlight and select USA VChip. Then select TV Ratings.
- Once you get to the TV RATING LIMIT screen, use the arrow buttons and OK on your remote to change the status of a TV program rating or content theme from View to Block.
The following sections give you more details about how to change the status of TV program limits.
Note: If you forget your password you can reset it. Make sure the TV is off. Simultaneously press and hold VOL- on the TV's front panel and CLEAR on the remote for approximately 5 seconds. Enter a new password the next time you access the PARENTAL CONTROL menu.
The V-Chip Rating Screen
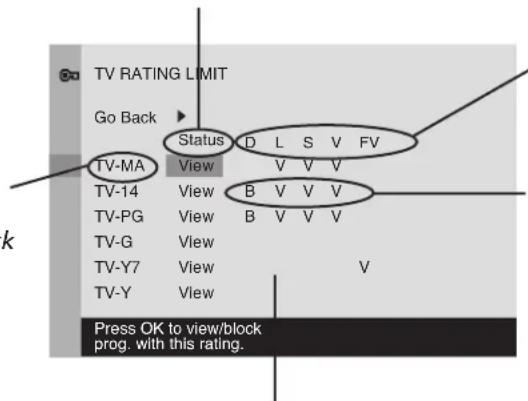
The following is an example of where items are located within the TV RATING LIMIT screen.
Rating Status Field
Lets you select whether the status of the age-based rating limit to the left is View or Block.
Rating Field
Lets you select from a list of age-based ratings you can block or view.
Content Themes
Lists the content themes you can block or view.
Content Status Fields
Lets you select which content themes to view for the selected rating, and whether the status of the content theme is currently View (V) or Block (B).
Rating Settings Area
Lets you see the current block/view state of age-based ratings and associated content.
| Hierarchy of Age-Based Ratings | |
| TV-MA Mature Audience Only | |
| TV-14 Parents Strongly Cautioned | |
| TV-PG Parental Guidance Suggested | |
| TV-G General Audience | |
| TV-Y7 Directed to Children 7 years and older | |
| TV-Y All Children |
Blocking Age-Based Ratings
You can automatically block all program ratings above a specified age-based rating level.
To block programs with higher ratings:
- Press the up or down arrow button to scroll to the rating corresponding with the lowest rating you do not want the child to watch.
- Press the OK button to toggle between View and Block. The status for the rating listed to the left and all higher ratings automatically changes to Block.
- Press the up or down arrow button to highlight Go back and press OK.
- Turn on V-Chip active in the PARENTAL CONTROL menu (box has check mark) for rating limits to take effect.
Viewing Age-Based Ratings
After you block age-based ratings, you can change some of the ratings back to View.
- Press the up or down arrow button to select the rating with a status of Block.
- Press OK to select View.
| Content Themes | |
| D Sexually explicit dialogue | |
| L Adult language | |
| S Sexual situations | |
| V Violence | |
| FV Fantasy Violence |
Blocking Specific Content Themes
You can block programs based on their content. (Content is represented by the D, L, S, V and FV on your screen.) When you block a content theme for a particular rating, you automatically block that content theme for higher rated programs as well.
To block program content:
- Determine the content themes you want to block.
- Press the down arrow button to scroll to the rating whose content theme you want to change.
- Press the right arrow button to move the highlight to a particular content theme status.
- Press the OK button to change its status to B. (In the example to the left, you block the language (L) corresponding with TV-14. The language for TV-MA is blocked as well).
Notes: Broadcasters are not required to provide content themes or age-based ratings.
You must remember to activate Parental Controls for rating limits to take effect.
Viewing Specific Content Themes
If you block specific content themes, you have the option of going back and changing some of the content themes back to (V) View:
- Determine the content themes you want to change to (V) View.
- Press the down arrow button to scroll to the rating whose content theme you want to change, such as B under language (L) corresponding with TV-14.
- Press the right arrow button to move the highlight to a particular content theme status.
- Press the OK button to change the status back to V. Your child would then be able to watch programs with the TV-14 adult language content, but not programs with TV-MA language content.
Note: Only the content theme status corresponding to TV-14 (L) language changes to (V) View. Higher rated content themes, such as that for TV-MA language, do not change.
Blocking Canadian V-Chip Ratings
If you receive Canadian programs you can block Canadian English and French V-Chip by ratings only. When you block a particular rating, you automatically block the higher rated programs as well.
To block Canadian English and French program ratings:
- Select Canada VChip from the PARENTAL CONTROL menu.
- Highlight English Ratings or French Ratings and press OK.
- Determine the rating you want to block.
- Press the down arrow button to scroll to the rating you want to change.
- Press the OK button to change its status to block (the lock icon appears and all ratings above the one you selected change to lock).
V-Chip Movie Rating Limit
Set movie rating limits by blocking movies rated above a specified level.
To access the Movie Rating Limit menu:
- Press MENU on the remote control (the MAIN MENU appears).
- Select Parental Control.
- Select USA V-Chip.
- Select Movie Ratings.
Blocking Movie Ratings
Once you are in the Movie Rating Limit menu, follow the same steps described for blocking Canadian V-Chip Ratings.
V-Chip Exempt Program Block
The Exempt Prgms. option lets you decide if programs that the V-Chip recognizes as unrated can be viewed. Unrated TV programs may include news, sports, political, religious, local and weather programs, emergency bulletins, public announcements, and programs without ratings. The Exempt option applies to both USA and Canadian unrated programs and Canadian programs rated E.
Unlocked All unrated programs are available. Locked All unrated programs are not available.
Press the down arrow to highlight Exempt Prgms. Then press the right arrow to toggle between the lock and unlock icon.
KidPass
The KidPass feature allows parents to set a certain amount of time every day of the week that a child can watch TV. To set KidPass:
- Select Parental Control from the main menu.
- Select KidPass (the KIDPASS menu appears with Current Day highlighted).
Note: If you can't select KidPass, you need to set the time. Highlight Go Back and press OK. Select Time and press OK. Enter the Time Config. menu. Set the time using the arrow and number buttons.
- Press the right arrow to select the current day.
- Press the down arrow button to choose the day of the week.
- After you've chosen the day of the week, press the right arrow to select the amount of time: Free and 00:30 up to 16:00 (30 minute increments).
- When you're done setting KidPass, select Go Back.
- Go to Lock Par. Controls and activate KidPass by entering the password.
When the time has expired, the TV shuts off. If you turn on the TV the same day it shut off, the password screen appears (enter the password used for Parental Control).
Notes: If control has been turned off in the master menu (Disallow Basic) this feature will not be available to other users.
You can change settings in the Parental Control menu only when Lock Par. Controls is in the unlocked position.
If you forget your password you can reset it. Make sure the TV is off. Simultaneously press and hold VOL- on the TV's front panel and CLEAR on the remote for approximately 5 seconds. Enter a new password next time you access the PARENTAL CONTROL menu.
Front Panel Lock
Selecting this option lets you lock (disable) or unlock (enable) the TV's front panel. The remote still tunes to any channel. When using this as a Parental Control method, remove access to any remote that is capable of operating the television.
- From the PARENTAL CONTROL menu, press the up or down arrow to highlight Front Panel Lock.
- Press the right or left arrow to turn on (lock is closed) or off (lock is open) front panel lock.
Create Password
Selecting this option lets you create a new password. Enter a new password from the Passwd. menu in the Lock Par. (Parental) Cont. (Control) menu, this is the password you use until you change it.
Using the ClonePRO™
![ready DSCI busy ready IR busy Comm. Legacy Decom. Master+ [Config] Master- [Factory] [Status] RESET INFO OK MENU CLEAR LEARN POWER TEACH ON OFF TEACH ClonePRO™](/content/2026/05/955013/images/91da26b4643a058750b9168594f83b0d1d09766c7d7d88591959ca611026b7b2.jpg)
Modes of operation
The ClonePRO operates from one of two modes:
DSCI Connect a DSCI cable to the ClonePRO and to the TV's DSCI port on the back panel.
IR (Infrared) This operation is wireless. Press ON to begin using the remote in IR mode.
The corresponding “ready” light indicates the mode of operation, and the corresponding “busy” light indicates activity in this mode.
Buttons with black labels function similarly in both modes, while green labels operate DSCI mode and red labels operate IR mode.
DSCI mode
The ClonePRO enters this mode when it is connected to the TV's Digital Serial Communications Interface port via a cable (included).
- Any standard (no-flip, 1-to-1) 8-conductor computer-networking cable may be used.
- No battery is required in this mode.
- If the unit is already in IR mode, press OFF to speed the transition to DSCI mode.
DSCI (green) buttons
Comm Restores the TV to normal commercial operation, essentially undoing the effect of the Legacy and Decom buttons.
Decom "Decommercializes" the TV to facilitate aftermarket resale.
[Factory] Press and hold the RESET button for several seconds to re-initialize the TV, reverting all settings to factory defaults.
Note: Pressing FACTORY overwrites any settings already in the TV.
LEARN Begins the process of learning the settings from a TV that has been setup as desired.
Note: Pressing LEARN overwrites any settings already in the ClonePRO.
Legacy Places the TV in a mode in which it emulates the behavior of older models. This is a required part of the configuration for some applications.
POWER Turns on the TV. It is recommended, though not required, when in DSCI mode to view on-screen displays.
[Status]: Press and hold the INFO button for several seconds to display settings stored in the ClonePRO and the TV. For example: Mem: CB:36 TV:36
This tells you the ClonePRO and the TV have 36 pages of information stored in memory.
Continues on next page...
Across the screen are red dashes. Press any button on the remote control you are using. Red pulses should appear, telling you the TV is recognizing the remote and is able to send out that information. If red pulses don't appear, contact your RCA distributor.
TEACH: This begins the process of teaching the settings stored in the ClonePRO to the TV to which it is connected.
Note: Pressing TEACH overwrites any settings already in the TV.
After successful teaching, the TV will turn off and reboot.
If the memory-image stored in the clone-box is not valid for the TV, an on-screen message will advise of the conflicting memory-sizes.
IR mode
The ClonePRO enters the IR mode when any button on the bottom row of the keypad is pressed (without connection to a TV DSCI port). A standard 9V battery (accessed via a small rear panel) is required to enable this mode.
Notes: Like any IR (infrared) remote control, the ClonePRO requires a reasonable line of sight between it and the TV for proper signaling. Obstructions, long distances, sharp angles and certain specialty lighting can reduce the effective range.
If the "IR ready" light stays on longer than 1 minute by itself, temporarily remove the battery to reset it.
Remove the battery prior to long-term storage.
IR (red) Buttons
Note: You must press the ON button for the IR buttons to operate.
Master+ & Master- The Master- button disables access to the TV's master menus via the master remote. (Some third-party devices, attached to the TV's DSCI port as part of a larger system, may disable access to master menus even after they are disconnected.) To enable the master menus, press Master+.
OFF Turns the TV off, and turns the ClonePRO off.
ON Turns the TV on, and turns on the ClonePRO IR mode, ready for subsequent buttons. Note that the unit will automatically turn itself off 30 seconds after the last button has been pressed to extend battery-life.
TEACH Begins teaching the settings stored in the ClonePRO to the TV, effectively "Cloning" the initially configured TV. May be made more reliable for older models by first filling the memory of the example TV with channel-labels on unused channels.
After an IR TEACH, older-model TVs do not need to reboot.
Note: Pressing TEACH overwrites any settings already in the TV.
- A TV must be turned on before being taught in IR mode.
• After successful teaching, the TV turns off and turns on with the new settings. - If the TV displays the message Cloning Timeout or Cloning Aborted, press TEACH again to retry, experimenting with the ClonePRO at different distances and angles from the TV.
- If no valid settings have been stored via a DSCI LEARN, the IR ready light will come on but nothing will appear on the TV screen.
Note: The ClonePRO cannot be used to cross clone (to copy the memory of older models into newer models, or vice versa), because the two have completely different memory-maps, memory-sizes, features and settings.
[Config]: Pressing and holding this button in IR mode toggles the “decommercialization” and aftermarket resale of older-model televisions. Note that this is not reversible after turning-off older-model TVs.
Cloning a TV
Use the ClonePRO or a master remote to complete any necessary setup steps to the TV, such as Auto Channel Search, changing Access & Power options, etc. Go to Chapter 1 for more information on setting up the TV. When you have finished setting up the TV, you can use it as your example TV.
- Connect the ClonePRO to the example TV's DSCI port.
- It is recommended, though not required, to turn on the TV. Press the POWER button.
- Press the LEARN button to begin the cloning process. When it is complete, Cloning Complete is displayed on-screen.
- Take the ClonePRO to each subsequent TV and then (in either DSCI or IR mode) TEACH each TV, monitoring the process on-screen.
The settings learned by the ClonePRO remain indefinitely, ready to TEACH the next TV until overwritten by a new LEARN operation.
General troubleshooting
Problems with the DSCI mode
- Make sure the TV is plugged into a live electrical outlet.
- Make sure the ClonePRO is plugged into the TV's DSCI port.
- The connecting cable should have at least 6 wires, mapping 1-to-1 (not flipped).
ClonePro remote isn't working
- Check the battery. Place a new 9V battery in the unit if the battery is old.
- Make sure the ClonePRO is pointed at the TV with a clear line of sight.
- If you are trying to TEACH, make sure there is a valid memory stored in the ClonePRO (Check by going into DSCI-mode [Status].)
Troubleshooting
Most problems you encounter with your TV can be corrected by consulting the Troubleshooting list that follows.
Note: If you prefer, we can provide you with the name of an Authorized Service Representative who will visit your location for a fee to install your electronic entertainment system and to instruct you in its operation. For details about this service, call 1-888-206-3359.
To contact the nearest RCA Service Center call 1-800-880-5966.
TV Problems
TV won't turn on
- Press the TV button.
• Make sure the TV is plugged in. - Check the wall receptacle (or extension cord) to make sure it is "live" by plugging in something else.
- Something might be wrong with your remote control. Press the POWER button on the front of the TV. If the TV turns on, check the remote control solutions on the next page.
- The front panel controls may be locked (disabled). Use the remote control to unlock the front panel controls by selecting Front Panel in the Access & Power Options menu and choosing Enabled.
Controls don't work
- The front panel controls may be locked (disabled). Use the remote control to unlock the front panel controls by selecting Front Panel in the Access & Power Options menu and choosing Enabled.
- Unplug the TV for two minutes and then plug it back in. Turn the TV on and try again.
TV turns off unexpectedly
- KidPass might have been set. Go to page 30 for instructions.
- A Schedule Recurrence may have been set. In the master menu system go to Time then Schedule.
- Electronic protection circuit may have been activated because of a power surge. Wait 30 seconds and then turn the TV on again. If this happens frequently, the voltage in your house may be abnormally high or low.
• Sleep Timer or Energy Saver may have been set. Chapter 1 has more details.
TV turns on unexpectedly
- Wake Timer might have been set. Go to page 15 for instructions.
- You might have pressed CH+ , CH- or OK on the remote accidentally.
Blank screen
• Make sure the component connected to the TV is turned on, and the TV is tuned to the correct Video Input Channel (Channel 3/4, VID1, S-VID, etc.)
- Try another channel.
- Press RESET, in case the picture controls are set too low.
No sound, picture okay
- Maybe sound is muted. Press the volume up button to restore sound.
- Maybe speakers are turned off. Check the Audio Output control panel in the master Sound menu. Go to page 11 for instructions.
- Maybe Initial Volume is set low. Go to the master Sound menu to check.
• If using S-Video or Y, Pb, Pr, remember to also connect the component's left and right audio output jacks to the TV.
Can't select certain channel
- Channel may be blocked or not approved in the Parental Control menu.
Noisy stereo reception
• The station might be weak. Change the Sound Type in the Sound menu from stereo to mono.
No picture, no sound but TV is on
- Maybe the cable/air setting is set to the wrong position. Select Signal Type from the master Setup menu. Go to Chapter 1 for more information.
- The channel might be empty — change channels.
- If you're trying to watch content from a component that's connected to the 'TV (like a DVD player or VCR), press the INPUT button on the remote control until the content appears.
Sound okay, picture poor
- Check antenna connections. Make sure all of the cables are firmly connected to the jacks.
Black box appears on the screen
- Closed-captioning might be on. Check Closed-Caption in the Setup menu. Go to page 16 for more information.
The Remote Control Doesn't Work
- Something might be between the remote and the remote sensor on the component. Make sure there is a clear path.
- Maybe batteries in remote are weak, dead or installed incorrectly. Put new batteries in the remote.
- You might need to reset the remote: remove batteries and press the number 1 button for at least 60 seconds. Release the 1 button and replace the batteries.
- Operation of certain remote control buttons might be restricted by master menu settings.
- Maybe remote is in wrong configuration (TV1 or TV2) for that TV. Check the Remote Config . settings in the Access & Power Options menu.
Problems with V-Chip/Parental Controls
The rating limits don't work
• You must lock the settings. Go to the Main menu, select Parental Control, then Lock Parental Controls to save your settings.
I don't remember my password and I want to unlock the TV
• Use the master remote to access the Password option in the Lock Par. Controls portion of the Parental Controls menu.
The V-Chip won't let me watch a program even though it's not rated as violent.
- Maybe the movie was given an NR (Not Rated) status. After you block movie ratings, you must set NR to View separately in order to view movies with an NR rating.
- Video Input Channels (VID, SVID) aren't available unless they have been manually added to the channel list.
Menu Problems
- Menu access may be blocked by ClonePRO programming.
- Try unplugging the TV for two minutes and then plug it back in and turn it on.
- The Energy Saver settings won't work if the TV Power is set to On Always in the Access & Power Options menu.
- The basic menu options might be restricted by master menu settings.
• The ClonePRO might have disabled master menus. - Sleep and Schedule functions won't work if the TV Power is set to On Always.
Care and Cleaning
CAUTION: Turn OFF your TV before cleaning.
You can clean the TV as required, using a soft lint-free cloth. Be sure to occasionally dust the ventilation slots in the cabinet to help assure adequate ventilation.
The TV's screen may be cleaned with a soft, lint-free cloth as well. Take care not to scratch or mar the screen. If necessary, you may use a cloth dampened with warm water. Never use strong cleaning agents, such as ammonia-based cleaners, or abrasive powder. These types of cleaners will damage the TV.
While cleaning do not spray liquid directly on the screen, or allow liquid to run down the screen and inside the TV. Also, avoid placing drinks or vases with water on top of the TV. This could increase the risk of fire or shock hazard or damage to the TV.
Caution: Using video games or any external accessory with fixed images for extended periods of time can cause them to be permanently imprinted on the picture tube (or projection TV picture tubes). ALSO, some network/program logos, phone numbers, etc. may cause similar damage. This damage is not covered by your warranty.
Limited Warranty
What your warranty covers:
- Any defect in materials or workmanship.
For how long after your purchase:
• One year for labor charges.
• One year for parts.
- Two years for picture tube.
(The warranty begins at time of first installation or 45 days after shipment, whichever comes first.)
What we will do:
- Pay any Authorized RCA Commercial Television Service Center the labor charges to repair your television.
- Pay any Authorized RCA Commercial Television Service Center for the new or, at our option, refurbished replacement parts and picture tube required to repair your television.
How you get service:
- Request service from any Authorized RCA Commercial Television Service Center, provided that your television is located within the geographic territory covered by an Authorized Commercial RCA Television Service Center. If not, you must take your television to the Service Center location at your own expense, or pay for the cost the Service Center may charge to transport your television to and from your location.
- To identify your nearest Authorized RCA Commercial Television Service Center, ask your distributor, visit www.rcacommercial.com, look in the Yellow Pages, or call 1-800-880-5966.
• Show the Authorized Service Center Representative your sales receipt or other evidence of purchase date or first rental.
What your warranty does not cover:
- Customer instruction. (Your Owner's Manual clearly describes how to install, adjust, and operate your television. Any additional information should be obtained from your distributor or sales representative.)
• Installation and related adjustments. - Acts of God, such as, but not limited to lightning damage.
• Signal reception problems not caused by your television.
• Damage from misuse or neglect. - Batteries.
- Damage from images burnt onto the screen.
- A television that has been modified or incorporated into other products.
- A television purchased or serviced outside the USA.
- In-room service.
Product registration:
- Please complete and mail the Product Registration Card packed with your TV. It will make it easier to contact you should it ever be necessary. The return of the card is not required for warranty coverage.
Limitation of Warranty:
- THE WARRANTY STATED ABOVE IS THE ONLY WARRANTY APPLICABLE TO THIS PRODUCT. ALL OTHER WARRANTIES, EXPRESS OR IMPLIED (INCLUDING ALL IMPLIED WARRANTIES OF MERCHANTABILITY OR FITNESS FOR A PARTICULAR PURPOSE) ARE HEREBY DISCLAIMED. NO VERBAL OR WRITTEN INFORMATION GIVEN BY TTE TECHNOLOGY, INC., ITS AGENTS OR EMPLOYEES SHALL CREATE A GUARANTY OR IN ANY WAY INCREASE THE SCOPE OF THIS WARRANTY.
Continues on next page...
- REPAIR OR REPLACEMENT AS PROVIDED UNDER THIS WARRANTY IS THE EXCLUSIVE REMEDY OF THE CONSUMER. TTE TECHNOLOGY, INC. SHALL NOT BE LIABLE FOR INCIDENTAL OR CONSEQUENTIAL DAMAGES RESULTING FROM THE USE OF THIS PRODUCT OR ARISING OUT OF ANY BREACH OF ANY EXPRESS OR IMPLIED WARRANTY ON THIS PRODUCT. THIS DISCLAIMER OF WARRANTIES AND LIMITED WARRANTY ARE GOVERNED BY THE LAWS OF THE STATE OF INDIANA. EXCEPT TO THE EXTENT PROHIBITED BY APPLICABLE LAW, ANY IMPLIED WARRANTY OF MERCHANTABILITY OR FITNESS FOR A PARTICULAR PURPOSE ON THIS PRODUCT IS LIMITED TO THE APPLICABLE WARRANTY PERIOD SET FORTII ABOVE.
How state law relates to this warranty:
- Some states do not allow the exclusion nor limitation of incidental or consequential damages, or limitations on how long an implied warranty lasts, so the above limitations or exclusions may not apply to you.
- This warranty gives you specific legal rights, and you also may have other rights that vary from state to state.
If you purchased your product outside the USA:
- This warranty does not apply. Contact your distributor for warranty information.
Service calls which do not involve defective materials or workmanship are not covered by this warranty. Costs of such service calls are the sole responsibility of the purchaser.
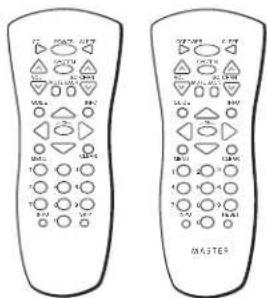
CRK17TC1 CRK17TD1
Basic
Master
Remote Control These are the remote controls that work with your TV. Replacements or spares can be ordered as needed.
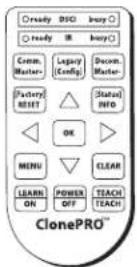
257195
ClonePRO Clones settings for multiple TVs. Replacements or spares can be ordered as needed.
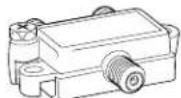
VH47
2-way Signal Splitter helps you connect to a second TV or VCR.

ANT200
Amplified VHF/UHF/FM Antenna allows you to easily switch from the antenna signal to cable or satellite easily without disconnecting antenna.
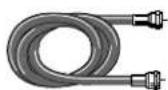
VH81 (3-ft)
VH82 (6-ft)
Screw-on Cable attaches to the round antenna connectors (called 75-ohm F-type) on the back of your VCR or TV. The ends screw onto the connectors for a secure connection.

VH83
Standard Audio/Video cable with RCA-type phono plugs.

VH913
S-Video Cable has multi-pin connectors on each end for connecting S-Video components to your TV.
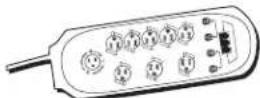
PS83202C2
Surge Protector provides eight outlets, two coax cable/DBS protection, telephone line protection, surge stat indicator and 2100 joules protection.
Description Part No. Price
Screw-on antenna cable (3-ft) VH81 \$3.95
Screw-on antenna cable (6-ft) VH82 \$4.95
Push-on antenna cable (6-ft) VH89 S5.95
Monaural VCR Dubbing Cable (6-ft) VH83 \$5.95
Stereo VCR Dubbing Cable (6-ft) VH84 S9.95
S-Video Cable (6-ft) VH976 \$7.95
S-Video Cable (12-ft) VH913 \$14.95
2-way Signal Splitter VII47 S3.95
Amplified Antenna ANT200 \$49.95
Basic Remote Control (CRK17TC1) 244888 **
Master Remote Control (CRK17TD1) 244889 **
ClonePRO Remote 257195 **
Audio•Video Adapter 228449 \$4.45
Surge Protector SCTV4000C \$49.95
Prices are subject to change without notice.
**Pricing not available at time of printing.
HOW TO ORDER
ON-LINE: Accessories may also be purchased at www.rca.com/accessories (subject to availability).
BY PHONE: To place your order by phone, have your Visa, MasterCard or Discover Card ready and call 1-800-338-0376. Use this number only to place an order for accessory items listed on this page.
All accessories are subject to availability. Where applicable, we will ship a superseding model.

As an ENERGY STAR® Partner, Thomson Inc. has determined that this product meets the ENERGY STAR guidelines for energy efficiency.
ENERGY STAR is a U.S. registered mark.
Visit the RCA website at www.rca.com
Please do not send any products to the Indianapolis address listed in this manual or on the carton. This will only add delays in service for your product.
TTE Technology, Inc.
10330 North Meridian Street
Indianapolis, IN 46290
©2004 TTE Technology, Inc.
RCA and associated marks are trademarks of THOMSON S.A. used under license to TCL-Thomson Electronics (TTE).
Printed in Thailand
TOCOM 16441050
- Television User's Guide
- CAUTION
- WARNING
- Product Registration
- Product Information
- IMPORTANT SAFETY INSTRUCTIONS
- Read before operating equipment
- Chapter 1: Connections & Setup ....5
- Chapter 2: Using the Remote Control .....17
- Chapter 3: Using the Menu System ......21
- Chapter 4: Using the TV's Features .....24
- Chapter 5: Other Information ....31
- Things to Consider Before You Connect
- Protect Against Power Surges
- Protect Components from Overheating
- Position Cables Properly to Avoid Audio Interference
- Important Stand and Base Safety Information
- Use Indirect Light
- Explanation of Jacks and Cables
- VIDEO 1
- VIDEO 2 (Model J32F635 only)
- MONITOR OUT
- The Front of Your TV
- Front Input Jacks
- Front Panel Buttons
- Plug in the TV
- Start-up
- Put Batteries in the Remote
- Turn on the TV
- Place All Available Channels Into Memory
- Set the Time
- The ClonePRO™
- Understanding the Menus
- Master Menus
- Basic Menus
- Using Master and Basic Menus
- Exiting a Menu
- Setting Limits in Master Menus
- Sound Menu
- Picture Menu
- Access and Power Options Menu
- Parental Control
- Time Menu
- Setup Menu
- Chapter 2: Using the Remote Control
- Types of Remote Controls
- Master Remotes
- Basic Remotes
- ClonePRO
- Basic Remote Buttons (CRK17TC1 & CRK17TD1)
- Additional Remote Buttons (CRK17TD1)
- Using the INPUT Button
- Inputs and On-Screen Displays
- Input Signal TV Display
- Using the SYSTEM Button
- ClonePRO™ Remote Buttons
- Chapter 3: Using the Menu System
- The Basic Menu System
- Channel Guide Menu
- Parental Control Menu
- Language & CC Menu
- The TV can be "Decommercialized"
- Chapter 4: Using the TV's Features
- Channel Banner
- Parental Controls and V-Chip
- How V-Chip Works
- USA V-Chip Rating System
- Canadian English V-Chip Rating System
- Canadian French V-Chip Rating System
- USA V-Chip TV Rating Limit
- The V-Chip Rating Screen
- Rating Status Field
- Rating Field
- Content Themes
- Content Status Fields
- Rating Settings Area
- Blocking Age-Based Ratings
- Viewing Age-Based Ratings
- Blocking Specific Content Themes
- Viewing Specific Content Themes
- Blocking Canadian V-Chip Ratings
- V-Chip Movie Rating Limit
- Blocking Movie Ratings
- V-Chip Exempt Program Block
- KidPass
- Front Panel Lock
- Create Password
- Using the ClonePRO™
- Modes of operation
- DSCI mode
- DSCI (green) buttons
- IR mode
- IR (red) Buttons
- Cloning a TV
- General troubleshooting
- Problems with the DSCI mode
- ClonePro remote isn't working
- Troubleshooting
- TV Problems
- TV won't turn on
- Controls don't work
- TV turns off unexpectedly
- TV turns on unexpectedly
- Blank screen
- No sound, picture okay
- Can't select certain channel
- Noisy stereo reception
- No picture, no sound but TV is on
- Sound okay, picture poor
- Black box appears on the screen
- The Remote Control Doesn't Work
- Problems with V-Chip/Parental Controls
- The rating limits don't work
- I don't remember my password and I want to unlock the TV
- The V-Chip won't let me watch a program even though it's not rated as violent.
- Menu Problems
- Care and Cleaning
- CAUTION: Turn OFF your TV before cleaning.
- The TV's screen may be cleaned with a soft, lint-free cloth as well. Take care not to scratch or mar the screen. If necessary, you may use a cloth dampened with warm water. Never use strong cleaning agents, such as ammonia-based cleaners, or abrasive powder. These types of cleaners will damage the TV.
- Limited Warranty
- What your warranty covers:
- For how long after your purchase:
- What we will do:
- How you get service:
- What your warranty does not cover:
- Product registration:
- Limitation of Warranty:
- How state law relates to this warranty:
- If you purchased your product outside the USA:
- HOW TO ORDER
- Visit the RCA website at www.rca.com
Brand : RCA
Model : VH82
Category : Cables for Computers and Peripherals