
KHB300WH - Blender KITCHENAID - Free user manual and instructions
Find the device manual for free KHB300WH KITCHENAID in PDF.


| Product Type | Immersion Blender (Hand Blender) |
| Model | KHB300WH |
| Brand | KitchenAid |
| Color | White |
| Power Rating | 120 V, 60 Hz, 5.0 Amps |
| Motor Power | 200 Watts |
| Speed Settings | 5 Variable Speeds |
| Shaft Material | Stainless Steel |
| Blade Material | Stainless Steel |
| Blending Shaft Length | 7.5 inches |
| Total Product Height | 11.5 inches |
| Product Weight | 1.5 lbs |
| Cord Length | 4.5 feet |
| Dishwasher Safe Parts | Blending shaft and bell (top rack) |
| Main Functions | Blending, Pureeing, Emulsifying, Whisking (with optional whisk) |
| Included Accessories | Blending arm, 3-cup blending jar, whisk attachment (may vary) |
| Safety Features | Non-slip grip, button operation, AC adapter |
| Warranty | 1 Year Limited Warranty |
| Country of Origin | USA |
| Certifications | ETL Listed |
Frequently Asked Questions - KHB300WH KITCHENAID
User questions about KHB300WH KITCHENAID
0 question about this device. Answer the ones you know or ask your own.
Ask a new question about this device
Download the instructions for your Blender in PDF format for free! Find your manual KHB300WH - KITCHENAID and take your electronic device back in hand. On this page are published all the documents necessary for the use of your device. KHB300WH by KITCHENAID.
USER MANUAL KHB300WH KITCHENAID
1-800-541-6390
Details Inside


We're so confident the quality of our products meets the exacting standards of KitchenAid that, if your Immersion Blender should fail within the first year of ownership, KitchenAid will arrange to deliver an identical or comparable replacement to your door free of charge and arrange to have your “failed” Immersion Blender returned to us. Your replacement unit will also be covered by our one year full warranty. Please follow these instructions to receive this quality service.
If you reside in the 50 United States and your KitchenAid® Immersion Blender should fail within the first year of ownership, simply call our toll-free Customer Satisfaction Center at 1-800-541-6390, 8 a.m. to 8 p.m., Monday through Friday, 10 a.m. to 5 p.m., Saturday, Eastern Time. Give the consultant your complete shipping address. (No P.O. Box Numbers, please.)
When you receive your replacement Immersion Blender, use the carton and packing materials to pack-up your “failed” Immersion Blender. In the carton, include your name and address on a sheet of paper along with a copy of the proof of purchase (register receipt, credit card charge slip, etc.).
For a detailed explanation of warranty terms and conditions, including how to arrange for service outside the United States, see pages 3 and 4.
Proof of Purchase & Product Registration
Always keep a copy of the sales receipt showing the date of purchase of your Immersion Blender. Proof of purchase will assure you of in-warranty service.
Before you use your Immersion Blender, please fill out and mail your product registration card packed with the unit. This card will enable us to contact you in the unlikely event of a
product safety notification and assist us in complying with the provisions of the Consumer Product Safety Act. This card does not verify your warranty.
Please complete the following for your personal records:
Model Number ____
Serial Number ____
Date Purchased
Store Name ____
Table of Contents
Hassle-Free Replacement Warranty....Inside Front Cover
Product Registration Card ......Inside Front Cover
Important Safeguards....2
Warranty ....3
For the 50 United States and District of Columbia....3
For Puerto Rico ....4
Arranging for Service after the Warranty Expires 4
Arranging for Service Outside the 50 United States and Puerto Rico ......4
Ordering Accessories and Replacement Parts 4
Electrical Requirements....5
Troubleshooting Problems ....5
Immersion Blender Features....6
Assembling Your Immersion Blender....8
Operating Your Immersion Blender....9
Operating Tips....13
Care and Cleaning....13
Storage....13
Recipes....14
Your safety and the safety of others are very important.
We have provided many important safety messages in this manual and on your appliance. Always read and obey all safety messages.

This is the safety alert symbol.
This symbol alerts you to potential hazards that can kill or hurt you and others.
All safety messages will follow the safety alert symbol and either the word “DANGER” or “WARNING.” These words mean:
DANGER
You can be killed or seriously injured if you don't immediately follow instructions.
WARNING
You can be killed or seriously injured if you don't follow instructions.
All safety messages will tell you what the potential hazard is, tell you how to reduce the chance of injury, and tell you what can happen if the instructions are not followed.
When using electrical appliances, basic safety precautions should always be followed including the following:
- Read all instructions.
- To protect against risk of electrical shock do not put motor body, cord or electrical plug of this Immersion Blender in water or other liquid.
- This appliance should not be used by children and care should be taken when used near children.
- Unplug from outlet when not in use, before putting on or taking off parts, and before cleaning.
- Avoid contacting moving parts.
- Do not operate any appliance with a damaged cord or plug or after the appliance malfunctions, or is dropped or damaged in any manner. Return appliance to the nearest Authorized Service Facility for examination, repair or electrical or mechanical adjustment.
- The use of attachments not recommended or sold by the manufacturer may cause fire, electric shock or injury.
- Be certain chopper cover is securely locked in place before operating appliance.
- Do not use outdoors.
- Do not let cord hang over edge of table or counter.
- Do not let cord contact hot surface, including the stove.
- When mixing liquids, especially hot liquids, use a tall container or make small quantities at a time to reduce spillage.
- Keep hands and utensils out of the container while blending to prevent the possibility of severe injury to persons or damage to the unit. A scraper may be used, but must be used only when the unit is not running.
- Blades are sharp. Handle carefully.
- This product is designed for household use only.
SAVE THESE INSTRUCTIONS
KitchenAid® Immersion Blender Warranty for the 50 United States and District of Columbia
This warranty extends to the purchaser and any succeeding owner for Immersion Blenders operated in the 50 United States and District of Columbia.
| Length of Warranty: | KitchenAid Will Pay For Your Choice of: | KitchenAid Will Not Pay For: |
| One Year Full Warranty from date of purchase. |  Hassle-Free Replacement of your Immersion Blender. See inside front cover for details on how to arrange for service, or call the Customer Satisfaction Center toll-free at 1-800-541-6390.ORThe replacement parts and repair labor costs to correct defects in materials and workmanship. Service must be provided by an Authorized KitchenAid Service Center. See the KitchenAid® Immersion Blender Warranty for Puerto Rico on page 4 for details on how to arrange for service. Hassle-Free Replacement of your Immersion Blender. See inside front cover for details on how to arrange for service, or call the Customer Satisfaction Center toll-free at 1-800-541-6390.ORThe replacement parts and repair labor costs to correct defects in materials and workmanship. Service must be provided by an Authorized KitchenAid Service Center. See the KitchenAid® Immersion Blender Warranty for Puerto Rico on page 4 for details on how to arrange for service. | A. Repairs when Immersion Blender is used in other than normal single family home use.B. Damage resulting from accident, alteration, misuse or abuse.C. Any shipping or handling costs to deliver your Immersion Blender to an Authorized Service Center.D. Replacement parts or repair labor costs for Immersion Blender operated outside the 50 United States and District of Columbia. |
KITCHENAID DOES NOT ASSUME ANY RESPONSIBILITY FOR INCIDENTAL OR CONSEQUENTIAL DAMAGES. Some states do not allow the exclusion or limitation of incidental or consequential damages, so this exclusion may not apply to you. This warranty gives you specific legal rights and you may also have other rights which vary from state to state.
KitchenAid® Immersion Blender Warranty for Puerto Rico
A limited one year warranty extends to the purchaser and any succeeding owner for Immersion Blenders operated in Puerto Rico. During the warranty period, all service must be handled by an Authorized KitchenAid Service Center. Please bring the Immersion Blender, or ship it prepaid and insured, to the nearest
Authorized Service Center. Call toll-free 1-800-541-6390, 8 a.m. to 8 p.m., Monday through Friday, 10 a.m. to 5 p.m., Saturday, Eastern Time to learn the location of a Service Center near you. Your repaired Immersion Blender will be returned to you prepaid and insured.
Arranging for Service After the Warranty Expires
WARNING

Electrical Shock Hazard Unplug before servicing. Failure to do so can result in death or electrical shock.
For service information, call toll-free 1-800-541-6390, 8 a.m. to 8 p.m., Monday through Friday, 10 a.m. to 5 p.m., Saturday, (Eastern Time) or write to:
Customer Satisfaction Center KitchenAid Portable Appliances P.O. Box 218 St. Joseph, MI 49085-0218
Arranging for Service Outside the 50 United States and Puerto Rico
Consult your local KitchenAid dealer or the store where you purchased the
Immersion Blender for information on how to obtain service.
Ordering Accessories and Replacement Parts
To order accessories or replacement parts for your Immersion Blender, call toll-free 1-800-541-6390, 8 a.m. to 8 p.m., Monday through Friday, 10 a.m. to 5 p.m., Saturday, Eastern
Time or write to: Customer Satisfaction Center KitchenAid Portable Appliances P.O. Box 218 St. Joseph, MI 49085-0218
Volts: 120 A.C. only. Hertz: 60
The amperage rating for your blender is located on the serial plate. The maximum rating is based on the attachment that draws the greatest load. Other recommended attachments may draw significantly less current.
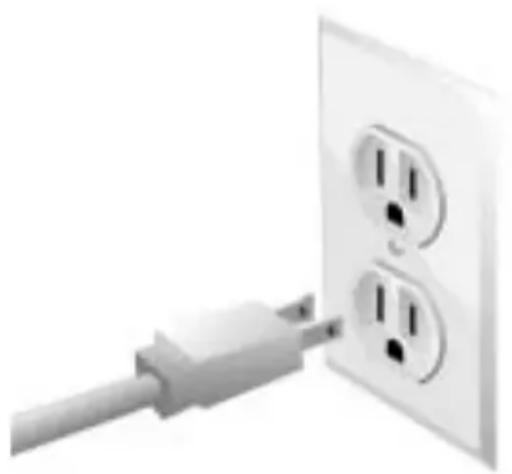
NOTE: This Immersion Blender has a polarized plug (one blade is wider than the other). To reduce the risk of electrical shock, this plug will fit in a polarized outlet only one way. If the plug does not fit fully in the outlet, reverse the plug. If it still does not fit, contact a qualified electrician. Do not modify the plug in any way.
Extension cords are available and may be used if special care is exercised in their use.
natural_image
Close-up of a white electrical outlet with two socket slots inserted into a cable (no text or symbols visible)If a long extension cord is used:
- The marked electrical rating of the extension cord should be at least as great as the electrical rating of the appliance.
- The cord should be arranged so it will not drape over the countertop or tabletop where it can be pulled by children or tripped over unintentionally.
Troubleshooting Problems
If your Immersion Blender should malfunction or fail to operate, please check the following:
- Is the Immersion Blender plugged in?
- Is the fuse in the circuit to the Immersion Blender in working order? If you have a circuit breaker box, be sure the circuit is closed.
- Turn Immersion Blender off for 10-15 seconds, then turn Immersion Blender back on.
If the problem cannot be corrected with the above steps, see the KitchenAid Warranty on page 3. Do not return the Immersion Blender to the retailer; retailers do not provide service.
Immersion Blender Features
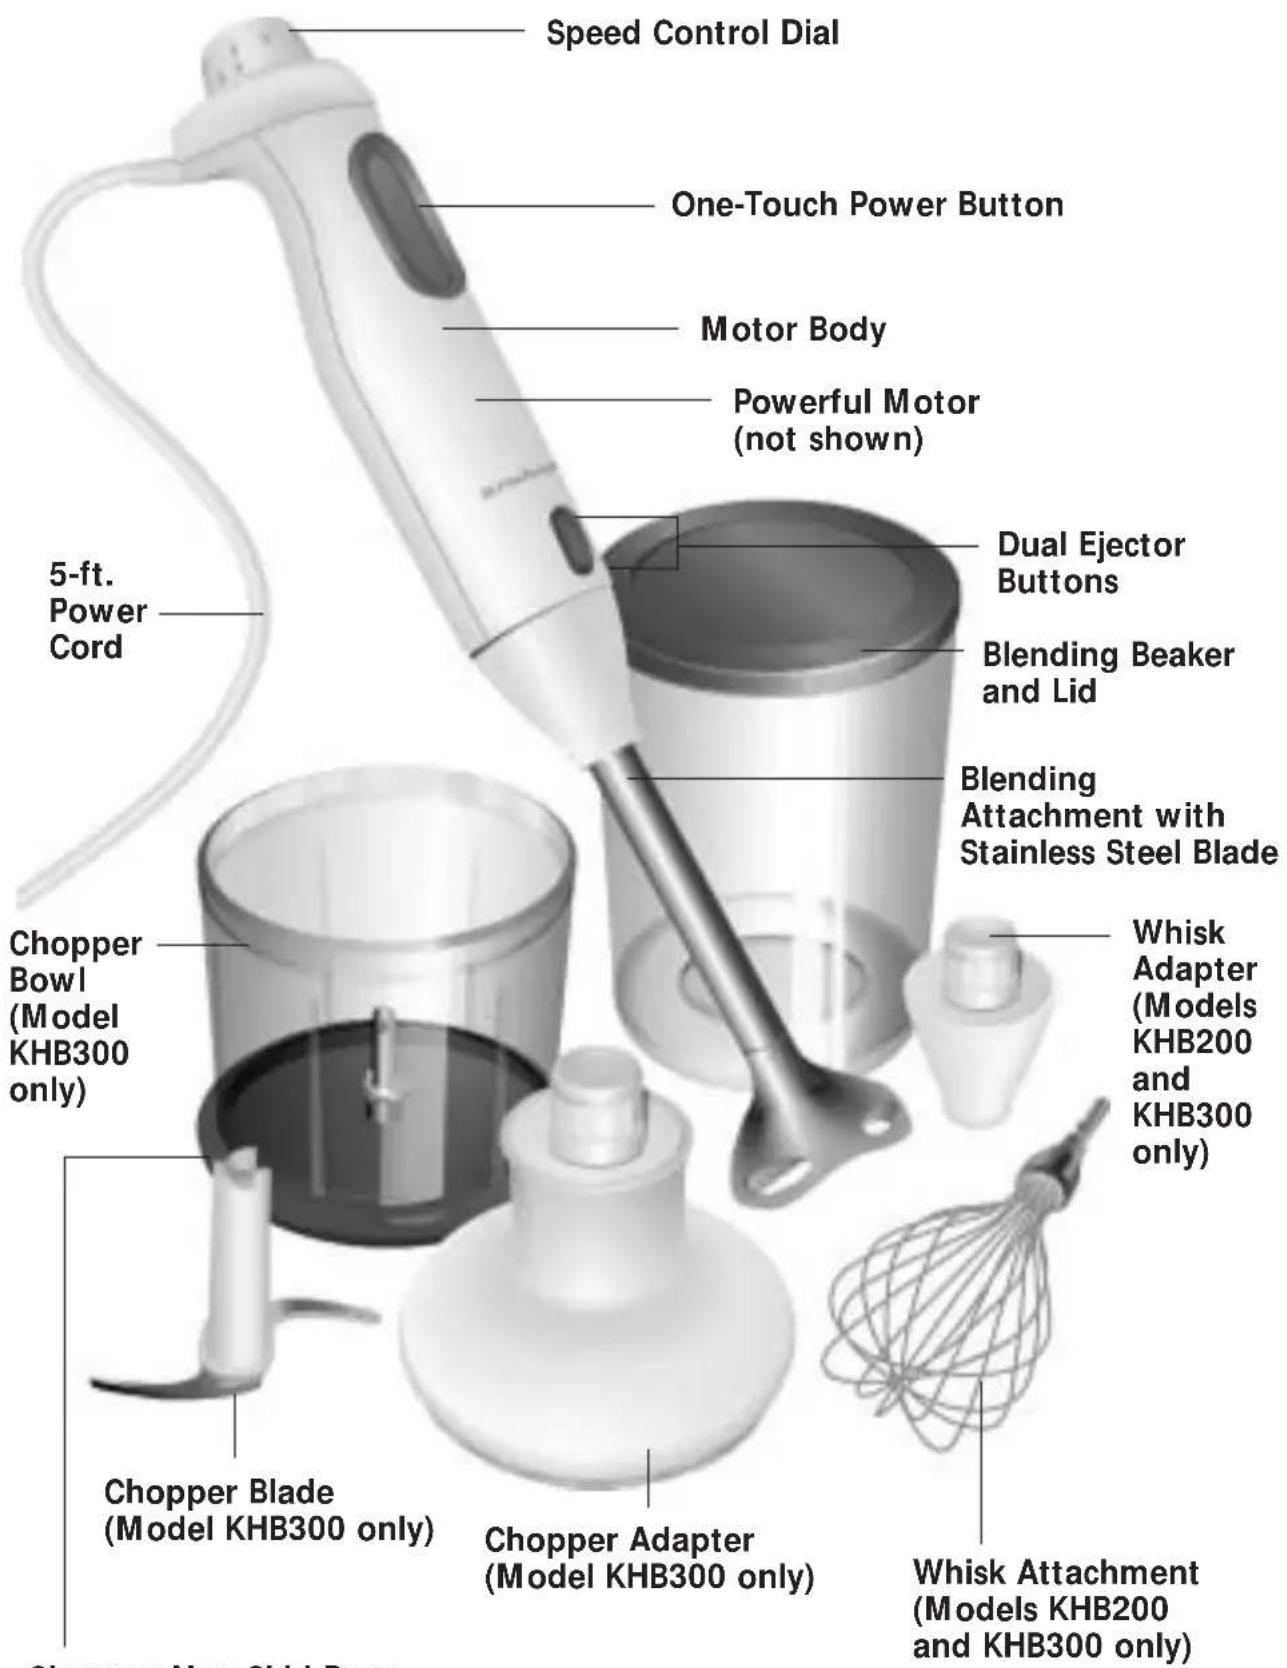
Chopper Non-Skid Base (doubles as an air-tight lid for chopper bowl)
Speed Control Dial offers speeds ranging from 9 (high) to 1 (low).
One-Touch Power Button is located on the front of the motor body and is activated by pressing and holding during blending. To stop blending, simply release the power button.
Motor Body is designed for a comfortable, non-slip grip.
Powerful Motor (not shown) provides powerful blending action and is designed for quiet, long-life operation.
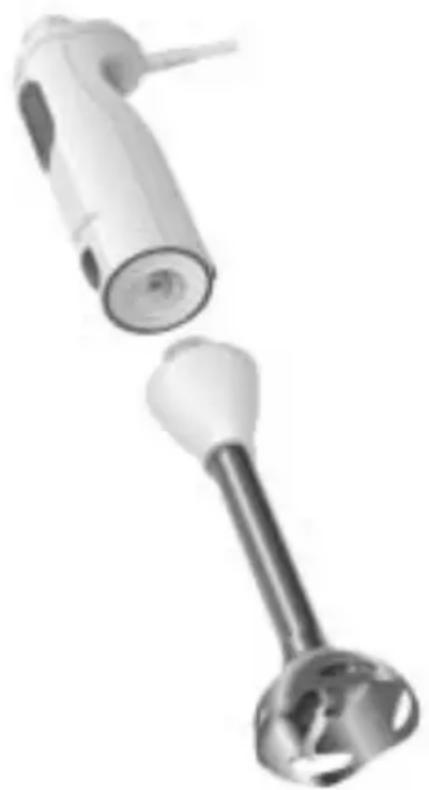
Blending Attachment with Stainless Steel Blade simply snaps onto the motor body. The sharp stainless steel blade is covered to help prevent splashing while blending.
Dual Ejector Buttons located on opposite sides of the motor body, release an attachment (and adapter) from the motor body when pressed.
5-ft. Power Cord is long enough to take the Immersion Blender to the cooktop or work area and is rounded with no grooves for easy clean up.
Blending Beaker and Lid are handy for individual blending jobs. Lid seals the top of the beaker to store blended ingredients.
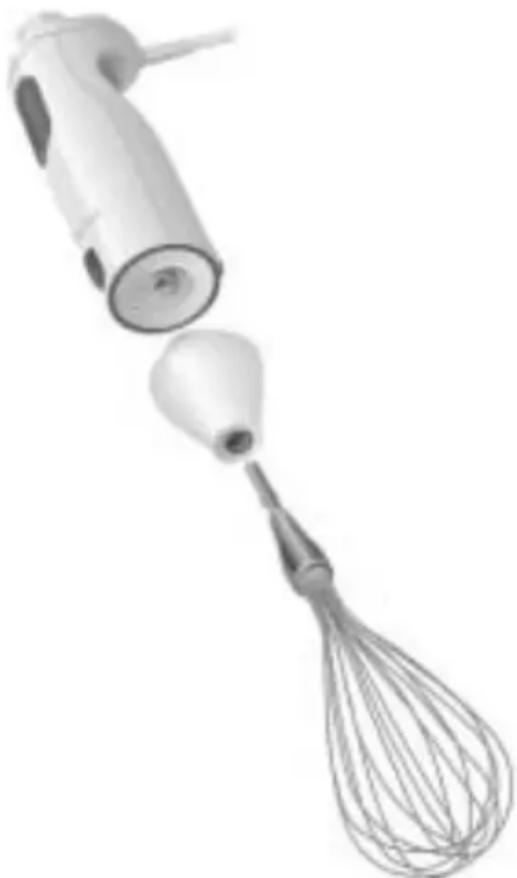
Whisk Attachment and Adapter (Models KHB200 and KHB300 only) whips egg whites and whipping cream. Whisk fits into the adapter, and the adapter snaps into the motor body. Adapter automatically adjusts the whisk to the proper range of speeds appropriate for whipping.
Chopper Attachment and Adapter
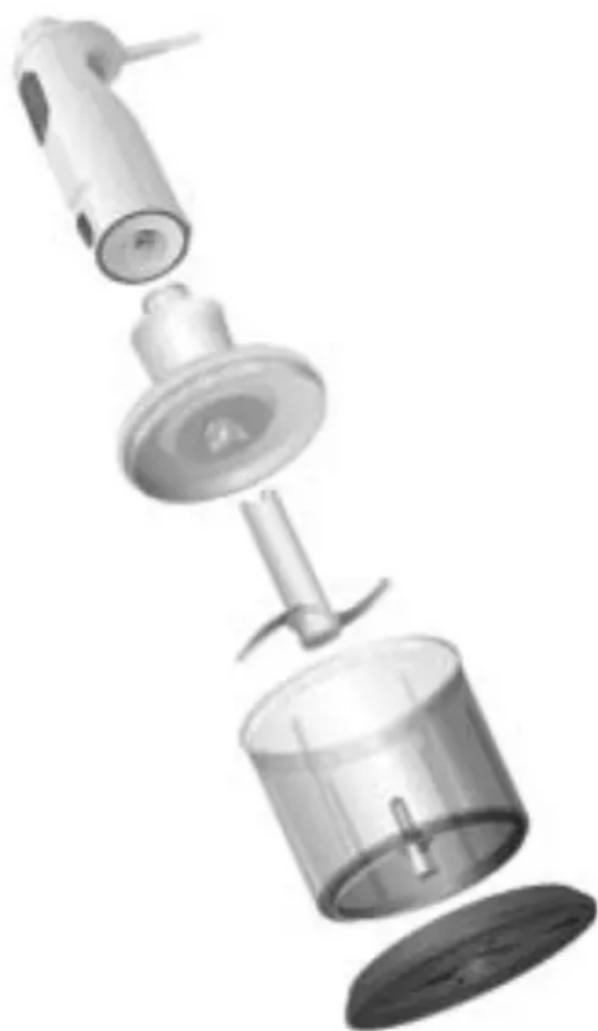
(Model KHB300 only) is perfect for small chopping jobs like herbs, nuts and vegetables. Chopper includes a bowl, blade, and chopper adapter. The chopper adapter snaps into the motor body, then locks over the top of the chopper bowl and blade. The chopper bowl base fits snugly on the bottom of the bowl during chopping process to prevent movement of the entire attachment, then seals on top of the chopper bowl for storage of ingredients.
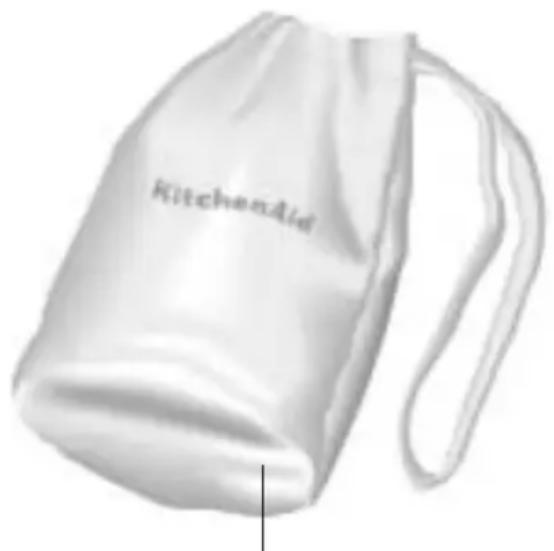
Storage Bag (Model KHB300 only) Cotton Twill drawstring bag is designed with three distinctive pockets to store the Immersion Blender motor body, the stainless steel blending attachment, and the whisk attachment. Storage bag is machine washable.
natural_image
Illustration of a kitchen aid bag with a strap (no text or symbols on the bag itself)Storage Bag (Model KHB300 only)
Assembling Your Immersion Blender
- Before using the KitchenAid ^® Immersion Blender for the first time, wipe the motor body and attachment adapters with a clean, damp cloth to remove any dirt or dust. Mild dish soap may be used, but do not use abrasive cleansers.
NOTE: Do not immerse the motor body or the adapters in water.
Dry with a soft cloth. Wash all the attachments and accessories by hand or in the dishwasher. Dry thoroughly.
NOTE: Always be sure to unplug the power cord from the wall socket before attaching or removing attachments. - Install attachments by aligning the motor body with either the blending attachment or an attachment adapter (Models KHB200 and KHB300 only). Insert the blending attachment or attachment adapter into the motor body until it locks with a click.
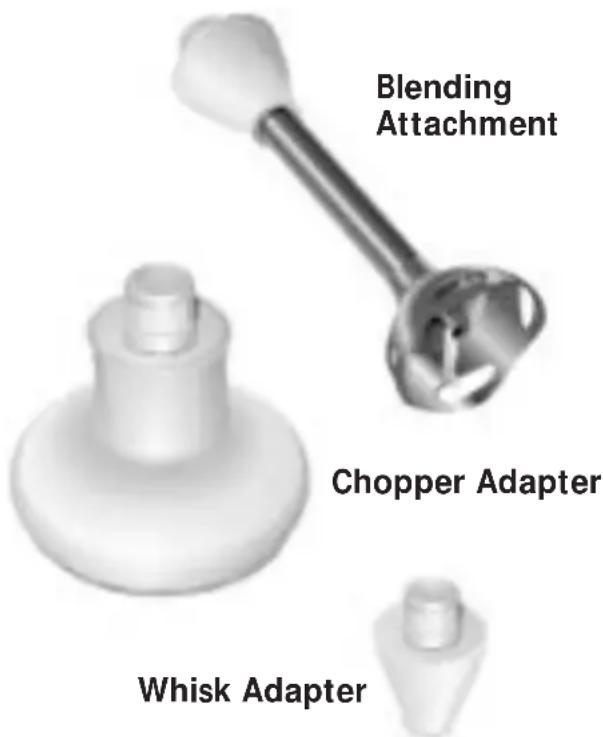
- Remove the attachments by pressing both ejector buttons on either side of the body.

natural_image
Illustration of a hand holding a pipette with arrows indicating force application (no text or symbols)- Read Operating Tips (page 13).
Operating Your Immersion Blender
Using the Blending Attachment
- Insert the blending attachment into the motor body.
natural_image
Two types of medical or laboratory devices with metallic tips, one open and one closed, shown without any visible text or symbols.- Plug the electrical cord into an electrical wall socket.
- Adjust the speed by turning the speed control dial on top of the Immersion Blender.
- Insert the Immersion Blender into the mixture.
NOTE: Immersion Blender should only be immersed in liquids the length of the attachment. Do not submerge beyond the seam of the blending attachment. Do not immerse the motor body into liquids or other mixtures.
- Press the power button to activate the Immersion Blender.
- When blending is complete, release the power button before removing Immersion Blender from the mixture.
- Unplug immediately after use, before removing or changing attachments.
Operating Your Immersion Blender
Using the Whisk Attachment
(Models KHB200 and KHB300 only)
Use the whisk to whip cream, beat egg whites and mix instant puddings.
- Insert the whisk into the whisk adapter.
natural_image
Illustration of a hand mixer with whisk and bulb (no text or symbols)- Insert the whisk adapter into the motor body. Adapter automatically adjusts the whisk to the proper range of speeds appropriate for whipping.
- Plug the electrical cord into an electrical wall socket.
- Adjust the speed by rotating the speed control dial on top of the Immersion Blender.
- Insert the Immersion Blender into the mixture.
NOTE: Immersion Blender should only be immersed in liquids the length of the attachment. Do not submerge beyond the seam of the whisk adapter. Do not immerse the motor body into liquids or other mixtures.
The stainless steel whisk may scratch or mar non-stick coatings; avoid using the whisk in non-stick cookware.
To prevent splattering and splash-out, use the whisk attachment in deep containers or pans.
- Press the power button to activate the Immersion Blender.
- When whisking process is complete, release the power button before removing Immersion Blender from the mixture.
- Unplug immediately after use, before removing or changing attachments.
Operating Your Immersion Blender
Using the Chopper Attachment
(Model KHB300 only)
WARNING
Cut Hazard
Handle blades carefully.
Failure to do so can result in cuts.
Use the chopper to chop small amounts of foods such as meat, cheese, onions, herbs, garlic, carrots, and nuts.
- To help prevent the chopper from slipping during processing, place the chopper base on the bottom of the chopper bowl.
natural_image
Exploded view of a kitchen appliance showing internal components (no text or symbols)- Insert the chopper blade into the chopper bowl.
- Add small pieces of foods to the bowl.
- Insert the chopper adapter into the motor body.
- Align the chopper adapter with the chopper bowl and turn to lock in place.
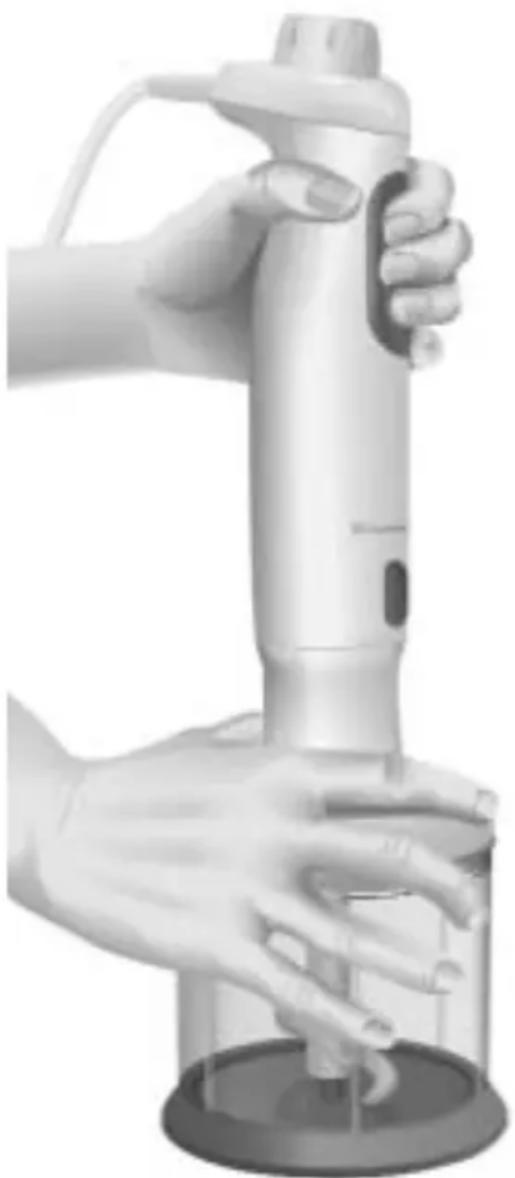
- Hold the motor body with one hand and the chopper bowl with the other while processing.
natural_image
Illustration of a hand using a handheld electric shaver to press down a cylindrical device (no text or symbols visible)- Press the power button to activate Immersion Blender. For best results, "pulse" the power by pressing and releasing the power button until ingredients reach the desired consistency.
Operating Your Immersion Blender
-
When chopping is complete, release the power button. Remove the chopper attachment by pressing both ejector buttons on each side of the motor body.
-
Unplug immediately after use, before removing or changing attachments.
| Chopper Processing Guide | ||||
| Food | Quantity | Preparation | Speed* | Time* |
| Meats | 200 g / 7 oz | Cut into 2 cm/ ^3/_4 " Cubes | 7–9 | 15 Seconds |
| Almonds/Nuts | 200 g / 7 oz | Place in Whole Nuts | 5–7 | 25 Seconds |
| Garlic | 10–12 Cloves | Place in Whole Cloves | 2–4 | 15 Seconds |
| Onions | 100 g / 3.5 oz | Cut into Quarters | 2–4 | 15 Seconds |
| Cheese | 100 g / 3.5 oz | Cut into 1 cm/ ^3/_8 " Cubes | 7–9 | 30 Seconds |
| Hard Boiled Eggs | 2 | Place in Whole Eggs | 7–9 | 3 Pulses |
| Carrots | 200 g / 7 oz | Cut Average Carrot into Quarters | 5–7 | 15 Seconds |
| Herbs | 50 g / 2 oz | Remove Stalks | 7–9 | 15 Seconds |
* Processing times and speeds are approximate. Actual usage may vary depending on quality of food and desired chop size.
Operating Tips
- Cut solid foods into small pieces for easier blending or chopping.
- To avoid splashing, insert the Immersion Blender into the mixture before pressing the power button, and release the power button before pulling the Immersion Blender out of the mixture.
- When blending in a saucepan on a cooktop, remove the pan from the heating element to protect the Immersion Blender from overheating.
- For best blending, hold the Immersion Blender at an angle and gently move up and down within the container. Do not pound down on the mixture with the Immersion Blender.
-
To prevent overflow, allow room in the container for the mixture to rise when using the Immersion Blender.
-
Be sure the extra long cord of the Immersion Blender is not extending over a hot heating element.
- Do not let the Immersion Blender sit in a hot pan on the cooktop while not in use.
- Remove hard items, such as fruit pits or bones, from the mixture before blending or chopping to help prevent damage to the blades.
- Do not use your Immersion Blender to process coffee beans or hard spices such as nutmegs. Processing these foods could damage the blades of the Immersion Blender.
- Do not use the beaker or the chopper bowl in the microwave oven.
- The stainless steel whisk may scratch or mar non-stick coatings; avoid using the whisk in non-stick cookware. To prevent splattering, use the whisk attachment in deep containers or pans.
Care and Cleaning
- Unplug Immersion Blender before cleaning.
- Remove the adapters and attachments by pressing both ejector buttons on either side of the motor body.
- Wipe the motor body and adapters with a damp cloth. Mild dish soap may be used, but do not use abrasive cleansers.
NOTE: Do not immerse the motor body or the adapters in water.
- Wipe power cord with warm, sudsy cloth; then wipe clean with damp cloth. Dry with soft cloth.
IMMERSION BLENDER ACCESSORIES AND ATTACHMENTS
Wash blending attachment, beaker and lid, whisk (Models KHB200 and KHB300 only), chopper bowl, blade, and non-skid base (Model KHB300 only) in hot, soapy water, or in the top rack of the dishwasher. Dry thoroughly.
Storage
The included drawstring storage bag (Model KHB300 only) is designed with three distinct compartments to conveniently store the Immersion Blender motor body and cord, the blending attachment, and the whisk attachment. The durable, cotton twill bag is machine washable.
Cream Cheese Frosting
1 package (8 oz.) cream cheese, softened
14 cup butter or margarine, softened
^1/_2 teaspoon vanilla
^1/_8 teaspoon salt
3-3 ^3/4 cups powdered sugar
In deep, narrow bowl, place cream cheese, butter, vanilla, and salt. Insert blending attachment into motor body. Blend at Speed 5 for 15 to 20 seconds, or until smooth. Add 3 cups powdered sugar. Blend at Speed 6 for 30 to 40 seconds, or until mixed, adding additional powdered sugar if necessary and scraping bowl as needed.
Yield: 12 to 16 servings (frosting for 2-layer or 13x9x2-inch cake).
Per Serving: About 220 cal, 1 g pro, 30 g carb, 10 g total fat, 7 g sat fat, 30 mg chol, 80 mg sod.
VARIATION
Orange Cream Cheese Frosting
Substitute 1 12 teaspoons grated orange peel for vanilla.
Yield: 12 to 16 servings (frosting for 2-layer or 13x9x2-inch cake).
Per Serving: About 220 cal, 1 g pro, 30 g carb, 10 g total fat, 7 g sat fat, 30 mg chol, 80 mg sod.
Vanilla Buttercream Frosting
^3/_4 cup butter or margarine, softened
^1/_8 teaspoon salt
3½ cups powdered sugar
1 teaspoon vanilla
2-3 ^1/2 tablespoons milk or half-and-half
In deep, narrow bowl, place butter, salt, powdered sugar, vanilla, and 2 tablespoons milk. Insert blending attachment into motor body. Blend at Speed 5 for 30 seconds. Increase to Speed 9; blend 15 to 25 seconds, or until creamy, adding additional milk if necessary and scraping bowl as needed.
Yield: 12 to 16 servings (frosting for 2-layer or 13x9x2-inch cake).
Per Serving: About 240 cal, 0 g pro, 35 g carb, 11 g total fat, 7 g sat fat, 30 mg chol, 25 mg sod.
VARIATION
Chocolate Buttercream Frosting
Add 2 ounces unsweetened chocolate, melted and cooled, to prepared Vanilla Buttercream Frosting. Blend at Speed 5 for 20 to 25 seconds, or until well mixed.
Yield: 12 to 16 servings (frosting for 2-layer or 13x9x2-inch cake).
Per Serving: About 260 cal, 1 g pro, 36 g carb, 14 g total fat, 9 g sat fat, 30 mg chol, 30 mg sod.
Chicken and Rice Baby Food
1 chicken thigh
1^1/2 cups reduced- sodium chicken broth or water
3 tablespoons uncooked long grain rice
Remove bone, any cartilage, and excess skin from chicken. In small saucepan, place chicken, broth, and rice. Bring to a boil; reduce heat to simmer. Cover and cook 20 minutes, or until chicken is thoroughly cooked, juices run clear, and rice is tender. Remove chicken; cool slightly.
Remove remaining skin or cartilage from chicken; cut into 1-inch pieces. Place chicken and rice mixture in blending beaker. Insert blending attachment into motor body. Blend at Speed 3 for 10 seconds, or until chopped. Increase to Speed 9; blend 15 to 20 seconds, or until desired consistency, adding additional liquid if necessary.
Yield: 4 servings ( 14 cup per serving).*
* Baby food may be frozen for later use.
Per Serving: About 70 cal, 5 g pro, 8 g carb, 2 g total fat, 0.5 g sat fat, 15 mg chol, 45 mg sod.
Applesauce to Zucchini Baby Food
2 cups peeled and chopped fruit or vegetables (apples, pears, peaches, carrots, squash, green beans, etc.)
^2/_3 cup water, broth, or juice
In medium saucepan, place fruit or vegetables and water. Bring to a boil; reduce heat to simmer. Cover and cook 10 to 30 minutes, or until very tender, adding additional water if needed. (Time will vary with type of food.) Cool slightly.
In blending beaker, place 1 to 2 tablespoons of cooking liquid and fruit or vegetables. Insert blending attachment into motor body. Blend at Speed 7 until chopped, about 10 seconds. Increase to Speed 9; blend until desired consistency, adding additional cooking liquid if necessary.
Yield: 4 servings ( 14 cup per serving).*
* Baby food may be frozen for later use.
Per Serving: About 30 cal, 0 g pro, 7 g carb, 0 g total fat, 0 g sat fat, 0 mg chol, 20 mg sod.
Hot Fudge Sauce
12 cup sugar
^1/3 cup unsweetened cocoa powder
^1/8 teaspoon salt
^3/4 cup whipping cream
6 squares (1 oz. each)
bittersweet
chocolate
6 tablespoons butter or margarine, cut into chunks
1 tablespoon light corn syrup
1 teaspoon vanilla
In blending beaker, combine sugar, cocoa, and salt; set aside. In small saucepan, place cream, chocolate, and butter. Heat and stir over medium-low heat until chocolate is melted and mixture is smooth, about 5 minutes. Add chocolate mixture, corn syrup, and vanilla to cocoa mixture in blending beaker. Insert blending attachment into motor body. Blend at Speed 2 for 5 seconds. Increase to Speed 9; blend 15 to 25 seconds, or until smooth. Serve over ice cream, strawberries, or pound cake. Store covered in refrigerator.
Yield: 16 servings (2 tablespoons per serving).
Per Serving: About 170 cal, 1 g pro, 15 g carb, 12 g total fat, 8 g sat fat, 25 mg chol, 25 mg sod.
VARIATION
Hot Fudge Mint Sauce
Substitute 1½ teaspoons mint extract for vanilla.
Yield: 16 servings (2 tablespoons per serving).
Per Serving: About 170 cal, 1 g pro, 15 g carb, 12 g total fat, 8 g sat fat, 25 mg chol, 25 mg sod.
Southern Sweet Potato Bake
3 pounds sweet potatoes or yams (about 3 to 4 large), washed and cut into quarters
1 small onion, peeled and cut into wedges Water
1 recipe Pecan Streusel Topping (see page 25)
12 cup butter or margarine, softened
13 cup packed brown sugar
1 tablespoon grated orange peel, if desired
12 teaspoon salt
1 teaspoon cinnamon
^1/4 teaspoon nutmeg, if desired
^1/_2 cup fresh orange juice
3 eggs
In large pot, place potatoes, onion, and enough water to cover vegetables. Bring to a boil. Reduce heat; simmer, covered, 20 to 25 minutes, or until potatoes are very tender.
Meanwhile, prepare Pecan Streusel Topping as directed; set aside.
Drain potato mixture well; cool slightly. Discard onion; peel potatoes and return to pot. Add butter, brown sugar, orange peel (if desired), salt, cinnamon, and nutmeg (if desired), to potatoes. Insert blending attachment into motor body. Blend at Speed 5 for 20 to 30 seconds, or until mixed. Add orange juice and eggs; blend at Speed 5 for 15 to 20 seconds, or until mixed. Pour into greased 11x7x2-inch baking pan.
Top with Pecan Streusel Topping. Bake at 350^ F for 45 to 55 minutes, or until puffed and knife inserted in center comes out clean.
Yield: 12 servings ( ^1/_2 cup per serving).
Per Serving: About 270 cal, 4 g pro, 31 g carb, 15 g total fat, 7 g sat fat, 80 mg chol, 170 mg sod.
Orange Banana-Berry Smoothie
1 large banana, peeled and broken into quarters
^1 / 2 cup hulled, halved strawberries
^1/4 cup orange juice
1 teaspoon honey,
if desired
In blending beaker, place ingredients. Insert blending attachment into motor body. Blend at Speed 2 for 3 to 5 seconds to chop. Increase to Speed 7; blend using an up and down motion about 10 seconds, or until smooth.
Yield: 1 serving.
Per Serving: About 180 cal, 2 g pro, 44 g carb, 1 g total fat, 0 g sat fat, 0 mg chol, 0 mg sod.
Raspberry Peach Smoothie
^1/2 cup fresh or frozen, unsweetened raspberries, partially thawed
1 cup sliced fresh or frozen, thawed peaches*
^1/_2 cup milk
2 tablespoons sugar
18 teaspoon nutmeg, if desired
In blending beaker, place ingredients. Insert blending attachment into motor body. Blend at Speed 7 using an up and down motion about 10 seconds, or until smooth.
Yield: 2 servings ( ^3/_4 cup per serving).
*Substitute 1 cup sliced canned peaches, drained, if desired.
Per Serving: About 210 cal, 3 g pro, 49 g carb, 1.5 g total fat, 1 g sat fat, 5 mg chol, 40 mg sod.
Double Chocolate Malt
1 cup chocolate ice cream
1^1/2 -2 tablespoons malt powder
3 tablespoons milk
2 tablespoons Hot Fudge Sauce (see page 16)*
In blending beaker, place ingredients. Insert blending attachment into motor body. Blend at Speed 9 for 10 to 20 seconds, or until smooth.
Yield: 1 serving.
*Prepared hot fudge topping may be substituted.
Per Serving: About 610 cal, 11 g pro, 78 g carb, 30 g total fat, 18 g sat fat, 85 mg chol, 300 mg sod.
Candy Ice Cream Freeze
1 cup vanilla or chocolate ice cream
3 tablespoons milk
^1/_4 cup chopped candy or cookies*
In blending beaker, place ice cream and milk. Insert blending attachment into motor body. Blend at Speed 9 for 5 seconds. Add candy pieces; blend at Speed 6 using an up and down motion for 10 to 15 seconds, or until smooth.
Yield: 1 serving.
*Try chocolate-coated caramel-peanut nougat bar, chocolate-covered peanut butter cups, or other favorites.
Per Serving: About 490 cal, 10 g pro, 59 g carb, 26 g total fat, 13 g sat fat, 65 mg chol, 240 mg sod.
Mocha Frappé
1 12 cups milk
2 tablespoons instant coffee granules
13 cup Hot Fudge Sauce (see page 16)*
1-1 ^1/2 cups ice cubes
In blending beaker, place all ingredients except ice. Insert blending attachment into motor body. Blend at Speed 3 for 3 to 5 seconds to mix. Add ice cubes; blend at Speed 9 using an up and down motion for 10 to 15 seconds, or until smooth and frosty.
Yield: 3 servings (1 cup per serving).
*Chocolate syrup may be substituted.
Per Serving: About 220 cal, 6 g pro, 20 g carb, 13 g total fat, 8 g sat fat, 35 mg chol, 90 mg sod.
Hearty Mixed Grain Pancakes
1 egg
1 cup milk
1 tablespoon vegetable oil
^2/_3 cup all-purpose flour
14 cup whole wheat flour
3 tablespoons cornmeal
3 tablespoons sunflower seeds
3 tablespoons rolled oats
1 tablespoon sugar
1 teaspoon baking powder
^1/_4 teaspoon cinnamon
^1/_2 teaspoon salt
In blending beaker, place egg, milk, and oil. Insert blending attachment into motor body. Blend at Speed 3 for 5 seconds to mix. Add remaining ingredients. Blend at Speed 4 using an up and down motion about 10 seconds, or until mixed.
Heat greased griddle to medium; pour batter onto griddle for individual pancakes. Cook until bubbles form on surface and edges begin to dry. Turn; cook until underside is light golden brown.
Yield: About 4 servings (two, 4-inch pancakes per serving).
Per Serving: About 260 cal, 10 g pro, 36 g carb, 10 g total fat, 2 g sat fat, 60 mg chol, 440 mg sod.
Creamy Caesar Salad Dressing
1 large clove garlic, peeled and halved
^1 4 cup fresh lemon juice
1 pasteurized egg
1 teaspoon sugar
^1/_2 teaspoon salt
^1/2 teaspoon Worcestershire sauce
^1/4 teaspoon coarsely ground black pepper
1 inch anchovy paste or 12 fillet anchovy, if desired
1^1/4 cups extra virgin olive or vegetable oil
12 cup shredded Parmesan cheese
In blending beaker, place all ingredients except oil and cheese. Insert blending attachment into motor body. Blend at Speed 2 for 10 to 15 seconds, or until garlic is finely chopped. Gradually add oil and cheese while blending at Speed 1 for 20 to 25 seconds, or until blended and creamy. Serve tossed with romaine lettuce, if desired.
Yield: 12 servings (2 tablespoons per serving).
Per Serving: About 230 cal, 2 g pro, 1 g carb, 25 g total fat, 4 g sat fat, 20 mg chol, 210 mg sod.
Fresh Herb Vinaigrette
^1/_3 cup white wine vinegar
2 tablespoons coarsely torn fresh basil leaves
1 teaspoon fresh oregano leaves
^1/2 teaspoon fresh rosemary leaves
12 teaspoon sugar
^1/_4 teaspoon salt
^1/_8 teaspoon black pepper
1 small clove garlic, peeled
1 cup extra virgin olive or vegetable oil
In blending beaker, place all ingredients except oil. Insert blending attachment into motor body. Blend at Speed 7 for 10 to 15 seconds, or until herbs and garlic are finely chopped. Gradually add oil while blending at Speed 1 for 10 to 15 seconds, or until well mixed. Serve with mixed greens.
Yield: 10 servings (2 tablespoons per serving).
Per Serving: About 200 cal, 0 g pro, 0 g carb, 22 g total fat, 3 g sat fat, 0 mg chol, 60 mg sod.
Fresh Tomato Basil Soup
1 medium carrot, peeled and cut into 1-inch pieces
1 rib celery, cut into 1-inch pieces
1 small onion, peeled and cut into 1-inch pieces
6 tablespoons butter or margarine
1 can (14 oz.) chicken or vegetable broth
1 can (11.5 oz.) tomato juice
4 tomatoes, peeled, cored, seeded,* and cut into quarters
^1/_4 teaspoon salt
^1/_4 teaspoon white pepper
^1/4-^1/3 cup torn, loosely packed fresh basil leaves
In chopper attachment bowl with blade, place carrot, celery, and onion. Insert chopper adapter into motor body and lock adapter onto bowl. Chop at Speed 3 for 10 seconds, or until finely chopped. Set aside.
In medium saucepan over medium heat, melt butter. Add chopped vegetable mixture. Cook and stir 10 to 15 minutes, or until tender. Add broth, tomato juice, and tomatoes. Bring to a boil. Reduce heat; cover and simmer 10 to 15 minutes, or until tomatoes are soft. Remove from heat. Add salt, white pepper, and basil. Insert blending attachment into motor body. Blend at Speed 3 for 10 to 20 seconds, or until basil is chopped and tomatoes are desired consistency. Serve hot or cold.
Yield: 6 servings (1 cup per serving).
* Dip tomatoes in boiling water 30 to 60 seconds to loosen peels. Cool under running water. Core and remove peel. Cut in half crosswise, and scoop or shake out seeds.
Per Serving: About 140 cal, 2 g pro, 8 g carb, 12 g total fat, 7 g sat fat, 30 mg chol, 510 mg sod.
Pan Gravy
^1/4 cup pan drippings, butter or oil
^1/3 cup all-purpose flour
12 teaspoon salt
12 teaspoon dried
marjoram or sage,
if desired
^1/_4 teaspoon black pepper
2 cups chicken or beef broth*
Insert whisk into whisk adapter and adapter into motor body; set aside. In large saucepan, heat drippings over medium heat. Blend in flour; cook until golden, stirring occasionally. Stir in salt, marjoram, if desired, and pepper.
Remove pan from heat; gradually add broth while whisking at Speed 1 for 10 to 20 seconds, or until smooth. Return pan to heat; cook 3 to 4 minutes, or until thickened and bubbly, whisking as needed to stir. Serve with mashed potatoes, noodles, and/or roasted poultry, beef, or pork.
Yield: 8 servings ( 14 cup per serving).
*For creamier gravy, substitute 1 cup milk or half-and-half for 1 cup broth.
Per Serving: About 50 cal, 5 g pro, 4 g carb, 1.5 g total fat, 0 g sat fat, 10 mg chol, 400 mg sod.
Chocolate Mocha Mousse
1 cup whipping cream
2 tablespoons powdered sugar
1 cup semisweet chocolate chips
13 cup granulated sugar
^1/_8 teaspoon salt
1 cup milk
2½ teaspoons
unflavored gelatin
1 tablespoon instant coffee granules
In blending beaker, place cream and powdered sugar. Insert whisk into whisk adapter and adapter into motor body. Whisk at Speed 7 for 45 to 60 seconds, or until stiff peaks form. Transfer to separate bowl, cover, and refrigerate.
In blending beaker, place chocolate chips, granulated sugar, and salt; set aside.
In small saucepan, add milk. Sprinkle gelatin over milk; let stand 5 minutes to soften. Heat over medium heat until very hot but not boiling, stirring frequently to dissolve gelatin. Pour milk mixture into blending beaker. Whisk at Speed 1 for 20 to 30 seconds to melt chocolate. Chill 45 to 60 minutes, or until completely cooled.
Add whipped cream to chocolate mixture. Whisk at Speed 1 for 3 to 5 seconds, or until mixed. Pour into serving dishes; chill thoroughly.
Yield: 5 servings ( 12 cup per serving).
Per Serving: About 420 cal, 5 g pro, 42 g carb, 29 g total fat, 18 g sat fat, 70 mg chol, 110 mg sod.
Whipped Cream
1 cup whipping cream 2-3 tablespoons powdered sugar 12 teaspoon vanilla
In blending beaker, place ingredients. Insert whisk into whisk adapter and adapter into motor body. Whisk at Speed 7 for 45 to 60 seconds, or until peaks form.
Yield: 16 servings (2 tablespoons per serving).
Per Serving: About 60 cal, 0 g pro, 1 g carb, 6 g total fat, 3.5 g sat fat, 20 mg chol, 5 mg sod.
VARIATION
Chocolate Whipped Cream
Increase powdered sugar to 14 cup; add 2 tablespoons unsweetened cocoa powder to other ingredients before whisking.
Yield: 16 servings (2 tablespoons per serving).
Per Serving: About 60 cal, 0 g pro, 3 g carb, 6 g total fat, 3.5 g sat fat, 20 mg chol, 5 mg sod.
Cinnamon Whipped Cream
Add 12 teaspoon cinnamon to other ingredients before whisking.
Yield: 16 servings (2 tablespoons per serving).
Per Serving: About 60 cal, 0 g pro, 1 g carb, 6 g total fat, 3.5 g sat fat, 20 mg chol, 5 mg sod.
Orange Whipped Cream
Substitute 1 teaspoon grated orange peel for vanilla and add to other ingredients before whisking.
Yield: 16 servings (2 tablespoons per serving).
Per Serving: About 60 cal, 0 g pro, 1 g carb, 6 g total fat, 3.5 g sat fat, 20 mg chol, 5 mg sod.
Fudge Ribbon Cream Pie
Crust
12 pecan shortbread cookies, broken
2 tablespoons butter or margarine, melted
Filling
^3/_4 cup Hot Fudge Sauce (see page 16), ^* warmed slightly
4 ounces cream cheese, softened
1 tablespoon sugar
1^1/4 teaspoons vanilla
1 package (3.4 oz.) instant cheesecake pudding and pie filling mix
1^1/2 cups milk, divided
Topping
2 tablespoons Hot Fudge Sauce (see page 16),* warmed slightly
1 teaspoon whipping cream
Crust: In chopper attachment bowl with blade, place cookies. Insert chopper adapter into motor body and lock adapter onto bowl. Chop at Speed 9 for 10 to 15 seconds, or until finely chopped. Add butter; chop at Speed 4 about 10 seconds, or until blended. Press crumb mixture evenly over bottom and sides of 9-inch pie plate. Bake at 375°F for 8 to 10 minutes, or until light golden and set. Cool.
Filling: Spread Hot Fudge Sauce in bottom of crust. Chill until set, about 20 minutes.
In blending beaker, place cream cheese. Insert whisk into whisk adapter and adapter into motor body. Whisk at Speed 3 for 5 to 8 seconds, or until smooth. Add sugar and vanilla; whisk at Speed 3 about 10 seconds to blend. Add pudding mix and 12 cup milk. Whisk at Speed 1 for 10 to 15 seconds to mix, scraping beaker as needed. Add remaining 1 cup milk, 12 cup at a time, whisking at Speed 1 about 10 seconds each time and scraping beaker as needed. Increase to Speed 4; whisk 20 seconds. Increase to Speed 9; whisk 25 to 35 seconds, or until slightly thickened. Pour over chilled fudge layer in pie plate.
Topping: In small bowl, combine Hot Fudge Sauce and cream. Drizzle over pie; draw knife blade through drizzle, if desired. Refrigerate until set, about 30 minutes.
Yield: 8 servings.
*Prepared hot fudge topping may be substituted. Per Serving: About 420 cal, 5 g pro, 41 g carb, 26 g total fat, 14 g sat fat, 60 mg chol, 320 mg sod.
Individual Pistachio Tarts
1 cup whipping cream
13 cup powdered sugar
3 ounces cream cheese, cut into 12 -inch cubes, softened
12 cup chopped
pistachios, divided
^1/4 teaspoon almond extract
^1/_4 teaspoon vanilla
1 package (6 crusts)
single-serve graham
cracker pie crusts
In blending beaker, place cream and powdered sugar. Insert whisk into whisk adapter and adapter into motor body. Whisk at Speed 1 about 5 seconds to mix. Increase to Speed 9; whisk about 25 seconds, or until soft peaks form. Add cream cheese; whisk at Speed 6 for 20 to 25 seconds, or until smooth. Add 13 cup pistachios, almond extract, and vanilla. Whisk at Speed 3 for 5 to 8 seconds, or until mixed. Pipe or spoon filling into crusts, dividing evenly. Garnish with remaining (approximately 212 tablespoons) pistachios. Refrigerate 1 to 2 hours to blend flavors.
Yield: 6 servings (1 tart per serving).
Per Serving: About 390 cal, 5 g pro, 26 g carb, 31 g total fat, 14 g sat fat, 70 mg chol, 180 mg sod.
Pecan Streusel Topping
13 cup packed brown sugar
^1/4 cup all-purpose flour
^1/8 teaspoon cinnamon or nutmeg
^1/8 teaspoon salt
3 tablespoons cold butter or margarine, cut into chunks
^1/2 cup pecan halves and pieces
In chopper attachment bowl with blade, place brown sugar, flour, cinnamon, and salt. Insert chopper adapter into motor body and lock adapter onto bowl. Chop at Speed 5 about 5 seconds, or until mixed. Add butter; pulse 5 to 6 times at Speed 5, about 4 seconds each time, or until blended and crumbly. Add pecans. Pulse 2 to 3 times at Speed 4, about 4 seconds each time, or until chopped and blended. Sprinkle on fruit pie filling, squash or sweet potato casserole, or coffee cake before baking.
Yield: 12 servings (topping for 8-inch or 9-inch square or round baking pan).
Per Serving: About 90 cal, 1 g pro, 9 g carb, 6 g total fat, 2 g sat fat, 10 mg chol, 25 mg sod.
Vegetable Barley Soup
1 medium onion, cut into 1-inch pieces
2 medium carrots, peeled and cut into 1½-inch pieces
1 rib celery, cut into 112 -inch pieces
2 small tomatoes, cored and seeded
13 cup fresh or frozen cut green beans
^1/_4 cup fresh or frozen green peas
14 cup fresh or frozen corn
4 cups (1 quart) chicken or vegetable broth
^1/_4 cup medium barley
^1/_2 teaspoon dried basil
^1/2 teaspoon dried marjoram
1 small bay leaf
^1/_4 teaspoon salt
^1/8 - ^1/4 teaspoon white pepper
In chopper attachment bowl with blade, place onion, carrots, and celery. Insert chopper adapter into motor body and lock adapter onto bowl. Pulse 5 to 6 times at Speed 4, about 5 seconds each time, or until coarsely chopped. Transfer vegetable mixture into large saucepan or Dutch oven. Set aside.
In chopper attachment bowl, place tomatoes. Replace adapter; pulse 3 to 4 times at Speed 2, about 3 seconds each time to chop.
Add tomatoes and remaining ingredients to saucepan. Bring to a boil. Reduce heat, cover, and simmer 45 to 60 minutes, or until vegetables and barley are tender. Remove and discard bay leaf.
Yield: 5 servings (1 cup per serving).
Per Serving: About 100 cal, 3 g pro, 16 g carb, 3.5 g total fat, 1 g sat fat, 5 mg chol, 960 mg sod.
Guacamole
^1/2 small serrano or jalapeno pepper, seeded and cut into quarters
1 clove garlic, peeled
3 tablespoons loosely packed fresh cilantro leaves, if desired
14 small onion, peeled and cut into 1-inch pieces
3 ripe avocados, peeled, pitted, and cut into 1-inch pieces, divided
2 tablespoons fresh lime juice
12 teaspoon salt
^1/8 teaspoon cayenne, if desired
In chopper attachment bowl with blade, place serrano pepper and garlic. Insert chopper adapter into motor body and lock adapter onto bowl. Chop at Speed 8 for 8 to 10 seconds, or until finely chopped. Add cilantro, if desired; chop at Speed 8 for 8 to 10 seconds, or until cilantro is well cut. Add onion; chop at Speed 8 for 5 to 10 seconds, or until onion is finely chopped.
Add 23 of avocados, lime juice, salt, and cayenne, if desired. Pulse 2 to 3 times at Speed 6, about 4 seconds each time, or until well chopped, scraping bowl as needed. Add remaining 13 of avocado. Pulse 3 to 4 times at Speed 6, about 4 seconds each time, or until desired consistency. Cover and refrigerate at least 2 hours before serving to blend flavors. Serve with corn chips, if desired.
Yield: 14 servings (2 tablespoons per serving).
Per Serving: About 70 cal, 1 g pro, 3 g carb, 6 g total fat, 1 g sat fat, 0 mg chol, 90 mg sod.
White Bean Dip
1 small clove garlic,
peeled
1 tablespoon red onion pieces
1 can (15.5 oz.) Great Northern beans, rinsed and drained
12 teaspoon dried oregano
2 tablespoons olive oil
2 tablespoons white wine vinegar
^1/_4 teaspoon salt
^1/8 teaspoon cayenne, if desired
In chopper attachment bowl with blade, place garlic. Insert chopper adapter into motor body and lock adapter onto bowl. Chop at Speed 5 for 5 to 10 seconds. Add onion; pulse 2 to 3 times at Speed 5, about 5 seconds each time, or until well chopped, scraping bowl as needed. Add remaining ingredients. Pulse 2 to 3 times at Speed 7, about 15 seconds each time to blend, scraping bowl as needed. Serve with vegetables and crackers, if desired.
Yield: 8 servings (2 tablespoons per serving).
Per Serving: About 80 cal, 3 g pro, 9 g carb, 3.5 g total fat, 0.5 g sat fat, 0 mg chol, 75 mg sod.
Tomato Basil Crostini
1 small clove garlic, peeled
3 Roma tomatoes, cored, seeded, and cut into chunks
1 tablespoon loosely packed fresh basil leaves
2 tablespoons
shredded Parmesan
cheese
1 tablespoon extra virgin olive oil
^1/_8 teaspoon salt
^1/8 teaspoon black pepper
32 slices ^1 (4-inch each)
baguette
In chopper attachment bowl with blade, place garlic. Insert chopper adapter into motor body and lock adapter onto bowl. Chop at Speed 5 for 5 to 10 seconds, or until finely chopped. Add tomatoes and basil. Pulse 4 to 5 times at Speed 3, about 4 seconds each time to coarsely chop. Add cheese, oil, salt, and pepper. Pulse 2 to 3 times at Speed 3, about 4 seconds each time to combine.
Before serving, lightly toast baguette slices by broiling 4 inches from heat for 1 to 1 12 minutes per side. Cool. Serve topped with about 1 12 teaspoons tomato mixture per toast.
Yield: 16 servings (2 crostini per serving).
Per Serving: About 100 cal, 2 g pro, 16 g carb, 3 g total fat, 0.5 g sat fat, 0 mg chol, 150 mg sod.

® Registered Trademark/™Trademark of KitchenAid, U.S.A.
- Proof of Purchase & Product Registration
- Table of Contents
- Your safety and the safety of others are very important.
- DANGER
- WARNING
- SAVE THESE INSTRUCTIONS
- KitchenAid® Immersion Blender Warranty for the 50 United States and District of Columbia
- KitchenAid® Immersion Blender Warranty for Puerto Rico
- Arranging for Service After the Warranty Expires
- Arranging for Service Outside the 50 United States and Puerto Rico
- Ordering Accessories and Replacement Parts
- Troubleshooting Problems
- If your Immersion Blender should malfunction or fail to operate, please check the following:
- Immersion Blender Features
- Chopper Attachment and Adapter
- Assembling Your Immersion Blender
- Operating Your Immersion Blender
- Using the Blending Attachment
- Using the Whisk Attachment
- Using the Chopper Attachment
- Operating Tips
- Care and Cleaning
- IMMERSION BLENDER ACCESSORIES AND ATTACHMENTS
- Storage
- Cream Cheese Frosting
- VARIATION
- Orange Cream Cheese Frosting
- Vanilla Buttercream Frosting
- Chocolate Buttercream Frosting
- Chicken and Rice Baby Food
- Applesauce to Zucchini Baby Food
- Hot Fudge Sauce
- Hot Fudge Mint Sauce
- Southern Sweet Potato Bake
- Orange Banana-Berry Smoothie
- Raspberry Peach Smoothie
- Double Chocolate Malt
- Candy Ice Cream Freeze
- Mocha Frappé
- Hearty Mixed Grain Pancakes
- Creamy Caesar Salad Dressing
- Fresh Herb Vinaigrette
- Fresh Tomato Basil Soup
- Pan Gravy
- Chocolate Mocha Mousse
- Whipped Cream
- Chocolate Whipped Cream
- Cinnamon Whipped Cream
- Orange Whipped Cream
- Fudge Ribbon Cream Pie
- Crust
- Filling
- Topping
- Individual Pistachio Tarts
- Pecan Streusel Topping
- Vegetable Barley Soup
- Guacamole
- White Bean Dip
- Tomato Basil Crostini
Brand : KITCHENAID
Model : KHB300WH
Category : Blender