OJL-325 - Charger Ozito - Free user manual and instructions
Find the device manual for free OJL-325 Ozito in PDF.


| Product Type | Jumper Leads |
| Brand | Ozito |
| Model | OJL-325 |
| Nominal Voltage | 12V DC |
| Max. Current | 220A |
| Cable Length | 3m |
| Wire Cross Section | 19.4 mm² |
| Wire Material | Aluminium |
| Clamp Material | Polypropylene; Copper Coated Steel |
| Max. Engine Capacity | 2.5L Petrol Engines |
| Weight | 1.2 kg |
| Included Accessories | Carry Bag |
| Overvoltage Protection | Yes (Surge Protector Unit with LED indicator) |
| LED Status Indicator | Green LED on surge protector |
| Clamp Polarity | Red (+) and Black (-) |
| Connection Order | Positive first, then negative to ground |
| Safety Features | Insulated clamps, reverse polarity protection, spark reduction |
| Maintenance | Clean with damp cloth, store in dry area |
| Environmental Care | Recycle packaging and tool at end of life |
| Warranty | 1 year replacement warranty |
| Compliance | Read instruction manual before use |
Frequently Asked Questions - OJL-325 Ozito
User questions about OJL-325 Ozito
0 question about this device. Answer the ones you know or ask your own.
Ask a new question about this device
Download the instructions for your Charger in PDF format for free! Find your manual OJL-325 - Ozito and take your electronic device back in hand. On this page are published all the documents necessary for the use of your device. OJL-325 by Ozito.
USER MANUAL OJL-325 Ozito
Nominal Voltage: 12V DC
Max. Current: 220A
Cable Length: 3m
Wire Cross Section: 19.4mm ^2
Wire Material: Aluminium
Clamp Material: Polypropylene;
Copper Coated Steel
Max. Capability: 2.5L Petrol Engines
Weight: 1.2kg
ozito.com.au
natural_image
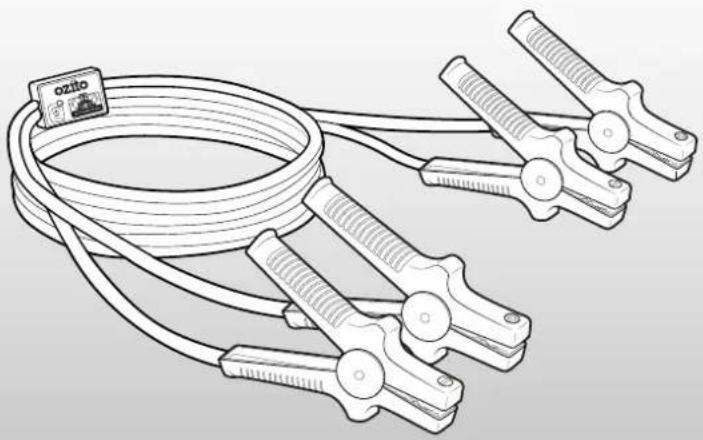
Illustration of a coiled cable with attached clips and a small object labeled 'ozito' (no text or symbols on the main subject)STANDARD EQUIPMENT
natural_image
Illustration of a coiled cable with multiple connectors (no text or symbols)3m Jumper Leads
natural_image
Simple line drawing of a round, spherical object with a narrow neck (no text or symbols)Carry Bag
1
YEAR REPLACEMENT WARRANTY
OJL-325
WARRANTY
IN ORDER TO MAKE A CLAIM UNDER THIS WARRANTY YOU MUST RETURN THE PRODUCT TO YOUR NEAREST BUNNINGS WAREHOUSE WITH YOUR BUNNINGS REGISTER RECEIPT. PRIOR TO RETURNING YOUR PRODUCT FOR WARRANTY PLEASE TELEPHONE OUR CUSTOMER SERVICE HELPLINE:
Australia 1800 069 486
New Zealand 0508 069 486
TO ENSURE A SPEEDY RESPONSE PLEASE HAVE THE MODEL NUMBER AND DATE OF PURCHASE AVAILABLE. A CUSTOMER SERVICE REPRESENTATIVE WILL TAKE YOUR CALL AND ANSWER ANY QUESTIONS YOU MAY HAVE RELATING TO THE WARRANTY POLICY OR PROCEDURE.
The benefits provided under this warranty are in addition to other rights and remedies which are available to you at law.
Our goods come with guarantees that cannot be excluded at law. You are entitled to a replacement or refund for a major failure and for compensation for any other reasonably foreseeable loss or damage. You are also entitled to have the goods repaired or replaced if the goods fail to be of acceptable quality and the failure does not amount to a major failure.
Generally you will be responsible for all costs associated with a claim under this warranty, however, where you have suffered any additional direct loss as a result of a defective product you may be able to claim such expenses by contacting our customer service helpline above.
1 YEAR REPLACEMENT WARRANTY
Your product is guaranteed for a period of 12 months from the original date of purchase and is intended for DIY (Do It Yourself) use only. If a product is defective it will be replaced in accordance with the terms of this warranty. Warranty excludes consumable parts, for example: valve adapters and accessories.
WARNING
The following actions will result in the warranty being void.
- If the tool has been operated on a supply voltage other than that specified on the tool.
- If the tool shows signs of damage or defects caused by or resulting from abuse, accidents or alterations.
- Failure to perform maintenance as set out within the instruction manual.
• If the tool is disassembled or tampered with in any way.
• Professional, industrial or high frequency use.
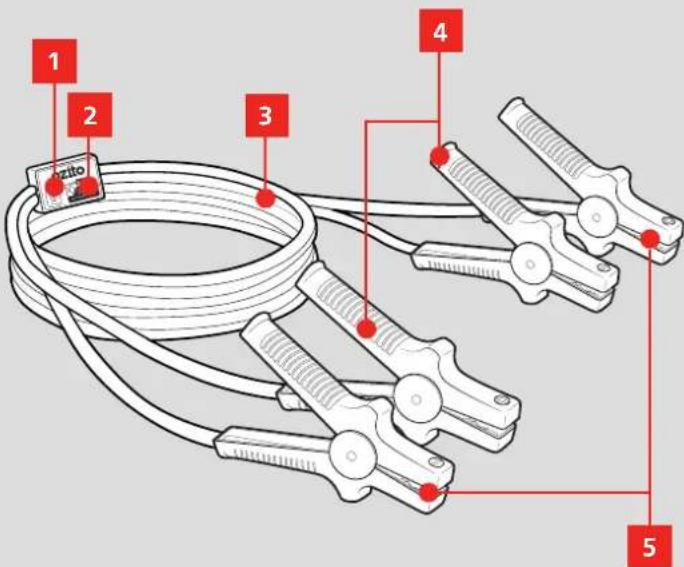
KNOW YOUR PRODUCT
- LED Status Indicator
- Overvoltage Surge Protector Unit
- 3m Insulated Cable
- Positive (+) Terminal Clamps (Red)
- Negative (-) Terminal Clamps (Black)
ONLINE MANUAL
Scan this QR Code with your mobile device to take you to the online manual.
SETUP & PREPARATION
1. VEHICLE PREPARATION

WARNING! FOLLOW VEHICLE MANUFACTURER'S INSTRUCTIONS FOR JUMP STARTING. FAILURE TO DO SO MAY RESULT IN PERSONAL INJURY & DAMAGE TO THE VEHICLES.

WARNING! ONLY CHARGE VEHICLE BATTERIES WITH BATTERIES OF THE SAME NOMINAL VOLTAGE.
Setting Up The Vehicles
- Place both vehicles into Park (for an automatic transmission) or Neutral (for a manual). Apply the handbrake.
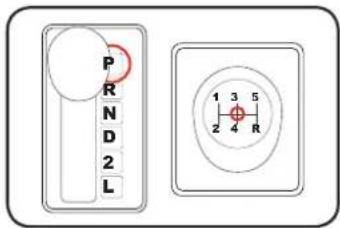
- Turn off any power draining functions (such as the stereo, headlights, interior lighting etc.) and then turn the engines of both vehicles off. Disconnect any phones, chargers, GPS units, computers etc.

WARNING! ENSURE THAT THE TWO VEHICLES ARE NOT TOUCHING IN ANY WAY. VEHICLES IN CONTACT WITH EACH OTHER COULD ESTABLISH A GROUND CONNECTION AND CAUSE PERSONAL INJURY TO THE USER OR BYSTANDERS.
2. CONNECTION SEQUENCE 3. SAFETY

WARNING! ALWAYS CONNECT THE CLAMPS TO THE POSITIVE BATTERY TERMINALS FIRST.
Attaching The Jumper Lead Clamps
Before connecting any of the clamps, identify the positive (+) and negative (-) terminals on both batteries. The positive terminal should be red and the negative terminal, black. Alternatively, if the terminals are not coloured, the positive terminal should be larger than the negative terminal.
Follow the connection order labelled on the clamps.

WARNING! ENSURE THAT NONE OF THE CLAMPS COME INTO CONTACT WITH EACH OTHER DURING USE. CONTACT BETWEEN LIVE CONNECTIONS MAY RESULT IN SPARKS, ELECTROCUTION, FIRE, SEVERE PERSONAL INJURY OR EVEN DEATH.
- Connect the red (+) clamp with the longer lead (further from the Surge Protector Unit) to the positive terminal of the flat battery.
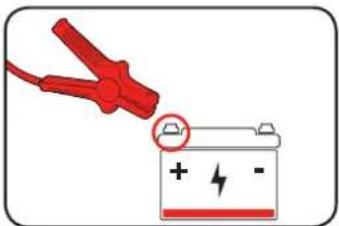
- Connect the other red (+) clamp on the positive terminal of the charged battery.
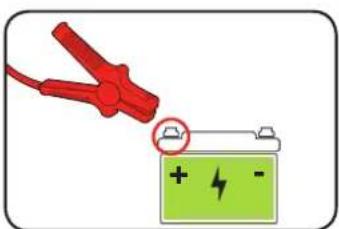
- Connect the black (-) clamp to the negative terminal of the charged battery.
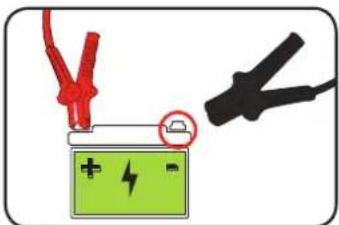
- Connect the last black (-) clamp onto a clean, exposed metal part (ground) on the engine block or engine as far away from the flat battery as possible.
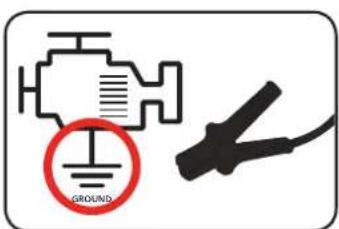

WARNING! CONNECTING THE BLACK CLAMP TO THE NEGATIVE TERMINAL OF THE FLAT BATTERY MAY CAUSE SPARKS, IGNITING FUMES FROM THE BATTERY.
UNCTIONS
Overvoltage Surge Protection
The overvoltage surge protection absorbs any voltage peaks that may occur during charging and jump starting.
Note: The green LED light on the overvoltage surge protection unit should light up automatically when the clamps are connected to the charged battery.
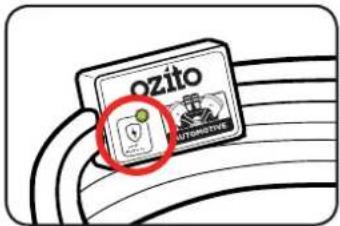

WARNING! CEASE USING THE JUMPER LEADS IMMEDIATELY IF THE GREEN LED DOES NOT LIGHT UP WHEN THE CLAMPS ARE CONNECTED TO THE CHARGED BATTERY.
4. JUMP STARTING THE VEHICLE 5. DIS

WARNING! NEVER ATTEMPT TO JUMP START A BATTERY THAT IS FROZEN, CRACKED OR DAMAGED IN ANY WAY. IT MAY EXPLODE WHEN CONNECTED TO ANOTHER BATTERY.
Charging The Flat Battery
- Check that the jumper leads are properly connected. Ensure that the jumper leads are not in contact with any rotating parts in the engine compartment.
- Start up the working vehicle and allow the engine to run for a few minutes.
- Start the engine of the discharged vehicle.

WARNING! STARTING THE IGNITION OF THE DISCHARGED VEHICLE SHOULD NOT TAKE LONGER THAN 15 SECONDS FOR EACH ATTEMPT. IF THE DISCHARGED VEHICLE DOES NOT START UP ON THE FIRST ATTEMPT, WAIT AT LEAST 1 MINUTE BEFORE TRYING AGAIN.
Note: If you cannot start the discharged vehicle after several attempts, contact a garage or qualified mechanic.
4. Once the discharged vehicle has started up, let the engine idle; this will continue charging up the flat battery. Do not shut off the discharged vehicle as it may not start up again.
CONNECTING THE VEHICLES

WARNING! DO NOT ALLOW THE CLAMPS TO CONTACT EACH OTHER OR DANGLE LOOSE IN THE ENGINE COMPARTMENT.

WARNING! ONLY GRASP CLAMPS BY THE INSULATED SURFACES.
Removing The Jumper Lead Clamps
The jumper leads should be removed in reverse connection order. Leave the vehicles running, but be very careful when removing the clamps as the circuit is still live.
- Remove the black (-) clamp from the discharged vehicle.
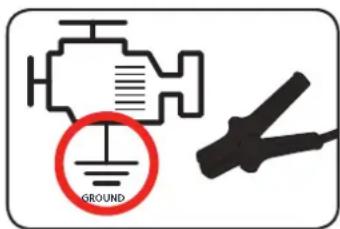
- Detach the black (-) clamp from the ground of the working vehicle.
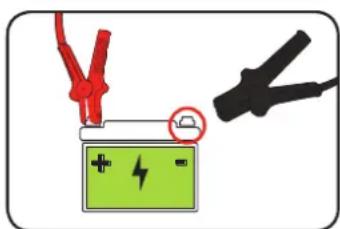
- Disconnect the red (+) clamp from the positive terminal of the working vehicle.
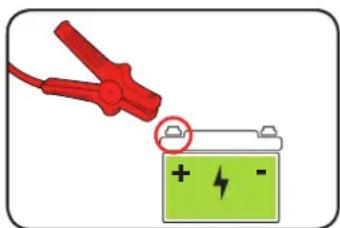
- Finally, remove the red (+) clamp from the positive terminal of the discharged vehicle.
natural_image
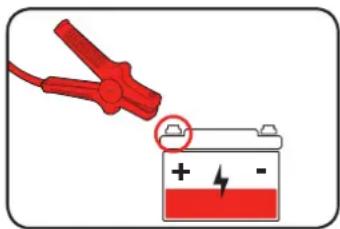
Illustration of a red clamp testing a battery with a lightning bolt (no text or symbols)- Drive the discharged vehicle around for 30-40 minutes to recharge the flat battery.
Note: Unless the cause of the flat battery is known (for example the lights were left on), the battery and electrical system should be checked by a suitably qualified mechanic as soon as possible.
MAINTENANCE DESCRIPTION OF
SYMBOLS
6. ACCESSORY CARE
Cleaning
- Clean the insulation of the jumper leads with a soft, damp cloth. Do not use any aggressive cleaners, brushes with metal or nylon bristles, sharp or metallic cleaning utensils such as knives, hand scrapers or the like. Do not submerge the jumper leads into water or solvents at any point. Use a dry cloth to clean the metal contacts.

WARNING! DO NOT WET METAL CONTACTS.

WARNING! MAKE SURE THE JUMPER LEADS ARE DISCONNECTED BEFORE CLEANING.
- Use a lint-free cloth to dry the jumper leads.
Storage
- Keep the jumper leads in the supplied carry bag when not in use to protect them from moisture.
- Store the jumper leads in a clean, dry area such as the boot of your car.
Note: Ozito Industries will not be responsible for any damage or injuries caused by the repair of the tool by an unauthorised person or by mishandling of the tool.
| V | Volts | A | Amperes |
| L | Litres | mm | Millimetres |
| m | Metres | Read instruction manual | |
| Warning |
CARING FOR THE ENVIRONMENT
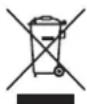
Power tools that are no longer usable should not be disposed of with household waste but in an environmentally friendly way. Please recycle where facilities exist. Check with your local council authority for recycling advice.

Recycling packaging reduces the need for landfill and raw materials. Reuse of recycled material decreases pollution in the environment. Please recycle packaging where facilities exist. Check with your local council authority for recycling advice.
SPARE PARTS
Spare parts can be ordered from the Special Orders Desk at your local Bunnings Warehouse.
For further information, or any parts not listed here, visit www.ozito.com.au or contact Ozito Customer Service:
Australia 1800 069 486
New Zealand 0508 069 486
E-mail: enquiries@ozito.com.au
! VEHICLE JUMPER LEADS SAFETY WARNINGS

WARNING! This item is not to be used by persons (including children) with reduced physical, sensory or mental capabilities, or lack of experience and knowledge, unless they have been given supervision or instruction.
Young children should be supervised to ensure that they do not play with the item.
Read all safety warnings and all instructions. Failure to follow the warnings and instructions may result in electric shock, fire and/or serious injury. Save all warnings and instructions for future reference.
- Only charge vehicle batteries with batteries of the same nominal voltage.
• Always connect the clamps to the positive (+) battery terminals first. - Ensure that none of the clamps come into contact with each other during use.
- If either vehicle has an electronic ignition system or is an alternatively fueled vehicle, the use of jumper leads may damage it.
- Do not allow the clamps to contact each other or dangle loose in the engine compartment.
- Only grasp clamps by the insulated surfaces.
- Make sure the vehicles are in either Neutral (Manual) or Park (Auto) with the handbrake on.
- Don't leave either engine running unattended.
- Keep away from children as they could potentially strangle or injure themselves.
- Keep children away from work area and jumper leads.
- Be careful when opening packaging and avoid using a sharp knife or pointed objects to open packaging as it may damage the jumper leads.
Risk of Fire & Deflagration
- Do not use jumper leads in environments where explosions may occur, such as in environments with ignition sources, flammable vapours, gases, dust or similar.
- Ensure that the jumper leads are not damaged.
- Route the jumper leads so that they cannot be caught by rotating parts in the engine compartment.
- Do not short circuit the jumper leads.
- Do not shorten or extend the jumper leads.
- Do not wear clothing made of synthetic materials during charging. The could generate sparks due to electrostatic charge.
Risk of Explosion & Chemical Burns
- Do not start a battery if it is cracked or damaged.
- Do not lean over the battery. The electrolyte from the discharged battery is also liquid at low temperatures.
- Wear protective gloves and safety glasses when working on the battery.
- Do not allow battery acid to make bodily contact. In the event of contact with battery acid immediately flush the applicable areas with plenty of clean water and consult a doctor.
- Never jump start a vehicle if the battery is frozen as the battery may explode. If the sides of the battery is bulged, it is likely frozen.
- Car batteries discharge hydrogen gas, which may ignite from flying sparks. Ensure that the jumper leads are connected in the correct order to reduce the risk of sparks.
- Only run the engine in a well-ventilated area to ensure toxic exhaust gas does not build up.
- Remove any vent caps on non-maintenance free batteries – be very careful as battery acid is highly corrosive
- Do not connect black terminal clamps to dead/flat battery, it may cause an explosion.
- Only connect jumper leads as prescribed in the manual.
Risk of Electric Shock
- Ensure the ignition switch is in the OFF position on both vehicles while connecting leads.
- Check the jumper leads for damage before each use. Do not use the jumper leads if they show signs of wear or damage.
- Cease using the jumper leads immediately if the green LED does not light up when the clamps are connected to the donor battery.
- Turn off the lights and power draining functions (such as the stereo and interior light) to help ease the strain off the charged battery
- Ensure that the terminal clamps do not touch. Contact between live connections may result in sparks, electrocution, fire, severe personal injury or even death.
- Ensure that there is no contact between the bodies of the vehicles and that no such contact occurs. Vehicles in contact with each other could establish a ground connection and result in personal injury to the user or bystanders.
- Ensure the charged battery is the same voltage as the flat battery
- When disconnecting the clamps, ensure that the lines of the jumper leads do not come into contact with the rotating parts of the engine compartment.
- Do not expose jumper leads to rain or wet conditions.
- WARRANTY
- YEAR REPLACEMENT WARRANTY
- WARNING
- KNOW YOUR PRODUCT
- SETUP & PREPARATION
- VEHICLE PREPARATION
- Setting Up The Vehicles
- CONNECTION SEQUENCE 3. SAFETY
- WARNING! ALWAYS CONNECT THE CLAMPS TO THE POSITIVE BATTERY TERMINALS FIRST.
- Attaching The Jumper Lead Clamps
- UNCTIONS
- Overvoltage Surge Protection
- JUMP STARTING THE VEHICLE 5. DIS
- Charging The Flat Battery
- CONNECTING THE VEHICLES
- Removing The Jumper Lead Clamps
- MAINTENANCE DESCRIPTION OF
- SYMBOLS
- ACCESSORY CARE
- Cleaning
- Storage
- CARING FOR THE ENVIRONMENT
- SPARE PARTS
- ! VEHICLE JUMPER LEADS SAFETY WARNINGS
- Risk of Fire & Deflagration
- Risk of Explosion & Chemical Burns
- Risk of Electric Shock
Brand : Ozito
Model : OJL-325
Category : Charger