
2lb Bread Maker - Bread maker BELLA - Free user manual and instructions
Find the device manual for free 2lb Bread Maker BELLA in PDF.


| Product Type | Bread Maker |
| Brand | Bella |
| Model | 2lb Bread Maker |
| Capacity | 2 lb (900 g) loaf |
| Dimensions | 10 x 13 x 12 inches (25.4 x 33 x 30.5 cm) |
| Weight | 10 lbs (4.5 kg) |
| Power Supply | 120 V, 60 Hz, 600 W |
| Control Panel | LCD display with touch buttons |
| Bread Programs | 12 preset programs including Basic, Whole Wheat, French, Sweet, Gluten-Free, Dough, Jam, etc. |
| Crust Control | Light, Medium, Dark settings |
| Loaf Size Options | 1 lb, 1.5 lb, 2 lb |
| Timer | Up to 15-hour delay start |
| Keep Warm | Automatic 1-hour keep warm after baking |
| Baking Pans | Non-stick bread pan with kneading paddle |
| Viewing Window | Large window to monitor baking process |
| Safety Features | Overheat protection, cool-touch handle, automatic shut-off |
| Cleaning | Wipe exterior with damp cloth; removable pan and paddle are dishwasher safe |
| Spare Parts | Replacement pans, paddles, and measuring cups available |
| Included Accessories | Measuring cup, measuring spoon, kneading paddle, recipe book |
| Warranty | 1-year limited warranty |
| Repairability | User-serviceable parts: bread pan, paddle; other repairs by certified technician |
Frequently Asked Questions - 2lb Bread Maker BELLA
User questions about 2lb Bread Maker BELLA
0 question about this device. Answer the ones you know or ask your own.
Ask a new question about this device
Download the instructions for your Bread maker in PDF format for free! Find your manual 2lb Bread Maker - BELLA and take your electronic device back in hand. On this page are published all the documents necessary for the use of your device. 2lb Bread Maker by BELLA.
USER MANUAL 2lb Bread Maker BELLA
natural_image
White Bella brand rice cooker with digital display and control buttons (no visible text or symbols on body)2 LB
BREAD MAKER
Instruction Manual and Recipe Guide
natural_image
Abstract logo design featuring a heart shape and stylized letter 'T' (no text or symbols)THANK YOU
for your purchase
REGISTER AND SIGN UP

natural_image
Generic user profile icon with a plus sign, no text or symbols presentfor special announcements trendy recipes!
TELL US WHAT YOU THINK!

natural_image
Silhouette of a person with five stars above it, no text or symbols presentRate, review or ask us a question.
GO TO: bellahousewares.com
myBELLAlife


BellaLifestyle



BellaLife
Table of Contents
Important Safeguards....2
Additional Important Safeguards....3
Notes on the Plug ....3
Notes on the Cord....3
Plasticizer Warning....3
Electric Power....4
10 Minute Power Failure Backup ....4
Getting to Know Your Bread Maker 4
Control Panel....5
15 MENU Programs 5-6
Program Cycles....6
Error Display....6
Program/Cycle Time Chart 7
Before Using for the First Time....7
Operating Instructions....8
13 Hour Delay Start Timer 8-9
Hints for Best Results....9
Preparing Bread and Dough....9
Measure Accurately 9
Yeast / Yeast Conversion Chart....10
Flour....10
Other Bread Ingredients 10-11
Gluten-Free Ingredients....11
Bread Baking in High Altitudes....12
Freezing Baked Bread....12
Freezing Dough 12
User Maintenance Instructions....12
Care & Cleaning Instructions....12
Storing Instructions....12
Trouble Shooting....13
Recipes....14-18


IMPORTANT SAFEGUARDS
When using electrical appliances, basic safety precautions should always be followed including the following:
-
READ ALL INSTRUCTIONS.
-
Do not touch hot surfaces; carry the unit by the housing.
-
Always use oven mitts when handling hot material, and allow metal parts to cool before cleaning. Allow the bread maker to cool thoroughly before putting on or taking off parts.
-
Unplug the bread maker from wall outlet when unit is not in use and before cleaning. Allow the bread maker to cool down completely before assembly or disassembly.
-
To protect against risk of electric shock, do not immerse the appliance or plugs in water or other liquids.
-
Close supervision is always necessary when this or any appliance is used near children or incapacitated persons.
-
This appliance is not intended for use by persons (including children) with reduced physical, sensory or mental capabilities, or lack of experience and knowledge, unless they have been given supervision or instruction concerning use of the appliance by a person responsible for their safety.
-
Children should be supervised to ensure that they do not play with the appliance. Do not operate this or any appliance with a frayed or damaged cord or plug, or after the appliance malfunctions or is dropped or has been damaged in any manner. Contact the manufacturer at their customer service telephone number for information on examination, repair, or adjustment.
-
Do not let the cord hang over the edge of a table or counter or touch hot surfaces. Do not allow anything to rest on the power cord. Do not place plug or cord where people may walk or trip over it.
-
Keep power cord away from the hot surface of this bread maker.
-
Do not place on an unsteady or cloth-covered surface.
-
Avoid contact with moving parts.
-
Do not use attachments not recommended by the manufacturer. They may cause fire, electric shock or injury or may damage the unit and void the warranty.
-
Do not use outdoors or for commercial purposes.
-
Do not place the appliance near a hot gas or electric burner, or in a heated oven.
-
Do not put any flammable objects on the hot surface of this bread maker.
-
Place this bread maker a minimum of 6 inches away from any wall or other object.
-
Do not use this bread maker for other than its intended use.
-
Before unplugging, press and hold the START/STOP button for 1 to 3 seconds to STOP operation; then grip plug and remove from wall outlet. Never pull on the cord.
-
Appliances are not intended to be operated by means of an external timer or separate remote-control system.
FOR HOUSEHOLD USE ONLY SAVE THESE INSTRUCTIONS
ADDITIONAL IMPORTANT SAFEGUARDS
CAUTION HOT SURFACES: This appliance generates heat and escaping steam during use. Proper precautions must be taken to prevent the risk of burns, fires, or other injury to persons or damage to property.
CAUTION: During use, internal parts of the bread maker and the area around the steam vent are HOT. Keep out of reach of children to avoid possible injury.
- A person who has not read and understood all operating and safety instructions is not qualified to operate this appliance. All users of this appliance must read and understand this instruction manual before operating or cleaning this appliance.
- If this appliance falls or accidentally becomes immersed in water, unplug it from the wall outlet immediately. Do not reach into the water!
- When using this appliance, provide adequate air space (at least 6 inches) above and on all sides for air circulation. Do not operate this appliance under a wall cabinet, while it is touching or near curtains, wall coverings, clothing, dishtowels or other flammable materials.
- If this appliance begins to malfunction during use, immediately unplug the cord. Do not use or attempt to repair a malfunctioning appliance!
- The cord to this appliance should be plugged into a 120V AC electrical wall outlet.
- Do not use this appliance in an unstable position.
Notes on the Plug
This appliance has a polarized plug (one blade is wider than the other). To reduce the risk of electric shock, this plug will fit in a polarized outlet only one way. If the plug does not fit fully into the outlet, reverse the plug. If it still does not fit, contact a qualified electrician. Do not modify the plug in any way.
Notes on the Cord
A. A short power-supply cord (or detachable power-supply cord) is to be provided to reduce risks resulting from becoming entangled in or tripping over a longer cord.
B. Longer detachable power-supply cords or extension cords are available and may be used if care is exercised in their use.
C. If a long detachable power-supply cord or extension cord is used:
1. The marked electrical rating of the detachable power-supply cord or extension cord should be at least as great as the electrical rating of the appliance;
2. If the appliance is of the grounded type, the extension cord should be a grounding-type 3-wire cord; and
3. The longer cord should be arranged so that it will not drape over the counter top or table top where it can be pulled on by children or tripped over.
Plasticizer Warning
CAUTION: To prevent Plasticizers from migrating to the finish of the counter top or table top or other furniture, place NON-PLASTIC coasters or place mats between the appliance and the finish of the counter top or table top. Failure to do so may cause the finish to darken; permanent blemishes may occur or stains can appear.
Electric Power
If the electrical circuit is overloaded with other appliances, your appliance may not operate properly. It should be operated on a separate electrical circuit from other appliances.
10 Minute Power Failure Backup
-
In case of a power outage, the stage of bread-making Cycle is stored into memory. If the power is restored within 10 minutes time, press the START/STOP button to continue the Cycle.
-
If the power outage exceeds 10 minutes, discard bread pan contents and begin again.
NOTE: If the dough is no further than the Kneading Cycle when the power is disrupted, press the START/STOP button to re-START the Program from the beginning.
Getting to Know Your Bread Maker
Product may vary slightly from illustration
Figure 1

Control Panel

- LCD Display: Displays active Program, active Cycle, crust COLOR and LOAF size. Also view Delay Start Time.
- MENU Button: Press button to advance to next Program. Refer to the Program list above the LCD display for options.
- TIME Button: Press to advance time in 10 minute increments.
- CYCLE Button: Use in conjunction with the TIME button to customize Program and Cycle times.
- LOAF Button: Press to select a 2 lb./900g or 1.5 lb./700g LOAF. This button is not active for QUICK, DOUGH, KNEADING, CAKE, SPECIALTY, JAM, YOGURT, BAKE, and HOME MADE Programs.
-
COLOR Button: Press to select Light, Medium or Dark COLOR crust. This button is not active for DOUGH, KNEADING, CAKE, JAM, YOGURT, BAKE Programs.
-
START/STOP Button: Press to START, STOP or PAUSE the selected Program.
- A short beep will be heard and the LCD will flash as the Program STARTS.
NOTE: NO buttons are active except the START/STOP button after any Program has started.
- To STOP the Program at any time, press the START/STOP button until a beep is heard; the bread maker will turn OFF.
- Press START/STOP button once to PAUSE the active Program. The Cycle TIME will flash on the LCD. If the START/STOP button is pressed again within 10 minutes without touching any other button, the Program Cycle will continue.
15 MENU Programs
Use the MENU button to set any of 15 different Programs. Each time the MENU button is pressed, a beep will sound and the Program will advance. The desired Program number will be appear prominently on the left side of the display.
- BASIC: Uses primarily all-purpose or bread flour.
- FRENCH: French breads traditionally lack sugars or large amounts of fat, they tend to be lighter in color and have a wonderful, crispy crust.
- WHOLE WHEAT: Whole-wheat bread is a yeast bread that is made with a significant portion of whole-wheat flour (50% or more). Using whole wheat flour produces more flavorful and healthful brown to dark brown loaves. Whole wheat bread tends to be denser than 100% white breads.
- QUICK: Always use rapid rise yeast or the bread will not rise and bake properly. Recipes may be modified by replacing standard yeast with an equal or larger amount of rapid rise yeast. NOTE: The QUICK Program cannot be used with gluten-free recipes.
- SWEET: Specifically designed to bake breads with large amounts of fat, sugar, eggs or cheese. During the initial mixing, ingredients may tend to gather in the corners of the bread pan. Use a rubber spatula to avoid clumps.
-
GLUTEN-FREE: Since gluten is found in most flours used in traditional bread baking, the ingredients to create gluten-free breads are unique. While they are "yeast breads," the doughs are generally wet and often have a batter-like consistency. It is also important not to over-mix or over-knead gluten-free doughs.
-
DOUGH: This Program is ideal for pizza dough and allows for the preparation of artisan doughs. It mixes ingredients, Kneads and takes the dough through the 2 Rise Cycles. Use almost any dough recipe (except gluten-free). Remove dough and use for making braided breads, rolls, pizza, etc.
- KNEADING: Knead doughs only. No Rise Cycles.
- CAKE: Batter-type quick breads achieve leavening from baking powder, baking soda and eggs rather than yeast. Add-ins must be added at the very beginning with other basic ingredients. If the final cake is too moist, allow the cake to Keep Warm for 10 to 15 minutes after baking is complete.
- SANDWICH: The SANDWICH Program produces a light textured bread with a thinner crust.
- SPECIALTY: Bakes 2 lb. loaves only. Use for bread types that are required in a shorter time. Breads baked using the SPECIALTY setting are smaller, with a dense texture.
- JAM: Prepare fresh homemade jams, marmalades and compotes. Mixing will start when the bread chamber is heated, about 10 minutes into the Program.
- YOGURT: Use organic whole fat milk (4-1/4 cups/1000 ml.) and acidophilus milk (1/2 cup/100 ml.) to prepare perfect homemade yogurt with no additives or preservatives.
IMPORTANT: The bread pan must be perfectly clean before preparing homemade yogurt.
IMPORTANT: NEVER use metal utensils when preparing yogurt.
-
BAKE: Use to bake store-bought doughs or to extend BAKE time if needed.
-
HOMEMADE: Make the recipe your own! Use the CYCLE and TIME buttons to adjust for each Cycle: Knead 1: 0 - 8 min. Rise 1: 20 - 60 min. Knead 2: 0 - 15 min. Rise 2: 0 - 35 min. Rise 3: 0 - 60 min. Bake: 0 - 80 min. Keep Warm: 0 - 60 min.
Program Cycles
- Knead: Most bread types use 2 Knead Cycles. The first Knead Cycle quickly mixes the main ingredients. The second Knead Cycle is longer, and continues the mixing process. The dough is "punched down" before the longer Cycle begins.
- Rise: Rise Cycles help to ensure the perfect consistency of all yeast breads. During the Rise Cycles, your bread maker will appear to be inactive. The display will confirm the bread maker is in Rise Cycle.
- Bake: This bread maker will consistently regulate both baking time and temperature according to the menu function selected.
- Keep Warm: After completion of the chosen Program; when the LCD time counts down to 0:00, 10 beeps will signal the end. The bread maker will advance to a 60 minute Keep Warm Cycle. Bread may be removed at any time by pressing the START/STOP button.
- If another loaf of bread or another Program is to be used after baking the first loaf, the bread maker must be cooled down sufficiently before using.
Error Display
- The error: H:HH will appear and 5 beeps will sound when the bread baking chamber is too hot. Open the lid for 10 to 20 minutes and allow the bread maker to cool down.
- The error: L:LL will appear and 5 beeps will sound when the bread baking chamber is too cold. Open the lid for 10 to 20 minutes and allow the bread maker to come to room temperature.
Program/Cycle Time Chart
| PROGRAM | LOAF SIZE | TOTAL TIME (hours) | KNEAD 1 (min) | RISE 1 (min) | KNEAD 2 (min) | RISE 2 (min) | RISE 3 (min) | BAKE (min) | KEEP WARM (min) | DELAY TIMER (hours) |
| 1. BASIC | 1.5 LB | 2:53 | 11 | 20 | 17 | 25 | 40 | 60 | 60 | 13:00 |
| 2.0 LB | 3:00 | 12 | 20 | 18 | 25 | 40 | 65 | 60 | ||
| 2. FRENCH | 1.5 LB | 3:40 | 18 | 40 | 22 | 22 | 45 | 65 | 60 | 13:00 |
| 2.0 LB | 3:50 | 20 | 40 | 25 | 25 | 45 | 70 | 60 | ||
| 3. WHOLE WHEAT | 1.5 LB | 3:32 | 11 | 25 | 21 | 21 | 60 | 60 | 60 | 13:00 |
| 2.0 LB | 3:40 | 12 | 25 | 23 | 23 | 60 | 65 | 60 | ||
| 4. QUICK | 2:10 | 12 | 10 | 13 | 13 | 25 | 70 | 60 | 13:00 | |
| 5. SWEET | 1.5 LB | 2:50 | 12 | 5 | 23 | 23 | 40 | 60 | 60 | 13:00 |
| 2.0 LB | 2:55 | 12 | 5 | 23 | 23 | 40 | 65 | 60 | ||
| 6. GLUTEN FREE | 1.5 LB | 2:50 | 12 | 5 | 30 | 20 | 40 | 70 | 60 | 13:00 |
| 2.0 LB | 2:55 | 12 | 10 | 30 | 20 | 40 | 70 | 60 | ||
| 7. DOUGH | 1:30 | 25 | 30 | 20 | 35 | 13:00 | ||||
| 8. KNEADING | 25 | |||||||||
| 9. CAKE | 1:50 | 7 | 4 | 10 | 80 | 60 | 13:00 | |||
| 10. SANDWICH | 1.5 LB | 2:55 | 17 | 40 | 25 | 24 | 35 | 50 | 60 | 13:00 |
| 2.0 LB | 3:00 | 17 | 40 | 25 | 24 | 35 | 55 | 60 | ||
| 11. SPECIALTY | 2:50 | 10 | 5 | 30 | 20 | 35 | 70 | 60 | 13:00 | |
| 12. JAM | 1:20 | 15 | 45 | 20 | ||||||
| 13. YOGURT | 8:00 | |||||||||
| 14. BAKE | 1:00 | 60 | ||||||||
| 15. HOME | 3:00 | 1 | 20-60 | N/A | 0-35 | 0-60 | 0-60 | 26 min |
Before Using for the First Time
- Remove all packing material and any promotional labels or stickers from your bread maker. Be sure that all parts of your new bread maker have been unpacked before discarding any packing materials.
- Wipe housing with a damp cloth to remove any dust from the warehouse or shipping.
- Wash inside of lid with sponge or damp cloth. Wash kneading paddle and bread pan in warm, soapy water and dry completely.
- Following the Operating Instructions, install an empty bread pan and kneading paddle into the baking chamber; then program bread maker to BAKE for 10 minutes. Allow the bread maker and parts to cool thoroughly before cleaning once more.
NOTE: During this first use, it is normal for this product to produce minor smoke and/or emit odor from mineral oils used in manufacturing.
- Dry all parts thoroughly and reassemble. Your bread maker is now ready for use.
Operating Instructions
- Open the lid. Grasp the bread pan handle or and turn the pan counterclockwise. (See Figure 2.)
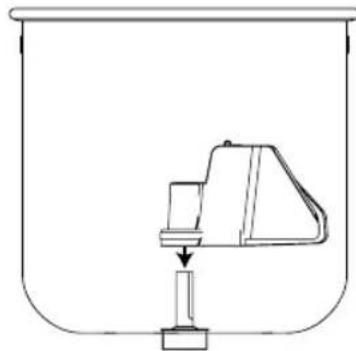
- Attach the kneading paddle, insert onto the shaft with wide base facing down. (See Figure 3.)
- Measure all ingredients and add to the bread pan. Always put liquids in first, dry ingredients next, and the yeast last. Yeast should never touch wet ingredients. (See Figure 4.)
- Replace the bread pan into the baking chamber, turning clockwise to lock in place.
- Close the lid and plug the power cord to a 120V AC electrical outlet. An audible beep will sound.
- The default settings will appear on the display: Program 1: BASIC, 3:00 hours, 2 lb/900g. LOAF and medium crust COLOR will be displayed.
- Press the MENU button until the desired Program number appears prominently on the left side of the display.
- Press the COLOR button to select: light, medium or dark. If no crust COLOR is selected, the unit will automatically default to medium.
- Press the LOAF button to select a 1 1/2 lb/700g or 2 lb/900g LOAF. If no loaf size is selected, the bread maker will automatically default to a 2 lb/900g loaf.
- Set the Delay Start Timer (see the "13 Hour Delay Start Timer" section following) or press the START/STOP button to begin bread maker operation immediately.
- To STOP the process at any time, press and hold the START/STOP button for 3 seconds.
- When the LCD time counts down to 0:00, 10 beeps will signal the completion of the bread maker's active Program.
- A 1 hour Keep Warm Cycle will begin for all Programs except: DOUGH, KNEADING, JAM, and YOGURT.
- To remove bread from the pan, open the lid and use the bread pan/paddle hook to aid in lifting the bread pan handle. Using oven mitts, remove the bread pan by turning counterclockwise (See Figure 5.) then lift the bread pan up and out of the baking chamber.
IMPORTANT! Always make sure the kneading paddle is removed from the bread before slicing.
Use the bread pan/paddle hook provided to aid in removal.
13 Hour Delay Start Timer
NOTE: The Delay Start Timer cannot be used for KNEADING, JAM, YOGURT or BAKE Programs.
The bread maker can be programmed to begin operating up to 13 hours in advance. For example, you can program your bread maker at 8 p.m. to finish baking at 9 a.m.
IMPORTANT: Set the Delay Start Timer based on when you would like your bread to be complete.
NOTE: Do not use perishable ingredients such as fresh milk, eggs, cheese, onions, fresh fruit or yogurt when using the Delay Start Timer.
- Always place the ingredients in the bread pan in the order listed in the recipe: liquids, dry ingredients and then yeast. (See Figure 4.)
- Press the MENU button to choose the desired baking Program. Press the corresponding buttons to set crust COLOR, and LOAF SIZE.

natural_image
Illustration of a hand placing a component into a kitchen appliance, showing a curved arrow indicating rotation (no text or symbols)Figure 3
natural_image
Simple line drawing of a container with a small object inside, no text or symbols presentFigure 4

Figure 5

natural_image
Line drawing of a kitchen appliance with a bag being inserted, showing internal components and a directional arrow (no text or symbols)-
Press the TIME button to set the number of HOURS ahead that you want the loaf to finish.
By pressing the TIME button you can set time for completion up to 13 hours later. Press to increase TIME in 10 minute increments or hold the TIME button to scroll faster.
NOTE: TIME cannot be decreased once it is programmed. Press the MENU button to re-program. -
Press the START/STOP button to begin the Delay Start countdown.
Hints for Best Results
-
This bread maker will bake up to a 2 lb. loaf of bread. WARNING! DO NOT EXCEED the maximum amount of ingredients.
-
Bread Programs 4 cups maximum
- Quick Bread Program 4 cups maximum
-
Dough Program 4 - 4 1/2 cups maximum
-
All ingredients except liquids must be at room temperature.
-
Use oven mitts when working with bread or any part of the bread maker that is hot from baking.
-
After baking, wipe off crumbs and clean the bread maker.
-
Unplug the bread maker when not in use.
-
It is normal for the viewing window to collect moisture during the Rise Cycle. As your food bakes, the moisture soon will evaporate so you can watch your bread's baking progress.
-
CAUTION: Do not touch the viewing window during use. The viewing window gets very hot.
-
Never open the lid during baking. This causes baked products to bake improperly.
-
Never unplug the bread maker during kneading or baking. This will stop the operation and will cause bread to bake improperly.
-
To avoid burns, stay clear of the air outlet vents during kneading and baking.
-
ALWAYS HANDLE THE HOT BREAD PAN AND HANDLE WITH A POT HOLDER OR OVEN MITT. After baking, wait for the bread maker to cool down before touching or cleaning the bread pan or internal parts of the bread maker without oven mitts.
-
Never use metal utensils with the bread maker. These can scratch the non-stick surface of the bread pan.
-
Avoid electric shock by unplugging the machine before using a damp cloth or sponge to wipe the interior of the baking chamber.
-
Never use the bread pan on a gas or electric cooktop, on an open flame, or in a microwave oven.
-
Do not cover the air outlet vents during Kneading and Baking Cycles. This could cause the bread maker to warp or discolor.
-
Always make sure the kneading paddle is removed from the bread before slicing. Use the bread pan/paddle hook provided to aid in removal.
-
Wash and dry cooking pot. IMPORTANT! The bread pan must be perfectly clean before preparing homemade yogurt.
-
IMPORTANT: NEVER use metal utensils when preparing yogurt.
Preparing Bread and Dough
- Always begin with fresh ingredients. Fresh flour and yeast are critical.
- All ingredients except liquids must be at room temperature.
- Liquids should be approximately 80^ F/27°C (baby bottle temperature). IMPORTANT: When using the QUICK Program, water must be 115^-125^ F/45°-51°C (warm).
- Always place the ingredients in the bread pan in the order listed in the recipe: liquids, dry ingredients and then yeast. (See Figure 4.)
Measure Accurately
- Mis-measuring, even slightly, can make a huge difference in baking results.
- When measuring liquids, use a liquid measuring cup. To ensure accuracy, set the measuring cup on the counter top and read the measurement at eye level.
- Spoon dry ingredients lightly into a standard dry ingredient measuring cup and level with a straight edge. Never shake the cup or tap it on the counter top. Do not scoop the flour with the measuring cup as this tends to pack more flour than the recipes call for.
- Use a clean measuring spoon to measure yeast and level with a straight edge.
- Liquid amounts called for in a recipe may need to be adjusted slightly because different climates and seasons result in a wide variety of humidity levels.
Yeast
Yeast Conversion Chart
1 tsp. active dry yeast = .75 tsp. instant yeast
1.5 tsp. active dry yeast = 1 tsp. instant yeast
2 tsp. active dry yeast = 1.5 tsp. instant yeast
- A 1/4 (.25) oz. package of yeast contains approximately 2.25 level teaspoons of yeast.
- When yeast is exposed to oxygen, moisture or warmth, the yeast activity deteriorates. Always store yeast in an airtight container. Refrigerate for up to 6 weeks or freeze for up to 6 months. Measure the amount needed and allow 15 minutes for the yeast to come to room temperature.
Flour
- All types of flour are affected by many factors, such as milling grades, moisture content, length of storage and manufacturing process., adjustments to the recipes may need to be made to compensate for climactic changes in different regions.
- To ensure an excellent loaf, bread flour is key. Milled from hard winter or spring wheat, the higher protein content makes it more durable than all-purpose flour. The protein, when mixed with liquid, becomes gluten. When kneaded, gluten becomes elastic and gives the bread better structure. In contrast, all-purpose flour, milled from a combination of soft and hard wheat, becomes elastic too easily for use in a bread maker and quickly loses its ability to stretch well.
IMPORTANT: Bread made from all-purpose flour will be smaller and more dense. - Wheat is the only grain that contains the type of protein that becomes elastic when kneaded. Other flours, such as rye, barley, oats, soy, rice and buckwheat add flavor and fiber to breads but do not add structure to the dough. Therefore, wheat flour is essential as a base when making bread.
- Wheat gluten is produced by processing white flour one more step. White flour contains both protein and starch, and mills now can remove most of the starch leaving only the protein (gluten). When gluten is added to recipes containing whole grain flours, it improves the volume and shape of the loaf significantly.
- Always store flour in airtight containers. Freeze to store flour for a long period of time.
- Whole grain wheat flours, which have a higher oil content, will become rancid, and should always be kept in the freezer.
- Allow all flours to return to room temperature before placing in the bread maker.
Other Bread Ingredients
Fat: is a dough enhancer and conditioner. Any type of oil or substitute may be used in equal proportions. Solid shortening or real butter should be divided into small pieces. There will be no noticeable difference in flavor but the crust may be crispier with real butter. The use of margarine is not recommended as it tends to make the crust tough.
Liquids: activate the yeast and bind the dough. Liquids refer to all wet ingredients used in the recipe. It is very important that the liquid temperature is 80^ F/27°C. With this liquid temperature, the yeast activates gradually to accommodate bread baking.
IMPORTANT: When using the QUICK BREAD Program, water must be 115°-125°F/45°-51°C (warm).
Eggs: are considered part of the total liquid amount. Eggs should be at room temperature. If refrigerated, place whole uncracked eggs in a bowl of warm water for 15 minutes to bring to room temperature.
Egg Substitutes: Liquid egg substitutes may be used as directed on the carton. 2 egg whites may be substituted for 1 whole egg.
IMPORTANT: All egg products must be used at room temperature.
Cinnamon and Garlic: DO NOT ADD MORE THAN LISTED IN THE RECIPE. Cinnamon and garlic break down the structure of the bread. Although it smells wonderful as it is baking, the flavor is dissipated in the baking process. Adding cinnamon and garlic to the dough in a bread maker, presents a problem. For more flavor, use cinnamon and garlic as spread for the bread rather than adding to the dough.
Fruits and Vegetables: DO NOT ADD MORE THAN LISTED IN THE RECIPE. If used in excessive amounts, may inhibit the rising of the bread.
Salt: regulates yeast activity. Salt-free recipes are not successful. Salt is necessary to control the activity of yeast, causing it to work slowly and steadily. Without salt, yeast acts too rapidly. Salt also strengthens the structure of the dough. If too little or no salt is used, the bread will rise rapidly and then fall.
The texture will also be more coarse and/or uneven.
Sugar: DO NOT ADD MORE THAN LISTED IN THE RECIPE. Too much sugar will cause the yeast to over-react causing the loaf of bread to be small and dense. Dried fruits also contribute sugar to the bread dough. Honey may be substituted for sugar in equal proportions; reduce the liquid by the same amount. Brown sugar may be substituted for white sugar in equal proportions.
Artificial Sweeteners: are not recommended because the yeast cannot react with them.
Milk: Coffee creamer, non-dairy creamer or dry buttermilk may be substituted for dry milk in equal proportions. Liquid milk 80°F/27°C may be substituted for water in equal proportions for all bread Programs.
Gluten-Free Ingredients
All of the following ingredients can be found either in the baking or gluten-free section of your local grocery store or in your local natural food market. They can also be easily found and ordered online. There are several commercial brands of gluten-free, all-purpose flour blends that can be used successfully.
Almond Flour or Almond Meal: Finely ground almond flour or meal adds protein, but is better left for savory and sweet cakes rather than yeast breads. You can use either almond flour or almond meal, as long as it is finely ground.
Baking Powder: Baking powder is a combination of baking soda and acid, so this leavener can be used in baked goods where there is no existing acid. Be sure to read the label because some baking powders use starches to keep the compound dry, which may affect those with gluten allergies.
Baking Soda: Baking soda is a chemical leavener that requires an acidic ingredient to activate. Examples include brown sugar, buttermilk, yogurt,
etc. Not only does baking soda provide lift to your baked product, but it also improves browning.
Buckwheat Flour: Buckwheat is not actually wheat at all. Buckwheat flour has a high protein content and a pleasant nutty flavor. It does need to be combined with other flours to produce a baked item with good structure.
Cornstarch: Cornstarch is a way to add structure and stability to a gluten-free bread that is otherwise provided by gluten. Use in moderation to avoid a very starchy and unpleasant flavor.
Flax Seeds (ground): Ground flax seeds are nutritious and act as a binder to produce a stable structure in baked goods.
Garbanzo/Chickpea Bean Flour: High in protein, garbanzo bean flour imparts a rich and sweet flavor in baked goods.
Guar Gum: Similar to xanthan gum and interchangeable, this thickening agent helps with the structure of the bread. Use sparingly as guar gum imparts a starchier flavor to baked goods.
Gluten-Free, All-Purpose Flour Blend: Many brands are available. Choose blends with a high % of rice flours.
Nonfat Milk Powder: Nonfat milk powder adds structure to breads by acting as an emulsifier by linking gluten-free flours to fats. The milk proteins also increase browning.
Powdered Psyllium Husk: Full of fiber, psyllium husk powder works similarly to a gum. One of the best ways to add structure and bind ingredients together in gluten-free recipes.
Oat Flour: High in protein and inexpensive, this flour adds a slight nuttiness to baked breads.
Potato Starch: Best used with doughs that are higher in moisture, potato starch contributes to the structure of the loaf and is a good tenderizer.
Brown Rice Flour: High in fiber with a nuttier flavor, use a finely ground flour with a smooth, sandy texture.
White Rice Flour: A very versatile gluten-free baking ingredient with a mild flavor that blends well with other flours.
Sweet White Rice Flour: Ground from sweet rice, use in small quantities when making your own gluten-free flour blend.
Sorghum Flour: High in protein and fiber, sorghum flour is a good substitution for oat flour.
Teff Flour: Very high in protein, with an earthy flavor, similar to whole-wheat flour.
Tapioca Starch (Flour): Used in small quantities, this starch is a great binder and gives finished breads good structure.
Xanthan Gum: Similar to guar gum and interchangeable, use as a thickening agent to help stabilize gluten-free breads. Use in small quantities.
Yeast: MUST BE FRESH! Always store yeast in the refrigerator and check the expiration date prior to using. Active, dry yeast or bread machine yeast is acceptable. When baking QUICK BREAD, rapid rise yeast or quick rise yeast must be used.
Bread Baking in High Altitudes
High elevations may make dough rise faster. We recommend that you first try the original recipe.
The dough ball should be round, smooth-textured, soft and slightly tacky to the touch. If you find the results are unsuccessful, decrease yeast 1 teaspoon at a time. You may also have to increase the liquid because of the drier air; start with 1 tablespoon and increase it if necessary. The addition of gluten will help the structure of the bread. The recommended amount is 1 teaspoon water per cup of flour unless specified otherwise in the recipe.
Freezing Baked Bread
When freezing bread and rolls, cool them before wrapping in plastic wrap. Place in a well sealed plastic bag. Bread may be frozen for up to 6 weeks. To thaw, partially open the wrapping to allow the moisture to escape gradually for best results.
Freezing Dough
At the end of the DOUGH Program, you may remove the dough and freeze for baking at a later time. Form the dough into the desired shape and immediately freeze for one hour to harden. Remove from the freezer and wrap tightly in plastic wrap. Next, place frozen dough in a plastic bag and seal. Dough can be kept in the freezer for up to four weeks. Thaw the dough in plastic bag in the refrigerator overnight or for several hours. Unwrap and place in a baking container. Cover and let stand in warm, draft-free place until the dough doubles from its original size. Because the dough is not room temperature, you will find it takes longer than usual to rise. Bake according to recipe instructions.
User Maintenance Instructions
This appliance requires little maintenance. It contains no user-serviceable parts. Any servicing requiring disassembly other than cleaning must be performed by a qualified appliance repair technician.
Care & Cleaning Instructions
- Unplug bread maker and allow to cool completely before cleaning.
- Remove bread pan from the bread maker.
- To clean the glass viewing window, use a glass cleaner or mild detergent and a damp cloth or plastic scouring pad. Do not use an abrasive cleaner or pad as they might scratch the glass.
- Clean the exterior housing with a damp cloth. A plastic scouring pad may be used, gently rub surface to avoid scratching.
- Remove any flour, bread crumbs or other food from the inside of the baking chamber, using a damp sponge, cloth or a small portable vacuum cleaner. A plastic scouring pad may be used; gently rub to avoid scratching.
- Rinse with a damp cloth and dry thoroughly.
- To clean the bread pan and kneading paddle, allow to cool completely before cleaning. If the kneading paddle is baked onto the drive shaft, simply fill the bread pan with soapy water. Holding the paddle in one hand, turn the crank at the bottom of the bread pan and try to loosen. If necessary, soak pan for up to 30 minutes.
CAUTION: Do not soak for longer than 30 minutes to avoid damage to the non-stick surface. - Wash bread pan and kneading paddle with a nylon bristle brush. Do not use steel wool, abrasive cleaners, or metal utensils on the bread pan or kneading paddle as they will damage the non-stick surface. Normal wear is to be expected. The non-stick may discolor over time but in no way will this impair performance.
NOTE: The bread pan and kneading paddle may be washed in the top rack of any dishwasher.
Storing Instructions
- Make sure bread maker is unplugged and cooled before storing.
- Clean the bread pan and kneading paddle following the procedures outlined in the "Care & Cleaning" section of this instruction manual.
- Wrap the bread pan/paddle hook in paper towel. Assemble the kneading paddle onto the bread pan, add the wrapped hook inside. Store the bread maker with the bread pan locked in position and the lid closed.
- Store the bread maker in its box or in a clean, dry place. Never store it while it is hot or still plugged in.
- Cord may be loosely wrapped around the bread maker. Never wrap cord tightly around the appliance. Do not put any stress on the cord where it enters the unit, as it could cause the cord to fray and break.
| TROUBLE SHOOTING | |
| Problem Solution | |
| When trying to make a second loaf of bread, bread maker MENU button will not register. Display window shows 0:00. | Allow at least 1 hour for the bread maker to cool down after baking. |
| After pressing START/STOP button, "H:HH" appears on display | Temperature inside baking chamber is too hot. Unplug the bread maker and open the lid. Allow at least 1 hour for the bread maker to cool down before using |
| After pressing START/STOP button, "L:LL" appears on display | Temperature inside baking chamber is too cold. Unplug the bread maker and open the lid. Allow at least 1 hour for the bread maker to come to room temperature before using. |
| After pressing START/STOP button, "E:E0" appears on display | Unplug the bread maker. Contact Consumer Service. |
| Crust is not browned enough.• Bread maker | lid should never be opened during baking process.Use BAKE Program to continue baking. Check every 10 minutes for desired color. |
| Bread falls after rising too much.• Not enough | flour used in recipe.Too much yeast used in recipe.Too much water/liquids used in recipe.Water was too hot for recipe. |
| Bread does not rise enough.• Too much flour | used in recipe.Not enough yeast used in recipe.Yeast was old, out of date.Not enough water/liquids used in recipe.Not enough salt/sugar used in recipe.Poor quality flour.Water too cold for recipe. |
| Crust is brown, but bread is not fully cooked. | Too much water/liquids used in recipe. |
| Top and sides of bread loaf are floury.• Too | much flour used in recipe.Not enough water/liquids used in recipe.Need to scrape down sides during kneading process. |
| Kneading paddle is stuck in bread pan.• Allow | bread pan to soak in warm water before removing.If the kneading paddle is baked onto the drive shaft, simply fill the bread pan with soapy water. Holding the paddle in one hand, turn the crank at the bottom of the bread pan and try to loosen. If necessary, soak pan for up to 30 minutes.CAUTION: Do not soak for longer than 30 minutes to avoid damage to the non-stick surface. |
| After pressing the START/STOP button, the motor is on, but kneading does not begin. | Check to make sure the bread pan is correctly inserted and locked into position.The kneading paddle is missing. |
| There is a burnt smell.• Some of the ingredients may have fallen outside the bread pan into the baking chamber. Allow the bread maker to cool completely. Then clean the inside of the baking chamber with a damp sponge.Check recipe to make sure ingredients do not exceed 4 cup maximum bread pan capacity. | |
| Baked bread loaf has an unusual aroma.• Be | sure to use fresh ingredients.Always measure ingredients accurately.Too much yeast was used in recipe. |
Recipes
| Water Conversion Chart | ml cups | |
| 360 1 1/2 | ||
| 340 1-7/16 | ||
| 320 1-1/3 | ||
| 280 1-1/4 | ||
| 270 1-1/8 | ||
| 260 1 |
Bread Mixes And Other Bread Maker Recipes
Use mixes labeled for up to 2 pound loaves. For best results, use the BASIC program. For SWEET breads and CAKES that call for oil, place the oil in the bread pan first to aid in easy removal of the bread.
Jam
Fresh Strawberries, cleaned, smashed 4 cups
Sugar 1 cup
Pectin powder 1 tablespoon
- Place all ingredients into the bread pan. Stir with a wooden spoon or spatula.
- Pour processed hot jam into a heat-safe container. Leave on the counter top to cool; stir frequently.
- Pour the jam into a refrigerator/freezer-safe container, leaving 1/2" of space at the top.
- Cover tightly to store. Jam will thicken upon cooling.
- Unplug and allow the bread maker to cool before cleaning.
Hints For Jam
- Do not reduce sugar or use sugar substitutes. The exact amounts of sugar, fruit, and other ingredients are necessary for a good set.
- Use only ripe fruit (not overripe or underripe) for best flavor.
- Do not puree fruit. Drain cubed fruit before crushing. Crush with a potato masher or food processor. Jam should have bits of fruit in it.
- Recipes should not exceed 3 cups fruit.
Recipes
Basic
Measure all liquid ingredients and add to the bread pan. Next, measure and mix all dry ingredients and add on top of the wet ingredients. Do not stir. Lastly, add yeast. Yeast should never touch wet ingredients. (See Figure 4.). Close the lid and press BASIC button.
1.5 lb/ 700g loaf 2 lb /900g loaf
| Water 80°F/27°C 1 1/4 cups 1 7/16 cups | ||
| Oil 2 tablespoons 3 tablespoons | ||
| Salt 1 teaspoon 1 1/2 teaspoons | ||
| Sugar 2 tablespoons 3 tablespoons | ||
| Flour 3 cups 3 1/2 cups | ||
| Bread Machine Yeast | 1 teaspoon | 1 teaspoon |
French
Measure all liquid ingredients and add to the bread pan. Next, measure and mix all dry ingredients and add on top of the wet ingredients. Do not stir. Lastly, add yeast. Yeast should never touch wet ingredients. (See Figure 4.). Close the lid and press FRENCH button.
1.5 lb/ 700g loaf 2 lb /900g loaf
| Water 80°F/27°C 1 1/4 cups | 1 7/16 cups | |
| Oil 2 tablespoons 3 tablespoons | ||
| Salt 1 1/2 teaspoon | 2 teaspoons | |
| Sugar 1 1/2 tablespoons | 2 tablespoons | |
| Flour 3 cups 3 1/2 cups | ||
| Bread Machine Yeast | 1 teaspoon | 1 teaspoon |
Whole wheat
Measure all liquid ingredients and add to the bread pan. Next, measure and mix all dry ingredients and add on top of the wet ingredients. Do not stir. Lastly, add yeast. Yeast should never touch wet ingredients. (See Figure 4.). Close the lid and press WHOLE WHEAT button.
1.5 lb/ 700g loaf 2 lb /900g loaf
| Water 80°F/27°C 1 cup | 1 7/16 cups | |
| Oil 2 tablespoons 3 tablespoons | ||
| Salt 4 teaspoons 2 teaspoons | ||
| Whole Wheat Flour | 1 cup | 2 cups |
| Flour 2 cups 2 cups | ||
| Brown Sugar | 2 tablespoons 2 1/2 tablespoons | |
| Milk Powder | 2 tablespoons 3 tablespoons | |
| Bread Machine Yeast | 1 teaspoon | 1 teaspoon |
Recipes
Quick
Measure all liquid ingredients and add to the bread pan. Next, measure and mix all dry ingredients and add on top of the wet ingredients. Do not stir. Lastly, add yeast. Yeast should never touch wet ingredients. (See Figure 4.). Close the lid and press QUICK button.
2 lb /900g loaf
| Water 115°-125°F/45°-51°C 1 1/3 cups |
| Oil 2 tablespoons |
| Salt 1 1/2 teaspoons |
| Sugar 2 tablespoons |
| Flour 3 1/2 cups |
| Bread Machine Yeast 1 1/2 teaspoons |
Sweet
Measure all liquid ingredients and add to the bread pan. Next, measure and mix all dry ingredients and add on top of the wet ingredients. Do not stir. Lastly, add yeast. Yeast should never touch wet ingredients. (See Figure 4.). Close the lid and press SWEET button.
| 1.5 lb/ 700g loaf | 2 lb /900g loaf | |
| Water 80°F/27°C | 1 1/4 cups | 1 7/16 cups |
| Oil 2 tablespoons 3 tablespoons | ||
| Salt 1 1/2 teaspoons 2 teaspoons | ||
| Sugar 3 tablespoons 4 tablespoons | ||
| Flour 3 cups | 3 1/2 cups | |
| Milk Powder | 2 tablespoons 2 tablespoons | |
| Bread Machine Yeast 1 teaspoon | 1 teaspoon |
Gluten free
Measure all liquid ingredients and add to the bread pan. Next, measure and mix all dry ingredients and add on top of the wet ingredients. Do not stir. Lastly, add yeast. Yeast should never touch wet ingredients. (See Figure 4.). Close the lid and press GLUTEN FREE button.
| 1.5 lb/ 700g loaf | 2 lb /900g loaf | |
| Water 80°F/27°C | 1 1/4 cups | 1 7/16 cups |
| Oil 2 tablespoons 3 tablespoons | ||
| Salt 1 teaspoon | 1 1/2 teaspoons | |
| Gluten Free Flour | 3 cups | 4 cups |
| Sugar 2 tablespoons | 2 tablespoons | |
| Bread Machine Yeast | 1 1/2 teaspoons | 1 1/2 teaspoons |
Recipes
Dough
Measure all liquid ingredients and add to the bread pan. Next, measure and mix all dry ingredients and add on top of the wet ingredients. Do not stir. Lastly, add yeast. Yeast should never touch wet ingredients. (See Figure 4.). Close the lid and press DOUGH button.
2 lbs /900g
| Water 80°F/27°C 1 1/2 cups |
| Oil 2 tablespoons |
| Salt 1 1/2 teaspoons |
| Flour 4 cups |
| Sugar 2 tablespoons |
| Bread Machine Yeast 1/2 teaspoon |
Kneading
Measure all liquid ingredients and add to the bread pan. Next, measure and mix all dry ingredients and add on top of the wet ingredients. Do not stir. Lastly, add yeast. Yeast should never touch wet ingredients. (See Figure 4.). Close the lid and press KNEAD button.
2 lbs /900g
| Water 80°F/27°C 1 1/2 cups |
| Oil 2 tablespoons |
| Salt 1 1/2 teaspoons |
| Flour 4 cups |
| Sugar 2 tablespoons |
| Bread Machine Yeast 1/2 teaspoon |
Cake
Measure all liquid ingredients and set aside. Next, measure all dry ingredients in a large bowl. Add liquid ingredients to the dry ingredients. Stir well. Add to the bread pan. Close the lid and press CAKE button.
2 lbs /900g
| Oil 2 tablespoons | |
| Sugar 1/2 cup | |
| Eggs (room temperature) 6 | |
| Self Rising Flour 1 3/4 cups | |
| Vanilla Extract | 1 teaspoon |
| Lemon Juice | 1 1/3 tablespoons |
Recipes
Sandwich
Measure all liquid ingredients and add to the bread pan. Next, measure and mix all dry ingredients and add on top of the wet ingredients. Do not stir. Lastly, add yeast. Yeast should never touch wet ingredients. (See Figure 4.). Close the lid and press SANDWICH button.
1.5 lb/ 700g loaf 2 lb /900g loaf
| Water 80°F/27°C 1 1/8 cup 1 7/16 cups |
| Butter or Margarine 1 1/2 tablespoons 2 tablespoons |
| Salt 1 1/2 teaspoons 2 teaspoons |
| Sugar 1 1/2 tablespoons 2 tablespoons |
| Dry Milk 1 1/2 tablespoons 2 tablespoons |
| Flour 3 cups 3 1/2 cups |
| Bread Machine Yeast 1 teaspoon 1 teaspoon |
Specialty
Measure all liquid ingredients and add to the bread pan. Next, measure and mix all dry ingredients and add on top of the wet ingredients. Do not stir. Lastly, add yeast. Yeast should never touch wet ingredients. (See Figure 4.). Close the lid and press SPECIALTY button.
2 lbs /900g
| Water 1 7/16 cups | |
| Oil | 3 tablespoons |
| Salt 1 teaspoon | |
| Malt Extract | 3 tablespoons |
| Refined Flour | 3 1/3 cups |
| Brown Sugar | 2 1/2 tablespoons |
| Raisins | 1/2 cup |
| Bread Machine Yeast 1 1/3 teaspoons | |
Yogurt
Add all ingredients to the bread pan. IMPORTANT: NEVER use metal utensils when preparing yogurt. Close the lid and press the YOGURT button.
| Pasteurized Whole Milk | 4 1/4 cups |
| Plain yogurt | 4 tablespoons |


natural_image
Three social media and video platform icons: Facebook, Twitter, and YouTube (no text or symbols beyond logos)BellaLife

BellaLifestyle

bellahousewares.com
For customer service questions or comments
BELLA is a registered trademark of Sensio Inc., Montréal, Canada H3C 4S9. All rights reserved.
- BREAD MAKER
- THANK YOU
- for your purchase
- myBELLAlife
- Table of Contents
- IMPORTANT SAFEGUARDS
- FOR HOUSEHOLD USE ONLY SAVE THESE INSTRUCTIONS
- ADDITIONAL IMPORTANT SAFEGUARDS
- Notes on the Plug
- Notes on the Cord
- Plasticizer Warning
- Electric Power
- Minute Power Failure Backup
- Getting to Know Your Bread Maker
- Control Panel
- MENU Programs
- Program Cycles
- Error Display
- Before Using for the First Time
- Operating Instructions
- Hour Delay Start Timer
- Hints for Best Results
- Preparing Bread and Dough
- Measure Accurately
- Yeast
- Yeast Conversion Chart
- Flour
- Other Bread Ingredients
- Gluten-Free Ingredients
- Bread Baking in High Altitudes
- Freezing Baked Bread
- Freezing Dough
- User Maintenance Instructions
- Care & Cleaning Instructions
- Storing Instructions
- Recipes
- Bread Mixes And Other Bread Maker Recipes
- Jam
- Hints For Jam
- Basic
- French
- Whole wheat
- Quick
- Sweet
- Gluten free
- Dough
- Kneading
- Cake
- Sandwich
- Specialty
- Yogurt
Brand : BELLA
Model : 2lb Bread Maker
Category : Bread maker